THE ENDNOTE GUIDED TOUR: MACOS - ENDNOTE TRAINING - ANU
←
→
Page content transcription
If your browser does not render page correctly, please read the page content below
The EndNote
Guided Tour:
macOS
EndNote Training
EndNote X9 Guided Tour: macOS                                                                                                    Page 2 of 47

Table of Contents

Part I.     Introduction to the Guided Tour ............................................................................. 4

          Are You Ready? ................................................................................................................................ 5

Part II. Introduction to an EndNote Library ......................................................................... 6

          Open the Sample Library ................................................................................................................ 6

          The Library Window ........................................................................................................................ 6

          The Reference Panel ....................................................................................................................... 8

          Sort the References ......................................................................................................................... 9

          Select and Open a Reference .......................................................................................................... 9

          Close the Reference ...................................................................................................................... 11

          Save References to a Group .......................................................................................................... 11

Part III. Setting EndNote Preferences................................................................................. 14

          Open the Sample Library .............................................................................................................. 14

          Access EndNote Preferences ........................................................................................................ 14

          Set a Default Library...................................................................................................................... 14

          Change the Library Display Font .................................................................................................. 15

Part IV. Entering a Reference ............................................................................................ 17

          Open the Sample Library .............................................................................................................. 17

          Create a New Reference ................................................................................................................ 17

Part V. Searching an Online Database ............................................................................... 23

          Open the Sample Library .............................................................................................................. 23

          Connect to an Online Database .................................................................................................... 23

Copyright© Clarivate 2020                                                                                                        September 2020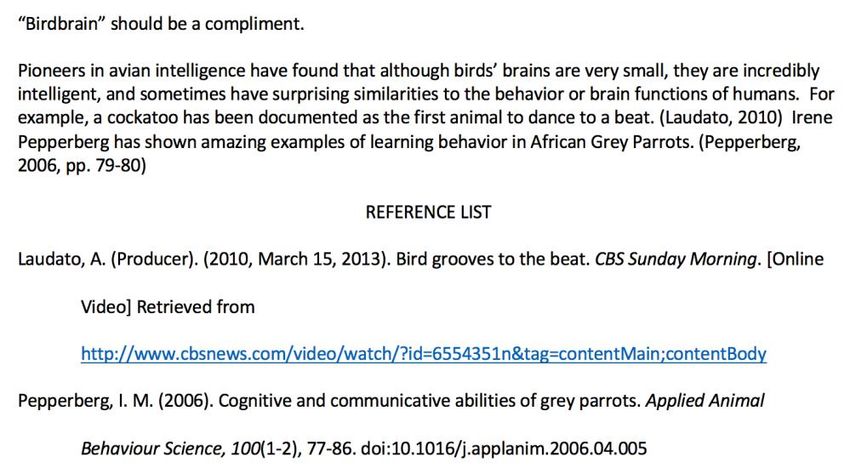
EndNote X9 Guided Tour: macOS                                                                                                   Page 3 of 47

         Search the Database ..................................................................................................................... 24

         Save the References ...................................................................................................................... 25

Part VI. Importing Reference Data into EndNote ................................................................. 27

         Open the Sample Library .............................................................................................................. 27

         Save the Data from PubMed ......................................................................................................... 29

         Import the Records into EndNote................................................................................................. 30

Part VII. Searching an EndNote Library and Creating a Bibliography ...................................... 33

         Open the Sample Library .............................................................................................................. 33

         Search for a Set of References ...................................................................................................... 33

         Create a Smart Group from the Search ........................................................................................ 34

         Export an Independent Bibliography ........................................................................................... 35

Part VIII. Using Cite While You Write in Microsoft Word .......................................................... 37

         Open the Sample Library .............................................................................................................. 37

         Cite EndNote References .............................................................................................................. 37

         Changing Bibliography Styles and Settings ................................................................................. 39

         Editing Citations ............................................................................................................................ 42

Part IX. Resources ........................................................................................................... 47

Copyright© Clarivate 2020                                                                                                       September 2020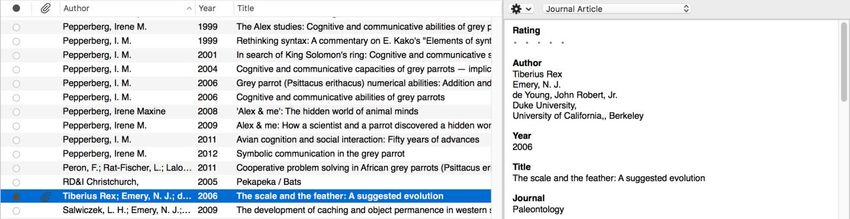
EndNote X9 Guided Tour: macOS                                                             Page 4 of 47

Part I.
 Introduction to the Guided Tour
This guided tour introduces you to the basics of using EndNote for storing references and writing papers.
The guided tour is not designed to show you everything about EndNote, but it does provide a summary of
some important features.

Part II:
Introduction to an EndNote Library

Learn how to open a reference library, sort the library, select, open, and close a reference, and save
references to a group. These skills prepare you for the rest of the tour.

Part III:
Setting EndNote Preferences

Learn how to set a default library to open automatically and how to change the display fonts.

Part IV:
Entering a Reference

Learn how to enter a reference, including inserting a file attachment.

Part V:
Searching an Online Database

Learn how to use EndNote to search databases and library catalogs available online and save those
references to an EndNote library. This feature requires that you have a connection to the Internet.

Part VI:
Importing Reference Data into EndNote

Learn how to import references that have been downloaded from a database to a tagged text file.

Part VII:
Searching an EndNote Library and Creating a Bibliography

Learn how to search for references in an EndNote library and export a formatted bibliography from an
EndNote library.

Copyright© Clarivate 2020                                                               September 2020
EndNote X9 Guided Tour: macOS                                                              Page 5 of 47

Part VIII:
Using Cite While You Write in Microsoft Word

Learn how to cite EndNote references while writing a paper with Microsoft Word 2016. You will insert
citations and have EndNote generate a bibliography for the paper.

(If you use a word processor other than Word 2016, please see EndNote Help)

Part IX:
Resources

Additional resources for learning more about EndNote.

Are You Ready?
At this point we assume that both EndNote and Word are installed on your computer. If you have not
installed EndNote, you can find instructions for installing it in Chapter 1 of The Little EndNote How-To Book.

The guided tour uses sample files that are installed in the Examples folder in the /Applications/EndNote
X9/Examples folder. These example files include a sample EndNote reference library called
Sample_Library_X9.enlx. This is a zipped file that will uncompress upon opening. The uncompressed
Sample_Library_X9.enl and Sample_Library_X9.data folder make up the working library. These two parts
must always be kept together.

Copyright© Clarivate 2020                                                                   September 2020

EndNote X9 Guided Tour: macOS Page 6 of 47
Part II.
Introduction to an EndNote Library
This part of the guided tour covers the basics of working with EndNote. In particular, you will learn how to:
⧫ Open an EndNote library.
⧫ Sort the reference list.
⧫ Select, open, and close references in the EndNote library.
⧫ Save references to groups.
⧫ Quit from the EndNote program.
Open the Sample Library
To start, open the Sample Library:
The EndNote program must be open in advance of opening the Sample Library. If you do not know how to
open a program on your computer, see your operating system’s Help files.
To open the Sample Library—
1. Select Open Library from the File menu in EndNote.
2. Navigate to the folder /Applications/EndNote X9/Examples and open the file Sample_
Library_X9.enlx. This is a compressed (zipped) file. When it is opened it will uncompress to create
the Sample_Library_X9.enl file and Sample_Library_X9.data folder.
NOTE: Open the .enlx file only the first time you open the Sample Library, to uncompress it. After the first
time, open the Sample_ Library_X9.enl file to open the Sample Library.
The Library Window
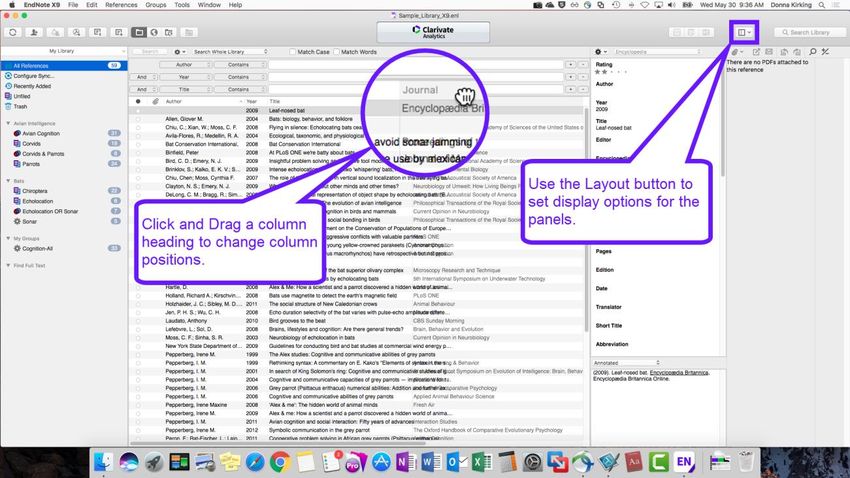
When you open the Sample Library you see the Library window listing all the references the library contains.
Move column dividers to adjust column widths, or drag columns from one position to another to change
the order of the columns.
Copyright© Clarivate 2020 September 2020
EndNote X9 Guided Tour: macOS                                                              Page 7 of 47

The Library window displays a multi-column list of references. By default, the first column in the reference
list shows a button indicating if the record is read or unread. The second column shows a paperclip icon
for references that include an attached file in the File Attachments field. Then, the first author’s name, the
year, the title, the reference type, the rating, and more are displayed for each reference. You can change the
showing fields using the EndNote Preferences.

The fields displayed in the Library window, as well as the font used for the display, can be changed using
the Preferences.

The left panel of the window lists various groups of references for easy retrieval. You can create groups and
group sets to organize your library.

The right panel of the window shows three subpanels: Reference, Preview, and PDF. Settings for displaying
this panel can be changed using the Layout button in the toolbar. For now, hide the PDF subpanel by
clicking the Layout button, then selecting Right - Preview, as shown below. The space that was taken by the
PDF subpanel is now available to the Reference and Preview subpanels.

Copyright© Clarivate 2020                                                                   September 2020
EndNote X9 Guided Tour: macOS Page 8 of 47
You can browse through your reference library by first selecting a reference, and then using the scroll bar
or the ARROW keys.
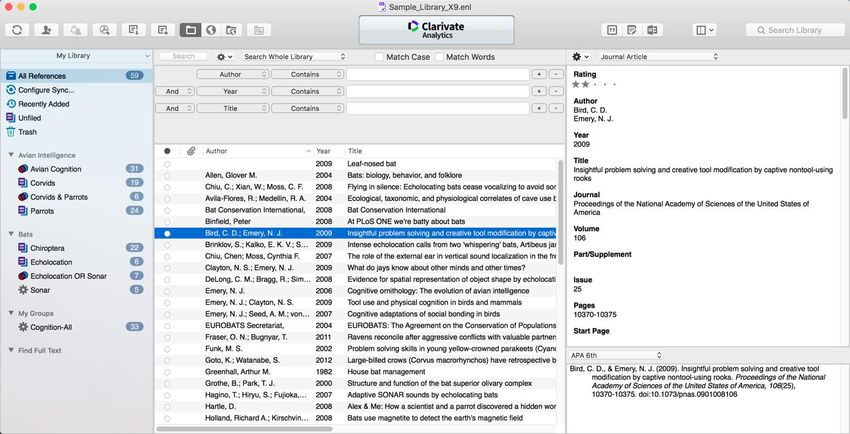
The Reference Panel
You can easily see more detail about a reference by highlighting the reference and viewing the Reference
panel.
1. For this example, single-click the reference by Bird in 2009. (Be careful not to double-click, which
would open the reference in a separate window.) With the default display settings, you should
see a reference panel like the one below at the right of the screen.
You can view and edit reference data in this subpanel.
Below the Reference subpanel is the Preview subpanel. The preview subpanel uses the current output style
to display the selected reference as it would be formatted for a bibliography. EndNote’s output styles (or
just styles) represent the rules for creating bibliographies for a variety of journals and other publications.
The styles determine how your references look when you print, export, preview, or create bibliographies.
To select a different output style to apply to the reference, click the drop-down menu at the top of the
Preview subpanel and select APA 6th from the list of output styles.
Copyright© Clarivate 2020 September 2020
EndNote X9 Guided Tour: macOS                                                             Page 9 of 47

Only one reference is displayed in the preview subpanel at a time. If multiple references are selected, only
the bottom selected reference is displayed. The format of the reference in the preview subpanel can be
changed at any time by choosing a different output style.

Sort the References
References can be easily sorted by clicking on a column heading (such as Author, Year, or Title).

To change the sort order:

    1.   Click the Author column heading to change the current Author sort from ascending order to
         descending order.

    2.   Click the Year column heading to see the references sorted in ascending order based on the year
         of publication.

    3.   Click the Year column heading again (a second time) to reverse the sort order and see the
         references sorted in descending order.

    4.   Now, click the Author column heading to return the sort order of the library to an alphabetical list
         sorted by the author names.

You can also sort the library by multiple fields at once, or select different language sorting options, by
selecting Sort Library from the Tools menu.

Select and Open a Reference
To work with specific references, you must first select them in the Library window.

There are different ways to select a reference, such as clicking on the reference using the mouse, using the
arrow keys, or typing the first few letters found in the field by which the library has been sorted.

Copyright© Clarivate 2020                                                                  September 2020
EndNote X9 Guided Tour: macOS                                                              Page 10 of 47

To see how this works, click once on any reference to select it. If you have arrow keys on your keyboard,
press the UP or DOWN ARROW to select the previous or next reference. When the library is sorted by author
name (as it should be now), you can also select a reference by typing the first few letters of the author’s last
name.

To quickly find and display a reference:

     1.   Select the Bird reference in the list by clicking in the list and then typing “bird” without pausing
          between letters.

          Now that the reference is selected, there are a number of things you can do with it, such as view
          its contents, copy, cut, delete, or edit it. For now, just open the reference to view the contents.

     2.   Open the selected Bird reference by pressing the ENTER/RETURN key or by using the Edit
          References command on the References menu. You can also open a reference by double-clicking
          on it in the Library window.

          The Reference window opens to display all of the information associated with the reference.

Copyright© Clarivate 2020                                                                    September 2020
EndNote X9 Guided Tour: macOS Page 11 of 47
This is where you enter or edit information for a reference. The citation information is displayed
at the top of the Reference window in the title bar: Bird, 1990 #2318. This information is the first
author’s last name, the year, and the EndNote record number.
To view the rest of the reference, use the mouse to scroll down the Reference window, or press
the TAB key to move forward from one field to the next. Press SHIFT+TAB to move backwards
through the fields. Use the Show Empty Fields setting to toggle between showing all fields in the
reference and only those fields that contain data.
Close the Reference
Next, close the reference. You can do this in one of these ways:
⧫ Click the Close button in the upper corner of the Reference window.
⧫ From the File menu, choose Close Reference.
⧫ From the keyboard, press CMD+W. Note that many of the menu commands have a keyboard
equivalent next to them.
Save References to a Group
The left panel of the library window lists groups of saved references. Groups organize your references by
categories, allowing you to have one large library for all your references while also being able to work with
smaller groups of references easily.
⧫ Groups are organized under group sets, and references are organized in groups.
Copyright© Clarivate 2020 September 2020EndNote X9 Guided Tour: macOS Page 12 of 47
⧫ You can have up to 5,000 groups per library.
⧫ You can have up to 5,000 group sets per library. Group sets will appear in gray text.
⧫ The same reference can be in multiple groups. The references are not duplicated, only assigned to
multiple categories.
⧫ Custom groups have a document icon: . You manually add records to a custom group. To
create a custom group, select Create Group from the Groups menu.
05 Group icons
⧫ Smart groups are based on a search and have a gear icon: . Records are updated automatically
by matching the group’s search criteria. To create a smart group, select Create Smart Group from
the Groups menu, or create a smart group from a search as shown in Part VII.
⧫ Combination groups have an icon of overlapping circles: . They are created by combining other
groups. To create a combination group, select Create from Groups from the Groups menu.
The Sample Library has examples of all these types of groups. Click the group names in the left panel of the
library window to view the references in each group. Then, click All References to display all the references
in the library again.
To create a new Custom Group and add references to it:
1. Click the Avian Intelligence group set. This will cause the new group to be added to this group set.
2. From the Groups menu, select Create Group. (Or, you could Ctrl-click in the Groups panel to
display a context-sensitive menu, and then select Create Group.)
3. In the Groups panel of the Library window, under Avian Intelligence, a group titled New Group is
now highlighted for editing.
4. Type “African Grey Parrots” as the group name, and then press the ENTER/RETURN key.
5. Click the new African Grey Parrots group. The reference list is blank, as there are no references in
this new group.
6. Click the Parrots group to display the references in that group.
7. Select the two Pepperberg, 2006 references.
8. Drag the selected (highlighted) references to the new African Grey Parrots group and drop them
on the title of the group. (Or, you could go to the Groups menu and choose Add References
To→African Grey Parrots.)
9. Click the African Grey Parrots group to display the two references now included in the group.
Copyright© Clarivate 2020 September 2020EndNote X9 Guided Tour: macOS Page 13 of 47
10. Click All References to display all the references in the library again.
To delete a group:
1. Ctrl-click the African Grey Parrots group to display a context-sensitive menu.
2. Select Delete Group.
When a group or group set is deleted, the references are not removed from the Library.
Many of the commands for managing groups are available both from the Groups menu and from the Ctrl-
click context-sensitive menu.
This concludes Part II of the guided tour. If you do not plan to continue the tour, go to the EndNote X9 menu
and choose Quit EndNote X9 to close the program. Otherwise, you can continue with the tour.
Copyright© Clarivate 2020 September 2020EndNote X9 Guided Tour: macOS Page 14 of 47
Part III.
Setting EndNote Preferences
In this part of the guided tour you will learn how to:
⧫ Display EndNote preferences
⧫ Set a default library to open each time you start EndNote.
⧫ Change the display fonts.
Open the Sample Library
If EndNote is not already running, start it and open the Sample Library as shown under Open the Sample
Library in Part II of the tour.
Access EndNote Preferences
To view or change the EndNote preferences:
From the EndNote X9 menu, choose Preferences.
Set a Default Library
You can assign a library to open automatically every time you start EndNote. You will find it useful to set the
Sample Library (Sample_Library_X9.enl) as your default library for now. Later, you can set it to open your
personal library.
To set a default library:
1. If you haven’t already, go to the EndNote X9 menu and choose Preferences.
2. In the list on the left, click Libraries.
3. From the drop-down When EndNote starts menu, select Open the specified libraries.
4. Click Add Open Libraries. You should see the full path and filename of the Sample Library
(Sample_Library_X9.enl) listed at the top of the window. When you next start up EndNote, the
Sample Library will open automatically.
5. Click Save to save this change.
Copyright© Clarivate 2020 September 2020EndNote X9 Guided Tour: macOS Page 15 of 47
While you could leave the Preferences dialog at this point, we are going to change another preference first.
Change the Library Display Font
Next, pick a different font to display text in the Library window.
To change the display fonts:
1. If you are not currently viewing the EndNote Preferences window, go to the EndNote X9 menu and
choose Preferences.
2. In the list on the left, click Display Fonts.
⧫ The Library font determines the font and size of the references listed in the Library window.
⧫ The General font changes the font used to display most text that is typed into EndNote (such
as in the Reference or Style windows). The General font is also used for most of the previews
and information panels in EndNote, as well as for bibliographies that are printed or copied
directly from EndNote.
⧫ The Labels font determines the font and size used for the Reference window field labels.
3. With Library selected, click the Change button.
4. In the Fonts list, change the font and font size to one you find easy to read. If you will be working
with Unicode character sets, be sure to select a Unicode font that will work with the languages
Copyright© Clarivate 2020 September 2020EndNote X9 Guided Tour: macOS Page 16 of 47
you use. EndNote uses Unicode to correctly handle extended characters. Click Save to save your
changes and continue.
5. To change the General font, click General, then click the Change button. Changes here are made
just as they were for the Library.
6. Click Save to save your changes, then leave the Preferences dialog by clicking the Close button in
the upper-left corner of the window.
You can change the preferences whenever needed to match your current work situation.
This concludes Part III of the guided tour. If you do not plan to continue the tour, go to the EndNote X9 menu
and choose Quit EndNote X9 to close the program. Otherwise, you can continue with the tour.
Copyright© Clarivate 2020 September 2020EndNote X9 Guided Tour: macOS Page 17 of 47
Part IV.
Entering a Reference
In this part of the guided tour you will learn how to:
⧫ Enter a reference into a library.
⧫ Attach files to a reference.
In this part of the tour, you are going to enter a journal article reference that includes an attached file.
Open the Sample Library
If EndNote is not already running, start it and open the Sample Library (Sample_Library_X9.enl), as shown
in Part II of the guided tour.
Create a New Reference
There are various ways to add references to an EndNote library:
⧫ Type the reference information into the Reference window.
⧫ Connect to an online bibliographic database and retrieve the references directly into EndNote, as
demonstrated in Part V of this tour.
⧫ Import text files of references that have been downloaded from online bibliographic databases, as
demonstrated in Part VI of this tour.
This example demonstrates how to type reference information into EndNote.
Once a library is open, you can add a new reference to it:
1. Click the All References group to add your new reference to the library as a whole, not to a specific
group.
2. From the References menu, choose New Reference (CMD+N). An empty Reference window opens
with the words “New Reference” displayed at the top.
Copyright© Clarivate 2020 September 2020EndNote X9 Guided Tour: macOS Page 18 of 47
New references appear as journal articles (unless you change the default setting) but can be
changed to any other type of reference using the Reference Type list at the top of the window.
Notice that the fields shown in the reference above are appropriate for a journal article.
3. Next, choose a reference type. Click the Reference Type list and choose Book.
Notice that the field labels changes to reflect the type of bibliographic information you would
record for a book. You are welcome to select other reference types from the list to see how the
fields change for each type of source.
Copyright© Clarivate 2020 September 2020EndNote X9 Guided Tour: macOS Page 19 of 47
Three reference types—Figure, Chart or Table, and Equation—are available specifically for
cataloging picture files and object files, although you can add File Attachments, Figures, and
Captions to any reference type.
When you are done looking at different reference types, set the reference type back to the Journal
Article reference type. You are now ready to enter reference information, beginning with the author
names.
4. Enter author names for the reference. Individual author names must be entered one per line.
a. Enter a personal author name with the first name first. With the cursor in the Author field,
type:
Tiberius Rex
As you type, EndNote suggests names similar to the one you are entering. This is EndNote’s
way of using term lists to facilitate the process of entering new references.
NOTE: The auto-complete feature can be turned on or off in the EndNote Term List section of the
Preferences. It works best for Author fields when you enter author names with the last name first.
The name you are entering, Tiberius Rex, is a new author in this library, so keep typing until
you complete the name and then press the ENTER/RETURN key.
The name appears in red text to indicate that it is a new name in the Author term list for this
library. When you close the reference, it will be added to the Author term list and the red text
will change to black.
b. Enter the second author’s name, but with the surname first:
Emery, N.J.
This author is already in the Sample Library, so as you start typing the last name, you will see
EndNote complete the name for you.
When using initials instead of full names for authors, place a space, a period (a full stop), or
a period and a space between initials. If there are no spaces or periods between initials,
EndNote will interpret the initials as a short full name.
EndNote will automatically abbreviate full names to initials when the style requires it.
Copyright© Clarivate 2020 September 2020EndNote X9 Guided Tour: macOS Page 20 of 47
Press ENTER/RETURN to accept EndNote’s suggested author name.
c. For the third author, enter:
de Young, John Robert, Jr.
The first comma separates the last and first name. The second comma is inserted before
suffix text, to make clear that it is not part of the author’s name for manipulation of name
order or abbreviating to initials. Suffix text will always print after the other information for
this author.
d. Enter the fourth author’s name, which in this case is a corporate author:
Duke University,
Corporate author names are entered with a following comma, so they will not be
manipulated like personal author names.
e. Enter the fifth author’s name, this time a corporate author with a comma inside the name.
University of California,, Berkeley
Because the corporate author has a comma inside the name, we inserted two commas at
the location of the original comma to allow for correct formatting. The first comma makes it
clear that text up to that point should not be manipulated, and the second comma indicates
that there is no first or middle name, yet the name includes suffix text.
5. Press TAB to accept the author name and move to the Year field. In the Year field, type:
2006
6. Continue entering the reference as shown below, using the TAB key to move to the next field, and
SHIFT+TAB to move to the previous field, if necessary. You can also use the mouse to click in the
desired field. If information is not provided for a particular field, leave that field empty.
Title: The scale and the feather: A suggested
evolution
Journal: Paleontology
Volume: 3
Issue: 1
Pages: 125-128
Date: November 22
Copyright© Clarivate 2020 September 2020EndNote X9 Guided Tour: macOS Page 21 of 47
Keywords: Feathers
Evolution
Birds
No extra punctuation (such as parentheses around the year) or text styles (such as bold or italic)
are entered into the reference if the whole field would be affected. EndNote adds the necessary
punctuation and text style changes to the references when it creates a bibliography. If only some
of the text within a field requires special formatting, such as italicizing species names, you would
need to apply that formatting.
While we are not entering any text into the Abstract, Notes, or Research Notes fields, you could
enter 64K of data into each of these fields, which amounts to about 10 pages of text.
NOTE: When references are imported from online databases or from importing PDFs, data may be imported
into the Notes field, but it is never imported into the Research Notes field. The Research Notes field is for
your personal notes only.
7. Next, attach a PDF file to the reference. You can attach just about any type of file to the File
Attachments field of a reference and can have up to 45 attachments per record.
Scroll to the File Attachments field. Click the paperclip icon at the top of the record, or select File
Attachments from the References menu, and then Attach File to display a file dialog. On the file
dialog:
a. Navigate to the folder /Applications/EndNote X9.
b. Click the Options button. Notice the check box titled Copy this file to the default file attach-
ment folder and create a relative link. Make sure this box is marked so that EndNote will make
a copy of the file to store with the library. That way, the attached file is always available to
you, even when you move the library or synchronize references between the desktop and
online.
c. Select the file titled EndNote.pdf. This is the EndNote documentation file in PDF format.
d. Click Open to insert the file into the File Attachments field. A file icon will appear in the field.
8. Close the Reference window by clicking the Close button in the upper-left corner of the Reference
window, or by choosing Close Reference (CMD+W) from the File menu.
Save changes to the reference, and it will appear in the Library window.
Copyright© Clarivate 2020 September 2020EndNote X9 Guided Tour: macOS Page 22 of 47
The reference shows a paperclip icon to indicate an attached file.
If you are finished working with EndNote for now, go to the EndNote X9 menu and choose Quit EndNote X9
to close the EndNote program, or you can continue this tour.
Copyright© Clarivate 2020 September 2020EndNote X9 Guided Tour: macOS Page 23 of 47
Part V.
Searching an Online Database
With EndNote's Online Search commands, you can search online bibliographic databases from within
EndNote and the results of your searches appear as EndNote references, ready for you to store in your own
EndNote library.
This section will guide you through these basic steps:
⧫ Connect to an online database.
⧫ Search the database.
⧫ Copy the references that you want to keep into an EndNote library.
NOTE: To follow this exercise, you must be at a computer with access to the Internet. The PubMed and Web
of Science online search files will generally work through a network firewall, but other online search files
use the z39.50 protocol and may be blocked by corporate network firewalls.
About the PubMed Database
For this lesson, you will connect to PubMed, the National Library of Medicine’s online public access version
of their MEDLINE database. PubMed is the online database you will be searching; the National Library of
Medicine is the information provider.
Open the Sample Library
If EndNote is not already running, start it and open the Sample Library (Sample_Library_X9.enl), as shown
in Part II of the Guided Tour.
Connect to an Online Database
The first step in searching an online database is connecting to it. To connect to the PubMed Database:
1. With EndNote running, click the Online Search mode button on the toolbar, shown below.
The Online Search favorites list will remember databases you have connected to in the past for
easy access. Click the more… button to see more Online Search files (also called “Connection
Files”) on your computer.
Copyright© Clarivate 2020 September 2020EndNote X9 Guided Tour: macOS Page 24 of 47
2. Select the PubMed connection file and EndNote will automatically attempt to connect to the
online database.
The Reference List will be empty at first because you have not retrieved any references yet. Above
the empty Reference List area will be the Search panel. If you do not see the Search panel, select
Show Search from the drop-down Layout menu.
3. If needed, resize the search panel to show more than one line for search criteria.
NOTE: Although there are thousands of Online Search files available, a typical installation of EndNote
installs less than 500. Additional files can be downloaded from the EndNote website.
Search the Database
The next step is to enter the search term(s) to find the references you need. Searching an online database
is very similar to searching an EndNote library, with a few exceptions.
Let’s say you are interested in finding more information about echolocation in bats for the Sample Library.
To enter the search term(s) and perform the search:
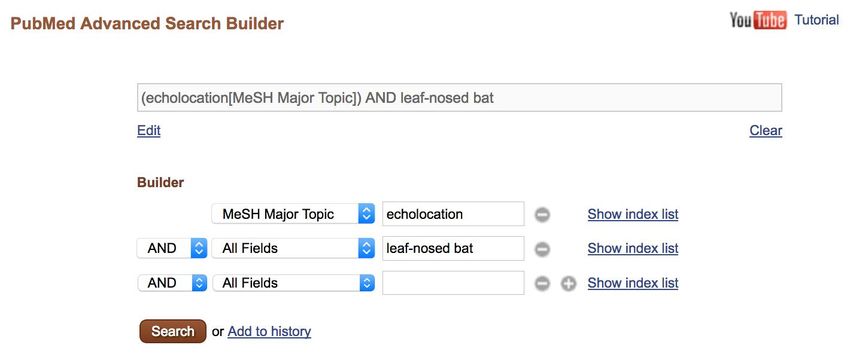
1. In the Search panel, set the first field to MeSH Major Topic and enter “echolocation” into the field
at the right for the search term. The comparison drop-down list in the middle for online searches
is always set to Contains.
2. Set the second field to All Fields and enter “leaf-nosed bat” as the second search term.
3. The Boolean connector between the two lines of search criteria should be set to AND so that both
terms must be present in the matching records.
Copyright© Clarivate 2020 September 2020EndNote X9 Guided Tour: macOS Page 25 of 47
4. Click the Search button.
EndNote sends the search request off to the online database (PubMed, in this example), and a
summary of the search results is displayed:
The dialog displays the number of references that were found to match your search request and
gives you the option to retrieve them.
NOTE: PubMed is updated regularly, so you may find a different number of references than illustrated here.
5. Click OK to retrieve the matching references.
The references are downloaded and appear in the PubMed group of the Online Search Mode
reference list.
You can halt a retrieval in progress by clicking the Cancel button, which replaces the Search
button during a retrieval, or by pressing the ESCAPE key (ESC).
Save the References
At this point you can peruse the retrieved references to see which ones you would like to keep. Save the
references you want by transferring them into your EndNote library.
To save your retrieved references:
1. Select two of the references displayed by holding down the CMD key and clicking on the individual
references. (SHIFT+click to select a range of references.)
2. Click the Copy to Local Library button, shown below, to copy all the selected references to your
permanent EndNote library.
3. Click the Local Library Mode button, shown below, to leave Online Search and return to your
permanent EndNote library.
Copyright© Clarivate Analytics 2018 June 2018EndNote X9 Guided Tour: macOS Page 26 of 47
The references copied from Online Search will appear in a Copied References group. This is a
temporary group; the next time a set of references is copied from Online Search, it will replace
this set. When you close and reopen the library, this set will not appear. So, this is a good time to
put the references in groups to organize them.
NOTE: If your school or organization has an agreement with the National Library of Medicine to receive extra
full-text links, Online Search of PubMed will not include those links. You must connect to PubMed through
your university library’s website using your browser, then import the references.
If you are finished working with EndNote for now, go to the EndNote X9 menu and choose Quit EndNote X9
to close the EndNote program, or you can continue this tour.
Copyright© Clarivate 2020 September 2020EndNote X9 Guided Tour: macOS Page 27 of 47
Part VI.
Importing Reference Data into EndNote
Online searching, described in the previous section, is one way to retrieve references from online
databases, but it does not offer the advanced search capabilities that may be available from databases you
can access through your university’s or institution’s library website.
If you have access to online bibliographic databases through your library, you can probably use EndNote’s
import filters to import text files downloaded from these sources. EndNote filters are configurable, so they
give you the flexibility to customize the data you import, if you wish.
In this part of the guided tour you will learn about:
⧫ Downloading data in a tagged output format.
⧫ Selecting an import filter and importing data into EndNote.
Open the Sample Library
If EndNote is not already running, start it and open the Sample Library (Sample_Library_X9.enl), as shown
in Part II of the guided tour.
About tagged text:
Often when you search a database, the matching references are displayed as text, with no clear indicator
between each piece of bibliographic information. The PubMed reference below, saved in an Abstract
format, is an example. There are few clear indicators for EndNote to be able to differentiate a title from an
author or an abstract, only line breaks.
1. PLoS One. 2016 Mar 30;11(3):e0151382. doi: 10.1371/jour-
nal.pone.0151382. eCollection 2016.
'Compromise' in Echolocation Calls between Different Colonies of the
Intermediate Leaf-Nosed Bat (Hipposideros larvatus).
Chen Y(1,)(2,)(3), Liu Q(1), Su Q(1), Sun Y(1), Peng X(1), He X(1),
Zhang L(1,)(2,)(3).
Author information:
(1)Guangdong Entomological Institute, Guangzhou, China. (2)Guangdong
Public Laboratory of Wild Animal Conservation and Utilization, Guang-
zhou, China. (3)Guangdong Key Laboratory of Integrated Pest Manage-
ment in Agriculture, Guangzhou, China.
Copyright© Clarivate 2020 September 2020EndNote X9 Guided Tour: macOS Page 28 of 47
Each animal population has its own acoustic signature which facili-
tates identification, communication and reproduction. The sonar sig-
nals of bats can convey social information, such as species identity
and contextual information. The goal of this study was to determine
whether bats adjust their echolocation call structures to mutually
recognize and communicate when they encounter the bats from different
colonies. We used the intermediate leaf-nosed bats (Hipposideros lar-
vatus) as a case study to investigate the variations of echolocation
calls when bats from one colony were introduced singly into the home
cage of a new colony or two bats from different colonies were cohab-
itated together for one month. Our experiments showed that the single
bat individual altered its peak frequency of echolocation calls to
approach the call of new colony members and two bats from different
colonies adjusted their call frequencies toward each other to a sim-
ilar frequency after being chronically cohabitated. These results
indicate that the 'compromise' in echolocation calls might be used
to ensure effective mutual communication among bats.
DOI: 10.1371/journal.pone.0151382
PMCID: PMC4814132
PMID: 27029005 [PubMed - indexed for MEDLINE]
To use this information effectively, each piece of bibliographic information must be consistently tagged so
it can be directed to the correct EndNote field.
Database providers typically offer several different download formats. Regardless of which system you are
searching, you need to save the references in a tagged format to a text file.
For this tour, we will save and import a text file of PubMed references in the tagged MEDLINE format. An
example of a portion of the reference above in this format would appear like this:
PMID- 27029005
OWN - NLM
STAT- MEDLINE
DA - 20160331
DCOM- 20160804
LR - 20160406
IS - 1932-6203 (Electronic)
IS - 1932-6203 (Linking)
VI - 11
Copyright© Clarivate 2020 September 2020EndNote X9 Guided Tour: macOS Page 29 of 47
IP - 3
DP - 2016
TI - 'Compromise' in Echolocation Calls between Differ-
ent Colonies of the Intermediate Leaf-Nosed Bat
(Hipposideros larvatus).
PG - e0151382
LID - 10.1371/journal.pone.0151382 [doi]
Each tag at the left of the example can be mapped to a corresponding EndNote field. If data is inconsistently
tagged, or poorly delimited, it may not be possible to import all the data accurately.
Save the Data from PubMed
We will begin by recreating our online search using PubMed’s website, then download the search results in
a format EndNote can import.
To search PubMed and save the records:
1. Begin by going to www.pubmed.gov in your browser. You should be redirected to the search
page.
NOTE: If your school or institution has an agreement with PubMed that allows you to receive extra full-text
links, always access PubMed through your library’s website and export the references using this method or
Direct Export. Using Online Search or going to PubMed directly will not provide the extra full-text links
because you must go through your library to receive them.
2. Click the Advanced link on the PubMed page, as shown below.
3. In the resulting window, build the search shown below. Notice that this is the same search you
did earlier using Online Search.
Copyright© Clarivate 2020 September 2020EndNote X9 Guided Tour: macOS Page 30 of 47
4. Click the Search button to perform the search.
5. You will receive a set of search results. Mark the references you wish to export to EndNote.
6. Click the Send to link and select File to see the window below. Set the options as shown below to
save the file in the MEDLINE format so the records can be imported to EndNote.
7. Click the Create File button and save the records to your computer’s hard drive. The file will be
named pubmed_result.txt by default. You must keep track of where you save the file. EndNote will
not know where it has been saved.
Import the Records into EndNote
Once you have captured and saved your data file in a tagged format, you need to identify the proper
EndNote filter to import the data. There are hundreds of filters included with EndNote; each one is designed
to read a specific tagged format from a specific information provider.
Copyright© Clarivate 2020 September 2020EndNote X9 Guided Tour: macOS Page 31 of 47
To import the saved PubMed text file into the Sample Library:
1. Open the Sample Library in EndNote.
2. Select Import from the File menu, then Import File.
3. Navigate to where you saved the file downloaded from PubMed and select it.
4. Click the Options button.
5. From the Import Options list, select Other Filters to display the list of filters supplied in the EndNote
Filters folder. More filters are available for download on the EndNote website.
6. Select the PubMed (NLM) filter from the list.
7. With the PubMed (NLM) filter selected, click the Choose button.
8. Leave the other two options at their default settings:
Duplicates: Import All
By default, a reference is considered a duplicate if the Author, Year, Title, and Reference Type
match a reference already in the library. You can change the duplicates criteria in the EndNote
Preferences. We will import all references regardless of duplicates.
Text Translation: No Translation
This option allows you to specify the text character encoding of the file you import. This is
important when you import references in languages that include Unicode extended characters.
NOTE: If some characters in an import are unreadable, appearing as “garbage” characters, an incorrect Text
Translation setting is usually the problem, but you may not know what the correct setting should be. Try
opening the downloaded file in Microsoft Word or another word-processing program. These programs are
very good at recognizing text encoding and should show a message asking you to confirm the encoding
method the program has selected. Make a note of the selected encoding option, close the word processor,
and select that encoding option in EndNote for the Text Translation setting, then try importing the data
again. If the word processor cannot recognize the encoding, contact the database provider and ask which
encoding the database uses.
9. The Import File dialog should look similar to the example below when all the options are selected.
Copyright© Clarivate 2020 September 2020EndNote X9 Guided Tour: macOS Page 32 of 47
10. Click Import to import the file.
When the import is complete, the newly imported references will be displayed in the Imported
References group. Click the Imported References group to see only the references last imported.
The Imported References group is a temporary group. It is replaced each time you import a new
set of references, and it is removed when you close the library. The references themselves remain
in the library unless you specifically delete them.
Some websites contain a download button that will send your search results directly to EndNote, pick the
correct import option, and start the import process automatically. This method of importing references is
called “Direct Export.” You can find directions for importing references from PubMed or Web of Science
using Direct Export in The Little EndNote How-To Book (see Resources), but the method shown with those
databases applies to many other sites using Direct Export.
NOTE: Direct Export works with the Firefox or Google Chrome browsers on macOS with EndNote X9.
Direct Export is not compatible with the Safari browser. The method shown above is compatible with all
browsers.
This concludes the tutorial for using EndNote’s Import command.
If you are finished working with EndNote for now, go to the EndNote X9 menu and choose Quit EndNote X9
to close the EndNote program, or you can continue this tour.
Copyright© Clarivate 2020 September 2020EndNote X9 Guided Tour: macOS Page 33 of 47
Part VII.
Searching an EndNote Library and Creating a
Bibliography
In this part of the guided tour you will learn how to:
⧫ Search an EndNote library for a subset of references.
⧫ Create a Smart Group based on the search.
⧫ Export an independent bibliography from EndNote.
In this part of the tour, you will search for a set of related references, create a Smart Group based on the
search, and export them formatted in a bibliographic style.
Open the Sample Library
If EndNote is not already running, start it and open the Sample Library (Sample_Library_X9.enl), as shown
in Part II of the guided tour.
Search for a Set of References
Let us assume that you want to generate a list of all references found in the Sample Library that contain the
phrase “grey parrot” and were published from 2000 to 2010.
To search for references:
1. Click the All References group at the left to search all the references in the library.
2. If you do not see the Search panel, select Show Search from the drop-down Layout menu. The
Search panel for searching within an EndNote library works much the same as when searching
online.
3. Resize the Search panel, if needed.
4. In the Search panel, set the first field to Any Field and enter “grey parrot” into the field at the right
for the search term. You may need to scroll up to find the field. The comparison drop-down list in
the middle should be set to Contains. When you are searching within an EndNote library, you have
more choices than Contains, but this option will find the term wherever it is located in the field.
5. Set the second field to Year and enter “2000” as the second search term. The comparison drop-
down list in the middle should be set to Is greater than or equal to.
Copyright© Clarivate 2020 September 2020EndNote X9 Guided Tour: macOS Page 34 of 47
6. If you need more lines for your search, click the plus sign (+) at the right of the bottom line to add
another line below it.
7. Set the third field to Year and enter “2010” as the second search term. The comparison drop-down
list in the middle should be set to Is less than or equal to.
8. The Boolean connector between the three lines of search criteria should be set to AND so that all
terms must be present in the matching records. Your display should look like this.
9. Click the Search button.
EndNote performs the search and displays the results in the Search Results group:
Notice that the following check boxes were not selected for this search:
Match Case: This option would limit the search to “grey parrot” in lowercase. If it were found
capitalized at the beginning of a sentence, or all uppercase, it would not match the search.
Match Words: This option would limit matches to full words, with no truncation. The phrase “grey
parrots” would not match our search.
Create a Smart Group from the Search
There may be searches that you repeat frequently, or perhaps you would like to have the results of the
search automatically updated and available to you whenever you open the library. Converting the search
to a Smart Group means it will be available at all times and constantly updated.
1. Click the Avian Intelligence group set at the left to add your new Smart Group to that group set.
2. After creating your search criteria, click the Options button in the Search panel, as shown below.
Copyright© Clarivate 2020 September 2020EndNote X9 Guided Tour: macOS Page 35 of 47
3. Choose the option Convert to Smart Group. A new smart group will be created called “Converted
Search.”
4. Ctrl-click the Converted Search group and select Rename Group. Type in the name “Grey Parrots
2000-2010” and press the ENTER/RETURN key.
You should now see a new Smart Group with the same set of references that were in your search
results, but this group will automatically update whenever a new reference matching your search
criteria is added to the library or a reference is changed to match the criteria.
You can also create Smart Groups by selecting Create Smart Group from the Groups menu in EndNote.
Export an Independent Bibliography
Now that you have located all the desired references, you are ready to export them as an independent
bibliography that can be edited in any word-processing program.
1. Select all the references in the Search Results set.
2. Select Export from the File menu.
3. Expand the window using the button shown below, then navigate to the desktop.
4. In the Save As setting it will show the default library name. Change the name to “Grey Parrots
2000-2010.”
5. Set the Save file as type setting to Rich Text Format (RTF). This file type can be opened and edited
in most word processors.
Copyright© Clarivate 2020 September 2020EndNote X9 Guided Tour: macOS Page 36 of 47
6. From the Output style drop-down menu, select APA 6th for this example. This drop-down menu
shows your favorite styles, but you can select any EndNote style installed on your computer by
selecting Select another style... from the menu.
7. Mark the box Export Selected References to export only the references you have selected in
EndNote.
You should now see settings like the those below.
8. Click the Save button to save your new bibliography.
9. Open the new Grey Parrots 2000-2010.rtf file in your word processor to see your new bibliography.
You can now edit this document as you would any other word-processing document.
This concludes Part VII of the guided tour. Part VIII demonstrates how to write a paper and cite references
in Microsoft Word.
If you are finished working with EndNote for now, go to the EndNote X9 menu and choose Quit EndNote X9
to close the EndNote program, or you can continue this tour.
Copyright© Clarivate 2020 September 2020EndNote X9 Guided Tour: macOS Page 37 of 47
Part VIII.
Using Cite While You Write in Microsoft Word
NOTE: Continue with this part of the tour only if you use Microsoft Word 2016. For instructions in using
EndNote with Word 2011, see the resources on the EndNote LibGuide (Resources). You can find Word
compatibility information for EndNote on the EndNote website.
EndNote’s Cite While You Write (CWYW) feature inserts a tab with EndNote commands onto Word’s ribbon
to give you direct access to your references while writing in Microsoft Word. The Cite While You Write
commands enable EndNote to format the citations and bibliography of the document that is currently open
in Word.
In this part of the guided tour, you will learn how to:
⧫ Insert EndNote bibliographic citations into your paper and create a bibliography.
⧫ Change the EndNote style and formatting of the bibliography.
⧫ Edit citations to add cited pages.
Open the Sample Library
If EndNote is not already running, start it and open the Sample Library (Sample_Library_X9.enl), as shown
in Part II of the guided tour.
EndNote will look for matching references in the currently open libraries. While EndNote can start and open
your default library when needed by Word, opening the library first assures that you are citing references
from the appropriate library.
For this tour, start Microsoft Word and create a new blank document.
Cite EndNote References
You are going to start entering text and citations. For this tour, you are going to enter a small amount of
text.
To start writing your paper and inserting citations:
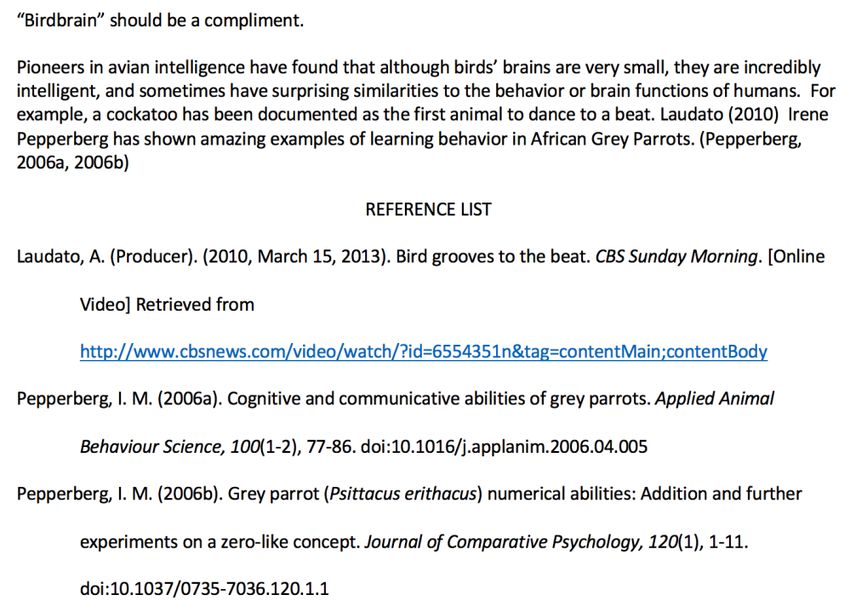
1. Enter text as though you were writing your paper (or copy it from this PDF and insert it into Word
as plain text):
“Birdbrain” should be a compliment.
Copyright© Clarivate 2020 September 2020EndNote X9 Guided Tour: macOS Page 38 of 47
Pioneers in avian intelligence have found that although birds’
brains are very small, they are incredibly intelligent, and
sometimes have surprising similarities to the behavior or brain
functions of humans. For example, a cockatoo has been documented
as the first animal to dance to a beat. Irene Pepperberg has shown
amazing examples of learning behavior in African Grey Parrots.
2. Place your cursor after the text “...dance to a beat.” to insert the first citation.
a. Click the top part of the Insert Citation button.
b. The EndNote Find & Insert My References window appears. Enter the word “beat” (without
the quotation marks) and press the ENTER/RETURN key.
c. Only a single reference in the library contains this word, so only one reference appears in the
results list. Select the reference and click the small arrow on the Insert button. This will bring
up a list allowing you to customize the reference as you insert it. Select the option to Insert
& Display as: Author (Year). This will cause the author’s name to appear in front of the citation.
The reference is inserted in the paper and the citation and bibliography are formatted. Do
not worry if they do not appear in your preferred style, we will change the style later.
3. Place your cursor at the end of the second paragraph to insert the second citation. This time we
will select references from the EndNote library and insert them.
a. Click the Go to EndNote button. This will take you to the open EndNote library.
b. In EndNote, click the Grey Parrots 2000-2010 Smart Group you created earlier in the tour and
select the two references by Pepperberg from 2006.
c. Click the small Insert Citation button on the toolbar. This will insert the references where you
left your cursor in Word.
Copyright© Clarivate 2020 September 2020EndNote X9 Guided Tour: macOS Page 39 of 47
You should now see a short paper with three citations in it and a bibliography at the end of
the document. By default, the bibliography will be placed at the end of the document, but
you can cut-and-paste it into another location in the document, if needed.
4. At this point, you may wish to save your document.
NOTE: You can also insert citations in footnotes. First, use the appropriate Word command to create the
footnote. Then, insert the EndNote citation into the footnote. Word controls the placement and numbering
of the footnote, and EndNote formats the citation based on the current style. EndNote includes many styles
for full-reference footnotes, such as the Chicago 17th Footnote style.
Changing Bibliography Styles and Settings
You can format your citations and bibliography as many times as you like, changing the output style and
various other layout settings each time.
To select formatting options for the bibliography:
1. To change just the style used for the citations and bibliography, choose a new style from the drop-
down Style menu. If you do not see the style you want, click Select Another Style… to select any
style installed on your computer. For this example, select the Vancouver style.
Your bibliography and citations will be reformatted to match the requirements of the Vancouver
style.
2. If you would like to change more options than just the style, click Configure Bibliography to open
the Configure Bibliography dialog.
The Configure Bibliography dialog contains many options for changing the format of the
bibliography. We will change just three: 1) changing the EndNote style to APA 6th, 2) Adding a title
Copyright© Clarivate 2020 September 2020You can also read