Studio Saturdays: Wrist Cuffs - Rollins College
←
→
Page content transcription
If your browser does not render page correctly, please read the page content below
Studio Saturdays: Wrist Cuffs
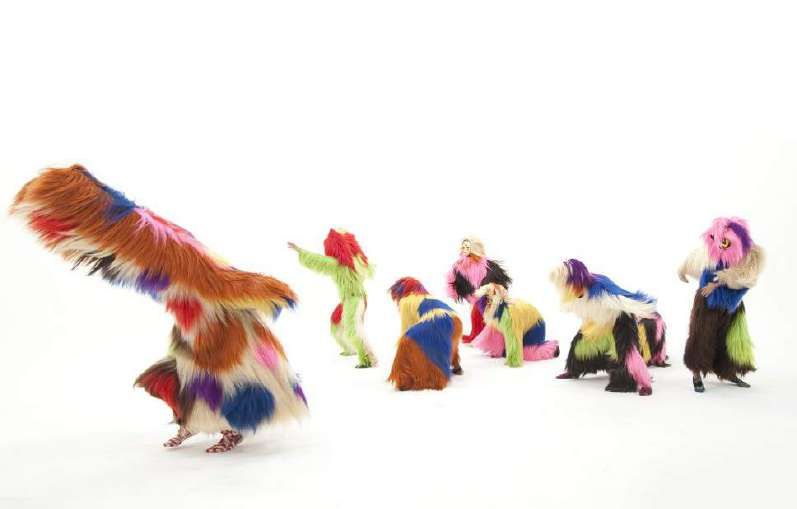
Drive-By by Nick Cave
Nick Cave
Drive-By
2011
Blue-ray Disc
16 minutes
Gift of Nilani Trent. Image Courtesy of Nick Cave.
LIST OF MATERIALS
- 2 Sheets of White Paper
- Colored Pencils or Crayons
- Scissor
- Ruler
- Pencil
- Glue
- 2 Sets of Velcro Dots
- 8-12 Jingle Bells with loops
Nick Cave is an interdisciplinary artist whose performance works include costume design, sound, and dance.
Interdisciplinary artists are artists who create works in multiple areas of art; for instance, an artist who makes
paintings and short films would be called interdisciplinary.

Nick Cave is most known for his “Soundsuits”. These are large, detailed costumes he creates using fabric,
sequins, beads, buttons, raffia—a material like straw—and other found objects like small sculptures and toys.
Because of the variety of materials, the Soundsuits make different sounds when they move. The suits are
displayed as sculptures or worn in Cave’s performance art pieces.

For his performances, Nick Cave —plus a group of dancers—will put on the Soundsuits and do practiced dances
in public places, encouraging people to watch and even participate. The large, decorated costumes completely
hide the person underneath when worn; the artist wants audience members (like you and me!) to watch the
dance without judging any of the performers based on the color of their skin, if they are a boy or a girl, how
nice their clothing might be, or any other element of their physical appearance. His work Drive-By is a recorded
performance that can be watched on a TV, tablet, or computer anytime, so you too can see the anonymous
Soundsuit dancers express themselves and make noise freely without fear of judgment.

For today’s project, we’ll be making jingle wrist cuffs inspired by Nick Cave’s Soundsuit structures, using paper and
jingle bells! In his artwork, Cave often uses recycled materials that had been previously thrown away, so you can use
plain paper or think creatively about how to use recycled paper instead. We will decorate our cuffs with bright and
cheerful patterns, adding as many jingle bells as we can so that, when we wear them, we can dance along to the music
they make.

THINK LIKE AN ARTIST
1) What colors and shapes will you use in your pattern design? Why?
2) In Nick Cave’s video, the Soundsuits dance to a really upbeat song. To what melody would your
   Soundsuit dance? What would be your song’s mood?
INSTRUCTIONS

1. Using a sheet of paper and a ruler, draw 3 marks, each one 2 ½ inches apart, on shortest side of your
paper. Use your markings as guides to draw 3 vertical lines down the longest part of your sheet a paper,
using a ruler to help you create straight lines. Repeat these steps on your second sheet of paper.

2. Cut both sheets along the lines drawn. You should have two sets of paper strips--each with 1 small strip
and 3 large strips of paper per cuff.

3. Design your cuffs however you want! You can choose to make each cuff a different design or make
them match. Try to fill all the space on the paper strips. Use colored pencils to bring it to life!

4. Flip the paper strips over and on the blank side draw a mark a ¼ inch from the top edge on both ends
of the paper. Draw a line across the strip connecting your markings. Then flip the paper over to the design
side and again mark a ¼ inch and connect your marks with a line. Repeat this on all paper strips.

5. Use scissors to cut vertical strips into the paper, stopping at the line. This will give your cuffs fringe!
Do this on all pieces.

6. Take your 6 large strips and apply glue the ¼ inch area you marked, on the design side. Flip all 8 strips,
design down, so that the plain backs are facing up. Starting with the small strip, attach each of the larger
strips, glue side down, so that the edge of the paper strip you are gluing sits right along the drawn line
of the strip beneath it. Keep adding the two remaining large strips to complete one cuff. Use your fingers
to curl the edges of your fringe and give them shape.
INSTRUCTIONS

7. Pinch one of the paper fringe tassels and thread it through a bell, curling the rest of the paper up to
keep it attached. Keep adding bells anywhere you want on your cuff.

8. Repeat the same steps of cutting, gluing, and attaching the bells to the other cuff to create a matching
pair.

9. Wrap the cuff around your wrist and mark a line where they overlap. Unpeel the back of the Velcro dot
and attach one on the inside of the cuff and one on the outside. Repeat the same steps for the other cuff
to complete.

Studio Saturdays: Flag Pinwheel
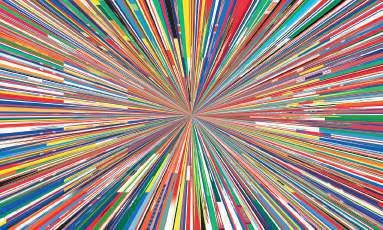
Citoyen du Monde by Meshac Gaba
Meshac Gaba
Citoyen du Monde
2012
Inkjet print on synthetic canvas
111 6/64 x 196 27/32 in.
The Alfond Collection of Contemporary Art at Rollins College,
Gift of Barbara ‘68 and Theodore ‘68 Alfond. Image courtesy of
Stevenson, Cape Town and Johannesburg.
LIST OF MATERIALS
- 1 Sheet of White Paper
- Colored Pencils
- Scissor
- Pencil
- A Tac
- Glue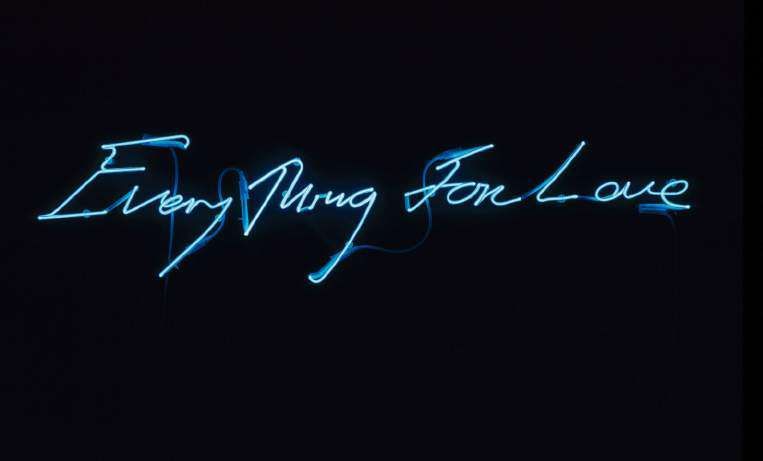
Meschac Gaba (Meh-shock Gah-bah) is a conceptual artist who was born in Cotonou (KOH-toe-no), Benin (beh-
NEEN). A conceptual artist is an artist whose work focuses more on the idea behind the artwork than the image
itself. Although he started creating art in Benin, an African country, when he was young, Gaba officially studied
art in Amsterdam, a European country. In his work, he often playfully uses the cultural exchange between African
and Western countries that he has experienced in his own life. Cultural exchange is what happens when different
groups of people from different places share traditions and ideas from their own cultures with each other. An
example of cultural exchange could be having a party where you and your friends bring traditional foods from
your cultural backgrounds to share with each other. The goal of cultural exchange is to promote harmony
between different people through understanding and better appreciation of their differences.

Citoyen du Monde, or “citizen of the world” in French, focuses on these same ideas of cultural unity; a sort
of “global flag,” the piece is a collection of the flags of almost all the nations of the world stretched out and
meeting at one point. Because there are so many, almost none are easy to see, creating an image of one unified
colorful flag of the world. Gaba is a citizen of the world himself, having lived in and traveled to different countries
across the globe. He shows through this work that even though we may come from many different backgrounds,
we live together on one earth.

For today’s project, we’ll be making flag pinwheels! In the same way that Meshac Gaba includes all the world’s
countries in his work, we will be using the flags of our own countries or heritage to create decorative patterns for
our pinwheels. You can use the flags’ colors or their designs—the choice is completely yours. For example, I live in
the United States, so I can make simple pinwheel blade designs that are red, white and blue. However, my family also
comes from Germany and Hungary, so I can also decorate my pinwheel blades with the American flag, the German
flag, and the Hungarian flag. You don’t have to just stick to flags; different symbols can represent cultures just as
much as a flag can, so feel free to think outside the box.

THINK LIKE AN ARTIST
1) What images make you feel most connected to the countries where you and your ancestors were
   born?
2)How will you use these symbols or flags to create a design pattern? Soundsuit dance?
INSTRUCTIONS

1. Fold the paper in half connecting the short sides together, then flip over and fold in half again for a
sharp crease. Use scissors to cut along the center line.

2. Fold the corner of the paper to the opposite edge until it creates a folded triangle, then cut off the
extra paper.Fold your square in half the opposite direction, again into the shape of a triangle. This will
make a giant even X in the center of your square.

3. Use a pencil to outline each triangle. Each triangle will be the area to draw your flag design. Look up
images of your heritage’s flags to use as reference. I am American, German, Polish, and Hungarian so I
am drawing these countries’ flags on my pinwheel. Draw the image on both the front and the back of the
paper.

4. While you draw your flags color them in with colored pencils and use a ruler to create straight lines.
Use scissors to cut along each folded line, making sure not to cut all the way to the center.

5. Put glue in the center of only one side and fold over one corner of each triangle making sure that the
same corner is glued down for each flag, creating a pinwheel shape.

6. Using the left-over paper, draw a small, quarter-sized circle. Cut this out and glue it into the center of
the pinwheel.

7. Use a thumbtack to poke a hole in the center—being careful not to prick your finger-- then press the
tack and pinwheel into the side of a pencil, just below the eraser.

8. Spin your flag with pride and celebrate your heritage to complete this Studio Saturday project!
Studio Saturdays: Paper Collage
                 Helen with the Drip by Nina Chanel Abney
                          Nina Chanel Abney
                          Helen with the Drip
                          2020
                          Acrylic and spray-paint on canvas
                          48 x 36 in.
                          The Alfond Collection of Contemporary Art at Rollins College, Gift
                          of Barbara ’68 and Theodore ’68 Alfond. Image Courtesy of the
                          artist and Jack Shainman Gallery, New York

                                 LIST OF MATERIALS
                               - 1 Sheet of White Paper
                               - 1 Sheet of Black Paper
                               - 6 Half Sheets of Colored Paper
                               - Pencil
                               - Scissor
                               - Glue
Nina Chanel Abney is an American contemporary artist who works in paint and collage. A contemporary artist is an artist who is alive and making art right now. Today’s piece, Helen with the Drip, is part of a series Abney began during the COVID-19 pandemic. Seeking an escape from the busy city, she began visiting the countryside of New York where she rode her bike along nature trails. These trips inspired her to create a series of paintings set in a utopia. A “utopia” is an imagined place where everything is perfect, like a paradise. Abney’s utopia is a place where she can hide from people and any judgments they have about who she is, what she does, and how she lives. In this space she can farm, play, and enjoy life away from the rules of others. Abney’s style in her paintings is inspired by collage, an artistic practice where a person cuts up many pieces of paper with different colors or different images on them, then puts the pieces together to make a new image. She uses stencils along with acrylic paint and spray paint to achieve this cut-out effect. In this painting, Abney uses her collage-inspired technique to create a portrait of a person named Helen holding a deer in a leaf-scattered field in front of a forest. Abney often repeats symbols or numbers in her works; in this piece, the “X” symbol is repeated on the body of the deer and on Helen’s shirt. Helen, the floor of leaves, the background of trees and the blue sky all seem to lay on the same flat surface together, with no true foreground and background. The background is made up of parts that are “far away” in the space of an artwork, like the trees that are small and distant. The foreground is made up of parts that are larger and “closer” to you the viewer, like Helen and the deer. Abney’s paintings show how you can create a larger space with only simple shapes and a few colors. For today’s project, we will be making paper stencil collages inspired by the free space in Nina Chanel Abney’s painting. Think about things you enjoy doing but that you are not comfortable doing in front of other people. For example, maybe you love to sing but don’t think you can do so as well as others or maybe you like to play hockey or acting in school plays but your friends don’t, so you avoid doing it to fit in. Use construction paper to cut out shapes and create a scene of you having fun doing what an activity you love a space where you are free to be yourself! THINK LIKE AN ARTIST 1) What images make you feel most connected to the countries where you and your ancestors were born? 2)How will you use these symbols or flags to create a design pattern? Soundsuit dance?
INSTRUCTIONS

1. Sketch out your scene on the white paper. As you draw, think of Abney’s blocky style and use simple
shapes that will be easy to cut out. You will use this sketch as a reference to create your artwork.

2. Decide what color each part of the sketch will be and then redraw the shapes onto the corresponding
paper. You may want to work on one color at a time. Make sure as you’re drawing to leave enough space
so that you’re able to fit everything.

3. Check off each section of the sketch as you draw them to keep track of your progress.

4. Once you have finished drawing all of your parts, use scissors to cut out each shape and keep them
together. Compare and adjust the pieces to each other as you cut them out. You may need to redo some
of your shapes, so make sure to keep your leftover paper.

5. Arrange the cut-out shapes on a plain sheet of background paper to recreate your original sketch.

6. Once all pieces are cut out and arranged on paper, glue them into place.
Studio Saturdays: Neon Sign
                     Everything For Love by Tracey Emin
                        Tracey Emin
                        Everything For Love
                        2005
                        Blue Neon
                        13 37/64 x 59 1/16 in.
                        The Alfond Collection of Contemporary Art at Rollins College, Gift
                        of Barbara ‘68 and Theodore ‘68 Alfond, Image courtesy of the
                        artist

                               LIST OF MATERIALS
                             - 1 Sheet of White Paper
                             - Thin Craft Wire
                             - 6-8 Pipe Cleaners
                             - Pencil
Tracey Emin is a British artist, born in London in 1963. She became well-known in the 1990s for the way her art brought her personal thoughts and feelings into the public eye in museums and galleries. Although the statements she makes in her neon sign artworks express Emin’s own emotions, almost like diary entries, when they are shown in a public space they also serve as general ideas any person viewing the work can relate to. This effect is also seen in Emin’s use of neon, as neon signs are usually seen in front of restaurants or shops to draw people in. Emin’s neon sign works are an example of Word Art, a type of art that started in the 20th century. Word Art focuses on words themselves as an art form instead of on images of people or objects. Word Art comes from the larger Graphic Art category. Graphic Art is art that is focused on using line drawings instead of just color to represent images. Illustrations for magazines and posters are an example of Graphic Art. In some Word Art pieces, what the words are saying is the most important part, and in others the shape and look of the words is the focus. Tracey Emin’s artworks are a mix of both; although the meaning of the short sentences is important, she also makes it more personal by bending the neon to resemble handwriting. This makes them different from street signs that use fonts created by computers. For today’s project, we will be making neon signs featuring Word Art. Think of a personal belief you have about a topic and turn it into a slogan. You will want it to be short and to the point. For example, I will be using the phrase “Love Wins” to express that love is the most important thing there is and should be experienced by everyone. We will then turn our words into art, shaping our letters with pipe cleaners in the same way Tracey Emin does with neon light tubes. THINK LIKE AN ARTIST 1) What idea will you be using and what does it mean to you? 2) Slogans are quick and catchy. How will you turn your idea into a slogan while keeping your full message complete?
INSTRUCTIONS

1. Determine the words that will make up your sign. Think of the style you want your words to look like.
Emin uses her own hndwriting to give it a personal touch. How does using your own handwriting make
this artwork more personal to you?

2. Use pipe cleaners to curve and bend into the shape of letters. Trim off any extra length with scissors.

3. Determine where the letter will be placed and wrap the ends of the pipe cleaners around each other
to connect.

4. Once all the letters have been connected place the word onto the black construction paper and hold
it down. Then use a pencil to outline.

5. Carefully use a thumbtack to poke holes into the paper following the drawn pencil line.

6. Cut small bits of wire and place it in the holes, keeping the pipe cleaner underneath it. While holding
everything in place, turn the paper over and twist the wire together.

7. Cut out more wire and thread it through the holes until all parts of the pipe cleaner are attached to the
paper. You may need to add more holes with the thumbtack as you work.

8. When you’re done, flatten the wire against the back of the paper to let it lay flat to complete.
Studio Saturdays: Light Box
                Everyone Deserves a Dream by Sam Durant
                         Sam Durant
                         Everyone Deserves a Dream
                         2018
                         Screenprint on translucent film, light box
                         11 3/4 x 15 3/4 x 4 3/4 inches
                         The Alfond Collection of Contemporary Art at Rollins College,
                         Gift of Barbara ‘68 and Theodore ‘68 Alfond. Image courtesy of
                         Krakow Witkin Gallery, Boston.

                                LIST OF MATERIALS
                                - 1 Sheet of White Paper
                                - Ruler
                                - Pencil
                                - Scissor
                                - Glue
                                - Sharpie
                                - Sheet of Cellophane
Sam Durant is an interdisciplinary American artist born in Seattle, Washington in 1961. Interdisciplinary artists are artists who create works in multiple areas of art; for instance, an artist who makes paintings and short films would be an interdisciplinary artist. Although Durant makes work with a variety of materials, his art focuses on contemporary and historical social and political issues. In this case, “contemporary” means things happening right now in the present, but they can also refer to things that happened in the past ten to thirty years. When we say “contemporary artist,” that means an artist who is making art right now, or was making art within that time frame. In his lightbox works, like Everyone Deserves a Dream, Durant takes phrases from signs used in political protests and makes them into artworks by printing the words onto lightboxes. By taking these phrases out of the specific context— or time and place— of the protest, Durant turns them into a more general political statement. This concept is like the artist from our previous video, Tracey Emin, whose private thoughts turn into universal ideas when made into neon sign artworks for the public to view. When thinking about what message to write for this craft, consider a cause you are passionate about or you see going on in your community like a social issue, a problem that affects many people within a society, or a social movement, a group of people working together for a common goal. What message do you think people need to see? For today’s project, we will be considering the power of words and how people share them with each other to express big ideas about our communities and the world. I will be using the same words chosen by Sam Durant, but you can look at magazines or online (with your parents’ permission) to see phrases people use to express an important idea. When you find a phrase that you like, write it down—this will be the message you share in your lightbox! THINK LIKE AN ARTIST 1) What sources can you look at for inspiration? 2) How can you use your text as a design to help enforce your message?
INSTRUCTIONS

1. Using a ruler, draw a mark at 1 ½ inches and another mark at 2 inches on the long side of the paper.
Repeat this on opposite corner and use your ruler to connect the marks by drawing a straight line.

2. Draw the same mark at 1 ½ inch and another at 2 inches on the short side of the paper and connect
them together with a ruler by drawing horizontal lines

3. Using a pair of scissors, cut along the short, outermost line of the corner squares.

4. Use a ruler to create straight folds along the longer, outermost line of center rectangle. Repeat this on
all 4 sides.

5. Draw an x on the inside of the center rectangle. Lightly bend the paper in half and snip the fold to
create a hole. Use this hole to cut out the center rectangle, using the marked inner lines as cutting guides.
When you are done cutting your paper, it should look like an empty frame. Fold over each corner flap and
add glue, attaching it to the adjacent corner flap to create a box. Pinch along the folded sides of the box
to create a sharp edge.

6. Put the sheet of cellophane inside the box and draw a line where it overlaps. Cut off the extra cellophane.

7. Use a permanent marker to write your statement. As you write, think about how the spacing, size, and
style of the words you draw express different feelings.

8. Line the inside of the box with glue and attach the cellophane to complete this Studio Saturday project!
Studio Saturdays: Kente Cloth
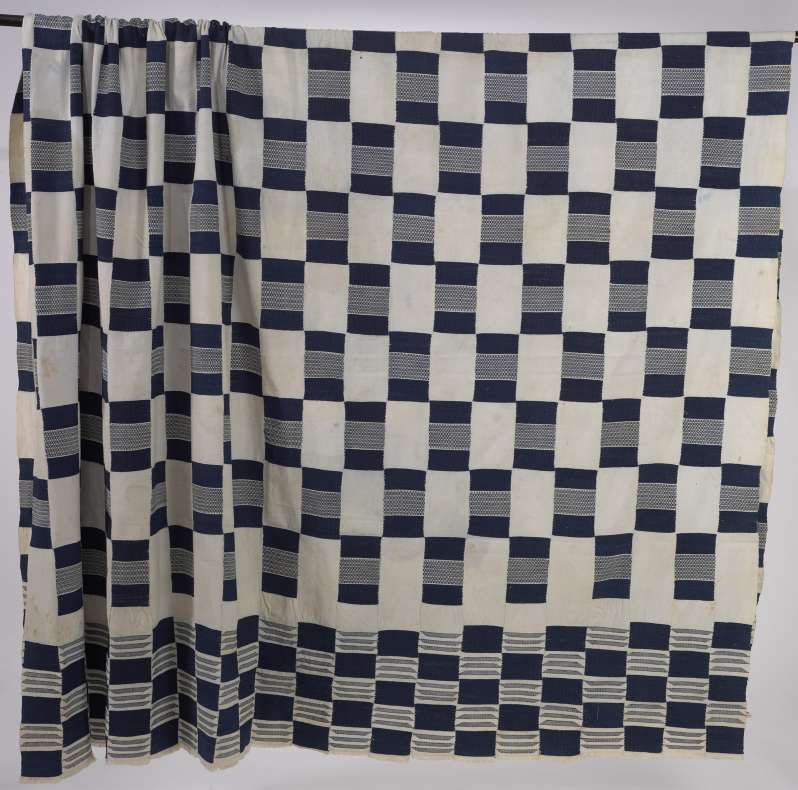
Indigo Kente Cloth by Unknown Ghana Artist
Artist Unknown (Ewe, Ghana)
Indigo Kente Cloth
20th Century
Cotton, indigo dye
Gift of William D. and Norma Canelas Roth ’65. 2020.23
LIST OF MATERIALS
- 1 Medium Cloth Square
- Pencil
- Ruler
- Acrylic Paint
- Small Bowl with 5-8 oz. of Water
- Scissor
- Paintbrush or Popsicle Stick
- Paper TowelThis woven fabric is an example of kente (kent-ey) cloth, a specific type of textile, or fabric, from Ghana. Kente originated with the Asante (uh-shon-tee) people of the Akan (uh-kahn) Kingdom in what is now the African country of Ghana. The Ewe (eh-way) people, who live across Southeastern Ghana, southern Benin, and the southern half of Togo (toh-go), have also long produced kente cloth as part of their culture. Kente cloth is hand-woven fabric originally made of raffia fibers, a plant material like straw. Later, in the 17th and 18th centuries, it was mainly made out of silk, and only royalty could afford it. Ghanaian royalty would pay a weaver to create special cloths with symbolic patterns that related to their ancestry, stories from their culture, or other specific meanings. Lower-cost cotton or silk-cotton combination kente eventually started to be created and made available to the general public. Different patterns and colors of kente have different meanings. Originally, kente was only made in black and white, but plant dyes began to be used to create all colors. This 20th century Ewe-woven cloth was dyed blue using the leaves of the indigo plant, a flowering plant that is native to tropical areas around the world. Although fabrics like this one don’t have the signature of an artist, we can credit them to a specific people or area of the world through their unique pattern or the location where they are found. Today, while kente cloth is still commonly worn by people in Ghana, people in the United States of African descent also often wear it to express their connection to their cultural heritage. For today’s project, we’ll be making our own handwoven kente cloths. Colors were very important, so think about what different colors mean to you as you select the color you will use to dye your cloth strips. The colors you choose could be those that are easily found in nature or that have personal significance in your family. THINK LIKE AN ARTIST 1) What colors will you use and why? 2) If you had to make your own paint dye to create your cloth, which natural sources could you use to make it?
INSTRUCTIONS

1. Line your ruler up along the horizontal edge of your cloth square and draw a mark on every ½ inch. At
the end you should have 15 lines.

2. Put the ruler on the mark vertically so that it reaches the other end of the cloth and draw a line going
across. Repeat this on all 15 marks.

3. Take a scissor and cut along the pencil lines. This will create 16 strips of cloth.

4. Divide the strips into two piles of 8, choose one group to dye and set aside the rest.

5. Fill a small bowl with water and add some acrylic paint into it. Mix it together with a paintbrush or
popsicle stick until the paint has completely dissolved.

6. Dip the cloth into the paint water and mix until it has been dyed. Then lay it flat on a piece of paper
towel to let it dry. Repeat this process until 8 of your cloth strips have been dyed. Once the cloth strips
have dried, peel them off the paper towel.

7. Place your dyed strips of cloth to the side and grab your undyed strips. Arrange them vertically, making
sure they are very close together.
INSTRUCTIONS

8. Starting from the second strip of undyed cloth, fold down every other strip of cloth about two inches.
Place one dyed strip horizontally across the undyed strips that remain straight, creating a pattern with the
two colors. Fold back the strips of undyed cloth to return to your starting position. Repeat the weaving
process, now starting by folding down the first undyed strip and continue alternating with each turn.

9. As you add more rows to your weaving adjust the strips of fabric to make sure there are no gaps, and
the fabric is tightly woven.

10. Grap the ends of two strips of fabric and tie them together, holding down the weaving to keep
everything in place, and then pull to create a tight knot. Turn the weaving over to the opposite side and
tie those two ends together.

11. Go to the other side of the cloth and tie both of those ends together. We are alternating sides so that
the pieces in the center will stay in place.

12. Repeat the same process for the white cloth strips, but this time you can tie all the pairs on one side
and then switch to the opposite side pulling on the ends to make sure that all knots are tight.

13. Finish tying together any remaining pieces of fabric, you may want to double knot any sides that you
feel like are loose. Adjust the strips so that they are close to create your own kente cloth inspired weaving
to complete this Studio Saturday project!
You can also read