Privilege Management for Mac BeyondInsight Integration Guide
←
→
Page content transcription
If your browser does not render page correctly, please read the page content below
Privilege Management for Mac
                             BeyondInsight Integration Guide

©2003-2021 BeyondTrust Corporation. All Rights Reserved. Other trademarks identified on this page are owned by their respective owners. BeyondTrust is not a chartered bank or trust company, or   TC:9/27/2021
depository institution. It is not authorized to accept deposits or trust accounts and is not licensed or regulated by any state or federal banking authority.
PRIVILEGE MANAGEMENT FOR MAC
                                                                                                                                                        BEYONDINSIGHT INTEGRATION GUIDE

                                 Table of Contents

                                      Integrate BeyondTrust Privilege Management for Mac with BeyondInsight                                                                        3
                                      Steps to Integrate Privilege Management for Mac with BeyondInsight                                                                           4
                                      Installation Information for BeyondInsight and Privilege Management for Mac                                                                  5

                                      Create and Deploy the BeyondInsight Client for Privilege Management for Mac                                                                  6
                                          Generate Client Certificate ZIP                                                                                                          6
                                          Install the BeyondInsight Client Certificate on the Endpoint                                                                             6
                                          Install the Privilege Management for Mac Client                                                                                          7
                                          Verify Security Settings                                                                                                                 8
                                          Install the BeyondInsight Adapter                                                                                                        8
                                          Check to See if the Endpoint has Connected                                                                                               9
                                      Configure the Privilege Management Policy Editor                                                                                           11
                                      Create a New Policy in the Privilege Management Policy Editor                                                                              13
                                      Create a Smart Rule and Assign Policy in BeyondInsight                                                                                     16
                                      Password Safe Integration                                                                                                                  19
                                          Prerequisites                                                                                                                          19
                                          Configure the BeyondInsight Adapter Settings                                                                                           19

SALES: www.beyondtrust.com/contact             SUPPORT: www.beyondtrust.com/support                 DOCUMENTATION: www.beyondtrust.com/docs                                                                   2
©2003-2021 BeyondTrust Corporation. All Rights Reserved. Other trademarks identified on this page are owned by their respective owners. BeyondTrust is not a chartered bank or trust company, or   TC: 9/27/2021
depository institution. It is not authorized to accept deposits or trust accounts and is not licensed or regulated by any state or federal banking authority.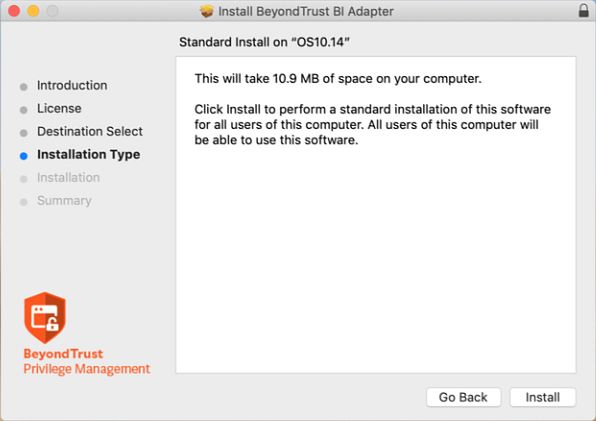
PRIVILEGE MANAGEMENT FOR MAC
                                                                                                                                                        BEYONDINSIGHT INTEGRATION GUIDE

      Integrate BeyondTrust Privilege Management for Mac with
      BeyondInsight
      Overview
      Privilege Management combines privilege management and application control technology in a single lightweight agent. This scalable
      solution allows global organizations to eliminate admin rights across the entire business. With the integration between BeyondInsight and
      Privilege Management, you have a proven privilege management solution that transmits data about your endpoints and policies to a
      centralized management console with the reporting and analytics capabilities needed to effectively operate your business in a secure
      fashion.

      Network Considerations

                                                          An event service is used to communicate between PM and BeyondInsight using port 443. Events
        TCP Port 443                                      from PM are sent to BeyondInsight using this service. Communications over this channel is secured
                                                          by means of a client certificate.

      Prerequisites

             l   BeyondInsight version 6.9.0.712 or later
             l   Privilege Management for Mac 5.4.51.0 or later

                   Note: The reporting component is available in BeyondInsight versions 6.10 and later.

                   For information on integrating BeyondTrust Privilege Management for Windows with BeyondInsight, please see the Privilege
                   Management for Windows Integration Guide, at www.beyondtrust.com/docs/privilege-management/windows.htm.

SALES: www.beyondtrust.com/contact             SUPPORT: www.beyondtrust.com/support                 DOCUMENTATION: www.beyondtrust.com/docs                                                                   3
©2003-2021 BeyondTrust Corporation. All Rights Reserved. Other trademarks identified on this page are owned by their respective owners. BeyondTrust is not a chartered bank or trust company, or   TC: 9/27/2021
depository institution. It is not authorized to accept deposits or trust accounts and is not licensed or regulated by any state or federal banking authority.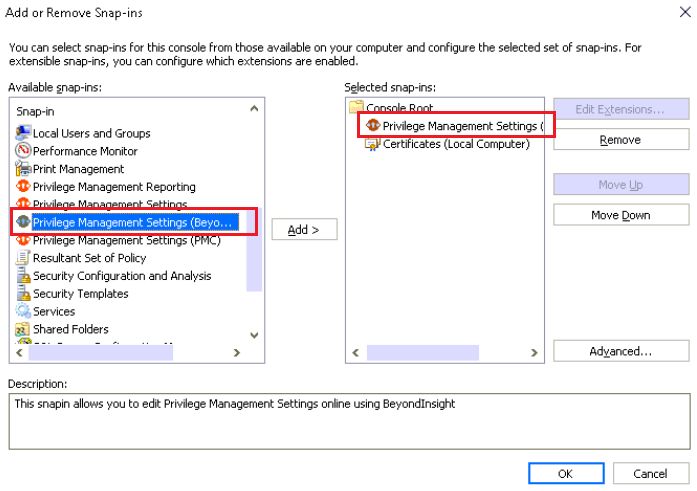
PRIVILEGE MANAGEMENT FOR MAC
                                                                                                                                                        BEYONDINSIGHT INTEGRATION GUIDE

      Steps to Integrate Privilege Management for Mac with
      BeyondInsight
      Once you have BeyondInsight and Endpoint Privilege Management installed in your environment, you need to configure both instances to
      communicate with each other. Below is a list of high level steps needed to complete the integration.

            1. Create and export the BeyondInsight client certificate.
            2. Use Rapid Deployment Tool to create a redistributable settings package for all endpoints accessing this BeyondInsightinstance.

                   Note: You can use the Jamf integration in the tool to automatically distribute the generated settings .pkg to your endpoints if
                   you are using Jamf for MDM with a Samba File Distribution Share. If you are not, you can save the settings created as a
                   distributable .pkg file.

            3. Using Mobile Device Management (MDM) or your method of choice, deploy the Privilege Management for Mac client and
               BeyondInsight adapter on all applicable endpoints.

                   Note: If you did not use the Jamf integration in the Rapid Deployment Tool step mentioned previously, you should also
                   distribute the .pkg file produced by the tool.

            4. Verify BeyondInsight is receiving heartbeats and information from Privilege Management for Mac endpoints.
            5. Configure the policy editor to communicate with BeyondInsight and test the connection.
            6. Create a new policy in the editor.
            7. Create a Smart Rule in BeyondInsight.
            8. Assign and deploy a policy from BeyondInsight.

SALES: www.beyondtrust.com/contact             SUPPORT: www.beyondtrust.com/support                 DOCUMENTATION: www.beyondtrust.com/docs                                                                   4
©2003-2021 BeyondTrust Corporation. All Rights Reserved. Other trademarks identified on this page are owned by their respective owners. BeyondTrust is not a chartered bank or trust company, or   TC: 9/27/2021
depository institution. It is not authorized to accept deposits or trust accounts and is not licensed or regulated by any state or federal banking authority.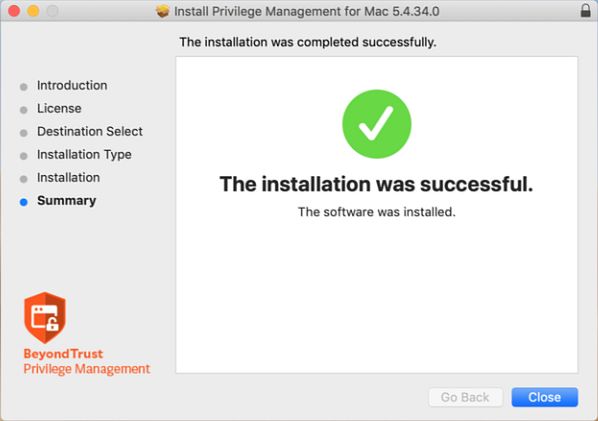
PRIVILEGE MANAGEMENT FOR MAC
                                                                                                                                                        BEYONDINSIGHT INTEGRATION GUIDE

      Installation Information for BeyondInsight and Privilege
      Management for Mac
      Prior to integration, verify all BeyondInsight and Privilege Management components are properly installed in your environment.

                     IMPORTANT!

         To complete this integration, please make sure you have the necessary software installed and configured as indicated in this guide,
         as well as any network considerations.

      BeyondInsight Installation

                   For detailed instructions on installing BeyondInsight in your environment, please see the BeyondInsight Installation Guide at
                   https://www.beyondtrust.com/docs/beyondinsight-password-safe/bi/index.htm.

      Privilege Management for Mac Installation

                   For detailed instructions on installing Privilege Management for Mac, please see the Mac Administration Guide at
                   https://www.beyondtrust.com/docs/privilege-management/mac/index.htm.

SALES: www.beyondtrust.com/contact             SUPPORT: www.beyondtrust.com/support                 DOCUMENTATION: www.beyondtrust.com/docs                                                                   5
©2003-2021 BeyondTrust Corporation. All Rights Reserved. Other trademarks identified on this page are owned by their respective owners. BeyondTrust is not a chartered bank or trust company, or   TC: 9/27/2021
depository institution. It is not authorized to accept deposits or trust accounts and is not licensed or regulated by any state or federal banking authority.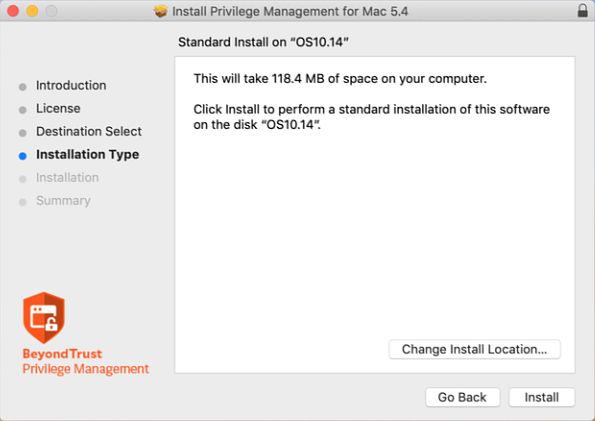
PRIVILEGE MANAGEMENT FOR MAC
                                                                                                                                                        BEYONDINSIGHT INTEGRATION GUIDE

      Create and Deploy the BeyondInsight Client for Privilege
      Management for Mac
      To establish communication between BeyondInsight and Privilege Management for Mac clients, a client certificate must be generated
      from BeyondInsight, and then installed on every Privilege Management for Mac client needing to transmit information to BeyondInsight.

      Generate Client Certificate ZIP

            1. On the BeyondInsight Server, go to C:\Program Files (x86)\eEye Digital Security\Retina CS.
            2. Run REMEMConfig.exe, which opens the BeyondInsight Configuration Tool.
            3. Click on the Certificate Management link.

            4. In the Certificate Management dialog window, select Export
               Certificate.
            5. Select Client Certificate as the Certificate type.
            6. Enter a chosen Password. We recommend that you use the
               existing BeyondInsight Central Policy password.
            7. Click the ellipses (…) to browse to the desired location.
                        l   Enter a File name and select Certificate files (*.pfx) as the
                            Save as type. We recommend that you name the certificate
                            eEyeEmsClient.pfx.
                        l   Click Save.
                        l   Verify the Path has been filled in correctly.
            8. Click OK. A notification appears, stating The Client certificate has been exported. Click OK again.

      Install the BeyondInsight Client Certificate on the Endpoint

                   For more information, please see the Rapid Deployment Tool Guide at https://www.beyondtrust.com/docs/privilege-
                   management/documents/windows-mac/pm-mac-rapid-deployment-tool.

SALES: www.beyondtrust.com/contact             SUPPORT: www.beyondtrust.com/support                 DOCUMENTATION: www.beyondtrust.com/docs                                                                   6
©2003-2021 BeyondTrust Corporation. All Rights Reserved. Other trademarks identified on this page are owned by their respective owners. BeyondTrust is not a chartered bank or trust company, or   TC: 9/27/2021
depository institution. It is not authorized to accept deposits or trust accounts and is not licensed or regulated by any state or federal banking authority.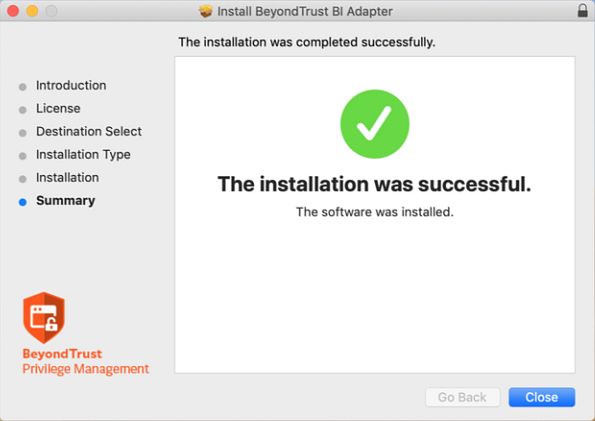
PRIVILEGE MANAGEMENT FOR MAC
                                                                                                                                                        BEYONDINSIGHT INTEGRATION GUIDE

      Install the Privilege Management for Mac Client
      The client and the adapter are obtained from BeyondTrust after purchasing Privilege Management with BeyondInsight, and may be
      distributed to the endpoints using the method of your choice, including Mobile Device Management (MDM), such as Jamf or AirWatch.
      You can create a settings package to set the adapter's configuration on all endpoints by using the Privilege Management for Mac Rapid
      Deployment Tool.

                   For more information, please see the Rapid Deployment Tool Guide at https://www.beyondtrust.com/docs/privilege-
                   management/documents/windows-mac/pm-mac-rapid-deployment-tool.

      The filenames are as follows, where x.x.x.x represents the version:

             l   PrivilegeManagementForMac_x.x.x.x.pkg
             l   BIAdapter_x.x.x.x.pkg

      To install the Privilege Management for Mac client:

            1. Double-click the PrivilegeManagementForMac_x.x.x.x.pkg file.
            2. Click Continue on the Introduction page.
            3. On the Software License Agreement page, click Continue and then click Agree to agree to the terms and conditions.
            4. (Optional) To change the installation destination, click the Change Install Location button. The Destination Select page will
               allow you to choose from viable installation location options. Click Continue.
            5. Click the Install button on the Installation Type page. If prompted,
               enter your admin credentials to continue. Click OK if the
               Installer.app needs permission to modify passwords, networking,
               or system settings.

SALES: www.beyondtrust.com/contact             SUPPORT: www.beyondtrust.com/support                 DOCUMENTATION: www.beyondtrust.com/docs                                                                   7
©2003-2021 BeyondTrust Corporation. All Rights Reserved. Other trademarks identified on this page are owned by their respective owners. BeyondTrust is not a chartered bank or trust company, or   TC: 9/27/2021
depository institution. It is not authorized to accept deposits or trust accounts and is not licensed or regulated by any state or federal banking authority.
PRIVILEGE MANAGEMENT FOR MAC
                                                                                                                                                        BEYONDINSIGHT INTEGRATION GUIDE

            6. The Summary page shows that the installation was successful.
               Click Close to complete the installation.

      Verify Security Settings
      Go through the following sections to ensure Privilege Management for Mac files have correct access.

      Set Allow on com.beyondtrust.endpointsecurity.systemextension
      After the agent and adapter are installed, ensure the security on the Privilege Management system extension is set to Allow.
      For com.beyondtrust.endpointsecurity.systemextension, go to System Preferences > Security & Privacy > General, and then
      select Allow.

      Verify Privacy Settings
      The following Privilege Management for Mac files require the privacy settings Full Disc Access and Files and Folders:

             l   com.beyondtrust.interrogator
             l   PrivilegeManagement
             l   defendpointd
             l   com.beyondtrust.endpointsecurity.systemextension

      To confirm the settings:

            1. Go to System Preferences > Security & Privacy > Privacy, and then select Full Disk Access. Ensure the Privilege
               Management files are listed.
            2. Select Files and Folders and confirm the Privilege Management files are listed.

      Verify Finder Extensions is Enabled
      One way to confirm Finder Extensions is on, go to the Applications folder and verify the Privilege Management shield icon is next to the
      applications.

      Install the BeyondInsight Adapter
      You may use the deployment method of your choice to get the BeyondInsight adapter to your endpoints, whether that be Mobile Device
      Management methods (such as Jamf or AirWatch), manual configuration, download from a shared resource, etc.

SALES: www.beyondtrust.com/contact             SUPPORT: www.beyondtrust.com/support                 DOCUMENTATION: www.beyondtrust.com/docs                                                                   8
©2003-2021 BeyondTrust Corporation. All Rights Reserved. Other trademarks identified on this page are owned by their respective owners. BeyondTrust is not a chartered bank or trust company, or   TC: 9/27/2021
depository institution. It is not authorized to accept deposits or trust accounts and is not licensed or regulated by any state or federal banking authority.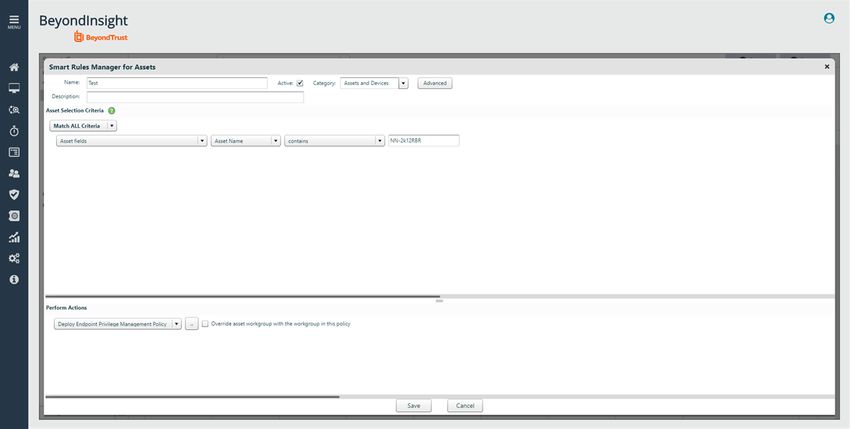
PRIVILEGE MANAGEMENT FOR MAC
                                                                                                                                                        BEYONDINSIGHT INTEGRATION GUIDE

      Best practice is to use the Privilege Management for Mac Rapid Deployment Tool.

                   For more information, please see the Rapid Deployment Tool Guide at https://www.beyondtrust.com/docs/privilege-
                   management/documents/windows-mac/pm-mac-rapid-deployment-tool.

            1. Double-click the BIAdapter_x.x.x.x.pkg file.
            2. Click Continue on the Introduction page.
            3. On the Software License Agreement page, click Continue and then click Agree to agree to the terms and conditions.
            4. Click the Install button on the Installation Type page. If prompted,
               enter your admin credentials to continue. Click OK if Installer.app
               needs permission to modify passwords, networking, or system
               settings.

            5. The Summary page shows that the installation was successful.
               Click Close to complete the installation.

      Check to See if the Endpoint has Connected
      After the settings file has been configured, the Privilege Management endpoint is capable of checking into BeyondInsight and sending
      events to BeyondInsight. If you have access to the machine running the BeyondInsight Server, you can determine if the endpoint has
      checked in by using either of the following methods:

            1. The endpoint is visible on the Assets page, at Assets > Endpoint Privilege Management.

                   Note: Configure the Activity Monitor to show all processes, as BIAdapter runs as user _defendpoint.

            2. Run the following SQL query:

SALES: www.beyondtrust.com/contact             SUPPORT: www.beyondtrust.com/support                 DOCUMENTATION: www.beyondtrust.com/docs                                                                   9
©2003-2021 BeyondTrust Corporation. All Rights Reserved. Other trademarks identified on this page are owned by their respective owners. BeyondTrust is not a chartered bank or trust company, or   TC: 9/27/2021
depository institution. It is not authorized to accept deposits or trust accounts and is not licensed or regulated by any state or federal banking authority.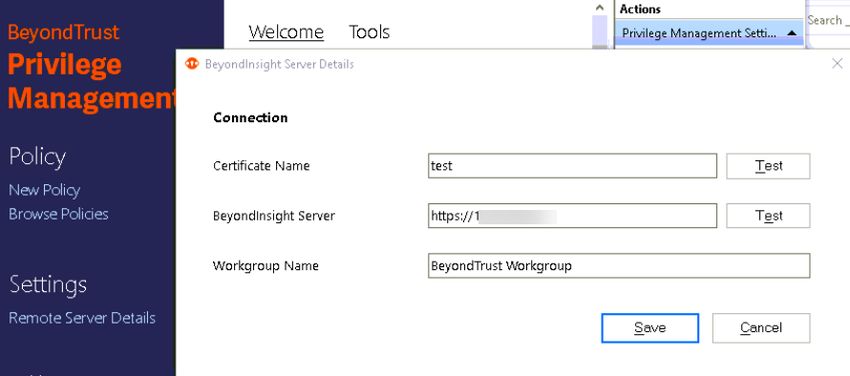
PRIVILEGE MANAGEMENT FOR MAC
                                                                                                                                                        BEYONDINSIGHT INTEGRATION GUIDE

          select * from Asset_PBDInfo
          select * from Asset_PBDInfoEx

                   Tip: If you want to force a policy update for a client getting an
                   update for the first time, you can restart the BeyondInsight
                   adapter. In the Activity Monitor, restart the BIAdapter process.
                   The default time for the policy update and for the heartbeat is six
                   hours. These values can be changed on the BeyondInsight
                   Server, and the policy can be applied to the endpoint, but this
                   policy would not be applied until the initial 6 hour period has
                   elapsed. Manually changing the RCSHeartbeatInterval and
                   RCSPolicyValidationInterval values in the settings file will also
                   cause the endpoint to check in more often. Enter the values in
                   minutes.

      If you have access to the endpoints, you can use either of the following methods to determine if they have checked in:

             l   Open Console and filter on subsystem: com.beyondtrust.BIAdapter. Ensure that Info and Debug Messages are on. Logs
                 about the connection will be displayed in real time. You can check when the next policy validation is scheduled, as well as the next
                 heartbeat request.
             l   Open Activity Monitor. The BIAdapter service is displayed as running.

SALES: www.beyondtrust.com/contact             SUPPORT: www.beyondtrust.com/support                 DOCUMENTATION: www.beyondtrust.com/docs                                                                  10
©2003-2021 BeyondTrust Corporation. All Rights Reserved. Other trademarks identified on this page are owned by their respective owners. BeyondTrust is not a chartered bank or trust company, or   TC: 9/27/2021
depository institution. It is not authorized to accept deposits or trust accounts and is not licensed or regulated by any state or federal banking authority.
PRIVILEGE MANAGEMENT FOR MAC
BEYONDINSIGHT INTEGRATION GUIDE
Configure the Privilege Management Policy Editor
After you deploy the client certificate to your Privilege Management Policy Editor machines, you can set up the Privilege Management
Policy Editor and configure the editor to work with BeyondInsight.
1. Launch the Microsoft Management Console (mmc.exe) as an admin and go to File >
Add/Remove Snap-in.
2. In the Available snap-ins menu, locate and select the Privilege
Management Settings (BeyondInsight) snap-in.
3. Click Add >, and then click OK. The Privilege Management
Settings (BeyondInsight) snap-in appears in the Console Root
menu.
Test the Connection
Before continuing on with the remainder of the integration setup, you should test the following:
l Test to ensure that a client certificate of the correct name is available in the certificate store.
l Test to ensure the policy editor can reach the BeyondInsight Server.
To test, click on Remote Server Details from the Welcome page. From the
BeyondInsight Server Details dialog, enter the server details. Then click
Test by Certificate Name and BeyondInsight Server to check each
component.
Note: The Certificate Name and Workgroup Name fields are
populated with default values.
If a certificate of the correct name is found, a message appears stating
Valid certificate found in certificate store.
SALES: www.beyondtrust.com/contact SUPPORT: www.beyondtrust.com/support DOCUMENTATION: www.beyondtrust.com/docs 11
©2003-2021 BeyondTrust Corporation. All Rights Reserved. Other trademarks identified on this page are owned by their respective owners. BeyondTrust is not a chartered bank or trust company, or TC: 9/27/2021
depository institution. It is not authorized to accept deposits or trust accounts and is not licensed or regulated by any state or federal banking authority.PRIVILEGE MANAGEMENT FOR MAC
BEYONDINSIGHT INTEGRATION GUIDE
If the BeyondInsight Server can be reached, a message appears stating
The server was reached successfully.
When finished testing, click Save.
SALES: www.beyondtrust.com/contact SUPPORT: www.beyondtrust.com/support DOCUMENTATION: www.beyondtrust.com/docs 12
©2003-2021 BeyondTrust Corporation. All Rights Reserved. Other trademarks identified on this page are owned by their respective owners. BeyondTrust is not a chartered bank or trust company, or TC: 9/27/2021
depository institution. It is not authorized to accept deposits or trust accounts and is not licensed or regulated by any state or federal banking authority.PRIVILEGE MANAGEMENT FOR MAC
BEYONDINSIGHT INTEGRATION GUIDE
Create a New Policy in the Privilege Management Policy Editor
Once you have established communication between the Privilege Management Policy Editor and the BeyondInsight Server, you can
create a new policy from the editor.
IMPORTANT!
Every time you create a new policy, you must enter a valid Privilege Management License. For more information on policy creation
and best practices, please see the Privilege Management for Mac Admin Guide at https://www.beyondtrust.com/docs/privilege-
management/mac/index.htm.
1. From the Welcome page, click New Policy.
2. Enter the credentials used to log in to your BeyondInsight instance.
3. Type in a name for your new policy, and then click OK.
4. On the right, click Licensing.
SALES: www.beyondtrust.com/contact SUPPORT: www.beyondtrust.com/support DOCUMENTATION: www.beyondtrust.com/docs 13
©2003-2021 BeyondTrust Corporation. All Rights Reserved. Other trademarks identified on this page are owned by their respective owners. BeyondTrust is not a chartered bank or trust company, or TC: 9/27/2021
depository institution. It is not authorized to accept deposits or trust accounts and is not licensed or regulated by any state or federal banking authority.PRIVILEGE MANAGEMENT FOR MAC
BEYONDINSIGHT INTEGRATION GUIDE
5. Enter a valid Privilege Management License code, and then click
Add.
The Welcome page updates to show more options, including:
l Export Policy
l Import Policy
l Import Template
l Digitally Sign
l Save Report
l Challenge / Response
l BeyondInsight Policy
l BeyondInsight Account
Upload Changes
Once you have created and modified your policy, you can upload your
changes to BeyondInsight by clicking Upload Changes on the Welcome
page.
After you have uploaded your policy to the BeyondInsight Server, you can view it in BeyondInsight Server from Menu > Configuration
> Privilege Management Policies.
Force Update Policy for End Users
End users are able to force a policy update to their computer from the system tray. This feature allows the end-user to request a new policy
from their desktop, thus significantly reducing the time it takes to update a policy.
SALES: www.beyondtrust.com/contact SUPPORT: www.beyondtrust.com/support DOCUMENTATION: www.beyondtrust.com/docs 14
©2003-2021 BeyondTrust Corporation. All Rights Reserved. Other trademarks identified on this page are owned by their respective owners. BeyondTrust is not a chartered bank or trust company, or TC: 9/27/2021
depository institution. It is not authorized to accept deposits or trust accounts and is not licensed or regulated by any state or federal banking authority.PRIVILEGE MANAGEMENT FOR MAC
BEYONDINSIGHT INTEGRATION GUIDE
1. In themenu bar, click the Privilege Management icon.
2. Click Check for Policy Update.
A notification appears with Update Finished to notify the user that a policy update has been applied to the client.
A notification appears with No Updates Found if the current policy is already up to date.
A notification appears with Unable to Check for Updates if the computer is unable to reach the management platform.
SALES: www.beyondtrust.com/contact SUPPORT: www.beyondtrust.com/support DOCUMENTATION: www.beyondtrust.com/docs 15
©2003-2021 BeyondTrust Corporation. All Rights Reserved. Other trademarks identified on this page are owned by their respective owners. BeyondTrust is not a chartered bank or trust company, or TC: 9/27/2021
depository institution. It is not authorized to accept deposits or trust accounts and is not licensed or regulated by any state or federal banking authority.PRIVILEGE MANAGEMENT FOR MAC
BEYONDINSIGHT INTEGRATION GUIDE
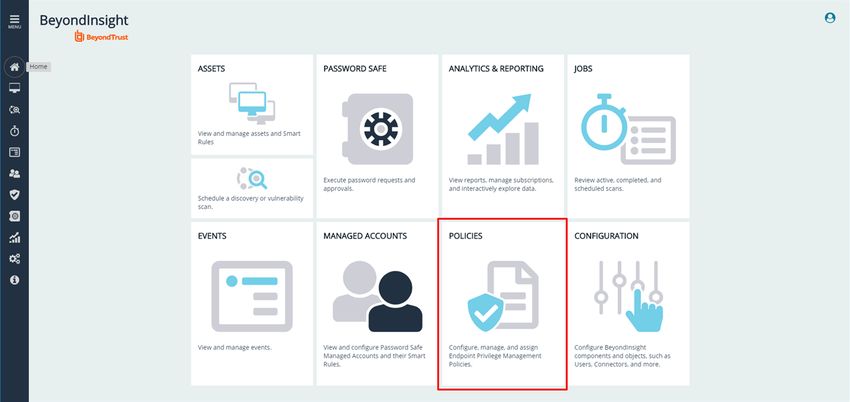
Create a Smart Rule and Assign Policy in BeyondInsight
After you have added and uploaded a policy to BeyondInsight from the Policy Editor, log in to your BeyondInsight instance to create Smart
Rules and assign policies for assets and users.
Tip: If BeyondInsight and Privilege Management for Mac are successfully communicating, the Endpoint Privilege
Management option becomes available under Menu > Assets.
Create a Smart Rule for Assets
1. In your BeyondInsight instance, click on Assets.
2. Click Manage Smart Rules.
3. Click New.
4. From the Smart Rules Manager for Assets dialog, type a name
for the Smart Rule.
5. Check Active.
6. From the Category dropdown, select Assets and Devices.
7. Enter a description, if needed.
8. In the Asset Selection Criteria section, design a query to pull in
the assets you wish to assign policy to.
Tip: For this example, we can narrow down the results of our query to locate our test system, NN-1K12RBR. Choose Match
ALL Criteria. Select Asset fields > Asset Name > contains > NN-1K12RBR.
9. From the Perform Actions dropdown, select Deploy Endpoint Privilege Management Policy.
10. Click the .. button.
11. Select an option from the policy you uploaded from Privilege Management for Mac .
12. Click Save.
For more information about creating and organizing Smart Rules, please see Use Smart Rules to Organize Assets in the
BeyondInsight User Guide at https://www.beyondtrust.com/docs/beyondinsight-password-safe/bi/index.htm.
SALES: www.beyondtrust.com/contact SUPPORT: www.beyondtrust.com/support DOCUMENTATION: www.beyondtrust.com/docs 16
©2003-2021 BeyondTrust Corporation. All Rights Reserved. Other trademarks identified on this page are owned by their respective owners. BeyondTrust is not a chartered bank or trust company, or TC: 9/27/2021
depository institution. It is not authorized to accept deposits or trust accounts and is not licensed or regulated by any state or federal banking authority.PRIVILEGE MANAGEMENT FOR MAC
BEYONDINSIGHT INTEGRATION GUIDE
Create a Smart Rule for Users
1. In your BeyondInsight instance, click on Policies.
2. Click Manage Smart Rules.
3. Click New.
4. From the Smart Rules Manager for Assets dialog, type a name
for the Smart Rule.
5. Check Active.
6. From the Category dropdown, select Policy Users.
7. Enter a description, if needed.
8. In the Selection Criteria section, design a query to pull in the users
you wish to assign policy to.
9. Click the .. button to build your query.
10. When finished, click Save.
11. From the dropdown, choose the query.
12. Check Discover Users.
13. From the Perform Actions section, choose the policy users and policies you wish to apply. Order policies as needed.
14. Select Show as Group.
15. Click OK.
16. Click Save.
For more information about managing policies for EPM, please see Manage User Policies in the BeyondInsight User Guide
at https://www.beyondtrust.com/docs/beyondinsight-password-safe/bi/index.htm.
Grant Users Permissions to Log in to the Policy Editor
If you would like to grant additional users access to log in to the Policy Editor, read and write access needs to be included on the Privilege
Management for Mac assets. This access is included by including permissions in the Smart Rule.
1. On the BeyondInsight Home page, click Configuration.
2. On the Configuration grid, select Role Based Access > User Management.
3. Locate the group you wish to edit and click the vertical ellipsis button to the far right.
4. Select View Group Details.
5. In the Group Details pane, click Smart Groups.
6. In the Smart Groups Permissions pane, select the appropriate Smart Group.
SALES: www.beyondtrust.com/contact SUPPORT: www.beyondtrust.com/support DOCUMENTATION: www.beyondtrust.com/docs 17
©2003-2021 BeyondTrust Corporation. All Rights Reserved. Other trademarks identified on this page are owned by their respective owners. BeyondTrust is not a chartered bank or trust company, or TC: 9/27/2021
depository institution. It is not authorized to accept deposits or trust accounts and is not licensed or regulated by any state or federal banking authority.PRIVILEGE MANAGEMENT FOR MAC
BEYONDINSIGHT INTEGRATION GUIDE
7. Click either the vertical ellipsis button to the far right or the Assign Permissions button at the top of the list.
8. Click Assign Permissions Full Control.
SALES: www.beyondtrust.com/contact SUPPORT: www.beyondtrust.com/support DOCUMENTATION: www.beyondtrust.com/docs 18
©2003-2021 BeyondTrust Corporation. All Rights Reserved. Other trademarks identified on this page are owned by their respective owners. BeyondTrust is not a chartered bank or trust company, or TC: 9/27/2021
depository institution. It is not authorized to accept deposits or trust accounts and is not licensed or regulated by any state or federal banking authority.PRIVILEGE MANAGEMENT FOR MAC
BEYONDINSIGHT INTEGRATION GUIDE
Password Safe Integration
You can integrate Privilege Management for Mac and Password Safe to rotate passwords on your macOS endpoints.
Prerequisites
l BeyondInsight Adapter 21.2
Configure the BeyondInsight Adapter Settings
BeyondInsight Adapter installation instructions are provided earlier in the guide.
For more information, please see "Install the BeyondInsight Adapter" on page 8.
Configure the following settings in the settings_app.xml:
l PasswordSafeState: The state of the feature: Enabled, Disabled, and Not_Configured (case sensitive). The default is Not_
Configured.
l PasswordSafeHeartBeatInterval: The time span, in minutes, the endpoint polls Password Safe checking for updated passwords.
Valid values are 1 to . The default is 60 minutes.
You can change settings in two ways:
l Add the settings
l Send a Privilege Management for Mac policy that contains Password Safe settings. When an asset has multiple policies, the first
policy with valid settings is used. The policy's settings are written to settings_app.xml.
Example section of the Password Safe settings in Privilege Management for Mac policy:
Enabled
60
Configure Password Safe
The macOS endpoints must be added to Password Safe as assets.
For more information, please see Add Assets to Password Safe in the Password Safe Administration Guide at
https://www.beyondtrust.com/docs/beyondinsight-password-safe/documents/ps/ps-admin.pdf.
SALES: www.beyondtrust.com/contact SUPPORT: www.beyondtrust.com/support DOCUMENTATION: www.beyondtrust.com/docs 19
©2003-2021 BeyondTrust Corporation. All Rights Reserved. Other trademarks identified on this page are owned by their respective owners. BeyondTrust is not a chartered bank or trust company, or TC: 9/27/2021
depository institution. It is not authorized to accept deposits or trust accounts and is not licensed or regulated by any state or federal banking authority.You can also read