PATHLAB SPECIMEN COLLECTION GUIDELINES
←
→
Page content transcription
If your browser does not render page correctly, please read the page content below
PATHLAB
SPECIMEN COLLECTION
     GUIDELINES

 This manual (version 2021) issued under the authority of

         …………………………………………….
                   Carol Branson
          Lead of Specialty Patient Services
             HOD Lakes Rotorua/Taupo

                       Laura Yau
                      HOD Waikato

                     Gerry Rivera
                   HOD Bay of Plenty
PATHLAB Collection Services Guidelines Manual Page 2 of 50
1 LABORATORY PROTOCOLS AND SERVICES ............................................................................ 6
1.1 Objectives ................................................................................................................................ 6
1.2 Test Results ............................................................................................................................. 6
1.3 Sendaway Charges .................................................................................................................. 6
1.4 Tests Not Covered by District Health Board Schedule .............................................................. 7
1.5 Confidentiality ........................................................................................................................... 7
1.6 Home Collection Service .......................................................................................................... 7
2 VENEPUNCTURE PROTOCOL AND PROCEDURE ..................................................................... 9
2.1 Introduction............................................................................................................................... 9
2.2 Identification and Form Check .................................................................................................. 9
2.3 Equipment Used During Vacutainer Venepuncture ................................................................... 9
2.4 Benefits of the Vacutainer Venepuncture .................................................................................. 9
2.5 Tube Description ...................................................................................................................... 9
2.6 Tube Inversion........................................................................................................................ 10
2.7 Preparation ............................................................................................................................. 10
2.8 Position of the Patient............................................................................................................. 10
2.9 Tourniquet .............................................................................................................................. 11
2.10 Areas / Sites to Avoid When Choosing A Vein................................................................... 11
2.11 Assistance to Hold a Patient During Venepuncture ........................................................... 12
2.12 Cleansing the Venepuncture Site ...................................................................................... 12
2.13 Selecting a Suitable Vein................................................................................................... 13
2.14 Vacutainer Venepuncture .................................................................................................. 14
2.15 Labelling the Tubes ........................................................................................................... 16
2.16 Request Form Documentation ........................................................................................... 16
2.17 Specimen Storage and Transportation .............................................................................. 17
2.18 Discharging the Patient ..................................................................................................... 17
2.19 Quality Control .................................................................................................................. 17
2.20 Trouble Shooting ............................................................................................................... 17
2.21 Correct Insertion of Vacutainer Tubes ............................................................................... 18
2.22 Needle Positioning and Failure to Draw Blood................................................................... 19
2.23 Inadequate Blood Flow...................................................................................................... 20
2.24 Blood Flow Stops Halfway Through Collection .................................................................. 20
2.25 Under filling of Tubes ........................................................................................................ 20
2.26 Haemolysed Specimens .................................................................................................... 20
2.27 Arteries.............................................................................................................................. 21
2.28 Severe Pain Following Venepuncture ................................................................................ 21
2.29 Venepuncture Procedure Check........................................................................................ 22
3 SPECIAL PROCEDURES ............................................................................................................. 23
3.1 Tests Requiring Appointments ................................................................................................ 23
3.2 Urine Collections .................................................................................................................... 26
3.3 Collection & Processing Of Joint Aspirate Specimens ............................................................ 28
3.4 Collection of Swabs ................................................................................................................ 29
3.5 MRSA Collect ......................................................................................................................... 29
3.6 Chlamydia Swab Collection .................................................................................................... 29
3.7 Viral Swab / Green Cap .......................................................................................................... 30
3.8 Flexi Swab .............................................................................................................................. 30
4 NASOPHARYNGEAL SWAB COLLECTION ............................................................................... 31
4.1 Putting On PPE ...................................................................................................................... 32
4.2 Removing PPE ....................................................................................................................... 33
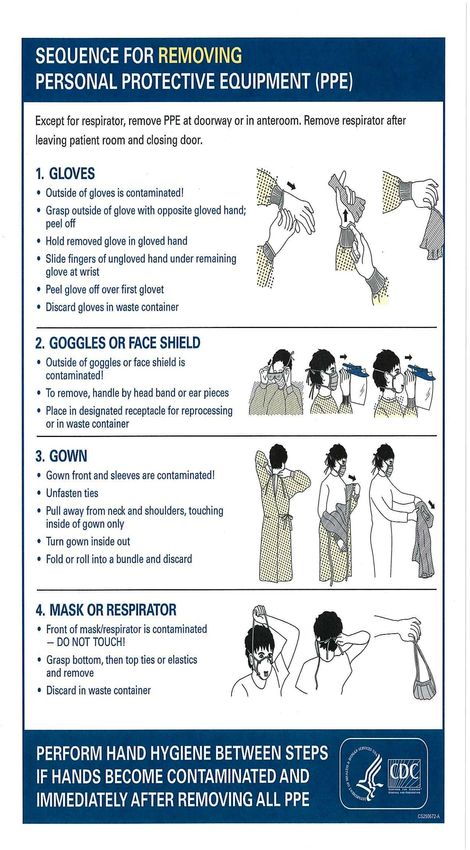
4.3 Low Vaginal Self-collect swab instructions ............................................................................. 34
4.4 Yellow Screw Top Containers (60mL)..................................................................................... 35
4.5 Collection of Specimens for Fungal Examination / Cultures .................................................... 35
4.6 Tests ...................................................................................................................................... 36
Version 2021 Authorised: C. Branson
Date: 26/08/2021 Intranet\Manuals\Published Manuals\Patient Services Pathlab Specimen Collection Guidelines V2021
Last Review Date: June 2021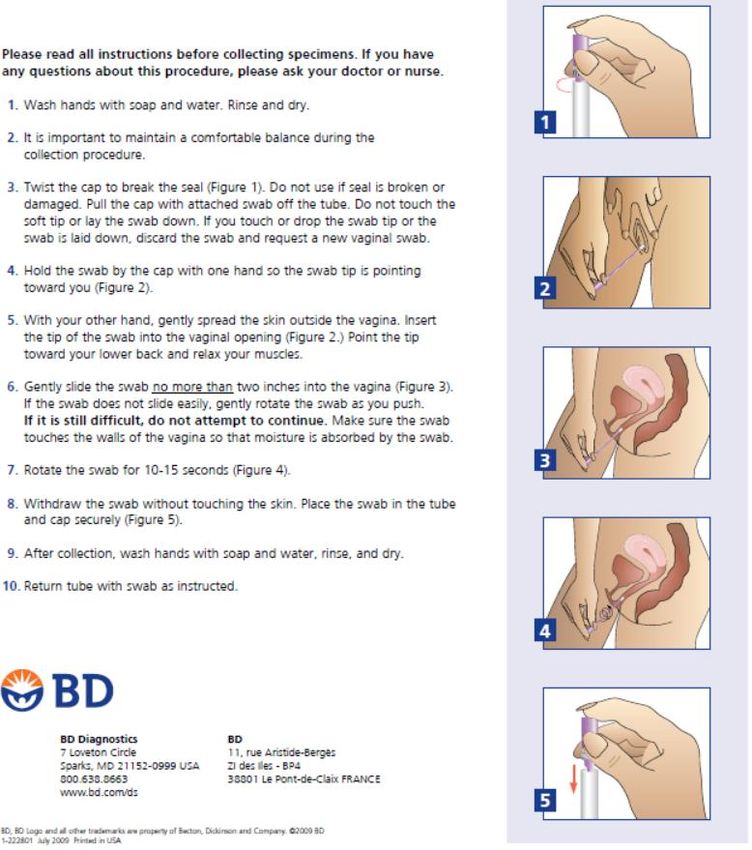
PATHLAB                                                         Collection Services Guidelines Manual                                   Page 3 of 50

5       COLLECTION, STORAGE AND TRANSPORTATION OF LABORATORY SPECIMENS ........... 37
        5.1 Objectives .............................................................................................................................. 37
        5.2 Standard Precautions ............................................................................................................. 37
        5.3 Sample Collection................................................................................................................... 37
        5.4 Microbiology Specimens ......................................................................................................... 38
        5.5 Histology ................................................................................................................................ 38
        5.6 Sample Transportation ........................................................................................................... 38
        5.7 Insufficient Specimens ............................................................................................................ 38
        5.8 Urgent Specimens .................................................................................................................. 38
        5.9 Mislabelled and Unlabelled Specimens .................................................................................. 39
        5.10 Documentation Problems .................................................................................................. 39

6       PATIENT INFORMATION ............................................................................................................. 40
        6.1 Faecal Collection .................................................................................................................... 40
        6.2 Seminal Fluid Collection ......................................................................................................... 40
        6.3 Post Vasectomy Specimens ................................................................................................... 40
        6.4 Sputum Collection .................................................................................................................. 40

7       HEALTH AND SAFETY ................................................................................................................ 41
        7.1 Infection Control – Standard Precautions ............................................................................... 41
        7.2 Cleaning and Disinfection of Vacutainer Holders .................................................................... 41

8    NEEDLESTICK ACCIDENTS / OTHER BLOOD OR BODY FLUID ACCIDENTS (includes
splashes involving mucous membranes or eyes, and human bites)................................................ 42
     8.1 First Aid .................................................................................................................................. 42

APPENDIX 1 – BLOOD CULTURES ..................................................................................................... 43
    Introduction ................................................................................................................................... 43
    Collection Times ............................................................................................................................ 43
    Blood Culture Bottles ..................................................................................................................... 43
    Blood Volume ................................................................................................................................ 43
    Equipment ..................................................................................................................................... 43
    Collection Procedure ..................................................................................................................... 44
    Flow Chart Summary ..................................................................................................................... 45

OUTTAKES ........................................................................................................................................... 46
    Tube Guide for Blood Sample Collection ....................................................................................... 46
    Test Price List ............................................................................................................................... 47
    Special Tests Available Only At Main Lab ..................................................................................... 47
    Test Services Available at All Pathlab Rooms ............................................................................... 48
    Tests for Which Doctors Surgeries Are Not Able To Take Samples............................................... 48
    Request for Home Collect ............................................................................................................. 49
    Collection Facility Locations .......................................................................................................... 50

 Version 2021                                                                                                            Authorised: C. Branson
 Date: 26/08/2021                               Intranet\Manuals\Published Manuals\Patient Services Pathlab/Specimen Collection Guidelines V2021
 Last Review Date: June 2021
PATHLAB                                          Collection Services Guidelines Manual                           Page 4 of 50

       DATE
                                                PAGE(S) CHANGED                                                SIGNED
     REVIEWED
   July 2015             Manual Reviewed                                                                      TM
   August 2016           Manual Reviewed                                                                      TM
   March 2018            Manual reviewed                                                                      TM
   May 2021              Manual reviewed                                                                      TM
   July 2021             Manual re-reviewed                                                                   CB

 Version 2021                                                                                               Authorised: C. Branson
 Date: 26/08/2021                  Intranet\Manuals\Published Manuals\Patient Services Pathlab Specimen Collection Guidelines V2021
 Last Review Date: May 2021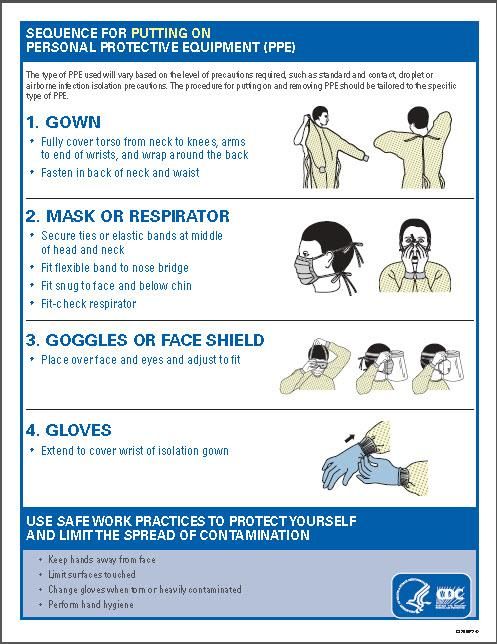
PATHLAB                                       Collection Services Guidelines Manual                           Page 5 of 50

                                           www.pathlab.co.nz

                                      BAY OF PLENTY (PLBOP)

  Provides a 24-hour, 7-day medical diagnostic testing services to the Bay of Plenty community
                                      and Tauranga Hospital.
                    For patient test results and any enquiries please phone:
                                           07 578 7073

                                                  WAIKATO (PLW)

    Provides medical diagnostic testing services to the Waikato, Coromandel Thames Valley
                                          community.
                   For patient test results and any enquiries please phone:
                                           07 858 0799

                               LAKES (Rotorua – PLR, Taupo - PLT)

Provides a 24-hour, 7-day medical diagnostic testing services to the Lakes (Rotorua and Taupo)
                                    community and hospitals.
                    For patient test results and any enquiries please phone:
                                           07 349 7907

                                         WHAKATANE (PLWh)

           We provide a 24-hour, 7-day medical diagnostic testing services to the Eastern Bay of
                               Plenty community and Whakatane Hospital.
                                   For patient test results please phone:
                                                 07 306 0823

 Version 2021                                                                                            Authorised: C. Branson
 Date: 26/08/2021               Intranet\Manuals\Published Manuals\Patient Services Pathlab Specimen Collection Guidelines V2021
 Last Review Date: May 2021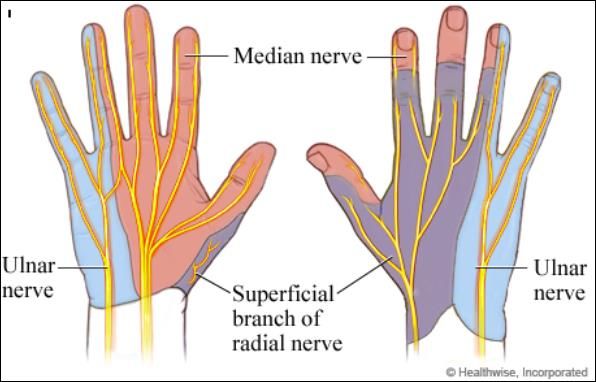
PATHLAB                                          Collection Services Guidelines Manual                           Page 6 of 50

1       LABORATORY PROTOCOLS AND SERVICES

1.1         Objectives

        Collection of specimens for laboratory analysis is necessary for the diagnosis and care of the
        patient. Sufficient quantity is required for tests to be performed as skilfully as possible and with
        minimal trauma to the patient. It is important to reassure the patient and put them at ease.

        On the lab request form check the following details are correct and clear, also check for any
        special requirements:
        • Name (surname and first name).
        • Date of birth.
        • Gender and NHI number.
        • Address and phone number.
        • Doctor’s name (and MCNZ no, address and phone number if not a local doctor) and signature if
            possible.
        • Clinical Details
        • Correct destination for results.
        • Fasting or non-fasting for appropriate tests.
        • Specified drug levels require date and time of last of last dose.
        • First or subsequent screen for Antenatal tests.
        • Check for 24-hour urine test or tests requiring appointments or special procedures at the lab e.g.
            GTT, or samples special treatment.
        • Cross matches - must be taken at least 2 days and no more than 7 days before the required
            date and each section of the form must be completed fully. (Please see NZ Blood Form).
        • Inform patients of requirements for faecal collection, sputum collection or seminal fluid collection.
            Give the patient written handout instructions with appropriate container.
        • If in doubt about any test requested refer to the lab.
        • Indicate patient eligibility for publically funded testing. Record NZ Resident or citizen.

1.2         Test Results

        Patient results are sent to the requesting doctor by e-mail, fax or printed report.                        URGENT
        REQUESTS – please mark form URGENT and destination of results.

1.3         Sendaway Charges

        For unusual tests requiring analysis in another country, Pathlab will collect and arrange courier
        transport for the specimen but costs for the collection, packaging and courier will be the patient’s
        responsibility.

        Refer patient to nearest Pathlab.

 Version 2021                                                                                               Authorised: C. Branson
 Date: 26/08/2021                  Intranet\Manuals\Published Manuals\Patient Services Pathlab/Specimen Collection Guidelines V2021
 Last Review Date: June 2021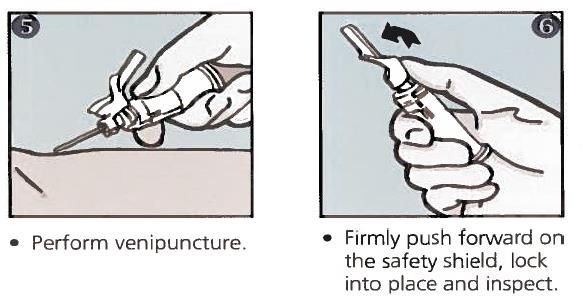
PATHLAB                                          Collection Services Guidelines Manual                           Page 7 of 50

1.4         Tests Not Covered by District Health Board Schedule

        The following patients must be charged for tests:
        • All overseas visitors.
        • All patients for immigration medicals must use the specific e-immigration form.
        • Self requests – refer to patient to nearest Pathlab to ensure correct completion of required
            paperwork.
        • Some specialised testing is restricted due to clinical indications and best practice.
        • All employment and pre-employment medicals.
        • Paternity Testing - $1275.00 (only by appointment - refer to lab).
        • NZ citizens requiring travelers or Visa tests, health related tests.

        The patient is required to pay at time of specimen collection. Please refer to Pathlab website
        for price list.
        • Insurance Medicals - These requests are to be charged to the insurance company on original
             Insurance Request form. Doctors request forms for Insurance will require full payment at time
             of collection.
        • Tests requested by a Naturopath / Nutritionist, Appearance Medicine or Sports physiotherapist.
        • Blood group – not related to Antenatal tests.
        • COVID testing pre travel or employment.

1.5         Confidentiality

        Occasionally you might have a patient who wishes to attend the laboratory anonymously. In such
        cases the patient may be pleased to know that the only persons knowing of their tests are
        themselves and the requesting doctor.

        If anonymity is required, the patient should be identified on the request form and labelling on the
        specimens using the following code - the first 2 letters of the patient’s surname, first initial, gender
        and DOB. e.g. John Harris - male - DOB 18/09/47 = HAJM180947.

        If you have a file number you recognise the patient by, this can be marked on the form as a
        reference number and the result will be reported with this reference number on it.

1.6         Home Collection Service

        Pathlab are contracted by the DHB to collect samples for patients in the community with strict
        guidelines of which the DHB are aware.

        Lack of transport is not a criterion for a home visit. See criteria below:
        • Bed bound and / or incapacitated patients.
        • Hospital level.
        • Severe dementia patients, Mental Health patients or those patients for who traveling to a
           collection room would cause undue distress.
        • Immunocompromised patients (house-bound)

        There are a number of transport options available to patients including the St John Shuttle Service
        currently operating.

        If you have a patient that you believe falls within the boundary of Pathlab home collections service,
        do not hesitate to call and discuss their needs with the head of department, Patient Services.

        Patients must ensure that all pets are restrained, and that the phlebotomist can safety gain access
        to the patient home. Special instructions must be included when requesting a home visit e.g patient
        fasting, withholding medication or patient can’t speak English.

 Version 2021                                                                                               Authorised: C. Branson
 Date: 26/08/2021                  Intranet\Manuals\Published Manuals\Patient Services Pathlab/Specimen Collection Guidelines V2021
 Last Review Date: June 2021
PATHLAB                                         Collection Services Guidelines Manual                           Page 8 of 50

        1.6.1        Emailing Request Forms

        If sending a request form for a home visit via email, please use the form as below, ensuring all
        required details are included.

        If you are emailing a Home Visit request form please email it to requestforms@pathlab.co.nz –
        clearly indicating that a Home Visit is required.
        Also indicating what area, the patient resides in Hamilton, BOP, Lakes etc

        Eform requests must be followed up with a phone call , clearly indicating that a Home Visit request
        has been sent via electronic ordering.

                                              Request for Home (Phlebotomy) Collect

        Date:                                                         Requested By:

        Patient Details
        Surname:                                              First Name:

        DOB / NHI:                                                        Phone No:

        Address:

        Date of required visit:

        Frequency of visit:               Daily / Weekly / Monthly / Urgent (If urgent, please phone the lab)

        Special Instruction(s):

        Laboratory request form at:                       House / Courier / To be faxed / Regular patient

        Refer Outtake

 Version 2021                                                                                              Authorised: C. Branson
 Date: 26/08/2021                 Intranet\Manuals\Published Manuals\Patient Services Pathlab/Specimen Collection Guidelines V2021
 Last Review Date: June 2021
PATHLAB                                          Collection Services Guidelines Manual                           Page 9 of 50

2       VENEPUNCTURE PROTOCOL AND PROCEDURE
2.1         Introduction

        Before you perform a venepuncture you must become totally familiar with your equipment and the
        technique.

        Most patients have good veins and this makes collecting samples much easier.

        If a patient has small or fragile veins and you are not confident please send them to a collection
        room.

2.2         Identification and Form Check

        This is the most important step in the procedure.

        Identify the patient. Ask the patient to spell his/her first and last name (underline the surname), and
        DOB, to ensure you have the right patient, the requesting Doctor’s , signature (not required for
        electronic form) and MCNZ number.

        Check the “OTHER TESTS” box for extra tests.

2.3         Equipment Used During Vacutainer Venepuncture

        •    Vacutainer needle holder (quick release)
        •    Eclipse 21 or 22 gauge safety shield needle. Check the cover seal
             is intact, expiry date and needle shaft for burrs.
        •    Alcohol swab and gauze swab.
        •    Tourniquet.
        •    Blood collection tubes, correct order of draw. Check expiry dates.
        •    Adhesive tape / plaster.
        •    Sharps container.

2.4         Benefits of the Vacutainer Venepuncture

        •    Speed of the blood collected by direct draw.
        •    Low risk of contact with blood.
        •    Less chance of clotted specimens.
        •    No need to transfer blood from syringe to tube.
        •    Cost factor.
        •    Minimal waste disposal of biohazards.

2.5         Tube Description

        Vacutainer tubes have been prepared by the manufacturers to be easily identified by their stoppers
        and labels. All the tubes have been evacuated of air to compensate exactly for the pre-determined
        volume of blood that will be drawn into the tube during the venepuncture. Nearly all the tubes
        contain a chemical additive (e.g. clot activator or anticoagulant) to assist in the protection and
        preparation of the specimen prior to analysis.

        To identify these additives the stoppers and labels are different colours. It is important to learn the
        properties of the tubes and the correct tube selection for specific tests. Also to prevent the possible
        carryover of additive from one tube to the next the manufacturer advises a particular order of tubes
        when collecting blood specimens:

 Version 2021                                                                                               Authorised: C. Branson
 Date: 26/08/2021                  Intranet\Manuals\Published Manuals\Patient Services Pathlab Specimen Collection Guidelines V2021
 Last Review Date: May 2021
PATHLAB Collection Services Guidelines Manual Page 10 of 50
2.5 Tube Description cont
a) Sterile Blood Culture culture media/Sterile
b) Citrate Blue Top liquid anticoagulant
c) CPDA Yellow Citrate phosphate dextrose adenine
d) Plain Red Top no additive
e) SST Gold Top serum separating gel and clot activator
f) Heparin Green Top Heparin anticoagulant
g) K2 EDTA (trace element) Navy Blue Potassium EDTA
h) EDTA Purple Top EDTA anticoagulant
i) EDTA Pink Top powder EDTA anticoagulant
j) Fluoride Grey Top Fluoride Oxalate powder anticoagulant
2.6 Tube Inversion
All tubes contain an additive or clot activator that needs to be thoroughly mixed with the blood
sample. Anticoagulants such as EDTA need to be thoroughly mixed to ensure specimens do not
clot.
Always mix tubes immediately by inverting at least 8 times. NEVER SHAKE THEM. Citrate 3-4
inversions only required.
Hold the tube upright, gently invert 180 and back. Repeat movement for each tube.
2.7 Preparation
Wash your hands with soap and water / hand sanitiser before you proceed to assemble the
equipment.
Gloves must be worn where indicated in a procedure protocol or in any circumstance where
your professional judgement indicates this to be appropriate or desirable.
Prepare your equipment before you search for a vein.
Lay the collection tubes out in the correct order of collection for easy access.
Break the needle cover seal in view of the patient and attach the needle to the needle holder.
Leave the coloured needle cover and safety shield in place.
2.8 Position of the Patient
Patient comfort is of utmost importance.
Normally a venepuncture is performed with the patient sitting comfortably with good back support
and the arm resting on a firm base.
Sometimes the patient will request to lie down.
Using an armrest, position the patient’s arm downward in as comfortable a position for the patient
as possible. The arm should always be lower than the shoulder.
Ensure the patient has adequate back support, to prevent the arm pulling away from you.
If the patient is lying down a pillow or towel may be necessary to help maintain a good position for
the arm.
Always check for and remove restrictive clothing that could act as an extra tourniquet.
Version 2021 Authorised: C. Branson
Date: 26/08/2021 Intranet\Manuals\Published Manuals\Patient Services Pathlab/Specimen Collection Guidelines V2021
Last Review Date: June 2021PATHLAB Collection Services Guidelines Manual Page 11 of 50
2.9 Tourniquet
Tourniquet systems are varied, but all are intended to help distend the vein to allow a successful
venepuncture.
Become totally familiar with using the tourniquet and practise until you become proficient in using
it smoothly.
Apply the tourniquet 7-10cm above the intended site, firmly, but so you can insert two fingers
between the strap and the patient’s arm.
Apply over the patient’s sleeve under the tourniquet to prevent pinching of the skin or pulling arm
hairs.
Children sometimes feel threatened by the restriction of a tourniquet and applying it over a sleeve
may be preferable.
The tourniquet is relaxed as soon as a good blood flow is established, but keep on the arm in case
you need to re-tighten , and then release at the end of the blood collection.
Remember: the tourniquet must not be applied for more than a minute. Prolonged pressure will
obstruct normal blood flow, will cause abnormal accumulation of fluids, which will contribute to
inaccurate test results.
Wipe your tourniquet with an alcohol wipe between each patient.
If not using a disposable tourniquet ensure your tourniquet is washed daily with hot soapy water
and left to dry.
Any blood contamination on the tourniquet - discard it.
After each collect check the inside of the needle holder/barrel for blood contamination – use
an alcohol wipe to clean.
2.10 Areas / Sites to Avoid When Choosing A Vein
• Scars from burns or surgery -or obvious scarring from excessive needle use.
• Haematoma or bruised areas -These are painful and may yield erroneous test results.
• Arm containing a fistula – may cause trauma or scarring. If only access use hand or median
cubital vein - not the cephalic vein if possible as this is used for Fistula formation for
haemodialysis.
• Picc Line side as may introduce infection but can be used if a last resort but collect sample
distal to as possible to the picc line.
• Infected or inflamed areas/sites as may exacerbate the infection and be painful for the patient.
• Side affected by a stroke or injury due to the inability to detect an adverse reaction e.g. nerve
injury.
• Veins on the underside and side of the wrist must not be used due to possibility of nerve and
tendon damage. See diagrams below:
Version 2021 Authorised: C. Branson
Date: 26/08/2021 Intranet\Manuals\Published Manuals\Patient Services Pathlab/Specimen Collection Guidelines V2021
Last Review Date: June 2021PATHLAB Collection Services Guidelines Manual Page 12 of 50
2.10 Areas / Sites to Avoid When Choosing a Vein
NEVER USE A VEIN FROM:
• The side of a mastectomy. The restriction of the tourniquet on the tissue and the possible
introduction of bacteria through a needle puncture may cause Lymphoedema (accumulation)
of fluid in the extremity) or lymphostasis (interruption of the lymph fluid flow. Patients who
have had lymph nodes removed, especially from the axilla (under arm) are more likely to
experience swelling and pain in the arm and are usually instructed by their doctor, specialist
or physiotherapist to avoid having blood taken from that arm.
N.B. If this is the only site available we require a letter from their Surgeon or Doctor giving
permission to collect from the side of a mastectomy. A copy of this letter should be retained by the
patient.
2.11 Assistance to Hold a Patient During Venepuncture
From time to time it is necessary to seek assistance to immobilise an arm if you suspect a patient
will be troublesome.
For an adult - ask the helper to stand/sit to the side of the arm to be used and hold the wrist down
firmly. Using the palm of the hand apply firm upward pressure (without pushing the arm up) under
the patient’s elbow to eliminate the possibility of the arm bending. Do not grip the elbow as this will
distort the venepuncture site and can make the patient feel quite uncomfortable.
It may be necessary to request another person to stand behind the patient’s chair to hold the patient
back in case there is a tendency to jerk forward.
For a child - the helper will sit on the same side as the intended venepuncture and hold the patient
as for an adult. It is recommended that very young patients be seated on a parent’s knee, to be
given a feeling of security during the procedure.
2.12 Cleansing the Venepuncture Site
Once you have selected a suitable vein, assess the direction, size and depth of it. You should be
able to palpate the vein for at least 2-3 cm, making sure there is no “junction” where the vein will
change direction.
Allow the site to air dry for at least 15 seconds. (Do not wipe the wet alcohol with a dry swab).
If it is necessary to palpate the vein, you must re-swab the site and allow to air dry.
Version 2021 Authorised: C. Branson
Date: 26/08/2021 Intranet\Manuals\Published Manuals\Patient Services Pathlab/Specimen Collection Guidelines V2021
Last Review Date: June 2021PATHLAB Collection Services Guidelines Manual Page 13 of 50
2.13 Selecting a Suitable Vein
Diagram showing Superficial Veins
of the Anterior Surface of the Upper
Arm.
• It is important to select a vein carefully for blood collection.
• A patient who has had previous blood tests will often indicate which arm has the most
accessible veins. This may not be correct and it will require tact if both arms are to be
inspected.
• One arm usually has better veins than the other and most often it is the one that is
predominantly used.
• Sometimes a slight rotation of the patient’s hand will show up a vein in the antecubital fossa.
• The antecubital fossa in front of the elbow joint is the area where Median Cubital, Cephalic and
Basilic veins pass through. (Refer to diagram)
• The larger and fuller medium cubital and cephalic veins are used most frequently.
• MEDIAN CUBITAL VEINS are preferred because:
They are typically closer to the surface of the skin.
Well-anchored and bruises less easily.
Less painful upon needle insertion.
Less likely to injure nerves if needle placement is not accurate
NOTE: attempt to locate the medial cubital vein on either arm before considering
alternative veins.
• Due to the proximity of the Basilic vein to the brachial artery and the median nerve, also the
Basilic vein is generally smaller, not particularly well anchored and tends to roll away it should
only be considered if no other vein is more prominent.
• Veins on the underside of the wrist must not be used.
• Palpate the vein. Using the fingertip press firmly down on the skin and as you lift your finger
you will feel the vein bounce back. Move across the ante Cubital area repeating the ‘press
down/release’ motion until you locate a vein. It will feel like a warm rubber tube. Do not press
down on a vein and hold the pressure while ‘wriggling’ the vein, as this will make the vein
‘reedy’.
• Never assume a blue line is a suitable vein for a venepuncture.
• Never slap the patient’s arm or ‘flick’ the vein.
NOTE:
Veins are spongy.
Arteries are deeper, pulsate and are more elastic and have a thick wall.
Tendons are tight and string-like
Thrombosed veins lack resilience, feel cord-like, roll easily and should not be used.
• Veins become more prominent and easier to enter when the patient forms a fist.
• The patient must not open and close (pump) their hand. Vigorous hand pumping may cause
changes in the concentration of certain analytes, e.g. potassium levels, in the blood.
Version 2021 Authorised: C. Branson
Date: 26/08/2021 Intranet\Manuals\Published Manuals\Patient Services Pathlab/Specimen Collection Guidelines V2021
Last Review Date: June 2021PATHLAB Collection Services Guidelines Manual Page 14 of 50
2.13 Selecting a Suitable Vein cont
• Once you have found a suitable vein, assess the direction, size and depth of it. Palpate the
vein for at least 2 –3 cm, making sure there is no ‘junction’ where the vein will change direction.
• If you have difficulty finding a suitable vein, request that you inspect the other arm.
• If unsure of your selection, please refer the patient to nearest Pathlab Room.
2.14 Vacutainer Venepuncture
a) Slide the first collection tube into the needle holder and press the tube on to the end of the
needle, no further than the ridge on the needle holder or the rubber stopper will be completely
pierced and the vacuum in the tube will be lost.
b) Remove the coloured needle cover. Visually check the needle prior to every venepuncture for
burrs, hooks or other manufacturing defects.
c) Try to stand directly in line with the vein you have selected.
d) Anchor the vein, by holding the arm skin firmly down below the area that you will puncture.
This prevents the vein from rolling or slipping and also helps to hold the arm still.
e) Pull back the needle safety shield back into an upright position. The bevel of the needle will be
facing upwards. (Fingertip hold)
f) Puncture the vein in one swift, smooth motion at an angle of 15° - 30°. Insert the needle in the
widest part of the vein and in the same direction as the vein. With practice, you should feel
the needle “give” as it threads into the lumen of the vein. Once the needle is inserted in the
vein there is no need to keep the vein anchored. That hand is now used to manipulate the
tube(s) on to the back of the needle.
g) Place your forefinger and middle finger on the needle holder flange and your thumb on the
bottom of the tube. Press the Vacutainer tube all the way on to the needle and the tube will
begin to fill.
h) Roll the tube so the label is underneath, to allow clear vision of the blood flow.
i) Now lightly rest your hand holding the needle assembly down on the patient’s arm making sure
you maintain the correct needle angle.
j) Gently relax the tourniquet pressure as soon as you establish a good blood flow. (Do
not release the tourniquet at this time. Just keep it completely relaxed on the arm until the
last tube has been collected).
k) When the vacuum is exhausted the blood volume is complete. The tube will only fill to the
coloured line on the label. Always aim for maximum tube filling to attain the correct
blood/additive ratio in the tube.
l) To remove the tube from the back of the needle, curl your fingers round the tube. Apply a
forward pressure with your thumb against the flange of the needle holder and with your fingers
smoothly pull back the tube and remove it from the needle holder.
m) Never push or pull the tube without “bracing” the needle holder as it will cause needle
movement or the needle will dislodge from the vein
n) As each successive tube is filling remember to gently invert the tube at least 8 times to mix.’
o) Maintain total focus on the point of needle entry throughout the procedure and keep a forward
pressure on the needle holder to prevent the needle coming out of the vein during tube
changes. It is vital to keep the needle as still as possible to minimise any discomfit to the patient
p) If the blood flow decreases, it may be necessary to tighten the tourniquet in an attempt to
distend the vein. Once the flow improves, the tourniquet pressure must be relaxed.
NOTE: Indications show that having the hand clenched may cause abnormal Potassium results.
Where possible keep the patient’s hand relaxed when searching for a vein and during the blood
collection.
Version 2021 Authorised: C. Branson
Date: 26/08/2021 Intranet\Manuals\Published Manuals\Patient Services Pathlab/Specimen Collection Guidelines V2021
Last Review Date: June 2021PATHLAB Collection Services Guidelines Manual Page 15 of 50
2.14 Vacutainer Venepuncture cont
q) When all the required tubes are collected as per order of draw, release the tourniquet.
r) Remove the last tube from the needle/needle holder, mix by inversion as per manufacturers
instructions.
s) Hold a dry gauze swab above the venepuncture site, but not touching the skin.
t) Place gauze over the needle site (do not press down).
u) Swiftly withdraw the needle from the vein then immediately apply the gauze with firm pressure
over the puncture site, push the safety shield forward with your thumb until you hear a click as
the shield locks into place covering the needle, then discard the needle immediately by
pressing the button on the quick release needle holder into sharps container.
v) The patient’s arm remains extended at this time as bleeding will recur if the arm is bent up then
straightened again. Allow at least 3 minutes for the clot to form, labelling the tubes while you
wait.
w) Advise the patient to leave the plaster on between 30 minutes and an hour to avoid heavy
lifting and strenuous exercise directly after blood test.
Version 2021 Authorised: C. Branson
Date: 26/08/2021 Intranet\Manuals\Published Manuals\Patient Services Pathlab/Specimen Collection Guidelines V2021
Last Review Date: June 2021PATHLAB Collection Services Guidelines Manual Page 16 of 50
2.15 Labelling the Tubes
• The blood collector must label the tubes.
• Always label the tubes after you collect the specimens, never before.
• Label the tubes before you put a plaster on the puncture site (time to stop the bleeding), before
the patient leaves the chair.
• Label the tubes from the request form, not from the previous tube.
• Always hold the tubes with the top to the left and label from left to right.
For Community Patients write on tubes: Patient’s full name
Date of birth
Time and date of specimen
For Cross Match Specimens write: Patient’s surname
Full first names
Date of birth
Time and date of specimen
Signature of collector
Tubes must be written in pen, no patient labels.
Never write the Doctor’s name on this tube.
Unlabelled or incorrectly labelled tubes will not be processed. Recollection will be required.
2.16 Request Form Documentation
The request form is the main communication through the Laboratory system, so if the information
is wrong it will affect all stored patient data in the computer, through the analysis process and the
results will be transmitted with wrong patient identification.
As well as the standard Laboratory form there are a number of computer-generated forms with
varied formats, which must be read, carefully to ensure patient data is correct and tests are not
missed.
All request forms require Clinical Details.
Prior to specimen collection you must check the patient’s name (and spelling), date of birth, NHI
number (hospital ID) and the requesting Doctor MCNZ number and signature (MCNZ not
required an online order form)
Use a black pen for added documentation as blue pens photocopy lightly.
When the specimen collect is completed you must add to the form in the “COLLECTED BY” space:
a) The time and date of the specimen collected.
b) The location e.g.: name of medical centre / name of rest-home.
c) Initials of the collector.
d) Whether patient fasting or non-fasting, what samples you have collected e.g.
• X1 SST
• X1 EDTA
• X1 grey
• X1 urine etc.
e) The time and date of last dose if for therapeutic drug monitoring.
If there are any queries regarding the specimens or the patient, the collector’s initials and location
enables the Laboratory staff to contact you for any related information. The importance of patient
identification and complete and accurate specimen labelling cannot be stressed enough.
Version 2021 Authorised: C. Branson
Date: 26/08/2021 Intranet\Manuals\Published Manuals\Patient Services Pathlab/Specimen Collection Guidelines V2021
Last Review Date: June 2021PATHLAB Collection Services Guidelines Manual Page 17 of 50
2.17 Specimen Storage and Transportation
Place the specimen(s) in a biohazard bag. Fold the request form inwards for confidentiality and
place in the bag pocket.
Store in a cool temperature until delivered to the Lab. Ideally, an ice pack attached (inside) to the
chilly bin lid prior to the day’s blood specimens being collected will maintain a preferred temperature
control. Blood specimens should never be in direct contact with an ice pack.
Blood specimens should be delivered to the Lab on the same day as soon as possible after
collection Alternative arrangements may be made only after discussion with the department
supervisor.
Transport all specimens in a chilly bin to maintain the required temperature, for safety and
confidentiality. Extremes of temperature, especially in a hot vehicle can compromise the test
results.
2.18 Discharging the Patient
• Check the patient’s arm for further signs of bleeding or bruising. If the patient is on anticoagulant
therapy, allow extra time to ensure the site will not start bleeding again. Never wipe the puncture
site with a gauze swab as this will take the clot from the surface and bleeding will recur.
• Cover the puncture site with a small plaster or micropore. Extra gauze under the plaster may
be necessary if the patient is on anticoagulants. Now the patient is requested to minimise arm
movement for a few minutes in case the clotting process has not totally completed.
• Watch for any signs of pallor or dizziness – blood tests will often affect patients.
• If the patient feels unwell do not encourage him/her to leave on their own until you are satisfied
there will be no further problems as they go home, especially if they are driving a vehicle
• Advise the patient to leave the plaster on for between 30 minutes to an hour and to avoid heavy
lifting and strenuous exercise directly after blood test.
2.19 Quality Control
• Do not store unnecessary amounts of tubes.
• Check expiry dates on equipment – monthly
• Collection tubes should only be used within the printed expiry date shown on the label.
• Keep your blood collection kit clean and prepared for the next use.
• Replace old or worn equipment e.g., tourniquet, needle holder, sharps container.
• Ensure patient preparation procedures are followed.
• Ensure specimen storage and transport to the Laboratory is timely.
2.20 Trouble Shooting
If veins are difficult to access, please have no more than 2 attempts. Please send the patient to
a Pathlab collection room. Continued needle trauma to veins by an inexperienced person will make
it more difficult to successfully draw blood and cause pain and discomfit to the patient.
If you suspect the patient will over-react to the needle prick do not hesitate to seek assistance in
holding the patient’s arm. If you are on your own, it may be preferable to refer the patient to the
closest Laboratory rooms where another person can assist.
Version 2021 Authorised: C. Branson
Date: 26/08/2021 Intranet\Manuals\Published Manuals\Patient Services Pathlab/Specimen Collection Guidelines V2021
Last Review Date: June 2021PATHLAB Collection Services Guidelines Manual Page 18 of 50
2.20 Trouble Shooting cont
If you have already tried and the patient pulls away and the needle comes out, immediately release
the tourniquet and apply pressure to the puncture site with a gauze swab. Your second attempt must
be in the opposite arm as tourniquet pressure on the first arm will cause bleeding to recur.
During the blood collection watch out for a “jerky “or irregular blood flow.
Possible cause: the needle position- the bevel may be pressing on the vein wall.
Remedy – re-align the needle.
Possible cause: the vein is collapsing – strong suction from the tube on a small vein.
Remedy – may need to tighten the tourniquet.
If the problem continues, abort the venepuncture attempt as the continued irregular flow is likely to
cause haemolysis (blood cells ruptured)
If the flow improves, take an extra tube of blood in the same tube type as the “problem” one to ensure
a quality specimen for testing.
2.21 Correct Insertion of Vacutainer Tubes
• When the tube is filled to capacity, remove it from the needle. Apply soft pressure to the needle
holder with your thumb and pull with your fingers curled around the tube. Always maintain
firm steady pressure when introducing or removing the tubes, to maintain needle depth and
to prevent needle movement in the patient’s vein.
• Invert the tube 8 times (never shake) to ensure the blood is properly mixed with additive.
• Continue filling each tube maintaining firm steady pressure as you change them until the
collection is complete.
• Remove the last tube from the needle holder and mix by inversion as per manufacturers
recommendations.
Version 2021 Authorised: C. Branson
Date: 26/08/2021 Intranet\Manuals\Published Manuals\Patient Services Pathlab/Specimen Collection Guidelines V2021
Last Review Date: June 2021PATHLAB Collection Services Guidelines Manual Page 19 of 50 2.22 Needle Positioning and Failure to Draw Blood Version 2021 Authorised: C. Branson Date: 26/08/2021 Intranet\Manuals\Published Manuals\Patient Services Pathlab/Specimen Collection Guidelines V2021 Last Review Date: June 2021
PATHLAB                                          Collection Services Guidelines Manual                        Page 20 of 50

2.23        Inadequate Blood Flow

          Causes                                                  Solutions
          Tube may be improperly inserted on the needle           Remove the tube and re-insert correctly.
          Needle bevel may be flush against the vein wall         Rotate the needle ¼ turn clockwise.
          Tourniquet applied too tightly for too long             Slowly and gently release the pressure.
          Tube may be damaged, pre-opened or
                                                                  Replace the tube. Vacuum lost
          punctured.
          Needle has transfixed the vein (gone through            Pull back slightly on the needle.     Be alert
          the back wall of the vein)                              for haematoma to form.
                                                                  Advance the needle forward until you feel the
          Needle is not completely in the vein
                                                                  ‘give’ as the needle penetrates the vein.

2.24        Blood Flow Stops Halfway Through Collection

          Causes                                      Solutions
                                                      Remove tube from holder for a few seconds to
          Vein may have collapsed
                                                      allow the vein to refill. Replace the tube.
                                                      Repeat the venepuncture on the opposite arm
          Needle may be displaced during tube changes
                                                      unless realignment of the needle is attained.

2.25        Under filling of Tubes

          Causes                                        Solutions
                                                        Reintroduce tube to continue tube filling until
          Premature removal of the tube
                                                        vacuum is exhausted.
          Long line of winged collector set may contain Use a ‘discard’ tube first, to ensure accurate
          air                                           test results

2.26        Haemolysed Specimens

        Haemolysis – the breakdown or rupture of red blood cells and the release of haemoglobin to the
        serum or plasma.

        Haemolysis results when Red Blood cells break down and Haemoglobin is released; the serum
        which is normally straw coloured becomes tinged with pink or red. If a specimen is grossly
        haemolysed the serum can appear dark red. Haemolysis can be caused by improper Phlebotomy
        technique such as:
        • Using a needle that is too small
        • Expelling blood vigorously into a tube
        • Shaking or mixing tubes too vigorously
        • Performing a venepuncture before the alcohol has dried at the collection site
        • Pulling back a syringe plunger too fast
        • A slow or jerky collect

 Version 2021                                                                                              Authorised: C. Branson
 Date: 26/08/2021                 Intranet\Manuals\Published Manuals\Patient Services Pathlab/Specimen Collection Guidelines V2021
 Last Review Date: June 2021
PATHLAB Collection Services Guidelines Manual Page 21 of 50
2.26 Haemolysed Specimens cont
Cause Solution
Release the tourniquet and remove needle. Repeat
Excessive probing with the needle
venepuncture at a different site
Allow disinfected skin site to totally air dry prior to
Alcohol contamination
venepuncture
Release the tourniquet, allow normal blood flow to
Prolonged tourniquet application ( 1 minute)
re-establish.
Underfeeding of tubes Redraw specimen with trauma-free Venepuncture.
Realign needle if pressing on a vein wall or if Vein
Irregular or ‘jerky’ draw.
collapsing gently increase tourniquet pressure.
Vigorous mixing of tubes Gentle inversion only.
Using a needle too small a gauge for the Where possible use 21G. Only use 22G for small
vacuum force. veins.
Collecting blood from a haematoma. Never draw blood from a bruised area.
You may have torn the vein.
Punctured both sides of the vein.
This is due to poor technique: Left the tourniquet on too tight for too long.
Insufficient pressure applied after removing the
needle.
Be mindful with patients who are on Anticoagulant therapy e.g. Warfarin, Aspirin or Heparin as they
have a tendency to bleed more freely. Also because they have frequent blood tests, their veins
need to be well cared for.
2.27 Arteries
In the event your needle entering an artery by mistake, either deep in the antecubital fossa or
sometimes in a superficial artery that is abnormally placed, just beneath the skin.
You will recognise it as an artery; by the way the blood spurts out as you insert the needle, the
bright red colour of the blood and the rapid haematoma development when the needle is removed.
You must react quickly. Immediately release the tourniquet. Remove the tube from the needle
holder and withdraw the needle from the artery. Then apply a firm pressure pad over the puncture
site for 10 minutes, timed by your watch. This should give adequate time for the hole in the vessel
to be plugged with a blood clot. Do not leave the patient during this time. It may be necessary
to maintain pressure for a longer period.
2.28 Severe Pain Following Venepuncture
If a patient complains of sudden moderate to severe pain radiating from the puncture site either up
or down the arm. This may indicate you have touched one of the many small subcutaneous nerves.
Remove the needle immediately and apply pressure.
Rarely does serious nerve damage occur but there is the possibility of continued pain for some
time and the patient may require follow-up treatment.
Apologise to the patient and be re-assuring. If you need to have a second venepuncture attempt,
ask permission and ensure you are confident. If you are unsure please refer the patient to a
collection room. If pain persists the patient should see a Doctor.
Version 2021 Authorised: C. Branson
Date: 26/08/2021 Intranet\Manuals\Published Manuals\Patient Services Pathlab/Specimen Collection Guidelines V2021
Last Review Date: June 2021PATHLAB Collection Services Guidelines Manual Page 22 of 50
2.29 Venepuncture Procedure Check
a) Introduce yourself.
b) Identify the patient. Check the request form: name, date of birth, address and phone number,
requestor details.
c) Document form. *Must be signed by the requesting Doctor.
d) Requestors MCNZ number and Clinical details required.
e) Explain procedure, and then wash hands.
f) Assemble equipment. Always break the needle seal in front of the patient.
g) Position the patient, either sitting or supine.
h) Apply the tourniquet and palpate for a vein.
i) Swab the venepuncture site using a circular motion from the centre outwards. Allow the skin
to air dry. Perform hand hygiene.
j) Anchor and enter the vein.
k) Relax the tourniquet.
l) Fill all tubes according to order of draw, inverting each one when full.
m) Release the tourniquet.
n) Hold dry swab loosely above the needle.
o) Withdraw the needle and activate safety shield and dispose of needle into biohazard container
p) Apply firm pressure on the venepuncture site, arm still extended.
q) Label tubes.
r) Check patient’s arm and apply tape over dry swab.
s) Discharge the patient.
t) Post care information
u) Perform hand hygiene.
*Not required for electronically generate forms.
Version 2021 Authorised: C. Branson
Date: 26/08/2021 Intranet\Manuals\Published Manuals\Patient Services Pathlab/Specimen Collection Guidelines V2021
Last Review Date: June 2021PATHLAB Collection Services Guidelines Manual Page 23 of 50
3 SPECIAL PROCEDURES
3.1 Tests Requiring Appointments
There are a number of patients who need to be referred to the laboratory for an appointment for
their tests. They are either time consuming tests or require Pathologist / technical assistance.
The following covers these tests and their requirements so you may be able to explain them clearly
to your patients.
These include:
3.1.1 DNA Paternity
Performed at:
• PLBOP - Cameron Rd and Whakatane Hospital appointment required.
• PLWh - Refer to Cameron Rd Tauranga.
• PLW - Main Lab and some out of town surgeries.
• PLR – Haupapa St.
• PLT - by arrangement.
• Takes approx. 15 mins per person.
• ID: All parties require a current photo. Adults need two forms of ID e.g. photo + passport or
driver’s licence or lawyer present. A child under 16 years old requires the mothers
consent/Affidavit
• Cost $1275.00
3.1.2 GTT (Glucose Tolerance) / Polycose Tolerance
Performed at:
• PLBOP / PLWh all rooms.
• PLW – all rooms
• PLR – Haupapa St
• PLT- Tuwharetoa and Turangi.
• Patient to fast for 10-12 hrs. prior but may drink water only.
• No vigorous exercise on the morning of the test
• Must stay at lab for 2 hrs. During test.
• Not permitted to eat, drink or smoke during test.
3.1.3 Skin Allergy Tests
Request form available on Pathlab website.
Appointment required:
• PLBOP- Cameron Rd, Baymed.
• PLWh – Whakatane Hospital in the afternoon.
• PLW - Main lab, Thames and Matamata.
• PLR - Rotorua Hospital site.
• PLT - Hospital site telephone for appt.
• Takes approximately 30 minutes.
• Patient must not have taken antihistamines for 3 days prior to test.
Version 2021 Authorised: C. Branson
Date: 26/08/2021 Intranet\Manuals\Published Manuals\Patient Services Pathlab Specimen Collection Guidelines V2021
Last Review Date: May 2021PATHLAB Guidelines Manual Page 24 of 50
3.1.4 FNA (Fine Needle Aspirate)
Performed at:
• PLBOP-Cameron Rd
• PLWh -Whakatane Hospital (Thursday only)
• PLW - Main lab only.
• PLR/PLT- Rotorua Hospital site
• By appointment with pathologist.
• Contact phone number of the patient is required.
• Recommend a support person accompanies them.
• Takes up to 20 minutes.
• If mammogram required, this must be done either before FNA procedure or 10 days post
procedure.
3.1.5 Bone Marrow
Performed at:
• PLBOP - Cameron Rd.
• PLWh - Whakatane Hospital, Thursday am.
• PLW - Main lab only.
• PLR/PLT - Rotorua Hospital site.
• By appointment with pathologist.
• Procedure takes approximately 1 hour.
• Patient will be administered a local anaesthetic.
• We recommend that the patient arrange to be taken home after the procedure. (Advisable that
they bring a support person.)
• There may be some discomfort during the procedure and the following 24 hours also. Post
procedure care instructions will be given by the Pathologist.
3.1.6 Synacthen (Investigation Addison’s disease)
Performed at:
• PLBOP - Cameron RD only.
• PLW - Main lab only.
• PLR - Rotorua hospital site, Chemo Day stay.
• PLT - Refer patient to Rotorua hospital site.
• Patient to avoid Cortisone, Hydrocortisone and Prednisone for 8 hours prior to test.
• Procedure duration 1 hour.
• Patient must remain at rooms until test completed.
• Requestor please write a prescription for patient to collect from pharmacy.
3.1.7 Drug Screening (clinical purposes only)
Not available for employment / court purposes.
Appointment Only:
• Bay of Plenty/Whakatane –Refer patient to TDDA –07 574 3597
• Pathlab Waikato – Refer to TDDA – 07 8505056
• PLR – Refer patient to TDDA – 07 345 4494 OR 07 343 1952 OR Achieve Workplace Health.
• Mobile testing is also available from TDDA.
Version 2021 Authorised: C. Branson
Date: 26/08/2021 Intranet\Manuals\Published Manuals\Patient Services Pathlab/Specimen Collection Guidelines V2021
Last Review Date: June 2021You can also read