NORDIC ID EXA21 USER GUIDE
←
→
Page content transcription
If your browser does not render page correctly, please read the page content below
2021-05-31
                 Nordic ID EXA21 User Guide
                                 Version 1.2

NORDIC ID EXA21
    USER GUIDE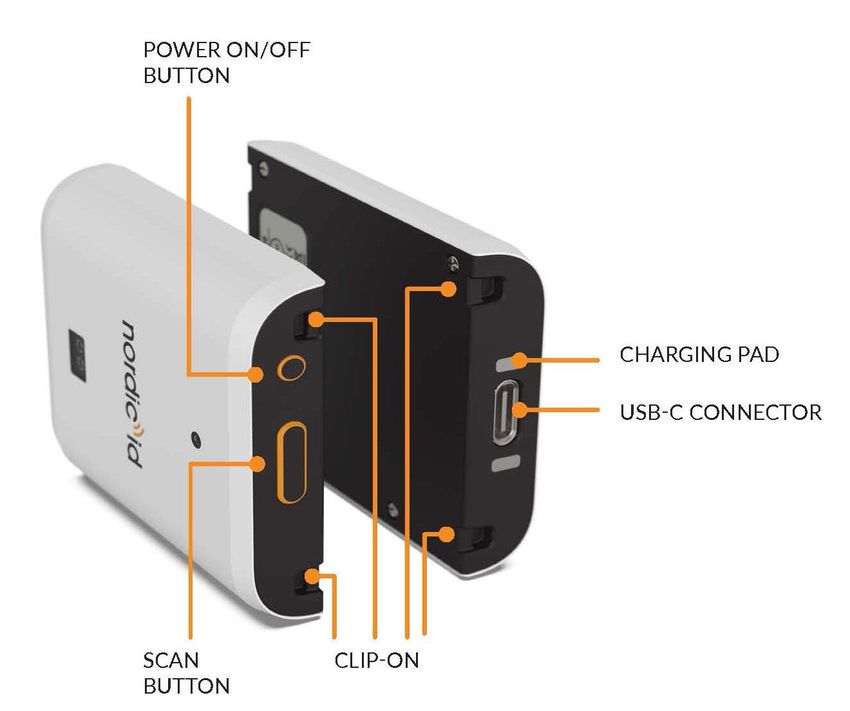
2021-05-31
                                                                                                                                                        Nordic ID EXA21 User Guide
                                                                                                                                                                        Version 1.2

TABLE OF CONTENTS

   GETTING STARTED...................................................................................................................................................................................4
        1.1.        GENERAL ...................................................................................................................................................................................4
        1.2.        AVAILABLE VARIANTS .......................................................................................................................................................4
        1.3.        AVAILABLE ACCESSORIES ...............................................................................................................................................4
        1.4.        PACKAGE CONTENT ...........................................................................................................................................................4
        1.5.        FEATURES OVERVIEW .......................................................................................................................................................5
        1.6.        CHARGING ...............................................................................................................................................................................6
        1.7.        FASTENING ..............................................................................................................................................................................7
                                   QUAD LOCK® FASTENING .............................................................................................................................7
                                   WRIST STRAP ..........................................................................................................................................................7
                                   FLEX HOLDER .........................................................................................................................................................8

   CONNECTIONS ..........................................................................................................................................................................................9
        2.1.        CONNECTING WITH HOST DEVICE............................................................................................................................9
        2.2.        PAIRING .................................................................................................................................................................................. 10
        2.3.        UNPAIRING ........................................................................................................................................................................... 10
        2.4.        CONNECTING WITH NORDIC ID SMART PAIR FEATURE ............................................................................ 10

   USING THE DEVICE ............................................................................................................................................................................... 11
        3.1.        POWER BUTTON................................................................................................................................................................ 11
        3.2.        SCAN BUTTON .................................................................................................................................................................... 11
        3.3.        TOF SENSOR ......................................................................................................................................................................... 12
        3.4.        STATUS LED .......................................................................................................................................................................... 13
        3.5.        BUZZER ................................................................................................................................................................................... 13
        3.6.        ANTENNA............................................................................................................................................................................... 13
        3.7.        FACTORY DEFAULTS ....................................................................................................................................................... 14
        3.8.        HARDWARE RESET ........................................................................................................................................................... 14
        3.9.        HID RFID MODE .................................................................................................................................................................. 14
                                   HID MODE VIA BLUETOOTH....................................................................................................................... 14
                                   HID MODE VIA USB ..........................................................................................................................................15
                                   READING RFID TAGS ....................................................................................................................................... 15

Nordic ID Group | Joensuunkatu 7 | FI-24100 Salo |Finland
Office +358 2 727 7700 | Fax + 358 2 727 7720 | info@nordicid.com                                                                                                                                   2 / 21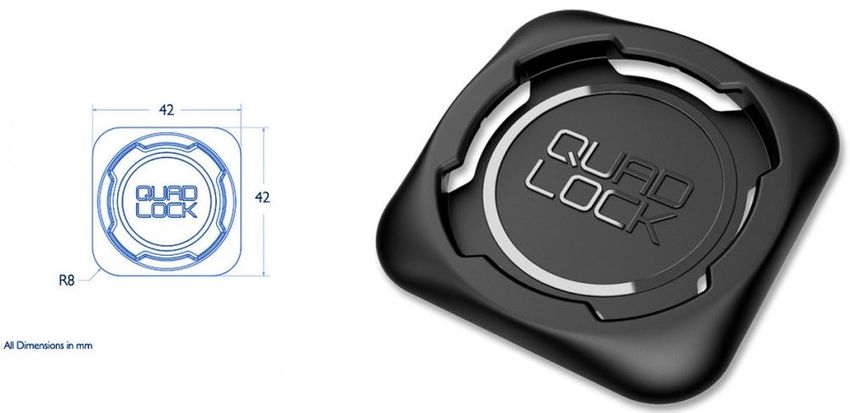
2021-05-31
                                                                                                                                                       Nordic ID EXA21 User Guide
                                                                                                                                                                       Version 1.2

   SOFTWARE ................................................................................................................................................................................................ 16
         4.1.        NORDIC ID RFID DEMO APPLICATIONS ............................................................................................................... 16
                                    NORDIC ID RFID DEMO FOR ANDROID ............................................................................................... 16
                                    NORDIC ID RFID DEMO FOR IOS .............................................................................................................. 16
                                    NORDIC ID KEYBOARD AND WEDGE SERVICE ................................................................................ 16
                                    NORDIC ID SMART WEAR APP .................................................................................................................. 16
         4.2.        APPLICATION DEVELOPMENT .................................................................................................................................. 17
                                    NUR API IN GENERAL ...................................................................................................................................... 17
                                    APPLICATION DEVELOPMENT KIT ......................................................................................................... 17
         4.3.        FIRMWARE UPDATE ........................................................................................................................................................ 19

   REGIONAL SETTINGS ........................................................................................................................................................................... 19
   SERVICE AND SUPPORT ..................................................................................................................................................................... 20
   WARRANTY ............................................................................................................................................................................................... 20
   RELATED DOCUMENTS AND CONTENT ................................................................................................................................... 20
   ABOUT NORDIC ID ................................................................................................................................................................................ 21
   VERSION HISTORY ................................................................................................................................................................................ 21

Nordic ID Group | Joensuunkatu 7 | FI-24100 Salo |Finland
Office +358 2 727 7700 | Fax + 358 2 727 7720 | info@nordicid.com                                                                                                                                 3 / 21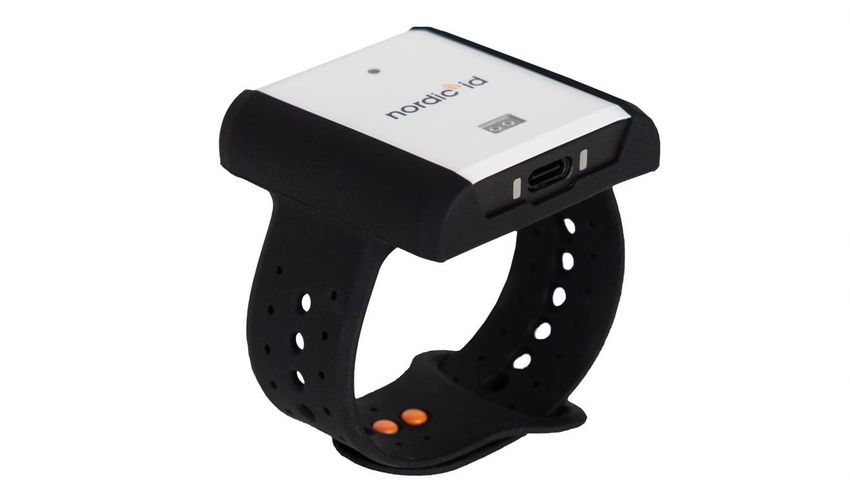
2021-05-31
                                                                                 Nordic ID EXA21 User Guide
                                                                                                 Version 1.2

           GETTING STARTED
    1.1. GENERAL
       Nordic ID EXA21 provides UHF RFID reader capabilities for host devices, such as smartphones, tablets or
       computers; Android, iOS or Windows 10. Nordic ID EXA21 is used with the host devices via Bluetooth®
       Low Energy wireless technology.

    1.2. AVAILABLE VARIANTS
       Nordic ID EXA21 is available in 2 different variants:

         CODE                   FREQUENCY

         IWC00001               868MHz (ETSI)

         IWC00002               915MHz (FCC)

    1.3. AVAILABLE ACCESSORIES
         CODE                   DESCRIPTION

         ACN00183               Wall adapter QuickCharge3 USB Type-C Kit EU_UK_US

         ACN00185               Nordic ID EXA21 Wrist Strap S-size

         ACN00187               Nordic ID EXA21 Wrist Strap L-size

         ACN00196               Nordic ID EXA21 4-Bay Desktop Charger Kit EU

         ACN00197               Nordic ID EXA21 4-Bay Desktop Charger Kit UK

         ACN00198               Nordic ID EXA21 4-Bay Desktop Charger Kit US

         ACN00207               Nordic ID EXA21 Flex Holder

         ACP00097               Quad Lock Universal Adaptor v1

    1.4. PACKAGE CONTENT
       Nordic ID EXA21 package contains following items
       •       Nordic ID EXA21
       •       Safety and regulations card

Nordic ID Group | Joensuunkatu 7 | FI-24100 Salo |Finland
Office +358 2 727 7700 | Fax + 358 2 727 7720 | info@nordicid.com                                      4 / 21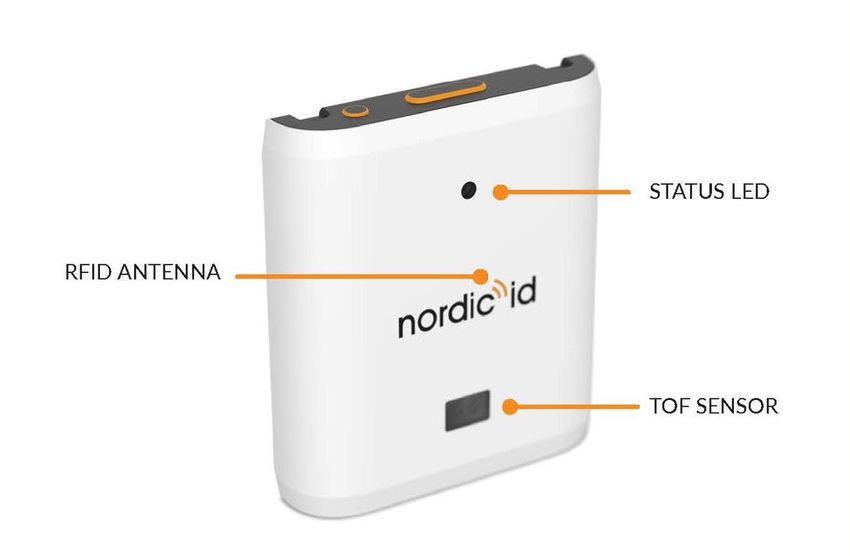
2021-05-31
                                                                                     Nordic ID EXA21 User Guide
                                                                                                     Version 1.2

    1.5. FEATURES OVERVIEW

                                    Picture 1. Key features of Nordic ID EXA21 (back cover)

                                Picture 2. Key features of Nordic ID EXA21 (front cover)

                                    NOTE! When holding the Nordic ID EXA21 device, please
                                              avoid covering it with the hand.

Nordic ID Group | Joensuunkatu 7 | FI-24100 Salo |Finland
Office +358 2 727 7700 | Fax + 358 2 727 7720 | info@nordicid.com                                         5 / 21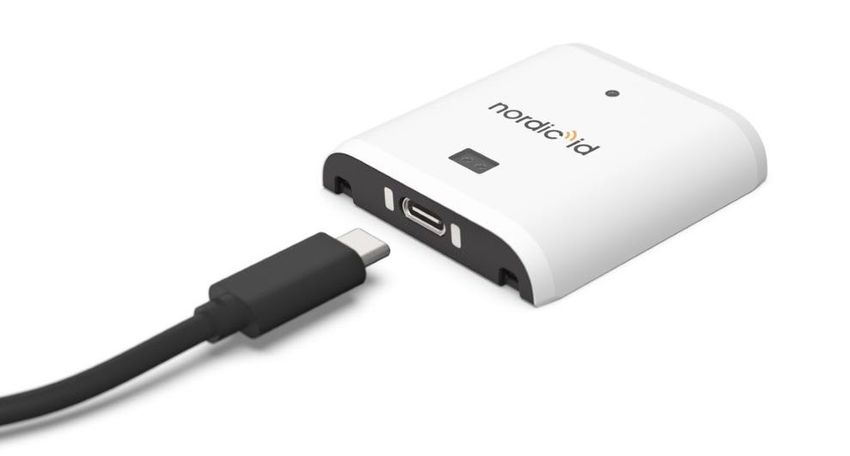
2021-05-31
Nordic ID EXA21 User Guide
Version 1.2
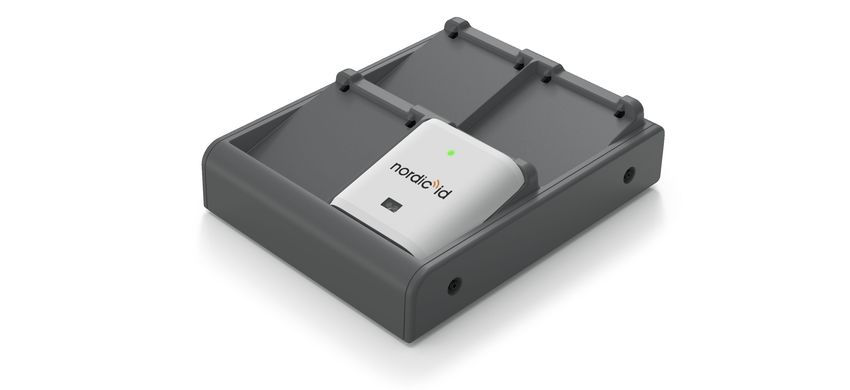
1.6. CHARGING
Nordic ID EXA21 can be charged via USB charger. Charging time from 0 to 100 % is about 2 hours, and 70-
80 % is reached after only 1 hour. The USB charger needs to have a USB-C connector and the
recommended charging power is at least 2.5 W (5 V @ 500 mA).
The Nordic ID EXA21 desktop charger can also be used to charge up to 4 Nordic ID EXA21 devices
simultaneously.
Charging state is indicated by red LED. Please see section 3.4 for information how the LED functions in
different situations.
Picture 3 Charging Nordic ID EXA21 via USB-C charger
NOTE: The USB-C charger is sold separately by Nordic ID.
See section 1.3
Picture 4 Charging Nordic ID EXA21 via 4-bay desktop charger
NOTE: The Desktop Charger Kit is sold separately by Nordic ID.
See section 1.3
Nordic ID Group | Joensuunkatu 7 | FI-24100 Salo |Finland
Office +358 2 727 7700 | Fax + 358 2 727 7720 | info@nordicid.com 6 / 21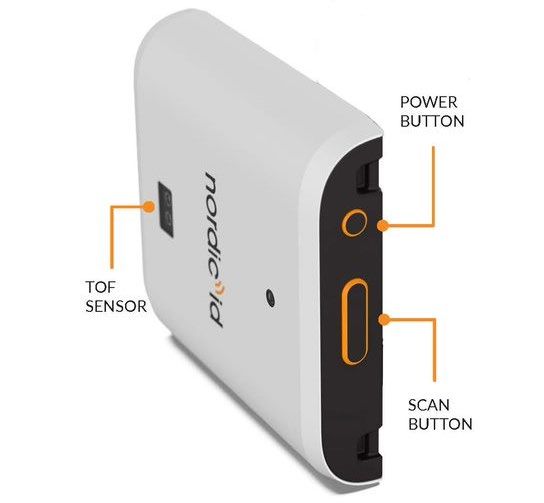
2021-05-31
                                                                                         Nordic ID EXA21 User Guide
                                                                                                         Version 1.2

    1.7. FASTENING
       Nordic ID EXA21 can be fastened with several methods. More accessories for other fastening and wearing
       methods will be included in next versions of this guide.

              QUAD LOCK® FASTENING

       The Quad Lock fastening is a popular and easy-to-use fastening system. The Quad Lock fastening system
       provides strong and secure fastening and is suitable for different kind of host devices. Please visit Quad
       Lock web pages for more information about different adapters.

       Fastening of Nordic ID EXA21 with the Quad Lock is easy. The first step is to attach a Quad Lock adapter
       on the back cover (black side) of Nordic ID EXA21. The second step is to fasten Nordic ID EXA21 with Quad
       Lock mount wherever needed.

                                  NOTE! Quad Lock® universal adaptor is sold separately
                                                   See section 1.3

              WRIST STRAP

       As a wearable device, using the Nordic ID EXA21 wrist strap, the device can be worn as a watch, allowing
       hands free usage.
       The wrist strap is available in two sizes: S (length 236mm) and L (length 288mm).

                                            Picture 5 Nordic ID EXA21 with wrist strap

                                     NOTE! The wrist strap is sold separately by Nordic ID.
                                                       See section 1.3

Nordic ID Group | Joensuunkatu 7 | FI-24100 Salo |Finland
Office +358 2 727 7700 | Fax + 358 2 727 7720 | info@nordicid.com                                             7 / 21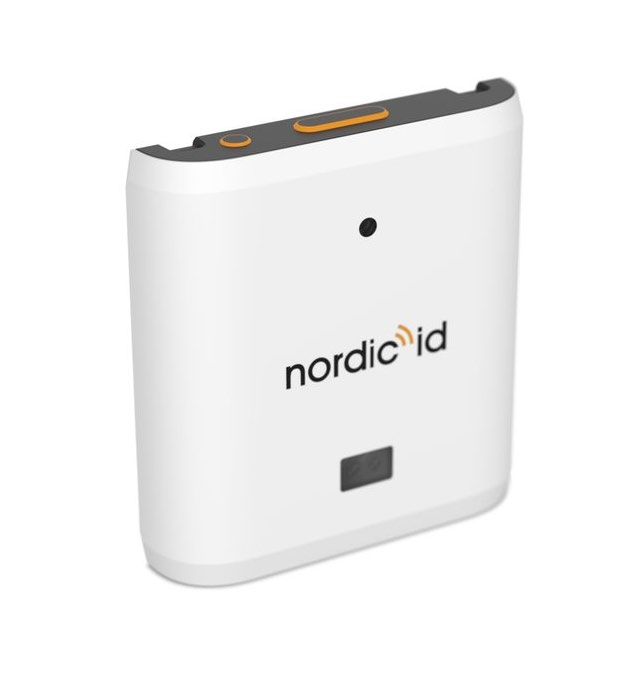
2021-05-31
                                                                                       Nordic ID EXA21 User Guide
                                                                                                       Version 1.2

              FLEX HOLDER

       The Nordic ID EXA21 can also be attached to mobile devices, such as smartphones, tablets or mobile POS;
       or on fixed surfaces, such as desks or walls.
       This silicon holder enables flexible usage of the Nordic ID EXA21, as you can easily detach the device from
       the mobile device and use it with the wrist strap or take it out from a desk to hold it with your hand. The
       holder will remain attached to the mobile device or fixed surface using the pre-applied double tape
       adhesive.
       It allows removing the device from its attached device or surface for charging it (with the wall charger or
       the 4-slots cradle), and it can also be detached for any other purpose such as sending it to support service,
       replacing a discharged unit or sharing it with workmates.
       Once the Nordic ID EXA21 is inside the holder, it hardly increases its size, being 57.22 x 54.26 x 13.63 mm
       (Nordic ID EXA21 without holder is 55 x 52 x 11.5 mm).

                                              Picture 6 Nordic ID EXA21 Flex Holder

                                     NOTE! The flex holder is sold separately by Nordic ID.
                                                       See section 1.3

Nordic ID Group | Joensuunkatu 7 | FI-24100 Salo |Finland
Office +358 2 727 7700 | Fax + 358 2 727 7720 | info@nordicid.com                                            8 / 21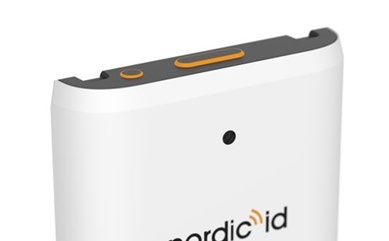
2021-05-31
                                                                                    Nordic ID EXA21 User Guide
                                                                                                    Version 1.2

         CONNECTIONS
       Nordic ID EXA21 supports Bluetooth Low Energy Class 2 and USB connections for host devices. Supported
       Bluetooth Low Energy versions are 4.0 – 5.0 and supported profiles are GATT (generic data transfer) and
       HID (keyboard emulation).

                          NOTE! Bluetooth Low Energy needs to be supported by host device

       If the Nordic ID EXA21 is powered on but not connected to any host device, it goes to sleep mode after 90
       seconds.
       Whilst the Nordic ID EXA21 is connected to a host device, it is always on, it never goes to sleep mode.

    2.1. CONNECTING WITH HOST DEVICE
       There are four ways to connect Nordic ID EXA with host device, being the third one (Nordic ID Smart Pair)
       the most advanced and easiest way to connect wirelessly.
            1. Connect without pairing via Bluetooth
               Nordic ID EXA21 will advertise itself via Bluetooth allowing the host device to connect. Bluetooth
               connection remains active until the host device closes the connection. Once the connection is
               closed Nordic ID EXA21 will start advertising again and allowing any host device to connect.
               Most applications will not require pairing with the host device. Without pairing, Nordic ID EXA21
               can be connected to any host device which can see its advertisement. When Nordic ID EXA21
               disconnects from host device, other host devices are available to connect as long advertisement is
               seeing from the Nordic ID EXA21.

            2. Connect with pairing via Bluetooth
               Pairing Nordic ID EXA21 with a specific host device increases security by preventing other hosts
               to connect to the paired Nordic ID EXA21. When paired, applications (like Nordic ID RFID Demo)
               connect to the device automatically. The connection remains active as long the host device is in
               Bluetooth range.

            3. Connect with Nordic ID Smart Pair feature
               The awesome Nordic ID Smart Pair feature provides an exceptionally easy way to connect and
               disconnect host device to our EXA readers. Just select “Nordic ID Smart Pair” from “Connection”
               listing in Nordic ID RFID Demo and host device starts looking for the EXA readers.
               Smart Pair works only when EXA is not paired.

            4. Connect via USB
               The Nordic ID EXA21 can connected with the host using USB-C type data cable. When connected,
               Bluetooth advertising stops and the blue led is continuously on. Advertising starts again when the
               USB cable is removed.

Nordic ID Group | Joensuunkatu 7 | FI-24100 Salo |Finland
Office +358 2 727 7700 | Fax + 358 2 727 7720 | info@nordicid.com                                           9 / 21
2021-05-31
Nordic ID EXA21 User Guide
Version 1.2
2.2. PAIRING
By default, pairing support is disabled from the Nordic ID EXA21 settings.
To enable pairing support using Nordic ID RFID demo, connect the Nordic ID EXA21 to host device and
go to Settings Reader Host device connection check “Enable pairing” tick box.
For easy pairing with the same host running the Nordic ID RFID Demo, you can press the “Pair” button in
that same screen.
Once paired, the Nordic ID EXA21 is continuously connected to the paired device and other host devices
cannot connect to the Nordic ID EXA21 until it is unpaired.
In firmware versions older than 4.x.x, a passcode (by default, the 6 last digits of the device serial number)
was required to pair the Nordic ID EXA21.
NOTE! When trying to establish a Bluetooth pairing, if the “Enable pairing” setting is
disabled in the Nordic ID EXA21, it may lead to an unnormal behaviour
2.3. UNPAIRING
Use the Nordic ID RFID Demo app (in the paired host device) Settings Reader Host device connection
and press “Unpair” button. Unpairing process clears the pairing information from the EXA21 and from the
host device.
Unpairing manually from EXA21
• Press “Scan“ button down and then “Power” button down and keep at least 3 second until device
beeps three times. Then pairing is cleared and device reboots.
• Remember to clear pairing information from the host device too. (SettingsBluetoothPaired
devices)
iOS devices typically prompt “pairing request” message box if pairing is enabled in Nordic ID EXA21 (as
explained in 2.2). In case pairing is not needed, the user can press “cancel” button and the device connects
without pairing. If the iOS device is going to be used without the pairing, please disable pairing support and
then the “pairing request” prompt won’t appear anymore.
2.4. CONNECTING WITH NORDIC ID SMART PAIR FEATURE
When using a Nordic ID EXA21 reader with a smartphone, both the Nordic ID EXA21 reader and your
smartphone are always close to each other while being used. Nordic ID Smart Pair is aware of this and thus
it establishes the connection only when they are close to each other.
• Connecting: One can connect the host device to the EXA reader just by placing host device close to
the EXA reader.
• Disconnecting will be done by pressing Power and Scan buttons simultaneously 3 seconds (LED
stops blinking).
The Nordic ID Smart Pair feature is always enabled in Nordic ID RFID Wear OS app.
Nordic ID Group | Joensuunkatu 7 | FI-24100 Salo |Finland
Office +358 2 727 7700 | Fax + 358 2 727 7720 | info@nordicid.com 10 / 212021-05-31
Nordic ID EXA21 User Guide
Version 1.2
USING THE DEVICE
Nordic ID EXA21 has one sensor (ToF) and two physical buttons for user interactions: Scan button and
Power button. Location of the buttons and ToF sensor can be seen in Picture 6.
Picture 6 Location of the buttons
3.1. POWER BUTTON
Quick press of power button turns reader On/Off when no host connection. The power button is disabled
when Nordic ID EXA21 has an active connection with the host device. In that case, only key notifications
will be sent to host.
Reader can be restored to factory defaults by keeping power button down at least 5 seconds when no
active host connection. See section 3.7.
NOTE! If device is not responsive, hardware reset can be forced by pressing
and keeping power button down until device reboots (~5 sec)
3.2. SCAN BUTTON
The scan button is located at the top of the reader. It can be used to start/stop UHF RFID scanning.
Depending on the application in use, the trigger button starts/stops UHF RFID reading. By default, the first
press of the button starts the reading and the second press of the button stops it.
Nordic ID Group | Joensuunkatu 7 | FI-24100 Salo |Finland
Office +358 2 727 7700 | Fax + 358 2 727 7720 | info@nordicid.com 11 / 212021-05-31
Nordic ID EXA21 User Guide
Version 1.2
3.3. TOF SENSOR
The ToF (Time-Of-Flight) sensor is located on the front side of the reader. It is used to trigger UHF RFID
scanning instead of using the Scan button. ToF mode is disabled by default. When enabled, the ToF sensor
sends an artificial light signal. UHF RFID scanning is automatically performed while any item interrupts this
signal, e.g., an object or your finger is placed in front of the sensor. Once the item disappears from the
sensor line of sight, UHF RFID scanning stops.
Enable and play with ToF sensor using Nordic ID RFID Demo in Android Settings Sensor
Nordic ID Group | Joensuunkatu 7 | FI-24100 Salo |Finland
Office +358 2 727 7700 | Fax + 358 2 727 7720 | info@nordicid.com 12 / 212021-05-31
Nordic ID EXA21 User Guide
Version 1.2
3.4. STATUS LED
Nordic ID EXA21 has one multicolour LED for user indications. Location of the LED can be seen in Picture
77.
Picture 7 Location of Status LED
Blue, blinking slow
Device advertising, not paired yet Red, stable
Blue, blinking fast Charging
Paired, no BLE connection Red, blinking slow
Blue, stable Low battery (2021-05-31
Nordic ID EXA21 User Guide
Version 1.2
3.7. FACTORY DEFAULTS
The Nordic ID EXA21 can be restored to factory defaults by keeping power button down at least 5
seconds when no active host connection.
Factory defaults:
• Pairing disabled.
• Secure passkey to default (6 last digits of serial number)
• RFID HID mode disabled
• ToF sensor disabled.
• ToF Range filter threshold values to default.
3.8. HARDWARE RESET
If the device is not responsive, hardware reset can be forced by pressing and keeping power button down
until device reboots (~5 sec).
3.9. HID RFID MODE
In HID mode, the Nordic ID EXA21 functions and communicates in a similar manner as a keyboard.
Therefore, the device will work with any application that supports an active cursor on input fields, for
example web browser applications. This mode works both when connecting to host via Bluetooth or when
connecting via USB.
Practical usage is to bring tag over the EXA21 ToF (Time-of-Flight) sensor for activating reading. The
Nordic ID EXA21 emits beep sound after successful read and push result (EPC of tag) into the HID channel
as keystrokes.
• Enable RFID HID mode using Nordic ID RFID Demo SettingsHID RFID support “Enable HID
RFID”
• Enable ToF sensor using Nordic ID RFID DemoSettingsSensor “Enable ToF” (see section 3.3)
Alternatively, from firmware version 4.x.x on, the RFID HID mode can also be enabled/disabled using long
pressing (5 seconds) the SCAN physical button while device is turned off.
• Change from normal mode to HID mode is indicated by blinking LED in blue. Pairing is automatically
enabled in this mode.
• Change from HID mode to normal mode is indicated by blinking LED in green.
HID MODE VIA BLUETOOTH
When operating in HID mode via Bluetooth, the Nordic ID EXA21 needs to be paired with the host device
and USB data cable must not be plugged. However, USB charge cable is allowed.
NOTE! When the Nordic ID EXA21 is configured for HID mode via Bluetooth, you may need to
reconnect after using non-HID applications (such as Nordic ID RFID Demo). This will enable the HID
mode again. The easiest way to do this is turn off/on Bluetooth of host device.
Nordic ID Group | Joensuunkatu 7 | FI-24100 Salo |Finland
Office +358 2 727 7700 | Fax + 358 2 727 7720 | info@nordicid.com 14 / 212021-05-31
Nordic ID EXA21 User Guide
Version 1.2
NOTE! HID operation via Bluetooth can be very slow and it’s not useful for cases where need to read
and transfer high amount of tags (> 5).
Also, accuracy of HID output may vary between host devices.
HID MODE VIA USB
Connecting USB data cable between the Nordic ID EXA21 and the host device, overrides Bluetooth
communication. USB HID is faster and more reliable compared to Bluetooth.
NOTE: If you had previously installed any Nordic ID software or drivers in your computer, the Nordic ID
EXA21 could be not detected as a keyboard in the PC, but as “NUR” in “Other devices”. In this case, you will
need to uninstall the NUR driver (Device manager -> Ports (COM & LPT)). After this, unplug the cable from
EXA21, connect it again and it will appear as a keyboard.
READING RFID TAGS
• The reading process is triggered by pressing Scan button or bringing tag over ToF sensor.
• Green led indicates reading in progress.
• The Nordic ID EXA21 read tags and transmits EPC of tag once into HID. Short beep when new tag(s)
are found.
• When releasing trigger (2nd push of Scan button or removing item from ToF sensor), the reading
process stops and Blue led is continuously on.
Nordic ID Group | Joensuunkatu 7 | FI-24100 Salo |Finland
Office +358 2 727 7700 | Fax + 358 2 727 7720 | info@nordicid.com 15 / 212021-05-31
Nordic ID EXA21 User Guide
Version 1.2
SOFTWARE
Nordic ID has taken an open source SW development approach in use with Nordic ID EXA21. Nordic ID
provides the SDK along with the examples through the GitHub. Nordic ID EXA21 supports powerful NUR
API so developers can use familiar NUR API for application development.
4.1. NORDIC ID RFID DEMO APPLICATIONS
Nordic ID provides feature rich yet easy-to-use RFID demo applications for iOS and Android platforms.
NORDIC ID RFID DEMO FOR ANDROID
Nordic ID RFID demo application for Android supports Android 5.0 and newer versions. The Nordic ID
RFID demo application is available from the Google Play store.
NORDIC ID RFID DEMO FOR IOS
Nordic ID RFID demo application for iOS supports iOS 9 and newer versions. The Nordic ID RFID demo
application is available from the Apple App store.
NORDIC ID KEYBOARD AND WEDGE SERVICE
Nordic ID Keyboard and Wedge service applications do provide wedge functionality for Android devices.
Android 5.0 and newer versions are supported.
Nordic ID Keyboard Nordic ID Wedge service
NORDIC ID SMART WEAR APP
Nordic ID Smart Wear app for smartwatches supports Android Wear 2.0 or Wear OS 1.0 and newer
versions. The Nordic ID RFID Smart Wear app is available from the Google Play store.
Nordic ID Group | Joensuunkatu 7 | FI-24100 Salo |Finland
Office +358 2 727 7700 | Fax + 358 2 727 7720 | info@nordicid.com 16 / 212021-05-31
Nordic ID EXA21 User Guide
Version 1.2
4.2. APPLICATION DEVELOPMENT
NUR API IN GENERAL
NUR API is an application programming interface for Nordic ID UHF RFID module. It provides control for
all Nordic ID UHF RFID readers. The NUR API provides compatibility between Nordic ID UHF RFID reader
from RFID functions perspective. The NUR API consists of application, NUR API, transport and HW layers
as depicted in Picture 8.
APPLICATION
NUR API (C/C++, .NET and Java)
Transport layer: TCP, serial port, USB and Bluetooth Low Energy
Android devices: TCP, Bluetooth Low Energy and USB OTG
iOS devices: Bluetooth Low Energy
DEVICES CONTAINING NORDIC ID NUR MODULE:
All Nordic ID UHF RFID readers
(even proprietary implementation using Nordic ID NUR modules)
Picture 8 NUR API architecture
APPLICATION DEVELOPMENT KIT
Nordic ID provides Software Development Kits (SDK) and code samples via GitHub for Android, iOS and
Windows 10:
https://github.com/NordicID/
The Software Development Kits provide development basics for Nordic ID EXA21. Samples utilizing the
Android, iOS and Windows 10 specific accessory extension used with Nordic ID EXA21 are available from
GitHub as well (includes e.g. RFID HID). Samples utilizing NUR API in general are available for Android, iOS
and Windows 10 (includes RFID generic operations such as write, locate etc.).
Nordic ID Group | Joensuunkatu 7 | FI-24100 Salo |Finland
Office +358 2 727 7700 | Fax + 358 2 727 7720 | info@nordicid.com 17 / 212021-05-31
Nordic ID EXA21 User Guide
Version 1.2
More information including source code and samples can be found from GitHub via:
https://github.com/NordicID/nur_nurapi_android
https://github.com/NordicID/nur_sample_android
https://github.com/NordicID/nur_tools_rfiddemo_android
https://github.com/NordicID/nur_sample_ios
https://github.com/NordicID/nur_sample_windows/tree/master/Win10_UWPSample
https://github.com/NordicID/nur_sample_windows
https://github.com/NordicID/rfiddemo_xamarin
Nordic ID Group | Joensuunkatu 7 | FI-24100 Salo |Finland
Office +358 2 727 7700 | Fax + 358 2 727 7720 | info@nordicid.com 18 / 212021-05-31
Nordic ID EXA21 User Guide
Version 1.2
4.3. FIRMWARE UPDATE
Firmware of Nordic ID EXA21 can be updated by using Nordic ID RFID Demo application in Android,
“Updates” option in main menu.
When firmware update is started, the device goes in DFU mode.
REGIONAL SETTINGS
Nordic ID UHF RFID readers do support operating frequency range between 860 - 960MHz. Some of the
readers do cover full operating frequency band and some of them have two sub bands that are 868 ETSI
band (865.6 - 867.6 MHz) and 915 FCC band (902 - 928 MHz). Regional organizations as ETSI and FCC
have set rules and requirements for operating frequencies, output power and other RF parameters for the
UHF RFID readers to comply local regional requirements. See variants in section 1.2.
Nordic ID has created set of regional settings in order to fulfil local regulations. Nordic ID is required to
ensure compliance of Nordic ID products will remain after production. Solution for this is products
including UHF RFID functionality will be set and locked in production based on customer order e.g. if a
product is ordered to Europe, it will be locked to ETSI region. And for example, if a product is ordered to
Australia region, then it’s locked to Australia region. When a product is locked to individual region, it will
comply local regulations of the region.
Nordic ID Group | Joensuunkatu 7 | FI-24100 Salo |Finland
Office +358 2 727 7700 | Fax + 358 2 727 7720 | info@nordicid.com 19 / 212021-05-31
Nordic ID EXA21 User Guide
Version 1.2
SERVICE AND SUPPORT
For technical enquiries regarding Nordic ID devices or software development, please contact our Technical
Support:
E-mail: support@nordicid.com
Telephone: +358 2 727 7790
As a manufacturer, Nordic ID stands responsible for providing repair services for its devices during and
after the warranty period. Together with partners Nordic ID serves customers globally. When your Nordic
ID device needs repair, always use Nordic ID Service or our authorized service partners. We want to make
sure that your Nordic ID product serves you the best possible way, and by using our preferred service
partners the quality of the service is trustworthy and the spare parts are original. This way the existing
product warranty remains, and you receive a 3-month service warranty for the repaired devices.
Nordic ID works together with full support and primary support partners. Full support partners can handle
both warranty and non-warranty repairs on behalf of Nordic ID in their own regions. In addition, Nordic ID
has a network of smaller repair centres, primary support partners, who offer the first line of support to
their customers locally.
For any enquiries about Nordic ID repair service please contact:
E-mail: service@nordicid.com
Telephone: +358 2 727 7791
WARRANTY
Nordic ID warrants that the Products are at the time of delivery free from defects in materials and
workmanship, provided the Products remain unmodified and are operated under normal and proper
conditions. Warranty period is the longer of twenty-four (24) months from the date of delivery in case the
Customer is end-customer or twenty-seven (27) months from the date of manufacture in case the
Customer is reseller. Spare parts are warranted against defects in workmanship and materials for a period
of ninety (90) days from the date of delivery to Customer.
For more detailed information about the warranty can be found from Nordic ID Sales Terms.
RELATED DOCUMENTS AND CONTENT
• Nordic ID EXA21 datasheet
• Nordic ID EXA21 Quick Guide
• Nordic ID Safety and Regulations Guide
• Nordic ID GitHub account for developers (https://github.com/NordicID)
Nordic ID Group | Joensuunkatu 7 | FI-24100 Salo |Finland
Office +358 2 727 7700 | Fax + 358 2 727 7720 | info@nordicid.com 20 / 212021-05-31
Nordic ID EXA21 User Guide
Version 1.2
ABOUT NORDIC ID
Nordic ID is at the centre of today’s real-time item tracking and reliable RFID technology. We help
organizations fight the damaging effects of item loss, facilitate streamlined business procedures, and stay
ahead of the competition.
We are ready to help you take advantage of our wide range of products and services designed to fit your
needs. Contact us now, and we will help you to tackle your challenges and get your business to the next
level.
Nordic ID Group
Salo IoT-center
Joensuunkatu 7
FI-24100 Salo
FINLAND
tel. +358 2 727 7700
fax +358 2 727 7720
www: www.nordicid.com
E-mail: info@nordicid.com
VERSION HISTORY
Version Date Modifications
1.0 01.04.2019 The first version
1.1 23.01.2020 Added HID, Pairing, ToF, accessories.
Updated LEDs and buttons behaviour.
1.2 31.05.2021 HID mode enabled/disabled using physical
button, pairing with PIN removed, LED
indications changed, added flex holder
accessory, more links to GitHub
Nordic ID Group | Joensuunkatu 7 | FI-24100 Salo |Finland
Office +358 2 727 7700 | Fax + 358 2 727 7720 | info@nordicid.com 21 / 21You can also read