Navy Drug and Alcohol Deterrence Program 2022 Guide 6 Support Programs
←
→
Page content transcription
If your browser does not render page correctly, please read the page content below

Navy Drug and Alcohol
     Deterrence Program
            2022
____________________________

           Guide 6

      Support Programs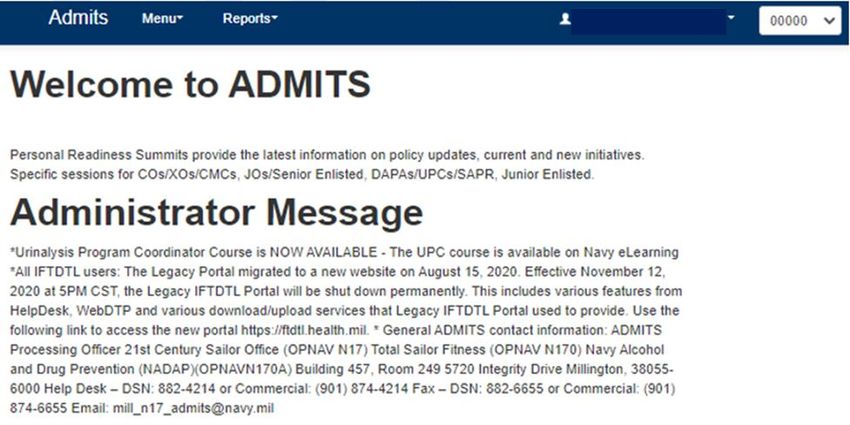
Table of Contents
Guide 6 – Support Programs                                                                Page
1. Internet Forensic Toxicology Drug Testing Laboratory Portal (iFTDTL)                   3

2. Alcohol and Drug Management Information Tracking System (ADMITS)                       12

3. Drug Testing Program Lite (DTPLITE) V6.X                                               31

4. Web Drug Testing Program (WebDTP)                                                      44

5. Navy Drug Screening Program (NDSP)                                                     52
Internet ForensicToxicology Drug Testing Laboratory Portal (iFTDTL)

                                                                              2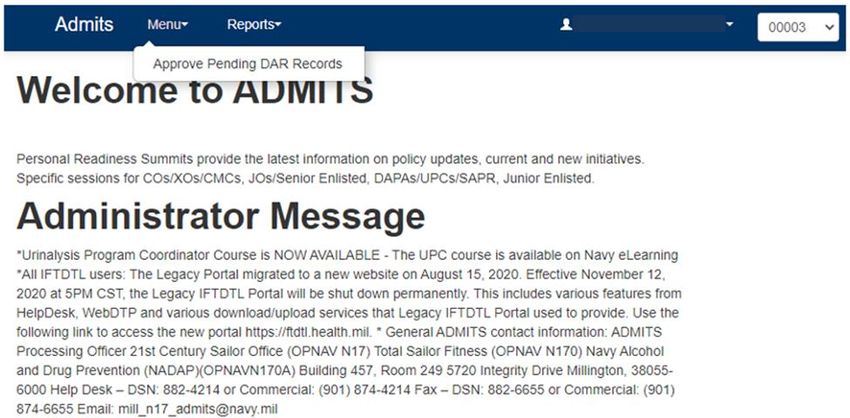
Guide 6 – Support Programs
1. Internet Forensic Toxicology Drug Testing Laboratory Portal (iFTDTL). iFTDTL is a
web-based system, operated by Department of Defense (DOD) that is the primary means of
reporting urinalysis results. Each command is responsible for tracking their urinalysis results,
drug positives, and discrepancies for all samples submitted for testing.

   a. Account Request Instructions: Accounts are given to individuals based on written
permission from the UIC’s Commanding Officer or echelon 2/3 Alcohol and Drug Control
Officer (ADCO).

    b. Accessing the iFTDTL Portal: Security settings may interfere with access to the
iFTDTL portal. Ensure TLS 1.0 is the only protocol checked. Use the following steps in
Internet Explorer to verify security settings:

Note: Google Chrome or Microsoft Edge are the recommended browsers. Other web browsers
may impact some functions within the portal.

       (1) Tools

       (2) Internet Options

       (3) Advanced

       (4) Under Settings Security, scroll down and look for:

                                                3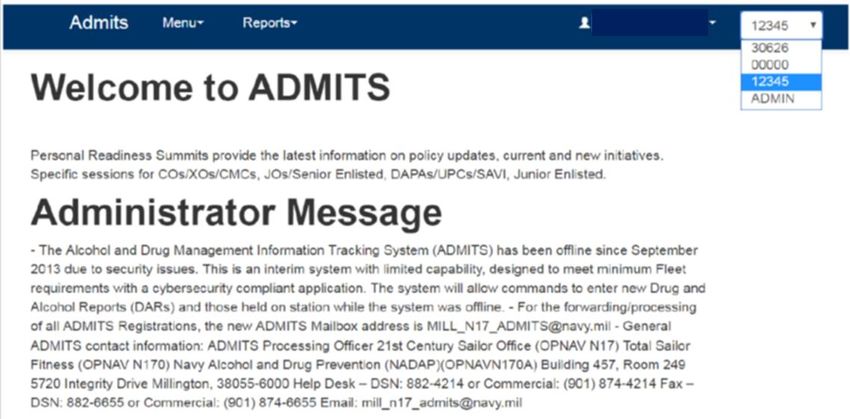
Select "APPLY"," OK" and then go to the iFTDTL web-site: https://ftdtl.health.mil

   c. Requesting an iFTDTL Account:

        (1) To access iFTDTL go to https://ftdtl.health.mil (add it to your favorites). New Users
are required to only use the iFTDTL SAAR form found under the “Getting Started” dropdown
“New User Guide” on the portal.

                                                4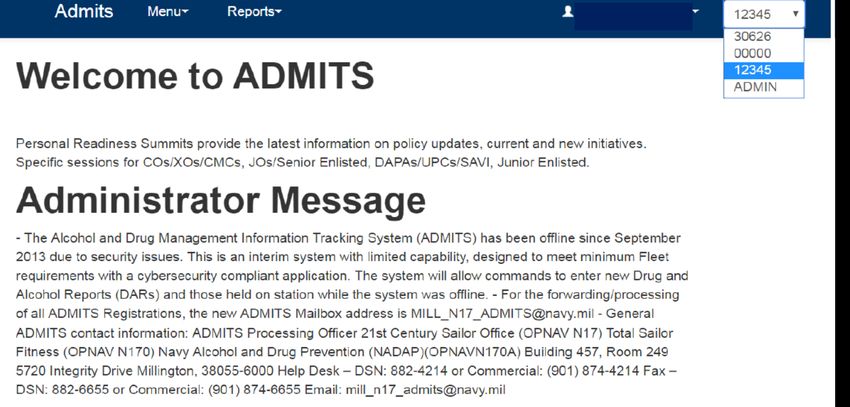
(2) Directions for correctly completing the iFTDTL SAAR are available at the Navy
Drug Detection and Deterrence Website https://www.mynavyhr.navy.mil/Support-Services/21st-
Century-Sailor/Drug-Detection-Deterrence/IFTDTL/ under iFTDTL SAAR Instructions.

        (3) Access the Portal. Click the New User link to start the new user registration process.
Enter the required information as denoted by the red asterisks. Upload the iFTDTL SAAR to
complete registration. Click the “Register” button, a “Thank You” message will pop up and a
"Back to Login" button will appear. Exit the portal.

       (4) E-mail a copy of your cyber awareness certificate to mill_dtadmin@navy.mil.

Note: It is required for all iFTDTL SAAR forms to be signed digitally in order for request to
be processed.

   d. Account Confirmation:

       (1) Access iFTDTL at https://ftdtl.health.mil (add it to your favorites). New Users are
required to download the IFTDTL SAAR from the portal and complete it using the instructions

                                                5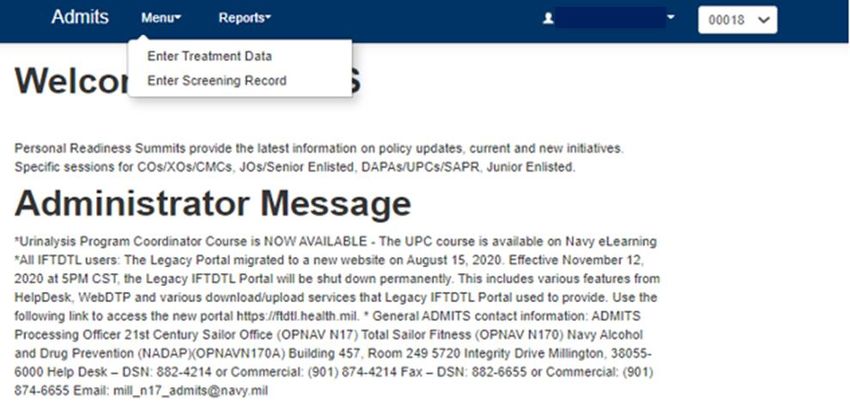
found on the Navy Drug Detection and Deterrence Website and upload the form into the Portal
as part of the registration process.

       (2) Email a copy of the completed SAAR along with Cyber Awareness certificate their
Command Access Card (CAC) with iFTDTL on first log in. If assistance with iFTDTL is
needed, contact the iFTDTL Help Desk at (901) 874-2458 or mill_dtadmin@navy.mil.

        (3) Once account request is process by the staff, User will receive an automated email
notification that their account is enabled.

                                 Click the “I Agree” box, then
                                     the CAC Login button

   e. How to review your urinalysis results: When you receive an e-mail notification from
iFTDTL reporting you have test results, log into the iFTDTL portal. https://ftdtl.health.mil. The
iFTDTL Portal will appear.

       (1) Click "I Agree"

       (2) Click "CAC Login"

       (3) Go to “My Modules”

       (4) Select "Results Portal" from the drop down menu

                                                6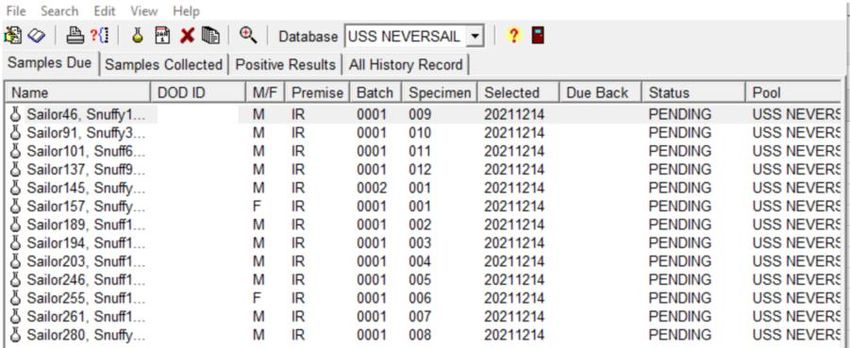
Note: Whenever the UPC selects the "New Drug Testing Results," and views results, those
results will become marked as “viewed” and will no longer be viewable under "New Drug
Testing Results".

       (5) Select “Results” accordion and click the “+” to drop down to see results report
options.

   f. New Test Results: To first assess your command testing results, click “New Drug
Testing Results” link.

                                                7
(1) Choose “New Report” from the Report Type drop down menu.

(2) Type in the RRU that you want to view results.

(3) Click the “Search” button to see the results.

(4) To view a different RRU, click the “Reset” and repeat steps 1 and 3.

                                                        New Report / Reprint
                                                          dropdown menu

(5) To Reprint past results, select Re-Print from the Report Type dropdown.

(6) Type in the RRU that you want to view results of.

(7) Enter Viewed Begin Date: (MM-DD-YYYY)

(8) Enter Viewed End Date: (MM-DD-YYYY)

(9) Enter Records per page (Example 100)

(10)   Click the “Search” button to see the results

                                          8
(11)    To view a different RRU, click the “Reset” and repeat steps 5 and 10.

Note: Results can be downloaded in Excel or PDF format.

   g. Ad Hoc Results. To see results previously viewed select the “Ad Hoc Results” link.
This report gives the user the ability to search for results by RRU, UIC, DODID, LAN, ARG and
more, allowing you to see test history for the current year plus two years.

While this report can be used in multiple ways, ensure that you have the proper dates selected.

       (1) Choose the date range that the samples were collected by the inputting the “Begin
Collection Date” and “End Collection Date”.

       (2) Type in the “UIC” of your command then click “Search” to generate report.

Note: Begin and End Collection Date are the dates the samples were collected at the command.

                                                9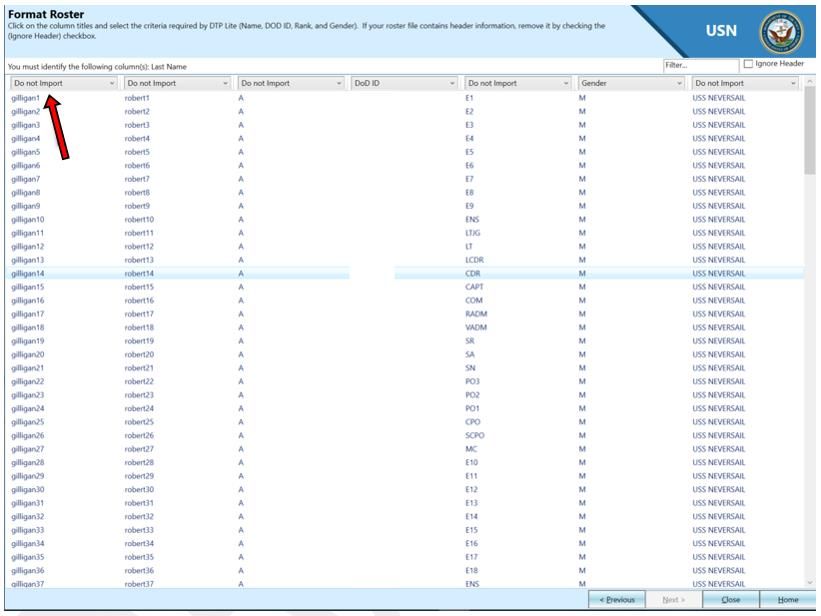
Begin and End Report Date are the dates the lab reported the results to iFTDTL. View Date is
the date that the results were viewed by someone with the permission to mark samples as
“Viewed”.

   h. Discrepancy Report: This report displays commands that have discrepancies on
samples received by the laboratory.

       (1) Click on “Discrepancy Report by RRU” link in the Query Laboratory Results section
located under the Results accordion.

       (2) Enter Begin Collection Date: (MM-DD-YYYY).

       (3) Enter End Collection Date: (MM-DD-YYYY).

Note: The collection date is the date on DD Form 2624

                                              10
(4) Begin Receive Date: (MM-DD-YYYY)
(5) End Receive Date: (MM-DD-YYYY)
Note: The Receive Date is the date the servicing lab received the specimen sample(s). This
date is not needed if searching by Collection Date only.
(6) Enter your command RRU in “My RRUs” box.
(7) To view a different RRU, click the “Reset” and repeat steps 2 and 5.
(8) Click the “Search” button to see the results.
Note: ADCOs have oversight over multiple commands to ensure that posted results are being
viewed and assist in resolving issues commands may have.
For additional information, please visit the Navy Drug Detection and Deterrence (DDD) website:
https://www.mynavyhr.navy.mil/Support-Services/21st-Century-Sailor/Drug-Detection-
Deterrence/IFTDTL/
Contact information:
iFTDTL Processing Office
Navy Drug Detection and Deterrence (NDDD) (OPNAV N173C)
BLDG 457 Room 249
5720 Integrity Drive
Millington, TN 38055-6000
Help Desk – DSN 882-2854 or Commercial: (901) 874-2854
Email: mill_dtadmin@navy.mil
11Alcohol and Drug Management Information Tracking System (ADMITS)
2. Alcohol and Drug Management Information Tracking System (ADMITS) ADMITS is a
web-based data system maintained by the Chief of Naval Operations (OPNAV N170A) and is a
central repository of alcohol and drug abuse incidents, screening data, treatment data, and
training information. DAPAs, ADCOs, UPCs, Commanding Officers/Officer’s in Charge, and
SARP Providers must use ADMITS in the execution of the OPNAVINST 5350.4 Series and the
OPGUIDE. Each command is responsible for tracking alcohol and drug related incidents,
command referrals, self-referrals, education and training, screening, and treatment.
a. Requesting an ADMITS Account
(1) Obtain and complete a System Authorization Access Request Navy (SAAR-N) form,
OPNAV 5239/14, available from the NAAP web site https://mynavyhr.navy.afpims.mil/Support-
Services/21st-Century-Sailor/NAAP/ (ADMITS page). Directions for correctly completing the
SAAR-N are also available at the NAAP website. All User Account Requests must include full
SSN for an ADMITS account to be created.
(2) The User Account Request must be signed by the CO/OIC, echelon 2/3 Commander,
or civilian director.
(3) All ADMITS account requests must be sent by digitally signed and encrypted email
to: MILL_N17_ADMITS@NAVY.MIL.
(4) Users will receive an email notifying them that the account has been created and
providing additional login instructions.
b. ADMITS new account and log in instructions
(1) All users must have and maintain an active BUPERS on line (BOL) account and must
log in every 30 days to prevent account from being suspended.
(2) To unlock a BOL account, follow direction on web site at
https://www.bol.navy.mil/bam/ or contact help desk at 1-800-951-6289 or
NPC_IT_Service_desk@navy.mil.
c. ADMITS login
(1) Log onto BUPERS ON-LINE: https://www.bol.navy.mil/bam.
(2) Select "ADMITS" link from Main menu.
12If you have received an email from ADMITS confirming your account has been created and the
ADMITS link is not listed in the BOL Main Menu please contact the ADMITS help desk for
additional assistance at (901) 874-4214, (DSN) 882, or MILL_N17_ADMITS@NAVY.MIL.
(3) Enter CAC pin when prompted.
(4) Example of ADMITS home Page display.
(5) Users with active accounts will be able to access Menu and Report navigation options
based on account privileges.
13d. Menu Tab Content
(1) Enter DAR Record (Command DAPA Only)
(2) Approve Pending Records (CO/OIC and DAR Approver)
(3) Enter Screening Record (SARP Provider)
(4) Enter Treatment Data (SARP Provider)
(a) Enter DAR Record
1. Select “Menu” tab
2. Select “Enter DAR Record”
Note: Ensure that you have selected the correct UIC for the member from your UIC list if you
have access to more than one UIC.
3. Enter the SSN for the member and select search.
4. Select “New Record” or “Edit” to edit a DAR that has not been approved.
5. If the member has more than one DAR entry a list will be displayed.
146. Edit DAR link will be present if the DAR is pending approval and can be
opened for editing.
7. Once a DAR has been approved it cannot be edited locally. Please contact the
ADMITS help desk for additional assistance for editing an approved DAR.
(b) DAR Data fields
1. Select the appropriate options from the drop down menu.
2. Date: Use Calendar Box or enter date of incident/referral
a. MM/DD/YYYY format
b. Incident date is the urinalysis collection date for a Drug positive result
c. Actual date of alcohol or drug referral/incident
15d. Cannot be a future date
3. Primary Substance: Select appropriate entry from list.
4. Incident info: Select appropriate entry from list
5. Frequency of Abuse: Select appropriate entry from list.
6. Method of Identification: Select appropriate entry from list.
167. Location Used: Select appropriate entry from list.
8. Incident Location: Select appropriate entry from list.
9. Comments: Enter comments about incident/referral, other statements as
deemed appropriate. Comments are limited to 1,485 total characters.
1710. Nature of incident: check box next to each option as appropriate.
11. Select “Save Report.” Saving the report will send to “Approve Pending DAR
Records” for approval.
(c) Approve Pending DAR Records. This option is only available to the CO/OIC or
individuals with DAR Approval Role in ADMITS.
1. Select UIC drop down to select UIC if user has multiple UIC’s
2. Select “Approve Pending DAR Records”
18(d) A complete list of all DAR pending approval will be displayed.
1. Scroll to locate appropriate member DAR
2. Select “View,” “Approve”, or “Delete.”
3. Selecting “View” will display the pending DAR (view only) in PDF format.
4. Selecting “Approve” will open a new dialog box prompting the CO/OIC to
enter their name and select the “Approve” box.
19Note: The CO/OIC’s name shall be entered when the approval authorization has been
delegated, not the name of the individual approving the DAR.
Note: DAR is now approved and there is no need to fax or email the document to NAAP.
5. Selecting “Delete” will remove the pending DAR from ADMITS. The DAR
is no longer retrievable.
d. Enter Screening Record (SARP User only)
(1) Select UIC From UIC list for the members UIC
(2) Select enter screening record from the Menu list
20(3) Select member from list. Only members with an approved DAR will be displayed.
(4) Select search
(5) Enter Screening Data by completing drop down options
21(6) Screening Date. Use Calendar Box or enter date of incident/referral
(a) MM/DD/YYYY format
(b) Should not be a future date
(c) Should not be a date prior to the DAR incident date
(7) Facility
22(8) Referral Reason
(9) Recommended Action
(10) Previous Education
23(11) Comments
(12) Save
e. Enter Treatment Data (SARP User Only)
(1) Select UIC from UIC list for the members UIC
(a) Select Enter Treatment Data from the Menu list
(b) Select member from display
24(c) Select Search
(d) Enter Treatment options from Drop list
(e) Type Program
(f) Treatment Completion Date
(g) Referral Source
25(h) Program Action
(i) Prognosis
(j) Facility
(k) Counselor
(l) Recommended Aftercare Action
26(m) Comments
(n) Save
e. Reports Tab Content
(1) Record Check
(2) Treatment Listing
(3) Screening Listing
(4) Incident Listing
(5) Urinalysis Specimen Details
(6) Urinalysis Specimen Receipt Summary
(7) DAR View/Print
27(8) Urinalysis History
(9) Urinalysis Specimen Summary Data
(a) Record Check
1. Select “Reports” tab
2. Select “Record Check”
3. Enter the member’s full SSN in the dialog box
Note: 9 digit SSN without dashes or spaces
4. Select “Submit”
5. The record check option will display the following
(b) Laboratory Positives
(c) Approved DAR
28(d) Screening
(e) Treatment
(f) Training
29Contact information:
ADMITS Processing Office
Navy Drug and Alcohol Deterrence (OPNAV N173C)
BLDG 457 Room 249
5720 Integrity Drive
Millington, TN 38055-6000
Help Desk – DSN 882-4214 or Commercial: (901) 874-4214
Fax-DSN 882-6655 or Commercial: (901) 874-6655
Email: MILL_N17_ADMITS@NAVY.MIL
30Drug Testing Program Lite (DTPLITE) V6.X
3. Drug Testing Program Lite (DTPLITE) V6.X. DTPLite is a standalone, workstation
hosted application that operates similarly to the Navy Drug Screening Program (NDSP)
application. The UPC will upload a roster and generate a test and print the same custody
documents as NDSP. However, DTPLite does not require a login to access the application
because it does not retain a history. Once the User closes the application, the test information is
automatically deleted. The User must upload a current roster each time the program is opened
and used. Once mandated, DTPLite is to be used “ONLY” when connectivity to WebDTP cannot
be established. It is not to be used in lieu of WebDTP for convenience. Users must save a copy
of the test generated by checking the box next to “DTP Selection Report”. This report is an
Excel file to be uploaded into WebDTP at a later date. The following steps will enable Users to
operate DTPLite correctly.
a. Double click on the DTPLite icon.
b. Select USN to activate Navy features within the application.
c. Select the location of the roster to Import. Make sure the Roster contains, at a minimum,
each column with Last Name only; First Name only, DODID and Organization (name of the
primary testing activity). Other column fields are highly recommend but not required to produce
31a test include: Middle initial, Rank/Rate and gender. Phone isn’t necessary since this is a
temporary function. Once you have a saved roster, ready to import, proceed using the next series
of screen shots. Activities with this program installed on systems connected to CANES are to
save their roster and program to the “F” drive, unless otherwise directed by local authority.
d. For this example, the roster is located in the Public folder on the system “C” drive.
3233
34
e. Click on “Do Not Import” and select the fields that correspond with the information
below it. Once all is selected, click “Next” to set up testing information.

                                              35
f. Input the Location Code and set up testing parameters. If testing by percentage, the value
enter will be the value produced. The application percentage is set to a default of 40 percent. The
roster in this demonstration has 200 names with the percentage set at 20 percent. The test will
produce 40 names. If the program is set to test by Total Number, whatever value entered that
36does not exceed 40 percent of the database will produce that number of names on the list. For
this information, testing was conducted by percentage.
37Note: If the command program is set to conducting four Random Samplings per month at 20
percent of assigned personnel, then for a command with 100 personnel assigned, set the
percentage at 5 percent each time a test is generated for a total of 20 percent for the month.
Remember, 20 percent is based on samples to the lab and tested.
g. For the example below, input testing activity UIC and command name as it appears in
plain language address (message) format for “Block 1” and TYCOM/ISIC information in “Block
2”. For Block 1, add contact email address in case the servicing lab needs to reach the
command.
h. Set the collection date, starting batch number and select products to print and save.
Create separate folders, by collection date and premise code, for each test event to avoid
overwrite. Save all items needed. Once the program is closed, no items can be reprinted. Make
sure to check the “DTP Selection Report” and save it. Upload into Web DTP when connection is
reestablished. Once finished, click Next.
38i. The next series of screenshots are document images saved.
39Notification Copy
Urinalysis Register
40DD Form 2624: “C6” code above the premise code identifies DTPLite was used, vice Wed
DTP. Do not send this form to the lab when using WebDTP and DTPLite. The UPC is to send
samples “ONLY”, unless accompanied with request to conduct specialized testing or to justify an
error to a bottle or on the bottle label(s).
41DD FORM 2624 (Backside): Must be printed or saved and edited using Adobe Pro. The form
cannot be edited within DTPLite.
422D Barcode Labels
DTP Selection Report: Upload into Web DTP once connection is established.
j. Once all actions are completed, close DTPLite and return to Tab D, Guide 3, for
43collection, packaging and transportation procedures.
Web Drug Testing Program (WebDTP
4. Web Drug Testing Program (WebDTP) is a web-based application that operates similarly
to the Navy Drug Screening Program (NDSP) application. The UPC will upload a roster,
generate tests and print the same custody documents as NDSP. WebDTP, like NDSP, currently
produces 1D barcode documents which the DD Form 2624(s) accompany the specimen samples
to the lab. However, WebDTP is transitioning to a 2D Barcode which will enable activities to
send specimen samples to the lab without the DD Form 2624(s). WebDTP will be the primary
Drug Testing Program application to be used. The UPC may use the available desktop
application when access to WebDTP is limited or not accessible. WebDTP users will not have to
mark samples as collected or positive/negative as all members are connected to the results portal
and their status is automatically updated. WebDTP access is for UPCs only and can be found
under “My Modules” within iFTDTL Portal. The following steps are to be followed to access
and use WebDTP. This is for general use and does not include newly added features after
release of this document. For questions, contact the support desk at (901) 874-4204, DSN (312)
882-4204 or email: mill_ndsp@navy.mil.
a. Access: UPC must register as a new user in iFTDTL Portal and email their IFTDTL
SAAR (Special SAAR Form) and a copy of their Cyber Awareness certificate to the iFTDTL
Support desk at mill_dtadmin@navy.mil, or NDSP/WebDTP support Desk via their respective
Alcohol and Drug Control Officer (ADCO).
b. Initial Setup: UPC must set up the Container parameters, in Manage Container, for
testing, then import roster to create the necessary Unit(s) and Pool(s) within WebDTP. Roster
can be taken from NDSP or produced locally. See steps below, including roster format.
(1) Export roster from NDSP or acquire from local Admin and save to the desktop
Log into iFTDTL Portal. Click on My Modules and select WebDTP
(2) If the Results Reporting Unit (RRU) doesn’t appear, click the up/down arrows to
reveal the RRU(s) and select the desired unit, then Open Container.
44c. Manage Container: UPC must set up testing frequency, Blocks 1 & 2 info, starting
batch number and chain of custody.
(1) Select Manage Container Tab: Check box below DD2624 Block 1 to lock in
information. Input Command information and UIC. Use of local phone number is highly
encouraged. Enter TYCOM/ISIC in block 2 (optional).
(2) Check the “Retest Carryover” to have members automatically added to the next test
event when they are in a “Carry Over” (Due Back) status. Leave blank to manually control
members being tested upon return.
(3) Input the number of Random Testing Days per month and input starting Batch
Number.
(4) Set up Chain of Custody.
(5) Click “Save” to save all changes.
Note: The percentage/total number option is available during the test selection. The system will
produce the exact number of Random Samplings requested as well as the exact percentage/total
number requested on each random test event. The system will produce additional test event if
“Check Random Testing Day” is selected beyond the desired amount.
45(6) Return to Testing Entity to Import Roster.
(7) From the Testing Entity Screen, click Import Roster, then “Choose File” and map
your way to the Roster.
Note 1: Ensure Roster is one of the following formats. xls; xlsx; or csv.
Note 2: Each Column is an individual field. The following columns are required: Last Name,
First Name, Initial, Rank, DODID/SSN, Unit Name, and Gender. During Import, select the
column containing DODID/SSN.
46(8) Select file and click “Open”, then “Load Roster”
Next Screen:
(9) Select the applicable options below “Load Roster” that apply. For Ignore Header,
WebDTP will automatically check the box if Header row exists.
- Check “Replace Roster with Import” for first time import and to replace any existing
information. Do not check if you are going to Append.
- Check “Append Import File to Roster” if only adding new information to the existing
pools/units currently in the WebDTP Container.
(10) Click “Do Not Import” above each column and select the corresponding title for
each column and click “Import This Roster.”
47(11) Once loaded successfully, look for green dialogue box with “Successful Imported
Roster”. Click “Close” and Member List will appear. Click “Testing Entity” which is the home
screen. All members are listed within the associated Unit(s) and/or Pool(s) and the system is
ready for use.
d. WebDTP Features: The following tabs within Testing Entity are to assist the User with
managing their program effectively.
(1) Member List: Displays all members listed in the Container and the Unit they are
associated with. There can be multiple Units within the Container. Other identifiers for each
member include, their DODID/SSN, Available Date if in a Carry Over status, Last Test Date;
Discrepancy/Retest status; Positive/Retest Status. From Member List, individual personnel can
be selected for various tests, including New Check-In testing and command wide testing from
this section. Also, UPC’s can add individual members to any unit from this screen. New Check-
In Pool is no longer necessary. Members can be exported via Excel or PDF.
(2) Blank Products: User can print blank custody forms and bottle labels with or without
Block 1&2 information.
(3) Manage Selections: User change the Collection Date; place members in Carryover
status with reason. Test can be canceled or member can be canceled. Reason needed. Select the
test generated and make the appropriate changes.
(4) Reporting: Section contains a variety of reports to assist the user in managing their
program.
(5) UNITS: This section contains the hierarchy Pools for selection. Multiple units can be
selected for testing during one test event. There are 5 tabs associated with this section.
(6) View Details: Select the desired Unit to view its details and make edits where
applicable.
(7) Members: Displays all members from the selected individual unit(s). From there,
user can add/delete members, apply Carry Over date, add member to Pool, generate tests, view
member details and make edits where applicable (name/rank change).
48(8) Selection: Generate Random/Unit Sweep/Sub-Unit Sweep testing.
(9) Import Roster: Allows import into the Unit or Pool sections. Roster must have the
exact same name of the Unit in one of the columns for organization.
(10) Deactivate: Use this to delete a Unit and its contents.
e. Pools: This section works much like the Pools section within NDSP. Sub-Pools from
NDSP are created here. UPC can only test one Pool at a time. However, the same member can
be added to multiple pools. This allows flexibility in creating various pools and testing. There
are five tabs associated with this section. Those with the same name as the Unit side, functions
in like manner in the Pools side.
(1) View Details: Select the desired Unit to view its details and make edits where
applicable.
(2) Members: Displays all members from the selected individual unit(s). From there,
user can add/delete members, apply Carry Over date, Add member to Pool, generate tests, view
member details and make edits where applicable (name/rank change).
(3) Selection: Generate Random/Unit Sweep/Sub-Unit Sweep testing.
(4) Deactivate: Use this to delete a Pool and its contents.
(5) Create: Create as many Pools as necessary.
f. Generate Test: From the Testing Entity Screen, click “Check Random Testing Day”
each day to see if it’s a test day. Do not check on days the activity does not intend to generate a
test. If the system says it’s not a testing day but the activity want to run a test anyway, use the
“Selection” tab under Units or Pools after selecting which unit(s) or Pool(s) to test. This
function will generate a random selection. It’s akin to Manually Choose Testing Days option in
NDSP.
(1) If it’s a Testing Day, Select the Unit or Pool to test from by clicking on the radial
button next to the corresponding Unit or Pool, then Selection above. Select the Premise code
49(IR/IO/IU), then the Collection Date. For IR, select Percentage or Number, then enter the value
for that specific test, and then click “Generate Selection List.
(2) Once members are listed, verify no changes to the members are required. If none,
click “Download Products” to retrieve documents to be printed.
(3) Follow guidance in “Barcode Management” below, regarding the use of 1D vs 2D
barcoded products to download.
50Note: For other type of tests, Click on Member List, then select the member(s) to be tested, then
click “Selection” for other available options.
g. Barcode Management
(1) 1D Barcoded custody documents (DD Form 2624) and bottles labels are used within
the Navy Drug Screening Program (NDSP) to accompany specimen samples to the lab.
(2) 2D Barcoded custody documents is used with DTPLite and WebDTP and is “never”
to be sent to the laboratory with specimen samples; nor shall 2D barcoded specimen bottles be
packaged with 1D barcoded specimen samples or handwritten bottle labels. Failure to comply
will result in specimen samples receiving a fatal discrepancy code (2F) which means samples
will not be tested. When using 2D barcoded documents/labels, only send a box of bottles to the
servicing lab (NO DD FORM 2624s TO BE SENT).
(3) Handwritten custody forms must accompany specimen sample samples to the
servicing Drug Screening Lab. Handwritten DD Form 2624(s) and/or Bottle Label(s) may be
packaged and shipped within the same shipping container as 1D barcoded specimen samples.
51Navy Drug Screening Program (NDSP)
5. Navy Drug Screening Program (NDSP). OUSD memo dated 10 December 2021 states the
Military Drug Testing Programs will no longer support the Drug Testing Program Desktop
applications 5.x for the collection of Service member urinalysis specimens. Effective 22 January
2022, all Navy activities are to complete shifting from using NDSP to using either WebDTP or
DTPLite or both, accordingly. Effective
23 January 2022 NDSP users will continue to have their specimen samples tested with assign
testable discrepancy code “5Z-5.X DTP Sample” until the shift is completed. Beginning 23 July
2022, specimen samples received using NDSP will no longer be tested and the testing activity
will receive fatal discrepancy code “5Y-5X DTP Decertified”. The following information is for
those who are not able to access DTPLite or WebDTP.
The Navy Drug Screening Program was developed to reduce the likelihood of gaming the
urinalysis program. In 1993 and 1994, a review of urinalysis testing revealed significant
problems with the method of testing. In 1995, Navy introduced the Navy Drug Screening
Program which implemented features such as computer randomly selected testing days which
randomized testing times and number of persons selected, setting parameters to testing by
percentage. The most current version is available on the NDSP page of the Navy Drug Detection
and Deterrence (DDD) website: https://www.mynavyhr.navy.mil/Support-Services/21st-
Century-Sailor/Drug-Detection-Deterrence/. The use of NDSP 5.4 is authorized until replaced
by WebDTP/DTPLite. For information purposes, NDSP and DTP 5.x are the same. They both
uses the same Client Collection Software. For assistance/questions, contact the
NDSP/WebDTP/DTPLite support desk at (901) 874-4204, DSN (312) 882-4204 or by email at
mill_ndsp@navy.mil.
a. Hardware Requirements
(1) Before attempting to install the NDSP, ensure that your system meets the following
minimum requirements:
(2) Pentium 200 MHz Processor, 64 MB RAM, 100 MB of free hard disk space,
Windows XP, 2000, Vista, or Windows 7 operating systems, and a Laser Printer.
(3) Prior to installation and use of the program, ensure that you have the appropriate
version for your specific network application by using the NDSP page of the DDD Web-site.
(4) Use of version 5.4 or greater is authorized. Version 5.4 is approved for use on
systems connected to all Navy networks (i.e. CANES/ISNS/CENTRIX/One Net/NMCI, etc.).
See DADMS #93275 and eMASS #2543. NMCI users must contact NMCI to have NDSP
pushed to the designated computer. Do not run NDSP with the same database on more than one
machine at a time. NDSP version 5.4 replaces all other versions in its entirety and is capable of
using SSN and/or DODID (EDIPI).
(5) NDSP version 5.4 will be replaced by WebDTP and/or DTPLite version 6.x. Users
will be notified when NDSP 5.4 sunset date is set for all users to switch to WebDTP and/or
DTPLite.
52b. NDSP Program Installation (Install Wizard). Use one of the applicable methods
below to install the software onto the designated computer.
(1) For NMCI users. Request the local IT (CTR rep) submit a “Move And Change
(MAC) Request” form to have NDSP pushed to the designated machine. NMCI will install the
application for you. Proceed to step (4) of the procedure below.
(2) For users on other networks. Contact the local IT to have the program pushed to your
machine or download a copy from the NDSP/DTP page in IFTDTL. Contact NDSP Help Desk
for assistance or to obtain a copy of NDSP 5.4. Once installed proceed to step (4) below.
(3) For desktop/laptop standalone computers. NDSP software has to be loaded via a disc
which a copy can obtained from DDD Program Office at (901) 874-4204 or email requests to
mill_ndsp@navy.mil. If a disc has to be mailed, provide the command mailing address with
POC information along with a copy of the primary UPC designation letter. Once received,
transfer the CD to the designated computer, double click on the "setup icon" and follow the next
steps below.
(4) For desktop/laptops connected to the network. Download a copy of NDSP from a
designated website, such as iFTDTL, NDSP/DTP page to the desktop of the computer or have it
pushed to the machine via IT Rep. Double click on the "setup icon" and follow the steps in the
next section below. If downloading is not possible, utilize one of the methods above to acquire a
copy of the application via a CD and follow the appropriate steps below.
For questions, contact the NDSP Help Line at (901) 874-4204 or email mill_ndsp@navy.mil.
(a) Click “Next” for the NDSP InstallShield Wizard.
(b) Read the informational window and select “Next”, then “Install”.
53(c) Click “Finish”.
(d) A shortcut will be created on the desktop. Double click on icon.
(e) Next screen appears to initiate install and click “Continue”.
(f) The initial screen (below) requires the system administrator for the application to
create an initial password. Minimum amount of characters allowed is 8. Password must contain
either two numbers or special characters and begin with a letter.
54(g) After the admin password is complete, the following screen will appear. Click
“OK”.
(h) Select dates to be excluded from testing, click to save, then to exit.
(i) Type in the command location or click the drop down and select the "country"
and click “OK”.
55(j) Click “Next”. Note: If the user has a backup data file to use, click “Finish” to
skip the remaining steps and the program will open to the main screen. See step 32 for visual
reference and proceed to section (f) “Database Restore” to restore a previous database from
another system. To continue with installation onto a new computer without a backup database
file, click “Next” and proceed to step (11).
(k) Click the “Create Users” button.
56(l) Click the green “+” symbol to add users.
Note: The designated primary UPC is to establish an ADMIN user account which is not to be
shared with anyone. The primary UPC is to create accounts for assistants with the assistants
creating their own password access. The command can designate as many accounts as needed.
It’s important for the primary UPC to delete members who no long require access to NDSP.
(m) Enter User ID, Full Name and Password. “DO NOT” use the word ADMIN
when creating additional user accounts. The ADMIN account cannot be deleted. Password
criteria contains at a minimum: Eight alpha/numeric/special characters with at least 2 numbers
or 2 special characters or combination of 1 number and 1 special character.
(n) Click “OK” once information is complete. An error message will appear if the
password criteria aren’t completed correctly.
57(o) Click the icon to exit.
.
(p) System Parameters are the established policy testing requirements established by
Navy and the command. The following steps will allow the user to set up their monthly testing
requirements. Click “Setup Parameters”.
(q) Each time a significant action is performed in NDSP, a record is created
consisting of user name and action performed, and a date/time stamp. This file can grow to be
58very large and should be periodically purged. This option gives the user control of how often the
Audit Log purges itself of data. It is recommended to set “Days to Keep” to 365 days and select
the “Manually Clear the Audit Log” option. Click “Testing Tab.”
1. Days To Keep: Enter the number of days for which you would like the
audit log to maintain records. Days to retain depend on individual site requirements.
2. Purge Now: The Audit Log can be manually cleared at any time by
clicking the “Purge Now” button. When this button is pressed ALL Audit log records older
than the "Days To Keep" are deleted.
3. Automated Audit Purge Options: This option allows a user to set the
NDSP program to automatically delete Audit Log files after a specified time period. With
this option selected, each time the program starts, NDSP will delete any Audit Log records
older than the number of days specified. If this option is not selected, the only way to clear
the Audit Log is by manually pressing the “Purge Now” button.
(r) The “System Parameters” screen consists of four tabs, each represents specific
screening parameters. They are explained in the following paragraphs. Click the "Testing tab".
Leave as default, unless operational commitments dictate otherwise.
591. Manually Choose Testing Days: This option allows the testing site to decide
what days are testing days.
2. Computer Chooses Random Screening Days: With this option NDSP will
randomly determine testing days for your command. With this option enabled NDSP will
determine if “Today is a screening Day”. This is determined each time the Random Testing
button is selected. If not a screening day the user is notified and testing is not allowed for the
selected pool. This option adds another level of randomization to the screening process because
no one, including the UPC, will know when testing will be conducted until the NDSP program
declares the day a screening day.
NOTE: In order for this option to be effective, a site will need to click the ‘Random Testing’
button on the main menu every day for each pool. If your command’s policy is to conduct
random testing at the commander’s discretion, then leave “Computer Random Chooses Testing
Days” unchecked.
3. Randomization Method: There are two methods of randomization used by
NDSP to select "personnel for random testing." The “Selection By Percentage” method selects
personnel based on a monthly percentage. The selection “By Total Number” method chooses
an exact number of personnel each time random testing is conducted. These options are set
according to site requirements.
a. By Percentage: The percentage method means if 20 percent is the value
entered then each member in the selected pool has a 20 percent probability of being selected. It
does not mean that 20 percent of the pool is selected.
60b. Count (Default Test): This is the exact number of members randomly
selected for testing.
After selecting the randomization method here at this screen the actual percentage or count
values are entered on the Pool Maintenance screen in the “Per Month Testing Info” Block.
NOTE: The percentage or total count value will re-appear on the Pool Management screen
each time a New Pool is created saving the user the trouble of having to re-enter the data every
time a new pool is created.
4. Collection Method: The Collection Method refers to; at what time in the
selection process a user would like to collect forms. This is determined by how a particular
service chooses to perform their collections and if computers are available at the collection site.
a. The method Print Forms at Collection (PFAC) allows DD Form 2624s
and bottle labels to be printed at the testing site as personnel arrive for collection. A printer
must be available at the testing site. This option can greatly reduce the amount of forensic
corrections made to forms due to “No-shows.”
b. The method Print Forms at Time of Selection (PFAS) allows a user to
preprint all forms before conducting collections.
A couple scenarios for the (PFAS) collection method are:
A user does not have a computer
Or printing capabilities at the collection site isn’t possible, so forms and labels are pre-
printed in advance.
Click “Service” tab and add the servicing Drug Screening Laboratory (DSL) address in the
address box. Once finished, click “Reports” tab.
615. Program Graphic: If you have your own service graphic that you would like
to have displayed at program start up, you may add it here by clicking the folder button and
browsing for your graphic file. NDSP uses the Department of the Navy seal which is located in
the BMP folder of the NDSP directory. If the DON seal is not present on the home screen,
follow these steps to view the seal inside the program.
a. Click on "System Utilities"
b. Click on "System Parameters" and "OK"
c. Click on "Service tab"
d. Click on yellow folder
e. Highlight USN.jpg and click "Open", then "OK"
f. If USN.jpg is not present, click the "drop down" and map your way to the
NDSP directory which is normally located under C:\Users\Public\NDSP\BMP and highlight the
USN.jpg and click "Open", then "OK". For systems connected to CANES, it will be located in
the “F” directory.
g. Leave the “Reports” tab as the default or change as needed and click
“OK”.
626. Group DD2624 By Gender. This option will maintain males and females on
separate DD Form 2624s.
7. Allow Collected Date To Be Set To Future Dates. Ordinarily; an individual
would be tested on the same day he or she was selected for testing. This option is provided
primarily for reserve units who must select personnel for testing before drill weekends. This option
should be set in accordance with your command regulations.
8. Preview DD2624 before Printing. Allows DD2624 form to be previewed
before they are sent to the printer.
9. Sort Screening Register. The Drug Testing Program Register is
automatically sorted by UIC (Navy). The Register can also be sorted by; Last Name or SSN
depending on the option selected.
Group Letters
By Database This option will generate a single commander’s letter addressed to the commanding
officer in charge of the global database. Listing all members selected for testing from the global
database.
By Sub Pool This option will generate a letter for each Commander of each individual pool and
sub-pool. Each letter will list the individuals selected from that pool. Once all the parameters have
been set the next screen in the Setup Wizard will be the Setup Pools screen.
(s) Click “Next, then “Setup Pool(s)” button.
(t) From Pool Maintenance Screen, the following fields must be filled in. UIC,
Command, Per Month Testing Info (# of Tests is minimum of 4 unless a waiver is approved to
perform less than four random samplings per month), DD Form 2624 Block 1 and Block 2.
Block 1 is the testing command message PLAD. Block 2 is the TYCOM message PLAD. Click
63, then “Next”.
Pool Maintenance
If a user is loading NDSP for the first time, the Pool Maintenance screen will guide the user in
setting up the pools. If NDSP is already installed and a user is upgrading to another version, the
user will not see this Setup Wizard. However, regardless of which version a user is running the
Pool Maintenance screen is always available for modifying pool information or adding and
deleting pools. Select the "Pool Maintenance screen" from the main menu.
What is a Pool?
Before setting up your pool structure, it is important to understand the definition of a pool and
how the Drug Screening Program uses pools. A “Pool” is basically a specific group of
personnel. Normally a pool is simply an organization such as, a command, a squadron,
department, duty section, etc. Some organizations using the NDSP program may want to
maintain different testing groups, for example, a reserve unit which contains both active duty and
reserve personnel. In this case the concept of a pool can be expanded to include an Active
Personnel Pool and a Reserve Personnel Pool. Pools can be very flexible depending upon
requirements and needs.
Adding New Pools
The Pool Maintenance screen above allows pools and subordinate pools to be added and deleted.
New databases may also be added and deleted. Multiple databases operate independently of one
another and allows the user to create separate pools for testing without affecting one another.
It’s like having more than one program within the same system. Members can be added to new
pools or current pools and to new or current databases. Pool information can be entered for any
64new pool or edited for existing pools. Keep in mind that you can import organizations into the
NDSP program so you may not need to set up all of your organizations initially.
The Pools in the NDSP mimic the command structure of the military using a tree type
organizational structure. Each Pool can contain any number of subordinate pools, which in turn
can contain their own subordinate pools and so on.
(u) Click the “Import Roster” button if you have a roster to import. If not, click
“Finish”.
(v) Select the applicable data-set types and import into the application. Roster files
are normally in Excel or ASCII Comma Delimited (CSV) format.
Note: It is important to ensure the roster contain the following “minimum” separate fields; Last
Name, First Name, SSN/DODID (EDIPI) and Organization. These are the minimum fields
required to import a roster. Other fields to import include Middle Initial, Gender, Rank/Rate,
UIC, Organization 2 (department, division, duty section, etc. Each column represents a separate
field so make sure the last name is in its own column, first name in its own column and so on.
65(w) Select the appropriate file for import into the application. Click “Open”.
(x) If the names are being imported into a single pool, do not check the box below. If
the roster contains multiple organizational names within the column to create additional pools,
check the box and click “Next”.
66(y) Confirm the action on the data being pulled into the application and click “OK”.
(z) Below is the screen that appears after the import. If the roster has a Header Row,
(i.e. the word Last Name, First Name, etc…) listed, place checkmark in “Ignore Header” so it
removes the first row and not get imported. Otherwise, leave it blank.
The phrase “Do Not Import” implies that the fields below it will not be imported if they are not
selected. The user has to click on the phrase “Do Not Import” to select the field that corresponds
with the information below it to import.
67(aa) Use the drop menus to identify the data type in each column of the data set.
(ab) After the selection of column to data set click “Finished”.
68(ac) Click “OK” on the Import Complete. If any error or mistake is made during
any point of the process, correct it and perform the above steps again.
NOTE: When performing a second and subsequent Import procedure, the program will
prompt a decision to either “Append” or “Replace” the current roster in the program.
If “Append” is selected, the roster will not replace any of the roster names in the program
database but rather add only new information.
If “Replace” is selected, the roster being imported will replace all names in the program database
with new information.
(ad) Now, the program is ready to run normally.
69c. Random Tests. (Make sure information in "Personnel Roster and Pool Maintenance is
correct before beginning testing).
(1) From the main screen, select the "Random Testing" button. Member Testing Wizard
will appear.
(2) Select the "pool to be tested". Verify the remaining information is correct; Collection
Date, Randomization Method, Testing Percentage, User Subordinate Pools checked. Confirm
testing premise is random testing (IR) and click "Finish".
70(3) Click "Yes" on the next screen.
(4) If the follow-on window states "Today is not a testing day", click "OK" and you are
finished.
(5) If the follow-on window states "Today is a testing day", click "OK" and the "Print
Test Products" page will appear with member’s names and documents to print. If you are using
NDSP 5.4 or greater, the batch number will appear at top. You can still change the batch number
if you desire.
71If there are members selected who are TAD or on leave, you can put them in a "Due Back" status
before their name and SSN appears on any documents. This will avoid line outs. Highlight their
name and "Right click" and select "Add/change due back dates" or click on "Edit" at top and
select "Add/change due back dates" and select the expected "return date" from the calendar.
(6) Select "2624 back side" and click on the "printer icon" at the top of the Print Test
Products page to view the document. Click "Edit" to input UPC information and click “OK”
when finished.
72(7) Click "Preview" to view and click the "Printer" icon to print. Make sure to print on
both sides of the DD Form 2624 so both sides are on one sheet when shipping. Click "close"
when finished. DD Form 2624 may be printed at the end of the sample collection to allow for
removal of members before printing.
DD Form 2624 Front Side
DD Form 2624 Back Side
73(8) Select "other documents" needed for sample collection and click the "Printer" icon to
view and the "Printer" icon again to print. At a minimum, the Urinalysis Register and the Bottle
Labels are needed at the collection site. It’s recommended to have the DD Form 2624 at the
collection site. Once all documents are printed, click the little brown door to exit.
(9) Once the names are selected, they are posted in the "Samples Due" section of the
program. Refer to "Update Samples Due" section for guidance.
(10) The UPC can return to the Print Test Products page by clicking on "Testing" from
the main screen and selecting "Reprint Products". Select the "test date" and "click" "OK".
d. Update Samples Due. (After each test, ensure samples collected are marked as
collected).
(1) From the main screen, select "Samples Due".
74(2) The "Samples Due" window appears. There are three other tabs in this window as
well. They are; "Samples Collected", "Positive Results" and "All History Record". Since
samples were collected, that information has to be updated to reflect that. For no shows, mark
them accordingly in Samples Due. For Cancel Tests, indicate the reason in the pop-up window.
(3) Highlight the members who provided a urine sample, based on the Urinalysis
Register.
(4) Click on the "yellow bottle" to mark as collected. They will disappear from Samples
Due and appear in Samples Collected. All names will stay in Samples Collected until the
laboratory results are received. Mark each sample according to the laboratory results. For
positives, a list of drug metabolites will appear. Select all that apply or Other, if none are listed.
All samples marked as Negative or cancelled will automatically move to "All History" record.
75Note: To move a large number of samples at one time, select the icon to the right of the printer
in "Samples Due" or "Samples Collected" and select the "test date", then "OK". This will query
all batches for that test date and can be group marked accordingly.
e. Backup Your Database. The Backup/Restore utility provides a means to backup all
NDSP data files to be restored in the event of a system failure or new program installation.
From the Main screen of the NDSP program click on the “System Utilities” icon.
(1) Select “System Backup/Restore” from the “Select System Utility” window.
(2) Click "OK".
(3) The “Backup/Restore Utility” window appears.
76(4) Select the "Backup Tab" from the Backup/Restore Utility window.
(5) Navigate to the folder where you would like to save the backup file.
(6) Click the "Backup/Restore icon" (Red Arrow).
(7) Click "Yes" when the Confirm window appears.
77(8) When the backup is complete – click "OK".
(9) A file will be created with a file extension of “.dtp”
(10) The numbers in the file name indicate the date the backup was created. Do not
retain more than four or five backups. A single backup contains all history of tests.
(11) Close the Backup/Restore utility window to return to the main menu.
Note: The NDSP software will ask you if you want to back up your database whenever you
closed the program. By clicking "Yes" you can also reach the Backup/Restore Utility window.
Using this method, the software will automatically close when the backup is complete.
Note: It is highly recommended to back up your database to a secondary location from time to
time, especially after conducting a test. This will reduce the possibility of losing data if system
failure occurs or get replaced.
78f. Database Restore. This is normally done when replacing computers or UPC turnover
involves moving the program to a different location. It is not required or desired to perform a
“Restore” procedure when accessing the program for normal use.
Note: DO NOT perform restore as a normal action when entering NDSP. NDSP retains the
information from each day’s use, regardless of performing a backup or not.
From the Main screen of the NDSP program click on the “System Utilities” icon.
(1) Select "System/Backup" Restore from the “Select System Utility” window.
(2) Click "OK".
79(3) Select the" Restore Tab" when the “Backup/Restore Utility” window appears.
(4) Navigate to the location of your backup file with a file extension of .dtp.
(5) Select the "backup file" you wish to restore - the first part of the filename represents
the date in which the backup was created.
(6) Click the "Restore icon" (Red Arrow).
80(7) When the Confirm window appears – click "Yes".
(8) When restoration is complete – click "OK".
(9) Close the Backup/Restore utility window to return to the main menu.
Program is ready for normal use. All of the previous data has been restored. Be aware that all
users and passwords are now the same as those in effect at the time the backup was created.
g. NDSP Reports
(1) From the main screen, select "Reports" at the top of the page.
81(2) Select “Analysis”, which features several reports.
(3) From this screen we have several reports available to the UPC under “Command
Reports", some of the useful reports are:
(a) Cancelled Tests Report
(b) Due Back Report
(c) Selected
(d) Tested
(e) Selected, but Not Tested
(f) Positive Summary Report
Example: The "Selected but Not Tested" report is helpful in determining who was selected but
not tested during the fiscal year. Those members would be included in your end-of-fiscal year
sub-unit sweep. Although this report will not tell you who was not selected, it will tell you who
has been tested, providing the information in Samples Due and Samples Collected is accurate.
You would then have to compare this report to your roster to determine who on the roster is not
on the tested report. Click the "down arrow" next to the "Report Start Date" box to select the
starting and ending date of a report. If assistance with NDSP is needed, contact the NDSP Help
Line at (901) 874-4204 or by email at mill_ndsp@navy.mil.
82You can also read