Lenovo XClarity Administrator Quick Start Guide Deploying an operating system - Version 3.4.0
←
→
Page content transcription
If your browser does not render page correctly, please read the page content below

Lenovo XClarity Administrator
Quick Start Guide
Deploying an operating system

Version 3.4.0
Sixth Edition (September 2021)
© Copyright Lenovo 2015, 2021.
LIMITED AND RESTRICTED RIGHTS NOTICE: If data or software is delivered pursuant a General Services
Administration “GSA” contract, use, reproduction, or disclosure is subject to restrictions set forth in Contract No.
GS-35F-05925.
Contents

Installing operating systems on bare-                          Configuring global OS-deployment settings .   . . .   22
metal servers. . . . . . . . . . . . . . . 1                   Configuring network settings for managed
Operating-system deployment considerations .       .   . . 4   servers . . . . . . . . . . . . . . .         . . .   24
Supported operating systems . . . . . . .          .   . . 8   Choosing the storage location for managed
                                                               servers . . . . . . . . . . . . . . .         . . .   26
Operating-system image profiles . . . . . .        .   . 12
                                                               Deploying an operating-system image . . .     . . .   29
Port availability for deployed operating systems   .   . 16
                                                               Integrating with Windows Active Directory .   . . .   32
Configuring a remote file server . . . . . .       .   . 18
Importing operating-system images . . . . .        .   . 20

© Copyright Lenovo 2015, 2021                                                                                         i
ii Lenovo XClarity Administrator Quick Start Guide Deploying an operating system
Installing operating systems on bare-metal servers
You can use Lenovo XClarity Administrator to manage the OS images repository and deploy operating-
system images to up to 28 bare-metal servers concurrently.

Learn more:
•    XClarity Administrator: Bare metal to cluster
•      XClarity Administrator: Operating-system deployment

Before you begin

After the 90-day free trial expires, you can continue to use XClarity Administrator to manage and monitor
your hardware for free; however, you must purchase full-function-enablement licenses for each managed
server that supports XClarity Administrator advanced functions to continue using the OS deployment
function. Lenovo XClarity Pro provides entitlement to service and support and the full-function-enablement
license. For more information about purchasing Lenovo XClarity Pro, contact your Lenovo representative or
authorized business partner. For more information, see Installing the full-function enablement license in the
XClarity Administrator online documentation.

About this task

XClarity Administrator provides a simple way to deploy operating-systems images to bare-metal servers,
which typically do not have an operating system installed.

Attention: If you deploy an operating system to a server that has an operating system installed, XClarity
Administrator performs a fresh installation that overwrites the partitions on the target disks

Several factors determine the amount of time that is required to deploy an operating system to a server:
• The amount of RAM that is installed in the server, which affects how long the server takes to start up.
• The number of and types of I/O adapters that are installed on the server, which affects the amount of time
  that it takes XClarity Administrator to perform an inventory of the server. It also affects the amount of time
  that it takes for the UEFI firmware to start when the server is started up. During an operating-system
  deployment, the server is restarted multiple times.
• Network traffic. XClarity Administrator downloads the operating-system image over the data network or
  the operating-system deployment network.
• The hardware configuration on the host on which Lenovo XClarity Administrator virtual appliance is
  installed. The amount of RAM, processors, and hard drive storage can affect download times.

Important: To deploy an operating-system image from XClarity Administrator, at least one of the XClarity
Administrator interfaces (Eth0 or Eth1) must have IP network connectivity to the server network interface that
is used to access the host operating system. Operating-system deployment uses the interface that is defined
on the Network Access page. For more information about network settings, see Configuring network access in
the XClarity Administrator online documentation.

Before you perform a bare-metal operating-system deployment on a server, prepare the server by updating
firmware to the latest levels and configuring the server using Configuration Patterns. For more information,
see Updating firmware on managed devices and Configuring servers using the XClarity Administrator in the
XClarity Administrator online documentation.

Attention: It is recommended that you do not use XClarity Administrator to perform a bare-metal operating-
system deployment on Converged and ThinkAgile appliances.

© Copyright Lenovo 2015, 2021                                                                                   1
Procedure
The following figure illustrates the workflow for deploying an OS image to a server.

Step 1.   Import OS images.

          Before you can deploy an OS image to a server, you must first import the operating system into the
          repository. When you import an OS image, XClarity Administrator:
          • Ensures that there is sufficient space in the OS images repository before importing the operating
            system. If you do not have sufficient space to import an image, delete an existing image from the
            repository and attempt to import the new image again.
          • Creates one or more profiles of that image and stores the profile in the OS images repository.
            Each profile includes the OS image and installation options. For more information about
            predefined OS image profiles, see Operating-system image profiles.

          A base operating system is the full OS image that was imported into the OS-images repository. The
          imported base image contains predefined profiles that describe the installation configurations for
          that image. You can create custom profiles in the base OS image that can be deployed for specific
          configurations.

          You can also import supported custom operating systems. This custom image contains a
          predefined placeholder profile, which cannot be deployed. You must import a custom profile that
          can be deployed or create your own custom profile based on the placeholder profile. After the
          custom profile is added, the placeholder profile is removed automatically.

          For Microsoft Windows Server 2016 and 2019, you can import a custom operating-system image
          for each release. The imported base image contains predefined profiles that describe the
          installation configurations for that image. You cannot create custom profiles in the custom OS
          image.

          The OS images repository can store up to ten operating-system images, if space is available to
          store the images (up to 50GB). For a list of supported base and custom operating systems, see
          Supported operating systems in the Lenovo XClarity Administrator online documentation.
Step 2.   (Optional) Customize the OS image.

          You can customize an OS image by adding device drivers, boot files (for Windows only),
          configuration settings, unattend files, post-installation scripts, and software. When you customize a
          base OS image, XClarity Administrator creates a customized OS-image profile that includes the
          custom files and installation options.

          The OS images repository can store an unlimited number of predefined and custom files, if space is
          available to store the files.
Step 3.   Configure global settings.

          Global settings are configuration options that serve as defaults for operating system deployment.
          You can configure the following global settings.
          • The password for the administrator user account to be used for deploying the operating systems

2   Lenovo XClarity Administrator Quick Start Guide Deploying an operating system
• The method to use to assign IP addresses to servers
• License keys to use when activating installed operating systems
• Optionally join an Active Directory domain as part of the Windows operating-system deployment
Step 4. Configure network settings.
You can specify the network settings for each server on which operating systems are to be
deployed.
If you are using DHCP to assign IP addresses dynamically, you must configure the MAC address.
If you are using static IP addresses, you must configure the following network settings for a specific
server before you can deploy an operating system to that server. After these settings are
configured, the deployment status of the server changes to “Ready.” (Note that some fields are not
available for static IPv6 addresses.)
• Hostname
The hostname must comply with the following rules:
– The hostname of each managed server must be unique.
– The hostname can contain strings (labels) that are separated by a period (.).
– Each label can contain ASCII letters, digits, and dashes (-); however, the string cannot start or
end with a dash and cannot contain all digits.
– The first label can be 2 - 15 characters in length. Subsequent labels can be 2 – 63 characters
in length.
– The total length of the hostname must not exceed 255 characters.
• MAC address of the port on the host where the operating system is to be installed.
The MAC address is set to AUTO by default. This setting automatically detects the Ethernet
ports that can be configured and used for deployment. The first MAC address (port) that is
detected is used by default. If connectivity is detected on a different MAC address, the XClarity
Administrator host is automatically restarted to use the newly detected MAC address for
deployment.
You can determine the status of the MAC address port that is used for OS deployment from the
MAC address drop-down menu on the Network Settings dialog. If multiple ports are up or if all
ports are down, AUTO is used by default.
Notes:
– Virtual network ports are not supported. Do not use one physical network port to simulate
multiple virtual network ports.
– When the server's network setting is set to AUTO, XClarity Administrator can automatically
detect network ports in slots 1 – 16. At least one port in slots 1 – 16 must have a connection
to XClarity Administrator.
– If you want to use a network port in slot 17 or greater for the MAC address, you cannot use
AUTO. Instead, you must set the server's network setting to the MAC address of the specific
port that you want to use.
– For ThinkServer servers, not all host MAC addresses are displayed. In most cases, MAC
addresses for AnyFabric Ethernet adapters are listed on the Edit Network Settings dialog.
MAC addresses for other Ethernet adapters (such as the Lan-On-Motherboard) are not listed.
In cases where the MAC address for an adapter is not available, use the AUTO method for
non-VLAN deployments.
• IP address and subnet mask
• IP gateway
Chapter 1 Installing operating systems on bare-metal servers 3• Up to two domain name system (DNS) servers
• Maximum transmission unit (MTU) speed
• VLAN ID, if VLAN IP mode is enabled
If you choose to use VLANs, you can assign a VLAN ID to the host network adapter that is being
configured.
Step 5. Choose the storage options
For each deployment, you can choose the preferred storage location where the operating system is
to be deployed. Depending on the operating system, you can choose to deploy to a local disk
drive, embedded hypervisor key, or SAN.
Step 6. Choose additional options and custom configuration settings, and deploy the OS image.
You can configure additional deployment options, such as the license key for the OS deployment,
and custom configuration settings. If you are installing Microsoft Windows, you can also configure
the Active Directory domain to join.
Notes:
• If you defined custom configuration settings for a specific custom OS profile, you must define
values for required custom configuration settings before you can deploy the profile to a server.
• When deploying a custom OS profile that includes custom settings, all target servers must use
the same custom OS profile and the values for the custom settings apply to all target servers.
You can then choose the target servers for deployment and the OS images to be deployed.
Remember that to deploy an operating system, the server must be have a deployment status of
“Ready.”
You can deploy operating-system images on up to 28 servers concurrently.
Before you attempt to deploy an operating-system image, review the Operating-system
deployment considerations.
Operating-system deployment considerations
Before you attempt to deploy an operating-system image, review the following considerations.
Lenovo XClarity Administrator considerations
• Ensure that no jobs are currently running on the target server. To see a list of active jobs, click Monitoring
➙ Jobs.
• Ensure that the target server does not have a deferred or partially activated server pattern. If a server
pattern has been deferred or partially activated on the managed server, you must restart the server to
apply all configuration settings. Do not attempt to deploy an operating system to a server with a partially
activated server pattern. To determine the configuration status of the server, see the Configuration
Status field on the Summary page for the managed server (see Viewing the details of a managed server in
the XClarity Administrator online documentation).
• Ensure that a password for the administrator account that is to be used to deploy the operating system is
specified on the Global Settings: Deploy Operating Systems dialog. For more information about setting
the password, see Configuring global OS-deployment settings.
• Ensure that the global default settings are correct for this operating-system deployment (see Configuring
global OS-deployment settings).
4 Lenovo XClarity Administrator Quick Start Guide Deploying an operating systemOperating system considerations
• Ensure that you have all applicable operating-system licenses to activate the installed operating systems.
You are responsible for obtaining licenses directly from the operating-system manufacturer.
• Ensure that the operating-system image that you intend to deploy is already loaded in the OS images
repository. For information about importing images, see Importing operating-system images.
• Operating-system images in the XClarity Administrator repository might not be supported only on certain
hardware platforms. Only OS-image profiles that are supported by the selected server are listed on the
Deploy OS Images page. You can determine whether an operating system is compatible with a specific
server from the Lenovo OS Interoperability Guide website.
• For Windows, you must import a boot file into the OS-images repository before you can deploy a
Windows profile. Lenovo bundles the predefined WinPE_64.wim boot file along with a set of device drivers
into a single package that can be downloaded from the Lenovo Windows drivers and WinPE Images
Repository webpage and then imported into OS-images repository. Because the bundle file contains both
device drivers and boot files, you can import the bundle file from the Device Driver or Boot Files tab.
• For SLES 15 and 15 SP1, you must import both the installer image and the associated package image
from the Server OS Support Center webpage. For SLES 15 SP2 or later, you need to import only the Full
Installation Media image because the Unified Installer and Packages DVDs from SUSE Linux Enterprise
Server 15 and 15 SP1 are deprecated.
• For ThinkSystem servers, XClarity Administrator includes out-of-box device drivers to enable the
installation of the operating system as well as basic network and storage configuration for the final
operating system. For other servers, ensure that the operating-system image that you intend to deploy
includes the appropriate Ethernet, Fibre Channel, and storage adapter device drivers for your hardware. If
the I/O adapter device driver is not included in the operating system, the adapter is not supported for OS
deployment. Always install the latest operating system to ensure that you have the latest inbox I/O adapter
device drivers and boot files that you need. You can also add out-of-box device drivers and boot files to
operating systems that have been imported into XClarity Administrator (see Customizing OS-image profiles
in the XClarity Administrator online documentation).
For VMware, use the latest Lenovo Custom Image for ESXi, which includes support for the latest adapters.
For information about obtaining that image, see the VMware Support – Downloads webpage.
• For ThinkSystem servers, if you want to deploy SLES 12 SP2, you must use a kISO profile. To get the
kISO profiles, you must import the appropriate SLES kISO image after you import the base SLES
operating system. You can download the SLES kISO image from the Linux Support – Downloads webpage.
Notes:
– The SLES kISO image counts towards the maximum number of imported OS images.
The OS images repository can store up to ten operating-system images, if space is available to store
the images (up to 50GB). For a list of supported base and custom operating systems, see Supported
operating systems in the Lenovo XClarity Administrator online documentation.
– If you delete all kISO profiles, you must delete the base SLES operating system and then import the
base operation system and kISO image again to deploy SLES 12 SP2 on a ThinkSystem server.
– If you create a custom OS-profile based on a kISO profile, the predefined device drivers in the base
operating system are not included. The device drivers that are included in the kISO are used instead.
You can also add device drivers to the custom OS-profile (see Creating a custom OS-image profile in the
XClarity Administrator online documentation).
For more information about limitations for specific operating systems, see Supported operating systems.
Network considerations
• Ensure that all required ports are open (see Port availability for deployed operating systems).
Chapter 1 Installing operating systems on bare-metal servers 5• Ensure that XClarity Administrator can communicate with the target server (both the baseboard
management controller and the servers’ data network) over the interface (Eth0 or Eth1) that was selected
when you configured the XClarity Administrator network access.
To specify an interface to be used for operating-system deployment, see Configuring network access in the
XClarity Administrator online documentation).
For more information about the operating-system deployment network and interfaces, see Network
considerations in the XClarity Administrator online documentation.
• Ensure that the IP addresses are unique for the host operating system. XClarity Administrator checks for
duplicate IP addresses that you specify for the network address during the deployment process.
• If the network is slow or unstable, you might see unpredictable results when deploying operating systems.
• The XClarity Administrator network interface that is used for management must be configured to connect
to the baseboard management controller using the same IP address method that you choose on the
Global Settings: Deploy Operating Systems dialog. For example, if XClarity Administrator is set up to use
eth0 for management, and you choose to use manually assigned static IPv6 addresses when configuring
the deployed OS, then eth0 must be configured with an IPv6 address that has connectivity to the
baseboard management controller.
• If you choose to use IPv6 addresses for the OS deployment global settings, the IPv6 address for XClarity
Administrator must be routable to the baseboard management controller and the servers’ data network.
• IPv6 mode is not supported for ThinkServer (see IPv6 configuration limitations in the XClarity Administrator
online documentation).
• If you are using DHCP to assign IP addresses dynamically, you must configure the MAC address.
• If you are using static IP addresses, you must configure the following network settings for a specific server
before you can deploy an operating system to that server. After these settings are configured, the
deployment status of the server changes to “Ready.” (Note that some fields are not available for static
IPv6 addresses.)
– Hostname
The hostname must comply with the following rules:
– The hostname of each managed server must be unique.
– The hostname can contain strings (labels) that are separated by a period (.).
– Each label can contain ASCII letters, digits, and dashes (-); however, the string cannot start or end
with a dash and cannot contain all digits.
– The first label can be 2 - 15 characters in length. Subsequent labels can be 2 – 63 characters in
length.
– The total length of the hostname must not exceed 255 characters.
– MAC address of the port on the host where the operating system is to be installed.
The MAC address is set to AUTO by default. This setting automatically detects the Ethernet ports that
can be configured and used for deployment. The first MAC address (port) that is detected is used by
default. If connectivity is detected on a different MAC address, the XClarity Administrator host is
automatically restarted to use the newly detected MAC address for deployment.
You can determine the status of the MAC address port that is used for OS deployment from the MAC
address drop-down menu on the Network Settings dialog. If multiple ports are up or if all ports are
down, AUTO is used by default.
Notes:
– Virtual network ports are not supported. Do not use one physical network port to simulate multiple
virtual network ports.
6 Lenovo XClarity Administrator Quick Start Guide Deploying an operating system– When the server's network setting is set to AUTO, XClarity Administrator can automatically detect
network ports in slots 1 – 16. At least one port in slots 1 – 16 must have a connection to XClarity
Administrator.
– If you want to use a network port in slot 17 or greater for the MAC address, you cannot use AUTO.
Instead, you must set the server's network setting to the MAC address of the specific port that you
want to use.
– For ThinkServer servers, not all host MAC addresses are displayed. In most cases, MAC addresses
for AnyFabric Ethernet adapters are listed on the Edit Network Settings dialog. MAC addresses for
other Ethernet adapters (such as the Lan-On-Motherboard) are not listed. In cases where the MAC
address for an adapter is not available, use the AUTO method for non-VLAN deployments.
– IP address and subnet mask
– IP gateway
– Up to two domain name system (DNS) servers
– Maximum transmission unit (MTU) speed
– VLAN ID, if VLAN IP mode is enabled
• If you choose to use VLANs, you can assign a VLAN ID to the host network adapter that is being
configured.
For more information about the operating-system deployment network and interfaces, see Configuring
network settings for managed servers and Configuring network settings for managed servers and Network
considerations in the XClarity Administrator online documentation.
Storage and boot-option considerations
• Ensure that the UEFI boot option on the target server is set to “UEFI boot only” before you deploy an
operating system. The “Legacy-only” and “UEFI first, then legacy” boot options are not supported for
operating-system deployment.
• Each server must have a hardware RAID adapter that is installed and configured.
Attention:
– Only storage that is set up with hardware RAID is supported.
– The software RAID that is typically present on the onboard Intel SATA storage adapter or storage that is
set up as JBOD are not supported; however, if a hardware RAID adapter is not present, setting the
SATA adapter to AHCI SATA mode enabled for operating-system deployment or setting unconfigured
good disks to JBOD might work in some cases. For more information, see OS installer cannot find the
disk on which you want to install XClarity Administrator in the XClarity Administrator online
documentation.
This exception does not apply to M.2 drives.
– If a managed device has both local drives (SATA, SAS, or SSD) that are not configured for hardware
RAID and M.2 drives, you must disable the local drives if you want to use M.2 drives, or you must
disable the M.2 drives if you want to use local drives. You can disable on-board storage controller
devices and legacy and UEFI storage option ROMs using the using Configuration Patterns by selecting
Disable local disk on the Local Storage tab of the wizard or by creating a Configuration Pattern from an
existing server and then disabling the M.2 devices in the extended UEFI pattern.
– If a SATA adapter is enabled, the SATA mode must not be set to “IDE.”
• The NVMe storage that is connected to a server motherboard or HBA controller is not supported and must
not be installed in the device; otherwise, OS deployment to non-NVMe storage will fail.
• When deploying RHEL, multi ports that are connected to same LUN on the target storage is not
supported.
Chapter 1 Installing operating systems on bare-metal servers 7• Ensure that secure-boot mode is disabled for the server. If you are deploying a secure-boot mode enabled
operating system (such as Windows), disable secure-boot mode, deploy the operating system, and then
re-enable secure-boot mode.
• When deploying Microsoft Windows to a server, attached drives must not have existing system partitions
(see OS deployment fails due to existing system partitions on an attached disk drive in the XClarity
Administrator online documentation).
• For ThinkServer servers, ensure that the following requirements are met:
– The boot settings on the server must include a Storage OpROM Policy that is set to UEFI Only. For more
information, see OS installer cannot boot on a ThinkServer server - XClarity Administrator in the XClarity
Administrator online documentation.
– If you are deploying ESXi and there are network adapters that are PXE bootable, disable PXE support
on the network adapters before deploying the operating system. The deployment is completed, you
can re-enable PXE support, if desired.
– If you are deploying ESXi and there are bootable devices in the boot-order list other than the drive on
which the operating system is to be installed, remove the bootable devices from the boot-order list
before deploying the operating system. After deployment is complete, you can add the bootable device
back to the list. Ensure that the installed drive is at the top of the list.
For more information about storage-location settings, see Choosing the storage location for managed
servers.
Managed-device considerations
• For information about operating-system deployment limitations for specific devices, see Supported
hardware in the XClarity Administrator online documentation.
• Ensure there is no mounted media (such as ISOs) on the target server. Additionally, ensure there are no
active Remote Media sessions open to the management controller.
• Ensure that the timestamp in BIOS is set to the current date and time.
• For ThinkSystem and System x servers, ensure that the Legacy BIOS option is disabled. From the BIOS/
UEFI (F1) Setup utility, click UEFI Setup ➙ System Settings, and verify that Legacy BIOS is set to
Disabled.
• For Flex System servers, ensure that the chassis is powered on.
• For Converged, NeXtScale, and System x servers, ensure that a Feature on Demand (FoD) key for remote
presence is installed. You can determine whether remote presence is enable, disabled, or not installed on
a server from the Servers page (see Viewing the status of a managed server in the XClarity Administrator
online documentation). For more information about FoD keys that are installed on your servers, see
Viewing Feature on Demand keys in the XClarity Administrator online documentation.
• For ThinkSystem servers and ThinkAgile appliances, the XClarity Controller Enterprise feature is required
for operating-system deployment. For more information, see Viewing Feature on Demand keys in the
XClarity Administrator online documentation.
• For Converged and ThinkAgile appliances, it is recommended that you do not use XClarity Administrator
to perform a bare-metal operating-system deployment.
Supported operating systems
Lenovo XClarity Administrator supports the deployment of several operating-systems. Only supported
versions of the operating systems can be loaded into the XClarity Administrator OS images repository.
Important:
• For information about operating-system deployment limitations for specific devices, see Supported
hardware in the XClarity Administrator online documentation.
8 Lenovo XClarity Administrator Quick Start Guide Deploying an operating system• The cryptographic management feature of XClarity Administrator allows limiting communication to certain
minimum SSL/TLS modes. For example, if TLS 1.2 is selected, then only operating systems with an
installation process that supports TLS 1.2 and strong cryptographic algorithms can be deployed through
XClarity Administrator.
• Operating-system images in the XClarity Administrator repository might not be supported only on certain
hardware platforms. Only OS-image profiles that are supported by the selected server are listed on the
Deploy OS Images page. You can determine whether an operating system is compatible with a specific
server from the Lenovo OS Interoperability Guide website.
• For OS and Hypervisor related compatibility and support information and resources for Lenovo servers
and solutions, see the Server OS Support Center webpage.
The following table lists the 64-bit operating systems that XClarity Administrator can deploy.
Operating system Versions Notes
CentOS Linux 7.2 and later Notes:
8.0 • All existing and future minor versions are supported unless otherwise
8.1 noted.
8.2 • DHCP, static IPv4, and static IPv6 address are supported.
• VLAN tagging is not supported.
• Out-of-box drivers are not supported.
• OS profile customization is not supported.
• CentOS 8.3 is not supported.
Microsoft® Windows® 2012 R2 Both the retail and volume license copies are supported.
Server 2012 R2U1 Note: XClarity Administrator is tested with only Windows versions that are
2016 supported by Microsoft at the time when the XClarity Administrator version
2019 was released.
2022 The following are not supported:
• Windows Reseller Option Kit (ROK)
• Windows Server Semi-Annual Channel (SAC) v1709, v1803, and v1809
• Windows Server 2019 Essentials
• Windows Server 2016 Nanoserver
• Windows Server 2012 Evaluation Copy
• Windows Server images to managed servers with embedded hypervisor
keys
Windows Server 2012 R2 on servers that contain Intel CLX processors
You must physically remove the embedded hypervisor key from the target
servers before deploying a Windows image. This includes Hyper-V through
one of the virtualization profiles.
– Datacenter
– Datacenter Core
– Datacenter Virtualization (Hyper-V)
– Datacenter Virtualization Core (Hyper-V with Core)
– Standard
– Standard Core
– Standard Virtualization (Hyper-V)
– Standard Virtualization Core (Hyper-V with Core)
Microsoft® Windows® 2016
Hyper-V Server
Chapter 1 Installing operating systems on bare-metal servers 9Operating system Versions Notes
Red Hat® Enterprise 6.8 and later Includes KVM
Linux (RHEL) Server 7.2 and later Notes:
8.x
• All existing and future minor versions are supported unless otherwise
noted.
• When importing the DVD version of the OS image, only DVD1 is supported.
• When installing RHEL on ThinkSystem servers, RHEL v7.4 or later is
recommended.
• To deploy RHEL 7.2, the global IP-assignment must be set to use IPv4
addresses. For information about global settings, see Configuring global
OS-deployment settings.
• OS deployment failures have been observed on IPv6 networks with lower
bandwidths due to timeouts in the OS installer.
SUSE® Linux 12.x Includes KVM and Xen hypervisors
Enterprise Server 15.x Notes:
(SLES)
• All existing and future service packs are supported unless otherwise
noted.
• When importing the DVD version of the OS image, only DVD1 is supported.
• OS deployment failures have been observed on IPv6 networks with lower
bandwidths due to time outs in the OS installer.
• If you want to deploy SLES 12 SP2 on a ThinkSystem server, you must use
a kISO profile. To get the kISO profiles, you must import the appropriate
SLES kISO image. For more information, see Operating-system
deployment considerations.
• For SLES 15 and 15 SP1, you must import both the installer image and the
associated package image from the Server OS Support Center webpage.
For SLES 15 SP2 or later, you need to import only the Full Installation
Media image because the Unified Installer and Packages DVDs from SUSE
Linux Enterprise Server 15 and 15 SP1 are deprecated.
10 Lenovo XClarity Administrator Quick Start Guide Deploying an operating systemOperating system Versions Notes
Ubuntu Server 20.04.x Notes:
• The image can be installed on the selected storage option (local disk drive,
M.2 drive, or FC SAN volume).
• All existing and future minor versions are supported unless otherwise
noted.
• Only DHCP is supported. Static IPv4 and static IPv6 address are not
supported.
• VLAN tagging is not supported.
• Out-of-box drivers are not supported.
• OS profile customization is not supported.
VMware vSphere® 5.5 Base VMware vSphere Hypervisor (ESXi) images and Lenovo VMware ESXi
Hypervisor (ESXi) 5.5u1 Custom images are supported.
5.5u2 Lenovo VMware ESXi Custom images are customized for select hardware to
5.5u3 give you online platform management, including updating and configuring
6.0.x firmware, platform diagnostics, and enhanced hardware alerts. Lenovo
6.5.x management tools also support simplified management of the ESXi with
6.7.x select System x servers. This image is available for download from the
7.0.x VMware Support – Downloads webpage. The license that is provided with the
image is a 60-day free trial. You are responsible for meeting all VMware
licensing requirements.
Important:
• All existing and future update packs are supported for 6.0, 6.5, 6.7, and 7.0
unless otherwise noted.
• Base ESXi images (without Lenovo customization) include only basic in-
box device drivers for network and storage. The base image does not
include the out-of-box device drivers (which are included in Lenovo
VMware ESXi Custom images). You can add out-of-box device drivers by
creating your own custom OS0image profiles (see Customizing OS-image
profiles in the XClarity Administrator online documentation).
• For some versions of Lenovo VMware ESXi Custom images, separate
images might be available for System x, ThinkSystem, and ThinkServer.
Only one image for a specific release can exist in the OS-images
repository at a time.
• ESXi deployment is not supported for certain older servers. For information
about which servers are supported, see the Lenovo OS Interoperability
Guide website.
• The following versions are supported for ThinkServer devices: ESXi 6.0u3,
6.5 and later.
• During the installation of ESXi 5.5 (any update), or 6.0 onto a server in a
Flex System chassis, the server might become unresponsive or restart
shortly after the following message:
Loading image.pld
• ESXi 5.5 requires Memory Mapped I/O (MMIO) space to be configured
within the initial 4 GB of the system. Depending on the configuration,
certain systems attempt to use memory higher than 4 GB, which can
cause a failure. To resolve the issue, see VMware deployment causes
system hang or restart in the XClarity Administrator online documentation.
• When deploying ESXi using a static IPv6 mode, the hostname that is
defined on the Network Settings page in XClarity Administrator is not
configured in the deployed ESXi instance. Instead, the default hostname
localhost is used. You must manually set the hostname in the deployed
ESXi to match the hostname that is defined in XClarity Administrator.
Chapter 1 Installing operating systems on bare-metal servers 11Operating system Versions Notes
• When deploying ESXi on a managed server, the operating system does not
explicitly move the drive on which the operating system is installed to the
top of the boot-order list. If a boot device containing a bootable OS or a
PXE server is specified before the boot device containing ESXi, then ESXi
does not boot. For ESXi deployment, XClarity Administrator updates the
boot-order list for most servers to ensure the ESXi boot device is at the top
of the boot-order list; however, ThinkServer servers do not provide a way
for XClarity Administrator to update the boot-order list. You must disable
PXE boot support or remove bootable devices other than the installation
drive before deploying the operating system. For more information, see
Operating system does not boot after deploying ESXi on a ThinkServer server
in the XClarity Administrator online documentation.
Tip: Instead of setting MM Config through the Setup utility for each server,
consider using one of the predefined extended UEFI patterns that are related
to virtualization, which sets the MM Config option to 3 GB and disables the
PCI 64-bit resource allocation. For more information about these patterns,
see Defining extended UEFI settings in the XClarity Administrator online
documentation.
Operating-system image profiles
When you import an OS image into the OS images repository, Lenovo XClarity Administrator creates one or
more profiles for that image and stores the profiles in the OS images repository. Each predefined profile
includes the OS image and installation options for that image.
OS image profile attributes
OS image profile attributes provide additional information about an OS-image profile. The following attributes
can be shown.
• kISO. You must use a kISO profile to deploy SLES 12 SP2 to a ThinkSystem server. You can download
the SLES kISO image from the Linux Support – Downloads webpage.
Predefined OS image profiles
The following table lists the profiles that are predefined by XClarity Administrator when you import an
operating-system image. This table also lists the packages that are included in each profile.
You can create a customized OS image profile for a base operating system. For more information, see
Customizing OS-image profiles in the XClarity Administrator online documentation.
Operating system Profile Packages included in the profile
CentOS Linux Basic @X Window System
@Desktop
@Fonts
compat-libstdc++-33
compat-libstdc++-33.i686
compat-libstdc++-296
libstdc++.i686
pam.i686
Minimal compat-libstdc++-33
compat-libstdc++-33.i686
compat-libstdc++-296
libstdc++.i686
pam.i686
12 Lenovo XClarity Administrator Quick Start Guide Deploying an operating systemOperating system Profile Packages included in the profile
Virtualization %packages libconfig
@virtualization libsysfs
@virtualization-client libicu
@virtualization-platform lm_sensors-libs
@virtualization-tools net-snmp
# begin additional packages net-snmp-libs
@basic-desktop redhat-lsb
@desktop-debugging compat-libstdc++-33
@desktop-platform compat-libstdc++-296
@fonts # begin additional rpms
@general-desktop xterm
@graphical-admin-tools xorg-x11-xdm
@kde-desktop rdesktop
@remote-desktop-clients tigervnc-server
@x11 device-mapper-multipath
@^graphical-server-environment # end additional rpms
@gnome-desktop
@x11
@virtualization-client
# end additional packages
Microsoft Windows Datacenter GUI
Server
Datacenter GUI
Note: Includes
virtualization Hyper-V role
Hyper-V through
the Virtualization Datacenter Hyper-V role
Profile. virtualization
core
Datacenter
core
Standard GUI
Standard GUI
virtualization Hyper-V role
Standard Hyper-V role
virtualization
core
Standard
core
Customized Datacenter_
Microsoft Windows customized
Server
Standard_
customized
Microsoft® Hyper_V
Windows® Hyper-
V Server 2016
Chapter 1 Installing operating systems on bare-metal servers 13Operating system Profile Packages included in the profile
Red Hat Enterprise Basic @X Window System
Linux (RHEL) @Desktop
Note: Includes @Fonts
KVM compat-libstdc++-33
compat-libstdc++-33.i686
compat-libstdc++-296
libstdc++.i686
pam.i686
Minimal compat-libstdc++-33
compat-libstdc++-33.i686
compat-libstdc++-296
libstdc++.i686
pam.i686
Virtualization %packages libconfig
@virtualization libsysfs
@virtualization-client libicu
@virtualization-platform lm_sensors-libs
@virtualization-tools net-snmp
# begin additional packages net-snmp-libs
@basic-desktop redhat-lsb
@desktop-debugging compat-libstdc++-33
@desktop-platform compat-libstdc++-296
@fonts # begin additional rpms
@general-desktop xterm
@graphical-admin-tools xorg-x11-xdm
@kde-desktop rdesktop
@remote-desktop-clients tigervnc-server
@x11 device-mapper-multipath
@^graphical-server-environment # end additional rpms
@gnome-desktop
@x11
@virtualization-client
# end additional packages
SUSE Linux Basic and 32bit
Enterprise Server Basic with Basis-Devel
(SLES) 12 kISO Minimal
WBEM
apparmor
base
documentation
file_server
fips
gateway_server
lamp_server
mail_server
ofed
printing
sap_server
x11
Minimal and Minimal
Minimal with file_server
kISO sap_server
14 Lenovo XClarity Administrator Quick Start Guide Deploying an operating systemOperating system Profile Packages included in the profile
Virtualization- 32bit
KVM and Minimal
Virtualization- apparmor
KVM with base
kISO documentation
file_server
fips
kvm_server
kvm_tools
sap_server
x11
Virtualization- 32bit
Xen and Minimal
Virtualization- apparmor
Xen with base
kISO documentation
file_server
fips
sap_server
x11
xen_server
xen_tools
SUSE Linux Basic and apparmor
Enterprise Server Basic devel_basis
(SLES) 15 enhanced_base
base
basesystem
minimal_base
print_server
sw_management
x11
x11_enhanced
x11_yast
yast2_basis
wget
Minimal and base
Minimal minimal_base
yast2_basis
wget
Chapter 1 Installing operating systems on bare-metal servers 15Operating system Profile Packages included in the profile
Virtualization- apparmor
KVM and devel_basis
Virtualization- enhanced_base
KVM base
basesystem
minimal_base
print_server
sw_management
x11
x11_enhanced
x11_yast
yast2_basis
xen_server
xen_tools
wget
Virtualization- apparmor
Xen and devel_basis
Virtualization- enhanced_base
Xen base
basesystem
minimal_base
print_server
sw_management
x11
x11_enhanced
x11_yast
yast2_basis
xen_server
xen_tools
wget
Ubuntu Minimal Openssh-server
Virtualization qemu
qemu-kvm
libvirt-daemon
libvirt-clients
bridge-utils
virt-manager
VMware vSphere® Virtualization Base VMware vSphere Hypervisor (ESXi) images and Lenovo VMware ESXi
Hypervisor (ESXi) Custom images are supported.
Port availability for deployed operating systems
Some ports are blocked by certain operating-system profiles. The following tables list the ports that are open
(not blocked).
Ensure that the hypervisor that is running the Lenovo XClarity Administrator appliance allows network traffic
(TCP/UDP) on ports 139, 445, 3001, 3900, 8443. These are required for operating-system deployment.
RHEL Virtualization profile
By default, the Red Hat Enterprise Linux (RHEL) Virtualization profile blocks all ports except for those that are
listed in the following table.
16 Lenovo XClarity Administrator Quick Start Guide Deploying an operating systemTable 1. Port availability for RHEL Virtualization profiles
TCP or
Port UDP Direction Communication description
22 TCP Inbound SSH communication
53 TCP, Outbound/Inbound Communication with RHEL KVM networking devices
UDP
67 TCP, Outbound/Inbound Communication with RHEL KVM networking devices
UDP
161 UDP Outbound Communication with SNMP agents
162 UDP Inbound Communication with SNMP agents
427 TCP, Outbound/Inbound Communication with SLP service agent, SLP directory agent
UDP
3001 TCP Outbound/Inbound Communication with management software image-deployment
service
15988 TCP Outbound CIM-XML over HTTP communication
15989 TCP Outbound CIM-XML over HTTP communication
49152 - TCP Outbound/Inbound KVM Virtual Server communication
49215
RHEL Basic and Minimal profiles
By default, the RHEL Basic and Minimal profiles block all ports except for those that are listed in the
following table.
Table 2. Port availability for RHEL Basic and Minimal profiles
TCP or
Port UDP Direction Communication description
22 TCP Inbound SSH communication
3001 TCP Outbound/Inbound Management software image-deployment service
communication
SLES Virtualization, Basic, and Minimal profiles
For SUSE Linux Enterprise Server (SLES), some open ports are dynamically assigned based on the operating
system version and profiles. For a complete list of open ports, see your SUSE Linux Enterprise Server
documentation.
VMware ESXi Virtualization profile
For a complete list of open ports for VMware vSphere Hypervisor (ESXi) with Lenovo customization, see the
VMware documentation for ESXi on the VMware Knowledge Base website.
Windows profiles
The following ports must be available for Windows profiles.
Chapter 1 Installing operating systems on bare-metal servers 17Table 3. Port availability for Windows profiles
TCP or
Port UDP Direction Communication description
137 UDP Outbound/Inbound NetBIOS Name Service
138 UDP Outbound/Inbound NetBIOS Datagram
139 TCP Outbound/Inbound NetBIOS Session
445 TCP Outbound/Inbound SMB over TCP
Configuring a remote file server
You can import OS images, device drivers, and boot files into the OS images repository from the local
system or from a remote file server. To import files from a remote file server, you must first create a profile
that is used to authenticate the connection to the remote file server.
About this task
The following cryptographic algorithms are supported:
• RSA–2048 bits
• RSA–4096 bits
• ECDSA–521 bits (secp521r1 curve)
The following protocols are supported:
• HTTP with no authentication.
• HTTP with basic authentication.
• HTTPS (certificate validation) with basic authentication.
• HTTPS (certificate validation) with no authentication.
• FTP with password authentication.
• SFTP (client validation) with password authentication.
• SFTP (client validation) with public-key authentication
For SFTP public key authentication and HTTPS certificate validation, Lenovo XClarity Administrator validates
that the remote file server’ certificate. If the server certificate is not in the trust store, you are prompted to
accept the server certificate and add it to the trust store. For information about troubleshooting validation
issues, see Server certification validation fails in the XClarity Administrator online documentation.
Procedure
To configure a remote file server, complete the following steps.
Step 1. From the XClarity Administrator menu bar, click Provisioning ➙ Manage OS images to display the
Deploy Operating System: Manage OS images page.
Step 2. Click the Configure File Server icon ( ) to display the Configure Remote File Server dialog.
18 Lenovo XClarity Administrator Quick Start Guide Deploying an operating systemStep 3. Select the protocol for the remote file server from the Remote File Server Protocol list.
Step 4. Click Create. The Configure Remote File Server dialog is displayed.
Note: This dialog differs depending on the protocol that you selected.
Step 5. Enter the server name, address, and port.
Step 6. For HTTP, HTTPS, FTP, and SFTP with basic authentication, enter a user name and password if
authentication is required to access the server.
Step 7. For SFTP with basic authentication, click Validate Server Certificate to obtain the public key
signature.
Note: A dialog might be displayed informing you that the OS deployment process does not trust
the public key of the SFTP file server. Click OK to store and trust the SFTP public key in the OS
deployment trusted key store. If successful, the public key signature is shown in the SFTP Server
Public Key Signature field.
Step 8. For SFTP with public-key authentication:
a. Enter a key passphrase and password and select the key type if authentication is required to
access the server.
b. Click Generate Management Server Key to obtain the public-key signature.
c. Copy the generated key to the authorized_keys file in your SFTP remote file server.
d. Select the The Management key was copied onto the server checkbox in XClarity
Administrator.
e. Click Validate Server Certificate to validate the public key signature.
Note: A dialog might be displayed informing you that the OS deployment process does not
trust the public key of the SFTP file server. Click OK to store and trust the SFTP public key in
the OS deployment trusted key store. If successful, the public key signature is shown in the
SFTP Server Public Key Signature field.
f. Click Save.
Step 9. Click Save Server.
After you finish
From the Configure Remote File Server dialog, you can perform the following actions:
• Refresh the list of remote file server by clicking the Refresh icon ( ).
Chapter 1 Installing operating systems on bare-metal servers 19• Modify a selected remote file-server by clicking the Edit icon ( ).
• Remove a selected remote file server by clicking the Delete icon ( ).
Importing operating-system images
Before you can deploy a licensed operating system to managed servers, you must import the image into the
XClarity Administrator OS images repository.
About this task
For information about operating system images that you can import and deploy, see Supported operating
systems.
The OS images repository can store up to ten operating-system images, if space is available to store the
images (up to 50GB). For a list of supported base and custom operating systems, see Supported operating
systems in the Lenovo XClarity Administrator online documentation.
You can import only one image at a time. Wait until the image is displayed in the OS images repository before
attempting to import another image. Importing the operating system might take a while.
For ESXi only, you can import multiple ESXi builds with same major/minor version to the OS images
repository.
When you import an operating system image, XClarity Administrator:
• Ensures that there is sufficient space in the OS images repository before importing the operating system.
If you do not have sufficient space to import an image, delete an existing image from the repository and
attempt to import the new image again.
• Creates one or more profiles of that image and stores the profile in the OS images repository. Each profile
includes the OS image and installation options. For more information about predefined OS image profiles,
see Operating-system image profiles.
Note: Internet Explorer and Microsoft Edge web browsers have an upload limit of 4 GB. If the file that you
are importing is greater than 4 GB, consider using another web browser (such as Chrome or Firefox) or copy
the file to a remote file server and import using the Remote import option.
Procedure
To import an operating-system image into the OS images repository, complete the following steps.
Step 1. Obtain a licensed ISO image of the operating system.
Note: You are responsible for obtaining applicable licenses for the operating system.
Step 2. From the XClarity Administrator menu bar, click Provisioning ➙ Manage OS Images to display the
Deploy Operating Systems: Manage OS Images page.
Step 3. Click the Import Files icon ( ) to display the Import OS Images and Files dialog.
Step 4. Click the Local tab to upload files from the local system, or click the Remote tab to upload files
from a remote file server.
Note: To upload a file from a remote file server, you must first create a remote-file-server profile by
clicking the Configure File Server icon ( ). For more information, see Configuring a remote file
server .
20 Lenovo XClarity Administrator Quick Start Guide Deploying an operating systemStep 5. If you chose to use a remote file server, select the server that you want to use from the Remote File
Server list.
Step 6. Enter the path and ISO-image file name, or click Browse to find the ISO image that you want to
import.
If you chose to use the local file server, you must enter the absolute path to the ISO-image file. If
you chose to use a remote file server, you must enter the absolute path (for example, /home/user/
isos.osimage.iso) or relative path (for example, /isos.osimage.iso) to the ISO-image file (depending
on the configuration of the remote file server). If the file is not found, verify that the path to the file is
correct, and try again.
Step 7. Optional: Optional: Enter a description for the OS image.
Step 8. Optional: Optional: Select a checksum type to verify that the ISO image being imported into
XClarity Administrator is not corrupt, and copy and paste the checksum value in the provided text
field.
If you select a checksum type, you must specify a checksum value to check the integrity and
security of the uploaded OS image. The value must come from a secure source from an
organization that you trust. If the uploaded image matches with the checksum value, it is safe to
proceed with deployment. Otherwise, you must upload the image again or check the checksum
value.
Three checksum types are supported:
• MD5
• SHA1
• SHA256
Step 9. Click Import.
Tip: ISO image is uploaded over a secure network connection. Therefore, network reliability and
performance affects how long it takes to import the image. If you close the web browser tab or
window in which the operating-system image is being uploaded before the upload completes, the
import fails.
Results
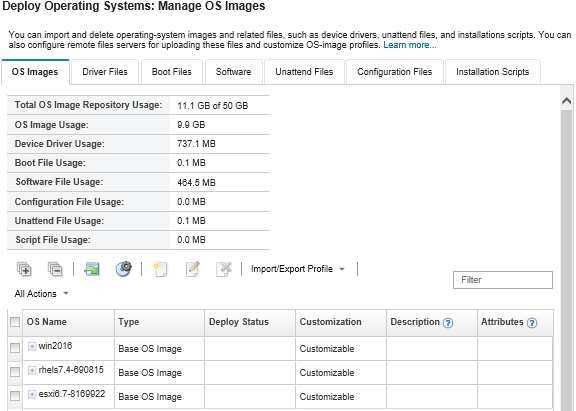
XClarity Administrator uploads the OS image and creates an image profile in the OS images repository.
Chapter 1 Installing operating systems on bare-metal servers 21From this page, you can perform the following actions. • Create a remote-file-server profile by clicking the Configure File Server icon ( ). • Customize an OS image by clicking the Create Customized Profile icon ( ). • Modify an OS image by clicking the Edit icon ( ). • Import a customized OS image profile and apply to a base OS image by clicking Import/Export Profile ➙ Import Customized Profile Image (see Importing a customized OS image profile in the XClarity Administrator online documentation). • Delete a selected OS image or customized OS image profile by clicking the Delete icon ( ). • Export a selected customized OS image profile by clicking Import/Export Profile ➙ Export Customized Profile Image. Note: When importing Windows Server images, you must also import the associated bundle file. Lenovo bundles the predefined WinPE_64.wim boot file along with a set of device drivers into a single package that can be downloaded from the Lenovo Windows drivers and WinPE Images Repository webpage and then imported into OS-images repository. Because the bundle file contains both device drivers and boot files, you can import the bundle file from the Device Driver or Boot Files tab.. Configuring global OS-deployment settings Global settings serve as defaults settings when operating systems are deployed. About this task From the Global Settings page, you can configure the following settings: 22 Lenovo XClarity Administrator Quick Start Guide Deploying an operating system
• The password for the administrator user account to be used for deploying the operating systems
• The method to use to assign IP addresses to servers
• License keys to use when activating installed operating systems
• Optionally join an Active Directory domain as part of the Windows operating-system deployment
Procedure
To configure the global settings to be used for all servers, complete the following steps.
Step 1. From the Lenovo XClarity Administrator menu bar, click Provisioning ➙ Deploy OS Images to
display the Deploy OS Images page.
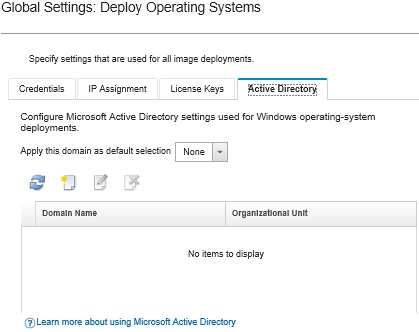
Step 2. Click the Global Settings icon ( ) to display the Global Settings: Deploy Operating Systems
dialog.
Step 3. On the Credentials tab, enter the password for the administrator account to be used to log in to
the operating system.
Step 4. On the IP Assignment tab, select the following options.
a. Optional: Select Use VLANs to allow configuring VLAN settings in the Network Settings dialog
(see Configuring network settings for managed servers).
Notes: Notes:
• VLAN tagging is not supported for Linux operating-system deployments.
• VLAN tagging is not supported for operating-system deployments on ThinkServer devices.
• VLAN mode is supported only for servers that have MAC addresses in their inventory. If
AUTO is the only MAC address that is available for a server, then VLANs cannot be used to
deploy operating systems to that server.
b. Select the method for assigning IP addresses when configuring the deployed operating
system:
Note: The XClarity Administrator network interface that is used for management must be
configured to connect to the baseboard management controller using the same IP address
method that you choose on the Global Settings: Deploy Operating Systems dialog. For
Chapter 1 Installing operating systems on bare-metal servers 23You can also read