Lab Procedure Guided Notes - Teacher Edition
←
→
Page content transcription
If your browser does not render page correctly, please read the page content below
Name: _________________________________________________ Period: ___________ Date: ________________

Lab Procedure Guided Notes – Teacher Edition
                                          Laboratory techniques are processes and practices that are
                                          recommended for using the various equipment in the laboratory.
                                          Learning the proper techniques and how to use all the equipment can
                                          take time; thus, it is important to start with the basics to be gain
                                          mastery of these techniques. Some of the basic lab techniques
                                          include pouring or transferring, measuring, filtering, and heating.

          Image by Freepik.com

Pouring / Transferring Liquids
   •   Transferring to a wide mouthed container
          o Use the back of your fingers to remove the stopper from the reagent
              bottle.
          o Hold the stopper between your fingers until the transfer is complete.
          o Grasp the container from which you are pouring with the palm of your
              hand covering the label.

   •   Transferring to a narrow-mouthed container
          o Use a funnel when transferring liquids to a narrow-mouthed container.
          o Put it on the top of the container with the tube inserted inside.
          o Take the container with the liquid and hold it above the funnel.
          o Slowly pour the contents into the funnel.
          o When transferring to a test tube or graduated cylinder, the container
              should be held at an eye level.
          o Pour slowly until the correct volume has been transferred.

Copyright © iTeachly.com                               1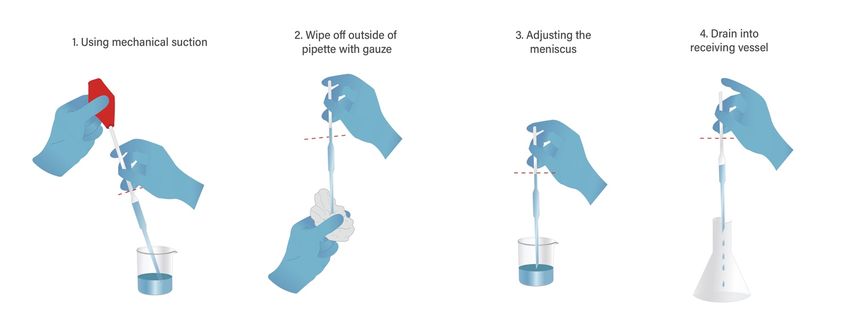
Name: _________________________________________________ Period: ___________ Date: ________________

Lab Procedure Guided Notes – Teacher Edition
   •   Transferring using a stirring rod
          o When pouring liquid from a reagent bottle into a beaker, the reagent
              should be poured slowly down a glass stirring rod.
          o The rod should touch the lip of the vessel from which you are pouring
              and the inside of the vessel into which the liquid is being transferred.

   •   Pipetting
          o It is a technique used to transfer liquids using a pipette.
          o Do not pipet directly from the reagent bottle unless you are
              instructed to do so. Instead, pour some of the liquid first into
              a container before pipetting the liquid.
          o Be careful not to touch the walls of the container or its
              contents with the tip of the pipette.
          o Make sure you keep the tip of the pipette elevated from the
              bottom of the container to avoid creating air bubbles.
          o A mechanical suction may be used to aspirate the liquid. Replace the suction with a finger then
              wipe off the side of the pipette. Slowly lift the finger to adjust the meniscus. Once the correct
              measurement is achieved, drain the liquid into the receiving vessel.

Copyright © iTeachly.com                                 2
Name: _________________________________________________ Period: ___________ Date: ________________

Lab Procedure Guided Notes – Teacher Edition
   •   Decanting
           o It is gradually pouring liquid from one container to another, without disturbing the sediment.
           o In this technique, the lighter component is poured off the top of the mixture.
           o The supernatant is the clear liquid that lies above the solid residue or sediment. This is the liquid
              being poured off to another vessel.
           o The liquid component that is collected or transferred into a new vessel is known as the decant.

Transferring Solids
   •   A solid can be dispensed from its reagent jar directly into a vessel especially if it is wide mouthed
       container.
   •   Tip the bottle and slowly rotate the bottle back and forth.
   •   Do not tip the bottle up high and let the contents pour out.
   •   If a solid is to be transferred into a narrow-mouther vessel, a powder funnel may be used.
   •   Alternatively, the solid can be nudged off a creased paper in portions using a spatula.

Copyright © iTeachly.com                                3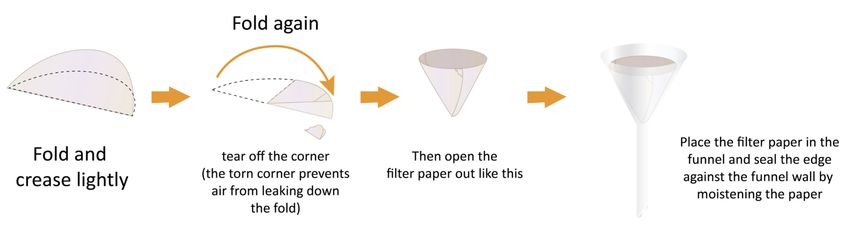
Name: _________________________________________________ Period: ___________ Date: ________________

Lab Procedure Guided Notes – Teacher Edition
Measuring volumes of liquids
   •   Select a cylinder that is large enough to hold the volume of liquid
       being measured.
   •   Put the graduated cylinder on a flat surface.
   •   Vide the height of the liquid in the cylinder with your eyes directly
       level with the liquid.
   •   The liquid will tend to curve downward. This curve is called the
       meniscus.
   •   Always read the measurement at the bottom of the meniscus.
   •   Look at the horizontal lines on the side of the cylinder. Ascertain to
       which line the meniscus is closest.

Measuring volumes of irregularly shaped solids
   •   Water displacement method is used to determine the volume of
       an irregularly shaped solid.
   •   To do this, find a graduated cylinder that is large enough to hold
       the object being measured.
   •   Fill the graduated cylinder with adequate water. This means that
       when the object is place in the cylinder. it must be fully submerged.
   •   Be careful not to put so much water that the water level will rise
       past the cylinder’s markings when the object is submerged.
   •   Record the volume of the water prior to submerging the object.
       Label it as initial volume.
   •   Place the object in the graduated cylinder and record the resulting
       water volume as final volume.
   •   Subtract the volume of the water alone from the volume of the water plus the object. This will be the
       volume of the irregularly shaped solid.

Copyright © iTeachly.com                                 4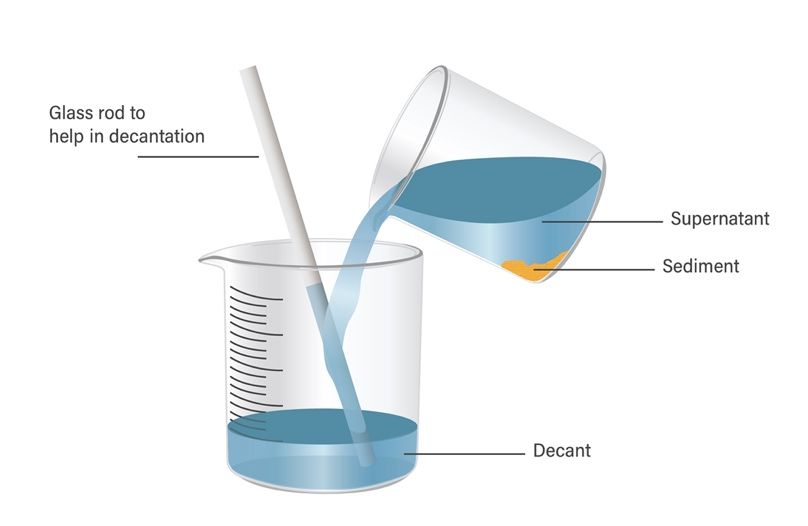
Name: _________________________________________________ Period: ___________ Date: ________________
Lab Procedure Guided Notes – Teacher Edition
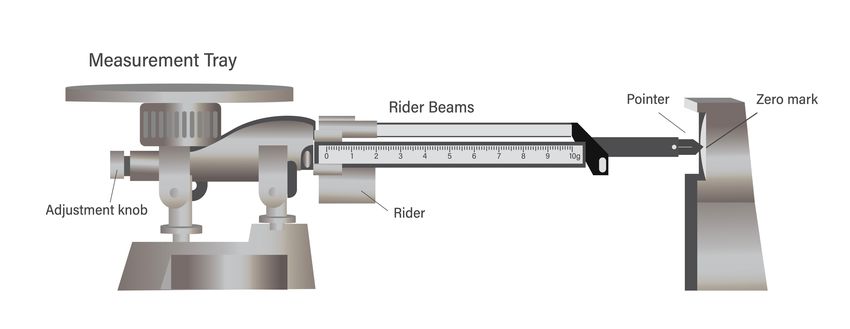
Measuring mass
• The triple beam balance is used measure masses very precisely.
• With the pan empty, move the three sliders on the three beams to their leftmost positions. This will
make the balance pointer equal to zero.
• If the pointer is not aligned with the zero mark, then calibrate the balance by turning the adjustment
knob on left side, under the pan.
• Once the balance has been calibrated, put the object to be measured on the pan.
• Move the 100-gram slider along the beam to the right until the pointer drops below the zero mark. The
notched position immediately to the left of this point indicates the number of hundreds of grams.
• Now move the 10-gram slider along the beam to the right until the pointer drops below the zero mark.
The notched position immediately to the left of this point indicates the number of tens of grams.
• The beam in front is not notched and the slider can move anywhere along the beam. The boldface
numbers on this beam indicate the grams and the tick marks between boldface numbers indicate tenths
of grams.
Filtering
• Filtration involves separation of a solid from a liquid by
passing the mixture through a porous material.
• In filtration, the porous filtering material is usually a
paper inserted in the funnel. The liquid collected is called
filtration while the solid collected in the filter paper is
called residue.
Copyright © iTeachly.com 5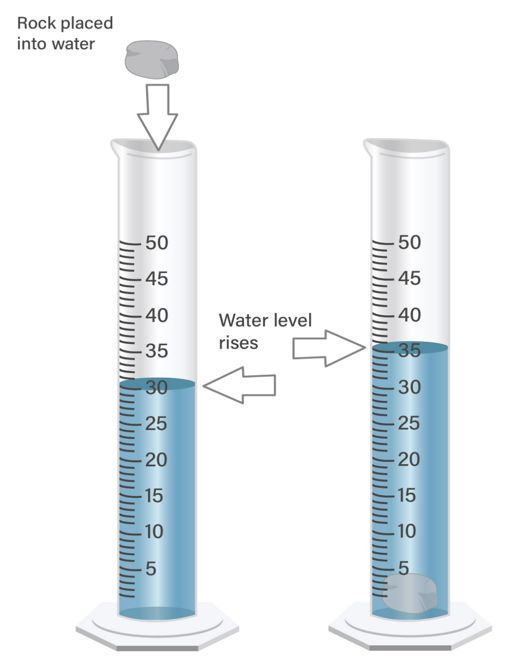
Name: _________________________________________________ Period: ___________ Date: ________________

Lab Procedure Guided Notes – Teacher Edition
   •   Fold the filter paper to fit in the funnel as shown in the image below.

   •   Wet the paper with the solvent, which is usually water.
   •   Adjust it so that the entire cone tightly fits on the inner surface of the glass funnel.
   •   Pour the contents of the solution to be separated onto the funnel with filter paper. Use a stirring rod
       when pouring to avoid spillage.

Heating
   •   Heating in a test tube
          o Hold the test tube with the help of a test tube holder at an
              angle.
          o Heat just below the surface of the liquid but not at the
              bottom.
          o While heating, the move the test tube back and forth.
          o If the test tube is heated at the bottom, a bubble may form
              causing the entire content to spill out of the test tube
              violently. This is called bumping. This can cause a serious
              accident, if the mouth of the test tube is pointing towards
              you or someone working near you.

Copyright © iTeachly.com                                 6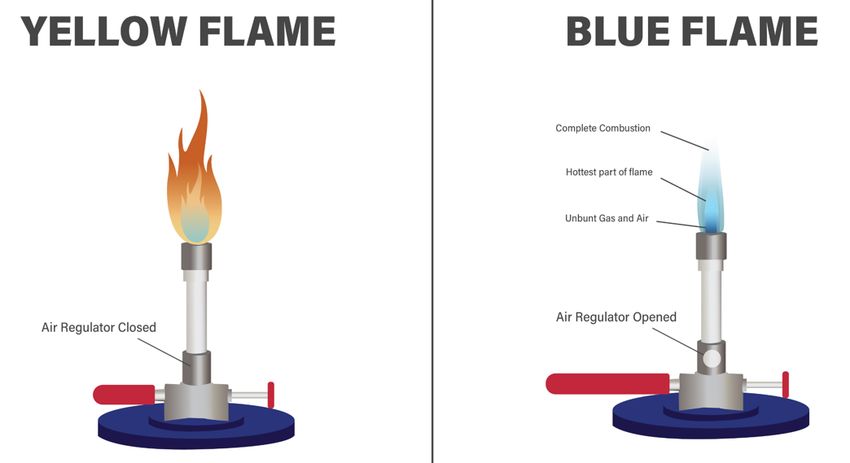
Name: _________________________________________________ Period: ___________ Date: ________________
Lab Procedure Guided Notes – Teacher Edition
• Heating in a beaker
o If the liquid is to be heated in a beaker or a flask, the beaker or the flask is placed on a wire gauze
which in turn is placed on a tripod.
o For safe boiling, it is advisable to add a chip of broken china dish or a piece of any other non-
reacting tiny material like pumice stone to avoid bumping.
Lighting a Bunsen Burner
• A Bunsen burner is a common laboratory instrument that produces a hot, sootless, and non-luminous
flame. It allows for precise regulation of the mixing of gas and oxygen before combustion which ignites
the flame.
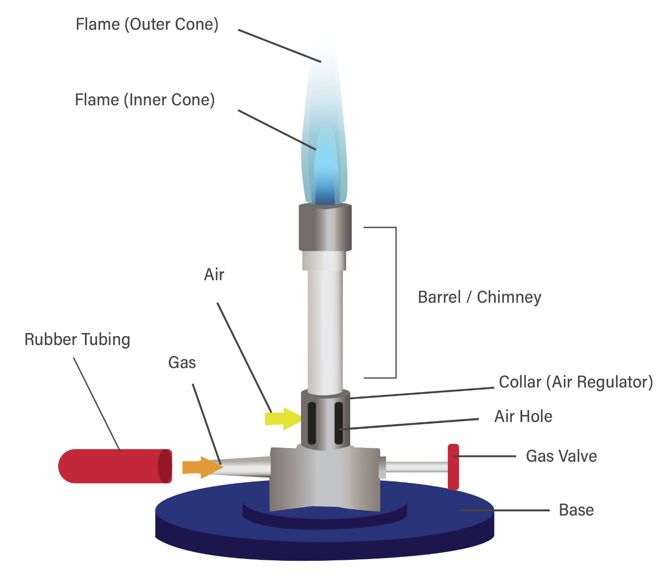
• The following are the parts of the Bunsen burner:
o Barrel – it is where the gas and air mix for
combustion
o Gas inlet – it is where one end of the rubber tube
is connected to the main gas
o Rubber tube – connects the burner to the main gas
o Gas valve – regulates the amount of gas that
enters the burner
o Collar – regulates the amount of air entering the
barrel
o Base – supports the burner
Copyright © iTeachly.com 7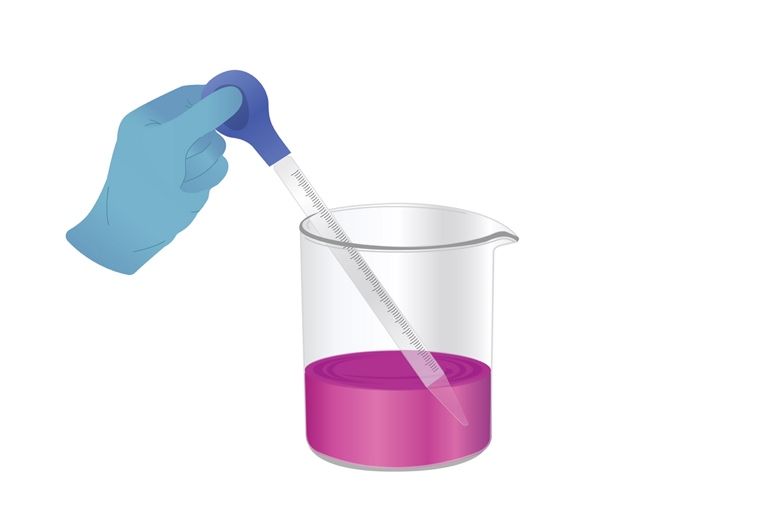
Name: _________________________________________________ Period: ___________ Date: ________________

Lab Procedure Guided Notes – Teacher Edition
   •   Luminous vs Non-luminous Flame
          o A luminous flame burns yellow while a non-luminous flame burns blue.

          o This is due to the difference in the available supply of oxygen.
          o Luminous flames have limited access to oxygen. It is a less hot flame, highly visible, and is used
              whenever you are not heating something.
          o Non-luminous flames have unlimited access to oxygen. It is hotter flame, harder to see, and is
              used whenever heating is necessary.
   •   To light a Bunsen burner:
          o Connect the hose securely to gas supply and Bunsen burner.
          o Turn on main gas. If you hear gas, check the valve on the Bunsen burner as it may be open. If it is
              open, close it by turning it counterclockwise.
          o Turn the valve on the Bunsen burner clockwise about 3 half turns.
          o Hold the striker on top of the barrel and ignite it.
          o Use the gas valve to control the flame’s size. Take note that more gas will create a larger flame
              and less gas gives a smaller flame.
          o Twist the collar to adjust the flame’s temperature. Close the collar so that no air enters the barrel
              for the coolest flame. Adjust the collar to allow air to enter the barrel and achieve a blue flame.
          o To extinguish the flame, close the needle valve completely by turning it clockwise to cut off the
              gas supply.

Copyright © iTeachly.com                               8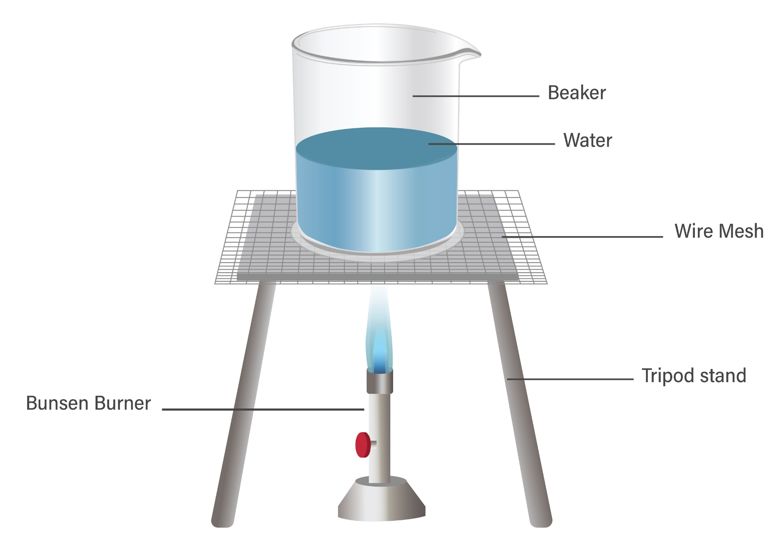
You can also read