EcoCoder-AI User Manual - V2.5 Copyright ECOTRON LLC All Rights Reserved
←
→
Page content transcription
If your browser does not render page correctly, please read the page content below
EcoCoder-AI

User Manual

      V2.5

  Copyright ECOTRON LLC
    All Rights Reserved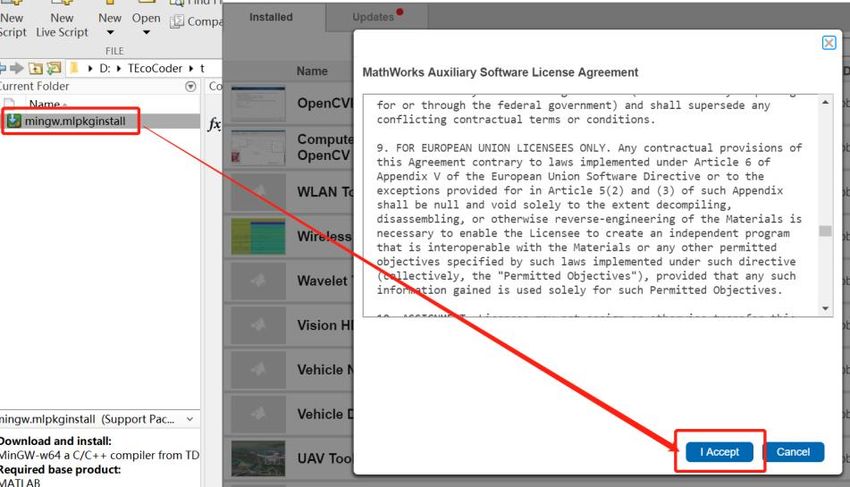
Revision History
 Time               Version   Detail                                       Reviser
 May. 2, 2019       V1.0      First version                                David Wang
 Sep. 20, 2019      V1.1      First page updated                           David Wang
 Nov. 10, 2019      V1.2      Add external mode                            David Wang
 Feb. 19, 2020      V2.0      Block update, detailed using instructions,   David Wang
                              external mode update                         Luke Wang
 Feb. 19, 2020      V2.1      Summary update                               David Wang
 Apr. 17, 2020      V2.2      Add 3 dependencies                           David Wang
 May 11, 2020       V2.3      Contact info updates                         Zack Li
 Sep 14, 2021       V2.5      Update based on v2.5 Manual                  Jason Du
                                                                           Churchill Qiu

Contact us
Web:             http://www.ecotron.ai

Email:           info@ecotron.ai

                 support@ecotron.ai

Address:         13115 Barton Rd, Ste H

                 Whittier, CA 90605 USA

Telephone:       +1 562-758-3039 / +1 562-713-1105

Fax:             +1 562-352-0552

                                       Copyright ECOTRON LLC
                                         All Rights Reserved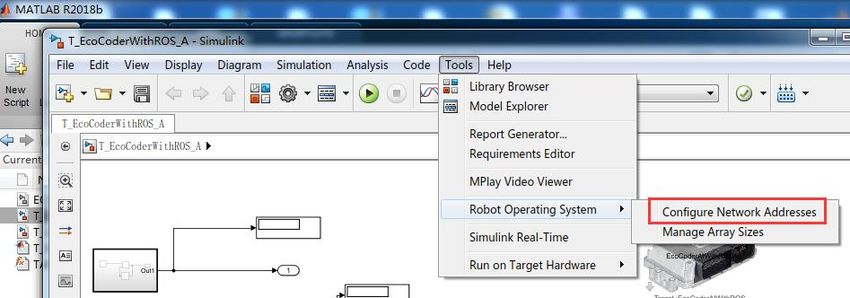
EcoCoder-AI Manual
                                                     Table of Contents
Chapter 1 Overview ........................................................................................................................ 4

   1.1 About EcoCoder-AI................................................................................................................ 4

   1.2 Operating System Requirements .......................................................................................... 4

   1.3 MATLAB Components Requirements ................................................................................... 4

   1.4 Supported MATLAB version .................................................................................................. 4

   1.5 Activate EcoCoder-AI ............................................................................................................ 5

       1.5.1       Activate EcoCoder by USB dongle ............................................................................ 5

Chapter 2 Build Developing Environment Based On EcoCoder-AI and Simulink ROS .................... 6

   2.1 Common ROS commands ..................................................................................................... 6

   2.2 Software Installation List ...................................................................................................... 7

   2.3 ROS Toolbox Dependencies for Systems and Software ........................................................ 9

   2.4 Install C++ Compiler ............................................................................................................ 10

       2.4.1       MATLAB 32bits Compiler Installation Steps ........................................................... 10

       2.4.2       MATLAB 64 bits Compiler Installation Steps .......................................................... 12

   2.5 Install MinGW-w64 Compiler.............................................................................................. 12

   2.6 Install EcoCoder-AI .............................................................................................................. 14

   2.7 Model Configuration ........................................................................................................... 18

   2.8 Read Camera Video Block Configuration ............................................................................ 18

   2.9 Sample Model Instruction................................................................................................... 20

       2.9.1       Login Xavier Through Serial Port and Check IP ....................................................... 20

       2.9.2       Use Ethernet to Login Xavier .................................................................................. 22

       2.9.3       Run ROS Master ...................................................................................................... 24

       2.9.4       Introduction to Basic Message Types ..................................................................... 24

1|Page
EcoCoder-AI Manual
      2.9.5        Custom Message Type Example Introduction ........................................................ 34

Chapter 3 EcoCoder-AI Package Library ....................................................................................... 39

   3.1 EcoCoder Target Definition ................................................................................................. 39

   3.2 CAN Module ........................................................................................................................ 40

      3.2.1        Receive CAN Raw with Trigger ................................................................................ 40

      3.2.2        Transmit CAN Message ........................................................................................... 41

      3.2.3        Read Fixed-Point CAN Message .............................................................................. 42

      3.2.4        Read CAN Message ................................................................................................. 45

      3.2.5        Send Fixed-Point CAN Message .............................................................................. 47

      3.2.6        Send CAN Message ................................................................................................. 49

   3.3 Socket UDP Module ............................................................................................................ 51

      3.3.1        UDP Receive ............................................................................................................ 51

      3.3.2        UDP Send ................................................................................................................ 52

   3.4 Sensors Blocks ..................................................................................................................... 53

      3.4.1        Read Camera Video................................................................................................. 53

   3.5 Linux Blocks ......................................................................................................................... 54

      3.5.1        Linus Printf .............................................................................................................. 54

Chapter 4 CAN Protocol Implementation ..................................................................................... 54

   4.1 DBC Convert to m File ......................................................................................................... 55

   4.2 CAN Broadcast Protocol Implementation ........................................................................... 58

      4.2.1        Select CAN Module Library ..................................................................................... 58

      4.2.2        Select m File ............................................................................................................ 58

      4.2.3        Select CAN Message................................................................................................ 58

      4.2.4        Select Sampling Time .............................................................................................. 59

2|Page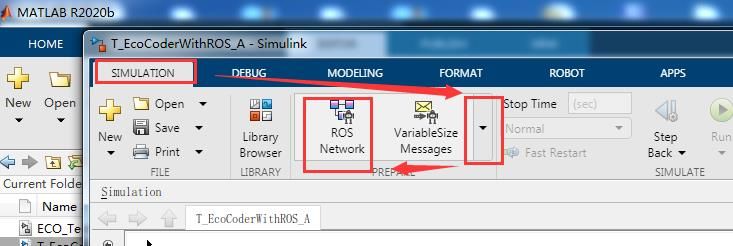
EcoCoder-AI Manual
       4.2.5        CAN Example Model ............................................................................................... 61

Chapter 5 FAQ ............................................................................................................................... 62

   5.1 Q1 - m Files Cannot Be Used ............................................................................................... 62

   5.2 Q2 - CAN Module Interface Is Blank ................................................................................... 62

   5.3 Q3 - Compilation Error Common Problems ........................................................................ 62

       5.3.1        Failed To Add Environment Variables in WIN10 System ........................................ 62

       5.3.2        MATLAB Needs to Be Restarted After Adding Environment Variables .................. 62

       5.3.3        Separator Error for Adding Environment Variables ................................................ 62

       5.3.4        The Current Path of The Model Has Characters in A Different Language, Spaces, or
       Special Characters ................................................................................................................. 62

3|Page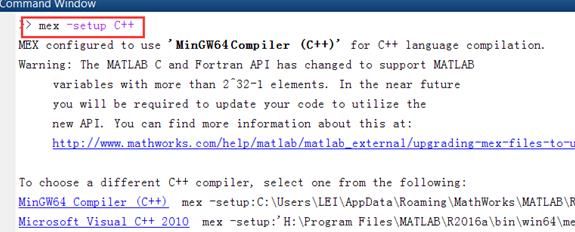
EcoCoder-AI Manual
Chapter 1 Overview

1.1 About EcoCoder-AI

EcoCoder-AI is a powerful automated code generation library based on Matlab/Simulink that links
directly to the target controller. EcoCoder-AI integrates the ability to generate code, compile, and
generate executable files with only one click. It can convert the control model based on Simulink
directly into a ROS-based executable program for the target controller and download it into the
target controller. It maximizes Simulink general libraries' usage and lets application developers
develop ROS-based applications in an easy graphical way.

1.2 Operating System Requirements

Windows 7, Windows 10 operating system.

1.3 MATLAB Components Requirements

Components that must be installed:
•   MATLAB
•   Simulink
•   MATLAB Coder
•   Simulink Coder
•   Embedded Coder
Components that are highly recommended:
•   Stateflow

1.4 Supported MATLAB version

Supported MATLAB versions by EcoCoder-AI:
▪   MATLAB R2016a 64-bit
▪   MATLAB R2016b 64-bit

4|Page
EcoCoder-AI Manual
▪   MATLAB R2017a 64-bit
▪   MATLAB R2017b 64-bit
▪   MATLAB R2018a 64-bit
▪   MATLAB R2018b 64-bit
▪   MATLAB R2019a 64-bit
▪   MATLAB R2019b 64-bit
▪   MATLAB R2020a 64-bit
▪   MATLAB R2020b 64-bit
▪   MATLAB R2021a 64-bit
Note: If customers have problems with MATLAB component configuration, please contact
customer support.

1.5 Activate EcoCoder-AI

EcoCoder requires a license file or USB dongle to be activated before it can be used.

1.5.1 Activate EcoCoder by USB dongle

Connecting the USB dongle device to the computer will automatically activate EcoCoder-AI.
Opening MATLAB after successful activation will show the following red prompt. And it will not
report license errors when EcoCoder Target Definition selects the target EcoCoderAIWithROS to
run the simulation.

5|Page
EcoCoder-AI Manual

Chapter 2 Build Developing Environment Based On EcoCoder-AI and Simulink ROS

For more ROS information, you can go to the ROS website. The official English website of Wiki is
http://wiki.ros.org/. The current release version of ROS in Xavier of EAXVA04 is ROS Melodic
Morenia, or also called melodic version.

2.1 Common ROS commands

          Command                      Description                       Example

           roscore                    Start master

rosrun pkg_name node_name             Run program              rosrun t_ros_a t_ros_a_node

                                 Get the nodes list when
         rosnode list
                                           running

                                    Show the detailed
  rosnode info node_name                                          rosnode info T_ROS_A
                                 information about node

         rostopic list         Show the topic of the node

                               Check ROS_PACKAGE_PATH
 echo $ROS_PACKAGE_PATH
                                      path variable

          rqt_graph                 Show node graph

   rosrun rqt_top rqt_top       Run rqt_top graphic tool

  rosrun rqt_topic rqt_topic   Run rqt_topic graphic tool

   rosnode kill node_name             Kill one Node                rosnode kill T_ROS_A

                                Show the contents of the
  rostopic echo topic_name                                    rostopic echo test_ros_uint16
                                     posted message

6|Page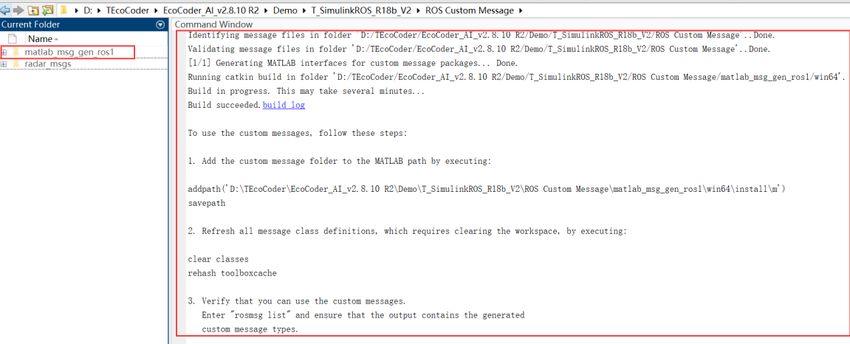
EcoCoder-AI Manual
                                    Post data into the
  rostopic pub topic_name      topic.After msg_type, press      rostopic pub test_ros_uint32
          msg_type                 Tab to complete the           std_msgs/UInt32 "data: 0"
                                         content.

2.2 Software Installation List

1) MobaXterm

MobaXterm is a more convenient SSH client software than Putty. On the official website, a free
green version can be downloaded. If users find it inconvenient to log in and operate the target
machine remotely on a Windows system, they can consider using MobaXterm. Also, some
examples later in this documentation are using MobaXterm.

2) Stateflow Compiler

For support about the Stateflow compiler, or a closer look at MATLAB's description of each
version, you can search at the MATLAB’s official search box, type Compilers for more
information.

 Compilers                                          Functions

                In general, MATLAB R2018a-R2020b recommends using Microsoft Visual C ++
Microsoft      2017 to meet the requirements of the compilers for most components, including
Visual C++                                       Stateflow.

 Lcc-win32                            Support 32 bits MATLAB Stateflow

 MinGW-        Support for some versions of MATLAB Stateflow. For details, please see the table
  GCC                       below MATLAB version and supported MinGW version.

MATLAB version and MinGW version that supports Stateflow are matched as bellow:
                  MATLAB Version          MinGW Version that supports Stateflow

               MATLAB 2015a or older                     Not support

7|Page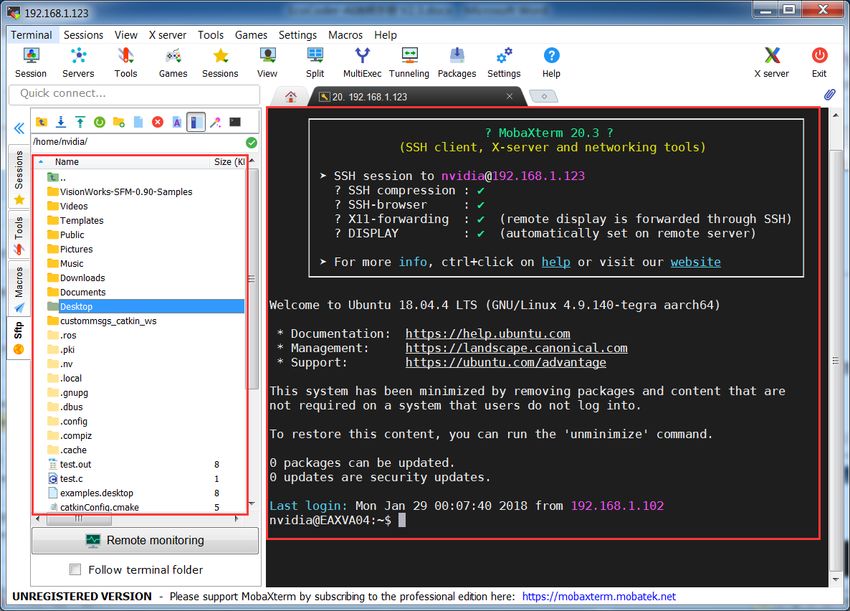
EcoCoder-AI Manual
                   MATLAB 2015b              MinGW 4.9.2 (Distributor:TDM-GCC)

                   MATLAB 2016a              MinGW 4.9.2 (Distributor:TDM-GCC)

                   MATLAB 2016b              MinGW 4.9.2(Distributor:TDM-GCC)

                   MATLAB 2017a              MinGW 4.9.2(Distributor:TDM-GCC)

                   MATLAB 2017b               MinGW 5.3(Distributor:TDM-GCC)

                   MATLAB 2018a              MinGW 5.3(Distributor:mingw-w64)

                   MATLAB 2018b              MinGW 6.3(Distributor:mingw-w64)

                   MATLAB 2019a              MinGW 6.3(Distributor:mingw-w64)

                   MATLAB 2019b              MinGW 6.3(Distributor:mingw-w64)

                   MATLAB 2020a              MinGW 6.3(Distributor:mingw-w64)

                   MATLAB 2020b              MinGW 6.3(Distributor:mingw-w64)

                   MATLAB 2021a              MinGW 6.3(Distributor:mingw-w64)

Compiler Selections:
Install a compiler version that supports MATLAB. You can type in the MATLAB official search box.
URL is:

https://www.mathworks.com/support/requirements/previous-releases.html

If install Microsoft Visual C+, it is recommended to refer to the following for installation. Also
when install Microsoft Visual Studio, you can just install the C++ environment without activating
the integrated development environment after installation:
    MATLAB R2010b-R2016a can use Microsoft Visual C++ 2010 Professional。
    MATLAB R2015a-R2018a can use Microsoft Visual C++ 2013 Professional。
    MATLAB R2016b-R2019b can use Microsoft Visual C++ 2015 Professional。
MATLAB R2018a-R2021a can use Microsoft Visual C++ 2017 Family。
3) EcoCoder-AI Installation Package

8|Page
EcoCoder-AI Manual
2.3 ROS Toolbox Dependencies for Systems and Software
The ROS Toolbox has been added to the MATLAB R2020b, eliminating the need to install the
Robots System Toolbox Interface for ROS Custom Message. The dependencies for the systems
and software are as follows:
1) System Requirements
Supports various OS:
• Windows® — Windows 10 recommended.
• Linux® — Ubuntu 18.04 recommended.
• Mac OS X
2) Python Version 2.7
Need to install A sub-version of version 2.7. In the command window, type pyenv to see if
Python is installed. Also, when installing multiple versions of Python, you can select version 2.7
by type the command: pyenv ('Version', '2.7').
3) CMake 3.15.5+
Need to download 3.15.5 or later versions of CMake from the CMake website. Remember to
choose to add CMake to the system environment variable PATH.
9|PageEcoCoder-AI Manual 4) C++ Compilers Need to install the C-compiler additionally. Requirements for the different system: • Windows— Visual Studio 2017 • Linux— GNU Compiler Collection (GCC) 6.3+ • macOS — Xcode 10+ 2.4 Install C++ Compiler For 32-bit systems, the MATLAB package provides a “Lcc” compiler that is sufficient to generate code. In order to use the Stateflow encoder in Simulink, it is necessary to install a third-party C++ compiler that supports the 64-bit version of MATLAB. 2.4.1 MATLAB 32bits Compiler Installation Steps 1) Type “mex -setup” in command window, then press Enter. 10 | P a g e
EcoCoder-AI Manual

2) Enter “y” and press enter.

3) Select compiler, such as selecting “1” and pressing enter keys.

4) Enter “y”, and press enter.

5) The following information pops up and the words “Done…” appear in the red box to
    indicate that the installation was successful.

11 | P a g e
EcoCoder-AI Manual
2.4.2 MATLAB 64 bits Compiler Installation Steps
1) Sign in to MATLAB’s official website.
2) Find the compiler supported by the current MATLAB version, download and install it.
3) Follow the previous MATLAB 32-bit instructions to configure the compiler.
2.5 Install MinGW-w64 Compiler
If you are using MATLAB R2018a-R2020b and have Microsoft Visual C++ 2017 installed, you
don’t need to install MinGW-w64. If you still need to install, you can refer to the following steps:
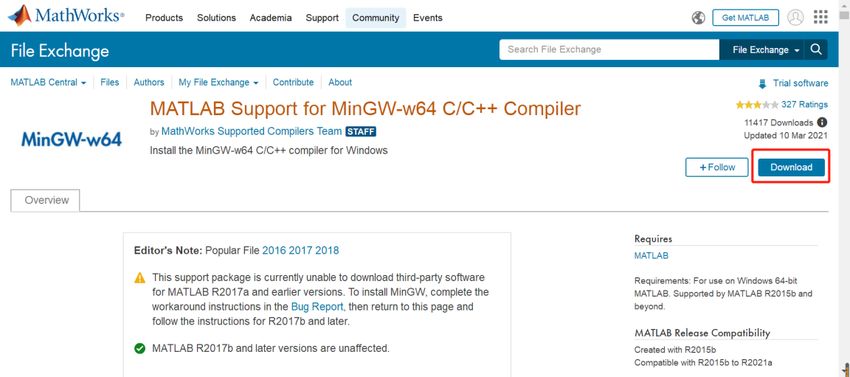
1) You can find installation resources by searching in the Help search box at MATLAB or
minGW-w64 website search box. The guidance URL:
https://www.mathworks.com/matlabcentral/fileexchange/52848-matlab-support-for-
mingw-w64-c-c-compiler
2) Download the latest version, click on Download below, you can download the file
mingw.mlpkginstall
12 | P a g eEcoCoder-AI Manual
3) When MATLAB is running, you can open the download and installation window by double-
clicking mingw.mlpkginstall in the MATLAB environment.
4) In MATLAB command window, enter "mex-setup C" and "mex-C-setup" for compiler
selection and installation of C and C++, respectively.
13 | P a g eEcoCoder-AI Manual
5) Select MinGW64 Compiler
2.6 Install EcoCoder-AI
Note: Turn off MATLAB throughout the whole installation process.
1) Double-click the EcoCoder installation file, and click “Next” after popping up the following
window
2) Once selected the installation path, click “Next”
14 | P a g eEcoCoder-AI Manual
3) Click “Next”
4) From the list of installed MATLAB, select the version of MATLAB that you want to use, click
“Install EcoCoder to selected MATLAB version” and then click “OK”
15 | P a g eEcoCoder-AI Manual
5) After the installation completion prompt appears, click “Close”
6) The desktop icon “EcoCoder Loader” appears to associate or disassociate EcoCoder to
MATLAB.
16 | P a g eEcoCoder-AI Manual
7) If the prompt “EcoCoder has been installed successfully” is indicated in the red box below
after starting MATLAB, the EcoCoder installation is successful.
Note: EcoCoder needs to be activated after installation is complete for further using.
17 | P a g eEcoCoder-AI Manual 2.7 Model Configuration Drag the module EcoCoder Target Definition and select the target EcoCoderAIWithROS to complete the basic configuration of the model. Also, need to configure Solver, mostly set as discrete type, step length units are second (the example below is 0.001s, you can set other values). Stop time is Inf, as shown below Also, if it's MATLAB R2016a-R2019a version, it's better to set the pattern below as External. 2.8 Read Camera Video Block Configuration Read Camera Video module uses three libraries of opencv. The link-library needs to be generated when compiling. However, CMakelist.txt that is automatically generated in Simulink's ROS environment does NOT contain link information, so it needs to be adapted. Three ways to solve, use either one of them: 1) Method 1 Every time, manually change CMakeLists.txt. When the code is generated, and the compilation reports an error, add the below contents of the following red box to the target machine's CMakeLists.txt file. After that, go to the target machine workspace directory, and type catkin_make command to compile manually. The program needs to be run manually after finishing the compilation. 18 | P a g e
EcoCoder-AI Manual

2) Method 2
Change cmake file in the target machine
Add the following content in below image to the target machine file
/opt/ros/melodic/share/share/cmake/catkinConfig.cmake. After one-time change, the model
can automatically compile each time. It is recommended to restore the default content of this
file if you do not use the Read Camera Video module.

3) Method 3
Change the MATLAB file through a script program.
Change the contents of the onCodeAfterGen.m file in the relative directory:
toolbox\ros\utilities\+ros\+codertarget\+internal\. Will release patch file for each MATLAB
versions later on.

19 | P a g e
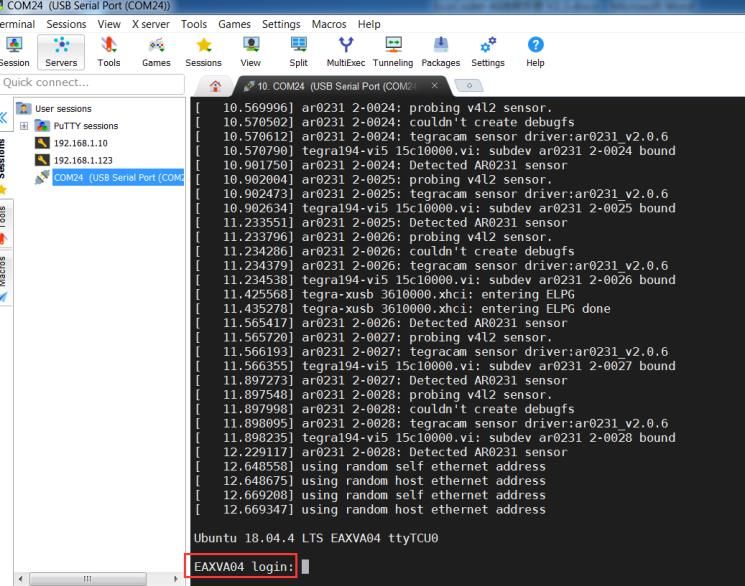
EcoCoder-AI Manual
2.9 Sample Model Instruction

2.9.1 Login Xavier Through Serial Port and Check IP

If you know the Ethernet IP address in Xavier, you can skip this section. Usually, Xavier has a
default IP of 192.168.1.123.
If you don't know the IP address, first, you need to prepare a USB serial device that can be used
on your PC. If you're using EAXVA04, you'll need to use the USB serial device DB9 Pin2 (RXD),
Pin3 (TXD), Pin5 (GND) to connect with controllers 121P-51 (TXD), 121P-70 (RXD), 121P-65
(GND). Then open MobaXterm and do the following:

Select the correct COM device and set the Baud Rate to 115200bps, then click OK. It will pops as
following:

20 | P a g e
EcoCoder-AI Manual

 Then power up the controller. After powering up, the screen will show messages below. When
 the login information shows up, please enter the username and password. The controller
 default username and password are both “nvidia”.

When the login is successful, in the command line, enters ifconfig to check eth0 detailed
information, then you can find the IP address, as shown in the following:

21 | P a g e
EcoCoder-AI Manual

Next time when log in with the same serial port, you can double-click the icon below directly.

2.9.2 Use Ethernet to Login Xavier

Open MobaXterm, then follow the below operations to setup the target machine IP, then click
OK.

22 | P a g e
EcoCoder-AI Manual

Then the following login information pops up, enter the username and password. The
controller default username and password are both “nvidia”.

After log-in successfully, the interface will show as below. The left list is the content of the
controller directories. You can use mouse to operate the directory and files. Right side is the
command window.

23 | P a g e
EcoCoder-AI Manual

2.9.3 Run ROS Master

The target machine is mostly used as the Master of ROS. So, after log-in the target machine with
MobaXterm, the Master can be started by roscore.

2.9.4 Introduction to Basic Message Types

Next, take MATLAB R2020b and EcoCoder v2.9.1 R1 as examples to introduce. First, decompress
the EcoCoderAIWithROS_R18b_V1.zip file in the DemoAI directory. Second, switch to the
decompressed path, as shown in the figure below. Then, double-click to open the model file
T_EcoCoderWithROS_A.slx. After that, you need to find Configure ROS Network Addresses to
perform the connection test of the target controller. The following figure shows the schematic
diagram of the operation of R2018b and R2020b, respectively.

24 | P a g e
EcoCoder-AI Manual

After opening Configure ROS Network Addresses, as shown below, select Custom and set the
target machine IP, keep the port 11311, and click Test to test.

25 | P a g e
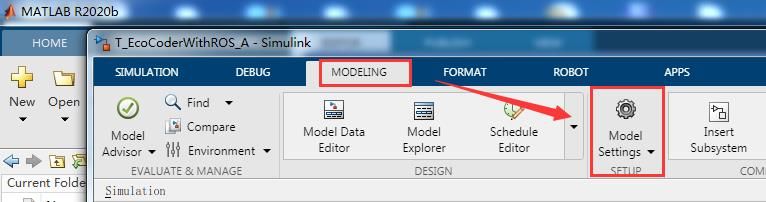
EcoCoder-AI Manual
After clicking Test, the following window will pop up, indicating that you can connect to the ROS
master of the target machine. Otherwise you need to start the master on the target machine
through the roscore command.

Next, you need to set some parameters, as shown in the following figure, respectively, for the
Model Settings selection of MATLAB R2018b and R2020b.

Then the pop-up window is as follows, according to the figure below to set some parameters in
the Hardware Implementation, as shown in the figure below.

26 | P a g e
EcoCoder-AI Manual

Select Device parameters->Edit, the pop-up window is as follows, fill in the IP address,
username and password of the target machine in the dialog box, and also need to fill in the ROS
directory of the target machine (the ROS directory in Xavier of EAXVA04 is /opt/ros/melodic),
You also need to set up the Catkin workspace directory. After the parameters are set, you can
directly click OK or click Test first.

27 | P a g e
EcoCoder-AI Manual
If you click Test, a pop-up window may appear as shown in the figure below, and you need to
click Fix to create a Catkin workspace directory.

Next, you can set the External mode according to your needs. When multiple nodes are running
at the same time, they cannot occupy the same port. You need to set the port. The port range is
256-65535, and the default is 17725.

After the setting is completed, the model can be compiled into a target machine program and
run on the target machine. The operation mode is divided into open external mode or non-
open external mode. When the external mode is turned on, you can use Simulink's external
mode to connect to the target computer program, which can modify the parameters in the

28 | P a g e
EcoCoder-AI Manual
program and monitor some signals, but it cannot be run independently. It must be controlled
by Simulink to run. When the external mode is not turned on, the program is run directly on the
target computer, and the target program cannot be connected in the external mode of
Simulink, but the target program can be run independently. When the simulation time of
MALTAB R2018b is set to Inf and the mode is set to External, click the simulation start button to
open the external mode to compile and run the program, click Build to not open the external
mode to compile and run the program. MALTAB R2020b Click Monitor&Tune to open the
external mode to compile and run the program, click Build&Run to not open the external mode
to compile and run the program. In addition, if you want to kill the program by instructions, you
can kill it by kill -9 $(pidof t_ ecocoderwithros_a_node), where t_ ecocoderwithros _a is the
lowercase of the model’s name.

Here, opens the external mode to compile and run the program to demonstrate. After
compiling and running the program successfully, the interface is as follows. You can see that the
program has been running normally by looking at the status bar.

29 | P a g e
EcoCoder-AI Manual

If you want to make the program in the target machine continue to run, but Simulink stops
connecting, you can open the Control Panel for control. The opening methods of MATLAB
R2018b and R2020b are as follows.

The External Mode Control Panel window is as follows:

30 | P a g e
EcoCoder-AI Manual

In the online state, if you want to stop the program running, you can directly click the
simulation Stop button or click the Stop Real-Time Code button in the External Mode Control
Panel as shown below.

Next, we will demonstrate some functions in the model. The first is the CAN module. Use the
CAN card to connect the 121P-48 (CAN1-H) and 121P-67 (CAN1-L) of the controller. The CAN0
of the controller corresponds to the one in EcoCoder-AI. CANA and CAN1 correspond to CANB.
Modify the parameters in the figure below to see the data changes on the CAN bus.

31 | P a g e
EcoCoder-AI Manual

After modifying the parameters, the bus data monitored by PCAN also changes, as shown in the
figure below

32 | P a g e
EcoCoder-AI Manual

If the parameters are not changed immediately after modifying the parameters, please check
whether it is because the Batch download in the Control Panel is enabled. If it is enabled, you
need to manually operate the Download button under the check box Batch download to update
all the modified parameters.

There are two ways to start the program through instructions on the target machine. Take the
current example model as an example. One is to use rosrun, first switch to the workspace
directory, and then execute source ./devel/setup.bash and then execute rosrun t_
ecocoderwithros _at_ ecocoderwithros _a_node. The other is to switch to the workspace
directory and run the command ./devel/lib/t_ ecocoderwithros _a/t_ ecocoderwithros _a_node.

33 | P a g e
EcoCoder-AI Manual
2.9.5 Custom Message Type Example Introduction

Robotics System Toolbox Interface for ROS Custom Messages toolbox is used to customize ROS
messages. The toolbox supports MATLAB R2017b-R2020a. Starting from R2020b, the function
of ROS custom messages is integrated into the ROS Toolbox, so R2020b is no longer needed
Install separately, but you need to install the dependencies required for custom ROS messages.
Regarding custom ROS related content, you can search for ROS Custom Message in help to find
the relevant content. Next, take MATLAB R2020b as an example to build the environment. Take
EcoCoderAIWithROS_R18b_V2.zip in the Demo directory of EcoCoder v2.9.1 R1 for example
explanation and unzip it. After EcoCoderAIWithROS_R18b_V2.zip, find radar_msgs under the
directory ROSMsg, radar_msgs is an example of a custom message, the directory structure and
files are as follows:

34 | P a g e
EcoCoder-AI Manual

Switch to the upper-level directory of the folder radar_msgs. If there are previously generated
files required by MATLAB, please delete them and enter rosgenmsg(pwd)

If it appears as shown in the figure below, it means that the generation is successful and only
needs to be generated once. In the future, follow the prompts in the figure below to add the
corresponding m folder path temporarily or permanently to the MATLAB path. It is
recommended to use temporary addition, that is, do not enter savepath Command (or add the
path via the mouse right click) and need to be set every time MATLAB is opened.

35 | P a g e
EcoCoder-AI Manual

Next, you need to deploy a custom message on the target machine. Take wk_radar_msgs.zip as
an example. The directory structure of the wk_radar_msgs file is as shown in the figure below.
Compared with MATLAB to generate a custom message, the CMakeLists.txt file is also required,
and two shell script files are added. setup.bash, uninstall.bash. Copy wk_radar_msgs to the
target machine, switch to the wk_radar_msgs directory during deployment, run
source ./setup.bash, and run source ./uninstall.bash during uninstallation. In addition, after
deployment, please do not delete the files under wk_radar_msgs.

The content of the CMakeLists.txt file is as follows, if want it to adapt to other messages, just
modify the content in the red box:

36 | P a g e
EcoCoder-AI Manual

The content of the setup.bash file is as follows. If want it to adapt to other messages, just
modify the content in the red box:

37 | P a g e
EcoCoder-AI Manual

The content of the uninstall.bash file is as follows, if want it to adapt to other messages, just
modify the content in the red box:

When using rostopic echo test_ros_RawData on the target machine does not work, please
switch to the wk_radar_msgs directory and run source devel/setup.bash.

38 | P a g e
EcoCoder-AI Manual
Chapter 3 EcoCoder-AI Package Library

After installing the EcoCoder-AI, many extension libraries will be added to the Simulink library,
which can be used to access the hardware interface developed by Ecotron or connect the
Simulink model to the ROS system. Click the “Simulink Library” button in the MATLAB interface,
and the dialog box shown below will pop up. You can see that “EcoCoder AI Blocks” has been
added.

3.1 EcoCoder Target Definition

EcoCoder Target Definition is used to define the target controller. This module must be added,
otherwise an error will occur during compilation. When drag and drop this module to the newly
created model, the model configuration will be performed automatically.

39 | P a g e
EcoCoder-AI Manual

General Parameters:

1) Target: choose your target hardware.

3.2 CAN Module

This is the CAN communication module, it calls the socket CAN interface of Linux, to realize CAN
message sending and receiving. And it supports to load the dbc file directly, for rapid
development of CAN system design.

3.2.1 Receive CAN Raw with Trigger

This block uses trigger type for receiving the CAN message, when ACU receives the CAN
message, it will be triggered for processing the task through the socket CAN interface.

40 | P a g e
EcoCoder-AI Manual
Parameter:

1) CAN Channel: channel selection

Outputs:

1) f(): Task event, when a CAN message is received, the processing pointed to by the event will
   be triggered
2) Remote: message type, 1 for remote frame, 0 for data frame
3) Extended: message type, 1 for extended frame, 0 for standard frame
4) ID: message ID
5) Length: message length
6) Data: message data

3.2.2 Transmit CAN Message

This block is used to send CAN messages. After calling this module, the socket CAN interface of
ACU will be called to send the CAN message.

Parameters:

1) CAN Channel: CAN channel selection
2) Sample Time: define the sampling time for this block

Inputs:

1) Remote: message type, 1 for remote frame, 0 for data frame
2) Extended: message type, 1 for extended frame, 0 for standard frame
3) ID: message ID

41 | P a g e
EcoCoder-AI Manual
4) Length: message length
5) Data: message data

3.2.3 Read Fixed-Point CAN Message

This module is used to receive CAN messages. The CAN message is parsed as a signal. The signal
is a fixed-point type, which requires the support of Fixed-point toolbox. This module is not
directly compatible with DBC, but it can load m files converted by DBC.

42 | P a g e
EcoCoder-AI Manual

Parameters:

1) Select CAN Channel State: Select the channel status, including Connected, Disconnected and
   DisconnectedOnlyData options. When Connected is selected, there is no input port, and the
   message information is directly read from the selected channel; when Disconnected is
   selected, the module will have input ports, and message information is obtained from these
   ports; when DisconnectedOnlyData is selected, it is only used for data conversion and has
   nothing to do with CAN. Note that EcoCoder-AI does not support Connected mode.
2) Select CAN Channel: CAN channel selection
3) Select M file: Select the m file converted by the DBC conversion tool, you need to add the m
   file to the MATLAB path. After each selection, and after clicking "OK" and "Apply", you need
   to double-click the module again to select Message.
4) Select Message: CAN message selection
5) Show Message Available Port: Shows whether the message data is received, 1 means data is
   received.

43 | P a g e
EcoCoder-AI Manual
6) Show Message Count Port: Counter for message, each time a new message is received, the
   counter is incremented by 1
7) Show Signal Names: When enabled, the names of the signals will be displayed on the output
   line
8) Enable Custom Variable Name Rules: Enable custom variable naming rules, the rule is to
   remove the second underscore in the variable name, and the first letter after the second
   underscore is capitalized
9) Define Signals: When enabled, the variable on the signal line will be defined as the
   measured quantity. When enabled, Show Signal Names must be enabled.
10) Signal prefix: The variable prefix on the signal line
11) Output data type: If checked, the data type of the signal is inherited backward; if not
   checked, the signal type is automatically defined as a fixed-point data type with scaling
12) Sample time: define the sampling time for this block
13) Function packaging: Module C code function settings are divided into two types:
   Parameterless and Parameterized. Parameterless is a function of no parameter type, and
   the code execution efficiency is high. Parameterized is a function with parameter type,
   which supports that the C code corresponding to the input and output signals of the module
   is a local variable. Situation to prevent compilation errors

Inputs:

When the channel status is Disconnected, the input ports are as follows. When Connected is
selected, there is no input port.

1) Enable: Enable Read Fixed-Point CAN message block
2) Remote: message type, 1 for remote frame, 0 for data frame
3) Extended: message type, 1 for extended frame, 0 for standard frame
4) ID: message ID
5) Length: message length
6) Data: message data

Outputs:

44 | P a g e
EcoCoder-AI Manual
1) For each signal after unpacking, the value of the signal is the actual physical value.

Note: The initial value of this module signal 0 represents the hexadecimal value, not the actual
physical value

3.2.4 Read CAN Message

This module is used to receive CAN messages. The CAN message is parsed as a signal, and the
signal type is automatically inherited backward. The module is not directly compatible with
DBC, but it can load the m file converted by DBC.

45 | P a g e
EcoCoder-AI Manual
Parameters:

1) Select CAN Channel State: Select the channel status, including Connected, Disconnected and
   DisconnectedOnlyData options. When Connected is selected, there is no input port, and the
   message information is directly read from the selected channel; when Disconnected is
   selected, the module will have input ports, and message information is obtained from these
   ports; when DisconnectedOnlyData is selected, it is only used for data conversion and has
   nothing to do with CAN. Note that EcoCoder-AI does not support Connected mode.
2) Select CAN Channel: CAN channel selection
3) Select M file: Select the m file converted by the DBC conversion tool, you need to add the m
   file to the MATLAB path. After each selection, and after clicking "OK" and "Apply", you need
   to double-click the module again to select Message.
4) Select Message: CAN message selection
5) Show Message Available Port: Shows whether the message data is received, 1 means data is
   received.
6) Show Message Count Port: Counter for message, each time a new message is received, the
   counter is incremented by 1
7) Show Signal Names: When enabled, the names of the signals will be displayed on the output
   line
8) Enable Custom Variable Name Rules: Enable custom variable naming rules, the rule is to
   remove the second underscore in the variable name, and the first letter after the second
   underscore is capitalized
9) Signal prefix: The variable prefix on the signal line
10) Sample time: define the sampling time for this block

Inputs:

When the channel status is Disconnected, the input ports are as follows. When Connected is
selected, there is no input port.

1) Enable: Enable Read CAN message block
2) Remote: message type, 1 for remote frame, 0 for data frame

46 | P a g e
EcoCoder-AI Manual
3) Extended: message type, 1 for extended frame, 0 for standard frame
4) ID: message ID
5) Length: message length
6) Data: message data
7) Function packaging: Module C code function settings, divided into two types: Parameterless
   and Parameterized. Parameterless is a parameterless type function with high code
   execution efficiency, while Parameterized is a parameterized type function that supports C
   corresponding to the input and output signals of the module. When the code is a local
   variable, prevent compilation errors.

Outputs:

1) For each signal after unpacking, the value of the signal is the actual physical value.

3.2.5 Send Fixed-Point CAN Message

This module is used to send CAN messages. Pack and send the CAN signal. The signal is a fixed-
point type and needs the support of the Fixed-point tool. The module is not directly compatible
with DBC, but it can load the m file converted by DBC.

47 | P a g e
EcoCoder-AI Manual

Parameters:

1) Select CAN Channel State: Select the channel status, including Connected, Disconnected and
   DisconnectedOnlyData options. When Connected is selected, there is no output port, and
   the message information is sent directly to the selected channel; when Disconnected is
   selected, the module will have output ports, and message information is output from these
   ports; when DisconnectedOnlyData is selected, it is only used for data conversion and has
   nothing to do with CAN. Note that EcoCoder-AI does not support Connected mode.
2) Select CAN Channel: CAN channel selection
3) Select M file: To select the m file converted by the DBC conversion tool, you need to add the
   m file to the MATLAB path. After each selection, after clicking "OK" and "Apply", you need
   to double-click the module again to select Message.
4) Select Message: CAN message selection
5) Input data type: If checked, the data type of the signal is inherited backward; if not checked,
   the signal type is automatically defined as a fixed-point data type with scaling.
6) Sample time: Model simulation time selection
7) Function packaging: Module C code function settings, divided into two types: Parameterless
   and Parameterized. Parameterless is a parameterless type function with high code

48 | P a g e
EcoCoder-AI Manual
   execution efficiency, while Parameterized is a parameterized type function that supports C
   corresponding to the input and output signals of the module. When the code is a local
   variable, prevent compilation errors.

Input:

1) For each signal, the value of the signal should be the physical value

Outputs:

When the channel status is Disconnected, the output ports are as follows. When Connected is
selected, there is no output port.

1) Remote: message type, 1 for remote frame, 0 for data frame
2) Extended: message type, 1 for extended frame, 0 for standard frame
3) ID: message ID
4) Length: message length
5) Data: message data

3.2.6 Send CAN Message

This module is used to send CAN messages. Pack and send the CAN signal. The signal type is
inherited. The module is not directly compatible with DBC, but it can load the m file converted
by DBC.

49 | P a g e
EcoCoder-AI Manual

Parameters:

1) Select CAN Channel State: Select the channel status, including Connected, Disconnected and
   DisconnectedOnlyData options. When Connected is selected, there is no output port, and
   the message information is sent directly to the selected channel; when Disconnected is
   selected, the module will have output ports, and message information is output from these
   ports; when DisconnectedOnlyData is selected, it is only used for data conversion and has
   nothing to do with CAN. Note that EcoCoder-AI does not support Connected mode.
2) Select CAN Channel: CAN channel selection
3) Select M file: To select the m file converted by the DBC conversion tool, you need to add the
   m file to the MATLAB path. After each selection, after clicking "OK" and "Apply", you need
   to double-click the module again to select Message.
4) Select Message: CAN message selection
5) Sample time: Model simulation time selection
6) Function packaging: Module C code function settings, divided into two types: Parameterless
   and Parameterized. Parameterless is a parameterless type function with high code
   execution efficiency, while Parameterized is a parameterized type function that supports C
   corresponding to the input and output signals of the module. When the code is a local
   variable, prevent compilation errors.

50 | P a g e
EcoCoder-AI Manual
Input:

1) For each signal, the value of the signal should be the physical value

Outputs:

When the channel status is Disconnected, the output ports are as follows. When Connected is
selected, there is no output port.

1) Remote: message type, 1 for remote frame, 0 for data frame
2) Extended: message type, 1 for extended frame, 0 for standard frame
3) ID: message ID
4) Length: message length
5) Data: message data

3.3 Socket UDP Module

3.3.1 UDP Receive

This module is used to receive UDP data packets from the Ethernet bus.

Parameters:

1) Port: Network port number.
2) Receive socket buffer size: receiving socket buffer (socket buffer), int32 type, unit byte.
3) Receive data width: received data length, int32 type, unit byte.

51 | P a g e
EcoCoder-AI Manual
4) Enable blocking mode: After being enabled, it is in non-blocking mode. The longest waiting
   time for receiving is the time set in Timeout. After the timeout, it will no longer wait for
   receiving and continue to execute the subsequent software. After being disabled, it is in
   blocking mode. If no data is received at this time, it will wait for reception until the data is
   received and continue to execute subsequent software.
5) Timeout: The timeout time in non-blocking mode, the unit is S.

Outputs:

1) New: Output 1 after reading the message and clear it to 0 in the next cycle.
2) IP: The IP address of the sender of the received UDP data.
3) Length: The length of the received UDP packet.
4) Data: The received UDP message data.

3.3.2 UDP Send

This module is used to send UDP data packets on the Ethernet bus.

Parameters:

1) Port: Network port number.
2) Send data width: send data length, int32 type, unit byte.

Inputs:

1) IP: The IP address of the UDP data receiver.
2) Data: UDP message data to be sent.

52 | P a g e
EcoCoder-AI Manual

3.4 Sensors Blocks

3.4.1 Read Camera Video

This module is used to read the RGB data collected from the camera.

Parameters:

1) Select the channel: Select the camera channel.
2) Set the number of rows: Set the number of pixel rows of the output image.
3) Set the number of columns: Set the number of pixel columns of the output image.

Outputs:

1) R: Get the pixel value of the R color channel of the image, the matrix size is rows * columns
   set in the parameter.
2) G: Get the pixel value of the G color channel of the image, the matrix size is rows * columns
   set in the parameter.
3) B: Get the pixel value of the B color channel of the image, the matrix size is rows * columns
   set in the parameter.

53 | P a g e
EcoCoder-AI Manual
3.5 Linux Blocks

3.5.1 Linus Printf

Chapter 4 CAN Protocol Implementation

The specific implementation of the application layer can be done through the definition of the
broadcast protocol matrix through the dbc file or the m file. The entire code generation process
is as follows:

54 | P a g e
EcoCoder-AI Manual

4.1 DBC Convert to m File

Through the EcoCAN tool in EcoCAL software, DBC can be converted to m file. For detailed
information about EcoCAN, please refer to the manual "EcoCAL Manual".

55 | P a g e
EcoCoder-AI Manual
1) Open the DBC file to be converted.

2) After the import is successful, the display is as follows.

56 | P a g e
EcoCoder-AI Manual

3) Export as m file.

57 | P a g e
EcoCoder-AI Manual
4.2 CAN Broadcast Protocol Implementation

4.2.1 Select CAN Module Library

If Simulink does not support the calibration function, please use the "Read CAN Message" and
"Send CAN Message" libraries.

4.2.2 Select m File

4.2.3 Select CAN Message

58 | P a g e
EcoCoder-AI Manual

4.2.4 Select Sampling Time

59 | P a g e
EcoCoder-AI Manual

1. Task_Inherit: This option is the time to inherit the upper module, and the CAN module needs
to be placed in the Function-Call subsystem and called through Task_Call.

2. Task_L1ms-Task_HL1000ms: This option means that the CAN module is called periodically at
the selected time.

3. Task_MDef: The sampling time is defined in the m file, unit in ms.

60 | P a g e
EcoCoder-AI Manual
The sampling time in the m file is as follows, and the period not in the table needs to be
realized by building a model:

    Interval        -1               1               5               10               20

     Actual
               Task_Inherit      Task_L1ms       Task_L5ms       Task_L10ms       Task_L20ms
   Sampling

    Interval        50             100              200              500             1000

     Actual
                Task_L50ms      Task_L100ms     Task_L200ms      Task_L500ms     Task_L1000ms
   Sampling

4.2.5 CAN Example Model

The following are example of CAN packing and unpacking modules:

61 | P a g e
EcoCoder-AI Manual Chapter 5 FAQ 5.1 Q1 - m Files Cannot Be Used Why can't the m file exported from DBC with "EcoCAN" be used? Check whether the name of the m file follows the c language variable naming rules and cannot be the name of an existing model or an existing m file. For example, "0-.Demo1.2" or "EcoCanM_Demo" are illegal. 5.2 Q2 - CAN Module Interface Is Blank Why is the CAN module interface blank or question mark in the model? Check whether the required m file is in the current path or added to the MATLAB path. 5.3 Q3 - Compilation Error Common Problems 5.3.1 Failed To Add Environment Variables in WIN10 System The PATH environment variable added to the WIN10 system should be added in the form of a dialog box in the manual, not in the form of a list. 5.3.2 MATLAB Needs to Be Restarted After Adding Environment Variables If you are opening MATLAB when you finish adding environment variables, you need to restart MATLAB after adding environment variables. 5.3.3 Separator Error for Adding Environment Variables Note that the delimiter for adding environment variables must be an English semicolon. 5.3.4 The Current Path of The Model Has Characters in A Different Language, Spaces, or Special Characters When the prompt "No such file or directory" appears in the Diagnostic Viewer, it is usually because there are characters in a different language, spaces, or special characters in the path. Please change to a path without them. 62 | P a g e
You can also read