Creating journeys through the arts - Lesson Book 4 - Art Sphere Inc.
←
→
Page content transcription
If your browser does not render page correctly, please read the page content below

Lesson
 Book
   4

             creating journeys
              through the arts
         Expanding the Creative Mind through Mixed Media Book 2
                       with Instructor: Greta Heeb
                       Editor: Simone Shemshedini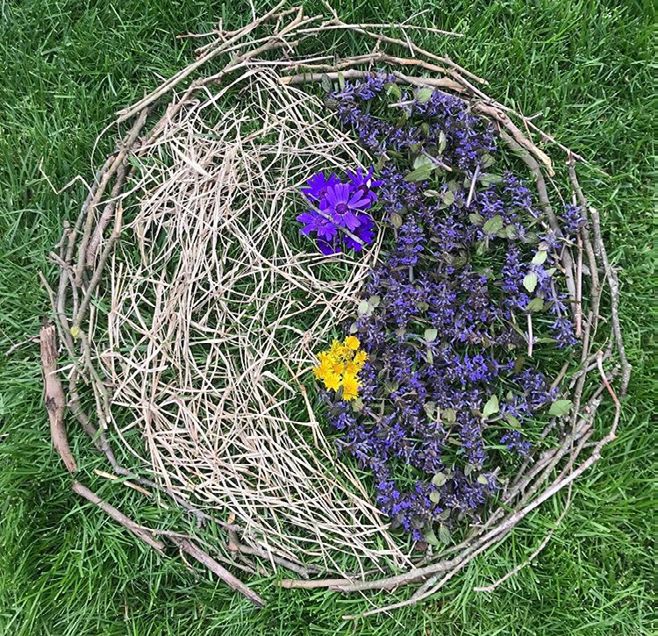
Table of Contents

  i-iii Preface

   iv Glossary

   1 Pasta People

   2 Henri Matisse “Stained Glass” Foil Embossing

   3 Rodney McCoubrey Recycled Fish

   5 Andy Goldsworthy Inspired Temporary Art

   6 Mother’s Day Inspired Kandinsky Heart Color Study

   7 Claude Monet Finger Painting

   8 Van Gogh "Starry Night" Mobile

   9 Cubist Flowers

  10 DIY T-Shirt Facemask

  11 Identity Silhouette

  12 Cork and Wire Ballerinas

  13 Jackson Pollock Drip Painting

  14 Leaf Prints

  15 Symmetrical Radial Designs

  16 Jerry Wilkerson’s “Bananas” Painting

  17 Color Wheel Flower

  18 Beehives for Kids

  19 Optical illusion hearts

  20 Social Awareness Artistic Challenge

  21 Painting with Utensils

22-25 Appendix

           Art Sphere Inc • www.artsphere.org • info@artsphere.org • © 2020 All Rights Reserved, Art Sphere Inc.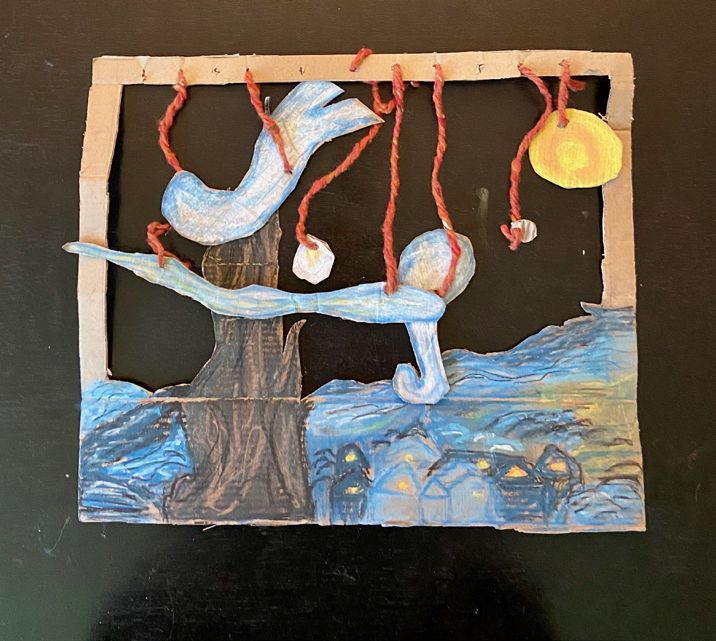
Use this space to create your own art!

Art Sphere Inc • www.artsphere.org • info@artsphere.org • © 2020 All Rights Reserved, Art Sphere Inc.
BOK Building, 1901 S 9th St. Studio 502, Philadelphia PA, 19148 • (215) 413 -3955 • www.artsphere.org• info@artsphere.org

c r e a t i n g j o u r n ey s t h r o u g h t h e a r t s
                        Follow your creativity and go beyond where the path leads so you can leave
                                      a trail to inspire others to express themselves, too!

Preface                                                                                          How to Use Our Online Materials and
We are pleased to present Creating Journeys                                                      This Book
Through the Arts to take you on a path to
                                                                                                 Not everyone learns the same way. Some people
transform everyday materials into art, to explore
                                                                                                 are more visual, some more musical, some more
the intersections of art with nature, literacy,
                                                                                                 mathematical1. Our “Trail Maps” include symbols
technology, theater, music, mindfulness and
                                                                                                 depicted in a “road sign” at the top of each
STEAM and to learn how to use the arts to express
                                                                                                 page and indicate the different learning
your core values. Throughout this journey, we
                                                                                                 styles to be found in each project. By pointing
invite you to reflect on the legacy that can be
                                                                                                 out the different ways that a project can be
created through the arts.
                                                                                                 approached, parents and teachers can guide
                                                                                                 their children to their individual paths to artistic
How this Book Came About                                                                         success and ways to express their unique
In 2020, Art Sphere Inc. (ASI) responded to Covid                                                creative voices. The different learning styles and
- 19 to move our curriculum offerings online to                                                  the symbols used to represent them in this book
engage and enrich Philadelphia’s communities                                                     include:
remotely. ASI has always been concerned about
the lack of access and cutbacks in funding for
the cultural arts in the inner city. In response,
we developed this book of free art lesson plans
for children to stimulate and inspire creative
thinking. Each art project is outlined with easy-
to-follow instructions and can be completed
with low-cost or “found” materials. The printed
book is supplemented by a database on ASI’s
website (www.artsphere.org) with additional art
lessons, which can be downloaded by teachers
and families. The projects in this book, which
have been tested in Art Sphere workshops and
in schools, at public events and with diverse
audiences, are designed to be easy enough for
a parent or a teacher with no formal arts training
to teach to others. All the projects can be
completed in an hour or less and are intended
for children from preschool to 6th grade.

1 These learning styles are based on Howard Gardner’s discussion of types of intelligences. For more detail, see: Howard Gardner, Frames of Mind: The
Theory of Multiple Intelligences (New York: Basic Books, 1983).
                             Art Sphere Inc • www.artsphere.org • info@artsphere.org • © 2020 All Rights Reserved, Art Sphere Inc.                            i
The lesson plans are more than just making                              Knowing that links sometimes become inactive
art objects. They incorporate ideas such as                             or are changed is beyond our control and
compassion, mindfulness, respect for nature,                            we apologize for the inconvenience. All the
healthy eating, cooperation, and other ideas for                        referenced links in this book have been checked
living in a way that contributes to a civil society.                    for accuracy.
The pages are laid out as if you and the class are
taking a journey:                                                       Please check our blog
                                                                        (artsphere.org/free-resources/curriculum) and
• Your Destination: summarizes the outcome                              other social media channels for more
                                                                        suggestions on creative art projects.
• Travel Kit: list of materials you will need to
make the object

• On the Path: ideas and directions for each
child to make his/her own object and ideas for
exploring the meaning of each object

• Group Tour: how to transform the individual
process into an interactive and collaborative
group experience

• Extend your Journey: vocabulary, helpful
references, and links to explore additional ideas

Find ways to express yourself - it's ok to think
outside the box!

                    Art Sphere Inc • www.artsphere.org • info@artsphere.org • © 2020 All Rights Reserved, Art Sphere Inc.   ii
Thank you
This book would not have been possible without the participation of many talented and dedicated
volunteers, interns and supporters. I would like to thank Penn Treaty Special Services District,
Pennsylvania Council on the Arts, Philadelphia Cultural Fund, The Alfred and Mary Douty Foundation,
The Christopher Ludwick Foundation, and The Stockton Rush Bartol Foundation for their years of
support, encouragement and for believing in Art Sphere’s work with youth living in low-income
communities.

Everything we do is a team effort. Teachers this year that directly or indirectly contributed to the
curriculum of ideas in this book include: Greta Heeb, Sophie Najjar, Kristen Rucker, Madison Drake,
Jedidah Groseclose, Madeleine Smith, Julie Shaffer, Lisa Jungmin Lee, Ryan Tillman, Hailey Adams,
Rise Skobeloff, Junyeon Sohn, Dayna Ensminger, Jim Burkhardt, Alice Zhao, Alexy Fitzmyer, Arielle
Vallet, Laura Cho, Maritza Lohman, Theresa Oliver, and Alan Silverman.

Many others also provided their time and expertise in areas of web development, animation, coding,
marketing, blogging, grant research, volunteer recruitment, IT staff support and so much more for
which I am very grateful: Sierra Mitchell, Kyle Kaempf, Michael Mitoulis, Brian Edmondson, Jeanne
McGill, Sharelle Boddie, Lila Vanni, Sarah Goldberg, Jade Hingten, Mallika Kodavatiganti, Dalia
Almutawaa, Jessica Soriano, Jennifer Granata, Emily Radamis, Anthony Coccerino, Joshua West,
TImo Stander, Martha Meiers, Robert Kurzban, Vince Heath, Eileen Brown, and Rupali Walunj.

My thanks also go to Judy Yellin, Steven White, Claire Manigo-Bizzell for editing each of our teachers’
lesson plans, and Maura O’Malley, Catherine Rheault, and Maria Boggi of Temple University's Institute
for Business and Information Technology. We appreciate Abbey Mayer and her COM 310 Technical
Communication Drexel class including: Leah Douglas, Ivy Clarke, Candice Nguyen, Sandra Olaniyi,
Allie Zubyk, Cecilla Murphy, Zana Schrader, Jeff Belonger and Sue Winant. Thanks also to McKenna
Mason, Sophie Najjar and Shamiul Islam for hand-drawn handouts that also can be found at
https://artsphere.org/blog/asi-handout-list/.

A special thank you to our Board of Directors: Erica Bettwy, P.J. Hakim, Subrata Mukherjee, John
Groenveld, Tiffany Mercer-Robbins, Cliff Price and Ashley Fry.

Best Wishes on Your Finding Your Own Path of Beauty,

Kristin Groenveld, Founder and Artistic Director
Art Sphere Inc.

Share the artwork you make and your thoughts about the lesson plans and let others know about our
free online version of this book: #takeanartjourney #creatinglegaciesthroughart #loveartsphereinc
                   Art Sphere Inc • www.artsphere.org • info@artsphere.org • © 2020 All Rights Reserved, Art Sphere Inc.   iii
Glossary
Abstract expressionism An art movement that started                       printmaking, which allows for reproducing multiples of
in America, often characterized by mark making and                        the same image
gestural brush strokes
                                                                          Movement When the painting has different attributes that
Asymmetry Not being equal on all sides of something                       draws one eye across the painting
Background, middle ground and foreground Three parts                      Negative space The space around and between an
of picture plane starting from the farthest away from                     image
viewer to the closest to the viewer (as in mountains miles
                                                                          Optical illusion Illusion created by a visual perception or
away, a trail sign a short distance walk and your hand
                                                                          trick
blocking part of the view of all three)
                                                                          Pattern A design you can make using repetition
Cork A material that is often found sealing wine bottles
                                                                          Parallel lines Lines on a plane that are equal distance
Color study A painting or drawing where one can
                                                                          apart and never meet
experiment with how colors react with each other
                                                                          Pointillism An art movement that was characterized by
Contemporary artist An artist who creates work today or
                                                                          painting with small dots or points
in recent times
                                                                          Portrait A depiction of a person
COVID-19 A virus that has caused a global pandemic
                                                                          Primary colors Red, yellow, and blue
Cubism An art movement where the characteristics
were geometric and shapely                                                Privilege Being given more fair opportunities and treated
                                                                          better because of your race, gender, or social class
Debossing Creating a sunken relief image
                                                                          Proportion The specific measurement you want
Elevated Raised
                                                                          something to be
Embossing A technique of creating a raised relief image
                                                                          Racism Prejudice and discrimination directed at
Equality Where all people are treated fairly and the                      someone or a group of people of a different race
same; without discrimination
                                                                          Radial design A type of balance based on a circle with
Features A distinctive attribute                                          its design extending from center
Geometric Decorated in regards to shape and line                          Recycle The process of converting waste materials into
                                                                          new objects
Hexagon A six-sided shape
                                                                          Repetition To repeat something
Identity The characteristics and traits that one associates
with themself and makes up who they are                                   ROYGBIV Red, orange,yellow, green, blue, indigo, violet
Impression An imitation or mark created by something                      Scale A way to measure something
Impressionism An art movement characterized by brush                      Silhouette The outline or shape of something or someone,
stroke and capturing life as it is happening                              typically against a light background
Inclusive Including everyone or everything                                Secondary colors Orange, green, purple
Interact When materials have an effect on each other
                                                                          Stained glass An art form using pieces of glass
Justice Making sure that people are given rights and
                                                                          Symmetry Being even on all sides
people are not treated unfairly
                                                                          Systematic racism Racism that happens through
Mandala An example of balanced radial design found in
                                                                          institutions, societal norms and practices
Hindu and Buddhist art; meant to represent the cosmos
and to be used as aids in meditation                                      Temporary Short term
Mobile An object that can move or hang freely                             Texture How something feels
Monoprinting A form of printmaking that has lines or
images that can only be made once, unlike most

                      Art Sphere Inc • www.artsphere.org • info@artsphere.org • © 2020 All Rights Reserved, Art Sphere Inc.             iv
1. PastaBUTTERFLIES
MIGRATING PeopleThis lesson is good for ages
This lesson is good for ages 5 -14
Your Destination:
Create a portrait using pasta.
On the Path:
Step 1 Create a quick sketch of Step 3 Start to lay out the
the person you are choosing to different types of pasta over your
recreate on a piece of paper. sketch. Once you are happy with
Start with an oval for the head, the layout, glue the pasta down.
and eyes that are about one
third of the way down the top of
the head. Make sure you leave
some space between the eyes.
About halfway between the
eyes, and the chin, draw the Travel Kit:
bottom of the nose, and about
halfway between the nose and Pasta
the chin, draw on a mouth. Construction paper
Step 2 Gather different types Glue
of pasta for the different Pencil
features. For example, if you are
Pasta People handout
portraying your sister and she has
straight hair, you might want to
use a straight noodle rather than
a curly noodle.
Group Tour:
Create a noodle creature with a friend or pick an artist that you are
interested in and create their portrait with the noodles.
Extend Your Journey:
Learn new vocabulary: proportion, scale, features, portrait, symmetrical, asymmetrical
Find visual aids and resources:
20 Popular Types of Pasta https://www.mybluprint.com/article/popular-types-of-pasta-when-to-use-each-one
Make Crazy Pasta Sculptures https://www.hellowonderful.co/post/MAKE-CRAZY-PASTA-SCULPTURES/
Pasta People handout: https://artsphere.org/blog/pasta-people-craft-handout/
Access our instructional video: https://www.youtube.com/watch?v=cnXk4OII7yY
Art Sphere Inc • www.artsphere.org • info@artsphere.org • © 2020 All Rights Reserved, Art Sphere Inc. 12. Henri Matisse “Stained
Glass” Foil Embossing
This lesson is good for ages 5 -14
Your Destination:
Learn how to emboss with materials you can find at home.
On the Path:
Step 1 Look at Henri Matisse’s brush and coat the board with a
stained glass "Tree of Life". very fine layer of glue. Place your
tin foil on top and press lightly
Step 2 Start by sketching out a around the yarn pieces to make
tree with branches on a piece of the embossed look. Let this dry.
cardboard. Draw leaflike shapes
and simplify into geometric Step 6 Pick different colors and
shapes. decorate your stained glass.
Make sure you color the raised
Step 3 Measure and cut string to areas a different shade then the Travel Kit:
different size pieces depending places that have been flattened.
on how much you need for each Cardboard
shape. String
Tin foil
Step 4 Glue the pieces of string
for each shape onto cardboard; Markers
then let dry. Glue
Step 5 Cut enough tin foil to Pencil
cover your board and wrap Scissors
around the edges. Use your paint
Old paintbrush
Foil Embossing handout
Group Tour:
Go for a nature walk and look at different trees with friends and family.
Extend Your Journey:
Pick your own subject and create your masterpiece using the above techniques.
Learn new vocabulary: embossing, stained glass, geometric, elevated, reduced
Find resources and visual aids here:
4 Ways to Emboss Like a Boss https://blog.thepapermillstore.com/4-ways-to-emboss-like-a-boss/
Henri Matisse Tree of Life https://www.wikiart.org/en/henri-matisse/tree-of-life-stained-glass-behind-the-altar-in-
the-chapel-of-the-rosary-at-vence-1951
Foil Embossing handout: https://artsphere.org/blog/henri-matisse-stained-glass-foil-embossing
Access our instructional video: https://www.youtube.com/watch?v=2da2RNor6mU
Art Sphere Inc • www.artsphere.org • info@artsphere.org • © 2020 All Rights Reserved, Art Sphere Inc. 23. Rodney McCoubrey
Recycled Fish
This lesson is good for ages 5 -14
Your Destination:
Reuse recyclables and transform them into art.
On the Path:
Step 1 Cut opposite sides of the Step 6 Cut out any shape or size
carton so it can be opened flat. pieces from a plastic bag to
Cut the tail fin by following the make scales for the body of the
triangular shapes that form the fish. Brush on a light layer of glue
bottom of the carton. Draw out where you want your scales to
the body of the fish on the larger be and then attach your plastic
part of the carton and cut it out. pieces. Let dry. Once your scales
are dry you can add more paint
Step 3 Choose one color to paint on top.
your fish. Paint everything except Travel Kit:
the tail fin and then let dry. Step 7 Once dry, make the
lower fin which can be glued to Milk carton (plastic or
Step 4 For the top fin and tail the middle of the fish or on the cardboard)
fin, cut different size and color bottom of your fish. Repeat the Magazine or newspaper
triangles out of a magazine. Glue steps for making your top fin.
Jar lid
the triangles on the top fin of
your fish. You can line them up Acrylic paint or gouache
from large to small or mix them Paintbrush
up. Glue the triangles down. For
the tail fin, overlap the triangles Plastic bag
so that the tail part of the carton The Rodney McCoubrey
is completely covered. Triangles Recycled Fish handout
can stick out from the fish tail. Let
fins dry.
Step 5 Cut enough tin foil to
cover your board and wrap
around the edges. Use your
paintbrush to coat the board
with a fine layer of glue. Then,
place your tin foil on top and
press lightly around the pieces
of string to make an embossed
look. Let dry.
Group Tour:
Collaborate with others to make a school of fish.
(lesson continued on next page)
3
Art Sphere Inc • www.artsphere.org • info@artsphere.org • © 2020 All Rights Reserved, Art Sphere Inc.Extend Your Journey:
Think about why it is important to reuse materials and tell a friend. Dive deeper into global climate change and
how it is impacting sea life. Practice recycling.
Learn new vocabulary: recycle, contemporary artist
Find resources and visual aids: Rodrigo's Recycled Art https://www.rodrigosrecycledart.com/
Climate Change: How Do We Know? https://climate.nasa.gov/evidence/
Material Renewal: Four Artists Turning Trash into Art http://magazine.art21.org/2016/03/18/material-renewal-
four-artists-turning-trash-into-art/#.XvOtnJNKhPM
Rodney McCoubrey Recycled Fish handout: https://artsphere.org/blog/rodney-mccoubrey-inspired-recycled-fish/
Access our instructional video: https://www.youtube.com/watch?v=3_v5a0s2xLo
Art Sphere Inc • www.artsphere.org • info@artsphere.org • © 2020 All Rights Reserved, Art Sphere Inc. 44. Andy Goldsworthy
Inspired Temporary Art
This lesson is good for ages 5 -14
Your Destination:
Focus on creating a pattern and repetition through natural materials
found outside.
On the Path:
Step 1 Look at Andy Step 5 Next, create a line
Goldsworthy’s artwork. Watch that divides the two circles by
the video below about him weaving between them like a
talking about his artistic process. snake slithering on the ground.
Step 2 Collect four or more Step 6 Fill the left side in with your
different natural materials. The light material and the right side in
materials should be different with your dark material.
colors, shapes, sizes and textures. Travel Kit:
Two of these items should be a
dark color, and two should be a Different colored or textured
light color. leaves
Flowers
Step 3 Make a large circle to
start your yin-yang symbol. Sticks
Other found objects
Step 4 Take one of your dark
colors and one of your light Temporary Art handout
colors and create two little dots
lined up vertically inside your
large circle.
Group Tour:
Go outside with a friend or family member and collaborate on a
gigantic leaf formation. Photograph the leaves to document and
then rescatter.
Extend Your Journey:
Go outside with a friend or family member and collaborate on a gigantic leaf formation.
Learn new vocabulary: pattern, repetition, temporary.
Find resources and visual aids: Andy Goldsworthy's artwork https://www.youtube.com/watch?v=9DjCMqtJr0Q
Temporary Art handout: https://artsphere.org/blog/andy-goldsworthy-inspired-temporary-art/
Access our instructional video: https://www.youtube.com/watch?v=hGojstv3C_w
Art Sphere Inc • www.artsphere.org • info@artsphere.org • © 2020 All Rights Reserved, Art Sphere Inc. 55. Mother’s day Inspired
Kandinsky Heart Color Study
This lesson is good for ages 5 -14
Your Destination:
Create Kandinsky’s color study with heart shapes instead of circles
for Mother’s Day. Through this lesson students will be able to observe
how colors interact together and interpret what the colors may
represent to them.
On the Path:
Step 1 Create a grid on your for the wet on dry technique,
paper by drawing two parallel where you use wet paint to go
lines vertically and three parallel over dry paint. While your wet
lines horizontally, evenly spaced hearts dry, you can use the
apart from the edges on a sheet wet-on-wet painting technique
of white paper. (Each line will be on some of the hearts by using
approximately 7 ¼ cm apart on another color directly over the Travel Kit:
a standard sheet of copy paper.) wet paint.
Next draw hearts in all of your Water based paint
boxes. Make sure that hearts are Step 3 Paint the areas around the (gouache or watercolor)
taking up most of the space in heart in the separate boxes.
each square. Paint brush
Crayons
Step 2 Now it is time to
experiment! Pick a few of your Paper (watercolor paper
hearts and paint them 5 different works best)
colors. This is going to be the start
Kandinsky Heart Color
Group Tour: Study handout
Learn about Wassily Kandinsky as an artist and how he views color
and how it influences his work.
Extend Your Journey:
Listen to music that inspired Wassily Kandinsky and use your own favorite song to make a painting.
Learn new vocabulary: color study, parallel, interact
Find resources and visual aids:
Music for Kandinsky Paintings https://www.youtube.com/watch?v=RGSF5AGZ7oI
What Does Colour Sound Like? https://www.youtube.com/watch?v=2xDnxkzQtdI
Arnold Schönberg & Wassily Kandinsky https://www.youtube.com/watch?v=daVaEoF5Hrk
Kandinsky Color Study https://www.moma.org/interactives/exhibitions/2012/inventingabstraction/?work=12
Kandinsky Heart Color Study handout: https://artsphere.org/blog/mothers-day-inspired-kandinsky-heart-color-study
Acces our instructional video: https://www.youtube.com/watch?v=nngDsp1BTAY
Art Sphere Inc • www.artsphere.org • info@artsphere.org • © 2020 All Rights Reserved, Art Sphere Inc. 66. Claude Monet
Finger Painting
This lesson is good for ages 5 -14
Your Destination:
Practice Impressionist art by recreating Monet’s “The Water-Lily Pond.
On the Path:
Step 1 Look at Claude Monet’s and layer pink paint on top. Use
“The Water-Lily Pond.” one of your fingers and make
little overlapping marks.
Step 2 Create your own color
palette by using a hard surface Step 4 On either side, paint your
to mix your paint on. Make lily pads starting with yellow as
several different shades of pink your base layer. Go in with pinks,
by mixing different amounts of blues, or reds and create thin
red and white paint on your layers on top for flower blossoms.
palette. Make a light green by Travel Kit:
mixing green and white paint. Step 5 Create foliage around
When a color is mixed with white, the sides. You can start with your Acrylic Paint
it is called a tint. Squeeze out light green and then add some
yellow, green, red and blue paint Paintbrush
darker green to add definition to
individually onto your palette the painting. Something to paint on
without mixing them with another
color. (canvas, wood, thick paper,
etc.)
Step 3 Start in the middle and Claude Monet Finger
paint the water with the blue Painting handout
Group Tour:
Create a waterscape mural with others on a larger piece of paper
using the techniques Monet used. See Monet’s “Water Lilies” for
inspiration.
Extend Your Journey:
After practicing Impressionist techniques with finger painting, try applying the skills you've learned using
paint brushes and palette knives. Learn how to identify aquatic plants (https://aquaplant.tamu.edu/plant-
identification/).
Learn new vocabulary: Impressionism, Pointillism
Find resources and visual aids: The Met Collection https://www.metmuseum.org/art/collection/
Claude Monet Finger Painting handout: https://artsphere.org/blog/claude-monet-finger-painting/
Access our instructional video: https://www.youtube.com/watch?v=WMLuiPCq5Mk
Art Sphere Inc • www.artsphere.org • info@artsphere.org • © 2020 All Rights Reserved, Art Sphere Inc. 77. Van Gogh "Starry
Night" Mobile
This lesson is good for ages 5 -14
Your Destination:
Create a 3-D version of "Starry Night."
On the Path:
Step 1 Look at Van Gogh’s Step 5 In the top section of the
“Starry Night” painting. two inches of cardboard you
have left, create little holes with
Step 2 Take your cardboard your scissors that will be used for
and draw out the bottom of the hanging the objects. Next cut
landscape with your marker. matching holes in the sky shapes.
Step 3 Cut out the sky of your Step 6 Hang the leftover
landscape, leaving about two cardboard sky shapes from the
inches on the top and on the holes in the top using the string. Travel Kit:
left side so that the landscape Cardboard
is still attached. Decorate your
Crayons or colored pencils
landscape.
Scissors
Step 4 With the leftover String
cardboard, cut out the shapes
in Van Gogh’s sky. These shapes Marker
consist of swirls and circles. After Starry Night Mobile handout
they are cut out, decorate the
shapes.
Group Tour:
Make a mobile of a room interior of your home with a family member
incorporating elements such as a rug, chair, table, lamp, clock,
window.
Extend Your Journey:
Investigate more examples of Post-Impressionism. Learn about the stars and how to identify constellations
(https://stardate.org/nightsky/constellations).
Learn new vocabulary: mobile, negative space
Find resources and visual aids:
Vincent Van Gogh: Starry Night https://www.vangoghgallery.com/painting/starry-night.html
Alexander Calder mobile https://www.moma.org/collection/works/81621
Starry Night Mobile handout: https://artsphere.org/blog/a-close-look-at-van-goghs-starry-night/
Access our instructional video: https://www.youtube.com/watch?v=-EXvSXKU1Rs
Art Sphere Inc • www.artsphere.org • info@artsphere.org • © 2020 All Rights Reserved, Art Sphere Inc. 88. Cubist Flowers
This lesson is good for ages 5 -14
Your Destination:
Students will learn about popular Cubist artists, such as Picasso,
who have heavily influenced the Cubist movement. By creating a
simple bouquet of flowers, students will be able to learn about the
characteristics of Cubism and how to create Cubist art.
On the Path:
Step 1 Look at Pablo Picasso’s using values of the similar color
cubist paintings. With a black instead, so shapes can be seen
crayon, draw out the outline of from a distance.
your bouquet.
Step 2 Use a ruler to make
straight lines that cut across the Travel Kit:
page at different angles with
a black crayon. This will break Paper
up the flowers and vase into Crayons
geometric shapes.
Oil pastels
Step 3 Color in the sections as
desired making sure no two Cubist Flowers handout
shapes that touch are the
exact same color. Consider
Group Tour:
Draw a picture with a friend or family member. Use plastic lids to
trace circles to break up the drawing. Color in the sections as desired
making sure no two shapes that touch are the exact same color.
Extend Your Journey:
Review different geometric shapes with a parent or friend.
Learn new vocabulary: Cubism, geometric
Find resources and visual aids:
Pablo Picasso's Cubism Period https://www.pablopicasso.org/cubism.jsp
Cubist artwork https://www.metmuseum.org/toah/hd/cube/hd_cube.htm
Cubist Flowers handout: https://artsphere.org/blog/cubism-paint-your-own-picasso-handout
Access our instructional video: https://www.youtube.com/watch?v=TECMUsYrCNk
Art Sphere Inc • www.artsphere.org • info@artsphere.org • © 2020 All Rights Reserved, Art Sphere Inc. 99. DIY T-Shirt Facemask
This lesson is good for ages 5 -14
Your Destination:
Create a facemask out of an old T-shirt that you have.
On the Path:
Step 1 Take your T-shirt and mark about two inches up from
make sure it is facing inside-out. the bottom of the shirt.
Measure how much of the shirt
you will need to cover your face Step 4 Using scissors, cut along
from the nose to the chin, use each of the marks you made
your hand as a reference. Take a for the straps until you reach the
sharpie and make a mark where mark you made for the front of
the tip of your finger is placed. the mask. You will be left with a
large flap in the middle of these
Step 2 Fold the T-shirt in half, two lines. Cut that off of the shirt Travel Kit:
having both ends meet the mark using the mark you made for the
you made. See our video for front of the mask as your guide. Old T-shirt
reference. Cut your fold away Cut the tube ends of the shirt
Scissors
from the rest of the shirt, leaving furthest from the facemask to
you with the neat fold you made, create 4 straps. Face Mask handout
and the remains of the shirt.
Step 5 Tie a knot with each of
Step 3 Make the front of the the straps on either side, making
mask, where your face will be sure that they are close to the
covered. Measure about 4 face mask. This will tighten the
inches from the left side of the facemask. Then, make a small
mask and make a mark. On the knot on the far end of each of
other side, you will make the the 4 straps to secure them. Your
straps. On the top of your folded mask is now complete! Tie these
piece of shirt, make a mark straps around the back of your
about two inches down from the head to wear it.
top of your shirt. Then, make a
Group Tour:
Have a family mask-making night or make one with a friend. Make extra masks to donate to people that
need them.
Extend Your Journey:
Learn new vocabulary: Covid-19
Find resources and visual aids: No Sew T-Shirt Bag https://www.youtube.com/watch?v=zgpaM3u2zng
Face Mask handout: https://artsphere.org/blog/diy-t-shirt-face-mask/
Access our instructional video: https://www.youtube.com/watch?v=dleivrYl4tc
10
Art Sphere Inc • www.artsphere.org • info@artsphere.org • © 2020 All Rights Reserved, Art Sphere Inc.10. Identity Silhouette
This lesson is good for ages 5 -14
Your Destination:
Based on Kara Walker’s work with silhouettes, the students will create
5 silhouettes of aspects that they feel make up their identity. The
silhouettes are going to be a basic outline of different shapes. This
can be activities they enjoy, such as, family members or symbols.
On the Path:
Step 1 On a piece of paper, from the black piece of paper.
or in your sketchbook, take 10 Glue the shapes you cut out with
minutes to think about 5 different the light paper on to the dark
aspects of your life that make paper.
up your personal identity. These
can be things about your family,
your culture, or anything else Travel Kit:
that comes to mind. Write these
things down and draw them! Black paper
Step 2 Taking your white paper, White paper
start to draw out the silhouettes Scissors
of these images; these can be
simple symbols or caricatures. Pencil
Step 3 Cut out these shapes. Glue
Also, cut out a large dark circle
Identity Silhouette handout
Group Tour:
Discuss Kara Walker’s artwork on identity, such as how she includes it
in her work and what aspects of identity she focuses on.
Extend Your Journey:
Create a silhouette of your face and make a poem about your identity to paste inside of it.
Learn new vocabulary: silhouette, identity
Find visual aids and resources: Kara Walker's artwork https://art21.org/artist/kara-walker/
Identity Silhouette handout: https://artsphere.org/blog/identity-silhouette/
Access our instructional video: https://www.youtube.com/watch?v=6BVbescGXv8
11
Art Sphere Inc • www.artsphere.org • info@artsphere.org • © 2020 All Rights Reserved, Art Sphere Inc.11. Cork and Wire
Ballerinas
This lesson is good for ages 5 -14
Your Destination:
Using recycled materials, create small sculptures of people. This will
give students a chance to practice creating sculptures in a fun,
creative way.
On the Path:
Step 1 Look at the artwork of Step 3 Next, stick the bottom of
Elizabeth Berrien and Alexander the sculpture into the cork so that
Calder. Think about how they it can stand freely. This can be
use wire in their work. What are the feet of your ballerina.
the similarities, what are the
differences? Step 4 Finally, take the plastic
bag and cut a piece off to make
Step 2 By bending and twisting the tutu. You can also use the Travel Kit:
your wire, create the shape of a plastic bag or fabric to make a
person. leotard. Wire
Cork
Group Tour: Ribbon
Fabric
Make more dancers with others. Create a stage by cutting a
rectangle out of the bottom of a cardboard box - play music and Tape
create a performance! Plastic bag
Wire cutter
Extend Your Journey: Scissors
Learn new vocabulary: cork, proportion Cork and Wire Ballerinas
handout
Find visual aids and resources:
A Brief History of Ballet https://tinyurl.com/yc5zaw6d
Classical ballet performances https://www.music-opera.com/en/classical-dance/
Sugar Plum Fairy https://www.youtube.com/watch?v=zV1qLYukTH8
Swan Lake https://www.youtube.com/watch?v=9rJoB7y6Ncs
Crafts with wire and cork https://recycledcrafts.craftgossip.com/fun-idea-for-wire-ribbon-and-recycled-cork-
people-for-halloween/2019/09/22/
Elizabeth Berrien’s wire artwork http://www.wirelady.com/
Alexander Calder’s wire artwork https://tinyurl.com/y8a4j5oq
Calder's Circus https://whitney.org/collection/works/5488
Artist Study with Kids: Alexander Calder https://www.artbarblog.com/artist-study-kids-alexander-calder/
Cork and Wire Ballerinas handout: https://artsphere.org/blog/wire-and-cork-ballerinas/
Access our instructional video: https://www.youtube.com/watch?v=mF2eYBXsz7o
12
Art Sphere Inc • www.artsphere.org • info@artsphere.org • © 2020 All Rights Reserved, Art Sphere Inc.12. Jackson Pollock
Drip Painting
This lesson is good for ages 5 -14
Your Destination:
Recreate Pollock’s drip painting by replicating the direct, raw
techniques that he used.
On the Path:
Step 1 Look at the artwork of the dripped paint untouched
Jackson Pollock. if you’d like. Notice how some
parts of your painting blend,
Step 2 On your canvas, drip your while other parts of the dripped
first layer of paint. Take the pallet paint are distinct.
knife or brush and smooth some
parts out.
Step 3 Take another color of Travel Kit:
paint and repeat the first step.
Wood
Step 4 Take a third color of paint Canvas
and drip it onto the canvas. Use
your paintbrush and palette Paint
knife to brush and move around Paintbrush
some parts. Also leave parts of
Pallette knife
Group Tour: Drip Painting handout
Look deeper into Jackson Pollock’s process by watching him work
and learn how he changed the art of painting.
Learn what Abstract Expressionism represents and how it changed
the art world.
Extend Your Journey:
Create your own non-representational art using the Abstract Expressionist style using paint and a paintbrush this
time.
Learn new vocabulary: Abstract Expressionism
Find visual aids and resources: Jackson Pollock's artwork https://www.jackson-pollock.org/
Drip Painting handout: https://artsphere.org/blog/jackson-pollock-drip-painting/
Access our instructional video: https://www.youtube.com/watch?v=o8H44YXWpeE
13
Art Sphere Inc • www.artsphere.org • info@artsphere.org • © 2020 All Rights Reserved, Art Sphere Inc.13. Leaf Prints
This lesson is good for ages 5 -14
Your Destination:
Explore nature with paint through the process of monoprinting.
On the Path:
Step 1 Gather flowers, leaves Step 3 Coat the more textured
and plant materials. Only pick side of your leaves and plant
plant materials you can identify materials with paint.
and that are safe to touch.
Rinse gently and remove excess Step 4 Press the plant materials
moisture by patting softly with a onto the paper creating a
paper towel. Place on a table stamp-like impression.
covered with newspaper.
Travel Kit:
Step 2 Notice that the leaves
have a smoother side and a Leaves
rougher side which has the raised
Flowers
texture of veins. Leaves transport
water and nutrients to the rest of Paint
a plant, just like how human veins Scrap paper
help transport blood in our own
bodies. Construction paper
Newspaper
Group Tour: Leaf Prints handout
Collaborate with others and create a garden on a large piece of
paper with all of your natural materials.
Extend Your Journey:
Learn more about monoprints made by artists from around the world.
Learn new vocabulary: impression, pattern, monoprint
Find visual aids and resources:
USDA Plants Database https://plants.usda.gov/java/
Identify different wildflowers http://mywildflowers.com/identify.asp
Plant Encyclopedia https://www.bhg.com/gardening/plant-dictionary/
Leaf Prints handout: https://artsphere.org/blog/leaf-printing/
Access our instructional video: https://www.youtube.com/watch?
v=T6YabO30GzU&list=PLN2FL32merRtb7mpleuOqshK3_OyPWyoc&index
=8
14
Art Sphere Inc • www.artsphere.org • info@artsphere.org • © 2020 All Rights Reserved, Art Sphere Inc.14. Symmetrical Radial
Designs
This lesson is good for ages 5 -14
Your Destination:
Learn about symmetry by creating a fun design.
On the Path:
Step 1 Look at radial designs in Step 3 Next split the circles up
art such as the Rose Window further by drawing lines on the
of the Notre Dame Cathedral, folds and through the circles
or Mandalas from Hindu and diagonally by making lines that
Buddhist art. Look at things that connect the corner of your
are radial – like snowflakes, stars, pages.
the top of a daisy, or the inside of
an orange. Step 4 Using your knowledge
of symmetry and radial design,
Step 2 Find the center of your decorate the circles as you see Travel Kit:
paper by folding it in half fit, making each quadrant a Markers
horizontally and vertically. Take mirror image of the others.
each of your bowls and trace to Paper
create three circles, one inside
3 different sized bowls (or
the other, with the smallest in the
center. plastic lids)
Ruler
Group Tour: Symmetrical Radial Designs
Research symmetrical animals, then recreate with a friend. handout
Extend Your Journey:
Create a large mandala using household items, things found in nature and learn about mandalas from around
the world.
Learn new vocabulary: radial, symmetry, asymmetry, mandala
Find visual aids and resources:
Sam Spreckley's Oil and Water https://www.axisweb.org/p/samspreckley/workset/90513-oil-and-water/
Mandala examples https://tinyurl.com/yaj2usng
Learn more about radial design https://study.com/academy/lesson/radial-design-definition-examples.html
Symmetrical Radial Designs handout: https://artsphere.org/blog/symmetrical-radial-designs/
Access our instructional video: https://www.youtube.com/watch?v=3qWlO7Dbhns
15
Art Sphere Inc • www.artsphere.org • info@artsphere.org • © 2020 All Rights Reserved, Art Sphere Inc.15. Jerry Wilkerson’s
“Bananas” Painting
This lesson is good for ages 5 -14
Your Destination:
Recreate Jerry Wilkerson’s "Bananas" painting using pointillism
techniques.
On the Path:
Step 1 View Jerry Wilkerson’s paper or trace a real banana.
“Bananas” and see how it was
created with uniform dots of Step 4 Paint the banana yellow
color. using dotting motion. Add a mix
of brown and black dots for lines
Step 2 View Georges Seurat’s and leave spaces when you
“Entrance of the Port of Honfleur” want to fade shapes into the
and compare and contrast the background or use the white of
two paintings. See how they the page to make white. Place Travel Kit:
both use visual mixing. Red dots closer to one another when
dots next to orange dots make you want a denser darker color. Q-tips
orange, blue dots next to yellow Pencil
dots make green, red dots next Step 5 Move on to paint the Yellow, blue, red, brown,
to blue dots make violet. starry sky background with and black paint or markers
different shades of blue. Canvas
Step 3 Sketch out a large
banana in the middle of the Palette (wax paper, plastic
lid, etc.)
Banana Painting handout
Group Tour:
Alternate: This project can
Create a mural filled with other fruits or vegetables using thumbprints. also be completed using
markers and paper.
Extend Your Journey:
Visit the Barnes Foundation online virtual exhibit (https://tinyurl.com/ybztkacs).
Learn new vocabulary: Pointillism
Find visual aids and resources:
Jerry Wilkerson's Bananas https://www.mutualart.com/Artwork/Bananas/FE17F8BEDE9501B8
Georges Seurat's A Sunday on La Grande Jatte https://www.metmuseum.org/art/collection/search/437658
View Barnes Takeout: Art Talk on Georges Seurat’s Entrance of the Port of Honfleur https://tinyurl.com/pj8895sv
Banana Painting handout: https://artsphere.org/blog/jerry-wilkersons-bananas/
Access our instructional video: https://www.youtube.com/watch?v=IxcWa94oa1o
16
Art Sphere Inc • www.artsphere.org • info@artsphere.org • © 2020 All Rights Reserved, Art Sphere Inc.16. Color Wheel
Flower
This lesson is good for ages 5 -14
Your Destination:
Create a color chart in the shape of a flower that includes labeled
primary and secondary colors: red, orange, yellow, green, blue and
violet.
On the Path:
Step 1 Look at the artwork of Piet Step 5 Create a stem with the
Mondrian and look at the color colors of Red, Orange, Yellow,
wheel. Green, Blue, and Violet. Label
them with the appropriate color.
Step 2 Draw the center of the
flower with black, a neutral color.
Step 3 Next, draw the primary Travel Kit:
colors (yellow, blue, red) in the Paper
shape of the petals. Label them
with a “P”. Pen
Step 4 Draw the secondary Markers
colors (orange, green, violet) in
Color Wheel Flower
the shape of petals. Label them
with a “S”. handout
Group Tour:
Look at artists that tend to use a lot of primary colors in their work such
as Piet Mondrian.
Extend Your Journey:
Start mixing colors by navigating through your chart. Experiment online to learn about more advanced color
relationships.
Learn new vocabulary: primary colors, secondary colors, ROYGBIV
Find visual aids and resources:
Learn more about the color wheel https://tinyurl.com/f3jx3erf
Learn more about Piet Mondrian https://www.piet-mondrian.org/composition-ii-in-red-blue-and-yellow.jsp
Color Wheel Flower handout: https://artsphere.org/blog/color-wheel-flowers/
Access our instructional video: https://www.youtube.com/watch?v=tgOdS5pR4xU
17
Art Sphere Inc • www.artsphere.org • info@artsphere.org • © 2020 All Rights Reserved, Art Sphere Inc.17. Beehives for Kids
This lesson is good for ages 5 -14
Your Destination:
Create a beehive with hexagons.
On the Path:
Step 1 Look at the artwork of Step 5 On a separate piece
Ava Roth made in collaboration of paper make your bees. Cut
with bees. them out and glue them to your
beehive paper.
Step 2 Take a tutorial on how to
make a hexagon tracer.
Step 3 Trace the hexagons on
your paper with a marker,
covering the whole page. Travel Kit:
Glue
Step 4 Color the inside of each hexagon yellow, and then add black
and brown to the edges of each hexagon, to give your picture Sharpie
more of a realistic beehive look. Hexagon tracer
Oil Pastels
Two pieces of paper
Group Tour:
Scissors
Watch a video on how bees live and maintain their hive. Plant a bee
friendly garden. Beehives for Kids handout
Extend Your Journey:
Talk to a parent about how the bees affect the ecosystem and how a beehive works. Build a bee house.
Learn new vocabulary: hexagon
Find visual aids and resources:
Celebrating the Greatest of All Pollinators—Bees https://tinyurl.com/pb5cz6pe
Why Bees Are Important https://www.planetbee.org/why-we-need-bees
Different Ways Kids Can Help Honeybees https://tinyurl.com/r9v5a5px
Beehives for Kids handout: https://artsphere.org/blog/beehive-coloring-handout/
Access our instructional video: https://www.youtube.com/watch?v=ju2taQ_sbxE
18
Art Sphere Inc • www.artsphere.org • info@artsphere.org • © 2020 All Rights Reserved, Art Sphere Inc.18. Optical illusion
hearts
This lesson is good for ages 5 -14
Your Destination:
Create a 3-D illusion out of line and color.
On the Path:
Step 1 Look at the artwork each shape you have created
made by Jeff Koons and Victor with the lines you drew in step 3,
Vasarely. and be sure to coordinate your
colors! On second heart: Choose
Step 2 On two separate pieces of two more colors you haven’t
paper, draw two hearts that are used yet. Start from the top left
as large as your piece of paper. and of your heart and color
across the heart, alternating
Step 3 On the first heart: Draw six colors every time you get to a
or seven lines through your heart, new shape that your wavy lines Travel Kit:
making sure that the lines touch made in your heart.
both ends of the paper. On the Your choice of medium
second heart: Draw horizontal (markers or crayons work
waves across the heart from the best) that have multiple
top of your paper down to the colors
bottom. Paper
Step 4 Rewrite to read as the Optical Illusions Heart
following: On the first heart: handut
Choose two colors that you
haven’t used yet. Color inside of
Group Tour:
Look at art made by artist Jeff Koons and other sculptures.
Extend Your Journey:
Look at great ideas for notching cardboard so that it can be structurally sound and even support the weight
of a person. Create 3-D sculpture made out of a medium that is typically used for 2-D art, such as paper or
cardboard.
Learn new vocabulary: optical illusion
Find visual aids and resources:
Learn about Jeff Koons https://art21.org/watch/extended-play/jeff-koons-art-history-short/
Learn more about Vasarely's art https://tinyurl.com/zrxabxfk
Optical Illusions Heart handout: https://artsphere.org/blog/optical-illusion-hearts/
Access our instructional video: https://www.youtube.com/watch?v=AFxqVvTki3M
19
Art Sphere Inc • www.artsphere.org • info@artsphere.org • © 2020 All Rights Reserved, Art Sphere Inc.19. Social Awareness
Artistic Challenge
This lesson is good for ages 5 -14
Your Destination:
The students will create a piece of artwork based on the following
prompt, “What do mirrors, windows, and sliding glass doors at school
look like when we create a world where everyone is treated fairly
and is able to reach their full potential?"
On the Path:
Step 1 Watch and read 2020 to the world that you have
Student Creative Challenge imagined (Mirrors).
Resources.
Step 4 What actions do you and
Step 2 Brainstorm about a world the people around you need to
that you would like to live in. A take in order to create this world
world where, not only do you (Sliding glass doors)? Draw a Travel Kit:
feel safe, but in which your picture of you and your friends
friends and peers do too. What helping to create this world. Any medium you would like
are your thoughts on how these Social Awareness Artistic
ideas could work? What needs
to change in order to make the Challenge handout
world better?
Step 3 Think of the ways in which
you can see yourself contributing
Group Tour:
Talk to one of your friends to learn about their race or culture. Include
them in your activities! Learn about artists from other cultures and races
at https://artclasscurator.com/art-around-the-world-in-30-days/.
Extend Your Journey:
Meet with a friend and brainstorm 5 steps that you can take to contribute to a more equal and just world.
Learn new vocabulary: inclusive, racism, equality, privilege, justice
Find visual aids and resources:
Laern more about activism https://blacklivesmatteratschool.com/
Student Creative Challenge Resources: https://tinyurl.com/nd4a4njx
Social Awareness Artistic Challenge handout: https://artsphere.org/blog/creativity-handouts/
Access our instructional video: https://www.youtube.com/watch?v=lKwHh6a_KvA
20
Art Sphere Inc • www.artsphere.org • info@artsphere.org • © 2020 All Rights Reserved, Art Sphere Inc.20. Painting with
Utensils
This lesson is good for ages 5 -14
Your Destination:
Paint a landscape using alternative utensils to explore texture and
movement in painting.
On the Path:
Step 1 Use your paint brush to first
paint the background of your
landscape. Make sure you use a
good amount of paint.
Step 2 Create a layer of texture
by using your utensils to scratch,
scrape, carry, press, displace, roll,
move, dab smear and stroke the Travel Kit:
paint along the canvas. Create
your own unique marks. Utensils
Step 3 Create layers of marks. Thick paper or canvas
Paintbrush
Step 4 Choose new colors and
repeat the last two steps until you Paint
are happy with the outcome of Painting with Utensils
your painting.
handout
Group Tour:
Look at artists who paint with nontraditional materials and experiment
by making your own nontraditional texture studies. Collect other tools
to experiment with making future marks such as: pompoms, popsicle
sticks, lids, old sneaker, scrunched up paper, scrunched up tissue,
sponges, old toothbrush, old comb, old hairbrush.
Extend Your Journey:
Create a landscape using your utensils. Mimic the texture that one would find in nature such as bark, clouds,
grass, weeds, flowers, leaves, pine trees, water falls, streams, ponds, dirt, sand and rocks. Assign a different tool
for making each texture.
Learn new vocabulary: texture, movement, background
Find visual aids and resources:
Jo Atherton's artwork https://joatherton.com/gallery/
Beyond the Brush: Inventive Use of Media for Painting Students https://www.studentartguide.com/
articles/inventive-mixed-media-techniques
Painting with Utensils handout: https://artsphere.org/blog/painting-with-utensils/
Access our instructional video: https://www.youtube.com/watch?v=kKSlxquBy
FE&list=PLN2FL32merRtb7mpleuOqshK3_OyPWyoc 21
Art Sphere Inc • www.artsphere.org • info@artsphere.org • © 2020 All Rights Reserved, Art Sphere Inc.APPENDIX
1 Pasta People
2 Henri Matisse "Stained Glass" Foil
Embossing
4 Andy Goldsworthy Inspired Temporary
3 Rodney McCoubrey Recycled Fish Art
5 Kandinsky Heart Color Study 6 Claude Monet Finger Painting
Art Sphere Inc • www.artsphere.org • info@artsphere.org • © 2020 All Rights Reserved, Art Sphere Inc. 22APPENDIX
7 Van Gogh "Starry Night" Mobile 8 Cubist Flowers
9 DIY T-Shirt Face Mask 10 Identify Silhouette
11 Cork and Wire Ballerina 12 Jackson Pollock Drip Painting
Art Sphere Inc • www.artsphere.org • info@artsphere.org • © 2020 All Rights Reserved, Art Sphere Inc. 23APPENDIX
13 Leaf Prints 14 Symmetrical Radial Designs
15 Jerry Wilkerson's "Bananas" Painting 16 Color Wheel Flower
17 Beehives for Kids 18 Optical Illusions Hearts
Art Sphere Inc • www.artsphere.org • info@artsphere.org • © 2020 All Rights Reserved, Art Sphere Inc. 24APPENDIX
19 Social Awareness Artistic
20 Painting with Utensils
Challenge
Art Sphere Inc • www.artsphere.org • info@artsphere.org • © 2020 All Rights Reserved, Art Sphere Inc. 25About Us
Art Sphere Inc. (ASI), founded in 1998, provides meaningful free arts programs in an effort to engage the
creativity in communities, empower neighborhoods, explore the positives in peoples’ lives, and heal the mind,
body, and spirit through the arts.
Working with hundreds of volunteers every year and partnering with numerous civic, academic and
governmental organizations, our grassroots events help support inner-city neighborhoods. ASI’s in-school and
after-school workshops lay the framework for the arts to nourish the character and development of youth, open
up a new world of social engagement and reinforce the school curriculum.
We appreciate the generous support of Penn Treaty Special Services District and other foundations and
institutions, who, among our other supporters, have paved the way for Art Sphere Inc. to continue to serve the
public through on-site and online education programs.
Art Sphere Inc. receives state arts funding support through a grant from the Pennsylvania Council on the Arts, a state agency
funded by the Commonwealth of Pennsylvania and the National Endowment for the Arts, a federal agency.
For more information, visit artsphere.org. https://artsphere.org/who-we-are/copyright-and-disclaimer/You can also read