CP42LH - User Manual - Christie Digital
←
→
Page content transcription
If your browser does not render page correctly, please read the page content below

CP42LH

User Manual
  020-101363-03
NOTICES

COPYRIGHT AND TRADEMARKS
Copyright © 2016 Christie Digital Systems USA Inc. All rights reserved.
All brand names and product names are trademarks, registered trademarks or trade names of their respective holders.

GENERAL
Every effort has been made to ensure accuracy, however in some cases changes in the products or availability could occur which may
not be reflected in this document. Christie reserves the right to make changes to specifications at any time without notice. Performance
specifications are typical, but may vary depending on conditions beyond Christie's control such as maintenance of the product in
proper working conditions. Performance specifications are based on information available at the time of printing. Christie makes no
warranty of any kind with regard to this material, including, but not limited to, implied warranties of fitness for a particular purpose.
Christie will not be liable for errors contained herein or for incidental or consequential damages in connection with the performance or
use of this material. Canadian manufacturing facility is ISO 9001 and 14001 certified.

WARRANTY
Products are warranted under Christie’s standard limited warranty, the complete details of which are available by contacting your
Christie dealer or Christie. In addition to the other limitations that may be specified in Christie’s standard limited warranty and, to the
extent relevant or applicable to your product, the warranty does not cover:
  a. Problems or damage occurring during shipment, in either direction.
  b. Projector lamps (See Christie’s separate lamp program policy).
  c. Problems or damage caused by use of a projector lamp beyond the recommended lamp life, or use of a lamp other than a Christie
     lamp supplied by Christie or an authorized distributor of Christie lamps.
  d. Problems or damage caused by combination of a product with non-Christie equipment, such as distribution systems, cameras,
     DVD players, etc., or use of a product with any non-Christie interface device.
  e. Problems or damage caused by the use of any lamp, replacement part or component purchased or obtained from an
     unauthorized distributor of Christie lamps, replacement parts or components including, without limitation, any distributor offering
     Christie lamps, replacement parts or components through the internet (confirmation of authorized distributors may be obtained
     from Christie).
  f. Problems or damage caused by misuse, improper power source, accident, fire, flood, lightening, earthquake or other natural
     disaster.
  g. Problems or damage caused by improper installation/alignment, or by equipment modification, if by other than Christie service
     personnel or a Christie authorized repair service provider.
  h. Problems or damage caused by use of a product on a motion platform or other movable device where such product has not been
     designed, modified or approved by Christie for such use.
  i. Problems or damage caused by use of a projector in the presence of an oil-based fog machine or laser-based lighting that is
     unrelated to the projector.
  j. For LCD projectors, the warranty period specified in the warranty applies only where the LCD projector is in “normal use” which
     means the LCD projector is not used more than 8 hours a day, 5 days a week.
  k. Except where the product is designed for outdoor use, problems or damage caused by use of the product outdoors unless such
     product is protected from precipitation or other adverse weather or environmental conditions and the ambient temperature is
     within the recommended ambient temperature set forth in the specifications for such product.
  l. Image retention on LCD flat panels.
  m.Defects caused by normal wear and tear or otherwise due to normal aging of a product.
The warranty does not apply to any product where the serial number has been removed or obliterated. The warranty also does not
apply to any product sold by a reseller to an end user outside of the country where the reseller is located unless (i) Christie has an office
in the country where the end user is located or (ii) the required international warranty fee has been paid.
The warranty does not obligate Christie to provide any on site warranty service at the product site location.

PREVENTATIVE MAINTENANCE
Preventative maintenance is an important part of the continued and proper operation of your product. Please see the Maintenance
section for specific maintenance items as they relate to your product. Failure to perform maintenance as required, and in accordance
with the maintenance schedule specified by Christie, will void the warranty.

REGULATORY
The product has been tested and found to comply with the limits for a Class A digital device, pursuant to Part 15 of the FCC Rules.
These limits are designed to provide reasonable protection against harmful interference when the product is operated in a commercial
environment. The product generates, uses, and can radiate radio frequency energy and, if not installed and used in accordance with the
instruction manual, may cause harmful interference to radio communications. Operation of the product in a residential area is likely to
cause harmful interference in which case the user will be required to correct the interference at the user’s own expense.
CAN ICES-3 (A) / NMB-3 (A)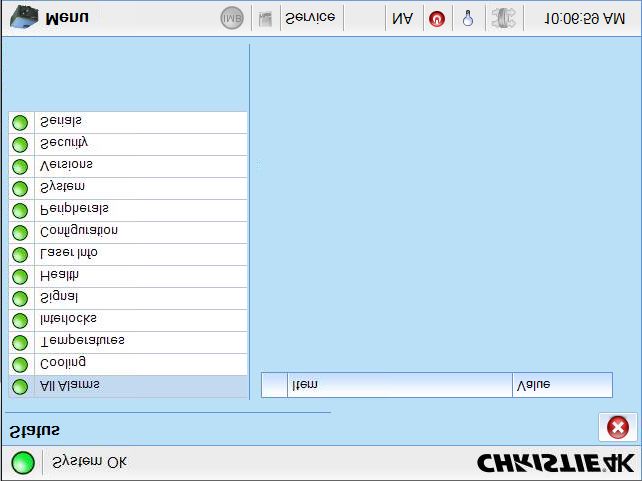
이 기기는 업무용 (A 급 ) 으로 전자파적합등록을 한 기기이오니 판매자 또는 사용자는 이점을 주의하시기 바라며 , 가정 외의 지역에서
사용하는 것을 목적으로 합니다 .

Environmental

The product is designed and manufactured with high‐quality materials and components that can be recycled and reused. This symbol            means
that electrical and electronic equipment, at their end‐of‐life, should be disposed of separately from regular waste. Please dispose of the product
appropriately and according to local regulations. In the European Union, there are separate collection systems for used electrical and electronic
products. Please help us to conserve the environment we live in!
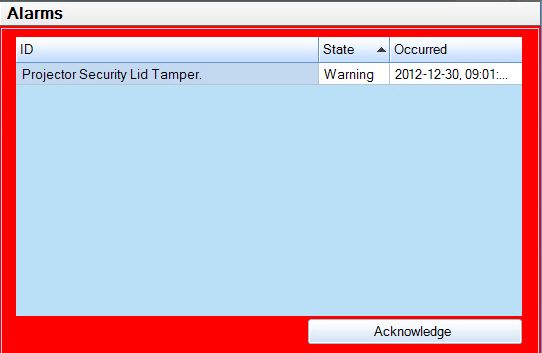
Table of Contents

         Introduction . . . . . . . . . . . . . . . . . . . . . . . . . . . . . . . . . . . . . . . . . . . . . . . . . 9
             General safety precautions          . . . . . . . . . . . . . . . . . . . . . . . . . . . . . . . . . . . . . . . . 10
             AC power precautions . . . . . . . . . . . . . . . . . . . . . . . . . . . . . . . . . . . . . . . . . . . . 10
             Christie Laser Projection System components . . . . . . . . . . . . . . . . . . . . . . . . . . . . 11

         Laser Safety Precautions . . . . . . . . . . . . . . . . . . . . . . . . . . . . . . . . . . . . . . 13
             Laser module laser safety labels . . . . . . . . . . . . . . . . . . . . . . . . . . . . . . . . . . . . . 14
             LM Rack laser safety labels          . . . . . . . . . . . . . . . . . . . . . . . . . . . . . . . . . . . . . . . . 16
             Projector laser safety labels . . . . . . . . . . . . . . . . . . . . . . . . . . . . . . . . . . . . . . . . 17
             Laser module status lights . . . . . . . . . . . . . . . . . . . . . . . . . . . . . . . . . . . . . . . . . 20
             LM Rack safety features          . . . . . . . . . . . . . . . . . . . . . . . . . . . . . . . . . . . . . . . . . . 21
             Projector safety features . . . . . . . . . . . . . . . . . . . . . . . . . . . . . . . . . . . . . . . . . . 22
             Nominal ocular hazard distance . . . . . . . . . . . . . . . . . . . . . . . . . . . . . . . . . . . . . 23

         Operate the Projector and Run Diagnostics . . . . . . . . . . . . . . . . . . . . . . . 25
             The Touch Panel Controller          . . . . . . . . . . . . . . . . . . . . . . . . . . . . . . . . . . . . . . . . 25
             The Main screen . . . . . . . . . . . . . . . . . . . . . . . . . . . . . . . . . . . . . . . . . . . . . . . . 26
             Turn the system on         . . . . . . . . . . . . . . . . . . . . . . . . . . . . . . . . . . . . . . . . . . . . . 27
             Test the interlocks . . . . . . . . . . . . . . . . . . . . . . . . . . . . . . . . . . . . . . . . . . . . . . 27
                 Test the key switch        . . . . . . . . . . . . . . . . . . . . . . . . . . . . . . . . . . . . . . . . . . . 27
                 Test the Laser Rack emergency stop . . . . . . . . . . . . . . . . . . . . . . . . . . . . . . . . 28
                 Test the projector emergency stop . . . . . . . . . . . . . . . . . . . . . . . . . . . . . . . . . 28
             Log on to the projector . . . . . . . . . . . . . . . . . . . . . . . . . . . . . . . . . . . . . . . . . . . 28
             Laser emission indicator lights . . . . . . . . . . . . . . . . . . . . . . . . . . . . . . . . . . . . . . 28
             View the status of projector components . . . . . . . . . . . . . . . . . . . . . . . . . . . . . . . 29
             Respond to alarms . . . . . . . . . . . . . . . . . . . . . . . . . . . . . . . . . . . . . . . . . . . . . . 30
             Run the projector interrogator . . . . . . . . . . . . . . . . . . . . . . . . . . . . . . . . . . . . . . 30
             View SMPTE errors . . . . . . . . . . . . . . . . . . . . . . . . . . . . . . . . . . . . . . . . . . . . . . 31
             Clear SMPTE errors . . . . . . . . . . . . . . . . . . . . . . . . . . . . . . . . . . . . . . . . . . . . . . 31
             Retrieve system logs . . . . . . . . . . . . . . . . . . . . . . . . . . . . . . . . . . . . . . . . . . . . . 31
             Run a server test . . . . . . . . . . . . . . . . . . . . . . . . . . . . . . . . . . . . . . . . . . . . . . . 31
             Turn the projector off . . . . . . . . . . . . . . . . . . . . . . . . . . . . . . . . . . . . . . . . . . . . 31
             Turn the system off in an emergency               . . . . . . . . . . . . . . . . . . . . . . . . . . . . . . . . . 32

         Manage the DLP . . . . . . . . . . . . . . . . . . . . . . . . . . . . . . . . . . . . . . . . . . . . 33
             Run a DLP self test . . . . . . . . . . . . . . . . . . . . . . . . . . . . . . . . . . . . . . . . . . . . . . 33
             Download an ICP certificate . . . . . . . . . . . . . . . . . . . . . . . . . . . . . . . . . . . . . . . . 33
             Disable the ICP signature test          . . . . . . . . . . . . . . . . . . . . . . . . . . . . . . . . . . . . . . 33

CP42LH User Guide                                                                                                                 4
020-101363-03 Rev. 1 (08-2016)
Work with Channels . . . . . . . . . . . . . . . . . . . . . . . . . . . . . . . . . . . . . . . . . . 34
             Create a new channel . . . . . . . . . . . . . . . . . . . . . . . . . . . . . . . . . . . . . . . . . . . . 34
             Activate a channel . . . . . . . . . . . . . . . . . . . . . . . . . . . . . . . . . . . . . . . . . . . . . . 36
             Restore default channel settings . . . . . . . . . . . . . . . . . . . . . . . . . . . . . . . . . . . . . 36
             Change the channel icon . . . . . . . . . . . . . . . . . . . . . . . . . . . . . . . . . . . . . . . . . . 37
             Add or remove preferred channels from the Preferred Channels pane                             . . . . . . . . . . . 37

         Manage Projector Setting Files . . . . . . . . . . . . . . . . . . . . . . . . . . . . . . . . . 38
             Create a source file . . . . . . . . . . . . . . . . . . . . . . . . . . . . . . . . . . . . . . . . . . . . . . 38
             Modify a source file . . . . . . . . . . . . . . . . . . . . . . . . . . . . . . . . . . . . . . . . . . . . . . 38
             Create a screen file . . . . . . . . . . . . . . . . . . . . . . . . . . . . . . . . . . . . . . . . . . . . . . 39
             Modify a screen file . . . . . . . . . . . . . . . . . . . . . . . . . . . . . . . . . . . . . . . . . . . . . . 39
             Create a MCGD file . . . . . . . . . . . . . . . . . . . . . . . . . . . . . . . . . . . . . . . . . . . . . . 39
             Modify a MCGD file . . . . . . . . . . . . . . . . . . . . . . . . . . . . . . . . . . . . . . . . . . . . . . 40
             Create a TCGD file . . . . . . . . . . . . . . . . . . . . . . . . . . . . . . . . . . . . . . . . . . . . . . 40
             Modify a TCGD file . . . . . . . . . . . . . . . . . . . . . . . . . . . . . . . . . . . . . . . . . . . . . . 40
             Create a new ILS file        . . . . . . . . . . . . . . . . . . . . . . . . . . . . . . . . . . . . . . . . . . . . 41
             Edit an existing ILS file . . . . . . . . . . . . . . . . . . . . . . . . . . . . . . . . . . . . . . . . . . . 41
             Enable automatic ILS adjustment on a channel . . . . . . . . . . . . . . . . . . . . . . . . . . . 41
             Reset ILS file settings . . . . . . . . . . . . . . . . . . . . . . . . . . . . . . . . . . . . . . . . . . . . 43
             Add a lens serial number . . . . . . . . . . . . . . . . . . . . . . . . . . . . . . . . . . . . . . . . . . 43
             Enable automatic ILS on a lens             . . . . . . . . . . . . . . . . . . . . . . . . . . . . . . . . . . . . . 43
             Reset the lens position on projector startup . . . . . . . . . . . . . . . . . . . . . . . . . . . . . 43
             Complete a full lens calibration . . . . . . . . . . . . . . . . . . . . . . . . . . . . . . . . . . . . . . 43
             Reset the ILS and the lens position . . . . . . . . . . . . . . . . . . . . . . . . . . . . . . . . . . . 44

         Work with the Scheduler . . . . . . . . . . . . . . . . . . . . . . . . . . . . . . . . . . . . . . 45
             Schedule the projector to turn on or off . . . . . . . . . . . . . . . . . . . . . . . . . . . . . . . . 45
             Edit a scheduled event         . . . . . . . . . . . . . . . . . . . . . . . . . . . . . . . . . . . . . . . . . . . 45
             Delete a scheduled event . . . . . . . . . . . . . . . . . . . . . . . . . . . . . . . . . . . . . . . . . . 46
             Delete all scheduled events . . . . . . . . . . . . . . . . . . . . . . . . . . . . . . . . . . . . . . . . 46
             Turn the scheduler off . . . . . . . . . . . . . . . . . . . . . . . . . . . . . . . . . . . . . . . . . . . . 46

         View and Modify Projector Settings . . . . . . . . . . . . . . . . . . . . . . . . . . . . . 47
             Set projector and TPC preferences . . . . . . . . . . . . . . . . . . . . . . . . . . . . . . . . . . . 47
             Adjust projector time settings           . . . . . . . . . . . . . . . . . . . . . . . . . . . . . . . . . . . . . . 47
             Modify projector communication settings . . . . . . . . . . . . . . . . . . . . . . . . . . . . . . . 48
             Add a network device . . . . . . . . . . . . . . . . . . . . . . . . . . . . . . . . . . . . . . . . . . . . 48
             Access a network device . . . . . . . . . . . . . . . . . . . . . . . . . . . . . . . . . . . . . . . . . . 49

CP42LH User Guide                                                                                                                 5
020-101363-03 Rev. 1 (08-2016)
View the Microsoft Windows Task Manager . . . . . . . . . . . . . . . . . . . . . . . . . . . . . . 49
View the Microsoft Windows Computer Management console . . . . . . . . . . . . . . . . . 49
View Microsoft Windows Explorer . . . . . . . . . . . . . . . . . . . . . . . . . . . . . . . . . . . . 49
View the Microsoft Network Connections window . . . . . . . . . . . . . . . . . . . . . . . . . . 50
View projector information . . . . . . . . . . . . . . . . . . . . . . . . . . . . . . . . . . . . . . . . . 50
Record the lens serial number . . . . . . . . . . . . . . . . . . . . . . . . . . . . . . . . . . . . . . 50
Manage User Accounts . . . . . . . . . . . . . . . . . . . . . . . . . . . . . . . . . . . . . . . 51
User access permissions . . . . . . . . . . . . . . . . . . . . . . . . . . . . . . . . . . . . . . . . . . 51
Add a user account . . . . . . . . . . . . . . . . . . . . . . . . . . . . . . . . . . . . . . . . . . . . . . 51
Change a user account password or permissions . . . . . . . . . . . . . . . . . . . . . . . . . . 52
Delete a user account . . . . . . . . . . . . . . . . . . . . . . . . . . . . . . . . . . . . . . . . . . . . 52
Backup, Restore, and Upgrade Projector Files . . . . . . . . . . . . . . . . . . . . . 53
Add an upgrade file . . . . . . . . . . . . . . . . . . . . . . . . . . . . . . . . . . . . . . . . . . . . . 53
Remove an upgrade file . . . . . . . . . . . . . . . . . . . . . . . . . . . . . . . . . . . . . . . . . . . 53
Install an upgrade . . . . . . . . . . . . . . . . . . . . . . . . . . . . . . . . . . . . . . . . . . . . . . 53
Back up projector settings and information . . . . . . . . . . . . . . . . . . . . . . . . . . . . . 54
Restore a file . . . . . . . . . . . . . . . . . . . . . . . . . . . . . . . . . . . . . . . . . . . . . . . . . . 54
Restore factory default settings . . . . . . . . . . . . . . . . . . . . . . . . . . . . . . . . . . . . . 54
Move files to the projector . . . . . . . . . . . . . . . . . . . . . . . . . . . . . . . . . . . . . . . . . 55
Delete projector files . . . . . . . . . . . . . . . . . . . . . . . . . . . . . . . . . . . . . . . . . . . . . 55
Work with Test Patterns . . . . . . . . . . . . . . . . . . . . . . . . . . . . . . . . . . . . . . 56
Add or remove test patterns from the preferred test patterns pane . . . . . . . . . . . . . 56
Turn a test pattern on or off . . . . . . . . . . . . . . . . . . . . . . . . . . . . . . . . . . . . . . . 56
Display a full screen test pattern . . . . . . . . . . . . . . . . . . . . . . . . . . . . . . . . . . . . 56
Add Devices . . . . . . . . . . . . . . . . . . . . . . . . . . . . . . . . . . . . . . . . . . . . . . . . 57
Play unencrypted content . . . . . . . . . . . . . . . . . . . . . . . . . . . . . . . . . . . . . . . . . 57
Play encrypted content . . . . . . . . . . . . . . . . . . . . . . . . . . . . . . . . . . . . . . . . . . . 57
Connect devices to the projector . . . . . . . . . . . . . . . . . . . . . . . . . . . . . . . . . . . . 57
Projector connections and status LEDs . . . . . . . . . . . . . . . . . . . . . . . . . . . . . . 58
Connect the projector to a computer . . . . . . . . . . . . . . . . . . . . . . . . . . . . . . . . 60
Connect devices to the GPIO port . . . . . . . . . . . . . . . . . . . . . . . . . . . . . . . . . . 60
Connect devices to the SCCI port . . . . . . . . . . . . . . . . . . . . . . . . . . . . . . . . . . 61
Connect devices to the 3D terminal . . . . . . . . . . . . . . . . . . . . . . . . . . . . . . . . 62
View 3D Content . . . . . . . . . . . . . . . . . . . . . . . . . . . . . . . . . . . . . . . . . . . . 63
Hardware and software requirements . . . . . . . . . . . . . . . . . . . . . . . . . . . . . . . . . 63
CP42LH User Guide 6
020-101363-03 Rev. 1 (08-2016)Set up projectors for 3D . . . . . . . . . . . . . . . . . . . . . . . . . . . . . . . . . . . . . . . . . . 64
Active stereo 3D configuration . . . . . . . . . . . . . . . . . . . . . . . . . . . . . . . . . . . . 64
Passive stereo 3D configuration . . . . . . . . . . . . . . . . . . . . . . . . . . . . . . . . . . . 65
3D system timing . . . . . . . . . . . . . . . . . . . . . . . . . . . . . . . . . . . . . . . . . . . . . 65
3D input video configurations . . . . . . . . . . . . . . . . . . . . . . . . . . . . . . . . . . . . 66
3D sync terminal PIN map . . . . . . . . . . . . . . . . . . . . . . . . . . . . . . . . . . . . . . . . . 66
Hardware setup . . . . . . . . . . . . . . . . . . . . . . . . . . . . . . . . . . . . . . . . . . . . . . 67
Maintenance . . . . . . . . . . . . . . . . . . . . . . . . . . . . . . . . . . . . . . . . . . . . . . . . 68
Shut down for maintenance . . . . . . . . . . . . . . . . . . . . . . . . . . . . . . . . . . . . . . . . 68
Check the coolant level . . . . . . . . . . . . . . . . . . . . . . . . . . . . . . . . . . . . . . . . . . 68
Inspect and clean optics . . . . . . . . . . . . . . . . . . . . . . . . . . . . . . . . . . . . . . . . . . 69
Remove dust from the projection lens . . . . . . . . . . . . . . . . . . . . . . . . . . . . . . . 69
Remove fingerprints, smudges, or oil from the projection lens . . . . . . . . . . . . . . 69
Replace the lens . . . . . . . . . . . . . . . . . . . . . . . . . . . . . . . . . . . . . . . . . . . . . . . . 70
Remove the lens . . . . . . . . . . . . . . . . . . . . . . . . . . . . . . . . . . . . . . . . . . . . . 70
Install a new lens . . . . . . . . . . . . . . . . . . . . . . . . . . . . . . . . . . . . . . . . . . . . . 70
Calibrate the lens motors . . . . . . . . . . . . . . . . . . . . . . . . . . . . . . . . . . . . . . . 70
Replace the lens . . . . . . . . . . . . . . . . . . . . . . . . . . . . . . . . . . . . . . . . . . . . . . . . 70
Remove the shroud . . . . . . . . . . . . . . . . . . . . . . . . . . . . . . . . . . . . . . . . . . . 71
Install the lens . . . . . . . . . . . . . . . . . . . . . . . . . . . . . . . . . . . . . . . . . . . . . . . 72
Filters . . . . . . . . . . . . . . . . . . . . . . . . . . . . . . . . . . . . . . . . . . . . . . . . . . . . . . . 75
Clean a washable filter . . . . . . . . . . . . . . . . . . . . . . . . . . . . . . . . . . . . . . . . . 75
Clean the light engine air filter . . . . . . . . . . . . . . . . . . . . . . . . . . . . . . . . . . . . . . 76
Clean the liquid cooling air filter . . . . . . . . . . . . . . . . . . . . . . . . . . . . . . . . . . . . . 77
Clean the IOS filter . . . . . . . . . . . . . . . . . . . . . . . . . . . . . . . . . . . . . . . . . . . . . . 78
Clean the Laser Module filter . . . . . . . . . . . . . . . . . . . . . . . . . . . . . . . . . . . . . . . 79
Troubleshooting . . . . . . . . . . . . . . . . . . . . . . . . . . . . . . . . . . . . . . . . . . . . . 80
Projector functionality . . . . . . . . . . . . . . . . . . . . . . . . . . . . . . . . . . . . . . . . . . . . 81
Display issues . . . . . . . . . . . . . . . . . . . . . . . . . . . . . . . . . . . . . . . . . . . . . . . . . 82
Laser Module functionality . . . . . . . . . . . . . . . . . . . . . . . . . . . . . . . . . . . . . . . . . 83
Projector Specifications . . . . . . . . . . . . . . . . . . . . . . . . . . . . . . . . . . . . . . . 85
Power requirements . . . . . . . . . . . . . . . . . . . . . . . . . . . . . . . . . . . . . . . . . . . . . 85
Physical specifications . . . . . . . . . . . . . . . . . . . . . . . . . . . . . . . . . . . . . . . . . . . . 85
Operating position . . . . . . . . . . . . . . . . . . . . . . . . . . . . . . . . . . . . . . . . . . . . 86
Operating environment . . . . . . . . . . . . . . . . . . . . . . . . . . . . . . . . . . . . . . . . . . . 86
Non-operating environment . . . . . . . . . . . . . . . . . . . . . . . . . . . . . . . . . . . . . . . . 86
CP42LH User Guide 7
020-101363-03 Rev. 1 (08-2016)Projection lens compatibility . . . . . . . . . . . . . . . . . . . . . . . . . . . . . . . . . . . . . . . 87
Accessories . . . . . . . . . . . . . . . . . . . . . . . . . . . . . . . . . . . . . . . . . . . . . . . . . . . 87
Standard . . . . . . . . . . . . . . . . . . . . . . . . . . . . . . . . . . . . . . . . . . . . . . . . . . . 87
Optional . . . . . . . . . . . . . . . . . . . . . . . . . . . . . . . . . . . . . . . . . . . . . . . . . . . 88
Third-party accessories . . . . . . . . . . . . . . . . . . . . . . . . . . . . . . . . . . . . . . . . . 88
Replacement air filters . . . . . . . . . . . . . . . . . . . . . . . . . . . . . . . . . . . . . . . . . 88
Laser Module Specifications . . . . . . . . . . . . . . . . . . . . . . . . . . . . . . . . . . . . 89
Power requirements. . . . . . . . . . . . . . . . . . . . . . . . . . . . . . . . . . . . . . . . . . . . . . 89
Physical specifications . . . . . . . . . . . . . . . . . . . . . . . . . . . . . . . . . . . . . . . . . . . 89
Operating environment . . . . . . . . . . . . . . . . . . . . . . . . . . . . . . . . . . . . . . . . . . . 90
Non-operating environment . . . . . . . . . . . . . . . . . . . . . . . . . . . . . . . . . . . . . . . . 90
Accessories . . . . . . . . . . . . . . . . . . . . . . . . . . . . . . . . . . . . . . . . . . . . . . . . . . . 90
Included . . . . . . . . . . . . . . . . . . . . . . . . . . . . . . . . . . . . . . . . . . . . . . . . . . . 90
Additional . . . . . . . . . . . . . . . . . . . . . . . . . . . . . . . . . . . . . . . . . . . . . . . . . . 90
Optional . . . . . . . . . . . . . . . . . . . . . . . . . . . . . . . . . . . . . . . . . . . . . . . . . . . 90
LM Rack Specifications . . . . . . . . . . . . . . . . . . . . . . . . . . . . . . . . . . . . . . . . 91
Power requirements . . . . . . . . . . . . . . . . . . . . . . . . . . . . . . . . . . . . . . . . . . . . . 91
Physical specifications . . . . . . . . . . . . . . . . . . . . . . . . . . . . . . . . . . . . . . . . . . . . 92
LM Rack (Full) . . . . . . . . . . . . . . . . . . . . . . . . . . . . . . . . . . . . . . . . . . . . . . . 92
LM Rack (Half) . . . . . . . . . . . . . . . . . . . . . . . . . . . . . . . . . . . . . . . . . . . . . . . . . 92
Operating environment . . . . . . . . . . . . . . . . . . . . . . . . . . . . . . . . . . . . . . . . . . . 93
Non-operating environment . . . . . . . . . . . . . . . . . . . . . . . . . . . . . . . . . . . . . . . . 93
Regulatory . . . . . . . . . . . . . . . . . . . . . . . . . . . . . . . . . . . . . . . . . . . . . . . . . 94
Safety . . . . . . . . . . . . . . . . . . . . . . . . . . . . . . . . . . . . . . . . . . . . . . . . . . . . . . . 94
Laser safety . . . . . . . . . . . . . . . . . . . . . . . . . . . . . . . . . . . . . . . . . . . . . . . . 94
Electro-magnetic compatibility . . . . . . . . . . . . . . . . . . . . . . . . . . . . . . . . . . . . . . 94
Environmental . . . . . . . . . . . . . . . . . . . . . . . . . . . . . . . . . . . . . . . . . . . . . . . . . 94
Certification . . . . . . . . . . . . . . . . . . . . . . . . . . . . . . . . . . . . . . . . . . . . . . . . . . . 95
CP42LH User Guide 8
020-101363-03 Rev. 1 (08-2016)Introduction
This manual is intended for professionally trained operators of the Christie Laser Projection System.
These operators are qualified to replace the lens and external air filters, but should not attempt to
install or service the projector. In addition, only Christie accredited personnel are authorized to
perform security procedures such as marriage.
Failure to comply with the following could result in death or serious injury.
• The components of the Christie Laser Projection System are designed and certified to
work together as a unit. Christie components should never be used with third-party
components. Use of non-Christie components with Christie systems may pose safety
concerns and void your warranty.
• Only Christie qualified technicians who are knowledgeable about the hazards associated
with laser use, high-voltage and high temperatures generated by the projector are
authorized to assemble, install, and service the Christie Laser Projection System.
CP42LH User Guide 9
020-101363-03 Rev. 1 (08-2016)Introduction
General safety precautions
Failure to comply with the following results in death or serious injury.
• An incorrect power setup provides a fire and shock hazard. Do not operate the system
unless certified connections, providing the recommended voltage, are used. Do not
attempt operation unless the power cord, power socket, and power plug meet the
appropriate local rating standards.
• Live power is a shock hazard. Only qualified service technicians are permitted to open a
projector enclosure, and only if the AC is fully disconnected.
Failure to comply with the following could result in death or serious injury.
• A qualified technician is required for all installations.
• The projection head must use Christie laser modules and the LM Rack (Full/Half).
• Use of the rear safety strap on the projector is mandatory to prevent the projector from
tipping. Secure the strap between the projector and the optional rack stand or another
structure.
• Four or more people are required to safely lift and install the projector.
• Two or more people are required to safely lift and install a Laser Module.
• The extremely high brightness of the projector can cause permanent eye damage. For
protection from harmful radiation, keep all projector housings intact during operation.
• Never look directly into the projector lens.
• Concentrated light is a fire hazard. Keep hands, clothes, and all combustible material
away from the concentrated light beam of the projector.
Failure to comply with the following could result in minor or moderate injury.
• Wear protective footwear when installing the rack.
• Position all cables where they cannot contact hot surfaces or be pulled or tripped over.
The Laser Modules and the projector must be operated in an environment that meets the
operating range specification. For the Laser Modules, see Operating environment on page
80; for the projector, see Operating environment on page 77. Failure to comply may result
in equipment damage.
AC power precautions
Failure to comply with the following could result in death or serious injury.
• Loose cables provide a trip or fire hazard. Position all cables where they cannot contact
hot surfaces, be pulled, or be tripped over.
• Damaged cables provide a fire hazard. Do not allow anything to rest on the power cord.
Never operate the projector if a cable appears damaged.
• Overloaded power outlets and extension cords provide a fire and shock hazard. Do not
overload power outlets or extension cords.
• Some attachments and accessories provide a fire, shock, or personal injury hazard. Only
use attachments and accessories that are recommended by Christie.
Only qualified service technicians are permitted to open projector enclosures and only if the
projector is disconnected from AC power. Failure to comply could result in minor or
moderate injury.
CP42LH User Guide 10
020-101363-03 Rev. 1 (08-2016)Introduction
Christie Laser Projection System components
G
A
H
E F
LASER INTERLOCK
LASER RACK
INTERLOCK IN
D
I
J
C
B
A Fiber optic bundle
Transmits the collected laser light to the projector.
B Projector
Modulates light from the Laser Modules and passes it through a projection lens to produce the image on
the screen.
C Ethernet cables
Connects the Laser Bank Manager and the projector to the network.
D Laser bank manager
Runs the Laser Bank Control Application that manages the Laser Modules.
E Interlock cable (9-pin)
Carries the signal for the emergency stop, key switch, and Laser Modules to verify a safe connection
between the Laser Modules and the projector.
F Interlock cable (25-pin)
Carries the signal for the Manual Reset button to the projector.
G LM Rack (Full/Half) (rear side shown)
A full and a half rack are available. The LM Rack Full (shown) accommodates up to 12 laser modules, the
power distribution unit, and the Laser system network switch and equipped with a key switch and an
emergency stop for safety. The LM Rack Half accommodates up to 7 laser modules.
H Laser module
Generates laser light for the projector.
CP42LH User Guide 11
020-101363-03 Rev. 1 (08-2016)Introduction
I Rack switch
Provides Ethernet connection to Laser Modules, Laser Bank Manager, and projector.
J Power distribution unit
Contains rectifiers and breakers to provide DC power to Laser Modules.
CP42LH User Guide 12
020-101363-03 Rev. 1 (08-2016)Laser Safety Precautions
The Christie Laser Projection System components have laser classifications, as outlined by the
International Electrotechnical Commission (IEC), ranging from Class 1 to Class 4. Immediate skin
hazard and eye hazard can occur from exposure to either the direct or specular reflected beam.
This may pose a fire hazard or a diffuse reflection hazard.
• Wavelength: 435 nm to 660 nm
• Beam divergence: 0.1 rad to 0.96 rad, lens dependent
• Pulse pattern: Continuous Wave (CW).
• Maximum output: < 10 W
Failure to comply with the following results in death or serious injury.
• This product must be installed within a restricted access location which is normally
inaccessible by the general public, including workers, visitors, and residents in the
immediate vicinity, by means of engineering or administrative control measures but is
accessible to authorized personnel that have had specific safety training.
• The installation setup must prevent access to the nominal ocular hazard area.
Failure to comply with the following could result in death or serious injury.
• A qualified technician is required for all installations.
• Never look into the end of a fiber optic cable while the device is operational. Laser
radiation can be harmful to the human eye and injury may occur.
• Invisible infrared LED radiation might be emitted from disconnected fibers or connectors.
Do not stare into beams or view directly with optical instruments.
• Lasers contain a high energy density. These can be dangerous for skin tissue as well as
pose an electrical, chemical, and non-ionizing radiation hazard.
• Do not operate the Christie Laser Projection System with the laser rack access panels
removed.
Failure to comply with the following could result in minor or moderate injury.
• Turn the laser module breakers off before inspecting the fiber optic cable.
• Use of controls or adjustments or performance of procedures other than those specified
herein may result in hazardous radiation exposure.
CP42LH User Guide 13
020-101363-03 Rev. 1 (08-2016)Laser Safety Precautions
Laser module laser safety labels
This diagram shows the laser safety labels on the right side of the Laser Module.
CLASS 1 LASER PRODUCT
IEC 60825.1: 2007
1 This product complies with performance
1 レーザー standards of laser products under 21 CFR
1 Part 1040.10 except with respect to those deviations
pursuant to Laser Notice #50, dated July 24, 2007
IEC 60825.1: 2007 U.S.A. Only
A B C
A CLASS 1 LASER PRODUCT
IEC630825-1: 2007
B Translation of label A in French, Chinese, Japanese, and Korean
C Christie Digital Systems Canada Inc.
809 Wellington Street North
Kitchener, ON N2G 4Y7
Canada
This product complies with performance standards of laser products
under 21 CFR Part 1040.10 except with those deviations pursuant to
Laser Notice #50, dated July 24, 2007
U.S.A. Only
CP42LH User Guide 14
020-101363-03 Rev. 1 (08-2016)Laser Safety Precautions
This diagram shows labels below the Laser Module cover.
Do not remove the Laser Module cover for maintenance or service. The Laser Module must
be repaired at a Christie Digital Factory. Removing the cover voids the warranty. Failure to
comply could result in death or serious injury.
• Wavelength: 435 nm to 660 nm
• Beam divergence: 10 mrad
• Pulse Pattern: Continuous Wave
• Maximum power: 64 W
A CAUTION
CLASS 4 LASER RADIATION WHEN OPEN AVOID EYE OR SKIN
EXPOSURE TO DIRECT OR SCATTERED RADIATION
B Translation of label A in French, Chinese, Japanese, and Korean
CP42LH User Guide 15
020-101363-03 Rev. 1 (08-2016)Laser Safety Precautions
LM Rack laser safety labels
This diagram identifies laser safety labels on the laser rack underneath the operator side door.
The laser rack contains a Class 3B laser product. Do not disassemble components in the
laser rack. Disassembling components voids the warranty. Failure to comply result in death
or serious injury.
• Wavelength: 435 nm to 660 nm
• Beam divergence: 260 mrad
• Pulse Pattern: Continuous Wave
• Maximum power: 100 mW
2000
!"
#$%&'()
!"
A 3B
CAUTION
CLASS 3B LASER RADIATION WHEN OPEN
AVOID EXPOSURE TO THE BEAM
MISE EN GARDE - - *+ - ,.
RAYONNEMENT LASER DE CLASSE 3B EN CAS D'OUVERTURE.
ÉVITEZ TOUTE EXPOSITION AUX RAYONS
)への,をけてください。
3B (
。
くとクラス 3B レーザーが$されます。
)
.
B
CAUTION
CLASS 3B LASER RADIATION WHEN OPEN
AVOID EXPOSURE TO THE BEAM
MISE EN GARDE - - *+ - ,.
RAYONNEMENT LASER DE CLASSE 3B EN CAS D'OUVERTURE.
ÉVITEZ TOUTE EXPOSITION AUX RAYONS
3B 。
くとクラス 3B レーザーが$されます。
)への,をけてください。
3B ( )
.
E-STOP
Arrêt D'urgence
KEY SWITCH
MANUAL RESET
CAUTION
CLASS 3B LASER RADIATION WHEN OPEN
AVOID EXPOSURE TO THE BEAM
MISE EN GARDE - - *+ - ,.
RAYONNEMENT LASER DE CLASSE 3B EN CAS D'OUVERTURE.
ÉVITEZ TOUTE EXPOSITION AUX RAYONS
3B 。
くとクラス 3B レーザーが$されます。
)への,をけてください。
3B ( )
.
WARNING: FEET FOR LEVELING ONLY! WARNING: FEET FOR LEVELING ONLY!
DO NOT TILT RACK STAND! DO NOT TILT RACK STAND!
FRENCH FRENCH
CHINESE CHINESE
A CAUTION
CLASS 3B LASER RADIATION WHEN OPEN AVOID EXPOSURE TO
BEAM
B Translation of label A in French, Chinese, Japanese, and Korean
CP42LH User Guide 16
020-101363-03 Rev. 1 (08-2016)Laser Safety Precautions
Projector laser safety labels
This diagram shows the laser safety labels on the operator side of the projector.
A Christie Digital Systems Canada Inc.
809 Wellington Street North
Kitchener, ON N2G 4Y7
Canada
This product complies with performance standards of laser products
under 21 CFR Part 1040.10 except with respect to those
characteristics authorized by Variance number effective
and deviations pursuant to Laser Notice #50, dated July 24,
2007
U.S.A. Only
B LASER RADIATION
AVOID EYE OR SKIN EXPOSURE TO
DIRECT OR SCATTERED RADIATIONS
CLASS 4 LASER PRODUCT
435nm-660nmLaser Safety Precautions
This diagram shows the laser safety labels on the lens side of the projector.
AVOI
D EXPO
LASER
EMITTED
FROMRADIATI SURE
THIS ON IS
APERTU
RE
$
2
- レー
の
" -
56
9 より
:
ザー
$
はこ
A
され
ます
!"
%& !#
SURE
AVOID EXPOON IS RE
RADIATIAPERTU
LASER THIS
FROM
EMITTED
B
れます
より$さ
この56
2
- レーザーは
- 9:
!"!#
%&
$"
A AVOID EXPOSURE
AVOID EXPOSURE LASER RADIATION IS
LASER RADIATION IS
EMITTED FROM THIS APERTURE EMITTED FROM THIS APERTURE
B Translation of label A in French, Chinese,
ÉVITER TOUTE EXPOSITION - UN RAYONNEMENT LASER Japanese, and Korean
EST ÉMIS À PARTIR DE CETTE OUVERTURE
2A/0 - BCDE<
/012
レーザーはこの678より;Laser Safety Precautions
This diagram shows the laser safety labels that appear on the fiber bundle relay optics.
Do not remove the protective housing. Failure to comply could result in death or serious
injury.
• Wavelength: 435 nm to 660 nm
• Beam divergence: 260 mrad
• Pulse Pattern: Continuous Wave
• Maximum power: 775 W
A CAUTION
CLASS 4 LASER RADIATION WHEN OPEN AVOID EYE OR SKIN
EXPOSURE TO DIRECT OR SCATTERED RADIATION
B Translation of label A in French, Chinese, Japanese, and Korean
CP42LH User Guide 19
020-101363-03 Rev. 1 (08-2016)Laser Safety Precautions
Laser module status lights
This diagram shows the location of the Laser Module LED status lights. The Laser Module is off when
the Power LEDs are off.
LED Red Green Amber White
A LASER ARMED Armed (Interlocks OK,
lasers are charged; may
or may not be emitting)
B POWER On (lasers are Standby (Chiller
active and emitting) and fans running)
C ENABLE Lasers are active and
emitting
D INTERLOCK Not blinking: OK
external interlock
failure
Blinking: IR
interlock failure
E WARN/FAULT Fault (Laser Module No fault Warning (Laser
does not turn on or Module is on but a
has turned off) laser temperature
or voltage is above
the warning
threshold)
CP42LH User Guide 20
020-101363-03 Rev. 1 (08-2016)Laser Safety Precautions
LM Rack safety features
This diagram shows the laser safety features on the operator side of the laser rack.
D
A
B
C
A Emergency stop
To shut down the Laser Modules in an emergency, press E-stop.
B Key switch
Key must be present for the system to run. Laser radiation is not accessible when the key is removed.
C Manual reset
Press Reset following a system restart.
D Fiber carrier panel
When any panel is removed, the laser interlock opens and the lasers cannot be armed.
CP42LH User Guide 21
020-101363-03 Rev. 1 (08-2016)Laser Safety Precautions
Projector safety features
This diagram shows the location of the laser safety features on the projector.
A
B
C
D
E F G H
A Laser emission indicator lights
Bottom two LEDs on both sides emit white light when the lasers are armed. They are off when the lasers are
not armed.
B Emergency stop
Turns off the Laser Modules off in an emergency.
C Manual reset
Re-arms the system after a system shutdown. Pressing Manual Reset indicates it is safe to arm the lasers.
D Remote interlock
Enables remote shutdown of the projector (optional).
E Laser beam stop
Blocks the laser light path. Rotate the beam stop to Closed when performing service or maintenance on the
projector. The laser projector system cannot be armed when the laser beam stop is closed.
F Fire alarm
Enables the projector to be connected to the facility fire alarm system (optional). When the alarm is
activated, the Laser Modules turn off.
G LM Rack (interlock)
Connects the projector to the laser rack.
H Laser interlock
Connects the projector to the Laser Modules. When the interlock is tripped, accessible radiation is reduced
below the maximum permissible exposure (MPE) level.
CP42LH User Guide 22
020-101363-03 Rev. 1 (08-2016)Laser Safety Precautions
Nominal ocular hazard distance
The installation setup must prevent access to the nominal ocular hazard area. Failure to
comply results in death or serious injury.
The nominal ocular hazard distance (NOHD) is the distance from the projector where the light
exceeds the maximum permissible exposure (MPE) on the eye and eye injuries can occur. The Skin
Nominal Hazard Zone (SNHZ) is the area where skin burns are possible. This diagram illustrates the
typical SNHZ (A), the NOHD (A + B), and the area (C) that is within permissible limits:
Hazard calculations are dependent on the number of light modules and the lens installed. This table
lists hazard distances for Christie projector lenses with the zoom adjusted to its most hazardous
position. Contact Christie support for assistance calculating hazard distances specific to your
installation.
Light Projection Lens 4K Extended Skin
Modules Throw Source NHZ
Ratio NOHD (m) (m)
7 1.25-1.45 DLPCine HB Zoom Lens (108-274101-01) 1.31:1 1.65 0.50
12 1.25-1.45 DLPCine HB Zoom Lens (108-274101-01) 1.31:1 2.8 0.65
7 1.25-1.83 DLPCine HB Zoom Lens (108-342100-01) 1.66:1 2.05 0.60
12 11.25-1.83 DLPCine HB Zoom Lens (108-342100-01) 1.66:1 3.50 0.80
7 1.45-2.05 DLPCine HB Zoom Lens (108-335102-01) 1.86:1 2.30 0.70
12 1.45-2.05 DLPCine HB Zoom Lens (108-335102-01) 1.86:1 3.90 0.80
7 1.6-2.4 DLPCine HB Zoom Lens (108-336103-01) 2.17:1 2.65 0.75
12 1.6-2.4 DLPCine HB Zoom Lens (108-336103-01) 2.17:1 4.55 1.05
7 1.8-3.0 DLPCine HB Zoom Lens (108-337104-01) 2.71:1 3.30 0.80
12 1.8-3.0 DLPCine HB Zoom Lens (108-337104-01) 2.71:1 5.65 1.30
CP42LH User Guide 23
020-101363-03 Rev. 1 (08-2016)Laser Safety Precautions
Light Projection Lens 4K Extended Skin
Modules Throw Source NHZ
Ratio NOHD (m) (m)
7 2.15-3.6 DLPCine HB Zoom Lens (108-338105-01) 3.26:1 3.95 1.20
12 2.15-3.6 DLPCine HB Zoom Lens (108-338105-01) 3.26:1 6.80 1.55
7 3.0-4.3 DLPCine HB Zoom Lens (108-278101-01) 3.89:1 4.70 1.40
12 3.0-4.3 DLPCine HB Zoom Lens (108-278101-01) 3.89:1 8.05 1.85
7 4.3-6.0 DLPCine HB Zoom Lens (108-279101-01) 5.43:1 6.55 2.00
12 4.3-6.0 DLPCine HB Zoom Lens (108-279101-01) 5.43:1 11.25 2.60
7 5.5-8.0 DLPCine HB Zoom Lens (108-280101-01) 7.24:1 8.75 2.65
12 5.5-8.0 DLPCine HB Zoom Lens (108-280101-01) 7.24:1 14.95 3.45
This table lists hazard distances for Christie projector high contrast lenses with the zoom adjusted to its
most hazardous position.
Light Projection Lens 4K Extended Skin
Modules Throw Source NHZ
Ratio NOHD (m) (m)
7 1.13-1.66:1 DLPCine HC Zoom Lens (108-400105-01) 1.66:1 2.25 0.60
12 1.13-1.66:1 DLPCine HC Zoom Lens (108-400105-01) 1.66:1 3.85 0.80
7 1.31-1.85:1 DLPCine HC Zoom Lens (108-401106-01) 1.86:1 2.50 0.70
12 1.31-1.85:1 DLPCine HC Zoom Lens (108-401106-01) 1.86:1 4.30 0.90
7 1.45-2.17:1 DLPCine HC Zoom Lens (108-402107-01) 2.17:1 2.95 0.80
12 1.45-2.17:1 DLPCine HC Zoom Lens (108-402107-01) 2.17:1 5.00 1.05
7 1.63-2.71:1 DLPCine HC Zoom Lens (108-403108-01) 2.71:1 3.65 1.00
12 1.63-2.71:1 DLPCine HC Zoom Lens (108-403108-01) 2.71:1 6.25 1.30
7 1.95-3.26:1 DLPCine HC Zoom Lens (108-404109-01) 3.26:1 4.35 1.20
12 1.95-3.26:1 DLPCine HC Zoom Lens (108-404109-01) 3.26:1 7.50 1.55
CP42LH User Guide 24
020-101363-03 Rev. 1 (08-2016)Operate the Projector and Run Diagnostics This section describes how to operate the projector and run projector diagnostic utilities. The Touch Panel Controller The TPC is a touch-sensitive screen used to control the projector. You can use the TPC to turn the projector and the Laser Modules on or off, select channels, and view status information. The TPC is mounted on the rear of the projector. You can tilt and turn the TPC to improve the viewing angle. Use the USB port on the side of the TPC to download log files and install software upgrades. You can disconnect the TPC from the projector and you can control the projector from a maximum distance of 30 meters (98 feet) with an optional cable. CP42LH User Guide 25 020-101363-03 Rev. 1 (08-2016)
Operate the Projector and Run Diagnostics
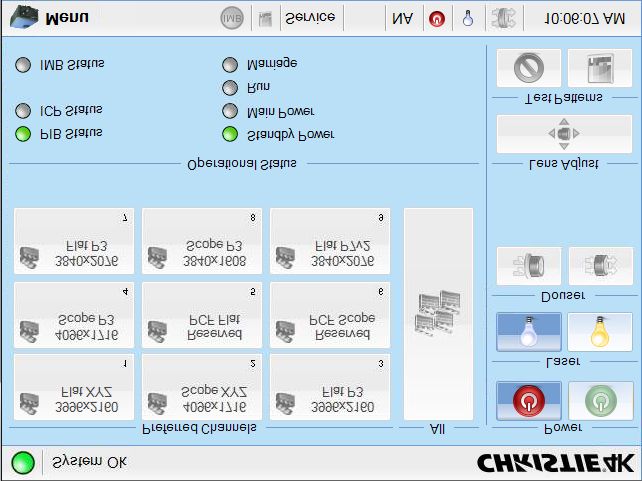
The Main screen
Use the Main screen of the Touch Panel Controller (TPC) to access power, lasers, douser, channel,
and test pattern settings.
A B C D
E
F
J
G
H
I
A A green LED indicates that the projector is operating properly. If a monitored system falls below a normal
reading, the LED is yellow or red. A yellow LED indicates a warning and a red LED indicates a critical error
you must correct. Click the status LED to open the Status window and resolve issues.
B Displays custom projector settings.
C Displays 64 saved channels.
D Turns the projector on or off. Tap Off to place the projector in stand-by mode. To prevent accidental
activation, tap and hold On or Off. A message displays in the title bar when the projector turns on or off.
E Turns the lasers on or off. To prevent accidental activation, tap and hold On or Off.
F Opens or closes the douser.
Controls the Intelligent Lens System (ILS) lens motors. Tap to open the ILS File Setup window.
H Selects or disables test patterns. To open the Preferred Test Patterns window, tap the Test Pattern.
I To access projector menu, tap Menu.
CP42LH User Guide 26
020-101363-03 Rev. 1 (08-2016)Operate the Projector and Run Diagnostics
J Displays the status of projector functions including the Projector Intelligence Board (PIB), the Integrated
Cinema Processor Board (ICP), the Integrated Media Block (IMB), Standby Power, Main Power, Run, and
Marriage. A green LED indicates the system is functioning correctly. A red LED indicates a critical error you
must correct. Click the status LED to open the Status window and resolve issues.
Turn the system on
1. Check the interlock cables are securely attached to the Laser Modules.
2. Check the interlock cable to the projector is securely attached.
3. Check the Ethernet cable between the projector and the Rack Switch is securely attached.
4. Check the Ethernet cable between the Laser Bank Manager and the Rack Switch is securely
attached.
5. Turn the Rack Switch on.
6. Turn on the Laser Bank Manager.
7. Turn on the circuit breaker on the projector baseplate under the front lens-side corner.
8. If the emergency-stop button on either the Laser Rack or the projector is activated, release it
by turning the button clockwise.
9. Turn the Beam Stop on the projector to OPEN.
10. Turn the Laser Rack key switch on.
The key must be in the switch at all times.
11. Turn on the Rack Switch at the rear of the Laser Rack.
12. Turn on the breakers (one per Laser Module) in the power distribution unit in the front of the
Laser Rack.
13. Press MANUAL RESET on the side of the Laser Rack or on the back of the projector.
14. Verify the status lights on the back of the projector and the front of the Laser Modules are
white.
The projector is armed, but the lasers are off.
Test the interlocks
Once the projector is running, ensure the safety interlocks are functioning.
Before displaying an image from the projector, test the three interlock devices. Every time
the interlock is activated, the Laser Modules turn off. Failure to comply could result in death
or serious injury.
Test the key switch
1. Turn the key switch on the Laser Rack off.
2. Check the status lights on the back of the projector are off.
CP42LH User Guide 27
020-101363-03 Rev. 1 (08-2016)Operate the Projector and Run Diagnostics
3. Turn on the key switch.
4. Press Manual Reset on the projector.
Test the Laser Rack emergency stop
1. Press the emergency stop button on the Laser Rack.
2. Check the status lights on the back of the projector are off.
3. To release the E-stop, rotate the knob clockwise.
4. Press Manual Reset on the projector.
Test the projector emergency stop
1. Press the emergency stop button on the projector.
2. Check the status lights on the back of the projector are off.
3. To release the E-stop, rotate the knob clockwise.
4. Press Manual Reset on the projector.
Log on to the projector
1. Tap Menu > Login.
2. Select a user name in the Username list.
3. In the Password field, type a password.
4. Tap Login.
Laser emission indicator lights
The bottom two LEDs on the rear corners of the projector indicate when the lasers are armed.
LEDs Status
White Lasers are armed and may or may not be emitting light.
Off Lasers are not armed.
CP42LH User Guide 28
020-101363-03 Rev. 1 (08-2016)Operate the Projector and Run Diagnostics
View the status of projector components
1. Tap Menu > Status.
The Status window displays information about the status of projector components. The right
pane lists projector components and their status. The left pane displays detailed information
about individual projector items.
• Green LED indicates the item is functioning correctly.
• Yellow LED indicates an item requires attention.
• Red LED indicates an item requires immediate attention.
If the Item or Value descriptions are too long for the cell, click the description to display the full
description at the bottom of the window. To adjust the width of a column in the left pane, tap and
drag the column border. When you close the Status window, the column widths return to their
default size.
CP42LH User Guide 29
020-101363-03 Rev. 1 (08-2016)Operate the Projector and Run Diagnostics
Respond to alarms
When an alarm occurs, an Alarms window with a red border appears with a description of the alarm
condition, state, and time and date of the alarm. The window only displays alarms you have not
previously acknowledged.
1. To acknowledge an alarm and remove it from the Alarms window, click Acknowledge.
2. To view all alarms, in the left pane, tap Menu > Status > All Alarms.
Run the projector interrogator
The interrogator captures diagnostic information that you can use to assist Christie service
personnel diagnose and correct projector issues. To access the Interrogator menu, you need
Operator, Administrator, or Service permissions. When you run the interrogator, you cannot modify
projector settings.
Image disruption can occur if you run the interrogator when content is playing.
Log files are compressed into a 7z or 7-zip file format. A tool for opening these archives can be
downloaded from http://www.7-zip.org.
1. Tap Menu > Diagnostics > Interrogator.
2. To obtain the projector log files only, tap Basic Mode.
3. To obtain projector log files and registered batch files, tap Enhanced Mode.
You cannot run an enhanced mode request when the lasers are on.
4. Tap Yes.
5. Insert a USB flash drive in the USB port on the side of the touch panel controller (TPC).
6. Tap Download to USB.
CP42LH User Guide 30
020-101363-03 Rev. 1 (08-2016)Operate the Projector and Run Diagnostics
View SMPTE errors
The SMPTE Errors window displays a numerical representation of the signal integrity of the HD-SDI
signals sent to the projector on the Bayonet Niell-Concelman (BNC) signal cables.
1. Tap Menu > Diagnostics > SMPTE Errors.
Clear SMPTE errors
1. Tap Menu > Diagnostics > SMPTE Errors.
2. Tap Clear Errors.
Retrieve system logs
System logs can help you identify and correct projector issues. To retrieve system logs you need
Operator, Administrator, or Service permissions.
1. Tap Menu > Diagnostics > System Logs.
2. Select a start date for the logs in the From list.
3. Select an end date for the logs in the To list.
4. Select a log type in the Type list.
5. Select the severity type in the Severity list.
6. Tap Retrieve Logs.
7. To download the log files to a USB:
a. Insert a USB flash drive in the USB port on the side of the touch panel controller (TPC).
b. Tap Download to USB.
Run a server test
You can run a server test to search the subtitle and metadata .xml files for errors in content or in
transmission from the server. You cannot use a server test to turn metadata or subtitling off or on.
1. Tap Menu > Diagnostics > Server Test.
2. To search the metafile, type the location of the metafile in the Meta File URI field.
3. To search the subtile file, type the location of the subtitle file in the Subtitling URI field.
Turn the projector off
1. On the Touch Panel Controller (TPC), tap and hold the light bulb icon to turn the lasers off.
CP42LH User Guide 31
020-101363-03 Rev. 1 (08-2016)Operate the Projector and Run Diagnostics
2. On the TPC, tap and hold the red power icon.
The projector enters standby mode.
If performing maintenance on the projector or removing the outer skins, disconnect the
projector from AC power. See Shut down for maintenance on page 67.
Turn the system off in an emergency
1. To shut down the system in an emergency, press E-Stop on the back of the projector (see
Projector safety features on page 22) or on the operator side of the Laser Rack (see LM Rack
safety features on page 21).
The Laser Modules turn off.
CP42LH User Guide 32
020-101363-03 Rev. 1 (08-2016)Manage the DLP
This section provides procedures for managing the Integrated Cinema Processor (ICP) electronics.
To access the DLP menus, you need Administrator or Service permissions.
Run a DLP self test
Run a DLP self test to test the functionality of the Integrated Cinema Processor (ICP) and DLP.
1. Tap Menu > Diagnostics > DLP Management.
2. Tap DLP Self Test.
3. Tap Yes.
4. To close the Results pane, tap Clear Results.
Download an ICP certificate
1. Insert a USB flash drive in the USB port on the side of the touch panel controller (TPC).
If you do not insert a USB flash drive, the ICP certificate is saved to the FTP root directory.
2. Tap Menu > Diagnostics > DLP Management.
3. Tap Download ICP Certificate.
4. Tap Close.
Disable the ICP signature test
Error messages appear when the ICP is turned on and the ICP signature test is run. They can
disrupt projector network monitoring. Use this procedure to disable the signature test.
1. Tap Menu > Diagnostics > DLP Management.
2. Tap Bypass Signature Test.
3. Tap Yes.
4. To re-enable the ICP signature test, clear the Bypass Signature Test checkbox.
CP42LH User Guide 33
020-101363-03 Rev. 1 (08-2016)Work with Channels
Create channels to store customized projector settings for different inputs. You can create a
maximum of 64 channels.
Create a new channel
You need Advanced, Administrator, or Service permissions to create or modify channel settings. You
can create a maximum of 64 channels.
1. Tap Menu > Channel Setup.
2. Tap the Launch Dialog icon.
3. Type a name for the channel and tap Enter.
4. Complete these fields on the Config 1 screen:
Field Description
Icon The icon associated with the channel.
Input The device associated with the channel.
Data Format The source color depth (8-10-12 bit) for the channel.
Source File The resolution and aspect ratio for the channel.
Screen File The screen type, masking, cropping, and lens settings for the channel.
Use PCF Associates the channel with a Projector Configuration File (PCF) and prevents Channel
adjustments.
PCF The PCF file associated with the channel.
Laser File The laser file associated with the channel.
Use ILS Associates the channel with a Intelligent Lens System (ILS) file.
ILS File The ILS file associated with the channel. The ILS file automatically adjusts the lens
position so the content displays correctly. Tap Launch Dialog to edit the ILS file
settings. Any changes made to the ILS File settings are applied to all channels that use
this ILS file.
5. Tap Config 2 in the left pane and then complete these fields:
Field Description
Measured Color The Measured Color Gamut Data (MCGD) file used to calculate target color processing.
CP42LH User Guide 34
020-101363-03 Rev. 1 (08-2016)Work with Channels
Field Description
Target Color The Target Color Gamut Data (TCGD) value. This option is not available when Use PCF
is selected in the Config 1 screen.
Color Space The method of color decoding for the current source. The default is YCbCr for all DVI
sources. The default for all cinema sources is Unity RGB. This option is not available
when Use PCF is selected.
Gamma The gamma correction required for the proper tonal range of the source material. This
option is not available when Use PCF is selected.
LUT_CLUT Applies a 3D color cube for increased color accuracy. This option is not available when
Use PCF is selected.
Scan Type The video scan type. The default is Progressive.
Automatic Scan Automatically performs scan type detection. This feature is supported for PIB inputs
Type Detection only.
Use PCT Applies Christie Pureformity Color Technology (PCT) to the channel.
PCT File Identifies the Christie Pureformity Color Technology (PCT) file associated with the
channel.
HDMI EDID Type Identifies the extended display identification data (EDID) type used by the channel
when playing content from a device connected to the HDMI A/LEFT or HDMI B/RIGHT
ports.
Enable 3D Dual Enables 3D Dual Measured Color on the channel. Select the color files for the left and
Measured Color right eyes.
6. Tap 3D Control in the left pane if the channel will be used to display 3D content. Complete
these fields:
Field Description
Enable 3D Enables 3D.
3D Test Patterns Displays 3D test patterns.
3D Sync Input Mode Specifies whether a specific frame of input data has left eye or right eye data.
Select Use White Line Code (true and inverted) if using a single 3D input
signal in which an embedded white line at the bottom of each frame identifies
left and right, and an additional separate 3D stereo sync input at the GPIO port
is not present. The bottom row of the left-eye sub-field should be pure white for
the left-most 25% of the pixel row and pure black for the remainder of the row.
The bottom row of the right-eye sub-field should be pure white for the left-most
75% of the pixel row and pure black for the remainder of the row.
Select Use Line Interleave for 3D source data only. When specified, the ICP
de-interleaves each line into the left image or right image in memory as
specified. Line interleave can be used with PsF 3D data (left and right data for
one field, then left and right data for second field).
L/R Display Reference Specifies which frame of eye data to display during a specific display frame. This
signal is referenced to the display frame rate which is specified by the Frame
Rate N:M.
Frame Rate N:M Sets how many frames to display per number of frames that form one complete
image. Increase the display frame rate to reduce flicker from your source(s).
CP42LH User Guide 35
020-101363-03 Rev. 1 (08-2016)Work with Channels
Field Description
L/R Display Sequence Defines the frame order (L-R or R-L) required for 3D perspective. This option
only has meaning when the Frame Rate factor M is equal to 2. For this case, 2
input frames of data are required to constitute a complete frame of image data.
This parameter tells the system which frames go together to make a complete
image.
Note: When using Line Interleave as the 3D Sync Input Mode, ensure that
Left (L1R1 L2R2) is selected.
3D Sync Polarity Keeps 3D stereo sync output the same as input (true) or reversed (inverted).
True: 3D L/R sync output from GPO will match L/R sync input.
Inverted: 3D L/R sync output from GPO will be the opposite of sync input (left
= right, right = left).
Dark Time Creates a blank time interval between left and right frames to allow for LCD
shutter glasses, Z screen, or rotating 3D wheel to synchronize the output. See
Dark Time and Output Delay Notes below. Values between 0 and 65535 are
accepted. To enter the dark time value, tap Launch Dialog .
Output Delay The non-image time in Microseconds (μ). Offset 3D stereo sync output in
relation to dark time interval. Acceptable values are between -32768 and 32767.
A positive offset adds a delay and a negative offset starts playback early. To
enter the output delay value, tap Launch Dialog.
Phase Delay The degree of reference between the left and right sync output. Values between
-180 and 180 are accepted. To enter the phase delay, tap Launch Dialog.
7. To activate the channel, tap Activate.
Activate a channel
1. Tap Menu > Channel Setup.
2. Select a channel in the Channel Name list.
3. Tap Activate.
Restore default channel settings
1. Tap Menu > Channel Setup.
2. Select a channel in the Channel Name list.
3. Tap Defaults.
4. To restore the default settings to the selected channel, tap Default Current Channel.
5. To restore the default settings to all channels, tap Default All Channels.
6. Tap OK.
CP42LH User Guide 36
020-101363-03 Rev. 1 (08-2016)Work with Channels
Change the channel icon
1. Tap Menu > Channel Setup.
2. Select a channel in the Channel Name list.
3. Tap Icon.
4. Tap an Icon.
5. Tap OK.
Add or remove preferred channels from the
Preferred Channels pane
You need Administrator or Service permissions to complete this procedure.
1. Tap Menu >Administrator Setup > Preferred Channel Setup.
2. To add a channel to the Preferred Channels pane, tap and drag a channel from the All
Channels list to the Selected Channel Buttons (Drag and Drop) pane.
3. To remove a channel from the Preferred Channels pane, tap and drag a channel from the
Selected Channel Buttons (Drag and Drop) pane to the recycle bin in the bottom right
corner.
CP42LH User Guide 37
020-101363-03 Rev. 1 (08-2016)Manage Projector
Setting Files
Advanced, administrator, service, or marriage permissions are required to complete the procedures
in this section.
Create a source file
Create source files to store resolution, offset, and aspect ratio settings for input devices.
1. Tap Menu > Advanced Setup > Source File Setup.
2. Tap Save As.
3. Type a name for the source file in the Filename field.
4. Tap OK.
5. Enter values in these areas:
Area Description
Resolution The X and Y resolution of the incoming signal. For example, 2048 (X) and 858 (Y) or 1920 (X)
and 1080 (Y). The resolution must match the incoming signal format.
Offset The amount of incoming data to discard. Set the values to zero to process all incoming data.
The allowable X range is -4096 to 4096 pixels and Y range of -2160 to 2160 pixels.
Aspect Ratio The aspect ratio for the incoming signal. The allowable range is 0 to 7.99.
6. Tap Save.
Modify a source file
1. Tap Menu > Advanced Setup > Source File Setup.
2. Select a source file in the Current Source File list.
3. Modify the Resolution, Offset, or Aspect Ratio values.
4. Tap Save.
CP42LH User Guide 38
020-101363-03 Rev. 1 (08-2016)Manage Projector Setting Files
Create a screen file
Use screen files to define the size of the display panel and image cropping. You can assign the same
screen file to multiple input devices.
1. Tap Menu > Advanced Setup > Screen File Setup.
2. Tap Save As.
3. Type a name for the source file in the Filename field.
4. Tap OK.
5. Complete these fields:
Field Description
Letter Box All image data is displayed and the aspect ratio is maintained.
Lens Factor The amount to stretch an image horizontally. Allowable values can range from 0.00 to
7.99. Type 1 if not using an anamorphic lens.
Presentation The size and location of the image. By default, the projector uses a 2048 x 1080
panel.
Cropping Hides unwanted image data.
6. Tap Save.
Modify a screen file
1. Tap Menu > Advanced Setup > Screen File Setup.
2. Select a screen file in the Current Screen File list.
3. Modify the screen file settings.
4. Tap Save.
Create a MCGD file
Create Measured Color Gamut Data (MCGD) files to correct on-screen colors. A colorimeter is
required to complete this procedure.
1. Turn the lasers on and allow it to operate for 20 minutes.
2. Tap Menu > Advanced Setup > MCGD File Setup.
3. Tap Save As.
4. Type a name for the MCGD file in the Filename field.
5. Tap OK.
6. If the MCGD file will be associated with a 3D channel, tap Enable 3D and select a frame rate in
the Frame Rate N:M list.
CP42LH User Guide 39
020-101363-03 Rev. 1 (08-2016)You can also read