Task Force & Strike Team - Leader Guidebook - Oregon.gov
←
→
Page content transcription
If your browser does not render page correctly, please read the page content below

Task Force & Strike Team
     Leader Guidebook

               Updated for 2021
Table of Contents

  Code of Conduct                                       1
  Expectations for all Responders                       1
  Task Force/Strike Team Leader Expectations            3
  Checklist 1 – Assembly                                5
  Checklist 2 - Arrival                                 6
  Checklist 3 - Demobilization                          7
  OSFM Structure Protection Guide                       8
  Sprinklers                                            18
  Flagging                                              19
  Forms Overview                                        20
     Form – Task Force/Strike Team Resource Form        21
     Form – Resource Manifest                           22
     Form – Apparatus Form                              23
     Form – ICS-214/Unit Log                            24
     Form – Incident Demobilization Inspection          25
     Form – Engine Company or Crew Performance Rating   26
     Form – Task Force After Action Review              27
  Standard Incident Communications Plan                 29
  Wildland Fire COVID-19 Screening Tool                 30
  Apparatus Cleaning                                    31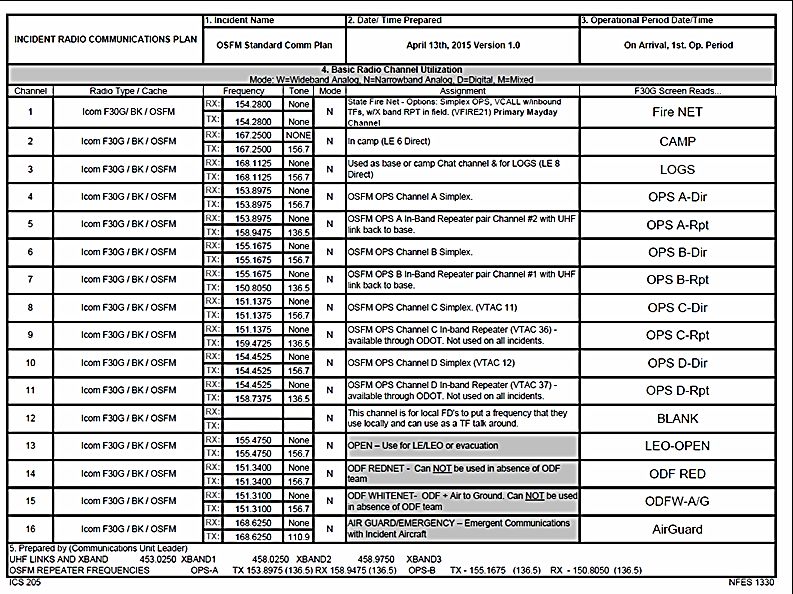
Code of Conduct

It is the duty of personnel mobilized by the State of Oregon to maintain
high standards of performance and conduct that will promote public trust
and provide the best possible service to Oregon. Personnel are expected
to demonstrate cooperation, efficiency, integrity, and accountability in the
performance of their duties. It is expected that all mobilized resources
will conduct themselves in a professional manner, meet the performance
standards for their position, and comply with all local, state, and federal
laws.

Your actions, behavior, and work ethic will be scrutinized by those with
whom you work and interact and by the citizens being served. You
represent the State of Oregon, your region, and your department as an
individual and as a team member on the fire line, in camp, and in transit.
Work hard, learn as much as you can, and come home safe.

                Specific Expectations for All Responders

Adhere to applicable safety standards. All mobilized individuals have a
responsibility to each other to be alert to and communicate all safety
hazards or near misses to the immediate supervisor or the Incident
Management Team. All injuries incurred while mobilized must be
documented and immediately reported to your supervisor.

Adhere to the chain of command. Become familiar with whom you are
working, follow directions, and keep your supervisor informed. You are
responsible for understanding your assignments and instructions; if in
doubt, immediately ask for clarification.

Drive apparatus in a safe and courteous manner at all times. Use all
appropriate safeguards, including backing guides. Be considerate of
civilian traffic. If traffic is backing up behind your convoy, pull off at the
first safe place and allow traffic to pass. All resources are expected to
obey posted speed limits and warnings at all times.

Wear your PPE when assigned and appropriate attire when in camp.

Maintain a state of readiness at all times. When not assigned, resupply
apparatus and restore equipment. You are expected to be available and
ready to respond on notice, 24 hours a day.

Harassment of any kind against coworkers, supervisors, civilians,
contractors, or others based on race, color, national origin, age, gender,
disability, religion, marital status, or any other class protected by civil

                                                                            pg. 1
rights laws will not be tolerated and will result in immediate
demobilization.
When not assigned or in camp, conduct yourself in a manner that will not
discredit yourself, your department, or the State of Oregon.
Misconduct, insubordination, dishonesty, inattention to duty or any
conduct that you know or should know is improper will not be tolerated
and may result in immediate demobilization from the incident.
Know and follow the procedures in the current Oregon Fire Service
Mobilization Plan.
Access to a cache and requests for supplies shall be only through your
chain of command. Return all procured equipment prior to
demobilization. You may be responsible for items not returned.
Alcohol and illegal drugs shall not be transported or consumed. A person
using prescription drugs may be asked to show reasonable proof that the
medication is prescribed to them. Consuming over-the-counter or
prescribed medication must not interfere with a person’s performance or
judgment.
Firearms are not allowed unless it is a requirement of your assigned
position.
You are required to report to your immediate supervisor any medical
condition that may arise that will interfere with your ability to safely
perform your assigned tasks.
Excerpted from the 2021 Oregon Fire Service Mobilization Plan
pg. 2Task Force/Strike Team Leader Expectations
While you are working on this incident, you are asked to adhere to the
following guidelines. Providing for public and firefighter safety is always
our number ONE priority.
Attend the Operations Period Briefing (Be on Time)
• Meet with your Division/Group Supervisor (DIVS) in the appropriate
Division Breakout immediately after the briefing to receive and
discuss specific details of your assignment.
• You are responsible for understanding your assignment and
obtaining all necessary information, maps, and an Incident Action
Plan (IAP) for each apparatus.
• While you are at briefings, your personnel are expected to be
preparing to start work; obtaining meals, water, ice, radio cloning,
fuel, etc. Your resources should be prepared to begin work
immediately following the Division Breakout.
• Ensure each apparatus officer completes and submits an ICS 214
(Unit Log) for each operational period. You will submit Unit Logs for
each apparatus and yourself to the DIVS after each operational
period.
Before Leaving the Incident Base
• Brief all personnel assigned to you.
• Ensure that your assigned resources have all necessary equipment
and documentation to understand their assignments.
• Check with your DIVS on the status of anything ordered the day prior
to determine delivery time and location.
Upon Arrival at your Assigned Division
• Account for all resources assigned to you.
• Debrief with the out-going DIVS or Task Force Leader.
• Personal protective equipment is mandatory for everyone on the line.
• Identify LCES (Lookouts, Communications, Escape Routes, and
Safety Zones) and insure that they adequate. You must do this
soon after arrival and brief all your personnel!
During the Operational Period
• Account for all resources assigned to you at all times.
• Document any actions, accidents, or agreements in your Unit Log
and notify your DIVS when appropriate.
• Make sure your activities are well coordinated with your adjoining
Divisions. Share resources when and where appropriate.
• Meet with your DIVS before 1400 (day shift) or 0200 (night shift) to
request any resources, supplies, or equipment needed for the next
operational period.
pg. 3• Update your DIVS on fire and weather conditions as appropriate.
• Develop contingency tactics, and always have alternate plans in
place.
• Make notes that may be relevant to complete evaluations and an
After Action Review prior to demobilization. Unsatisfactory
performance will not be tolerated; it is to be identified and dealt with
immediately. If you are unable to resolve the performance problem, it
shall be brought to the attention of the DIVS. Outstanding
performance needs to be documented and recognized. Be prepared
to make recommendations on what type of recognitions might be
appropriate to the DIVS.
• All accidents or injuries must be documented and reported
immediately.
Before Leaving the Assigned Division
• Account for all assigned resources.
• Debrief with the in-coming DIVS or Task Force Leader.
Upon Returning to the Incident Base
• Ensure that all of your assigned resources have returned to camp
and are accounted for.
• Debrief with your DIVS.
• You are to be available to return to work 24 hours a day.
Internal/External Political Concerns
The needs of the local jurisdiction and community must be an important
consideration in all interactions. Ask your DIVS how you can cooperate
with the Incident Information Officers when you come in contact with
community members or media.
pg. 4Task Force/Strike Team Leader Mobilization Checklist #1
FOR ASSEMBLING THE TASK FORCE/STRIKE TEAM
Personnel and apparatus that do not meet the response standards of the
Mobilization Plan may be rejected by the Incident Commander without
state reimbursement for travel or any other response costs.
Assemble Task Force/Strike Team (TF/ST) at Point of Departure.
Brief all personnel on code of conduct and expectations.
Confirm all personnel have adequate personal gear for a minimum of
seven days and are self-sufficient for 72 hours with adequate food,
drinking water, and sleeping bags.
Ensure all personnel conduct self-screening using the Wildland Fire
COVID-19 Screening Tool.
Confirm all personnel are fit for duty.
Confirm all personnel are properly trained and equipped with
appropriate structural, wildland, or other necessary PPE for the type
of incident to which you are responding.
Confirm all apparatus meet applicable standards, are properly and
adequately equipped, in good repair, and capable of meeting travel
and firefighting requirements.
Confirm all apparatus have the ability to utilize State Fire Net.
Confirm all apparatus are fully fueled and personnel have travel
funds.
Complete and submit a TF/ST Resource Form to the AOC.
You must receive explicit approval from the AOC.
Ensure one Resource Manifest Form is completed for each
apparatus, including command and support apparatus.
Ensure one Task Force/Strike Team Apparatus Form has been
completed for each apparatus.
Brief all personnel on incident, travel route, communications en route,
pre-determined fuel or rest stops, safety issues, and second-in-
command.
Advise AOC of departure time, travel route, and estimated time of
arrival. (503-373-0001)
Ensure that each apparatus uses the same departure time on their
Resource Manifest.
Prior to arrival at the incident, ensure all apparatus are fully fueled
and ready to begin operations. This final fueling is not reimbursable.
pg. 5Task Force/Strike Team Leader Mobilization Checklist #2
FOR TASK FORCE/STRIKE TEAM ARRIVAL AT AN INCIDENT
Personnel and apparatus that do not meet the response standards of the
Mobilization Plan may be rejected by the Incident Commander without
state reimbursement for travel or any other response costs.
Prior to arrival at the incident, ensure all apparatus are fully fueled
and ready to begin operations. This final fueling is not reimbursable.
Advise AOC of arrival time. (503-373-0001)
Arrive at requested time and location. Collect Resource Manifests
and Apparatus Forms. TFL ONLY don mask and meet Resource
Unit Leader (RESL) at designated location to complete check-in.
Initiate ICS-214s (Unit Logs) for each apparatus. Complete this form
daily and provide to Division/Group Supervisor (DIVS). Document
actions, accidents, agreements, and other relevant information.
Determine availability and location of food, water, and fuel.
Determine location of sleeping areas. Find a safe, comfortable, and
quiet place for the TF/ST to sleep and establish camp.
Visit Communications Unit and ensure all apparatus have radios with
incident communications plan.
Confirm your group has access to systems or paperwork to complete
structural triage work (paper forms or electronic system).
Determine what level of medical care is available, its location, and
how to access it.
Locate your DIVS and obtain your initial assignment and/or briefing.
Confirm how to contact them.
Find out where and when operational briefings occur and be on time
for briefings. Attend all briefings; get updated maps, and Incident
Action Plans (at least one per apparatus).
When possible, debrief with the Task Force/Strike Team Leader(s)
you are relieving.
“How can we accomplish this task while minimizing human contact
or contact where humans have recently been?”
pg. 6Task Force/Strike Team Leader Mobilization Checklist #3
FOR DEMOBILIZING THE TASK FORCE/STRIKE TEAM
Ensure all damage claims have been reported to Division/Group
Supervisor (DIVS) and documented appropriately.
Each apparatus operator must complete Incident Demobilization
Vehicle Safety Inspection Form. Any failed items must be reported to
DIVS.
Ensure all ICS-214s (Unit Logs) have been given to DIVS.
Ensure the return of all borrowed equipment and resources to the
appropriate party.
Complete evaluations for all resources assigned to you.
Receive evaluation from DIVS.
Complete Task Force After Action Review.
Ensure all personnel have sufficient rest prior to demobilization.
Make sure all apparatus are fully fueled.
Brief all personnel on travel route, communications en route, pre-
determined fuel or rest stops, safety issues, and second-in-command.
Check out with the Resource Unit Leader (RESL). Provide RESL with
Demobilization Vehicle Safety Inspection Forms, evaluations, Task
Force After Action Review Form, and any other documentation you
have. RESL must sign all Manifests and return hard cards.
Advise the AOC of departure time and ETA. (503-373-0001)
Advise the AOC and your Fire Defense Board Chief of arrival. (503-
373-0001)
Each apparatus must record their in-station time on their Manifest.
“How can we accomplish this task while minimizing human contact
or contact where humans have recently been?”
pg. 7Oregon State Fire Marshal
Structure Protection Guide
PURPOSE
This structural protection plan is designed to provide structural resources with common expectations,
procedures and terminology in order to execute efficient structural protection during wildland
fire/urban interface incidents.
PROCEDURE
The components of effective structural protection are based on the integrated actions surrounding
three critical actions; Structural Triage, Structural Preparation and Defensible Tactical Action. The
successful implementation of these actions is based on the following critical factors: TIME,
RESOURCES and FIRE CONDITION. These factors must be strongly considered in the decision
making of when and how to execute the critical structure protection actions.
I. Structural Triage
Utilization of the OSFM Structural Protection Checklist should be utilized when triaging structures
with the goal of placing each structure in one of the following categories. These categories will be
utilized to determine the structural prep and defensible actions given consideration of available time,
resources and fire condition.
Defensible – Stand Alone (Low Risk) Prep and Go (High Risk)
Safety zone present No safety zone present
Requires little or no attention If time allows, rapid mitigation, apply
Will require patrol or foam or gel
homeowner presence after Set trigger point for safe retreat
Go to nearest safety zone, return to
fire passage
area after fire passage
Defensible – Prep and Hold (Moderate Risk) Check and Go (Extreme Risk)
Safety zone present at or near No safety zone present
structure for apparatus and Inadequate time for mitigations
firefighters If time allows, ensure lives are not
threatened
Structure has a higher probability
Set trigger point for safe retreat
of ignition without firefighter
Go to nearest safety zone, return to
intervention area after fire passage
pg. 8II. Structure Preparation
Structural preparation is executed based on the Structural Protection Checklist and is a factor of
TIME, RESOURCES and FIRE CONDITION. If a fire front is imminent or highly likely the goal is
to defend what can be saved and accomplish as much of the Structure Prep Priorities as feasibly
possible. This section is intended to provide structural protection resources with a clear guideline of
what structure prep objectives are expected based on the mode of operation. This is a critical
component of the structure prep plan, if there are other actions not addressed in this plan it is
recommended that those actions are discussed with the appropriate supervisors.
Prioritize Structural Prep Actions based on the greatest chance of savability. Complete prep actions
on the structures using the following order.
1. Low Risk- Stand Alone. Reinforce and ensure prepped for standalone defense.
2. Moderate risk- Prep and Hold. Time sensitive, these structures provide biggest gains.
3. High Risk- Prep and Go. Time sensitive.
4. Extreme Risk- Check and Go
Structure Prep Priorities
The following outlines the order of priority in which preparation should be conducted. Two general
levels of structure prep are identified: Surface Prep and Full Prep. The three critical factors of time,
resources, and fire condition will determine which level and priority should be accomplished. This
determination may occur in conjunction with the Division/Group Supervisor.
Depending upon these critical factors, attempt to accomplish as much as feasibly possible starting
with Surface Prep priorities down through the Full Prep priorities. The ultimate goal with any of
the following prep work is to minimize ore eliminate the direct flame contact to the edge of a
combustible building material.
SURFACE PREP
Should always be completed first. Allows crews to conduct initial prep work without
physically altering structures or property providing crews opportunity to conduct work if fire
front is not imminent and it is unclear if fire front will affect the area.
Priority #1 ROOF (critical ignition component)
• Clean out gutters and ember traps at the vertical intersections and
horizontal surfaces, remove receptive fuel beds, leaves, needles,
debris and any other flammable materials on or attached to the
roof.
• Flush gutters with water and plug down spouts.
Priority #2 INTERIOR
• Close windows.
• Turn lights on, close interior doors and unlock and shut exterior
doors.
Priority #3 EXTERIOR
• Relocate easy to move flammable/combustible items surrounding
structure (lawn furniture, toys, propane cylinders, gas cans etc.) to
an area of cover or outside preparation perimeter (garage, shed,
barn etc.).
• Clear decks, walkways and other areas of light receptive fuels
(leaves, needles ect.). Consider base of exterior walls, decks or
other areas of adjoining combustible surfaces of the structure.
pg. 9FULL PREP
Complete Surface Prep priorities first and then determine which of the following Full Prep
tasks need to be/can be completed.
Priority #4 EXTERIOR
• Remove receptive fuels adjacent to the structure 5-10 feet (fine
dead fuels, leaves, grass, bark dust, firewood, etc).
• Cover attic and basement vents. (metal window screen is
preferable).
• Shut off gas, LP/NG.
Priority #5 SECONDARY PRIORITIES
• Remove vegetation within 30 feet of structure scatter flat.
• Limb trees 5 to 7 feet from ground.
• Remove debris and ember traps around structure.
• Remove lawn furniture and toys- place in home if possible.
• Remove attached fences 10 feet from structure for access and
removal of combustibles.
• Remove and scatter wood pile or cover to avoid ignition by ember
shower.
• Move cars if possible.
• Construct handline around structure, outbuildings, or immovable
fuel sources/hazards.
• Consider burn out operations.
• Consider use of sprinkler kits. Only if adequate structural prep
has been obtained.
• Consider use of structure wrap.
• Consider extreme prep tactics (additional limbing or falling of
trees).
• Consider egress preparation. Limbing/brushing 5 to 10 feet on
either side of road/driveway.
• Consider the need for Temporary Refuge Area (TRA) and/or
Safety Zone preparation.
FIRE IMMINENT
Consider when fire front is imminent and structure is categorized as defensible.
• Determine defensible action.
• Stretch hose lines.
• Ladder roof, hose to roof.
• Initiate Structural Prep Checklist if not already complete-
Complete as much as possible before initiating defensible stand.
• Consider burn out operations.
pg. 10III. Defensible Tactical Action
The following tactical actions allow firefighters combating an urban interface wildland fire to utilize
common terminology and actions in order to safely and effectively defend structures.
Primary Tactical Action
Primary tactical actions are based on the triage category and level of structure prep accomplished
prior to arrival of fire front. Primary tactical action may be supplemented or transition to another
primary action or secondary tactical action as needed.
1. STAND ALONE
Triage Category: Defensible (Low Risk)
- Purpose: Adequate safety zones and escape routes allow for safe and effective
preparation and defensible stand.
- Indicators: Structure requires little or no preparation or protection.
- Actions: Ensure adequate structural preparation measures are in place. If needed
make defensible stand as fire front approaches.
- Considerations: Situational awareness. Tactical patrol before and after fire front.
Increased possibility of occupants holding in place.
2. PREP & DEFEND
Triage Category: Defensible (Moderate Risk)
- Purpose: A tactic used when it is possible for fire resources to stay and defend
structures as the fire front arrives.
- Indicators: Safety zones, escape routes and TRAs are present and adequate time
allows for safe preparation of structure for defense prior to fire front impact.
- Actions: Aggressive structure prep following Structure Prep Checklist. Adequate
time, resources and conditions to make a defensible stand as fire front approaches.
- Considerations: Situational awareness, escape routes and safety zones must be
identified and maintained. Utilization of PACE planning in case of adverse fire
behavior changes. Fire behavior must allow for firefighters to safely remain in
place and engage the fire.
pg. 113. PREP & GO
Triage Category: (High Risk)
- Purpose: No safety zone present.
- Indicators: Time allows for rapid mitigation measures.
- Actions: Rapid triage, prep and retreat to Safety Zone or TRA.
- Considerations: Set trigger point for safe retreat and return tactical action.
pg. 124. CHECK & GO
Triage Category: (Extreme Risk)
- Purpose: Inadequate defensible space prohibits safe defense actions.
- Indicators: Extreme fire behavior, compressed time constraints.
- Actions: Rapid evaluation to check for occupants who may require removal or
rescue, then withdraw to a Safety Zone or TRA.
- Considerations: Retreat and return tactical action when able.
pg. 13Secondary Tactical Action
Secondary tactical action should be utilized to supplement and support the primary tactical action.
1. RETREAT & RE-ENGAGE
- Purpose: Follow up tactic used when Check and Go, Prep and Go or Bump and
Run tactics are initially used.
- Indicators: When there is insufficient time to safely set up ahead of the fire or the
intensity of the fire would likely cause injury to personnel located in front of the
fire.
- Actions: After retreating to TRA or Safety Zone, return behind the fire front to
search for victims, minimize property loss, effect perimeter control, extinguish hot
spots around structures, control hot spots and reduce ember production. Check
areas that are known ember traps, under decks, under houses, gutters, flower
beds/bushes, and sheds.
- Considerations: Adequate TRA and/or safety zone
pg. 142. ANCHOR & HOLD
- Purpose: Defend exposures, stop structure to structure ignitions, reduce ember
production and extinguish structure fires.
- Indicators: Primary mechanism of fire spread is STRUCTURE to STRUCTURE
in common neighborhoods or commercial areas.
- Actions: Tactical utilization of control lines and large water streams from fixed
water supplies.
- Considerations: Only utilized when water supplies are abundant. Utilization of
gels and class “A” foams to assist in mop-up and prevent secondary ignitions.
pg. 153. BUMP & RUN
- Purpose: Often used when inadequate resources are available to conduct
perimeter control or other structure defense tactics.
- Indicators: Defensive tactic when fire front impact is imminent. Offensive tactic
when resources are attempting to steer the fire to an established end point where
other resources have prepared control lines. Structure prep is minimal due to
compressed time constraints.
- Actions: Resources move ahead of the fire front to extinguish spot fires, hot spots
and defend structures. Resources remain mobile, able to maneuver quickly,
leapfrogging from one structure to another.
- Considerations: Situational awareness and utilization of PACE Planning. May
involve direct attack with fireline and firing operations. FFs must move if
structures become involved and quick knockdown cannot be achieved.
Utilization of additional resources behind “bump and run” for perimeter control
and tactical patrol.
pg. 164. TACTICAL PATROL
- Purpose: Tactic used before or after fire front that relies on mobility of assigned
resources to continually monitor assigned areas
- Indicators: Before or after fire front in which the fire may pose a risk to
structures from fire brands or smoldering combustibles in void spaces, roofs, in
rain gutters and stored material near buildings. Also, in areas away from the fire
in which there is predicted to be significant ember showers and there is an
accumulation of receptive fuels.
- Actions: Patrol area where the fire has passed but there is still a risk to structures
from fire brands
- Considerations: Patrol areas downwind of potential ember showers. This tactic
should also be considered to extinguish hot spots (mop up) or secondary structure
ignitions, and address safety issues such as power lines, hazard trees and other
hazards. Check areas that are known ember traps, under decks, under houses,
flower beds/bushes, and sheds.
pg. 17SPRINKLERS
When ordering a sprinkler kit, also order a pump kit.
Advantages
• Useful where resources cannot stay to defend the structure due to:
1. Egress ‐ narrow one lane roads; no easy turn around
2. Erratic or extreme fire behavior
3. Resource shortage‐ not enough engines to assign one engine to every
structure
• Creates a micro climate around protected resource
Disadvantages
• Cannot replace firefighters on the ground
• Takes time to install
• Lag time from order to arrival
• Equipment intensive
SPRINKLER KIT CONTENTS
TOOLS
• 1 EA Instructions
• 1 EA Carton, 16” x 14” x 12”
• 1 EA Packsack, Waterproof, w/ Straps
• 1 EA Bag, Cotton, Lunch or Tool, 10” x 24”
• 1 EA Saw, Pruning, 10”
• 1 EA Wrench, Adjustable, 10”
• 1 EA Wrench, Spanner, 11”
• 1 EA Hammer, Claw
• 1 LB Nails, Duplex, Double Head, 16d, 3”
• 12 EA Pin, Panel, Hold down, 8”
• 8 EA Stake w/Clamp, Sprinkler, Metal, 18” x 1” x 1”
• 2 EA Block, Wood 2” x 4” x 6”
• 2 EA Cord, Nylon, 1/8” x 100 ft
• 12 Tie Wraps, One Way, 15” ‐ 17”
WATER HANDLING
• 4 EA Pressure regulator, RV 40 ‐50
• 5 LG Hose, Garden, Synthetic, 3/4” NH x 50 ft
• 5 EA Gasket, Garden Hose, 3/4”
• 1 EA Nozzle, Garden Hose, 3/4” NH, Adjustable, Brass
• 1 EA Nozzle, Plastic, 60 GPM, 1 1/2”
• 4 EA Sprinkler Assembly, 1/2”, Sprinkler Heads w/ Couplings
• 4 EA Tee, Hoseline, 1 1/2” x 1 1/2” x 1” w/ Cap
• 2 EA Valve, Wye, Gated, Brass, 3/4”
• 4 EA Valve, Shut Off, Ball, Brass, 3/4” NH
• 1 EA Reducer, 1 1/2” NH‐F to 1” NPSH‐M
• 4 EA Reducer, 1” NPSH‐F to 3/4” NH‐M
pg. 18GUIDELINES FOR SPRINKLER SET UP
• Where possible place the sprinkler high to simulate rain. Structures are designed
to resist rain.
• All combustible material that is adjacent to the building or under decks must be
wet.
• Easily ignited surface material on the building must be made wet and all parts of
a wood roof
• Avoid direct hitting of windows and doors or any location that would allow water
to enter the building
• Test the set up to be sure all sprinklers are working properly and all targeted
parts are getting wet.
• The sprinklers do not need to be operated for a long period before the fire arrives
(approx. 1 hr), but should be working for the entire fire front passage
• Protect the hose lines by burying them or keeping them under sprinkler
protection
• Pump sites should be sprinkler protected if they are on vegetation or other fuel.
OSFM STANDARD FLAGGING
• Red & white striped with “hazard” printing: general hazard
• Yellow & black striped with “bees” printing: bees
• Orange & black skull & crossbones with “killer tree” printing: hazard trees
• Blue with “water” printing: water supply
• Hot pink with “escape route” printing: escape route
• Light purple with “triaged” printing: triaged structures
o Write date, time, & TF identifier on flagging
• White with “occupied” printing: occupied residences in evacuation areas
o Write date, time, & TF identifier on flagging
Helicopter and Tanker carrying capacities
Tankers
Super Tanker 747 19,000 gallons
VLAT DC-10 12,000 gallons
C-130 3,000 to 3,500 gallons
Scooper 1,000 gallons
Super Scooper 1,600 gallons
Helicopters
Type 1
Chinook 2,400 bucket, 2,800 internal gallon tank
Skycrane 2,650 gallons
Sikorsky S-61 (Croman) 1,000 to 1,200 gallons
Blackhawk 700 to 1,000 gallons
K-Max 700 to 1,000 gallons
Type 2
Huey 300 to 360 gallons
Approximate gallons per load. All influenced by elevation and weather.
pg. 19FORMS – USE AND PURPOSE
TF/ST Leaders are encouraged to have copies of the following forms on hand when they
assemble at the Point of Departure (POD).
Task Force/Strike Team Resource Form (Pg 21)
This form is submitted to the AOC for approval prior to mobilization to an incident. This form
will provide information about the incident and TF identifier. All apparatus and personnel
must be included on this form and it should align with the Manifests provided during check-
in.
Resource Manifest Form (Pg 22)
The Manifest provides the information required by OSFM to reimburse local departments
for their participation in mobilizations. Each mobilized unit (engines, command, and
support) must have their own Manifest. All personnel names and departments must be
included on this form. Incomplete or inaccurate forms may result in the delay or denial of
reimbursement.
The Engine Boss of each responding unit should start their Manifest at the time of
mobilization. Manifest completion is ultimately the responsibility of the TF/ST Leader. Upon
arrival, the RESL will collect and verify your Manifests. Upon demobilization, the RESL will
use the form to demobilize the unit and provide a hard-card copy for each apparatus. Your
Fire Defense Board Chief or the OSFM can supply you with these forms.
Apparatus Form (Pg 23)
This form is part of the check-in process and is submitted to the RESL upon arrival. This
form is used by both Safety and Operations.
ICS-214/Unit Log (Pg 24)
This form is to be completed by each unit daily and submitted to DIVS. Detail actions,
accidents, agreements, contact with homeowners, lost equipment, injuries, and other
pertinent information.
Incident Demobilization Inspection Form (Pg 25)
Each apparatus must have a demobilization inspection conducted by the AO. This process
can be facilitated by the IMT’s Safety Officer.
Engine Company or Crew Performance Rating (Pg 26)
Each Task Force/Strike Team will be evaluated by their DIVS.
TF/ST Leaders are expected to conduct evaluations on each apparatus under their
direction. These evaluations are to be reviewed, signed, and provided to the IMT prior to
demobilization. OSFM forwards copies of all evaluations to the Fire Defense Board Chief.
Task Force After Action Review Form (Pg 27)
Each TF/ST Leader is expected to facilitate an After Action Review using the provided
form, which is provided to the RESL during the demobilization process. This process
should take approximately 20 minutes and the intention is to identify successes and
challenges, both operationally and logistically.
pg. 20TASK FORCE/STRIKE TEAM RESOURCE FORM
1. AOC to complete top section & send to Acting Fire Defense Board Chief
2. FDBC to complete bottom portion & send back to AOC
3. AOC to approve – do not depart until approved by the AOC
Conflagration Name:
Staging Location: Requested Arrival at Staging (date & time):
Order #: Task Force / Strike Team Identifier:
Other Information (closed roads, fuel availability, etc.):
County Sending Resources:
Fire Defense Board Chief: Cell Phone: Department:
Task Force / Strike Team Leader: Cell Phone: Department:
Optional Assistant / Trainee TFL: (circle one) Cell Phone: Department:
Apparatus Officer or # of
Kind/Type Apparatus # Department Cell Phone
Engine Boss Personnel
List additional departments responding:
**By submitting this form, I affirm that assigned resources do NOT have present symptoms of illness using
the Wildland Fire COVID-19 Screening Tool**
Name: Date:
AOC Email: osfmaoc@osp.oregon.gov Phone: 503-373-0001 Fax: 503-378-5329
pg. 21RESOURCE MANIFEST
AOC: 503-373-0001
Task Force/Resource Name: IMT Assignment (IMT members only):
Order # Incident Name
APP / VEH # Resource Kind / Type Apparatus Home Agency
Last Name, First Position Home Agency
Resource left POD (Contact AOC): Resource arrived home (Contact AOC):
Date / Time Date / Time
--------------------------------------------------------- IMT Use Only ----------------------------------------------------------
Check-in RESL Initials Demob RESL Initials
Date / Time Date / Time
Each apparatus should have one completed Manifest.
Task Force/Resource Name: Name of Task Force
IMT Assignment: Leave blank – for IMT members only
Order #: Order number issued by AOC
Incident Name: Name of the incident
APP / VEH #: Apparatus or vehicle number
Resource Kind/Type: Apparatus kind and type (i.e. E6 for Type 6 engine )
Apparatus Home Agency: Agency owning the apparatus/vehicle
Enter the names of individuals on apparatus.
• Enter position for each individual (i.e. ENG, AO, FF).
• Enter home agency for each individual on apparatus.
Enter date and time Task Force leaves the POD for the incident.
Upon arrival back at home station, enter date and time.
pg. 22pg. 23
pg. 24
pg. 25
pg. 26
Task Force After Action Review (AAR)

                                       pg. 27
Instructions & Examples
1. What was planned? (Spend about 25% of total time on this question and
the next)
Review the intent of the mission:
Key task assignments; desired “end state” (what does “Right” look like?).
Example: TF1 was assigned structure triage, prep and protection on Deer Creek road with
approximately 40 primary Structures and 20 secondary structures. The TF was to locate
safety zones and escape routes. Then gather other important information including
evacuation status, water supply and other intelligence. After that information was gathered
the TF was to map and locate all structures, triage the structures and prep them as time
allowed. When and if assignment was complete the TF would be in patrol mode and
respond to request as needed.
2. What actually happened?
Establish the facts
Pool multiple perspectives to build a shared picture of what happened.
Example: TF1 responded to Deer Creek Road and established and located safety zones
and escape routes. TF1 only triaged 21 primary structures and 9 secondary structures in
the operational period. The TF met with homeowners that we made contact with that took
time and some locked gates hindered our triage work. Little to no prep work was done
because the TF spent time communicating with homeowners and some homeowners did
not want any fuel mitigation done near the home.
3. Why did it happen? (Spend about 25% of total time on this question)
Analysis of cause and effect
Focus on WHAT, not WHO; draw out explanations of what occurred.
Example: Homeowners not all evacuated, some evacuated residents closed and locked
gates when leaving. No maps were available prior to our arrival so locating structures took
longer. Once the structures were located and mapped triage can happen faster.
4. What are we going to do next time? (Spend about 50% of total time on this
question)
Correct Weaknesses
Focus on items you can fix, rather than external forces outside of your control.
Sustain/Maintain Strengths
Identify areas where groups are performing well and should sustain. This will help repeat
success and create a balanced approach to the AAR.
Example: Communicate with homeowners to leave gates open when evacuating. Get
maps from local fire district if overhead team maps are not available yet. (The local fire
district almost always has paper maps to make copies) Possibly assign a local fire district
rep to the TF for the first couple hours for local knowledge and Info.
pg. 28pg. 29
WILDLAND FIRE COVID-19 SCREENING TOOL
Today or in the past 24 hours, have you had any of the following symptoms 1?
 Symptom
 Cough more than expected?
 Shortness of breath or difficulty breathing?
 Fever? Chills?
 Muscle pain, outside your normal for firefighting?
 Sore throat?
 New loss of taste or smell?
 Fatigue, outside your normal for firefighting?
 Headache, outside your normal for firefighting?
 Congestion or runny nose, outside your normal for firefighting?
 Nausea or vomiting
 Diarrhea
  * Take temperature with no-touch thermometer, if available *
Instructions for Screening
 Item                                                                        What to Do
 Ifresource has a cough that is more than expected, shortness of breath or   DO NOT MOBILIZE
 difficulty breathing, or any other symptoms listed.
 At Entries:                                                                 DO NOT ANNOUNCE
     Consider adequate number of personnel needed for screening.             Ask individual to step
     Although medical personnel are ideal, screeners do not have to be       aside and follow the steps
     medically trained.                                                      below.
 Ifresource has cough, shortness of breath or difficulty breathing, or any
 other listed symptoms including fever (over 100.4) at entry.

 Steps to follow
 Escort symptomatic individual to isolation area.
 Isolation support personnel should begin documentation.
 Have symptomatic individual contact Supervisor for further direction.
 Notify public health officials.
 Have individual transported as appropriate.
 Protect and secure any collected Personal Identifiable Information (PII) or Personal Health
 Information (PHI).

1
 Symptoms of Coronavirus
httos://www.cdc.gov/coronavirus/201 9-ncov/symptoms-testing/symptoms. html

                                                                                                  pg. 30
Apparatus Cleaning - Daily
From “How to Reduce the Risk of the Coronavirus in Your Vehicle”
Have the Right Tools
It is possible to disinfect and kill the virus on external surfaces. There are
several ways to prepare your vehicle to be especially clean and safe during the
outbreak. Experts recommend using disposable gloves while cleaning or
dedicating reusable gloves for COVID-19 disinfection purposes only.
Most common EPA-registered household disinfectants will work. Be sure to
read the labels to make sure the cleaner is safe to use on the different surfaces
in your vehicle. We recommend keeping a tube of disinfectant wipes in the
vehicle as an easy and effective preventive measure.
The CDC has recommendations for homemade bleach and alcohol solutions
given that many brand-name disinfectants have been in short supply.
Focus on Common Vehicle Touchpoints
You'll want to clean the places you come into contact with the most. Besides
the obvious places such as a door handle, key fob or steering wheel, the most
important part of the interior to keep clean is the dashboard.
Other places to clean include the inside door buttons, seat belts, gear shifters
and touchscreens. How often should you do this? While your individual
circumstances with your vehicle will vary, the CDC recommends cleaning and
disinfecting touched surfaces daily.
The outside of the apparatus is less susceptible to carrying the virus. That's
because the sun and outside weather can shorten its life span. However, it is
still a good idea to clean door handles and other exterior touch points. Gas
pump handles and keypads at gas stations are also locations to be wary of.
Use disposable paper towels and approved cleaning solution, or wipes for
cleaning if possible.
Wipes – not sprays – are recommended to avoid aerosolizing the virus on
contact.
pg. 31CDC Disinfecting Guidelines
Clean the area or item with soap and water or another detergent if it is dirty.
Then, use a household disinfectant.
Recommended use of EPA-registered household disinfectant.
Follow the instructions on the label to ensure safe and effective use
of the product.
Many products recommend:
o Keeping surface wet for a period of time (see product label)
o Precautions such as wearing gloves and making sure you have good
ventilation during use of the product.
Diluted household bleach solutions may also be used if appropriate
for the surface.
o Check the label to see if your bleach is intended for disinfection, and
ensure the product is not past its expiration date. Some bleaches,
such as those designed for safe use on colored clothing or for
whitening may not be suitable for disinfection.
o Unexpired household bleach will be effective against coronaviruses
when properly diluted.
Follow manufacturer’s instructions for application and proper
ventilation. Never mix household bleach with ammonia or any other
cleanser.
Leave solution on the surface for at least 1 minute.
To make a bleach solution, mix:
o 5 tablespoons (1/3rd cup) bleach per gallon of water
OR
o 4 teaspoons bleach per quart of water
Alcohol solutions with at least 70% alcohol may also be used.
pg. 32You can also read