ROCK PAINTING - DIY INSTRUCTIONS
←
→
Page content transcription
If your browser does not render page correctly, please read the page content below
ROCK PAINTING – DIY INSTRUCTIONS
Get crafty and creative with Tar Heel kindness rocks.

MATERIALS
☐ Rocks – in whatever size, color and texture you prefer.
  • Many stores sell smooth “river rocks” and rock painting kits.
  • Please do not take rocks from public parks.
☐ Paint in various colors, acrylic paint works best
☐ Painting tools
  • Such as paintbrushes, sponges, Q-tips, pencil, chalk
☐ Clean-up tools
  • Such as paper towels, toothpick and Exacto-knife
☐ Paint pens (optional)
  • For writing, geometric dot patterns and other small details
☐ Outdoor Mod Podge (a sealer, see next section)
☐ Craft sealer/clear glaze spray (optional) (see next section)
☐ Painter’s tape and sharp scissors
  • For accent wall rocks
☐ Cardboard or paper to work on

SEALERS
A “sealer” does a few things for your rocks: 1) Because rocks are porous, using an initial sealer
prevents your rock from absorbing lots of paint (i.e. you’ll need to use less paint). 2) When your work is
finished, a sealer provides protection from the paint fading or being chipped or damaged.

A brief comparison of sealer options:
☐ Not Sealed
   ● The top rock is not sealed. It shows every fingerprint when picked up.
☐ Outdoor Mod Podge (bottom left)
   ● Mod Podge is a glue that you apply with a paint brush or sponge.
   ● This clear sealer will help the paint last longer if you are displaying
        rocks outside.
☐ Craft sealer/clear glaze spray (bottom right)
   ● The look of clear glaze is sharper than Mod Podge, however it’s a bit
        harder to control the precision of the application. Plus, you need to
        apply in a well-vented, preferably outside, area.
☐ Paint as a sealer
   ● For the initial sealer, you can opt for a coat of paint. We recommend either a neutral color (black,
        white, gray) or the same color as you’d like your rock to be painted for the project.

PREP YOUR ROCKS A DAY OR TWO BEFORE
☐ Wash and dry your rocks (even if they look clean!)
☐ “Seal” your rocks by placing on cardboard and using the sealer of your choice (see previous
  section). You’ll want to seal your rocks again - with a clear sealer - once your rock is finished.
  • Be sure to follow the instructions for your sealer (drying time, ventilation, number of coats, etc.)
☐ You may wish to test/draw your designs on paper before drawing/painting on your rocks.
CRAFTING TIPS
☐ Some paints (esp. yellow) may look transparent on bare rock. You may find that adding a small
amount of white (a dab/size of a Q-tip head) to your paint helps the color show up better.
☐ Have your clean-up tools nearby.
☐ If you don’t have the right shade of Carolina blue, try mixing equal parts light blue and white
together. Then mix in ¼ part of grey/light grey. Be sure to create enough color for two coats.
☐ HAVE FUN! If things aren’t looking the way you were hoping, just try again. Your creation will be
unique to you.
QUESTIONS?
Email Douglass Payne ’04 at Douglass_Payne@unc.edu with any questions for this craft.
ACCENT WALL ROCKS
This craft is great for kids.
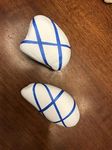
☐ 1. Cut strips of painter’s tape that are roughly twice as long as
your rock’s widest point.
☐ 2. Cut your painter’s tape in half length-wise several times to
achieve the width of tape desired. I aimed for 1/8 inch or
smaller. Long, sharp scissors work well for this step.
☐ 3. Wrap 4- 5 strips of tape around your rock, in an asymmetric
crisscross pattern, so that 8-10
sections are created. Be sure that every bit of tape is
flat/securely attached to your rock. The ends should end on
the bottom side of your rock.
☐ 4. Fold the ends of each strip for easy removal.
☐ 5. Design ideas:
• For a Carolina-themed rock, paint your sections in alternating colors of white, Carolina blue,
grey and white.
• Use you own color palette of 1- 10 colors.
• Add details with a paint brush or paint pen after you paint has dried.
• Add several color of paint to your rock and swirl around while wet.
• Add glitter paint as a final layer.
☐ 6. LEAVE THE TAPE IN PLACE so that you can apply a second coat of paint.
☐ 7. To remove tape SLOWLY pull the strips off one at a time. If you notice the paint lifting from your
rock use an Exacto-knife to gently separate the paint layer from the tape.
☐ 8. Use a toothpick or Exacto-knife to remove any stray paint from the rock that was under the tape.
☐ 9. Seal your work once it’s dry.
Non painted river rock, sealed, with red River rock painted white (3-4 coats), with blue painter’s
painter’s tape. The resulting lines are black. tape. The resulting lines are white.RAM ROCK
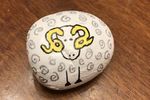
☐ Paint two rocks completely white. You will likely need to apply 2-4 coats of paint.
☐ 1. Use a yellow paint pen to draw the ram horns. The right horn looks similar to a “fancy” number 2
and the left is a mirror image, or you might imagine a “fancy” number 6.
☐ 2. Then use a black paint pen to draw the head around the horns.
☐ 3. Add eyes, nostrils and outline the horns in black.
☐ 4. Add two front legs and feet using a straight line and triangle for each.
☐ 5. Use a gray or silver paint pen to draw swirls around the ram’s head and legs.
☐ 6. Seal your work once it’s dry.
1 and 2 3 and 4 5
TAR HEEL DOTS
Note: I used paint pens for this design. Alternatively, you could use acrylic paint and circular tools (Q-tip
with cotton removed, tip of a pencil, new pencil eraser, etc.) in various sizes
☐ Choose 3-5 colors (Color A, Color B, etc.)
☐ 1. Using Color A (blue), create a medium sized dot in the center of your rock.
☐ 2. Using Color B (yellow), place 4 small dots around the Color A dot at North, South, East and West.
Be sure each is the same distance from the center dot.
☐ 3. Using Color C (silver/grey), place 4 small dots in between the Color B dots – at the same distance
from the center dot as the Color B dots.
☐ 4. Using Color D (pink), place 4 small dots at North, South, East and West, in alignment with the
Color B dots.
☐ 5. Using Color B (yellow) place 4 small dots in between the Color D dots.
☐ 6. Using Color A (blue) and C (silver/grey) add tiny dots in a variety of patterns to the existing dots.
☐ 7. Seal your work once it’s dry.
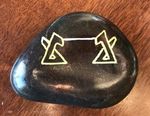
6.RAM ROCK (ANGULAR)
Use paint pens, photos and guide below for proportions and reference.
A series of written instructions and notes can be found at the end of this
document. Don’t forget to seal your work once it’s dry!
8
..
1 and 2. 3, 4 and 5.
KINDNESS ROCKS
Spread some cheer and encouragement by leaving kindness rocks in your neighborhood, public park
or sharing with friends and family.
☐ Use your favorite quote, doodles and colors to create your own design.
☐ Don’t forget to seal your work once it’s dry. (* for contrast purposes, the “Your best” rock is not
sealed – can you tell the difference?)RAM ROCK (ANGULAR)
Use paint pens, photos below and guide for proportions and reference.
☐ 1. Using white, draw a line for the top of the ram’s head.
☐ 2. Using yellow, draw perpendicular lines at each end of the white line.
Then draw upward angled (45) lines from each corner.
☐ 3. Using yellow, draw a downward angled line from the top point of the line
made in step 2.
• Proportion details: The line should
Steps 1 and 2
o 1) be the same length as white line drawn for head and
o 2) end at a distance from the imaginary perpendicular line that is equal to the
distance from the imaginary perpendicular line and the corner of the head and
top of horn (see orange lines in guide).
☐ 4. Using yellow, draw a straight line from the bottom point of the line from
step 3 to a point that’s just past its imaginary intersection of the
perpendicular yellow line at the top of the head.
☐ 5. Using yellow, draw the top-inside part of the horns (but NOT the inside-
bottom yet). The width of the horn is consistent with the length of the Steps 3 and 4
straight line you drew in step 2; Stop the line at that width-distance from the
bottom yellow line of step 4.
☐ 6. Using yellow, draw an angled (45) line upward to meet the inside line of
the horn; the resulting shape is the ram’s face and ear. Continue the line
from the outer-line of the ram’s horn.
☐ 7. Complete the bottom of each horn, maintaining a consistent width (inner
triangle is very small).
☐ 8. Add a very short, white, slanted line inside each ear. Then add blue right Steps 5 and 6
triangles for the eyes and two tiny white dots for the nostrils.
☐ 9. Seal your work once it’s dry.
Step 7
Step 8
8
..You can also read


