Pro BBQ Controller V3 & V4 - Muxall LLC Welcome to the future
←
→
Page content transcription
If your browser does not render page correctly, please read the page content below

August 2021
                                                           Version 4, Issue 2

  Pro BBQ Controller
       V3 & V4

Muxall LLC
Welcome to the future…
Providing automated products for home and business since
2013.

                                                                        1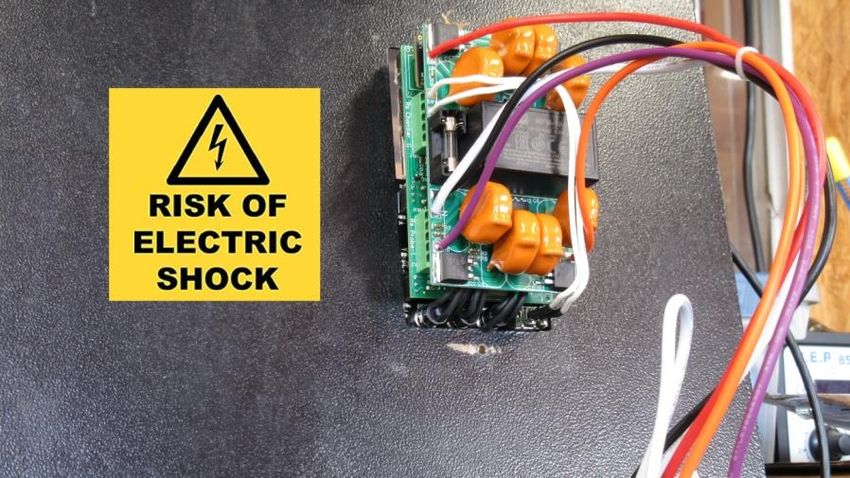
Table of Contents
TABLE OF CONTENTS ............................................................................ 2
OVERVIEW AND FEATURES .................................................................. 7
QUICK START ....................................................................................... 8
        Starting A Cook Using The Front Panel ........................................... 8
        Power On Controller ....................................................................... 8
        Press Start Button ........................................................................... 8
        Set Cook Temp ................................................................................ 8
        Press Enter/Save Button ................................................................. 8
QUICK START – CONT. .......................................................................... 9
        Starting A Cook Using The Web App ............................................... 9
        Power on the controller .................................................................. 9
        Launch Web Browser ...................................................................... 9
        Enter the IP address ........................................................................ 9
        Login ............................................................................................... 9
        Click Start Button ............................................................................ 9
QUICK START – CONT. ........................................................................ 10
        Cooking with the lid open ............................................................. 10
UNBOXING THE PRO BBQ CONTROLLER ............................................. 11
INSTALLING THE PRO BBQ CONTROLLER ............................................ 12
        Shakeproof Washers ..................................................................... 12
        Removing Old Controller ............................................................... 13
        Wiring the Electrical...................................................................... 14
        2-Wire Probe Adapter Installation ................................................ 16
        Removing 2-Wire Adapter ............................................................ 17
        External WiFi Antenna .................................................................. 18
        Meat Probe Jumpers ..................................................................... 19
        Powering Up Controller ................................................................ 20
FRONT PANEL NAVIGATION ............................................................... 21
>>>>>>>> BUTTON PANEL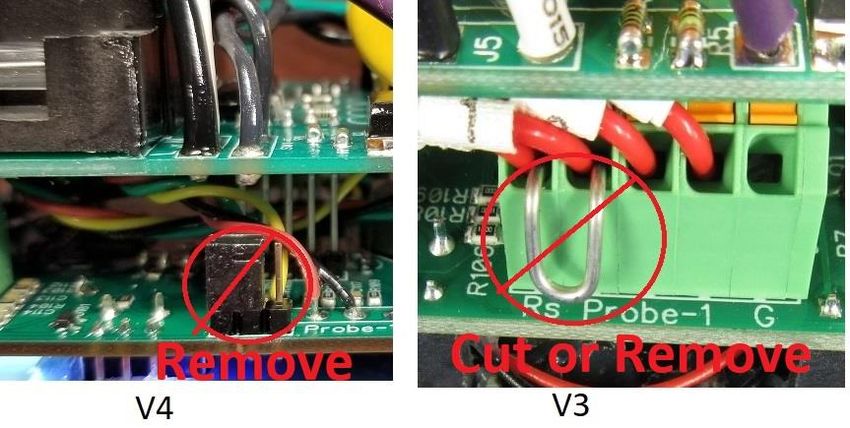
Setting the WiFi Password ............................................................ 23
        WiFi Password Char Map .............................................................. 23
        WiFi Security Settings ................................................................... 24
        IP Address For Web App Access .................................................... 24
PROFILES 1-4 ...................................................................................... 25
        Cook By Time ................................................................................ 25
        Cook By Temp ............................................................................... 25
        Target Temp ................................................................................. 25
        Cook Time ..................................................................................... 25
        Hold............................................................................................... 25
SMOKE CONTROL ............................................................................... 26
        Smokiness ..................................................................................... 26
        Slew Rate ...................................................................................... 27
        Pellet Refill .................................................................................... 28
COOK-BY-PROBE ................................................................................ 29
        Cook By Probe Settings ................................................................. 29
        Enable Cook-By-Probe................................................................... 29
        Select Which Meat Probe to Use with Cook-By-Probe .................. 29
        Set Desired Meat Temp................................................................. 30
        What To Do After Cook ................................................................. 30
WEB APP ............................................................................................ 31
        Accessing The Web App ................................................................ 31
        Username and Password Defaults ................................................ 32
        Add Tab button ............................................................................ 33
        Controller Menu ............................................................................ 33
        Graph Tab ..................................................................................... 33
        Config Tab ..................................................................................... 33
        Update Tab ................................................................................... 33
        Help Button ................................................................................... 33
>>>>>>>> CONTROL TAB
COOK SETTINGS ................................................................................. 36
        Cooking Profiles 1-4 ...................................................................... 36
        Target Temp ................................................................................. 36
        Cook Time ..................................................................................... 36
        Hold............................................................................................... 36
SMOKE SETTINGS ............................................................................... 37
        Precision Cook ............................................................................... 37
        Minimum Smoke ........................................................................... 37
        Medium Smoke ............................................................................. 37
        Max Smoke ................................................................................... 37
ENDING CONTROL .............................................................................. 38
        Hot Dog Easy................................................................................. 38
        Cook By Time ................................................................................ 38
        Cook-By-Probe .............................................................................. 38
        Enable Cook-By-Probe................................................................... 38
        Graphing the Meat Probe ............................................................. 39
        What to do After Cook .................................................................. 39
        Turn Off When Done ..................................................................... 39
        Smoke When Done........................................................................ 39
RECIPES .............................................................................................. 40
        Save Recipe ................................................................................... 40
        Rate Recipe ................................................................................... 40
        Delete Recipe ................................................................................ 41
        Retrieve Recipe ............................................................................. 41
FAN SPEED CONTROL ......................................................................... 42
        Fan Speed...................................................................................... 42
        Fan Speed Status........................................................................... 42
MANUAL OVERRIDE CONTROLS ......................................................... 43
        Fan Override ................................................................................. 43
        Auger Override .............................................................................. 43
STATS CONTROL ................................................................................. 44
ENTER/SAVE & START/STOP .............................................................. 44
        Enter/Save Button......................................................................... 44
        Start Button .................................................................................. 44
        Stop Button ................................................................................... 44

                                                                                                                 4
>>>>>>>> CONFIG TAB
Aussie MOde ................................................................................. 56
        Cookshack PG MOde ..................................................................... 56
        MSG Experiment Mode ................................................................. 56
GRAPHS ............................................................................................. 57
        Enable Chamber Temp Graphing .................................................. 58
        Meat Probe Temp Graphing ......................................................... 58
        graphing a Meat Probe ................................................................. 58
        Reading the Graphs ...................................................................... 59
UPDATE.............................................................................................. 60
FAQ .................................................................................................... 61
        Why does the controller overshoot on startup? ........................... 61
        Why is the grill running 10 or more degrees above the set temp? 61
        Why is the Temp swinging so much? ............................................ 61
        Why is the temp NOT SWINGING? ................................................ 61
FAQ – CONT. ...................................................................................... 62
        Why is my grill showing “Pause”? ................................................ 62
        Graph & Flame-On Detect Temp .................................................. 62
Z-GRILLS PATC SETTINGS .................................................................... 63
MAX AND MIN LIMITS........................................................................ 64
CONTACT ........................................................................................... 65

                                                                                                              6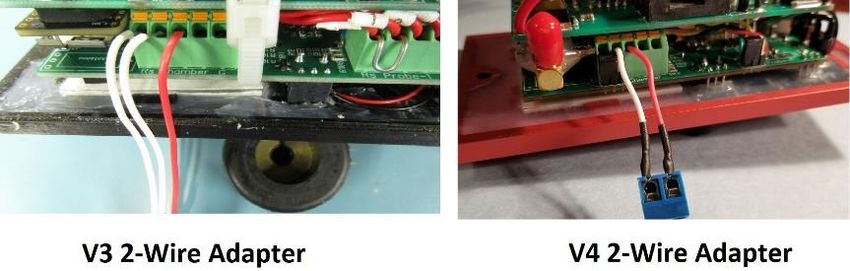
Overview and Features
The Muxall LLC Professional BBQ Controller for pellet grills
is a plug-n-play replacement for the stock Traeger ® BBQ
Controller and other pellet grills.

The Muxall Pro BBQ Controller supports three meat probes, four
cooking profiles, cook-by-probe, auto off, smoke when done,
historical graphing, low pellet alarm, cook done alarm, smokiness
settings, fan and auger manual overrides, recipe saving, recipe star
rating, flame-out detection alarm, auto fan speed adjustment for low
temp cooking, 120V-240V mains power, Fahrenheit or Celsius
temperature scales, custom modes for: Memphis and Cookshack
pellet grills, supports type B, E, J, K, N, S, R, T thermocouples, 2, 3 and
4 wire RTDs, and thermistors with 0.1 degree F accuracy and 0.001
degree F resolution, and WiFi with software updates from the cloud.

The Muxall Pro BBQ Controller is globally installed with users in the
US, Australia, and Israel.

                                                                         7
Quick Start
STARTING A COOK USING THE FRONT PANEL

POWER ON CONTROLLER
Pull on the toggle switch and
move it to the ON position.

PRESS START BUTTON
Press-and-hold the Start/Stop
button 4 seconds. You should
hear a beep.

                            SET COOK TEMP
                            Make sure the cursor is under
                            the Profile Temp. Turn the
                            knob to change grill cooking
                            temperature.

                            PRESS ENTER/SAVE BUTTON

                            Put the hotdogs on!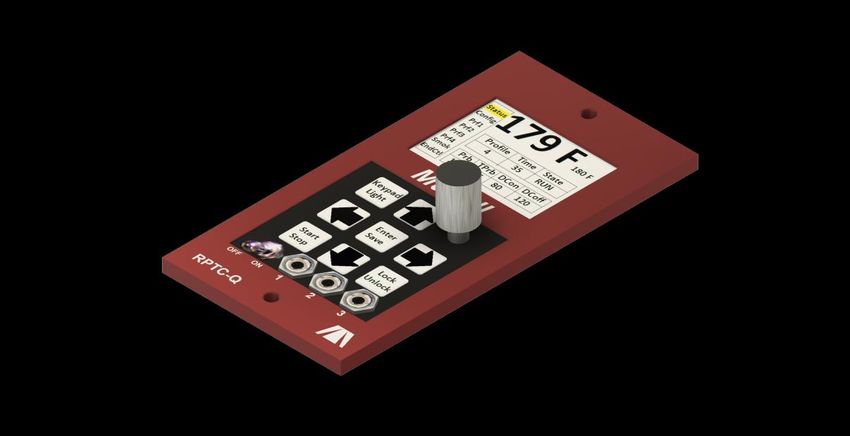
Quick Start – Cont.

STARTING A COOK USING THE WEB APP

 POWER ON THE CONTROLLER Pull
 on the toggle switch and move it to
 the ON position.
 LAUNCH WEB BROWSER
 On your PC, tablet, or phone, launch
 Chrome, Firefox, Safari, or your
 favorite web browser.
 ENTER THE IP ADDRESS (see below)
 in the address bar and then press
 Enter or Go in web browser.
 LOGIN - Default password is: muxall
 For more details about logging into
 the web app see: Accessing the Web
 App.

  The IP address can
  be found in the front
  panel Config screen.

                                        CLICK START BUTTON
                                        From the Web App Control
                                        tab click “Start” to start the
                                        cook. That’s it! The default
                                        cook temp is 180F. See
                                        “Cook Settings” to change.

                                                                         9
Quick Start – Cont.
COOKING WITH THE LID OPEN

 Some grills support searing over the burn pot with the grill lid
 open. If you cook with the LID open, you MUST disable
 Flame-Out & Flame-On Detection.

  Disable Flame-Out &
  Flame-On Detection
  is only in the web
  app under the
  Config tab. Press
  Save when done.

                                                                    10
Unboxing the Pro BBQ Controller
Unpack the controller from its shipping box and locate the Chamber
Probe 2-to-3 wire adapter and 2 shake proof washers. NOTE – 2-wire
adapter may already be installed on the controller. Do not throw away
the shipping box in case you need to return the Pro BBQ Controller to
Muxall for service and for FREE shipping.
Installing the controller requires only two tools: 1. A medium size cross
head (Phillips-Head) screwdriver and, 2. A small 2.4mm flat-head
screwdriver.
11Installing the Pro BBQ Controller
WARNING – Shake proof washers MUST penetrate
the anodizing for proper grounding!
SHAKEPROOF WASHERS
Shake proof (star locking)
washers must be used to
fasten the controller to the grill
to ensure proper grounding.
Firmly tighten faceplate screws
with shake proof washers for
proper grounding.
If the controller is going to be mounted off of the grill or where the
faceplate screws don’t go to Earth ground, then a ground wire from
the faceplate to Earth ground is required.
Ground wire for controllers
mounted off of the grill or on
plastic. Shake proof wash
must still be used.
12Installing the Pro BBQ Controller -
Cont
REMOVING OLD CONTROLLER
UNPLUG YOUR BBQ FROM MAINS
POWER BEFORE BEGINNING!
Remove the original controller from your pellet BBQ. It is suggested
that you take pictures of all the wiring before disconnecting. Also,
labeling the wiring will speed up installation.
The compact design of the Muxall Pro BBQ Controller allows it to fit in
the stock BBQ controller mounting cutout. The screw holes should
also align with the stock BBQ Controller cutout. If not, visit
shop.muxall.com to see if there is a faceplate designed for your
particular BBQ.
13Wiring the Pro BBQ Controller
WIRING THE ELECTRICAL
The wiring harness of the Muxall Pro BBQ Controller is color coded to
match a stock BBQ Controller. Purple is the Igniter, Orange is the Fan,
Red is the Auger, and Black is L1 (Mains Power Input). The controller
will automatically detect and switch between 120V-240V mains power.
NOTE – Check all your connectors and tighten them up! You will be
surprised how much better your grill will run!
14Pit Temp Probe Installation
A 2-wire to 3-wire adapter is included with the V3 Controller. It is
required if your Pellet BBQ uses a 2-wire RTD (typical on Traeger ®) or
2-wire thermistor. V4 Controllers have a straight 2-wire adapter
without the third wire.
Installing Pit Temp Probe Wires
Using a small flat-head screwdriver, connect the Chamber (Pit) probe
wires to the 2-wire adapter. The pit temp probe wires are reversable.
So, it doesn’t matter if they are connected backwards.
152-Wire Chamber Probe Adapter
2-WIRE PROBE ADAPTER INSTALLATION
Installing
The ends of the 2-wire adapter are pre-tinned with solder for easier
installation. You do NOT need to push the orange wire-release to install
the wires. Push firmly on the wire to insert it into the terminal block.
The wire should go into the terminal block about 1/2 of an inch.
With the V3 2-wire adapter, make sure the 2 white wires are installed in
ports 1 and 2, the leftmost ports, and the red wire is installed in port 3.
With the V4 2-wire adapter, the red and white wires go into ports 2 and
3. The wires are reversable so it doesn’t matter if they are connected
backwards.
162-Wire Chamber Probe Adapter -
Cont
REMOVING 2-WIRE ADAPTER
With the V3 controller, the white wire in port 1 of the Chamber terminal
block must be removed to support 3-wire and 4-wire RTD pit temp
probes.
With the V4 controller, just remove the jumper in front of the Chamber
terminal block.
Using a small flat-head
screwdriver, push firmly
on the orange release
button until the wire
releases. You may have
to push the wire in, to
get it to release.
17Wi-Fi Antenna Installation
EXTERNAL WIFI ANTENNA is optional with the Muxall Pro BBQ
Controller.
Assemble the antenna as show.
Connect the antenna cable end
connector to the Controller’s
connector.
WiFi SMA connector
is under the red cap.
Note – Cap colors may change in the future.
18Meat Probe Jumpers
MEAT PROBE JUMPERS - The Muxall Pro BBQ Controller comes with
jumpers installed for Meat Probe ports 1-3. These jumpers are needed
to support 2-wire meat probes that come standard with most pellet
grills.
Note – 4-Wire RTDs MUST have the jumper removed to operate
properly. 3-wire PT100 RTDs and 3-wire thermistors do not need the
jumpers. But they can be used with or without the jumpers installed.
Using a small flat-head
screwdriver, push firmly
on the orange release
button until the jumper
releases. You may have
to push the jumper in, to
get it to release.
19Powering Up The Controller
POWERING UP
CONTROLLER
ON/OFF Toggle Switch turns on
or off mains power to the
controller. It must be pulled
out to toggle it. This prevents
accidentally turning it on or off.
20Front Panel Navigation
Current Profile Status
Profile Number
Time Remaining (minutes)*
Target Temp* Chamber (Pit) Temperature
Controller Status
Cook By Probe Status
Probe Number (0 = disabled)
Outside Temp***
Probe Target Temperature
The Knob scrolls through
Probe #1 Temperature** numbers and letters by
Probe #2 Temperature turning and brings up the
Probe #3 Temperature menu screen by pressing.
Cursor buttons move the
Panel Light toggles the LCD
cursor around the LCD.
backlight and button panel
LEDs ON/OFF.
Lock / Unlock the buttons and
knob on the front panel. This
Stop/Start a cook and must
prevents accidental changes.
be held 4 seconds to work.
This prevents accidentally Meat Probes Jacks
starting or stopping a cook.
ON/OFF Toggle Switch turns on
or off mains power to the
controller. It must be pulled
out to toggle it. This prevents
accidentally turning it on or off.
* You can change the target temp and time remaining for the current profile
except for profile 0 and profile 5. When Profile 0 is displaying, the Target
Temp that is displaying and changing is the Target Temp for Profile 1. Profile
0 is Ignite Fire state and Profile 5 is Cool Down state. Change Ignite Fire and
Cool Down times using the config tab in the web app.
**0 = “No Probe” or “Misconfigured Probe”
*** Outside Temp also shows how hot the controller is. If it gets over 150F, it
will shut down.
21>>>>>>>> Button Panel
WiFi Config and IP Address -
Cont
                                   SETTING THE WIFI PASSWORD
                                   Using the cursor buttons, push the
                                   down arrow to move the cursor under
                                   the WiFi password. Use the left and
                                   right arrows to move the cursor and
                                   the knob to change letters and
                                   numbers. Setting a position to blank
                                   deletes the letter or number in that
                                   position. Press Save/Enter when done.

WIFI PASSWORD CHAR MAP. Using the knob: Scrolling right goes
down the list and scrolling left goes up the list. Scrolling past the end
brings you to the top of the list and vice-versa.

                                                                            23
WiFi Config and IP Address -
Cont
WIFI SECURITY SETTINGS
The Muxall Pro BBQ Controller’s WiFi security negotiates WPA2-PSK
with AES encryption.
The Pro BBQ Controller
MUST be turned off
then turned on “Reboot”
for the WiFi to connect
after saving changes.
IP ADDRESS FOR WEB APP ACCESS
The Muxall Pro BBQ Controller’s WiFi defaults using DHCP. You can
get the IP address from the Config screen after the controller has
been restarted and the WiFi is connected.
Pro Tip – A static IP address can be configured in the web app Config
tab. This will ensure the controller uses the same IP address every
time.
24Profiles 1-4
COOK BY TIME – If none of the profiles are held (Hold=N) then the
controller will cook using the Cook Time and temp from each profile
then end the cook.
COOK BY TEMP – One of the profiles is held (Hold=Y). Then, the
controller will stay on the held profile, forever, until the user ends the
cook or Cook-By-Probe ends the cook.
From any screen, press the
control panel knob once. That
will pull up the Menu screen on
the LCD.
Using the cursor buttons, cursor
down to “Prof 1” and press the
“Enter/ Save” button.
“Cursor down to Y-Hold
and set to N to use
Profiles 2-4”
TARGET TEMP can be increased or decreased by turning the control
panel knob.
COOK TIME - Cursor down to Cook Time and adjust it up or down
using the control panel knob.
HOLD - Cursor down to Hold and set to “N” to use Profiles 2-4. The
Muxall Pro BBQ Controller defaults Profile 1 Hold to “Y” when first
turned on.
Repeat for Profiles 2-4.
25Smoke Control
Front Panel and Web App
SMOKINESS setting can be set using the front panel or web app.
From any screen, press the
control panel knob once. That
will pull up the Menu screen on
the LCD.
Using the cursor buttons, cursor
down to “Smoke” and press the
“Enter/ Save” button.
“For tighter temperature
control, set to Minimum
Smoke or Precision
Cook”
With the cursor under Maximum Smoke, turn the control panel knob
to set the Smokiness setting and press the “Enter/ Save” button. For
tighter temperature control, set to Minimum Smoke or Precision
Cook.
Pro Tip - Precision Cook uses a different algorithm in PATC and may
produce more consistent smoke than Minimum Smoke which could
give you better temperature accuracy and smoke.
26Slew Rate
Front Panel And Web App
SLEW RATE setting is the gas pedal for the grill. The higher the slew
rate, the faster the grill reaches its target chamber temp but can
cause overshoot. Default is recommended for most grills except
insulated grills; which may require a slower slew rate.
From any screen, press the
control panel knob once. That
will pull up the Menu screen on
the LCD.
Using the cursor buttons, cursor
down to “Smoke” and press the
“Enter/ Save” button.
An incorrect setting of Slew Rate can cause the pellet grill to not
reach its set temperature or overshoot a temperature.
Pro Tip – Higher temperature cooks may require a faster slew rate to
keep up with heat loss from wind and ambient temperature gradient.
27Pellet Hopper Level
Front Panel and Web App
PELLET REFILL can be done using the front panel or web app. Enable
/ Disable Pellets Level Tracking and Full To Empty Auger Run Minutes
is only configurable in the web app under Config.
From any screen, press the
control panel knob once. That
will pull up the Menu screen on
the LCD.
Using the cursor buttons, cursor
down to “Smoke” and press the
“Enter/ Save” button.
Scroll down to N-Pellet Refill and
set “N” to “Y”. This tells the
controller you want to reset the
Pellet Hopper level.
Scroll right to the 100 New
Level. Use the control panel
knob to dial in the level of
pellets. Press Save/Enter when
done..
The New Level is the percent of hopper that is filled. For example: 100% =
Full, 50% = half full, 25%= quarter full, etc. NOTE – Pellets Level Tracking
must be enabled in the web app.
28Cook-By-Probe
Front Panel and Web App
COOK BY PROBE SETTINGS can be set using the front panel or web
app. You should have one of the Cooking Profiles set with Hold=Y
when using Cook-By-Probe.
From any screen, press the
control panel knob once. That
will pull up the Menu screen on
the LCD.
Using the cursor buttons, cursor
down to “EndCtl” and press the
“Enter/ Save” button.
ENABLE COOK-BY-PROBE
Cursor under N-Cook By Probe
and, using the knob on the
control panel, set “N” to “Y”.
This enables cook by probe. The
Probe Number will change to
“1” by default.
SELECT WHICH MEAT PROBE
TO USE WITH COOK-BY-
PROBE
Cursor down to Probe Number,
using the knob on the control
panel, select which probe
number will be used for Cook By
Probe. You can use any of the 3
meat probes.
29Ending Control
SET DESIRED MEAT TEMP
Cursor down to set the Cook By
Probe Target Temperature. You
can manually enter a Custom
target temperature by turning
the control panel knob or,
cursor to the right, and select a
predefined probe target
temperature.
Cursor to the right, turning the
control panel knob, set a
predefined target probe temp.
The predefined selections are:
Beef, Veal Lamb, Grnd Meats
(Hamburger), Poultry, and Pork
WHAT TO DO AFTER COOK
Cursor down to set the Cook By
Probe action when the probe
target temperature is reached.
Using the knob on the control
panel, select either “Turn Off
When Done” (default) or
“Smoke When Done”.
After selecting your Cook By Probe options, press the Enter/Save
button.
Note – The historical graph only displays the set Cook-By-Probe
number.
30Web App
ACCESSING THE WEB APP
The Muxall Pro BBQ Controller can be controlled from the front panel
or by using the web app. Use Chrome, Firefox, Safari, or another web
browser to access the web app.
To access the web app,
first get the IP address
assigned to the Pro BBQ
Controller.
The IP address can be
found in the front panel
Config screen.
To get to the Config screen,
push the control panel knob to
get the Menu. Cursor down to
Config and press Save/Enter.
The IP address is four numbers,
dot separated, ranging from 0-
255.
Depending on your router
configuration this address may
occasionally change after
rebooting.
31Web App - Cont
USERNAME AND PASSWORD DEFAULTS
The default username and password to access the web app is: muxall
On your PC, tablet, or phone,
launch Chrome, Firefox, Safari,
or your favorite web browser.
Enter the IP address in the
address bar then press Enter or
Go.
You should see this login screen.
Enter the default username and
password muxall then click on
Login.
If asked to save the password,
click on Yes so save time in the
future.
NOTE – Your browser may display a WARNING about an unsecure
website when you first login to the App. Just click OK or CONTINUE.
This should only happen when you first login to the controller.
32Web App - Cont
Web App
ADD TAB BUTTON pulls up the web app’s Controller Menu.
CONTROLLER MENU
GRAPH TAB – For historical
graphing.
CONFIG TAB – For network,
probes, and PATC
You must be logged-in to
access the Controller
UPDATE TAB – For performing
web app and firmware
Menu.
updates.
Click on “X” in a tab’s corner to
close it.
HELP BUTTON Gets the latest User’s Manual from the Muxall LLC
website. Requires a PDF Reader.
33>>>>>>>> Control Tab
Pellet Hopper Level
Front panel and Web App
REFILL PELLET HOPPER level can be done using the front panel or
web app.

                                          From the Control tab in the web
                                          app, scroll down to Pellet
                                          Hopper and click “Fill”.

Enter how much fuel (pellets)
was added as a percentage.
100 = Full, 50 = half full, etc.
Click OK.

                                        The green fuel gauge should
                                        reflect the amount of pellets
                                        added.

NOTE – Refilling the Pellet Hopper resets the Auger Run Minutes to 0.

Pro Tip – Pellets can also be removed and adjusted by setting the
percent fill level lower.

                                                                            35
Cook Settings
Front Panel and Web App
COOKING PROFILES 1-4 are executed automatically by the Pro BBQ
Controller in numerical order 1 --> 4 unless the “Hold” checkbox is
checked.
On the Control tab, scroll down
to Cook Settings
TARGET TEMP is the desired
target chamber (pit) temp.
COOK TIME is how long to stay
in this profile. This also includes
the ramp up/down to reach the
target temperature
HOLD prevents the controller
from moving to the next profile.
You should have one profile
with the Hold checkbox checked
when using Cook-By-Probe.
Click “Submit” when done.
NOTE – The Pro BBQ Controller defaults Profile 1 with “Hold”
checked. You must un-check the “Hold” box to use Profiles 2-4.
Pro Tip – Make sure to include enough time for changing
temperatures. For example, if your grill takes 20 minutes to reach
350F and you want to cook for 120 minutes at 350F, set the Cook
Time to 140 minutes.
36Smoke Settings
Front Panel and Web App
Smoke Control changes the amount of smoke used in the cook by
swinging the temp around the target chamber temp.
PRECISION COOK – Tries to hold the target temp as closely as
possible.
MINIMUM SMOKE – Very little swinging of the pit temp.
MEDIUM SMOKE – When Max Smoke is too much.
MAX SMOKE – Call the fire department!
Humidity, grill construction, wood flavors, and target temperature all
affect how well the controller swings the pit temp.
Insulated grills will hardly swing so Precision Cook is recommended.
From the Control tab in the web app, scroll down to Smoke Control. The
Pro BBQ Controller defaults to “Maximum Smoke”.
Select desired smokiness and then click on “Submit”.
Pro Tip - Precision Cook uses a different algorithm in PATC and may
produce more consistent smoke which could give you better temperature
accuracy and smoke than Minimum Smoke.
37Ending Control
Front Panel and Web App
These settings tell the Controller how to determine when a cook is
done and what to do afterward.
There are three ways to cook with the Muxall Pro BBQ Controller:
HOT DOG EASY – Basically, turn the grill on, set a temp and start
cooking. The grill will stay at the set temp forever until the user ends
the cook.
COOK BY TIME – Enter Target Temps and Cook Times in any or all of
the four profiles (1-4) without Hold checked in any of the four
profiles. The grill will start from Profile 1 and go to Profile 4 following
the temps and times set. When it gets to the end of Profile 4, the
cook is done.
COOK-BY-PROBE – The same as Cook-By-Time except Hold is
checked in the last profile you intend to use. When the meat
reaches the Target Probe Temp, the cook is done.
Cook By Probe
ENABLE COOK-BY-PROBE
Cook-By-Probe uses a meat probe to measure the temperature and
compare that reading to its set temperature; in this case, 145F.
From the Control tab in the web app, scroll down to Ending Control.
Cook By Probe is off by default and shows “None” for probe
number.
To enable Cook By Probe, mark the checkbox. Using the dropdown,
select which probe number you want to use for Cook By Probe.
38Cook By Probe - Cont
You can manually enter a Custom target probe temperature or
select a predefined Target Probe Temperature. The predefined
selections are: Beef, Veal Lamb, Grnd Meats, Poultry, and Pork.
These are the “Safe Minimum Cooking Temperatures” posted by the
U.S. Department of Health. See foodsafety.gov for more info. Press
Submit after changes.
GRAPHING THE MEAT PROBE – Only the selected meat
probe is graphed and Cook-By-Probe must be enabled. To
use your meat probe to monitor and graph temperature
without it shutting the grill off, you can set a Custom Target
Probe Temp to 400F or 500F.
Ending The Cook
WHAT TO DO AFTER COOK - After Cook-By-Time or Cook-By-Probe
finishes, the controller can do one of two actions:
TURN OFF WHEN DONE – is the default action and puts the grill
into Cool Down state and then turns the grill off.
SMOKE WHEN DONE – tries to drop the temp of the grill down to
150F and keeps it at that temp until you turn the grill off. It’s like a
Keep Warm mode but a little hotter. Press Submit after changes.
39Recipes
Web App
Saving Recipes can only be done using the Web App.
SAVE RECIPE - From the Control tab in the web app, scroll down to -
Recipe-. The Default recipe is used by the Pro BBQ Controller when
first turned on. You cannot save any changes to the Default recipe.
Once everything (Cooking Profiles, Smoke Control, Cook By Probe)
are set the way you want them, you can save these settings in a
recipe.
To save a recipe, type in a name in the recipe textbox and click on
Save.
NOTE – Saving a recipe does not submit your settings. You must click
on the Enter/Save button for the recipe to be used by the controller.
RATE RECIPE - If you like the way the cook turned out, you can rate
the recipe using the dropdown with the hearts. You can give your
recipes 1-5 hearts. Click “Submit” when done.
40Recipes - Cont
Web App
Retrieving and Deleting Recipes can only be done using the Web App.
From the Control tab in the web app, scroll down to “-Recipe-“. The
Default recipe is used by the Pro BBQ Controller when first turned
on. You cannot delete the Default recipe.
DELETE RECIPE - After a recipe has been saved or retrieved, the
button on the right will show Delete. Clicking on Delete will remove
the recipe that is showing. You cannot delete the Default recipe.
RETRIEVE RECIPE - Click on the
dropdown arrow and then click
on the recipe you want. The “You must click on
recipe will be loaded in the Web Enter/Save button to run
App but not submitted. You
a retrieved recipe.”
must click on “Enter/Save” to run
a retrieved recipe.
41Fan Speed Control
Web App
Variable fan speeds will be used for cooking at low temperatures.
This setting can be changed on the fly.
FAN SPEED
Auto – Default. The controller
will automatically slow the fan
down when cooking at low
temps.
10% - 100% - Manual settings.
The controller will use this
setting when cooking below
200F.
Press Submit after changing.
FAN SPEED STATUS
The Fan Speed % reports how
fast the fan is currently running.
Warning – Enable Flame-Out Detection, in the config tab, when
cooking at very low temperatures (less than 180) in hot weather.
Warning – Testing has shown that cooking at 10% fan is not
enough to keep the fire lit. Auto’s lowest fan speed is 20%.
Pro Tip – You don’t need to change the Smoke Control setting when
The
usingcontroller will run with
multiple profiles the fan at temps
high 100% during
and lowIgnite Fire and
temps.
Cooldown states.
When the fan speed is less than 100%, Auto or fixed percent setting,
the Smoke Control setting is disabled and Precision Cook is
automatically used. The smoke control setting is used when the fan
speed goes back up to 100% with higher temps.
42Manual Override Controls
Web App
Manual Overrides controls are only available in the web app and can
only be used when the grill is “Off” or “Paused”.
FAN OVERRIDE
Checking the Fan Override
checkbox turns the fan on.
Press Submit to run.
Pro Tip – Fan Override is useful for cold smoking. Manual Fan
Override will run the fan at 100% if the Fan Speed is set on “Auto”.
Otherwise, Manual Fan Override will run the fan at the selected
speed.
AUGER OVERRIDE
Checking the Auger Override
checkbox turns the auger on.
Press Submit to run.
Pro Tip – Auger Override is useful when changing pellets.
43Stats Control
Web App
Stats Control settings can only be set using the web app.
From the Control tab in the web
app, scroll down to Stats
Control. Post Stats every 7
seconds is enabled by default.
Press Submit after changes.
Warning - Disabling Post Stats will stop all updates to the Web App
from the Pro BBQ Controller.
Pro Tip – For long cooks, setting Post Rate to 20 seconds will
reduce the amount of data stored on the device you are using
to monitor the Pro BBQ Controller.
Enter/Save & Start/Stop
Front Panel and Web App
ENTER/SAVE BUTTON – Submits all the settings in the Control tab to
the controller.
START BUTTON – Starts the cook and sets the controller state to
Ignite Fire.
STOP BUTTON – Stops the cook and sets the controller state to Cool
Down.
NOTES – If the Client State or Device State is not “READY”, then
an error dialog will pop-up. Client State is the Web App and
Device State is the Muxall Pro BBQ Controller.
44>>>>>>>> Config Tab
Network Settings
Front Panel & Web App
WiFi SSID and Password can only be set from the Front Panel.
Controller Name, DHCP and static IP Addresses are only settable from
the web app.

                              From the Config tab in the web
                              app, scroll down to “Network”.

                              WIFI SSID – Veiw Only
                              WIFI PASSWORD – View Only

CONTROLLER NAME – Is
the hostname of the
controller.
ENABLE MDNS – Multicast
DNS is experimental and
uses the hostname to build
a URL to access the web app
instead of using an IP
address.                               USE DHCP – Makes the
                                       controller get an IP address
Click “Save” when done.                from your WiFi router.
                                       STATIC IP ADDRESS –
                                       Uncheck “Use DHCP” if you
                                       want to set a permanent IP
                                       Address**

**Warning – You MUST set your WiFi router to not use the permanent
(aka static) IP address or you’ll end up with duplicate IP address
conflicts.
DUPLICATE IP ADDRESSES – Two devices have the same IP address.

                                                                       46
Temperature Probes
Web App
Setting Temperature Probes can only be done using the web app. The
Muxall Pro BBQ Controller supports RTDs, Thermocouples and
Thermistors. Thermocouples are rarely used in pellet BBQ grills.
From the Config tab in the web
app, scroll down to
“Temperature Probes”.
This shows the current settings
of the Meat Probes and
Chamber Probe.
Click “Save” when done.
“Thermocouples are
rarely used in Pellet BBQ
Grills”
Pro Tip – To quickly identify if a temperature probe is an RTD or
Thermistor, use an ohm meter to measure the resistance of the
probe. RTDs range from 100 ohms to 2000 ohms where thermistors
usually range from 10K ohms to 1M ohms.
47Temperature Probes - Cont
RTD TYPES
Resistance Temperature Detectors (RTDs) are used extensively in
pellet grills. PT-1000 and PT-100 probes are the most common.
Platinum (PT) and Nickel (NI) RTD types are settable under Model.
PT-1000 – By far the most
common meat probe –Default.
PT-100 – Is also common with
better accuracy and usually 3 or
4 wires.
The number after the metal type
is the resistance of the sensor at
0 C (32 F). For example:
PT-1000 = 1000 ohms @ 32 F
Conductors are the number of
wires coming from the RTD.
2-Wire is almost always used for
chamber probes and most meat
probes.
3-Wire and 4-Wire are used for
high accuracy meat probes.
Click “Save” when done.
Note - 3-Wire meat probes will work with a 2-Wire setting but a 2-
Wire meat probe WILL NOT work with a 3-Wire setting. If your 3-
Wire meat probe is not working, try setting it to 2-Wire.
48Temperature Probes - Cont
THERMISTOR TYPES
Thermistors used with pellet grills are typically Negative Temperature
Coefficient (NTC) types and are identified by their resistance at 25
degrees Celsius.
Thermistors are widely used in
meat probes because of their
energy efficiency for use with
battery operated devices.
Thermistors meat probes are
almost always 2-Wire.
Click “Save” when done.
“Custom thermistors are
made to prevent
competitor probes from
being used.”
CAMPCHEF – Two conductor probe, does not require 2.5mm adapter.
FIREBOARD – Two conductor probe, does require 2.5mm adapter.
MAVERICK – Two conductor probe, does require 2.5mm adapter.
INKBIRD – Two conductor probe, does require 2.5mm adapter.
THERMOPRO – Two conductor probe, does require 2.5mm adapter.
Pro Tip – If you have a thermistor probe that is not listed, try going
down the list to see if it works with another manufacturer’s probe
setting.
49Temperature Probes - Cont
NUMBER OF CONDUCTORS
Determining the number of conductors a meat probe has can be tricky
because a lot of 2-Wire probes will have 3 conductor jacks.
2 CONDUCTOR PLUG
These are very common with
thermistor and RTD meat
probes and may need a 2.5mm
to 3.5mm adapter.
Click “Save” when done.
3 CONDUCTOR PLUG
These are very common with
high-end RTD meat probes.
Click “Save” when done.
A lot of 2 conductor meat probes
will have a 3 conductor plug.
4 CONDUCTOR PLUG
True Kelvin Temperature
Measurement is only achieved
using 4 conductors.
This is not common with pellet
grills.
Click “Save” when done.
NOTE – To use a 4-Wire meat probe, you must remove the jumper in
the meat probe terminal block. See Meat Probe Jumpers in this
manual.
Pro Tip – To get better accuracy using a 3-Wire meat probe, you
must remove the jumper in the meat probe terminal block. See Meat
Probe Jumpers in this manual.
50PATC
Web App
The Predictive Analytics Temperature Control (PATC) is only settable
using the web app. *Except for Slew Rate
From the
Config tab in
the web app,
scroll down to
“PATC”.
This shows the
current
settings of
PATC.
SLEW RATE
The slew rate is the change of
temperature per unit of time:
∆T/∆t. That is, the maximum
rate at which a pellet grill can
respond to an abrupt change of
input fuel.
Click “Save” when done.
Pro Tip – Grill overshoot can be controlled by limiting output slew
rate but will be problematic if faster temp convergence is desired.
51PATC - Cont
ENABLE FLAME-OUT & FLAME-ON DETECTION
From the Config tab under
PATC, Enable Flame-Out &
Flame-On Detection checkbox is
ON (unchecked) by default.
Click “Save” when done.
FLAME-OUT DETECT TIME
Flame-Out Detect Time default
is 5 minutes. The Flame-Out
Detect Time(m) is a timer that
sets how long the grill is allowed
to drop temperature (with the
auger running) before it shuts
the grill off.
Click “Save” when done.
52PATC - Cont
FLAME-ON DETECT TEMP
This value sets the rise in temp
above the Outside Temperature
during Igniter On Time. Default
is 10F.
Click “Save” when done.
Example: If the Outside temp is 80F and Flame-On Detect Temp is 20F,
then the grill must get to 100F or higher during the Igniter On Time to
pass this test.
Note – If your grill is in direct sunlight or has been previously used and is
still hot, these conditions may give a give a false positive to this test.
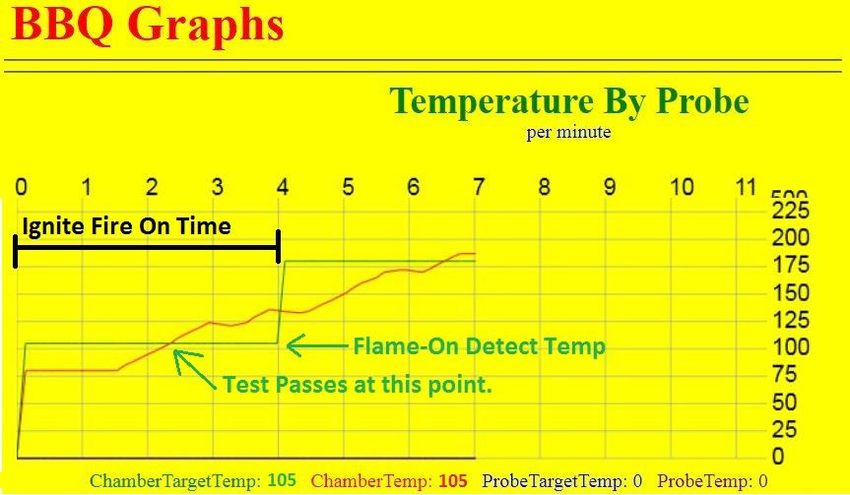
GRAPH & FLAME-ON DETECT TEMP –During Ignite Fire, the green line
(ChamberTargetTemp) shows the minimum temp the grill must get to
pass the Flame-On test. The Chamber Temp must be equal to or greater
than the Flame-On Detect Temp during the Ignite Fire state to pass the
test.
53PATC - Cont
FUEL ON MINIMUM - Is the minimum time, in seconds, that PATC will run
the auger to prevent flame-out.
Set between 3-5 seconds. Any
lower or higher can cause issues
in most grills.
Click “Save” when done.
NOTE - Setting Fuel On Minimum too low will result in flame-outs.
Setting this too high will prevent low temp cooking.
IGNITER ON TIME - Is how long, in minutes, PATC keeps the igniter
energized. During this time, the LCD and web app will display Ignite Fire
in the Status.
Set the Igniter On Time higher
for very cold temperatures.
Increase igniter life by reducing
the Igniter On Time.
Click “Save” when done.
Pro Tip – Having the igniter ½ to 1 inch into the firepot will reduce
the need to increase igniter on time.
54PATC - Cont
IGNITE FIRE AUGER DUTY CYCLE
Ignite Fire Auger Duty Cycle - Is how long PATC will run the auger per
minute when starting the grill. It’s a duty cycle to ensure the igniter has
enough fuel to ignite when starting a grill.
Examples:
Setting to 30 result in a duty
cycle of 30s ON/30s OFF or 20
for a duty cycle of 20s ON/ 40s
OFF, etc.
Click “Save” when done.
Pro Tip – Reducing Ignite Fire Auger On per Minute on grills that
have thick steel or are insulated will reduce temperature overshoot
on startup.
COOL DOWN TIME
Cool Down Time is how long, in minutes, PATC will run the fan to cool off
the grill after the cook has been finished.
How long to cool the grill
off by running the fan.
The cool down state is entered by pressing and holding the start/stop
button on the front panel, clicking “Off” in the web app, or when Cook-
By-Probe ends the cook. Click “Save” when done.
Pro Tip –Cool Down state will also cool your food off. Use “Smoke
When Done” (in Control tab) to keep your food warm after the cook.
55PATC Modes
PATC modes are used for different pellet grills in the US and abroad. Each
mode has custom settings to support the make of grill and also for
convenience so the user doesn’t have to figure out how to setup his/her
grill.
DEFAULT MODE
The Default Mode is for standard, Traeger ® like, pellet grills in the US.
MEMPHIS MODE
This is for Memphis Pellet Grills in the US
AUSSIE MODE
This is for countries that use 50Hz mains power. The name will probably
be changed in the future to just 50Hz Mode.
COOKSHACK PG MODE
This is for Cookshack Pellet Grills in the US.
MSG EXPERIMENT MODE
This is for the Muxall Smoker Grill prototype and test grills.
56Graphs
Web App
Graphing a cook is an excellent way to monitor your grill’s
performance, the doneness of the food, and head-off any potential
disasters.
Click on “Add Tab” to pull
up the Controller Menu.
Then, click on “graph” to
get the BBQ Graphs page.
NOTE - Due to the large amount of data generated to make a graph,
the Controller does not store this data in its memory. You must
keep the graph open on a device that won’t go to sleep.
57Graphs - Cont
ENABLE CHAMBER TEMP GRAPHING
The Chamber Temp is graphed during Ignite Fire, Run, and Cool Down
states. The Target Chamber Temp is only graphed during the Run
state.
Chamber Temps:
Target is green.
Actual is red.
MEAT PROBE TEMP GRAPHING
A Meat Probe is only graphed in the Run state.
GRAPHING A MEAT PROBE, the “Cook-By-Probe” box must be
checked and the probe you want to graph, selected. Setting the
Cook-By-Probe temp to 400F allows you to monitor the probe temp
without the controller shutting off the grill unless your food is 400F!
See Cook By Probe Setting from Web App for more info.
58Graphs - Cont
READING THE GRAPHS
Probably the best way to understand what the graphs are showing is
to look at a real example.
In this example, the Target Chamber Temp, green, is set to 225F.
The actual Chamber Temp, red, shows a little overshoot at 10
minutes after start up and a dip at 35 minutes when the food was put
on.
The Cook By Probe Target Temp, blue, shows the temp set to 400F to
monitor without shutting off the grill until 117 minutes into the cook
when it was changed to 145F so the Cook By Probe system could stop
the cook when the meat was done.
The Probe Temp, purple, shows the probe was being used to monitor
the grate temp where the food was going to go; it shows the grate
temp slightly under the chamber temp. Then the Food Probe was
inserted into the food at 35 minutes and then adjusted at 70 minutes.
At about 145 minutes, the Probe Temp = Probe Target Temp and the
Cook By Probe system automatically stopped the cook.
59Update
Web App
The Muxall Pro BBQ Controller supports online cloud updates.
To get to the Update Tab, click
on “Add Tab” to get the
Controller Menu then “update”.
“Software Info displays
the current software
version.”
To update, click on the
Update button with
“Latest” selected.
CAUTION – DO NOT push buttons on the front panel while the
update is in progress. Unplug all meat probes.
Note – Only select “Latest” unless otherwise instructed by Muxall LLC
support.
60FAQ
WHY DOES THE CONTROLLER OVERSHOOT ON STARTUP?
Usually, overshooting the temperature on startup is caused by too
many pellets in the burn pot. Try changing the Ignite Fire Auger DC to
20 seconds or less under PATC in the Config tab.
WHY IS THE GRILL RUNNING 10 OR MORE DEGREES ABOVE THE
SET TEMP?
This is usually caused by too high of a Fuel On Min (FOM). Try
reducing the FOM to 3 under PATC in the Config tab.
WHY IS THE TEMP SWINGING SO MUCH?
If you are running Precision Cook or Min Smoke and you are seeing
massive swings, this is usually caused by a burn pot full of ash.
If you are running Max Smoke or Min Smoke, weather is most likely
the cause. Wind, humidity and temperature all contribute to how
well or not so well a grill runs.
WHY IS THE TEMP NOT SWINGING?
If you are running Max Smoke and you are not seeing any swinging.
This is usually caused by high humidity. Humid air is slow to heat up
and slow to cool off. Don’t worry, you should still be getting good
smoke because the controller is burning the same amount of wood.
61FAQ – Cont.
WHY IS MY GRILL SHOWING “PAUSE”?
Flame Out and Flame On Detection tests the following:
1. Did Ignite Fire reach its Flame-On Detect Temp?
2. Has the auger been running without the pit temp rising for longer than
Flame-Out Detect Time?
The Flame-Out & Flame-On Detection will Pause the cook and start an
alarm if the grill fails either of the tests. There is no auto-relight.
Someone will have to fill the hopper, or fix whatever caused the test
failure, and push "Start" to resume the cook.
GRAPH & FLAME-ON DETECT TEMP –During Ignite Fire, the green line
(ChamberTargetTemp) shows the minimum temp the grill must get to
pass the Flame-On test. The Chamber Temp must be equal to or greater
than the Flame-On Detect Temp during the Ignite Fire state to pass the
test. See the section on Flame-On detection for an example graph.
62Z-Grills PATC Settings
63Max and Min Limits
The Muxall Pro BBQ Controller maximum and minimum limits.
MaxCookTemp = 500F
MinCookTemp = 120F
Smoke Mode = 150F
Max Cook Time = 995 Minutes
Max WiFi SSID Length = 31 Characters
Max WiFi Password Length = 31 Characters
Max Recipe Name Length = 10 Characters
64Contact We give you three easy ways to reach out: Visit us on the Web Call us Send us email Muxall LLC Shipping 120 E. FM 544 STE 72-208 Murphy, TX 75094 Phone (972) 212-6890 Fax (972) 212-6894 65 www.muxall.com info@muxall.com
You can also read


