PET Technical Procedures Manual
←
→
Page content transcription
If your browser does not render page correctly, please read the page content below
PET
          Technical
         Procedures
           Manual

Version 1.2.2         1
April 5, 2023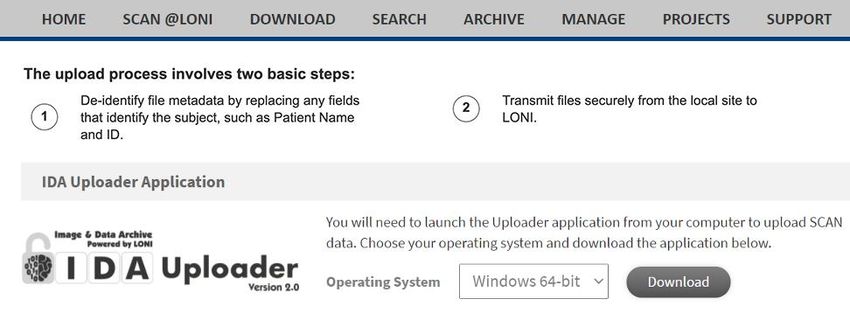
Document Version History
 Version        Date            Author                       Description
 1.12           Jan 21, 2022    Suzanne Baker                Replaced QuickStart Guide with PET checklist
 1.2            July 22, 2022   Suzanne Baker                Added GE Disc ST reconstruction sheet
 1.21           March 9, 2023   JiaQie Lee, Suzanne Baker,   Adopted consistent language for Subject ID,
                                Brittany Hale                PTID & NACCID; Updated PET Upload Form

 1.22           April 5, 2023   Trevor Chadwick              Revised FDG and PI2620 acquisition times

Version 1.2.2                                                                                      2
April 5, 2023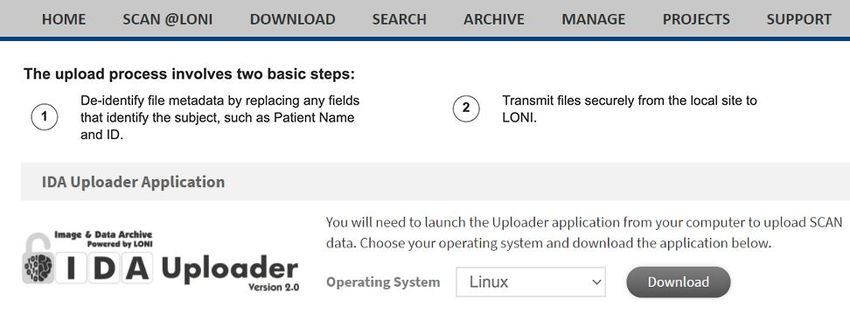
TABLE OF CONTENTS
SCAN PET Checklist ........................................................................................................ 5
General Information ......................................................................................................... 7
Contact Information ......................................................................................................... 7
Site Qualification .............................................................................................................. 7
   Hoffman Phantom Scans .............................................................................................................. 7
Regulatory ......................................................................................................................... 9
Quality Monitoring of PET scanner ................................................................................ 9
   PET-only Scanner ........................................................................................................................ 9
   PET/CT Scanner .......................................................................................................................... 9
   PET/MR Scanners ........................................................................................................................ 9
PET General Information ............................................................................................... 10
   Ambient Conditions..................................................................................................................... 10
   Naming convention ..................................................................................................................... 10
   Documentation ........................................................................................................................... 11
PET Procedures .............................................................................................................. 12
   Radiotracer Doses ...................................................................................................................... 13
   Preparing subject ........................................................................................................................ 14
   Drawing up, assaying, and injection dose ................................................................................... 14
   Subject Positioning ..................................................................................................................... 15
   Attenuation Correction ................................................................................................................ 16
   Emission Acquisition ................................................................................................................... 16
   Post PET Scan ........................................................................................................................... 17
Appendix A: PET Scanner Reconstruction Parameters............................................ 18
   GE Discovery MI - PET/CT scanners .......................................................................................... 19
   GE Discovery 600, 610, 690, 710, and MI DR - PET/CT scanners .............................................. 20
   GE Discovery 690-XT - PET/CT scanner .................................................................................... 21
   GE Discovery RX - PET/CT scanners ......................................................................................... 22
   GE Discovery STE - PET/CT scanners ....................................................................................... 23
   GE Discovery ST - PET/CT scanners ......................................................................................... 24
   GE Signa - PET/MR scanners .................................................................................................... 25
   Philips Vereos - PET/CT scanners .............................................................................................. 26
   Philips Ingenuity TF - PET/CT scanners ..................................................................................... 27
   Philips Gemini TF - PET/CT scanners......................................................................................... 28
   Siemens BioGraph Horizon - mCT TrueV PET/CT scanners .................................................... 29
   Siemens BioGraph mMR ............................................................................................................ 30
   Siemens BioGraph Vision PET/CT scanners ............................................................................. 31
   Siemens BioGraph mCT - mCT TrueV PET/CT scanners ........................................................ 32
   Siemens BioGraph HiRes – 81 slice PET/CT (Model 1080) ........................................................ 33
   Siemens BioGraph TruePoint – and TruePoint TrueV PET/CT scanners (Models 1093, 1094) .... 34
   Siemens ECAT Exact HR+ (BGO) 63-slice scanners .................................................................. 35
Appendix B: IDA Uploader Introduction and User Registration .............................. 36
Appendix C: Obtaining/Installing IDA-uploader ......................................................... 39
Appendix D: How to Upload PET Data to SCAN using IDA-uploader .................... 48

Version 1.2.2                                                                                                                             3
April 5, 2023
Appendix E: How to Upload PET Hoffman Phantom Data to SCANQUAL ............. 58
Appendix F: SCAN PET Upload Form.......................................................................... 63

Version 1.2.2                                                                                           4
April 5, 2023
SCAN PET Checklist
About this checklist: This checklist is designed to serve as a roadmap

Step1. Identify SCAN Liaison(s) Responsible for Study Oversight and
Submit Site Information
    •    Description of SCAN Liaison role:
           o Respond to queries from the SCAN team
           o Maintain list of site contacts for imaging site
           o Ensure protocol compliance
           o Submit PET contact information to SCAN via this form

Step2. Submit SCAN site information
    •    Submit Site and Contact Information team via Site Information Form noting:
           o Who will serve in the PET liaison role
           o All site contacts for imaging site (Technologists/Uploaders/PI’s)

Step3. Prepare to participate in the SCAN Study
    •    Ensure regulatory compliance and institutional approval for data sharing
    •    Get ready to collect images:
            o Qualify your PET Scanner
            o Know how to order and allocate correct PET tracers
            o Review PET upload form with imaging center staff responsible for the
                protocol
    •    Identify participants that are eligible for the study:
            o All participants must have:
                   ▪ A NACC ID (NOTE: If the participant does not have an assigned
                        NACC ID, the data upload will not be accepted)
                   ▪ Been scanned after Jan 1, 2021
                   ▪ PET data collected according to SCAN standards

Step4. Collect and upload data according to protocol
    •    Prepare for image collection:
            o Check-in with imaging center to review the following:
                   ▪ Protocol for data acquisition will be used
                   ▪ Protocol for image reconstruction will be used
    •    Technician acquires images:
            o Follow protocol for image acquisition tracer and dose
            o Ensure PET upload form is filled out during each scan
            o Reconstruct images as per scanner specifications (Appendix A)
    •    Upload images:
            o Ensure images are uploaded properly
            o Make sure you have the filled-out PET upload form
            o After images are uploaded you will transfer PET upload form via web
               interface
Version 1.2.2                                                                    5
April 5, 2023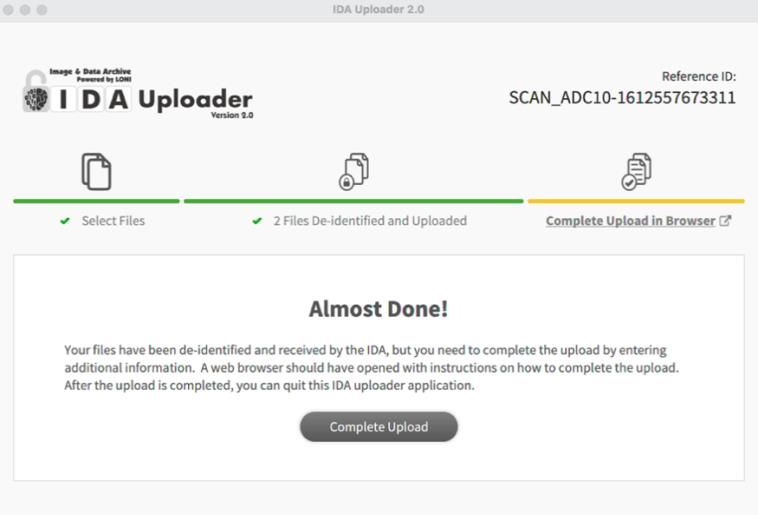
•    Troubleshooting:
            o Identify and correct any mistakes that are detected in image
               reconstruction or upload
            o Be aware of appropriate SCAN personnel available for
               questions/advice

Version 1.2.2                                                                6
April 5, 2023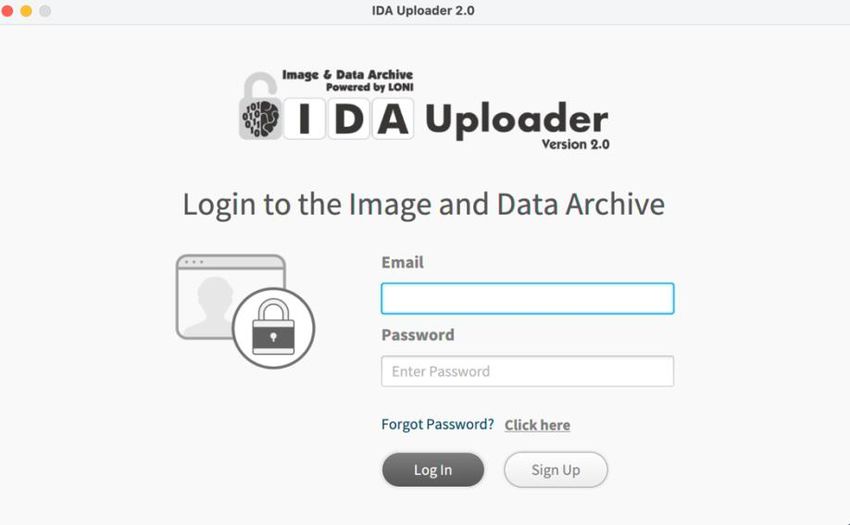
General Information
The purpose of this manual is to further explain the PET imaging component of the
SCAN protocol. Standard procedures are needed to ensure consistency of data
collection in this study. Contents include:
    • Imaging center training and setup process
    • Image acquisition guidance (required image acquisition schedule, tracer,
        administration and recommended techniques)
    • Submission of image data to the SCAN Data Portal

This manual contains information for study-site clinical staff involved with the care of
study participants during the imaging procedure and those involved with the processing
and transfer of PET imaging data.

Contact Information
Questions about Uploading SCAN data:
data.coordinator@loni.usc.edu
(For questions/concerns regarding individual subjects contact the study coordinator at
your referral site).

Technical/QC questions:
koeppe@umich.edu (Robert A. Koeppe) or slbaker@lbl.gov (Suzanne L. Baker).
For questions regarding scanner specific acquisition and reconstruction parameters.

Site Qualification
It is preferable for sites to use existing qualified TRC-PAD, ADNI, LEADS, DIAN, DIAN-
TU, Pointer, or NiAD scanners for PET imaging. If you are using a scanner that has not
been qualified for one of these projects by Bob Koeppe, it will need to be qualified
before imaging can be performed. Please contact Bob Koeppe (koeppe@umich.edu).

If you plan to acquire data for SCAN on a new PET scanner, please contact Bob
Koeppe. You will need to perform two Hoffman phantom scans and send images to Bob
Koeppe prior to scanning any subjects on the new PET scanner.

Hoffman Phantom Scans
Do you need to perform Hoffman phantom scans?
Phantom scans will be performed during the site qualification process, to set up SCAN
PET acquisition and reconstruction protocols and to validate their quality. It will also be
required after a major hardware upgrade of your PET system, to detect any potential
deviation due to the upgrade. Once the system is up and running again, please check
the potential impact of the upgrade on the acquisition parameters and communicate
Version 1.2.2                                                                            7
April 5, 2023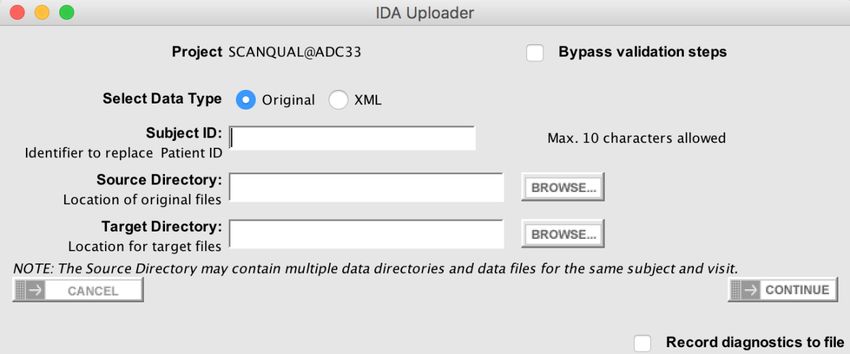
with Bob Koeppe (koeppe@umich.edu) to find out what change is considered
acceptable.

NOTE: If you are using a new scanner that is not listed in the appendix, then the
University of Michigan PET QC Team will provide you with scanner specific instructions
for your site’s PET scanner.

Instructions on Hoffman phantom scans:
1. Filling Hoffman:
Radioactivity: ~0.6 mCi F-18 at time of scan start.
Fill the phantom carefully to remove air bubbles as much as possible. Mix thoroughly.

Tips for successful filling:
   a) Take out ~50 ml from a filled phantom, BEFORE putting in the radioactivity. It
       works best to use a spinal needle to inject the radioactivity. Be careful not to
       “stab” the plastic with the tip of the needle as this often creates a “hot” spot in the
       scan.
   b) Next, fill the phantom with all but ~10 ml, and mix thoroughly.
   c) Then put in all but the last ~1 ml, and mix again.
   d) Finally, fill that last ml or so as best you can to get rid of the remaining air bubble
       and mix on last time. For mixing, it works well to put down absorbent pads and
       have two people roll the phantom back and forth for a half a minute to a minute,
       which allows less direct contact with the phantom, thus reducing personnel
       exposure. (One can even use the floor and their feet.)

2. Scanning of the Hoffman phantom:
The Hoffman phantom should be positioned in the scanner in the same manner as a
subject laying on their back. The frontal cortex should be closer to the top of the
scanner, occipital cortex to the floor.
Acquisition: The acquisition time for the Hoffman phantom scan should be four 5-min
frames, for a total of 20 min. Reconstruction: The same reconstruction parameters
should be used as the human scans.

3. Upload Hoffman phantom reconstruction files:
See Appendix B part D.

4. Phantom scan evaluation and result:
University of Michigan QC will examine the phantom data and determine if the correct
parameters have been met and assure there are no other underlying problems with the
scanning session. Your site will be notified by email if the phantom scans pass or fail,
and whether your PET system has been certified for SCAN.

Version 1.2.2                                                                              8
April 5, 2023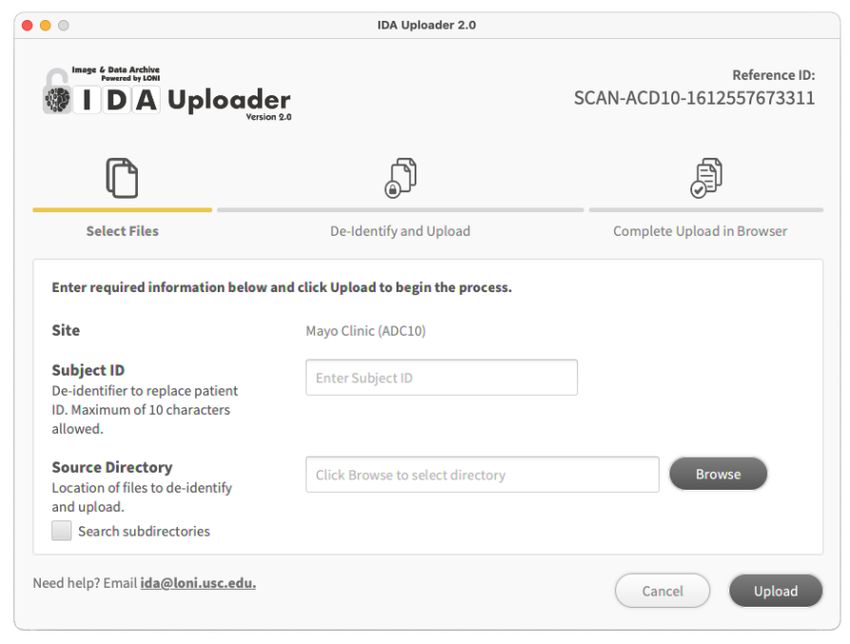
Regulatory
You must have institutional approval to share your data. Sites must be appropriately
licensed through appropriate state or federal agencies to receive and use all
radiotracers prior to imaging.

Sites must also receive both IRB approval and radiation safety committee (RSC) or
similar approval, before scanning any subjects.

Quality Monitoring of PET scanner
To ensure scanner/ancillary equipment stability and quality, each site is required to
perform ongoing quality control procedures.

PET-only Scanner
                •   The PET scanner should have an up-to-date calibration and normalization
                    on the date of each imaging session.

                •   A daily QC/blank scan should be done at the beginning of the day the
                    scanning is to be completed. This scan should be visually inspected for
                    abnormalities. If there is a possibility that the abnormality could impact the
                    quality of the PET scan the study should be rescheduled.

PET/CT Scanner
                •   The PET/CT scanner should have an up to date calibration and
                    normalization on the date of the imaging session.

                •   A daily QC check should be done at the beginning of the day the scanning
                    is to be completed. This scan should be visually inspected for
                    abnormalities. If there is a possibility that the abnormality could impact the
                    quality of the PET scan the study should be rescheduled.

                •   Daily CT should be performed as recommended by the specific vendor,
                    but typically should include a "checkup/calibration" procedure and a water
                    phantom scan. The checkup/calibration procedure guarantees optimum
                    image quality by warming up the x-ray tube and should be performed at
                    startup and within 1 hour prior to any scan. The water phantom provides
                    quality measurements of 3 parameters. The parameters are the CRT
                    value of water calculated in Hounsfield units (HU), the pixel noise of
                    images calculated as a standard deviation, and the tube voltages
                    measured directly on the x-ray tubes. These three measurements should
                    be determined for all available KVp values.

PET/MR Scanners
                •   The PET/MR scanner should have an up-to-date calibration and
                    normalization on the date of the imaging session.

Version 1.2.2                                                                                  9
April 5, 2023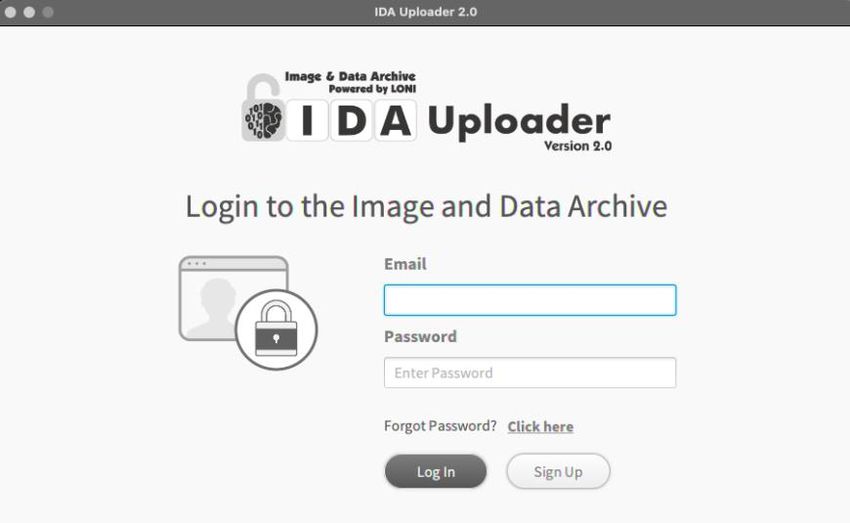
•   On the day of a scan, a daily normalization and detector setup should be
                    completed before any subject scanning is performed. This scan should be
                    visually inspected for abnormalities. If there is a possibility that the
                    abnormality could impact the quality of the PET scan the study should be
                    rescheduled.

                •   Daily MR QC should be performed as recommended by the specific
                    vendor.

Ancillary Equipment
                •   Quality control of the dose calibrator should be performed throughout the
                    course of the study. This typically will include daily constancy, quarterly
                    linearity checks and annual accuracy tests

PET General Information
Ambient Conditions

Standardization of the environment during the uptake period following tracer
administration is not essential.

Naming convention

It is VERY important that each site follow standard file identification so that all scans can
be easily identified.

When uploading data to SCAN, you will enter your PTID or Subject ID (local Subject ID)
which is a sequence of up to 10 characters. Formats vary by each center that you use
for UDS (uniform dataset) identification internally. As a rule, enter the complete ID.
However, you may leave off leading zeros if the format is all numeric digits. Also, either
upper or lower case may be used for any alphabetic characters.

         The Subject ID or PTID is different from the NACCID.
            • Subject ID or PTID - this is the ADRC-managed participant ID, or "local
               ID". Formats vary by center.
            • NACC ID - this is the NACC-managed participant ID. It is a string with the
               prefix ‘NACC’ followed by 6 digits.

         PLEASE NOTE: If the participant does not have an affiliated NACCID assigned
         to the Subject ID or PTID you entered, the upload will not be accepted.

The tracer should be included in the Series Description:

In the PET scan Series Description, include PET radiotracer used as follows:
       Amyloid_PIB                    Tau_Flortaucipir
Version 1.2.2                                                                                10
April 5, 2023
Amyloid_Florbetapir Tau_MK6240
Amyloid_Florbetaben Tau_PI2620
Amyloid_NAV Tau_GTP1
FDG
Documentation
The study coordinator must ensure the PET Technologist has a copy of all PET Upload
Form prior to each scan session, and that the PET scan information form matches the
type of study being performed (amyloid, tau, or glucose metabolism). Be sure to
complete the PET Upload form as the study is being acquired. A process should be
established for transferring this form(s) back to the study coordinator.
Version 1.2.2 11
April 5, 2023PET Procedures
Be sure to have the PET scan upload form and fill out accordingly during the procedure.
ORDERING TRACER: Radiotracers are generally ordered from radio-pharmacies by
the imaging center. Please be certain that your research participants will receive the
correct tracer at the correct dose and be aware of the delivery time because the
radioactivity will decay.
Considerations for acquisition and reconstruction:
1. Reconstruction framing: Any frames within the Acquisition start-stop time listed in
Table 1 should be reconstructed as multiple 5-minute frames.
Examples: for Florbetaben 90-110, this should be 4x5min frames; for MK6240 70-110
this should be 8x5min frames; for GTP1 this should be 6x5min frames.
2. Are longer dynamic scans (emission started at time of injection) acceptable?
As long as the dynamic scan fully includes at least one of the start-stop times listed in
Table 1 for that tracer, this is acceptable. You are encouraged to upload the
reconstruction of the full dynamic dataset as long as the framing within the tracer-
specific acquisition time is 5 minute frames. Examples: PIB 0-50min would not be
acceptable, but a PIB scan from 0-60min would be acceptable where the framing from
0-40min should adhere to your site’s reconstruction protocols and framing within 40-
60min must be 4x5min frames
3. Are longer static scans acceptable?
This is now acceptable (also preferred) for acquisition and reconstruction as long as it
includes a preferred acquisition time. Example: If you acquire Flortaucipir from 75-
115min post-injection (which is acceptable because it includes the preferred 80-100min
acquisition time), we would rather you fill out the PET meta data form with the write-in
start and stop times of 75 and 115 and upload 8x5min frames, instead of doing a
special reconstruction that is only 80-100 min as 4x5min frames.
4. There are many Acquisition start-stop times listed for a tracer, which should we
choose?
• If you have a current protocol: choose the start-stop time that adheres
to your current protocol.
• If your current protocol covers multiple start-stop time options
listed: reconstruct/upload the longest option. Examples: If you are
collecting MK6240 from 70-110min, reconstruct and upload 8x5min
frames from 70-110min as a single reconstruction, not 70-90 or 90-
110min. If you are acquiring PIB from 40-90min, we prefer you
reconstruct 40-90min as 10x5min frames and enter the start and stop time
in manually for the meta data. If you are acquiring PI2620 from 0-90min,
reconstruct and upload the full dynamic data set where 0-45min can be
Version 1.2.2 12
April 5, 2023framed as you see fit and 45-90min is 9x5min frames.
• If you do not have a current protocol, the preferred times for tracers
with multiple options are:
o PIB 50-70min
o MK6240 90-110min
Radiotracer Doses
Table 1: Radiotracer Doses, Acquisition times post-injection
Suggested Minimum Acquisition
Target Dose ± injectable dose start-stop time
10% post-injection
Tracer mCi MBq mCi MBq (min)
AMYLOID TRACERS
PIB 15 555 8 300 40-60, 50-70,
40-70
Florbetapir 10 370 6 225 50-70
Florbetaben 8 295 5 185 90-110
NAV4694 8.1 300 6.5 240 40-70, 50-70
TAU TRACERS
Flortaucipir 10 370 6 225 80-100
MK6240 5 185 4 150 70-90, 90-110,
70-110
PI2620 5 185 4 150 30-60, 45-75, 60-
90, 45-90
GTP1 7 260 5 185 60-90
GLUCOSE METABOLISM TRACER
FDG 5 185 4 150 30-45, 30-60
The above are suggested target doses +/-10%. We will accept data scanned with the
above tracers as long as the amount injected does not fall below the minimum injectable
dose and scans are acquired using the start-stop times listed under Acquisition time
post-injection. If you are acquiring data using an acquisition time not listed, please
contact Suzanne Baker (slbaker@lbl.gov).
Version 1.2.2 13
April 5, 2023Using aseptic technique and radiation shielding, draw of the radiotracer and assay with
a dose calibrator. Record the assay time to the nearest minute. Do not add saline to the
dose prior to administration. Adding saline could potentially lead to precipitation out of
solution form.
Preparing subject
• Have the subject use the restroom and empty their bladder.
• Allow them to lie comfortably in a bed or reclining chair in a room. Supply
them with blankets/pillows as needed to maximize their comfort.
• Obtain intravenous access using a small angiocath.
Drawing up, assaying, and injection dose
• Draw up sufficient tracer to achieve the target dose and assay with a dose
calibrator.
• Record the assay time to the nearest minute. Do not q.s. (add saline)
to the dose prior to administration. Adding saline could potentially lead to
precipitation out of solution form.
• Inspect the radiopharmaceutical dose solution prior to administration and
do not use it if it contains particulate matter or is discolored.
• Inject the radiotracer and follow the injection with an intravenous flush of
0.9% sterile sodium chloride. Record the injection time to the nearest
minute. The IV line can be discontinued at this time.
• Re-assay the dose syringe. If the residual activity is 0.1 mCi or greater,
record the amount and correct the amount of the injected dose for the
residual activity.
• If acquisition does not start with injection, allow the subject to rest
comfortably in the room during the incorporation period until about 10-15
min prior to the start time for the particular radiotracer.
• 10-15 minutes before scanning, have the subject use the restroom and
empty their bladder.
Version 1.2.2 14
April 5, 2023• For PET/CT scanners, the subject should be placed on the scanning table
early enough to obtain a CT scan prior to the emission scan, and still be
able to begin the emission acquisition at the appropriate start time. PET-
only systems will acquire a transmission scan following the
emission acquisition, so preparation of the subject can begin a few
minutes later than if on a PET/CT system.
Subject Positioning
Proper subject positioning is a key aspect of the successful completion of the PET
exams. It is important to take the time necessary to ensure not only that the subject is
properly positioned but also can comfortably maintain that position throughout the
duration of the scanning session. Excessive motion and in particular a difference in
the subjects’ position between the emission scan and the transmission or CT
scan used for attenuation correction is the single most common cause of failed
studies.
• Have the subject remove any bulky items from their pockets such as
billfolds, keys, etc.
• In addition, they should remove eyeglasses, earrings, and hair
clips/combs if present. If possible, they should try and remove hearing
aids also.
• Position the subject so that their head and neck are relaxed. It may be
necessary to add additional pads beneath the neck to provide sufficient
support. Use the lasers to ensure there is little or no rotation in either
plane. The head should be approximately positioned such that the PET
scanning planes are parallel to the imaginary line between the external
canthus of the eye and the external auditory meatus (orbitomeatal plane)
and the head is centered in the sagittal plane. More important exact
matching of the orbitomeatal plane is making sure the subject is
comfortable, which will hopefully translate to less subject motion during
the scan.
• Alignment marks should be put on the subject using the laser system,
which can then be subsequently used to check alignment and reposition
the subject as necessary.
• Use support devices under the back and/or legs to help decrease the
strain on these regions. This also will assist in the stabilization of motion in
the lower body.
Version 1.2.2 15
April 5, 2023• Once the subject has been positioned foam pads can be placed alongside
the head for additional support. Velcro straps and/or tape should also be
used to secure the head position. Vacuum beanbags can also be used in
this process.
• The subjects should be offered a “panic button” or be reassured that
someone is watching or able to hear them at all times.
• Proper positioning of the subject to get the entire head in the field of view
is critical to the success of the project.
Checking the subject positioning and readjusting (if possible) the position of the
subjects’ head should be done often throughout the study.
Attenuation Correction
PET/CT Scanners
• Standard CT acquisition parameters, but low effective mAs (~30 is typical)
• The subject must undergo the CT scan starting about 5 minutes prior to
starting the PET scan. Be sure to prepare the subject so that you are
ready to press “start” for the PET emission scan at the required time.
PET-only Scanners
• For dynamic PET scans (emission starts at injection), acquire the
transmission scan for attenuation correction for 5-6 minutes before the
emission scan. The subject should be repositioned “on their marks” prior
to acquiring the emission scan.
• For static PET scans, acquire the transmission scan using rod sources for
5-6 minutes after the acquisition of the standard emission scan. The
subject should be repositioned “on their marks” prior to acquiring the
transmission scan.
• Segmentation and re-projection routines will be applied for attenuation
correction.
Emission Acquisition
• Every effort should be made to make sure the acquisition time fully encompasses
Version 1.2.2 16
April 5, 2023the target start-stop time from Table 1. Scheduling scans very close in time following
a clinical study (which could run late) is not an acceptable reason for starting a scan
late. Example: If you are only acquiring Flortaucipir data from 80-100min, every
effort should be made to start the acquisition as close to 80min post-injection as
possible.
• It is crucial that the subject’s position is checked several times throughout the PET
scan. A good idea is to check the subject’s marks using the laser system at the end
of each 5 min scan frame. The subject’s position should be returned as closely as
possible to the original position just at the beginning of the next scan frame.
Post PET Scan
• Reconstruct images using parameters specific to your site’s scanner (See
Appendix A). The framing should always be multiple 5min frames within
the start-stop time window in Table 1. Otherwise, the same reconstruction
parameters should be used for all emission scans. Upon completion of the
reconstruction, review all the images to assess for artifacts.
• Archive ALL raw and processed study data including copies of the
attenuation correction-related files (transmission, CT, etc), normalization
and blank scans. It is necessary to archive and store raw and processed
data at the imaging site for the duration of the project and local guidelines
(approximately 5 years).
• Upload PET data using IDA-Uploader (Appendix B)
Version 1.2.2 17
April 5, 2023Appendix A:
PET Scanner
Reconstruction
Parameters
Version 1.2.2 18
April 5, 2023GE Discovery MI - PET/CT scanners
(Arizona, Univ of Washington, Mayo)
Acquisition Parameters:
CT scan:
Low mAs scan acquired shortly before emission. Leave enough time to start
emission acquisition promptly at start time given immediately above. Scans
should never be started early
Randoms Correction:
Singles: (not ‘real-time subtraction’ or ‘delays’)
Reconstruction Parameters:
For reconstruction framing, see Table 1:
Framing within the start-stop time in Table 1 should be multiple 5 min frames (ex,
for 30-60min start-stope time, 6x5min frames).
If dynamic data was acquired, uploading the reconstruction of the full dynamic
dataset is encouraged as long as the frames within the start-stop time are
reconstructed as multiple 5 min frames.
Reconstruction Method:
VPHD or VPFX (not VPHDS or VPFXS). Use VPHD or VPFX, which ever
your site normally uses
6 iterations; 16 subsets
Grid: 192 x 192 x (53, 71, or 89) (depending on the Disc-MI model)
FOV: 256 mm (results in voxel size of 1.333 mm)
Slice Thickness: 2.79 mm
Smoothing Filter: NONE or 0.0 (for all filter options: loop filter, post-filter and
z-axis filter)
All corrections ‘On’
Note: Reconstruction offsets should be used to assure the head is fully in the in-
plane FoV.
Version 1.2.2 19
April 5, 2023GE Discovery 600, 610, 690, 710, and MI DR - PET/CT scanners
(Wake Forest, Arizona, Oregon, Kansas, Boston)
Acquisition Parameters:
CT scan:
Low mAs scan acquired shortly before emission. Leave enough time to start
emission acquisition promptly at start time given immediately above. Scans
should never be started early
Randoms Correction:
Singles: (not ‘real-time subtraction’ or ‘delays’)
Reconstruction Parameters:
For reconstruction framing, see Table 1:
Framing within the start-stop time in Table 1 should be multiple 5 min frames (ex,
for 30-60min start-stope time, 6x5min frames).
If dynamic data was acquired, uploading the reconstruction of the full dynamic dataset
is encouraged as long as the frames within the start-stop time are reconstructed as
multiple 5 min frames.
Reconstruction Method:
VPHD or VPFX (not VPHDS or VPFXS). Use VPHD or VPFX, which ever
your site normally uses
4 iterations; 24 subsets (or as close to 24 subsets as the software
allows)
Grid: 192 x 192 x 47
FOV: 256 mm (results in voxel size of 1.333 mm)
Slice Thickness: 3.27 mm
Smoothing Filter: NONE or 0.0 (for all filter options: loop filter, post-filter and
z-axis filter)
All corrections ‘On’
Note: Reconstruction offsets should be used to assure the head is fully in the in-
plane FoV.
Version 1.2.2 20
April 5, 2023GE Discovery 690-XT - PET/CT scanner
(Mayo)
Acquisition Parameters:
CT scan:
Low mAs scan acquired shortly before emission. Leave enough time to start
emission acquisition promptly at start time given immediately above. Scans
should never be started early
Randoms Correction: Singles: (not real-time subtraction)
Reconstruction Parameters:
For reconstruction framing, see Table 1:
Framing within the start-stop time in Table 1 should be multiple 5 min frames (ex, for
30-60min start-stope time, 6x5min frames).
If dynamic data was acquired, uploading the reconstruction of the full dynamic dataset is
encouraged as long as the frames within the start-stop time are reconstructed as
multiple 5 min frames.
Reconstruction Method:
VPHD
4 iterations; 20 subsets
Grid: 192 x 192 x 79
FOV: 256 mm (results in voxel size of 1.333 mm)
Slice Thickness: 1.96 mm
Smoothing Filter: NONE or 0.0 (for all filter options: loop filter, post-filter and
z-axis filter)
All corrections ‘On’
Note: Reconstruction offsets should be used to assure the head is fully in the in-
plane FoV.
This scanner says Discovery 690 in the header, but the 79 (instead of 47) planes and
1.96mm slice thickness tells you it's the XT.
Version 1.2.2 21
April 5, 2023GE Discovery RX - PET/CT scanners
(Hopkins)
Acquisition Parameters:
CT scan:
Low mAs scan acquired shortly before emission. Leave enough time to start
emission acquisition promptly at start time given immediately above. Scans
should never be started early
Randoms Correction:
Singles: (not real-time subtraction)
Reconstruction Parameters:
For reconstruction framing, see Table 1:
Framing within the start-stop time in Table 1 should be multiple 5 min frames (ex,
for 30-60min start-stope time, 6x5min frames).
If dynamic data was acquired, uploading the reconstruction of the full dynamic
dataset is encouraged as long as the frames within the start-stop time are
reconstructed as multiple 5 min frames.
Reconstruction Method: 3D Iterative (fully 3D Iter; not 3D FORE IR):
4 iterations; 21 subsets
Grid: 128 x 128
FOV: 256 mm (results in voxel size of 2.0 mm)
Slice Thickness: 3.27 mm
Smoothing Filter: NONE or 0.0 (for all filter options: loop filter, post-filter and z-
axis filter)
All corrections ‘On’
Note: Reconstruction offsets should be used to assure the head is fully in the in-
plane FoV.
Version 1.2.2 22
April 5, 2023GE Discovery STE - PET/CT scanners
(UCSD, UCSF)
Acquisition Parameters:
CT scan:
Low mAs scan acquired shortly before emission. Leave enough time to start
emission acquisition promptly at start time given immediately above. Scans
should never be started early
Randoms Correction:
Singles: (not real-time subtraction)
Reconstruction Parameters:
For reconstruction framing, see Table 1:
Framing within the start-stop time in Table 1 should be multiple 5 min frames (ex,
for 30-60min start-stope time, 6x5min frames).
If dynamic data was acquired, uploading the reconstruction of the full dynamic
dataset is encouraged as long as the frames within the start-stop time are
reconstructed as multiple 5 min frames.
Reconstruction Method: 3D Iterative (fully 3D Iter; not 3D FORE IR):
4 iterations; 20 subsets
Grid: 128 x 128
FOV: 256 mm (results in voxel size of 2.0 mm)
Slice Thickness: 3.27 mm
Smoothing Filter: NONE or 0.0 (for all filter options: loop filter, post-filter and z-
axis filter)
All corrections ‘On’
Note: Reconstruction offsets should be used to assure the head is fully in the in-
plane FoV.
Version 1.2.2 23
April 5, 2023GE Discovery ST - PET/CT scanners
(UCI)
Acquisition Parameters:
CT scan:
Low mAs scan acquired shortly before emission. Leave enough time to start
emission acquisition promptly at start time given immediately above. Scans
should never be started early
Randoms Correction:
Singles: (not real-time subtraction)
Reconstruction Parameters:
For reconstruction framing, see Table 1:
Framing within the start-stop time in Table 1 should be multiple 5 min frames (ex,
for 30-60min start-stope time, 6x5min frames).
If dynamic data was acquired, uploading the reconstruction of the full dynamic
dataset is encouraged as long as the frames within the start-stop time are
reconstructed as multiple 5 min frames.
Reconstruction Method: Iterative if available (fully 3D Iter; not 3D FORE IR)
Only if fully iterative is not available, as in some older systems, is it ok to use 3D
FORE IR.
4 iterations; 21 subsets* (* for older software versions having only 3D FORE
IR, 24 subsets)
Grid: 128 x 128 x 47
FOV: 256 mm (results in voxel size of 2.0 mm)
Slice Thickness: 3.27 mm
Smoothing Filter: NONE or 0.0 (for all filter options: loop filter, post-filter and z-
axis filter)
All corrections ‘On’
Note: Reconstruction offsets should be used to assure the head is fully in the in-
plane FoV.
Version 1.2.2 24
April 5, 2023GE Signa - PET/MR scanners
(Alabama, Stanford)
Acquisition Parameters:
Randoms Correction:
Singles: (not real-time subtraction)
Reconstruction Parameters:
For reconstruction framing, see Table 1:
Framing within the start-stop time in Table 1 should be multiple 5 min frames (ex,
for 30-60min start-stope time, 6x5min frames).
If dynamic data was acquired, uploading the reconstruction of the full dynamic
dataset is encouraged as long as the frames within the start-stop time are
reconstructed as multiple 5 min frames.
Reconstruction Method: VPHD
4 iterations; 16 subsets
Grid: 192 x 192 x 89
FOV: 256 mm (results in voxel size of 1.333 mm)
Slice Thickness: 2.79 mm
Smoothing Filter: NONE or 0.0 (for all filter options: loop filter, post-filter and z-
axis filter)
All corrections ‘On’
Note: Reconstruction offsets should be used to assure the head is fully in the in-
plane FoV.
Version 1.2.2 25
April 5, 2023Philips Vereos - PET/CT scanners
(Vanderbilt)
Acquisition Parameters:
CT scan:
Low mAs scan acquired shortly before emission. Leave enough time to start
emission acquisition promptly at start time given immediately above. Scans
should never be started early
Reconstruction Parameters:
For reconstruction framing, see Table 1:
Framing within the start-stop time in Table 1 should be multiple 5 min frames (ex,
for 30-60min start-stope time, 6x5min frames).
If dynamic data was acquired, uploading the reconstruction of the full dynamic
dataset is encouraged as long as the frames within the start-stop time are
reconstructed as multiple 5 min frames.
Reconstruction Method: OSEM
4 iterations; 21 subsets
Grid: 256 x 256 x 164
FOV: 256 mm (results in voxel size of 1.0 mm) Slice Thickness: 1.0 mm
Smoothing: Post-Gaussian filter should be 0 or OFF (no post-filtering)
The attenuation field should indicate “CTAC-SG” and the scatter field should
indication “SS-Simul”.
Version 1.2.2 26
April 5, 2023Philips Ingenuity TF - PET/CT scanners
(Penn)
Acquisition Parameters:
CT scan:
Low mAs scan acquired shortly before emission. Leave enough time to start
emission acquisition promptly at start time given immediately above. Scans
should never be started early
Acquisition Protocol: Brain
Reconstruction Parameters:
For reconstruction framing, see Table 1:
Framing within the start-stop time in Table 1 should be multiple 5 min frames (ex,
for 30-60min start-stope time, 6x5min frames).
If dynamic data was acquired, uploading the reconstruction of the full dynamic
dataset is encouraged as long as the frames within the start-stop time are
reconstructed as multiple 5 min frames.
Reconstruction Method: Blob-OS-TF
Grid: 128 x 128 x 90
FOV: 256 mm (results in voxel size of 2.0 mm) Slice Thickness: 2.0 mm
Smoothing: Set SMOOTHING parameter to ‘SHARP’
All other parameters should be set to defaults for the “Brain” protocol. All
corrections ‘On’
For Blob-OS-TF reconstruction: The attenuation field should indicate “CTAC-
SG” and the scatter field should indication “SS-Simul”.
Version 1.2.2 27
April 5, 2023Philips Gemini TF - PET/CT scanners
(Penn, Rush, Florida:Univ of Miami, Cleveland)
Acquisition Parameters:
CT scan:
Low mAs scan acquired shortly before emission. Leave enough time to start
emission acquisition promptly at start time given immediately above. Scans
should never be started early
Acquisition Protocol: Brain Protocol
Reconstruction Parameters:
For reconstruction framing, see Table 1:
Framing within the start-stop time in Table 1 should be multiple 5 min frames (ex,
for 30-60min start-stope time, 6x5min frames).
If dynamic data was acquired, uploading the reconstruction of the full dynamic
dataset is encouraged as long as the frames within the start-stop time are
reconstructed as multiple 5 min frames.
Reconstruction Method: Iterative: LOR-Ramla
Grid: 128 x 128 x 90
FOV: 256 mm (results in voxel size of 2.0 mm)
Slice Thickness: 2.0 mm
Smoothing: Set SMOOTHING parameter to ‘SHARP’
All other parameters should be set to defaults for the “Brain” protocol. All
corrections ‘On’
For LOR-Ramla reconstruction: The attenuation field should indicate “CTAC-
SG” and the scatter field should indication “SS-Simul”.
Version 1.2.2 28
April 5, 2023Siemens BioGraph Horizon - mCT TrueV PET/CT scanners
(Wisconsin)
Acquisition Parameters:
CT scan:
Low mAs scan acquired shortly before emission. Leave enough time to start
emission acquisition promptly at start time given immediately above. Scans
should never be started early
Reconstruction Parameters:
For reconstruction framing, see Table 1:
Framing within the start-stop time in Table 1 should be multiple 5 min frames (ex,
for 30-60min start-stope time, 6x5min frames).
If dynamic data was acquired, uploading the reconstruction of the full dynamic
dataset is encouraged as long as the frames within the start-stop time are
reconstructed as multiple 5 min frames.
Method: Iterative: OSEM-3D (do NOT use TrueX reconstruction)
4 iterations; 20 subsets
Grid: 360 x 360 x 81 (or 109 for the extended FoV model)
Zoom: 2.0 (results in voxel size of ~1.018 mm)
Smoothing Filter: NONE (All-pass or ‘0.0’)
Match CT slices: ‘Off’ or ‘No’ (results in PET slice thickness of ~2.027 mm)
All corrections ‘On’
I’ve seen 1 of 4 Horizon’s that shows a slice thickness of 2.025 instead of 2.027 ??
Version 1.2.2 29
April 5, 2023Siemens BioGraph mMR
(NYU, NY:Mount Sinai, Washington University)
Reconstruction Parameters:
For reconstruction framing, see Table 1:
Framing within the start-stop time in Table 1 should be multiple 5 min frames (ex,
for 30-60min start-stope time, 6x5min frames).
If dynamic data was acquired, uploading the reconstruction of the full dynamic
dataset is encouraged as long as the frames within the start-stop time are
reconstructed as multiple 5 min frames.
Method: Iterative: OSEM-3D (do NOT use TrueX reconstruction)
4 iterations; 21 subsets
Grid: 344 x 344 x 127
Zoom: 2.0 (results in voxel size of 1.04313 mm)
Smoothing Filter: NONE (All-pass or ‘0.0’)
Match CT slices: ‘Off’ or ‘No’ (results in PET slice thickness of 2.03125
mm)
All corrections ‘On’
Note for BioGraphs: 1080, TruePoint (1093,1094), mCT, Horizon (possible mMR) To
reconstruction into a matrix >256 your site has to have purchased the high-resolution
option. Some have not, since it is actually pretty expensive.
256 is the best you can do. Resolution tends to be close to 0.5mm lower.
As you probably know, Siemens recon interpolated the sinogram projections down to
the recon grid first, which losses MUCH resolution if you go down to 128. I know
initially it was to speed up reconstruction, and then my (strong) guess is that at some
point someone realized, when lets charge more for the ability to recon into large
matrices and get the full resolution.
Version 1.2.2 30
April 5, 2023Siemens BioGraph Vision PET/CT scanners
(Indiana, Northwestern, New Mexico, UCSF, Washington University, Mayo)
Acquisition Parameters:
CT scan:
Low mAs scan acquired shortly before emission. Leave enough time to start
emission acquisition promptly at start time given immediately above. Scans
should never be started early
Reconstruction Parameters:
For reconstruction framing, see Table 1:
Framing within the start-stop time in Table 1 should be multiple 5 min frames (ex,
for 30-60min start-stope time, 6x5min frames).
If dynamic data was acquired, uploading the reconstruction of the full dynamic
dataset is encouraged as long as the frames within the start-stop time are
reconstructed as multiple 5 min frames.
Method: Iterative: OSEM-3D (do NOT use TrueX reconstruction)
8 iterations; 5 subsets with ToF (time-of-flight)
ToF must be used
Grid: 440 x 440 x 159
Zoom: 2.0 (results in voxel size of 0.825 mm)
Smoothing Filter: NONE (All-pass or ‘0.0’)
Match CT slices: ‘Off’ or ‘No’ (results in PET slice thickness of ~1.645 mm)
All corrections ‘On’
Version 1.2.2 31
April 5, 2023Siemens BioGraph mCT - mCT TrueV PET/CT scanners
(UCDavis, New Mexico, Pittsburgh, Cleveland Clinic, USC, Florida:Univ of Florida,
Columbia, Univ of Michigan, Yale)
Acquisition Parameters:
CT scan:
Low mAs scan acquired shortly before emission. Leave enough time to start
emission acquisition promptly at start time given immediately above. Scans
should never be started early
Scans and scan duration:
LIST-MODE: If your scanner has list-mode capability:
NO LIST-MODE: ONLY If your scanner does not have list-mode capability:
*** Note that reduce motion artifacts, two separate emission scans will be
acquired as closely together as possible. Do not repeat CT scan.
Reconstruction Parameters:
For reconstruction framing, see Table 1:
Framing within the start-stop time in Table 1 should be multiple 5 min frames (ex,
for 30-60min start-stope time, 6x5min frames).
If dynamic data was acquired, uploading the reconstruction of the full dynamic
dataset is encouraged as long as the frames within the start-stop time are
reconstructed as multiple 5 min frames.
Method: Iterative: OSEM-3D (do NOT use TrueX or ToF reconstruction)
4 iterations; 24 subsets
Grid: 400 x 400 x 81 (or 109 for TrueV model)
Zoom: 2.0 (results in voxel size of ~1.018 mm)
Smoothing Filter: NONE (All-pass or ‘0.0’)
Match CT slices: ‘Off’ or ‘No’ (results in PET slice thickness of ~2.027 mm)
All corrections ‘On’
Version 1.2.2 32
April 5, 2023Siemens BioGraph HiRes – 81 slice PET/CT (Model 1080)
(Florida: Mt Sinai)
Acquisition Parameters:
CT scan:
Low mAs scan acquired shortly before emission. Leave enough time to start
emission acquisition promptly at start time given immediately above. Scans
should never be started early
PET acquisition:
LIST-MODE: If your scanner has list-mode capability
NO LIST-MODE: ONLY If your scanner does not have list-mode capability
*** Note that reduce motion artifacts, two separate emission scans will be
acquired as closely together as possible. Do not repeat CT scan.
Reconstruction Parameters:
For reconstruction framing, see Table 1:
Framing within the start-stop time in Table 1 should be multiple 5 min frames (ex,
for 30-60min start-stope time, 6x5min frames).
If dynamic data was acquired, uploading the reconstruction of the full dynamic
dataset is encouraged as long as the frames within the start-stop time are
reconstructed as multiple 5 min frames.
Method: Iterative: FORE / OSEM-2D
4 iterations; 16 subsets
Grid: 336 x 336 x 81
Zoom: 2.0 (results in voxel size of ~1.01567 mm)
Smoothing Filter: NONE (All-pass or ‘0.0’)
Match CT slices: ‘Off’ or ‘No’ (results in PET slice thickness of ~2.00 mm)
All corrections ‘On’
Version 1.2.2 33
April 5, 2023Siemens BioGraph TruePoint – and TruePoint TrueV
PET/CT scanners (Models 1093, 1094)
(Univ or Michigan, Washington University)
Acquisition Parameters:
CT scan:
Low mAs scan acquired shortly before emission. Leave enough time to start
emission acquisition promptly at start time given immediately above. Scans
should never be started early
PET acquisition:
LIST-MODE: If your scanner has list-mode capability
NO LIST-MODE: ONLY If your scanner does not have list-mode capability
*** Note that reduce motion artifacts, two separate emission scans will be
acquired as closely together as possible. Do not repeat CT scan.
Reconstruction Parameters:
For reconstruction framing, see Table 1:
Framing within the start-stop time in Table 1 should be multiple 5 min frames (ex,
for 30-60min start-stope time, 6x5min frames).
If dynamic data was acquired, uploading the reconstruction of the full dynamic
dataset is encouraged as long as the frames within the start-stop time are
reconstructed as multiple 5 min frames.
Method: Iterative: OSEM-3D (do NOT use TrueX reconstruction)
4 iterations; 21 subsets
Grid: 336 x 336 x 81 (or 109 for TrueV (1094) model)
Zoom: 2.0 (results in voxel size of ~1.015 mm
Smoothing Filter: NONE (All-pass or ‘0.0’)
Match CT slices: ‘Off’ or ‘No’ (results in PET slice thickness of ~2.027 mm)
All corrections ‘On’
Version 1.2.2 34
April 5, 2023Siemens ECAT Exact HR+ (BGO) 63-slice scanners
(Pittsburgh for PIB only)
Acquisition Parameters:
Transmission scan:
Five or six min 2-D scan acquired immediately post-emission scan;
process with segmentation.
Reconstruction Parameters:
For reconstruction framing, see Table 1:
Framing within the start-stop time in Table 1 should be multiple 5 min frames (ex,
for 30-60min start-stope time, 6x5min frames).
If dynamic data was acquired, uploading the reconstruction of the full dynamic
dataset is encouraged as long as the frames within the start-stop time are
reconstructed as multiple 5 min frames.
Method: Iterative: (FORE / OSEM-2D) 4 iterations; 16 subsets
Grid: 128 x 128 x 63
Brain Mode: ON
Zoom: 2.0
Smoothing Filter: NONE (software version 7.2 says ‘All Pass (Ramp)’)
Axial filtering: NONE (software version 7.2 says ‘Off’)
All corrections ‘On’
Version 1.2.2 35
April 5, 2023Appendix B: IDA Uploader Introduction and User Registration Version 1.2.2 36 April 5, 2023
INTRODUCTION
This document provides instructions for account registration and uploading images for the SCAN project
in the Laboratory of Neuro Imaging's Image & Data Archive (IDA). For sites needing to upload site
qualification scans, instructions for uploading to the SCANQUAL project are also included. The IDA utilizes
a data de-identification process and encrypted file transmission to help ensure compliance with subject-
privacy regulations.

SYSTEM REQUIREMENTS
The IDA system requires the following:
    •    a computer with Internet access
    •    newer web browser software (IE/Edge, Firefox, Chrome, Safari)
    •    a valid user account with upload access for SCAN and/or SCANQUAL
    •    installation of the IDA Uploader application

USER REGISTRATION (Skip this step and go to Appendix C if you already have an IDA account)
    1. To register for a user account, go to the Image & Data Archive Log-In website
       (https://ida.loni.usc.edu) and select “Instant free signup” in the top right corner.

    2. Complete New account registration (3 steps).

                a. Enter your email address and select “CONTINUE”. A security code will be
                   emailed to you.

Version 1.2.2                                                                                          37
April 5, 2023
b. Enter the security code sent to your email and click “CONTINUE”.
c. Complete the New account registration form and click “REGISTER”. A link to set your
password will be emailed to you with subject line “Welcome to the LONI Image & Data
Archive”.
d. Create a password and click “CONTINUE”.
3.
Your account is created, if you need upload access to SCAN or SCANQUAL, please send an
email to the appropriate contact following the steps below:
For access to SCAN or SCANQUAL, email data.coordinator@loni.usc.edu
a. Enter “SCAN Upload Access Request” or “SCANQUAL Upload Access Request” in the
subject line of your email.
b. Provide the email address you used when creating your account, your site name and site
number in your email request.
c. You will receive an email when your account access has been set, generally within one
working day.
Version 1.2.2 38
April 5, 2023Appendix C:
Obtaining/Installing
IDA-uploader
Version 1.2.2 39
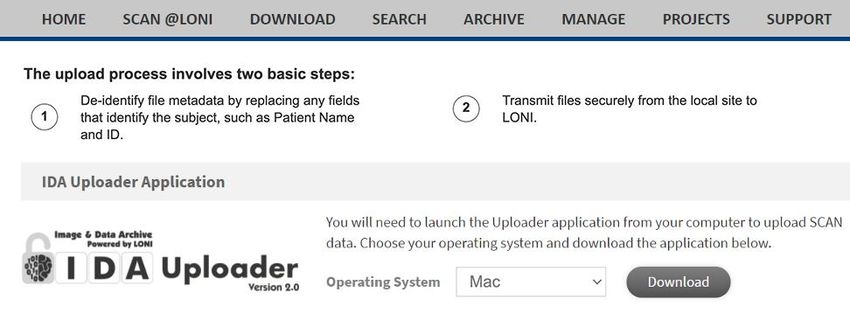
April 5, 2023OBTAINING AND INSTALLING THE IDA-UPLOADER
a. Installing the IDA-Uploader for Windows
b. Installing the IDA-Uploader for Mac
c. Installing the IDA-Uploader for Linux
a. Installing the IDA-Uploader for Windows
1. Log in to the IDA and select SCAN from the PROJECTS menu.
2. Select the ARCHIVE Menu option.
3. Select your operating system (Windows 32-bit or 64-bit) from the dropdown menu.
4. Click “Download”.
5. Open the application by clicking on the download in your browser or by locating the
IDA-Uploader-2.0.msi application in the Downloads section of your File Explorer.
Version 1.2.2 40
April 5, 20236. You will be taken to the IDA-Uploader Setup Wizard – click “Next” to continue.
7. Choose your destination folder and click “Next”.
Version 1.2.2 41
April 5, 20238. Click “Install”.
Note: If you receive a popup asking for permission to run the application, click “yes”.
9. Click “Finish” to exit the Setup Wizard.
10. Locate the application on your device by typing in “IDA-Uploader” in the Windows Start Menu.
b. Installing IDA-Uploader for Mac
Version 1.2.2 42
April 5, 20231. Log in to the IDA and select SCAN from the PROJECTS menu.
2. Click ARCHIVE from the Menu.
3. Select your operating system (Mac) from the dropdown menu.
4. Click “Download”.
5. Open your Finder application, click Downloads, right-click ‘IDA-Uploader-2.0.pkg’ and
select “Open”.
NOTE: If you try to install by double-clicking on ‘IDA-Uploader-2.0.pkg’, you may receive a
message that it cannot be opened. Please ensure that you follow the instructions above to
successfully open.
Version 1.2.2 43
April 5, 20236. An Install IDA-Uploader window will appear. Click “Continue”.
7. Next, choose a destination for the installation. Click “Continue”.
Version 1.2.2 44
April 5, 20238. For Installation Type, you can review the details of the installation. Click “Install”.
9. During the installation, you will need to enter the User Name and Password for the
computer. Click “Install Software”.
Version 1.2.2 45
April 5, 202310. Once the installation is complete, the window will provide a summary of a successful
installation. Click “Close”.
NOTE: A window will appear to ask “Do you want to move the “IDA-Uploader” installer to the
trash?”. You can choose Keep or Move to Trash.
11. Locate the application in your computer by opening your Finder application. Click on
Applications and double-click IDA-Uploader.
Version 1.2.2 46
April 5, 2023c. Installing IDA-Uploader for Linux
1. Log in to the IDA and select SCAN from the PROJECTS menu.
2. Select the ARCHIVE Menu option.
3. Select your operating system (Linux) from the dropdown menu.
4. Click “Download”.
5. Please visit https://www.oracle.com/java/technologies/javase-downloads.html to
download the latest Oracle JDK. NOTE: A minimum version of 15.0.1 is required to
run IDA-Uploader-2.0.jar
6. Choose DEB, PRM or the compressed archive depending on your Linux Distribution.
7. Once you have completed the installation, open the terminal and run: java -jar IDA-
Uploader-2.0.jar
Version 1.2.2 47
April 5, 2023Appendix D:
How to Upload
PET Data to SCAN
using IDA-uploader
Version 1.2.2 48
April 5, 2023UPLOADING (ARCHIVING) TO SCAN
1. Open the IDA-Uploader application.
2. Enter your email and password, then click “Log In”.
3. Select SCAN from the Project dropdown menu.
Version 1.2.2 49
April 5, 20234. Then, select your site from the Site dropdown menu. Click “Continue”.
5. Enter your PTID or Subject ID (local Subject ID) which is a sequence of up to 10
characters. Formats vary by each center that you use for UDS (uniform dataset)
identification internally. As a rule, enter the complete ID. However, you may leave off
leading zeros if the format is all numeric digits. Also, either upper or lower case may
be used for any alphabetic characters.
The Subject ID or PTID is different from the NACCID.
• Subject ID or PTID - this is the ADRC-managed participant ID, or "local ID". Formats vary
by center.
• NACC ID - this is the NACC-managed participant ID. It is a string with the prefix ‘NACC’
followed by 6 digits.
PLEASE NOTE: If the participant does not have an affiliated NACCID assigned to the Subject ID or
PTID you entered, the upload will not be accepted.
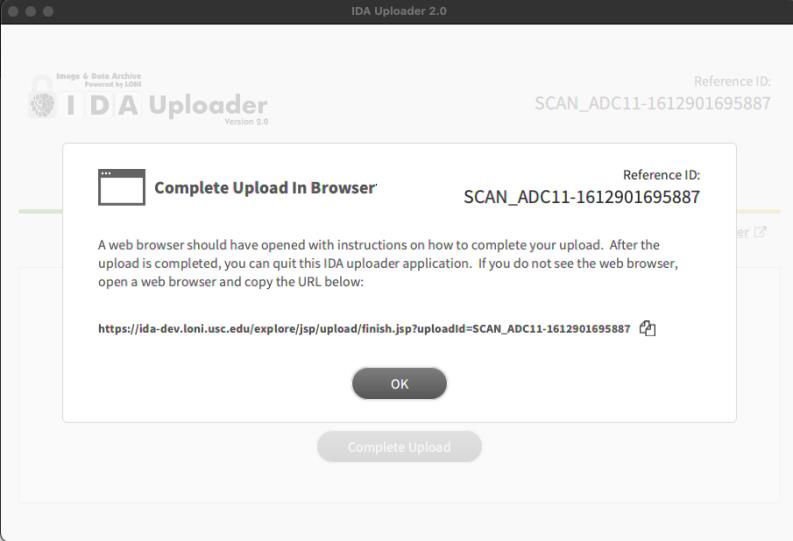
6. Click “Browse” to select the Source Directory. Then click “Upload”.
NOTE: The Source Directory is the directory containing the files to be uploaded. If your Source Directory
contains subdirectories, choose to include/exclude those files by checking “Search subdirectories”.
Version 1.2.2 50
April 5, 2023You can also read