MOVING PLATFORMS AND CHECKPOINTS: LOOPS AND BOOLEAN VARIABLES IN UNREAL ENGINE - TEACHER GUIDE
←
→
Page content transcription
If your browser does not render page correctly, please read the page content below
MOVING PLATFORMS
AND CHECKPOINTS:
LOOPS AND BOOLEAN
VARIABLES IN UNREAL ENGINE
TEACHER GUIDE
MOVING PLATFORMS AND CHECKPOINTS:
                                                                              LOOPS AND BOOLEAN VARIABLES IN UNREAL ENGINE

Activity 1
Moving Platforms and Checkpoints: Loops and Boolean Variables in Unreal Engine

Overview
Unreal Engine is an immersive 3D game Engine that powers some of the most popular video games in the world. While
some games require teams of professionals to produce a final product, you can get started with no experience. Rather
than focusing solely on basic concepts of computer programming, you’ll jump straight into building a video game. This
series of activities is designed to guide you through the process of creating a 3D video game while highlighting the
important computing concepts along the way. We hope the promise and excitement of building a video game will give
you the context and motivation to learn essential computer programming concepts.

This entire program contains five (5) Hour of Code activities that combine all the concepts and instructions you need to
complete a 3D video game that you can play and share with friends. The activities and included project files are designed
to be done in order from beginning to end or you can select any single activity to complete individually. Each activity
holds exciting new challenges and discoveries that unlock the power of game development using Unreal Engine.

About this Activity
This second activity in the 5-part Hour of Code series introduces exciting new learning opportunities. Our game
challenges the player to navigate obstacles and challenges across a perilous void to unlock the door that holds the
secrets of the future.

In the previous activity, we built a parkour challenge to bring the player to this point. In this activity, we’re going to
increase the difficulty by creating treacherous moving platforms leading to the next step. In addition to the added
difficulty, we will introduce a reward in the form of a checkpoint. When the player reaches the checkpoint they’ll respawn
at that location so they don’t have to start at the beginning.

Let’s get started with building our game and learning about valuable computer programming concepts along the way!

Getting Started
If you have not downloaded Unreal Engine and the Hour of Code Project, see the Getting Started Guide to do so.
If you have, open the project and begin!

                                                                                                                             2
MOVING PLATFORMS AND CHECKPOINTS:
                                                                                 LOOPS AND BOOLEAN VARIABLES IN UNREAL ENGINE

Programming Concepts
In this activity, you will be introduced to the concept of Loops in animation by converting a few simple floating islands
into challenging moving platforms. You will also be using Boolean Variables to add checkpoints that will reward players
for completing difficult tasks. When a player reaches a checkpoint, their starting point will be set to that location instead
of the beginning of the game. This reduces player frustration as they can continue to try this level from the checkpoint.

Preparing the Activity

If you have completed Activity 1 already, you can skip this section if you would like to build on the work you’ve
already completed.

   If you are starting here at Activity 2 or would like to have a fresh start, please follow these instructions for starting a
   new project.

   Since we are starting at Activity 2, we need to load the completed sample version of Activity 1 in order to start our
   game from the beginning. Completed samples for each level are included with the sample project. Follow these
   steps to load the level 1 content.

   The completed levels are found in the Levels panel. This can be displayed by navigating to Windows > Levels. Click
   and drag the window by the tab to dock it next to the World Outliner so we can use it later.

Fig. 001a – Move the Levels panel next to the World Outliner panel.

                                                                                                                                 3
MOVING PLATFORMS AND CHECKPOINTS:
                                                                                   LOOPS AND BOOLEAN VARIABLES IN UNREAL ENGINE

Load the completed level by navigating to the Levels panel and right-clicking on Level_01_End and choosing Change
Streaming Method > Always Loaded. This will load the example level when you play the game. You don’t want to load the
other levels, so just leave the Blueprint option checked for those.

   Teacher Note

   If a student joins the activity without completing the first activity, you can use these example levels. They also will
   allow you to break up this entire project to be taught in any order you wish, or only teach specific activities as you
   see fit. For example, if you are starting on activity 2, make sure the student toggles activity 1 to Always Loaded.

Fig. 001b - Loading the Level 1 sample if you didn’t create your own.

NOTE: Make sure Persistent Level is shown in bold text. If you double-click one of the other levels, i.e. Level_01_end,
that level becomes active. This means that when an actor is added to the Viewport it will be added to the Level_01_end
level. The other levels will still be visible, but not available for editing in the Viewport. Within these activities we will only
be adding assets to the Persistent Level. The level name that is in bold text is the active level.

                                                                                                                                     4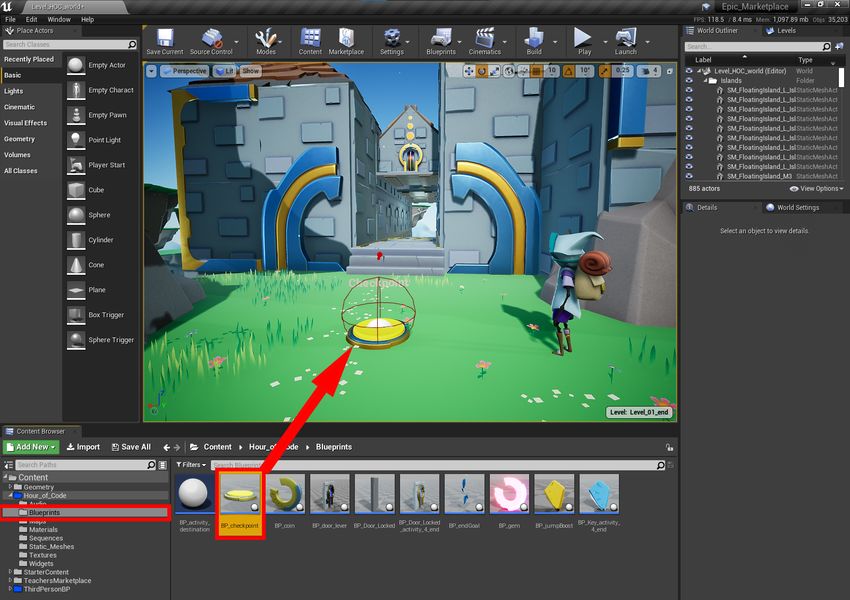
MOVING PLATFORMS AND CHECKPOINTS:
                                                                                                  LOOPS AND BOOLEAN VARIABLES IN UNREAL ENGINE

   Troubleshooting

   If an actor is added to any level other than the Persistent Level, simply select the actor, and right mouse click
   Persistent Level and choose Move Selected Actors to Level.

Fig. 001c – Moving actors to the Persistent Level if accidentally placed in the Level_## level.

Time-saving Tips

We have added a few helpful things to the project. Take a moment to review these tips.

Camera Bookmarks
Camera bookmarks are useful for quickly changing your location in the editor. To see how they work, first click anywhere
inside the Viewport, then press the number 1 or 2 at the top of your keyboard. You will notice that the camera will jump to
specific locations.

1 = beginning location of activity 1
2 = beginning location of activity 2

This will allow you to quickly move around your level without having to manually navigate from one place to another.
Buttons 1 – 7 are assigned to important bookmarks for this course, and you can assign your own camera bookmarks by
pressing the Ctrl + any number at the top of your keyboard. Try using numbers 8 – 0.
Your Turn: Set another camera bookmark somewhere in the level using Ctrl + 8. To check if it worked, you can revisit
other camera bookmarks by pressing a number between 1 and 7. Now press 8 on the keyboard and it should bring you to
the bookmark you created. Did it work?

                                                                                                                                            5
MOVING PLATFORMS AND CHECKPOINTS:
LOOPS AND BOOLEAN VARIABLES IN UNREAL ENGINE
Play From Current Location
Did you know that you can start the game from where the camera is currently located? To set this up, simply open the
drop-down menu next to the Play button and choose the Current Camera Location option. This will save you a lot of
time when playtesting your levels. Just be aware that if you start the game above a void, your player will fall into the void
and respawn.
Fig. 001d – Setting Play button to start from current camera location.
Let’s Play!
Checkpoints are used in games to reward players for completing difficult tasks. They also allow players to try a
difficult sequence over and over without having to waste time traveling to it from the beginning of the level. Let’s add a
checkpoint to reward the player for getting across the floating islands we added in Activity 1.
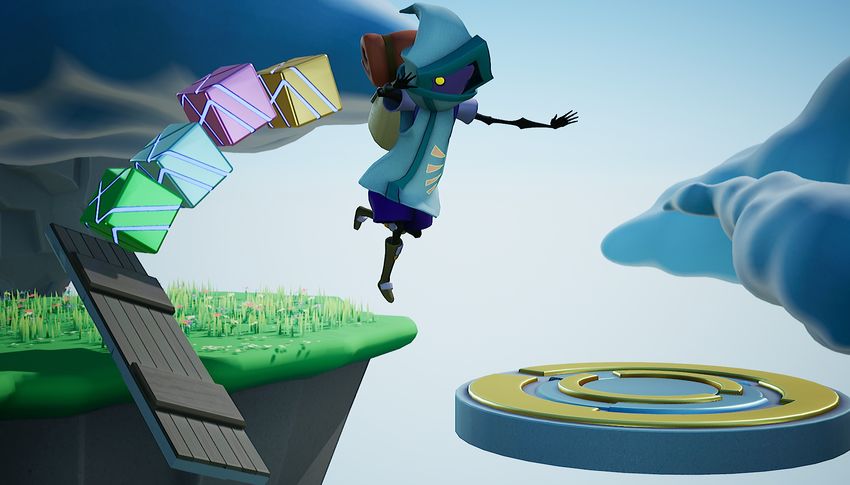
Press the number 2 to move to the beginning of level 2. In the Content Browser navigate through the Hour_of_Code
folder to the Blueprints folder and find the BP_checkpoint asset.
Drag one into your scene to the large floating island, before the second tunnel.
6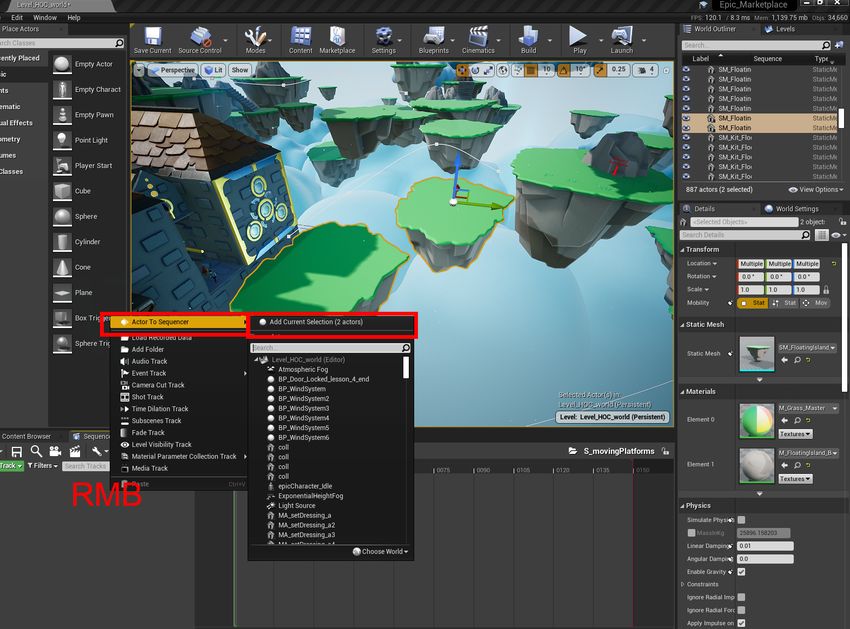
MOVING PLATFORMS AND CHECKPOINTS:
                                                                             LOOPS AND BOOLEAN VARIABLES IN UNREAL ENGINE

Fig. 002a – Placing the checkpoint

Pro-Tip: Here’s some useful tips for placing items on the ground.

•    After placing your checkpoint in the world, press the W key to enable the Move gizmo.
•    Grab the blue arrow and drag the checkpoint up above the ground.
•    Press the End key on the keyboard to snap the checkpoint down to the first ground surface it finds below the object.
•    Then press the E key to activate the Rotation gizmo and click and drag on the blue curve to rotate the checkpoint so
     the red arrow is pointed in the direction you want your character to face when they respawn.

                                                               Fig. 002c – Rotate the checkpoint to set player facing
    Fig. 002b – Checkpoint with “Rotate” gizmo
                                                               direction when respawned

                                                                                                                        7
MOVING PLATFORMS AND CHECKPOINTS:
                                                                               LOOPS AND BOOLEAN VARIABLES IN UNREAL ENGINE

Position yourself above the platform near the checkpoint you just placed. Make sure you selected the Current Camera
Location from the Play button drop-down menu. Now play the game to test the checkpoint by walking over it. It should
turn blue when it is activated. After activating the checkpoint, jump off the edge of the island. You will respawn at the
checkpoint facing the direction the red arrow is pointing.

Checkpoint accomplished! You can follow these same steps to place a checkpoint at any part of the game.

Moving Platforms
Now walk to the tunnel and ride the moving platform to the end of the tunnel. This introduces a new game mechanic,
moving platforms! In order to create moving platforms, we are going to have to learn how to create an animation
sequence in Unreal Engine. Hang on tight. We will get to that shortly! As you ride the moving platform that has been
provided, you’ll arrive at the edge of the next void we want to cross. (If you completed the previous Hour of Code activity,
you’ll have some experience with placing floating islands in your world.)

Fig. 003 – Place a path of floating islands to the next destination.

Locate the Static_Mesh folder in the Content Browser (Content > Hour_of_Code > Static_Meshes) and find the
SM_FloatingIsland_S static mesh. You’ll add a few of them to get across the void to the next section, but let’s start
by placing one in the void at the end of the tunnel. Drag the SM_FloatingIsland_S mesh into the world. With the newly
placed floating island selected, press the W key to use the Move gizmo. Click and drag the arrows to place the island in
your desired position.

                                                                                                                               8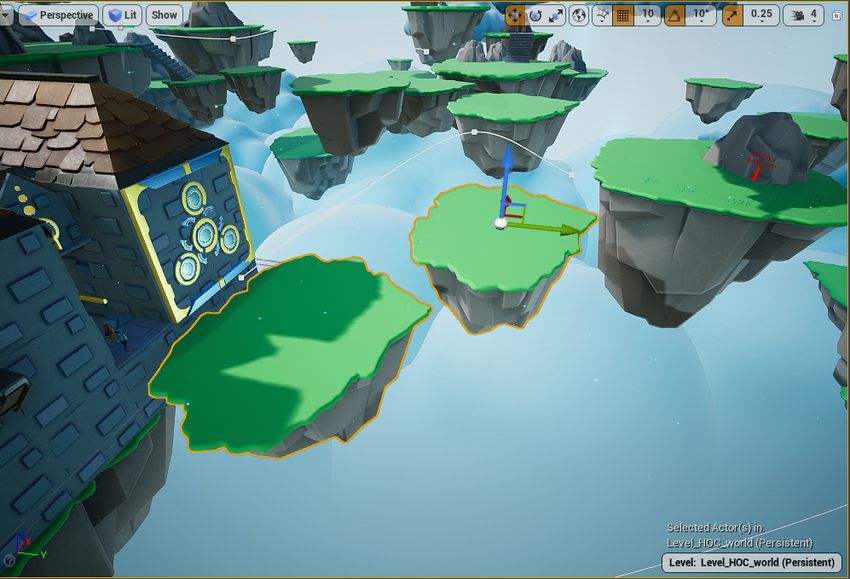
MOVING PLATFORMS AND CHECKPOINTS:
                                                                               LOOPS AND BOOLEAN VARIABLES IN UNREAL ENGINE

After placing the first island, we can save time by quickly duplicating the island to place any other islands needed to
reach the next level. To duplicate the first island, make sure it is selected with the Move gizmo.

Fig. 003a - Duplicating islands as platforms

While holding the Alt key, click and drag on the green arrow of the gizmo to duplicate the island closer to the destination.
You will need to let go of the Alt key once you have created a duplicate, then hold it again to create a new duplicate.
Repeat this as needed so that you have enough islands. (Three floating islands should be sufficient.) Once you have
enough islands in place, change their position and test your level to see if you can get across to the next large
floating island.

Since this is the second level, let’s make it a little more challenging by giving them a Looping animation, and make them
move around. We will use a feature called Sequencer to create the animations.

In the Content Browser select the Content > Hour_of_Code > Sequences folder. Click the green Add New button in the
top-left of the Content Browser and navigate to Animation, then choose Level Sequence.

                                                                                                                           9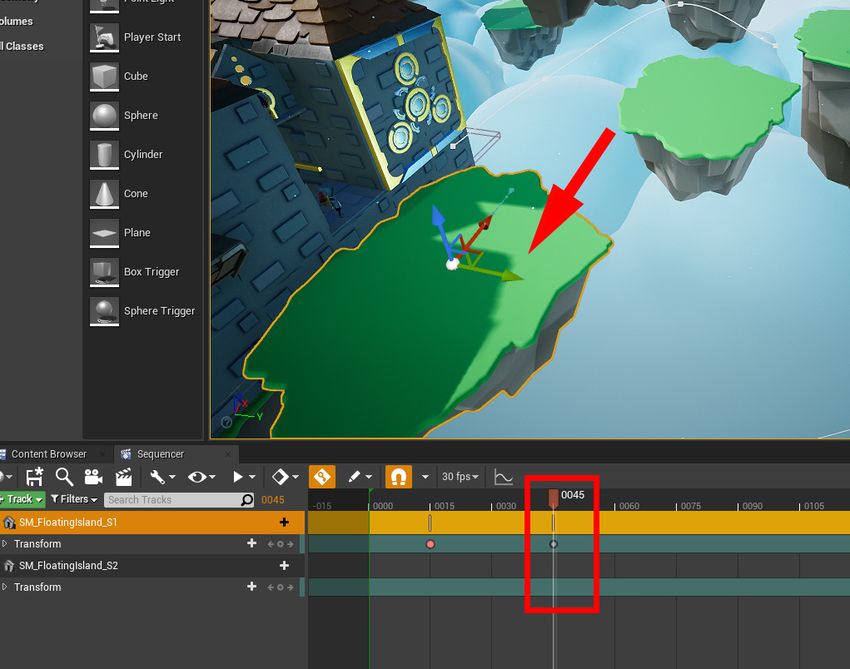
MOVING PLATFORMS AND CHECKPOINTS:
                                                                    LOOPS AND BOOLEAN VARIABLES IN UNREAL ENGINE

Fig. 004 – Selecting a Level Sequence animation.

This will create a new Level Sequence. Name it S_movingPlatforms.

Fig. 005 – Naming your Level Sequence.
                                                                                                              10
MOVING PLATFORMS AND CHECKPOINTS:
LOOPS AND BOOLEAN VARIABLES IN UNREAL ENGINE
Double click the S_movingPlatforms sequence to open Sequencer. Then drag the Sequencer tab and dock it next to the
Content Browser.
Fig. 005a – The Sequencer panel placed next to the Content Browser panel.
Let’s take a moment to talk about animation. Animation is controlled by using a timeline to manipulate two attributes:
• Time
• Keyframes
We will use keyframes to tell a floating island where it needs to be, and at what time it should be there.
There is also an order of operations to follow when creating keyframes that will help avoid issues. The order is:
1. Set the Time by moving the playhead in the sequence timeline (time)
2. Set the Location by moving the object to its target location for that time in the viewport (keyframes)
Tween, Lerp (Bleep, Blarp)
Keyframes offer a great advantage in computer animation. Since the computer can calculate the position of your
object between two keyframes, you don’t have to do the work.
If you start an animation with an object at position “0” and set the object to position “500” at 5 seconds, you would
set keyframes at 0 and 5 seconds on the timeline. The computer will automatically move the object from the
starting position to the ending position between the two keyframes.
Looping – If you are designing an animation to loop, you will want to end the animation at the same position as the
beginning. Looping an animation that starts at 0 and ends at 500 will cause a jump from 500 to 0 when it loops
back to the beginning. Building your animation with three keyframes setting the position from 0 to 500 and back to
0 will create a smooth transition upon looping.
Jargon
Tweening (or In-betweening) is a term in computer animation to describe the positions between two keyframes that
are computed automatically.
Lerp (Linear Interpolation) is used to calculate the coordinates between two points using a straight line between the
two points.
11MOVING PLATFORMS AND CHECKPOINTS:
LOOPS AND BOOLEAN VARIABLES IN UNREAL ENGINE
Let’s animate our floating islands.
First, select all your floating islands, you can hold Shift while clicking on actors to add them to your selection. (You will
see a gold outline on objects that are selected.) Then right-click in the empty gray area on left side of Sequencer,
chose Actor To Sequencer > Add Current Selection (# actors)
Fig. 005b – Selecting all floating islands and right mouse clicking to add them to the Sequencer
To make the animation process easier, click the key icon at the top of the Sequencer panel. This will toggle ON
the auto keyframe function, which will create our keyframes automatically as we move our floating islands around in
the level.
1. Next, move the Playhead to around frame 15 in the timeline, and then select the first floating island.
12MOVING PLATFORMS AND CHECKPOINTS:
LOOPS AND BOOLEAN VARIABLES IN UNREAL ENGINE
Fig. 006 – Select the first floating island and move the playhead to 0015
Remember, time first, location second.
2. To create a Keyframe click the add keyframe button of the transform section of your selected floating island.
Fig. 007 – Click the button for manually adding keyframes.
13MOVING PLATFORMS AND CHECKPOINTS:
LOOPS AND BOOLEAN VARIABLES IN UNREAL ENGINE
3. Next, let’s change the time, then change the location of the first platform.
° Set the playhead to frame 45.
° Move the floating island to another location by dragging the red Move gizmo.
° Make sure the platform will pass in front of where the player can jump onto it.
This step will move the platform from the starting position at 0015 on the timeline to the destination position set at 0045
on the timeline. The platform will move smoothly between the two points.
Fig. 008 – Setting the next keyframe position at 0045.
4. We can have the platform remain stationary by setting another keyframe, but not moving the platform.
° Move the playhead to frame 75.
° Click the add keyframe button in the transform section.
14MOVING PLATFORMS AND CHECKPOINTS:
LOOPS AND BOOLEAN VARIABLES IN UNREAL ENGINE
Fig. 009 – Using a keyframe to hold an island stationary until 0075.
5. To complete the loop, we will need to copy the original location and paste it at the end of the animation. Select the
first keyframe, right-click and choose Copy to save it to the clipboard.
Fig. 010 – Copying a keyframe.
15MOVING PLATFORMS AND CHECKPOINTS:
LOOPS AND BOOLEAN VARIABLES IN UNREAL ENGINE
6. Next, move the play head to frame 105, right-click the sequence timeline, then choose Paste > Transform.Location.
Fig. 011 – Pasting a keyframe.
If you click and drag the playhead back and forth in the timeline, you will see your floating island move. You can also
change the timing of the animation by moving the keyframes left and right in the timeline.
7. By default, the timeline has set the sequence duration to 150 frames; this can be shortened by dragging the red line
to the right. Let’s shorten the animation to 120 frames.
Fig. 012 – Change the animation length by dragging the red line. 16MOVING PLATFORMS AND CHECKPOINTS:
LOOPS AND BOOLEAN VARIABLES IN UNREAL ENGINE
8. Be sure to Save your sequence animation by clicking the save icon in the Sequencer panel, or by choosing
Save All from the File menu.
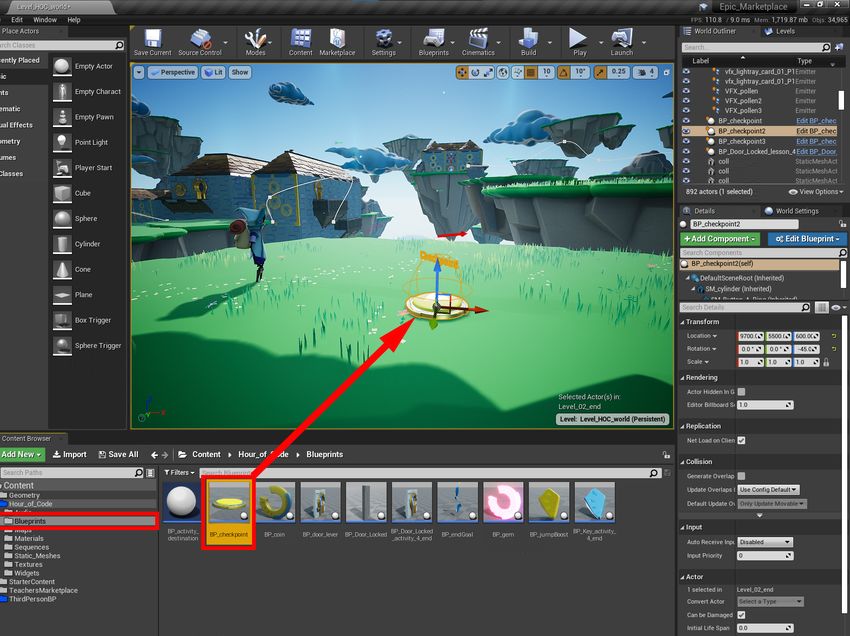
9. Now you will need to add the sequence to your level. If you don’t, the floating island won’t animate when you play
the game.
In the Content Browser drag the S_movingPlatform sequence into the level and place it near the animated
floating island.
Fig. 013 – Add the moving platform sequence to the world.
10. Now let’s set the animation to play automatically when the game starts, and also set it to Loop. By setting the
animation to Loop, the animation will repeat as soon as it completes.
° Select the S_movingPlatform actor in the level.
° In the Details panel, toggle Auto Play ON.
° Open the Loop drop-down menu and choose Loop Indefinitely.
17MOVING PLATFORMS AND CHECKPOINTS:
LOOPS AND BOOLEAN VARIABLES IN UNREAL ENGINE
Fig. 014 – Set the looping attributes of the moving platform
11. It’s time to play-test. Play your level and see how the animation you just created moves the platform around in
your level.
Troubleshooting
If your island isn’t moving or isn’t moving as expected, review the previous steps more closely to find a step you
may have missed. Seek help from your peers if you are having trouble.
18MOVING PLATFORMS AND CHECKPOINTS:
LOOPS AND BOOLEAN VARIABLES IN UNREAL ENGINE
Animate the Remaining Islands
Now that you understand how to animate objects using Sequencer, you can animate the rest of your floating islands. We
have already added the other islands to the sequence, so you will only need to keyframe them.
REMEMBER. Time first. Location second.
Give your players enough time to jump from one platform to the next, one second is usually enough, though this will
depend on the player. Getting feedback will help ensure your game is enjoyable. The default setting in Unreal is 30
frames per second. So, keep the platform stationary for at least 30 frames.
Fig. 015 – Keep your sequence to the default 30 fps (frames per second)
Pro Tip: If you set a checkpoint or a camera bookmark right where the player will start jumping across the moving
islands, you can save time as you test your parkour jumps.
Add Another Checkpoint
To complete this activity, add one more checkpoint to reward your players when they make it across all your moving
islands. Drag another BP_checkpoint to the large floating island destination and rotate it to face the next floating island.
19MOVING PLATFORMS AND CHECKPOINTS:
LOOPS AND BOOLEAN VARIABLES IN UNREAL ENGINE
Fig. 016 – Add another checkpoint at the end of the moving platforms.
Remember to Save All your work.
Teacher Note: Animation can become frustrating. Be sure to check with your students often to see how they
are doing. If it is reasonable, have them animate only one island that will take the player from the tunnel to the
large island.
If you have more advanced students, consider introducing the extension activity early. Have them create floating
islands that move in circles, remember that we are working in 3 dimensions. The islands don’t have to remain on a
2D plane, and they can move through each other too. In this scenario collisions of static meshes, such as floating
islands, won’t affect each other.
20MOVING PLATFORMS AND CHECKPOINTS:
LOOPS AND BOOLEAN VARIABLES IN UNREAL ENGINE
Take the time to get feedback on your level. Remember all good games go through playtesting to make sure players are
having fun. Think about what works well, and what parts are frustrating to other players.
• Do you need to add longer delays when jumping between islands? This could be helpful to give players a chance to
make each jump.
• Maybe add a checkpoint at the beginning of the moving islands?
Deep Dive: A Look at Coding in Unreal Engine with the Blueprint Visual
Scripting System
Unreal Engine is an incredibly powerful platform used to build games like Rocket League and Fortnite. It is also used in
moviemaking, digital product presentations, virtual reality, and many other applications. Despite having such extensive
technical features, it is possible to create content without writing code. This is made possible by a drag and drop visual
editing process known as Blueprints. These Hour of Code projects are going to introduce you to the power of Blueprints,
starting right now. We’ll start by inspecting a Blueprint in this activity, and future activities will explore modifying them for
our project.
Let’s take a minute to look under the hood of what is happening inside the BP_checkpoint actor. In the Content Browser,
double click on it to open the Blueprint Editor.
Here you can see it has been broken up into 5 different chunks of code. By looking at each section closely we can get an
understanding of what this blueprint is doing. In simple terms, this blueprint spawns the character at its location after
the character dies. But that only scratches the surface.
Fig. 017 – A Blueprint showing the drag and drop visual coding in Unreal Engine.
Section 1:
• When the player crosses the collision sphere, the blueprint activates the EventBeginOverlap node which starts
the chain of events.
21MOVING PLATFORMS AND CHECKPOINTS:
LOOPS AND BOOLEAN VARIABLES IN UNREAL ENGINE
Fig. 018 – The collision sphere attached to the checkpoint
Section 2:
• Next, the code checks to see if this checkpoint has been activated before. IF it has, the code stops and nothing else
happens.
• IF not, then it sets a variable to True. This variable is called a Boolean, Bool for short.
Section 3:
• At this stage the code changes the color of the material on the cylinder to blue.
• This is so the player knows they have already walked over this checkpoint.
• This is known as a “quality of life” feature, making it easier for players to understand what has happened in their
game at a glance.
Section 4:
• This section is making a call to the game.
• Think of it like this:
° This checkpoint is an actor on a stage, an actor in your level.
° It needs to tell the game that the character just walked through it.
° To do this, it needs to make a call, this is known as Casting in code language.
° Casting = Call = Talking to
• So, this fourth section is telling the game that the character just walked over the checkpoint, and the game is storing
that information.
• The game then will use that stored information to spawn the character back at this location.
Section 5:
• This last section plays a sound to let the player know that they have activated the checkpoint.
22MOVING PLATFORMS AND CHECKPOINTS:
LOOPS AND BOOLEAN VARIABLES IN UNREAL ENGINE
Extension Activity
If you would like to spend more time, let’s take the animation to the next level!
• Consider adding more complex animation sequences with multiple keyframes that change the speed and delays of
the platforms.
• Consider moving the platforms in 3D space; instead of just moving a platform side to side, try adding movement on
another axis.
• The goal is for the player to reach the next checkpoint.
What’s Next?
In the next activity we will add to your game development toolbox by introducing new challenges that require special
powers and introduce collectible items. These powers will allow your players to reach new locations they couldn’t before.
We’ll give them the chance to collect items, like coins, that entice the player to venture into uncharted territory.
23You can also read