Tesla Motors Model S. Owner's Manual 2013.
←
→
Page content transcription
If your browser does not render page correctly, please read the page content below

Cover.fm Page 2 Friday, July 19, 2013 1:20 PM

                                      MODEL S
                                      OWNER’S MANUAL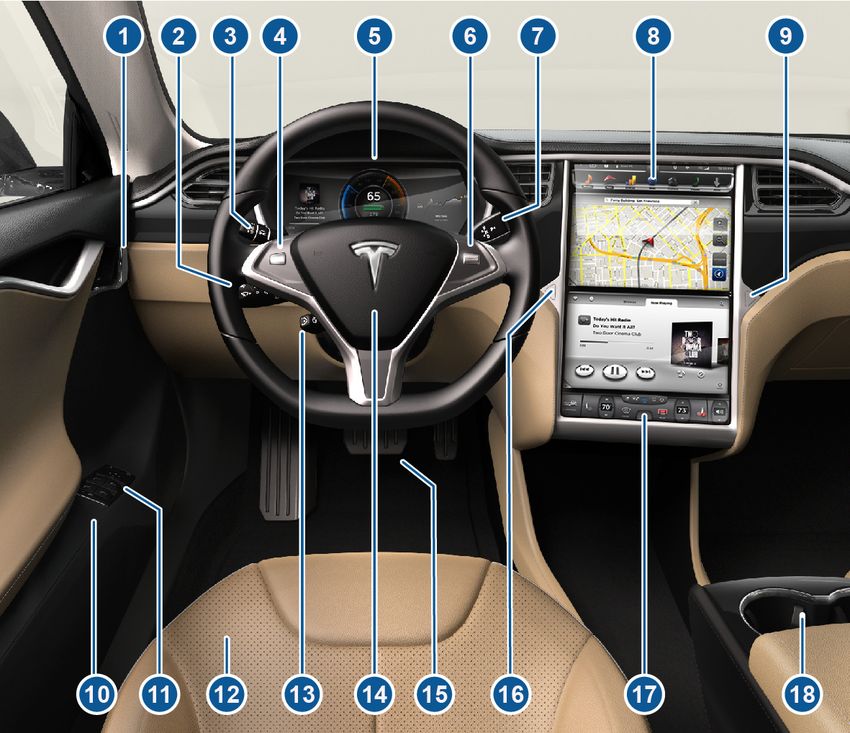
Cover.fm Page 3 Friday, July 19, 2013 1:20 PM

 DOCUMENT APPLICABILITY
 This document describes the features available at time of printing for:
 MODEL S SOFTWARE Version: 5.0
 Features released in subsequent versions of software are not described in this document. However, you can
 display information about the newest features by viewing the Release Notes on the Model S touchscreen. These
 Release Notes are displayed on the touchscreen after a software update, and can be displayed at any time by
 touching the Tesla “T” at the top center of the touchscreen, then touching the Release Notes link (see
 page 5.24). If information provided in this document conflicts with information in the Release Notes, the Release
 Notes take precedence.

 ILLUSTRATIONS
 The illustrations provided in this document are for demonstration purposes only. Depending on vehicle options,
 software version and market region, the information displayed on the touchscreen in your Model S may appear
 slightly different.

 PRODUCT SPECIFICATIONS
 All specifications and descriptions contained in this document are verified to be accurate at the time of printing.
 However, because continuous improvement is a goal at Tesla, we reserve the right to make product
 modifications at any time.

 ERROR OR OMISSIONS
 To communicate any inaccuracies or omissions in this manual, please send an email to:
 ownersmanualfeedback@teslamotors.com.

©2012-2013 TESLA MOTORS, INC. All rights reserved.
All information in this document and all MODEL S® software is subject to copyright and other intellectual property
rights of Tesla Motors, Inc. and its licensors. This material may not be modified, reproduced or copied, in whole or in
part, without the prior written permission of Tesla Motors, Inc. and its licensors. Additional information is available
upon request. The following are trademarks or registered trademarks of Tesla Motors, Inc. in the United States and
other countries:

TESLA       TESLA MOTORS          TESLA                                                               MODEL S
                                  ROADSTER

HOMELINK® and the HOMELINK® house icon are registered trademarks of Johnson Controls, Inc. Bluetooth® is a
registered trademark of Bluetooth SIG, Inc. iPhone® is a registered trademark of Apple, Inc. Android™ and
Google Maps™ are trademarks of Google, Inc. Sirius, XM and all related marks and logos are trademarks of Sirius XM
Radio Inc. Pandora is a registered trademark of Pandora Media, Inc. Spotify is a registered trademark of the Spotify
Group. All other trademarks contained in this document are the property of their respective owners and their use
herein does not imply sponsorship or endorsement of their products or services. The unauthorized use of any
trademark displayed in this document or on the vehicle is strictly prohibited.
book.book Page i Friday, July 19, 2013 12:53 PM

                                                                                       TABLE OF CONTENTS

   OVERVIEW                                                                          Maps..................................................................... 5.19
   Interior Overview............................................... 1.2              Navigation ....................................................... 5.20
   Exterior Overview ............................................. 1.3               Security Settings............................................ 5.22
                                                                                     HomeLink® Universal Transceiver............ 5.23
   OPENING AND CLOSING                                                               Software Updates.......................................... 5.24
   Doors..................................................................... 2.2    Mobile App ....................................................... 5.25
   Windows .............................................................. 2.7
   Rear Trunk........................................................... 2.8         CHARGING
   Front Trunk ....................................................... 2.10          Electric Vehicle Components...................... 6.2
   Sunroof ............................................................... 2.12      Battery Information ........................................ 6.4
   Glove Box .......................................................... 2.13         Charging Model S ............................................ 6.5
   Cup Holders...................................................... 2.14
                                                                                     MAINTENANCE
   SEATING AND SAFETY                                                                Maintenance Schedule................................... 7.2
   RESTRAINTS                                                                        Tire Care and Maintenance .......................... 7.3
   Front and Rear Seats ...................................... 3.2                   Temporary Tire Repair................................... 7.8
   Seat Belts............................................................ 3.4        Cleaning.............................................................. 7.12
   Child Safety Seats ............................................ 3.7               Wiper Blades and Washer Jets ................. 7.15
   Tesla Built In Rear Facing Child Seats..... 3.11                                  Fluid Reservoirs............................................... 7.16
   Airbags ............................................................... 3.15      Fuses.................................................................... 7.19
                                                                                     Jacking and Lifting........................................ 7.23
                                                                                     Parts and Accessories.................................. 7.24
   DRIVING
   Driver Profiles ................................................... 4.2
   Steering Wheel................................................. 4.3               SPECIFICATIONS
   Mirrors.................................................................. 4.5     Identification Labels .......................................           8.2
   Starting and Powering Off........................... 4.6                          Vehicle Loading................................................         8.3
   Gears .................................................................... 4.7    Dimensions and Weights ..............................                   8.5
   Instrument Panel.............................................. 4.8                Subsystems ........................................................     8.6
   Lights ................................................................... 4.11   Wheels and Tires..............................................          8.8
   Wipers and Washers ..................................... 4.15
   Park Assist......................................................... 4.16         ROADSIDE ASSISTANCE
   Trip Information .............................................. 4.18              About Roadside Assistance......................... 9.2
   Energy Usage................................................... 4.19              Instructions for Transporters ...................... 9.3
   Brakes ................................................................ 4.20
   Traction Control............................................. 4.22                CONSUMER INFORMATION
   Cruise Control................................................. 4.23              Disclaimers ....................................................... 10.2
   Rear View Camera ........................................ 4.24                    Reporting Concerns...................................... 10.3

   USING THE TOUCHSCREEN
   Touchscreen Overview .................................. 5.2
   Touchscreen - Controls................................. 5.4
   Touchscreen - Settings ................................. 5.6
   Climate Controls ............................................... 5.8
   Active Air Suspension ................................... 5.11
   Media and Audio............................................. 5.12
   Phone .................................................................. 5.17

   P/N: 1028871-07-A REV: 1                                                                                                                                      i
book.book Page ii Friday, July 19, 2013 12:53 PM

book.book Page 1 Friday, July 19, 2013 12:53 PM

                                                                          OVERVIEW

   Interior Overview............................................... 1.2
   Exterior Overview ............................................. 1.3

                                                                                     1.1
book.book Page 2 Friday, July 19, 2013 12:53 PM

               Interior Overview                                   Interior Overview

OVERVIEW

  1. Interior doors (page 2.4)                          9. Glove box button (page 2.13)
 2. High beams (page 4.12)                              10. Power window switches (page 2.7)
    Turn signals (page 4.14)                            11. Exterior mirror adjustment switches
    Wipers and washers (page 4.15)                          (page 4.5)
 3. Cruise control (page 4.23)                          12. Seats (page 3.2)
 4. Steering wheel buttons - left (page 4.3)            13. Steering column adjuster (page 4.3)
 5. Instrument panel (page 4.8)                         14. Horn (page 4.4)
 6. Steering wheel buttons - right (page 4.4)           15. Brakes (page 4.20)
  7. Gear selector (page 4.7)                           16. Hazard warning lights (page 4.14)
 8. Touchscreen (page 5.2)                              17. Cabin climate control (page 5.8)
           NOTE: Touch Controls in the bottom left      18. Cup holders (page 2.11)
           corner of the touchscreen to control
           Model S features such as doors, locks, and
           lights.

1.2                                                                      MODEL S OWNERS MANUAL
book.book Page 3 Friday, July 19, 2013 12:53 PM

                                                     Exterior Overview

   Exterior Overview

      1. Exterior lights (page 4.11)              6. Front trunk (page 2.10)
     2. Door handles (page 2.4)                   7. Wheels and tires (page 8.8)
     3. Sunroof (page 2.12)                       8. Rear view camera (page 4.24)
    4. Charge port (page 6.5)                     9. Rear trunk/liftgate (page 2.8)
     5. Exterior mirrors (page 4.5)               10. Parking sensors - optional (page 4.16)

   OVERVIEW                                                                                    1.3
book.book Page 4 Friday, July 19, 2013 12:53 PM

book.book Page 1 Friday, July 19, 2013 12:53 PM

                                                                      OPENING AND CLOSING

   Doors
   Keyless Locking and Unlocking .................. 2.2
   Using the Key..................................................... 2.2
   Using Exterior Door Handles ...................... 2.4
   Using Interior Door Handles........................ 2.4
   Interior Locking and Unlocking.................. 2.4
   Child-protection Locks................................... 2.5
   Drive-away Locking......................................... 2.5
   Walk-away Locking ......................................... 2.5
   Unlocking with a Dead Key Battery .......... 2.5
   Opening Interior Doors with No Power ... 2.6

   Windows
   Opening from the Exterior ........................... 2.7
   Opening and Closing from the Interior.... 2.7
   Locking Rear Windows .................................. 2.7

   Rear Trunk
   Opening................................................................ 2.8
   Closing .................................................................. 2.8
   Adjusting the Opening Height .................... 2.8
   Interior Release ................................................. 2.9
   Opening with No Power ................................ 2.9

   Front Trunk
   Opening.............................................................. 2.10
   Closing ................................................................ 2.10
   Interior Emergency Release ........................ 2.11
   Opening with No Power ............................... 2.11

   Sunroof
   Opening and Closing .................................... 2.12

   Glove Box
   Opening and Closing .................................... 2.13

   Cup Holders
   Opening and Closing .................................... 2.14

                                                                                            2.1
book.book Page 2 Friday, July 19, 2013 12:53 PM

                      Doors                                                                Doors

Keyless Locking and Unlocking                         Using the Key
OPENING AND CLOSING
Doors

Model S has sensors that can recognize the            To quickly familiarize yourself with the key,
presence of a key. The sensors are located at         think of the key as a miniature version of
each end of the dash panel and behind the rear        Model S, with the Tesla badge representing the
bumper, and have a range of approximately             front. The key has three buttons that feel like
three feet (one meter).                               softer areas on the surface.

                                                       1. Trunk

                                                         • Double-click to open the rear trunk.
If Model S is equipped with the optional tech
package, walking up to Model S when you have             • If Model S is equipped with a powered
your key with you automatically unlocks the                liftgate, double-click to close the rear
doors. Similarly, open the trunk by just walking           trunk. You can also single-click to stop
up to Model S with your key with you and press             the liftgate when it is moving.
the switch located under the trunk’s exterior         2. Lock/Unlock All
handle.
                                                         • Double-click to unlock doors and the rear
Press a door handle, and it extends. Or, if the            trunk. Hazard warning lights flash twice
AUTO-PRESENT HANDLES setting is turned on                  and door handles extend.
(see page 2.4), door handles extend
                                                         • Single-click to lock doors and trunks (all
automatically when Model S unlocks.
                                                           doors and trunks must be closed). Hazard
If you turn on the walk-away locking setting               warning lights flash once and door
using the touchscreen, Model S locks when you              handles retract.
walk away carrying your key with you (see                • Press and hold to lower all windows.
page 2.5).
                                                      3. Front trunk (also called the “frunk”)
                                                         • Double-click to open the front trunk.
                                                      You do not need to point the key at Model S,
                                                      but you must be within operating range (which
                                                      varies depending on the strength of the key’s
                                                      battery). If Model S is unable to detect the key,
                                                      the touchscreen displays a message indicating
                                                      that a key is not inside. Place the key where
                                                      Model S can best detect it, which is below the
                                                      12V power socket (see page 4.6).
                                                      Radio equipment on a similar frequency can
                                                      affect the key. If this happens, move the key at
                                                      least 30 cm away from other electronic devices
                                                      (phone, laptop, etc).

2.2                                                                     MODEL S OWNERS MANUAL
book.book Page 3 Friday, July 19, 2013 12:53 PM
Doors
If the key does not work, you may need to 4. Insert the new battery (type CR2032) with
change its battery. if the key’s battery is the ‘+’ side facing up. Avoid touching the
discharged, you can open Model S by following flat surfaces of the battery, and wipe the
the unlocking procedure described on battery clean before fitting. Finger marks
page 2.5. can reduce battery life.
CAUTION: Remember to bring the key 5. Align the battery, then press the key and
with you when you drive. Although you battery together until they snap into place.
can drive Model S away from its key, you Used batteries contain harmful
will be unable to power it back on after it substances. Seek advice on disposal from
powers off. Tesla or your local authority.
CAUTION: Protect the key from impact,
water damage and high temperatures. Getting More Keys
Avoid contact with solvents, waxes and If you lose a key or require an additional one,
abrasive cleaners. contact Tesla. Model S can recognize up to
three keys.
Replacing the Key Battery
When ordering a new key for Model S, take all
The key’s battery lasts for approximately a year. available keys with you for reprogramming.
When the battery is low, a message displays on
the instrument panel. Follow these steps to
replace it:
1. Place the key, button side down, on a soft
surface.
2. Release the battery cover using a small flat
bladed tool.
3. Remove the battery by pushing it toward
the center of the key to release it from the
front retaining clips.
OPENING AND CLOSING 2.3opening & closing.fm Page 4 Friday, July 26, 2013 2:01 PM
Doors Doors
Using Exterior Door Handles Using Interior Door Handles
A light press on a door handle extends it, Pull the interior door handle toward you to
provided Model S detects a valid key nearby. open the door.
If Model S is equipped with the optional tech
package, you can set the door handles to
extend automatically whenever you approach
the driver’s side carrying the key. On the
touchscreen, touch Controls > Settings >
Auto-Present Handles > On.
NOTE: To prevent children from opening rear
Insert your hand into the handle and pull to doors using the interior handles, use the
open the door. touchscreen (Controls > Settings > Child
Door handles retract if you do not use them Protection Locks) to turn on the
within one minute after they extend. Just press child-protection locks (see page 2.5).
a handle to extend it again. Door handles also
retract a minute after the last door closes, when Interior Locking and Unlocking
Model S begins moving, and when you lock
Model S. From inside Model S, you can use the
touchscreen to lock or unlock doors and trunks,
NOTE: To preserve battery life, Model is provided a valid key is inside the vehicle. Touch
designed to temporarily disable the Controls > Lock/Unlock. The current lock
Auto-Present Handles feature when: status displays on the bottom left of the
• The key has been out of range for more instrument panel.
than 24 hours.
NOTE: If a door or trunk is still open when you
• The key remains within range for five lock Model S, it locks when you close it.
minutes after all doors have been closed.
In these cases, extend the handles by touching
the driver’s door handle or pressing the unlock
button on the key. There is no need to reset the
setting. The next time you approach Model S,
provided the above conditions do not apply,
handles automatically extend.
Whenever a door is open, the Door
Open indicator displays on the
instrument panel. The image of the
Model S on the touchscreen Controls window
also shows which door or trunk is open.
2.4 MODEL S OWNERS MANUALbook.book Page 5 Friday, July 19, 2013 12:53 PM
Doors
Child-protection Locks Unlocking with a Dead Key Battery
Model S has child-protection locks on the rear If Model S does not unlock when you walk up to
doors and liftgate to prevent them from being it, or when you press the unlock button on your
opened using interior handles. Use the key, the key’s battery may be dead. If this is the
touchscreen to turn child protection locks on or case, you can still unlock and drive Model S.
off. Touch Controls > Settings > Child To unlock Model S (and disable the security
Protection Locks. alarm), position the key near the base of the
NOTE: It is recommended that you turn passenger side windshield wiper, as shown.
child-protection locks on whenever children are
seated in the rear seats.
Drive-away Locking
Model S can automatically lock all doors
(including the trunks) whenever your driving
speed exceeds 8 km/h. To turn this feature on
or off, touch Controls > Settings > Drive-Away
Door Lock.
Walk-away Locking To drive Model S, place the key against the
center console, immediately below the 12V
If Model S is equipped with the optional tech power outlet, then press the brake pedal to turn
package, Model S doors and trunks can Model S on.
automatically lock whenever you walk away
carrying the key. For instructions on how to replace the key’s
battery, see page 2.3.
To turn this feature on or off, touch Controls >
Settings > Walk-Away Door Lock. NOTE: Unlocking Model S using this method
disables walk-away locking. You must manually
NOTE: If all doors are closed and you re-enable walk-away locking after replacing the
double-click the key to unlock Model S, key’s battery.
walk-away locking is temporarily suspended
until the next time you use the key to lock
Model S. This allows you to keep Model S
unlocked in your garage.
OPENING AND CLOSING 2.5book.book Page 6 Friday, July 19, 2013 12:53 PM
Doors Doors
Opening Interior Doors with No
Power
If Model S has no electrical power, front doors
open as usual using the interior door handles.
To open the rear doors, fold back the edge of
the carpet below the rear seats to expose the
mechanical release cable. Pull the mechanical
release cable toward the center.
2.6 MODEL S OWNERS MANUALbook.book Page 7 Friday, July 19, 2013 12:53 PM
Windows
Opening from the Exterior
Windows
to be fully operational and can cause
hazardous, unauthorized or unintentional use
To open windows from outside Model S, press
of Model S.
and hold the unlock button on the key.
Locking Rear Windows
To prevent passengers from using the rear
window switches, press the rear window lock
switch. The switch light turns on. To unlock rear
windows, press the switch again.
Opening and Closing from the
Interior
Press down on a switch to lower the associated
window all the way down. Window switches
operate at two levels. To lower a window
partially, hold the switch and release when the
window is at the desired position.
WARNING: To ensure safety, it is
recommended that you lock the rear
windows whenever children are seated in the
rear seats.
WARNING: Never leave children
unattended in Model S.
Similarly, pull a switch to raise the associated
window. This also operates at two levels—when
raising, hold the switch and release when the
window is at the desired position.
WARNING: Before closing a power
window, it is the driver’s responsibility to
ensure that all occupants, especially children,
do not have any body parts extended through
the window’s opening. Failure to do so can
cause serious injury.
WARNING: When leaving Model S, always
take your key with you. Leaving the key in
Model S allows all doors, windows, and controls
OPENING AND CLOSING 2.7book.book Page 8 Friday, July 19, 2013 12:53 PM
Rear Trunk Rear Trunk
Opening Closing
Rear Trunk
To open the rear trunk, do one of the following: To close the trunk, pull down on the liftgate and
• Touch Controls > Trunk on the touchscreen. push firmly, ensuring it is fully closed.
• Double-click the Trunk button on the key. If Model S is equipped with the optional tech
package, you can close the powered liftgate by:
• Press the switch located under the exterior
handle (if not equipped with the optional • Double-clicking the trunk button on the key.
tech package, you must first unlock • Touching Controls > Trunk on the
Model S). touchscreen.
• Pressing the switch located on the
underside of the liftgate (see page 2.8).
If a powered liftgate senses an obstruction
when closing, it automatically opens and
sounds two chimes. Remove the obstruction
and try closing it again. If it cannot close the
second time, powered operation is temporarily
disabled. Manually closing it restores powered
operation.
NOTE: The power closing feature is also
temporarily disabled if you leave the powered
liftgate open for more than an hour.
Adjusting the Opening Height
If Model S is equipped with a powered liftgate,
you can adjust its opening height to make it
easier to reach:
When the liftgate is open, the 1. Open the liftgate, then lower it to the
instrument panel displays the Door desired opening height.
Open indicator light. The image of the
Model S on the touchscreen Controls window
also displays the open trunk.
To stop a powered liftgate while it is moving,
single-click the Trunk button on the key. Then,
when you double-click the Trunk button, it
moves again, but in the opposite direction
(provided it was not almost entirely open or
closed when you stopped it). For example, if
you single-click to stop the liftgate while it is
opening, when you double-click, it closes.
To open the trunk in the unlikely situation in
which Model S has no electrical power, see
page 2.9.
2. Press and hold the button on the underside
of the liftgate for 2 seconds until you hear a
confirmation beep.
3. Confirm that you have set it to the desired
height by closing the liftgate, then
reopening it.
2.8 MODEL S OWNERS MANUALbook.book Page 9 Friday, July 19, 2013 12:53 PM
Rear Trunk
Interior Release Opening with No Power
To open the trunk from inside Model S, press If Model S has no electrical power, you can
the interior release switch and push the liftgate open the rear trunk from inside. Use the
up. mechanical release cable located on the
underside of the liftgate, next to the interior
light.
1. Remove the cover by pulling its lower edge
very firmly toward you.
If Model S is equipped with the optional tech 2. Pull the cable to release the latch.
package, you do not need to push it up. When 3. Push the liftgate open.
you press the release switch, it opens, and
when you pull the switch, it closes.
NOTE: The interior release switch is disabled if
the child-protection locks are turned on (see
page 2.5), or if Model S is moving.
OPENING AND CLOSING 2.9book.book Page 10 Friday, July 19, 2013 12:53 PM
Front Trunk Front Trunk
Opening Closing
Front Trunk
To open the front trunk: Lower the hood, then place both hands on the
• Touch Controls > Front Trunk on the front of the hood as shown. Press down firmly
touchscreen, or double-click the front trunk with both hands to engage the latches. Lift the
button on the key. front edge of the hood to ensure it is fully
closed.
• Pull the hood up.
WARNING: Slamming or dropping the
hood can cause damage, and does not
ensure that it is properly closed.
WARNING: Do not drive with the hood
secured by the secondary catch alone.
The door open indicator displays on the
instrument panel when the front trunk
is open. The image of the Model S on
the touchscreen Controls window also displays
the open trunk.
To open the front trunk in the unlikely situations
where Model S has no electrical power, see
page 2.11.
2.10 MODEL S OWNERS MANUALbook.book Page 11 Friday, July 19, 2013 12:53 PM
Front Trunk
Interior Emergency Release Opening with No Power
An interior release button inside the front trunk If Model S has no electrical power, or if you are
allows a person locked inside to get out. This unable to open the front trunk using the
release button is active whenever Model S is touchscreen or key, pull the mechanical release
stationary. lever located below the glove box. This releases
the primary catch.
Press the interior release button to open the
front trunk, then push up on the hood.
NOTE: The button glows for several hours after
a brief exposure to ambient light.
Then push down on the secondary catch lever
and lift the hood. You may need to push the
hood down slightly to release the pressure
against the secondary catch.
OPENING AND CLOSING 2.11book.book Page 12 Friday, July 19, 2013 12:53 PM
Sunroof Sunroof
Opening and Closing WARNING: Do not allow occupants to
Sunroof
extend any part of their body through the
If your Model S is equipped with a sunroof,
sunroof. Doing so can cause serious
touch Controls > Sunroof on the touchscreen
injury from flying debris, tree branches, or other
to operate it. Drag, or tap on, the sunroof slider
obstructions.
bar, or touch the image of the sunroof and drag
it. The sunroof moves to the selected position. WARNING: Before closing the sunroof,
ensure that occupants, especially
children, do not have any body part
extended through the sunroof opening. Failure
to do so can cause serious injury.
CAUTION: Remove snow and ice before
opening the sunroof. Opening a sunroof
covered in snow and ice can cause
damage.
CAUTION: Do not carry objects in
Model S that protrude through the
sunroof. Doing so can damage the
sunroof’s seals and anti-trap mechanism.
Touch OPEN once to open the sunroof to its
comfort position (80% open to minimize wind
noise). Or, move the sunroof to the comfort
position by dragging the slider bar to the
indent position. If you find wind noise (which
varies depending on driving speed) excessive,
even with the sunroof in the comfort position,
open a window slightly.
Touch OPEN twice to open the sunroof fully.
Touch CLOSE to fully close the sunroof.
If the sunroof’s safety mechanism detects any
obstruction, it does not close. If, after removing
the obstruction, it still does not close, touch
and hold CLOSE to override the sunroof’s
anti-trap mechanism.
Touch VENT to open the sunroof slightly.
To stop the sunroof from moving at any time,
touch the image of the sunroof.
2.12 MODEL S OWNERS MANUALbook.book Page 13 Friday, July 19, 2013 12:53 PM
Glove Box
Opening and Closing
Glove Box
To open the glove box, press the switch located
to the right of the touchscreen. If you leave the
glove box open for five minutes, its light
automatically turns off.
NOTE: The glove box locks whenever Model S is
locked externally, using the key or walk-away
locking. It does not lock when Model S is locked
using the touchscreen.
WARNING: When driving, keep the glove
box closed to prevent injury to a
passenger if a collision or sudden stop
occurs.
OPENING AND CLOSING 2.13book.book Page 14 Friday, July 19, 2013 12:53 PM
Cup Holders Cup Holders
Opening and Closing
Cup Holders
To expose a cup holder, slide back the armrest.
2.14 MODEL S OWNERS MANUALbook.book Page 1 Friday, July 19, 2013 12:53 PM
SEATING AND SAFETY RESTRAINTS
Front and Rear Seats
Correct Driving Position ................................ 3.2
Adjusting the Driver’s Seat........................... 3.2
Folding Rear Seats........................................... 3.3
Raising Rear Seats ........................................... 3.3
Head Supports................................................... 3.3
Seat Covers......................................................... 3.3
Seat Belts
Wearing Seat Belts ......................................... 3.4
Wearing Seat Belts When Pregnant ........ 3.4
Seat Belt Pre-tensioners ................................ 3.5
Testing Seat Belts ............................................ 3.5
Seat Belt Warnings ......................................... 3.6
Child Safety Seats
Guidelines for Seating Children .................. 3.7
Choosing a Child Safety Seat ...................... 3.7
Seating Larger Children................................. 3.8
Installing Child Safety Seats......................... 3.8
Installing Seat Belt Retained Child Seats 3.8
Installing ISOFIX Child Seats....................... 3.9
Attaching Upper Tether Straps ................ 3.10
Testing a Child Safety Seat ........................ 3.10
Warnings - Child Safety Seats................... 3.10
Tesla Built In Rear Facing Child
Seats
Usage Restrictions .......................................... 3.11
Opening............................................................... 3.11
Folding................................................................ 3.12
Seating a Child ................................................ 3.13
Warnings - Tesla Child Seats ..................... 3.14
Airbags
Location of Airbags....................................... 3.15
How the Airbags Work................................. 3.16
Types of Airbags ............................................ 3.16
Disabling the Front Passenger Airbag ... 3.17
Inflation Effects ............................................... 3.18
Airbag Warning Indicator ........................... 3.18
Airbag Warnings............................................. 3.18
3.1book.book Page 2 Friday, July 19, 2013 12:53 PM
Front and Rear Seats Front and Rear Seats
Correct Driving Position Adjusting the Driver’s Seat
SEATING
Front andAND
RearSAFETY
Seats RESTRAINTS
The seat, head support, seat belt and airbags
work together to maximize your safety. Using
these correctly ensures greater protection.
Position the seat so you can wear the seat belt
correctly, while being as far away from the front
airbag as possible:
1. Sit upright with both feet on the floor and
the seat back reclined no more than 30
degrees.
2. Make sure you can easily reach the pedals
and that your arms are slightly bent when
holding the steering wheel. Your chest
should be at least 25 cm from the center of
the airbag cover.
3. Place the shoulder section of the seat belt
mid-way between your neck and your
shoulder. Fit the lap section of the belt
tightly across your hips, not across your
stomach.
Model S seats include integrated head supports 1. Adjust lumbar support.
that cannot be adjusted or removed. 2. Adjust backrest.
3. Move seat forward/backward.
4. Adjust the seat’s height and tilt angle.
WARNING: Do not adjust seats while
driving. Doing so increases the risk of a
collision.
WARNING: Riding in a moving vehicle
with the seat back reclined can result in
serious injuries in a collision, as you could slide
under the lap belt or be propelled into the seat
belt. Ensure your seat back is reclined no more
than 30 degrees when the vehicle is moving.
3.2 MODEL S OWNERS MANUALbook.book Page 3 Friday, July 19, 2013 12:53 PM
Front and Rear Seats
Folding Rear Seats Raising Rear Seats
Model S has a split rear seat that can fold Before raising a rear seat, make sure that the
forward. seat belts are not trapped behind the backrest.
Before folding, remove items from the seats Pull the seat back upward until it locks into
and the rear foot well. To allow the rear seat place.
backs to fold completely flat, you may need to To confirm that the seat back is locked in the
move the front seats forward. upright position, try pulling it forward.
WARNING: Always ensure the seat backs
are locked in their upright position.
Failure to do so increases the risk of injury.
Head Supports
Seats include integrated head supports that
cannot be adjusted or removed.
Seat Covers
Do not use seat covers on Model S. Doing so
could restrict deployment of the side air bags
if an accident occurs. It can also reduce the
To fold a rear seat, press the corresponding accuracy of the occupant detection system.
lever and fold the seat forward.
SEATING AND SAFETY RESTRAINTS 3.3book.book Page 4 Friday, July 19, 2013 12:53 PM
Seat Belts Seat Belts
Wearing Seat Belts 4. Pull the belt to check that it is securely
Seat Belts
fastened.
Using seat belts and child safety seats is the
most effective way to protect occupants if a 5. Pull the diagonal part of the belt toward the
collision occurs. Therefore, wearing a seat belt reel to remove excess slack.
is required by law in most jurisdictions.
To Release a Belt
Both the driver and passenger seats are
Hold the belt near the buckle to prevent the
equipped with three-point inertia reel seat
belt from retracting too quickly, then press the
belts. Inertia reel belts are automatically
button on the buckle. The belt retracts
tensioned to allow occupants to move
automatically. Ensure there is no obstruction
comfortably during normal driving conditions.
that prevents the belt from fully retracting. The
The seat belt reel automatically locks to prevent belt should not hang loose. If a seat belt does
movement of occupants if Model S experiences not fully retract, contact Tesla.
a force associated with hard acceleration,
braking, cornering, or an impact in a collision.
Wearing Seat Belts When Pregnant
The seat belt reminder on the
instrument panel alerts you if a seat belt Do not put the lap or shoulder sections of the
for an occupied seat is not fastened. If seat belt over the abdominal area. Wear the lap
the belt remains unfastened, the reminder section of the belt as low as possible across the
flashes and an intermittent chime sounds. If all hips, not the waist. Position the shoulder
occupants are buckled up and the reminder portion of the belt between the breasts and to
stays on, re-fasten seat belts to ensure they are the side of the abdomen. Consult your doctor
correctly latched. Also remove any heavy for specific guidance.
object (such as a briefcase) from an
unoccupied seat. If the reminder light continues
to stay on, contact Tesla.
To Fasten a Belt
1. Ensure correct positioning of the seat (for
correct driving position, see page 3.2).
WARNING: Never place anything
between you and the seat belt to cushion
the impact in the event of an accident.
2. Draw the belt out smoothly, ensuring the
belt lays flat across the pelvis, chest and
mid-point of your collar bone, between the
neck and shoulder.
3. Insert the latch plate into the buckle and
press together until you hear a “click”
indicating it is locked in place.
3.4 MODEL S OWNERS MANUALbook.book Page 5 Friday, July 19, 2013 12:53 PM
Seat Belts
Seat Belt Pre-tensioners Testing Seat Belts
The front seat belts are equipped with To confirm that seat belts are operating
pre-tensioners that work in conjunction with correctly, perform these three simple checks on
the airbags in a severe frontal collision. The each seat belt.
pre-tensioners automatically retract both the 1. With the seat belt fastened, give the
seat belt anchor and the seat belt webbing, webbing nearest the buckle a quick pull.
reducing slack in both the lap and diagonal The buckle should remain securely locked.
portions of the belts, resulting in reduced
2. With the belt unfastened, unreel the
forward movement of the occupant.
webbing to its limit. Check that unreeling is
free from snags, and visually check the
webbing for wear. Allow the webbing to
retract, checking that retraction is smooth
and complete.
3. With the webbing half unreeled, hold the
tongue plate and pull forward quickly. The
mechanism should lock automatically and
prevent further unreeling.
If a seat belt fails any of these tests, contact
Tesla immediately.
For information about cleaning seat belts, see
page 7.13.
If the pre-tensioners and airbags did not
activate in an impact, this does not mean they
malfunctioned. It usually means that the
strength or type of force needed to activate
them was not present.
WARNING: Once the seat belt
pre-tensioners have been activated, they
must be replaced. After any accident, have the
airbags, seat belt pre-tensioners and any
associated components checked and, if
necessary, replaced.
SEATING AND SAFETY RESTRAINTS 3.5book.book Page 6 Friday, July 19, 2013 12:53 PM
Seat Belts Seat Belts
Seat Belt Warnings WARNING: When seat belts are not in
use, they should be fully retracted and
WARNING: Seat belts should be worn by
not hanging loose. If a seat belt does not fully
all occupants for every journey no matter
retract, contact Tesla.
how short. Failure to do so increases the risk of
injury or death if an accident occurs.
WARNING: Secure small children in a
suitable child safety seat (see page 3.7).
Always follow the child safety seat
manufacturer's instructions when installing.
WARNING: Ensure that all seat belts are
worn correctly. An improperly worn seat
belt increases the risk of injury or death if an
accident occurs (see page 3.4).
WARNING: Do not wear seat belts over
hard, fragile or sharp items in clothing,
such as pens, keys, eyeglasses, etc. The
pressure from the seat belt on such items can
cause injury.
WARNING: Seat belts should not be worn
with any part of the strap twisted.
WARNING: Each seat belt assembly must
be used by one occupant only. It is
dangerous to put a seat belt around a child
being carried on an occupant’s lap.
WARNING: Seat belts that have been
worn in an accident must be inspected or
replaced by Tesla, even if damage to the
assembly is not obvious.
WARNING: Seat belts that show signs of
wear (such as fraying) or have been cut
or damaged in any way, must be replaced by
Tesla.
WARNING: Avoid contaminating a seat
belt’s components with any chemicals,
liquids, grit, dirt or cleaning products. If a seat
belt fails to retract or latch into the buckle, it
must be replaced immediately. Contact Tesla.
WARNING: Do not make modifications or
additions that can prevent a seat belt
mechanism from taking up slack, or that can
prevent a seat belt from being adjusted to
remove slack. A slack belt greatly reduces
occupant protection.
WARNING: Do not make modifications
that can interfere with the operation of a
seat belt, or that can cause a seat belt to
become inoperable.
3.6 MODEL S OWNERS MANUALbook.book Page 7 Friday, July 19, 2013 12:53 PM
Child Safety Seats
Guidelines for Seating Children
Child Safety Seats
You must restrain infants and small children If your Model S is equipped with Tesla built in
using a child safety seat appropriate for the rear facing child seats, these seats are child
child’s age, weight, and size. Carefully follow safety seats and are designed only for children
the instructions provided by the manufacturer within a specific height and weight range (see
of the child safety seat. Never use child safety page 3.11).
seats in the front row passenger seat.
Refer to the tables below for guidelines on the type of seatbelt installed and ISOFIX installed child
restraint you should used based on the weight of the child.
Seatbelt Installed Child Restraints
Front Rear Rear
Mass Group Passenger Outboard Centre
Group 0 up to 10 kg L U U
Group 0+ up to 13 kg L U U
Group 1 9 - 18 kg UF* U, UF U, UF
Group II 15 - 25 kg UF* U, UF U, UF
Group III 22 - 36 kg UF* U, UF U, UF
U: Universal rear facing child restraint
UF: Universal forward facing child restraint
L: Suitable for these particular child restraints - Maxi-Cosi Cabrio/Cabriofix E4 04443517 or Takata Mini E4
04443717
*: Seat must be placed in rearmost highest position
ISOFIX Installed Child Restraints
Vehicle ISOFIX Position
Mass Group Size Class Fixture Rear Outboard Rear Centre
Group 0 up to 10 kg E R1 IL IL
Group 0+ up to 13 kg E R1 IL IL
D R2 IL IL
C R3 IL IL
Group 1 9 - 18 kg D R2 U, UF IL
C R3 U, UF IL
B F2 IUF IUF
B1 F2x IUF IUF
A F3 IUF IUF
IL: Suitable for any semi-universal child restraint (any rear or forward facing restraint with support leg)
IUF: Suitable for any universal child restraint (forward facing with tether)
NOTE: If the combined weight of the child and the child safety seat is over 29 kg, Tesla recommends
attaching the safety seat using the seat belt and upper tether strap. In addition to safety, this has
the added benefit of ensuring the seat belt reminder does not stay lit. Always follow the seat belt
manufacturer’s instructions when installing child safety seats.
SEATING AND SAFETY RESTRAINTS 3.7book.book Page 8 Friday, July 19, 2013 12:53 PM
Child Safety Seats Child Safety Seats
Seating Larger Children Installing Seat Belt Retained Child
If a child is too large to fit into a child safety Seats
seat, but too small to safely fit into the standard First, make sure that the child falls into the
seat belts, use a booster seat appropriate for correct weight range for the seat.
the child’s age and size. Carefully follow the
Avoid dressing the child in bulky clothing and
manufacturer’s instructions to secure the
do not place any objects between the child and
booster seat using the seat belts. Do not use
the restraint system.
the ISOFIX system to secure booster seats,
even in situations where the booster seat is Adjust harnesses for every child, every trip.
equipped with the ISOFIX system. Always follow the detailed instructions
provided by the child safety seat manufacturer.
Installing Child Safety Seats General guidelines are provided below.
There are two general methods used to install 1. Place the child safety seat in Model S, route
child safety seats: the seat belt, and secure the buckle in
accordance with the child safety seat
• Seat belt retained - these seats are secured manufacturer’s instructions.
using the vehicle’s seat belts (see page 3.8).
• ISOFIX* retained - these seats can attach to
anchor bars built into the vehicle’s rear
seats (see page 3.9).
Check the child safety seat manufacturer’s
instructions and the table on page 3.7 to
determine which installation method to use.
Some child safety seats can be installed using
either method. Always follow the child safety
seat manufacturer’s instructions.
2. Allow the seat belt to retract, and remove
all slack in the seat belt while firmly pushing
the child safety seat into the Model S seat.
3. If the seat belt retained child safety seat has
an upper tether, attach it to the back of the
seat (see page 3.10).
3.8 MODEL S OWNERS MANUALbook.book Page 9 Friday, July 19, 2013 12:53 PM
Child Safety Seats
Installing ISOFIX Child Seats To install a ISOFIX retained child safety seat,
slide the safety seat latches onto the anchor
Lower ISOFIX anchor points are provided at all
bars until they click into place. Carefully read
three second row seating positions and are
and follow the instructions provided by the
located between the seat back rest and rear
child safety seat manufacturer.
cushion. The exact location of each anchor
point is indicated by the child safety seat
identification tab on the seat.
Once installed, test the security of the
installation before seating a child. Attempt to
twist the child safety seat from side to side and
Although ISOFIX anchor points are provided at try to pull it away from the seat, then check that
all three rear seating positions, you can only use the anchors are still securely in place.
two at the same time. To seat three children,
use a non-ISOFIX retained seat in the middle.
When installing two ISOFIX retained child
safety seats, you cannot install them adjacent
to each other with one in the middle and the
other on the left (driver’s side).
SEATING AND SAFETY RESTRAINTS 3.9book.book Page 10 Friday, July 19, 2013 12:53 PM
Child Safety Seats Child Safety Seats
Attaching Upper Tether Straps Warnings - Child Safety Seats
If an upper tether strap is provided, attach its WARNING: Do not allow a baby or infant
hook to the anchor point located on the back of to be held on a lap. All children should be
the rear seats. Always position the strap so that restrained in an appropriate child safety seat at
it runs over the center of the Model S head all times.
support, except in cases where you are WARNING: To ensure children are safely
installing a ISOFIX retained child safety seat in seated, follow all instructions provided in
the center position—in this case, run the strap this document and by the manufacturer of the
over the left hand side of the head support, as child safety seat.
shown. Tighten according to the child safety
seat manufacturer’s instructions. WARNING: Children should ride in a rear
facing child safety seat using the seat’s
integrated 5 point harness for as long as
possible.
WARNING: When seating larger children,
make sure the child's head is supported
and the child’s seat belt is properly adjusted
and fastened. The shoulder portion of the belt
must be away from the face and neck, and the
lap portion must not be over the stomach.
WARNING: Never attach two child safety
seats to one anchor point. In a collision,
one anchor point may not be strong enough to
secure both seats.
WARNING: Child safety seat anchors can
withstand loads resulting only from
correctly fitted child safety seats. Do not use
these anchors for any other purpose.
WARNING: Always check harnesses and
tether straps for damage and wear.
WARNING: Never leave a child
unattended in Model S, even if the child is
secured in a child safety seat.
WARNING: Never use a child safety seat
NOTE: To prevent the strap from moving from
that has been involved in an accident.
side to side, the top of the head support
Have the seat inspected or replaced as a
deforms.
described in the child safety seat
manufacturer’s instructions.
Testing a Child Safety Seat
Before seating a child, always make sure the
child safety seat is not loose:
1. Hold the child safety seat by the belt path
and try to slide the safety seat from side to
side and front to back.
2. If the seat moves more than 2.5 cm, it is too
loose. Tighten the belt or reconnect the
ISOFIX retained child safety seat.
3. If you are unable to reduce slack, try a
different seat location or try another child
safety seat.
3.10 MODEL S OWNERS MANUALbook.book Page 11 Friday, July 19, 2013 12:53 PM
Tesla Built In Rear Facing Child Seats
Usage Restrictions 3. Undo the Velcro strap:
Tesla Built In Rear Facing Child Seats
The Tesla built in rear facing child seats are child
restraint systems and are approved to United
Nations ECE Regulation R44.04 standards for
use by children in Mass Groups II and III,
weighing 15 - 36 kg. These seats must only be
used for children who are between 3 and 12
years old, and 98 - 135 cm tall.
Always ensure the top of the child’s head
cannot contact the vehicle and that the child is
seated comfortably with the seat belts
positioned and latched correctly. The child’s
pelvis must be held securely in place by the lap
belt. Follow all instructions provided and do 4. Pull the handle to release the head supports
not use supplemental child safety seats in from the seat back, then pull the head
these seats. supports toward you to unfold them:
NOTE: To draw more air into the rear seating
areas, it is recommended that whenever a child
is seated in the Tesla built in rear facing child
seats, you set the climate control system to
draw outside air into Model S, instead of
recirculating the air. See page 5.9.
Opening
1. Remove the cover from the trunk floor and
pull the strap to lift the seat assembly
upward:
5. Raise the seat back to the upright position
and push until it locks into position. Visually
check to ensure that the retaining catches
are engaged:
2. Push the seat assembly into position:
6. Check that the seat back and seat base are
securely retained in the upright position by
trying to pull the seat back toward you.
SEATING AND SAFETY RESTRAINTS 3.11book.book Page 12 Friday, July 19, 2013 12:53 PM
Tesla
Tesla Built Built Facing
In Rear In RearChild
Facing Child Seats
Seats
Folding 4. Pull the strap at the rear of the seat to fold
the seat assembly into the trunk floor:
CAUTION: Before folding the seats,
fasten the seat belts to prevent them
from getting trapped in the seat
mechanism and being damaged.
1. Pull the handle to release the seat back and
pull the seat back fully forward:
5. Replace the cover on the trunk floor:
2. Push the lever to release the head supports
from the seat back, then fold back onto the
seat:
3. Secure the Velcro strap:
3.12 MODEL S OWNERS MANUALbook.book Page 13 Friday, July 19, 2013 12:53 PM
Tesla Built In Rear Facing Child Seats
Seating a Child 7. Slide the shoulder clips into place to ensure
the upper portion of the belts remain
The Tesla built in rear facing child seats are child
positioned over the child’s shoulders.
restraint systems and are approved to United
Nations ECE Regulation R44.04 standards for
use by children in Mass Groups II and III,
weighing 15 - 36 kg. These seats must only be
used for children who are between 3 and 12
years old, and 98 - 135 cm tall.
Always ensure the top of the child’s head
cannot contact the vehicle and that the child is
seated comfortably with the seat belts
positioned and latched correctly. Follow all
instructions provided and do not use
supplemental child safety seats in these seats.
NOTE: To draw more air into the rear seating
areas, it is recommended that whenever a child
is seated in the Tesla built in rear facing child
seats, you set the climate control system to
draw outside air into Model S, instead of
recirculating the air. See page 5.9.
1. Position the child in the seat with arms
through the loops of the seat belts.
2. Connect the two halves of the seat belt
tongue.
3. Insert the seat belt tongue latch into the
buckle and ensure it is securely fastened.
To release, press the button on the buckle, and
separate the two halves of the seat restraint.
4. Adjust the shoulder belts so they run over
the top of the child’s shoulders and away
from the face.
5. Adjust the length of the buckle to ensure
the lower straps sit low on the child’s pelvis.
The child’s pelvis must be held firmly in
place.
6. Pull the lower straps until the child is
securely held in the seat.
SEATING AND SAFETY RESTRAINTS 3.13book.book Page 14 Friday, July 19, 2013 12:53 PM
Tesla
Tesla Built Built Facing
In Rear In RearChild
Facing Child Seats
Seats
Warnings - Tesla Child Seats WARNING: Do not remove the built in
rear facing child seats for any reason,
WARNING: The Tesla built in rear facing
including cleaning. To ensure safety of
seats are child restraint systems and are
occupants, removal and installation must be
approved to United Nations ECE Regulation
performed by qualified Tesla service
R44.04 standards for use by children in Mass
technicians.
Groups II and III, weighing 15 - 36 kg. These
seats must only be used for children who are WARNING: Do not make modifications or
between 3 and 12 years old, and additions that can interfere with the
98 - 135 cm tall, provided the top of the child’s operation of the Tesla built in rear facing child
head cannot contact the interior. seats.
WARNING: Do not use supplemental WARNING: To prevent injury, ensure all
child restraint systems, including booster loose items (bags, luggage, etc) are
seats, in the Tesla built in rear facing child seats. secured. In an accident, or during hard braking
and sharp turns, loose items could cause injury.
WARNING: Always ensure that the top of
the child’s head cannot touch the
headliner and that the child is seated
comfortably with the seat belts correctly
fastened.
WARNING: Follow all instructions and
heed all warnings related to the Tesla
built in rear facing child seats. Failure to do so
can compromise occupant safety.
WARNING: Read all safety warnings and
labels attached to the seats.
WARNING: Do not leave children
unattended in Model S, even if the child is
secured in a child safety seat or a Tesla built in
rear facing child seat. In hot weather, the
interior temperature can reach dangerous
levels that can result in dehydration, serious
injury or death.
WARNING: Do not remove or replace the
fabric on a Tesla built in rear facing child
seat. The covers are an integral part of the
restraint’s performance and should not be
removed or replaced with any other type than
those supplied by Tesla.
WARNING: If the Tesla built in rear facing
child seats have been worn in an
accident, they must be inspected or replaced
by Tesla, even if damage is not obvious.
WARNING: Before allowing a child to ride
in the Tesla built in rear facing child seats,
check that the seat is securely held in the
upright position by trying to pull the seat back
toward you.
3.14 MODEL S OWNERS MANUALbook.book Page 15 Friday, July 19, 2013 12:53 PM
Airbags
Location of Airbags
Airbags
Airbags are located in the approximate areas
shown here. Airbag warning information is
printed on the sun visors.
1. Passenger knee airbag
2. Passenger front airbag
3. Side airbags
4. Curtain airbags
5. Driver’s knee airbag
6. Driver’s front airbag
SEATING AND SAFETY RESTRAINTS 3.15book.book Page 16 Friday, July 19, 2013 12:53 PM
Airbags Airbags
How the Airbags Work Types of Airbags
Inflation of airbags depends on the rate at
Advanced The front airbags are advanced
which the vehicle’s cabin changes speed in a
front airbags designed to reduce airbag
collision. The rate of deceleration determines
airbags related injuries to children or small
whether airbags inflate.
adults who ride in front. On the
Airbags inflate instantly with considerable driver’s side, the front airbag
force accompanied by a loud noise. The inflated works with a seat position sensor
bag, together with the seat belts, limits that adjusts the inflation level
movement of occupants to reduce the risk of based on the seating position of
injury. the occupant. For safety of infants
Front airbags are not ordinarily designed to and small children, the front
inflate in rear collisions, rollovers, minor front or passenger airbag can be disabled
side collisions, heavy braking, or driving over as described on page 3.17.
bumps and potholes. Therefore, significant Knee Knee airbags and the front airbags
superficial damage can occur to the vehicle airbags work together. The knee airbags
without the airbags inflating or, conversely, a limit the forward motion of the
relatively small amount of structural damage front seat occupants by restricting
can cause airbags to inflate. leg movement, thereby positioning
If you are planning to modify your vehicle for a the occupants so that the front
person with disabilities in a way that may affect airbags work more effectively.
the airbag system, contact Tesla.
Side Side airbags protect the thorax
airbags region of the torso and the pelvis
and inflate only if a severe side
impact occurs. Airbags on the
non-impacted side do not inflate.
Curtain Curtain airbags help protect the
airbags head and ordinarily inflate only if a
severe side impact occurs or if the
vehicle rolls over. The airbags on
the non-impacted side do not
inflate.
3.16 MODEL S OWNERS MANUALbook.book Page 17 Friday, July 19, 2013 12:53 PM
Airbags
Disabling the Front Passenger The ON/OFF status of the front passenger
Airbag airbag displays in the upper right corner of the
touchscreen.
When a child is seated in the front passenger
seat (even though the child is seated in a child
safety seat or booster seat), you must ensure
the front passenger airbag is turned off. This
prevents the airbag from injuring the child if a
collision occurs.
NOTE: Rear seats are the preferred location for
seating children in child safety seats.
To turn the passenger airbag on or off, touch
Controls > Settings > Safety & Security >
Passenger Airbag.
You can also turn the passenger airbag on or off
by touching the status indicator, shown above.
If the status shows the airbag as on, even if you
have turned it off (or vice versa), contact Tesla
immediately.
NOTE: Model S has a capacitive touchscreen
and may not respond to your touch if you are
wearing standard gloves. If the touchscreen is
not responding, remove gloves or wear gloves
with conductive fingertips for use with
capacitive touchscreens.
WARNING: If the control for the
passenger airbag does not appear to be
functioning, do not seat any passenger in the
front seat. Contact Tesla immediately to have
the vehicle inspected and if necessary, repaired.
WARNING: Never seat a child in a child
safety seat or a booster seat on the front
passenger seat when the airbag is activated.
Doing so can cause serious injury or death.
WARNING: Do not use seat covers on
Model S. Doing so could restrict
deployment of the side air bags if an
accident occurs. It can also reduce the
accuracy of the occupant detection system.
SEATING AND SAFETY RESTRAINTS 3.17You can also read