Mag One BPR 40d User Guide - AUGUST 2021 2021 Motorola Solutions, Inc. All rights reserved
←
→
Page content transcription
If your browser does not render page correctly, please read the page content below

DIGITAL TWO-WAY RADIO

Mag One BPR 40d User
Guide

AUGUST 2021
                                                        *MN007942A01*
©   2021 Motorola Solutions, Inc. All rights reserved     MN007942A01-AB
MN007942A01-AB
Contents

Contents
Legal and Support.......................................................................................................4
       Legal and Compliance Statements................................................................................................4
                 Supplier's Declaration of Conformity...................................................................................4
                 Notice to Users (FCC and Industry Canada)...................................................................... 5
                 Intellectual Property and Regulatory Notices......................................................................5
                 Important Safety Information...............................................................................................6
       Read Me First................................................................................................................................ 6
Chapter 1: Radio Overview...................................................................................... 8
       1.1 Programmable Buttons............................................................................................................ 9
                 1.1.1 Assignable Radio Functions...................................................................................... 9
       1.2 LED Indications........................................................................................................................9
Chapter 2: Getting Started......................................................................................11
       2.1 Charging the Battery..............................................................................................................11
       2.2 Attaching and Removing the Battery..................................................................................... 12
                 Attaching the Battery.........................................................................................................12
                 Removing the Battery....................................................................................................... 13
       2.3 Attaching and Removing the Antenna................................................................................... 14
                 Attaching the Antenna.......................................................................................................14
                 Removing the Antenna..................................................................................................... 14
       2.4 Attaching and Removing the Belt Clip................................................................................... 15
                 Attaching the Belt Clip.......................................................................................................15
                 Removing the Belt Clip..................................................................................................... 16
       2.5 Attaching the Universal Connector Cover..............................................................................16
       2.6 Removing the Universal Connector Cover............................................................................ 17
       2.7 Turning the Radio On............................................................................................................ 18
       2.8 Turning the Radio Off............................................................................................................ 18
       2.9 Adjusting the Volume.............................................................................................................18
Chapter 3: Time-Out Timer.....................................................................................19
Chapter 4: Selecting Channels.............................................................................. 20
Chapter 5: Calls.......................................................................................................21
       5.1 Group Calls............................................................................................................................21
                 5.1.1 Making Group Calls................................................................................................. 21
                 5.1.2 Responding to Group Calls......................................................................................21
       5.2 Private Calls ..........................................................................................................................21
                 5.2.1 Making Private Calls................................................................................................ 22

2
MN007942A01-AB
                                                                                                                                     Contents

                 5.2.2 Responding to Private Calls.....................................................................................22
       5.3 All Calls..................................................................................................................................22
                 5.3.1 Making All Calls....................................................................................................... 22
Chapter 6: Call Alert Operation..............................................................................23
       6.1 Making Call Alerts..................................................................................................................23
       6.2 Responding to Call Alerts...................................................................................................... 23
Chapter 7: Talkaround............................................................................................ 24
       7.1 Toggling Between Repeater and Talkaround Modes............................................................ 24
Chapter 8: Monitor Feature ................................................................................... 25
       8.1 Monitoring Channels..............................................................................................................25
Chapter 9: Scan.......................................................................................................26
       9.1 Turning Scan On or Off .........................................................................................................26
       9.2 Responding to Transmissions During Scanning....................................................................26
       9.3 Deleting Nuisance Channels................................................................................................. 27
Chapter 10: Initiating Radio Enable.......................................................................28
Chapter 11: Initiating Radio Disable......................................................................29
Chapter 12: Authorized Accessories List............................................................. 30

                                                                                                                                                      3
MN007942A01-AB
Legal and Support

Legal and Support
Legal and Compliance Statements

Supplier's Declaration of Conformity

Supplier's Declaration of Conformity
Per FCC CFR 47 Part 2 Section 2.1077(a)

Responsible Party
Name: Motorola Solutions, Inc.
Address: 2000 Progress Pkwy, Schaumburg, IL. 60196
Phone Number: 1-800-927-2744
Hereby declares that the product:
Model Name: BPR 40d
conforms to the following regulations:
FCC Part 15, subpart B, section 15.107(a), 15.107(d), and section 15.109(a)

Class B Digital Device
As a personal computer peripheral, this device complies with Part 15 of the FCC Rules. Operation
is subject to the following two conditions:
1 This device may not cause harmful interference, and

4
MN007942A01-AB
                                                                                         Legal and Support

2 This device must accept any interference received, including interference that may cause unde-
  sired operation.
        NOTE:
        This equipment has been tested and found to comply with the limits for a Class B
        digital device, pursuant to part 15 of the FCC Rules. These limits are designed to pro-
        vide reasonable protection against harmful interference in a residential installation. This
        equipment generates, uses and can radiate radio frequency energy and, if not installed
        and used in accordance with the instructions, may cause harmful interference to radio
        communications. However, there is no guarantee that interference will not occur in a
        particular installation.
        If this equipment does cause harmful interference to radio or television reception, which
        can be determined by turning the equipment off and on, the user is encouraged to try to
        correct the interference by one or more of the following measures:
        •   Reorient or relocate the receiving antenna.
        •   Increase the separation between the equipment and receiver.
        •   Connect the equipment into an outlet on a circuit different from that to which the
            receiver is connected.
        •   Consult the dealer or an experienced radio or TV technician for help.

Notice to Users (FCC and Industry Canada)
This device complies with Part 15 of the FCC rules and Industry Canada's license-exempt RSS's per
the following conditions:
•   This device may not cause harmful interference.
•   This device must accept any interference received, including interference that may cause undesired
    operation.
•   Changes or modifications made to this device, not expressly approved by Motorola Solutions, could
    void the authority of the user to operate this equipment.

Intellectual Property and Regulatory Notices

Copyrights
The Motorola Solutions products described in this document may include copyrighted Motorola
Solutions computer programs. Laws in the United States and other countries preserve for Motorola
Solutions certain exclusive rights for copyrighted computer programs. Accordingly, any copyrighted
Motorola Solutions computer programs contained in the Motorola Solutions products described in this
document may not be copied or reproduced in any manner without the express written permission of
Motorola Solutions.
No part of this document may be reproduced, transmitted, stored in a retrieval system, or translated
into any language or computer language, in any form or by any means, without the prior written
permission of Motorola Solutions, Inc.

Trademarks
MOTOROLA SOLUTIONS, the Stylized M Logo, Mag One, and BPR 40d are registered in the U.S.
Patent and Trademark Office. All other products and service names are the property of their respective
owners.

                                                                                                        5
MN007942A01-AB
Legal and Support

License Rights
The purchase of Motorola Solutions products shall not be deemed to grant either directly or by
implication, estoppel or otherwise, any license under the copyrights, patents or patent applications
of Motorola Solutions, except for the normal non-exclusive, royalty-free license to use that arises by
operation of law in the sale of a product.

European Union (EU) Waste of Electrical and Electronic Equipment (WEEE)
directive

     The European Union's WEEE directive requires that products sold into EU countries must have
the crossed out trash bin label on the product (or the package in some cases).
As defined by the WEEE directive, this cross-out trash bin label means that customers and end-users
in EU countries should not dispose of electronic and electrical equipment or accessories in household
waste.
Customers or end-users in EU countries should contact their local equipment supplier representative or
service centre for information about the waste collection system in their country.

Disclaimer
Please note that certain features, facilities, and capabilities described in this document may not be
applicable to or licensed for use on a specific system, or may be dependent upon the characteristics
of a specific subscriber unit or configuration of certain parameters. Please refer to your Motorola
Solutions contact for further information.
©   2021 Motorola Solutions, Inc. All Rights Reserved

Important Safety Information

        CAUTION:
        This radio is restricted to Occupational use only. Before using the radio, read the RF
        Energy Exposure and Product Safety Guide for Portable Two-Way Radios which contains
        important operating instructions for safe usage and RF energy awareness and control for
        Compliance with applicable standards and Regulations.

Any modification to this device, not expressly authorized by Motorola Solutions, may void the user's
authority to operate this device.
Under Industry Canada regulations, this radio transmitter may only operate using an antenna of a type
and maximum (or lesser) gain approved for the transmitter by Industry Canada. To reduce potential
radio interference to other users, the antenna type and its gain should be so chosen that the equivalent
isotropically radiated power (e.i.r.p.) is not more than that necessary for successful communication.
This radio transmitter has been approved by Industry Canada to operate with Motorola Solutions-
approved antenna with the maximum permissible gain and required antenna impedance for each
antenna type indicated. Antenna types not included in this list, having a gain greater than the maximum
gain indicated for that type, are strictly prohibited for use with this device.

Read Me First
This user guide covers the basic operations of the radio models offered in your region.

6
MN007942A01-AB
                                                                                         Legal and Support

Notations Used in This Manual
Throughout the text in this publication, you notice the use of Warning, Caution, and Notice. These
notations are used to emphasize that safety hazards exist, and the care that must be taken or
observed.
       WARNING: An operational procedure, practice, or condition, and so on, which may result in
       injury or death if not carefully observed.
       CAUTION: An operational procedure, practice, or condition, and so on, which may result in
       damage to the equipment if not carefully observed.
       NOTE: An operational procedure, practice, or condition, and so on, which is essential to
       emphasize.

Special Notations
The following special notations are used throughout the text to highlight certain information or items:

Table 1: Special Notations

Example                                              Description
Menu key or PTT button                               Bold words indicate a name of a key, button, or
                                                     soft menu item.
Your radio shows Bluetooth On.                       Typewriter words indicate the MMI strings or
                                                     messages displayed on your radio.
                                        The courier, bold, italic, and angle brackets indi-
                                                     cate user input.
Setup→Tone→All Tones                                 Bold words with the arrow in between indicate
                                                     the navigation structure in the menu items.

Feature and Service Availability
Your dealer or administrator may have customized your radio for your specific needs.
       NOTE: Not all features in the manual are available in your radio. Contact your dealer or
       administrator for more information.
You can consult your dealer or system administrator about the following:
•   What are the functions of each button?
•   Which optional accessories may suit your needs?
•   What are the best radio usage practices for effective communication?
•   What maintenance procedures promote longer radio life?

                                                                                                           7
MN007942A01-AB
Chapter 1: Radio Overview

    Chapter 1

Radio Overview

                     1

             2

             3
      4                                       11

         5                                    10

                                      9
             6
     7

                                          8

Action                      Description
1                           Antenna
2                           Channel Selector Knob
3                           On/Off/Volume Control Knob
4                           LED Indicator
5                           Push-to-Talk (PTT) Button
6                           Programmable Side Button 1
7                           Programmable Side Button 2
8                           Microphone
9                           Speaker
10                          Programming Port
11                          Accessory Connector

8
MN007942A01-AB
                                                                                Chapter 1: Radio Overview

1.1
Programmable Buttons
Depending on the duration of a button press, the programmable buttons function differently.

Table 2: Button Press Duration

Action                        Description
Press                         Press and release.
Long press                    Press and hold for 4 seconds or less depending on the settings
                              through the Customer Programming Software (CPS).

1.1.1
Assignable Radio Functions
You can assign a list of radio functions to the programmable buttons.

Table 3: Types of Programmable Functions

Function                      Description
All Alert Tones On/Off        Allows you to toggle all tones and alerts on or off.
Battery Indicator             Allows you to indicate battery strength by using the LED Indicator.
High/Low Power                Allows you to toggle transmit power level between high and low.
Monitor                       Allows you to monitor a channel.
Nuisance Delete               Allows you to temporarily remove an unwanted channel, except for
                              the Selected Channel, from the scan list. The Selected Channel refers
                              to the selected zone or channel combination of you from which scan is
                              initiated.
One Touch Access              Allows you to directly initiate a predefined Private Call, Group Call,
                              Call Alert, or Home Revert.
Repeater/Talkaround           Allows you to toggle between using a repeater and communicating
                              directly with another radio.
Scan On/Off                   Allows you to toggle scan on or off.
Tight/Normal Squelch          Allows you to toggle squelch level between tight and normal.

1.2
LED Indications
The LED Indicator shows the operational status of your radio. A qualified technician can permanently
disable the LED indication by preprogramming it.

Table 4: LED Indications

Indication                 Status
Solid Red                  The radio is charging or transmitting.

Blinking Red               The battery capacity is low.

Solid Yellow               The radio is scanning for activity.

                                                                                                       9
MN007942A01-AB
Chapter 1: Radio Overview

Indication                  Status
Solid Green                 The radio is receiving transmission.

Blinking Green              The radio is scanning for activity.

10
MN007942A01-AB
                                                                                           Getting Started

 Chapter 2

Getting Started
Getting Started provides instructions to prepare your radio for use.

2.1
Charging the Battery
Your radio is powered by a Lithium-Ion (Li-Ion) battery.
Prerequisites:Turn off your radio when charging.

Procedure:
      •   To comply with warranty terms and avoid damages, charge the battery using an authorized
          charger.

      •   Charge a new battery 14 to 16 hours before initial use for best performance.
          Batteries charge best at room temperature.

                                                                                                       11
MN007942A01-AB
Chapter 2: Getting Started
2.2
Attaching and Removing the Battery
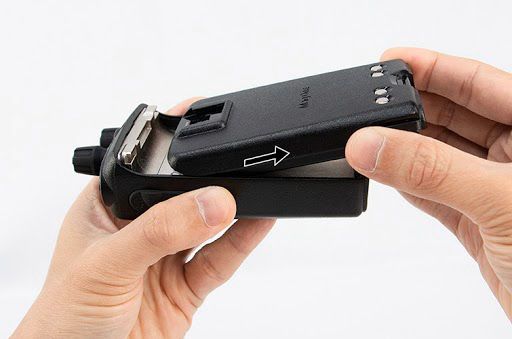
Attaching the Battery
Procedure:
1 Slide the battery into the battery compartment.
2 Flip the battery latch close and press it onto the battery until it locks in place.
12MN007942A01-AB
Chapter 2: Getting Started
Removing the Battery
Procedure:
1 Turn off your radio.
2 Flip the battery latch open.
3 Slide the battery out of the battery compartment and lift it.
13MN007942A01-AB
Chapter 2: Getting Started
2.3
Attaching and Removing the Antenna
Attaching the Antenna
Procedure:
1 Set the antenna in the receptacle.
2 Turn the antenna clockwise.
NOTE: Fastening the antenna blocks water and dust from entering the radio.
Removing the Antenna
Procedure:
1 Turn the antenna counterclockwise.
2 Remove the antenna from the receptacle.
14MN007942A01-AB
Chapter 2: Getting Started
2.4
Attaching and Removing the Belt Clip
Attaching the Belt Clip
Procedure:
Align the grooves on the clip with the grooves on the battery and press it downwards until it
clicks.
15MN007942A01-AB
Chapter 2: Getting Started
Removing the Belt Clip
Procedure:
1 To remove the clip, press the belt clip tab away from the battery.
2 Slide the clip upwards and away from the radio.
2.5
Attaching the Universal Connector Cover
When and where to use:Replace the universal connector cover or dust cover when the universal
connector is not in use.
Procedure:
1 Insert the slanted end of the cover into the slots above the universal connector.
2 Secure the connector cover to the radio by pressing the cover inwards.
16MN007942A01-AB
Chapter 2: Getting Started
2.6
Removing the Universal Connector Cover
Procedure:
Remove the universal connector cover or dust cover by pulling the cover out.
Postrequisites:Replace the dust cover when the universal connector is not in use.
17MN007942A01-AB
Chapter 2: Getting Started
2.7
Turning the Radio On
Procedure:
Rotate the On/Off/Volume knob clockwise until a click sounds.
If your radio is turned on, your radio shows the following indications:
• A tone sounds.
NOTE: If the Tones/Alerts function is disabled, no tone sounds.
• The orange LED blinks, followed by the green LED.
NOTE:
If your radio fails to turn on although your battery is charged and properly attached, contact your
dealer for assistance.
2.8
Turning the Radio Off
Procedure:
Rotate the On/Off/Volume knob counterclockwise until a click sounds.
2.9
Adjusting the Volume
Procedure:
1 To adjust the volume of your radio, perform one of the following actions:
NOTE: Your radio can be programmed to have a minimum volume offset where the
volume level cannot be lowered past the programmed minimum volume.
18MN007942A01-AB
Time-Out Timer
Chapter 3
Time-Out Timer
Your system administrator can set the time-out time for a channel through the radio software.
Before your radio reaches the time-out time, a ten-second warning beep sounds.
When your radio reaches the time-out time, your radio stops transmitting and shows the following
indications:
• A tone sounds.
• The red LED extinguishes.
To resume transmission, you must release the PTT button and wait for the penalty timer to expire.
19MN007942A01-AB
Chapter 4: Selecting Channels
Chapter 4
Selecting Channels
Your radio supports up to 16 channels. Each channel can be programmed with different features that
support different groups of users.
Procedure:
Select channels by toggling the Channel Selector knob.
Your radio indicates the channel number through voice announcement. If the channel is not
programmed, an error tone sounds.
20MN007942A01-AB
Calls
Chapter 5
Calls
Depending on the type of call, you can make, receive, and respond to calls in both Conventional
Analog and Digital mode.
Your radio supports the following types of calls:
• Group Calls
• Private Calls
• All Calls
5.1
Group Calls
Group Calls are calls from an individual radio to a group of radios. To communicate in a group, your
radio must first be configured as a part of the talkgroup.
5.1.1
Making Group Calls
Procedure:
1 To select a channel with an active group ID, toggle the Channel Selector knob.
2 To call, press the PTT button.
3 Wait for the Talk Permit Tone to end, and speak into the microphone.
NOTE: If the selected channel is busy, a busy tone sounds and your radio unable to
make a call.
4 To listen, release the PTT button.
If your radio does not detect voice activity for a predetermined period, the call ends.
5.1.2
Responding to Group Calls
When and where to use:When you receive Group Calls, your radio shows the following indications:
• The green LED illuminates.
• Your radio unmutes and the incoming call sounds through the speaker.
Procedure:
1 To respond, press the PTT button.
2 Wait for the Talk Permit Tone to end, and speak into the microphone.
3 To listen, release the PTT button.
5.2
Private Calls
Private Calls are calls from an individual radio to another individual radio.
21MN007942A01-AB
Chapter 5: Calls
5.2.1
Making Private Calls
Procedure:
1 To select a channel with an active subscriber ID, toggle the Channel Selector knob.
2 To call, press the PTT button.
3 Wait for the Talk Permit Tone to end, and speak into the microphone.
NOTE: If the selected channel is busy, a busy tone sounds and your radio unable to
make a call.
4 To listen, release the PTT button.
If your radio does not detect voice activity for a predetermined period, the call ends.
5.2.2
Responding to Private Calls
When and where to use:When you receive Private Calls, your radio shows the following indications:
• The yellow LED illuminates.
• Your radio unmutes and the incoming call sounds through the speaker.
Procedure:
1 To respond, press the PTT button.
2 Wait for the Talk Permit Tone to end, and speak into the microphone.
3 To listen, release the PTT button.
If your radio does not detect voice activity for a predetermined period, the call ends.
5.3
All Calls
All Calls are one-way calls from an individual radio to all radios on a channel. All Calls are used for
making important announcements.The recipients on the channel cannot respond to All Calls.
When you receive All Calls, your radio shows the following indications:
• A tone sounds.
• The yellow LED illuminates.
• Your radio unmutes and the incoming call sounds through the speaker.
All Calls do not wait for a predetermined period before ending. You can only continue with programmed
button functions after the All Call ends. If you switch to a different channel during an All Call, your radio
stops receiving the call.
5.3.1
Making All Calls
Procedure:
1 To select a channel with an active group ID, toggle the Channel Selector knob.
2 To call, press the PTT button.
3 Wait for the Talk Permit Tone to end, and speak into the microphone.
22MN007942A01-AB
Call Alert Operation
Chapter 6
Call Alert Operation
Call Alert paging enables you to alert a specific radio user to call you back.
6.1
Making Call Alerts
Procedure:
Press the programmed One Touch Access button.
If the call alert acknowledgment is received, a positive tone sounds.
If the call alert acknowledgment is not received, a negative tone sounds.
6.2
Responding to Call Alerts
When and where to use:When you receive a Call Alert, your radio shows the following indications:
• A repetitive tone sounds.
• The yellow LED blinks.
Procedure:
To respond, press the PTT button within four seconds.
23MN007942A01-AB
Chapter 7: Talkaround
Chapter 7
Talkaround
This feature allows you to continue communicating when your repeater is non-operational, or when
your radio is out of range from the repeater but within the talk range of other radios.
The talkaround setting is retained even after powering down.
7.1
Toggling Between Repeater and Talkaround Modes
Procedure:
Press the programmed Repeater/Talkaround button.
If a positive tone sounds, your radio is in talkaround mode.
If a negative tone sounds, your radio is in repeater mode.
24MN007942A01-AB
Monitor Feature
Chapter 8
Monitor Feature
The feature allows you to remotely activate the microphone of a target radio. You can use this feature
to monitor any audible activity surrounding the target radio.
8.1
Monitoring Channels
Procedure:
Press the programmed Monitor button and hold the button to continue monitoring the channel.
If the channel is in use, your radio shows the following indications:
• You hear radio activity.
• The green LED illuminates.
If the monitored channel is free, your radio shows the following indications:
• You hear “white noise".
• The green LED illuminates.
Postrequisites:To stop monitoring the channel, release the programmed Monitor button.
25MN007942A01-AB
Chapter 9: Scan
Chapter 9
Scan
Your radio scans through the programmed scan list for the current channel looking for voice activity
when you start a scan.
Your radio also performs dual-mode scan. If you are on a digital channel, and your radio locks onto
an analog channel, your radio automatically switches from digital mode to analog mode during the call.
If you are on an analog channel, and your radio locks onto a digital channel, your radio automatically
switches from analog mode to digital mode during the call.
Table 5: Scan types
Type Description
Main Channel Scan Your radio scans all the channels or groups in your scan list. When
(Manual) scanning, your radio may, depending on the settings, automatically
start on the last scanned active channel or group, or on the channel
where scan was initiated.
9.1
Turning Scan On or Off
Procedure:
Press the programmed Scan button.
If Scan is enabled, your radio shows the following indications:
• A positive tone sounds.
• The green LED blinks.
If Scan is disabled, your radio shows the following indications:
• A negative tone sounds.
• The green LED extinguishes.
9.2
Responding to Transmissions During Scanning
During scanning, your radio stops on a channel or group where activity is detected. The radio stays on
that channel for a programmed duration known as hang time. If you want to prioritize a channel, you
can enable the Priority Scan feature through the Customer Programming Software (CPS). Priority Scan
allows the radio to automatically receive transmission from talkgroups with higher priority.
Procedure:
1 Press the PTT button.
2 Wait for the Talk Permit Tone to end, and speak into the microphone.
3 To listen, release the PTT button.
26MN007942A01-AB
Chapter 9: Scan
9.3
Deleting Nuisance Channels
If a channel continually generates unwanted calls or noise (termed a "nuisance" channel), you can
temporarily remove the unwanted channel from the scan list. This capability does not apply to the
channel designated as the Selected Channel.
Procedure:
1 Press the programmed Nuisance Delete button until you hear a tone.
2 Release the programmed Nuisance Delete button.
27MN007942A01-AB
Chapter 10: Initiating Radio Enable
Chapter 10
Initiating Radio Enable
Prerequisites:In One Touch Access, set the to Radio ENABLE.
Procedure:
1 Select the channel with the subscriber ID that you want to enable transmission from.
2 Press the programmed One Touch Access button.
When your radio transmits enable signal, the red LED illuminates.
NOTE: Your radio may transmit enable signal up to three times.
If initiating radio enable is successful, your radio shows the following indications:
• A positive indicator tone sounds.
• The green LED blinks once.
If initiating radio enable is unsuccessful, a negative indicator tone sounds.
The receiving radio restarts.
28MN007942A01-AB
Initiating Radio Disable
Chapter 11
Initiating Radio Disable
Prerequisites:In One Touch Access, set the to Radio DISABLE.
Procedure:
1 Select the channel with the subscriber ID that you want to disable transmission from.
2 Press the programmed One Touch Access button.
When your radio transmits disable signal, your radio shows the following indications:
• A tone sounds.
• The red LED illuminates.
If initiating radio disable is successful, your radio shows the following indications:
• A positive indicator tone sounds.
• The green LED blinks once.
If initiating radio disable is unsuccessful, a negative indicator tone sounds.
The receiving radio shows the following indications:
• A tone sounds.
• The red LED blinks once.
29MN007942A01-AB Chapter 12: Authorized Accessories List Chapter 12 Authorized Accessories List 30
MN007942A01-AB
                                                              Chapter 12: Authorized Accessories List

Table 6: Antennas

Part Number                       Description
PMAE4020_                         Mag One, UHF, 450–470 MHz, Stubby Antenna
PMAE4104_                         Mag One, UHF, 400–470 MHz, Wideband Antenna

Table 7: Battery

Part Number                       Description
PMNN4075_                         Mag One Li-Ion, 1700 mAh Battery

Table 8: Cable

Part Number                       Description
PMDN4077_                         Programming Cable USB

Table 9: Carry Device

Part Number                       Description
PMLN4743_                         Mag One Spring Belt Clip

Table 10: Charger

Part Number                       Description
PMPN4140_                         Desktop Single-Unit Base Charger
25009297001                       Power Supply, Switch-Mode, Low Noise, 18 W, US/NA

Table 11: Earbuds and Earpieces

Part Number                       Description
PMLN6534_                         Mag One Earbud with In-Line Microphone/PTT/VOX Switch
PMLN6531_                         Mag One Ear Receiver with In-Line Microphone/PTT/VOX Switch

Table 12: Headset and Headset Accessory

Part Number                       Description
PMLN6542_                         Mag One Ultra-Lightweight Headset with Boom Microphone and
                                  In-Line PTT Switch

Table 13: Remote Speaker Microphone

Part Number                       Description
PMMN4092_                         Mag One Remote Speaker Microphone

                                                                                                  31
MN007942A01-AB
Table des matières
Table des matières
Avis juridique et soutien.............................................................................................4
Déclarations juridiques et de conformité........................................................................................4
Déclaration de conformité du fournisseur........................................................................... 4
Avis aux utilisateurs (FCC et Industrie Canada)................................................................. 5
Propriété intellectuelle et avis réglementaires.................................................................... 5
Consignes de sécurité importantes.....................................................................................6
Lisez-moi d’abord.......................................................................................................................... 7
Chapitre 1 : Présentation de la radio.........................................................................9
1.1 Touches programmables....................................................................................................... 10
1.1.1 Fonctions de radio affectables................................................................................. 10
1.2 Indications du voyant............................................................................................................. 10
Chapitre 2 : Pour commencer.................................................................................. 12
2.1 Charge de la batterie............................................................................................................. 12
2.2 Installation et retrait de la batterie..........................................................................................13
Installation de la batterie................................................................................................... 13
Retrait de la batterie..........................................................................................................14
2.3 Installation et retrait de l’antenne...........................................................................................15
Installation de l’antenne.................................................................................................... 15
Retrait de l’antenne...........................................................................................................15
2.4 Installation et retrait de la pince de ceinture.......................................................................... 16
Fixation de la pince de ceinture........................................................................................ 16
Retrait de la pince de ceinture.......................................................................................... 17
2.5 Installation du couvercle du connecteur universel................................................................. 17
2.6 Retirer le couvercle du connecteur universel.........................................................................18
2.7 Mise sous tension de la radio................................................................................................ 19
2.8 Mise hors tension de la radio.................................................................................................19
2.9 Réglage du volume................................................................................................................19
Chapitre 3 : Minuterie de délai d’attente................................................................. 20
Chapitre 4 : Sélection des canaux...........................................................................21
Chapitre 5 : Appels................................................................................................... 22
5.1 Appels de groupe...................................................................................................................22
5.1.1 Appels de groupe.....................................................................................................22
5.1.2 Réponse à un appel de groupe................................................................................22
5.2 Appels privés ........................................................................................................................ 23
5.2.1 Faire des appels individuels.....................................................................................23
2MN007942A01-AB
Table des matières
5.2.2 Réponse à des appels individuels........................................................................... 23
5.3 Appels généraux....................................................................................................................23
5.3.1 Appel général...........................................................................................................24
Chapitre 6 : Fonction d'alerte d’appel..................................................................... 25
6.1 Exécution d’une alerte d’appel...............................................................................................25
6.2 Réponse à un avertissement d’appel.................................................................................... 25
Chapitre 7 : Mode direct........................................................................................... 26
7.1 Basculement entre les modes Répéteur et Direct................................................................. 26
Chapitre 8 : Fonction d’écoute ................................................................................27
8.1 Écoute de canaux.................................................................................................................. 27
Chapitre 9 : Balayage................................................................................................28
9.1 Activation ou désactivation du balayage................................................................................28
9.2 Réponse à une émission pendant un balayage.....................................................................28
9.3 Suppression des canaux nuisibles........................................................................................ 29
Chapitre 10 : Activation de la radio......................................................................... 30
Chapitre 11 : Désactivation de la radio................................................................... 31
Chapitre 12 : Liste des accessoires approuvés..................................................... 32
3MN007942A01-AB Avis juridique et soutien Avis juridique et soutien Déclarations juridiques et de conformité Déclaration de conformité du fournisseur Déclaration de conformité du fournisseur Règlement CFR 47, partie 2, section 2.1077(a) de la FCC Partie responsable Nom : Motorola Solutions, Inc. Adresse : 2000 Progress Pkwy, Schaumburg, IL. 60196 Numéro de téléphone : 1 800 927-2744 Déclare par les présentes que le produit : Nom du modèle : est conforme aux réglementations suivantes : Partie 15, sous-partie B, section 15.107(a), 15.107(d) et section 15.109(a) des règlements de la FCC Appareil numérique de classe B En tant que périphérique d’ordinateur personnel, cet appareil est conforme aux dispositions de la partie 15 des règlements de la FCC. Son utilisation est assujettie aux deux conditions suivantes : 1 Cet appareil ne doit pas causer d’interférence nuisible; et 4
MN007942A01-AB
                                                                                     Avis juridique et soutien

2 Cet appareil doit accepter toute interférence reçue, y compris les interférences pouvant
  entraîner un fonctionnement indésirable.
        REMARQUE :
        Cet équipement a fait l’objet de tests et a été déclaré conforme aux limites établies
        pour un appareil numérique de classe B, conformément à la section 15 des règlements
        de la FCC. Ces limites sont fixées afin d’offrir une protection suffisante contre des
        interférences nuisibles dans une installation résidentielle. Cet équipement génère,
        utilise et peut émettre de l’énergie de radiofréquence et, s’il n’est pas installé ou
        utilisé conformément aux instructions, il peut provoquer un brouillage nuisible aux
        communications radio. Cependant, il est impossible de garantir qu’il n’y aura aucune
        interférence dans une installation particulière.
        Si cet appareil cause une interférence nuisible à la réception de la radio ou de la
        télévision, ce qui peut être déterminé en éteignant et en allumant l’appareil, vous êtes
        encouragé à remédier à la situation en prenant une ou plusieurs des mesures suivantes :
        •   Réorienter ou déplacer l’antenne réceptrice.
        •   Augmenter la distance entre l’équipement et le récepteur.
        •   Brancher l’appareil dans une autre prise sur un circuit différent de celui du récepteur.
        •   Consulter le distributeur ou un technicien de radio ou de télévision chevronné pour
            obtenir de l’aide.

Avis aux utilisateurs (FCC et Industrie Canada)
Le présent appareil est conforme aux CNR d’Industrie Canada applicables aux appareils radio
exempts de licence et à la partie 15 des règlements de la FCC :
•   Cet appareil ne doit pas causer d’interférence nuisible.
•   Cet appareil doit accepter toute interférence reçue, y compris les interférences pouvant entraîner un
    fonctionnement indésirable.
•   Toute modification apportée à cet appareil sans l’autorisation explicite de Motorola Solutions peut
    annuler l’autorisation d’utiliser cet appareil.

Propriété intellectuelle et avis réglementaires

Droits d’auteur
Les produits Motorola Solutions décrits dans ce document peuvent inclure des programmes
informatiques protégés par des droits d’auteur de Motorola Solutions. Les lois des États-Unis
et d’autres pays réservent à Motorola Solutions certains droits exclusifs pour les programmes
informatiques protégés par droits d’auteur. Par conséquent, tout programme informatique protégé par
droits d’auteur de Motorola Solutions compris dans les produits Motorola Solutions décrits dans le
présent document ne peut être copié ni reproduit de quelque manière que ce soit sans l’autorisation
écrite expresse de Motorola Solutions.
Aucune partie du présent document ne peut être reproduite, transmise, stockée dans un système de
recherche documentaire ou traduite dans une autre langue ou dans un langage informatique, sous
quelque forme ou par quelque moyen que ce soit, sans l’autorisation écrite préalable de Motorola
Solutions, Inc.

                                                                                                            5
MN007942A01-AB
Avis juridique et soutien
Marques de commerce
MOTOROLA SOLUTIONS, le logo au M stylisé, et Mag One, and BPR 40d sont des marques
déposées au bureau des brevets et marques de commerce des États-Unis. Les autres noms de
produit et de service sont la propriété de leurs détenteurs respectifs.
Droits de licence
L’achat de produits Motorola Solutions ne peut être considéré comme une transaction octroyant
directement, par inférence, estoppel ou autrement une licence en vertu des droits d’auteur, des droits
de brevets ou d’une demande de brevet de Motorola Solutions, à l’exception d’une licence d’utilisation
normale et non exclusive, libre de toute redevance, prévue par la loi lors de la vente d’un produit.
Directive sur la mise au rebut des équipements électriques et électroniques de
l’Union européenne (UE) (DEEE)
La directive DEEE de l’Union européenne exige que les produits (ou leur emballage, dans
certains cas) vendus dans les pays de l’UE portent l’étiquette de la poubelle barrée.
Comme le définit la directive WEEE, cette étiquette de poubelle barrée signifie que les clients et
les utilisateurs finaux dans les pays de l’UE ne doivent pas jeter les équipements électriques et
électroniques ou leurs accessoires dans les ordures domestiques.
Les clients ou les utilisateurs finaux dans les pays de l’UE doivent communiquer avec le représentant
ou le centre de service de leur fournisseur d’équipement pour obtenir des renseignements sur le
système de collecte des déchets de leur pays.
Avis de non-responsabilité
Veuillez noter que certaines fonctionnalités, installations et capacités décrites dans ce document
pourraient ne pas s’appliquer ou être accordées sous licence pour l’utilisation sur un système
particulier, ou pourraient dépendre des caractéristiques d’une unité mobile d’abonné ou de la
configuration de certains paramètres. Veuillez consulter votre personne-ressource chez Motorola
Solutions pour en savoir plus.
© 2021 Motorola Solutions, Inc. Tous droits réservés.
Consignes de sécurité importantes
MISE EN GARDE :
Cette radio doit être utilisée à des fins professionnelles uniquement. Avant d’utiliser
la radio, lisez le guide Radios bidirectionnelles portatives : exposition aux radiofréquences
et sécurité du produit, qui contient d’importantes instructions de fonctionnement pour une
utilisation sécuritaire et des informations sur l’exposition aux fréquences radioélectriques, dans
le but d’assurer votre conformité aux normes et règlements en vigueur.
Toute modification apportée à cet appareil sans l’autorisation explicite de Motorola Solutions peut
annuler l’autorisation d’utiliser l'appareil.
Selon la réglementation d’Industrie Canada, cet émetteur radio ne peut être utilisé qu’avec une
antenne dont le type et le gain maximal (ou minimal) sont approuvés par Industrie Canada pour
cet émetteur. Afin de limiter les interférences radio pour les autres utilisateurs, le type et le gain de
l’antenne doivent être choisis de façon à ce que la puissance isotrope rayonnée équivalente (p.i.r.e) ne
soit pas plus forte qu’il ne le faut pour établir la communication.
Cet émetteur radio a été approuvé par Industrie Canada pour utilisation avec une antenne approuvée
par Motorola Solutions offrant le gain maximal autorisé et l’impédance requise pour le type d’antenne
6MN007942A01-AB
Avis juridique et soutien
indiqué. Il est strictement interdit d’utiliser avec cet appareil tout type d’antenne ne figurant pas dans
cette liste et présentant un gain supérieur au maximum indiqué pour le type.
Lisez-moi d’abord
Ce guide d'utilisation décrit le fonctionnement de base des modèles de radio offerts dans votre région.
Notations utilisées dans ce manuel
En parcourant le texte de ce document, vous remarquerez l’utilisation des mots Avertissement, Mise
en garde et Remarque. Ces notations sont utilisées pour mettre l’accent sur les dangers potentiels et
pour encourager les utilisateurs à prendre des précautions.
AVERTISSEMENT :
Une procédure, une pratique ou une condition de fonctionnement, etc. qui pourrait causer des
blessures ou entraîner la mort si elle n’est pas respectée.
MISE EN GARDE :
Une procédure, une pratique ou une condition de fonctionnement, etc. qui pourrait causer des
dommages à l’équipement si elle n’est pas respectée.
REMARQUE :
Une procédure, une pratique ou une condition de fonctionnement, etc. qui doit absolument être
précisée.
Notations spéciales
Les notations spéciales suivantes sont utilisées tout au long du texte pour mettre en évidence
certaines informations ou certains éléments :
Tableau 1 :Notations spéciales
Exemple Description
Touche Menu ou touche PTT Les mots en gras indiquent le nom d’une touche
ou d’un élément de menu.
La radio affiche Bluetooth activé. Les mots en police de machine à écrire
indiquent les chaînes MMI ou les messages
affichés sur la radio.
La police courier, les caractères gras, italiques
et les chevrons indiquent une entrée de
l’utilisateur.
Configurer→Tonalité→Toutes les tonalités Les mots en gras avec flèche indiquent la
structure de navigation dans les éléments de
menu.
Disponibilité des fonctionnalités et des services
Votre détaillant ou votre administrateur peut avoir personnalisé votre radio en fonction de vos besoins
particuliers.
REMARQUE :
Les fonctions du manuel ne sont pas toutes offertes par votre radio. Pour obtenir plus de
renseignements à ce sujet, communiquez avec votre détaillant ou avec votre administrateur.
Adressez-vous à votre détaillant ou à votre administrateur de système pour obtenir les renseignements
suivants :
• Quelles sont les fonctions de chaque bouton?
7MN007942A01-AB
Avis juridique et soutien
• Quels accessoires optionnels pourraient vous être utiles?
• Quelles sont les pratiques exemplaires d’utilisation de la radio pour assurer une communication
efficace?
• Quelles procédures d’entretien peuvent prolonger la durée de vie de la radio?
8MN007942A01-AB
Présentation de la radio
Chapitre 1
Présentation de la radio
1
2
3
4 11
5 10
9
6
7
8
Action Description
1 Antenne
2 Bouton sélecteur de canal
3 Bouton Marche/Arrêt/Volume
4 Voyant lumineux
5 Bouton d’émission (PTT)
6 Bouton latéral programmable 1
7 Bouton latéral programmable 2
8 Microphone
9 Haut-parleur
10 Port de programmation
11 Connecteur d’accessoire
9MN007942A01-AB
Chapitre 1 : Présentation de la radio
1.1
Touches programmables
Selon la durée de la pression, les boutons programmables fonctionnent différemment.
Tableau 2 :Durée de pression
Action Description
Appuyer Appuyez et relâchez.
Appui long Appuyez et maintenez pendant 4 secondes ou moins selon les
paramètres du logiciel de programmation client (CPS).
1.1.1
Fonctions de radio affectables
Vous pouvez attribuer une liste de fonctions de la radio aux boutons programmables.
Tableau 3 :Types de fonctions programmables
Fonction Description
Toutes les Vous permet d'activer ou de désactiver les sonneries et les
tonalités d'alerte activées/ avertissements.
désactivées
Indicateur de batterie Permet d’indiquer la charge de la batterie au moyen du voyant.
Puissance élevée/faible Vous permet d’alterner entre un niveau de puissance élevé ou bas.
Moniteur Permet de surveiller un canal.
Suppression des Vous permet de retirer temporairement un canal nuisible de la liste
nuisances de balayage, sauf le canal sélectionné. Le canal sélectionné réfère à
la zone ou à la combinaison de canaux sélectionnée de l'utilisateur à
partir duquel le balayage est effectué.
Accès direct Vous permet de lancer un appel de groupe ou privé prédéfini et
d'envoyer un avis d'appel ou de revenir au mode Accueil.
Relais/Direct Vous permet d'alterner entre l'utilisation d'un répéteur et les
communications directes avec une autre radio.
Balayage activé/ Vous permet d'activer ou de désactiver le balayage.
désactivé
Silencieux normal/filtré Vous permet de basculer entre les modes Normal et Filtré.
1.2
Indications du voyant
Le voyant indique l’état de fonctionnement de la radio. Un technicien qualifié peut désactiver en
permanence le voyant en le reprogrammant.
Tableau 4 :Indications du voyant
Indication État
Rouge fixe La radio est en cours de charge ou de transmission.
10MN007942A01-AB
Chapitre 1 : Présentation de la radio
Indication État
Rouge clignotant La capacité de la batterie est faible.
Jaune fixe La radio effectue un balayage pour détecter de l'activité.
Vert fixe La radio reçoit la transmission.
Vert clignotant La radio effectue un balayage pour détecter de l'activité.
11MN007942A01-AB
Chapitre 2 : Pour commencer
Chapitre 2
Pour commencer
Cette section fournit les instructions pour la préparation de votre radio en vue de son utilisation.
2.1
Charge de la batterie
Votre radio est alimentée par une batterie au lithium-ion.
Préalables :
Mettez votre radio hors tension durant la charge.
Procédure :
• Pour vous conformer aux conditions de la garantie et pour éviter les dommages, chargez la
batterie au moyen d'un chargeur autorisé.
• Chargez toute batterie neuve de 14 à 16 heures avant sa première utilisation afin d’assurer un
rendement optimal.
Pour des résultats optimaux, chargez la batterie à la température ambiante.
12MN007942A01-AB
Chapitre 2 : Pour commencer
2.2
Installation et retrait de la batterie
Installation de la batterie
Procédure :
1 Glissez la batterie dans le logement de la batterie.
2 Rabattez le loquet de la batterie pour le fermer et appuyez-le sur la batterie jusqu'à ce qu’il
verrouille en place.
13MN007942A01-AB
Chapitre 2 : Pour commencer
Retrait de la batterie
Procédure :
1 Éteignez votre radio.
2 Rabattez le loquet de la batterie pour l’ouvrir.
3 Faites glisser la batterie hors de son compartiment et soulevez-la.
14MN007942A01-AB
Chapitre 2 : Pour commencer
2.3
Installation et retrait de l’antenne
Installation de l’antenne
Procédure :
1 Placez l’antenne dans son orifice.
2 Tournez l’antenne dans le sens horaire.
REMARQUE :
Fixer l'antenne empêche l'eau et la poussière d’entrer dans la radio.
Retrait de l’antenne
Procédure :
1 Tournez l’antenne dans le sens antihoraire.
2 Retirez l’antenne de son orifice.
15You can also read