Jungle Gym User Manual - Assembly, Installation, Care, Maintenance, and User Instructions - Propel Trampolines
←
→
Page content transcription
If your browser does not render page correctly, please read the page content below
Jungle Gym
                                   User Manual

    Assembly, Installation, Care, Maintenance, and User
                         Instructions

                                           WARNING
 READ THESE MATERIALS PRIOR TO ASSEMBLING
        AND USING THIS JUNGLE GYM.

   Failure to assemble and use this Jungle Gym as specified in this manual will automatically void the warranty

1|Page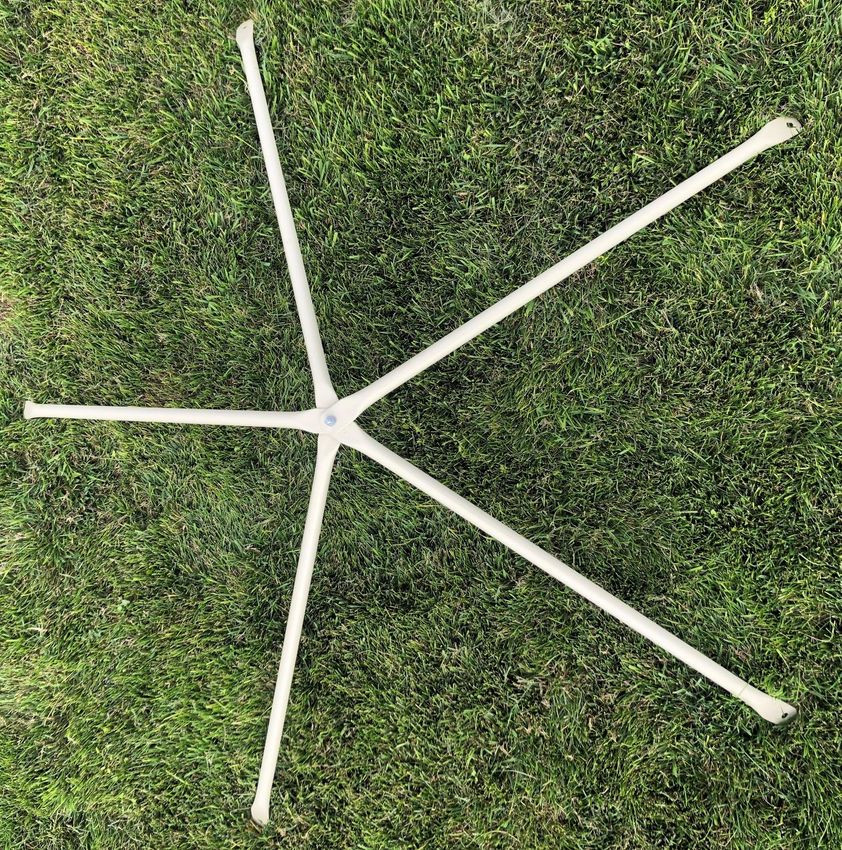
Do Not return this product to the store. Instead, please visit our website at
www.PropelTrampolines.com where you will find our current contact
information. Our friendly customer service staff can help you with any
problems or questions that may arise during the assembly, installation, use,
maintenance, or obtainment of replacement parts for your Jungle Gym.

 This conforms to ASTM F1148, Consumer Safety Performance Specification
                    for Home Playground Equipment.

                                  WARNING
Read all assembly, care, maintenance, and user instructions in
this manual prior to assembling and using this Jungle Gym.

 Please save this manual for future reference and check our
 website for the latest manual revisions.

                               LIABILITY DISCLAIMER:
 While every attempt is made to embody the highest degree of protection in all equipment, we cannot
 guarantee freedom from injury. The user assumes all risk of injury due to use, assembly, or transportation.
 All merchandise is sold on this condition. No representative of the company can waive or change disclaimer
 condition.

                                           WARNING
This Jungle Gym has a maximum number of 4 occupants that may safely use the entire playset , with
a maximum weight of 400 pounds.

2|Page
BEFORE YOU BEGIN
 Thank you for purchasing a Propel Jungle Gym.

 This Jungle Gym comes equipped with warnings and instructions for its proper assembly,
 care, maintenance, and use. This information must be read by all supervisors and users before
 any person is allowed to use it.

 Follow all warning pictures included in this manual. If you have any questions regarding these
 warnings, please contact us at cs@propeltrampolines.com.

 After reading this manual, if you have further questions, or if you would like to contact us,
 please visit our website at www.PropelTrampolines.com.

                                     WARNING

 1. Place the equipment on level ground, not less than 6 ft. (1.8 m) from any structure or
    obstruction such as a fence, garage, house, overhanging branches, laundry lines, or
    electrical wires.
 2. DO NOT install home playground equipment over concrete, asphalt, packed earth,
    grass, carpet, or any other hard surface. A fall onto a hard surface can result in serious
    injury or death to the equipment user.
 3. Create a site free of obstacles that could cause injuries- such as low overhanging tree
    branches, overhead wires, tree stumps and/or roots, large rocks, bricks, and concrete.
 4. Choose a level location for the equipment. This can reduce the likelihood of the play set
    tipping over and loose-fill surfacing materials washing away during heavy rains.
 5. Children must not use this equipment until it is properly installed.
 6. One week after assembly, check equipment for loose or missing bolts. Tighten and
    replace if needed.
 7. Fall Height: 60” (152 cm). We recommend using 9” (15 cm) of Double Shredded Bark
    Mulch.

 User should read and understand rules. Supervisor should be sure that these
                     rules are always properly followed:

3|Page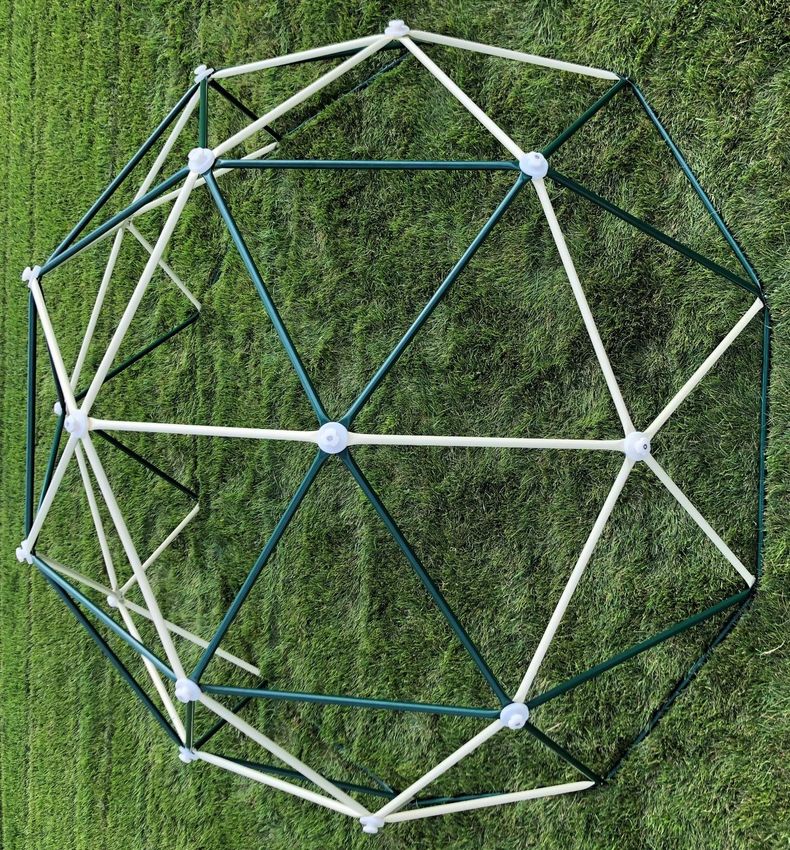
Operating & Maintenance Instructions
                                                    WARNING
     Observing the following statements and warnings reduces the likelihood of serious or fatal injury.
     Adult supervision is recommended for children of all ages at all times while the Jungle Gym is being used.
     Do not use the equipment in a manner other than intended.
     Do not allow children to jump from moving play items.
     Users should be dressed appropriately. Users wearing inappropriate items such as but not limited to, loose fitting
     clothing, hood and neck drawstrings, scarves, cord-connected items, cape, and ponchos should not be allowed to
     play on the equipment. These items can cause death by strangulation.
     Do not climb on the equipment when it is wet.
     Do not allow others to attach items to playground equipment that are not specifically designed for use with the
     equipment. Such as, but not limited to, jump ropes, clothing lines, pet leashes, cables and chains as they may
     cause a strangulation hazard.
     Users need to remove their bike or other sports helmet before playing on the playground equipment.
     Users need to be dressed in well-fitting and full foot enclosing footwear. Examples of inappropriate footwear are
     clogs, flip flops, and sandals.
     Do not move equipment while it is in use.
     Do routine checks and maintenance procedures regularly, if not done the equipment could overturn and/or
     become a hazard.
     Check surfacing material and replenish as necessary to maintain proper depth.
     Remove any tripping hazards, such as exposed concrete footings, tree stumps, or rocks.
     Check all nuts and bolts regularly for tightness and tighten as required. It is particularly important that this
     procedure be followed at the beginning of each season.
     Check all coverings for bolts and sharp edges regularly to be certain they are in place. It is especially important
     to do this at the beginning of each new season.
     Do not use the equipment when the temperature drops below 32 degrees Fahrenheit or 0 degrees Celsius.

IMPORTANT: UNITED STATES CONSUMER PRODUCT
  SAFETY COMMISSION’S (USCPSC) Outdoor Home
          Playground Safety Guidelines:
  One of the most important things you can do to reduce the likelihood of serious head injuries
 is to install shock-absorbing protective surfacing under and around your play equipment.
 The protective surfacing should be applied to a depth that is suitable for the equipment height
 in accordance with ASTM Specification F1292. There are different types of surfacing to
 choose from; whichever product you select, follow these guidelines:

   1. Loose-Fill Materials:
         a. Maintain a minimum depth of 9 inches of loose-fill materials such as wood
            mulch/chips, engineered wood fiber (EWF), or shredded/recycled rubber mulch
            for equipment up to 8 feet high; and 9 inches of sand or pea gravel for equipment
            up to 5 feet high. NOTE: An initial fill level of 12 inches will compress to about
            a 9-inch depth of surfacing over time. The surfacing will also compact, displace,
4|Page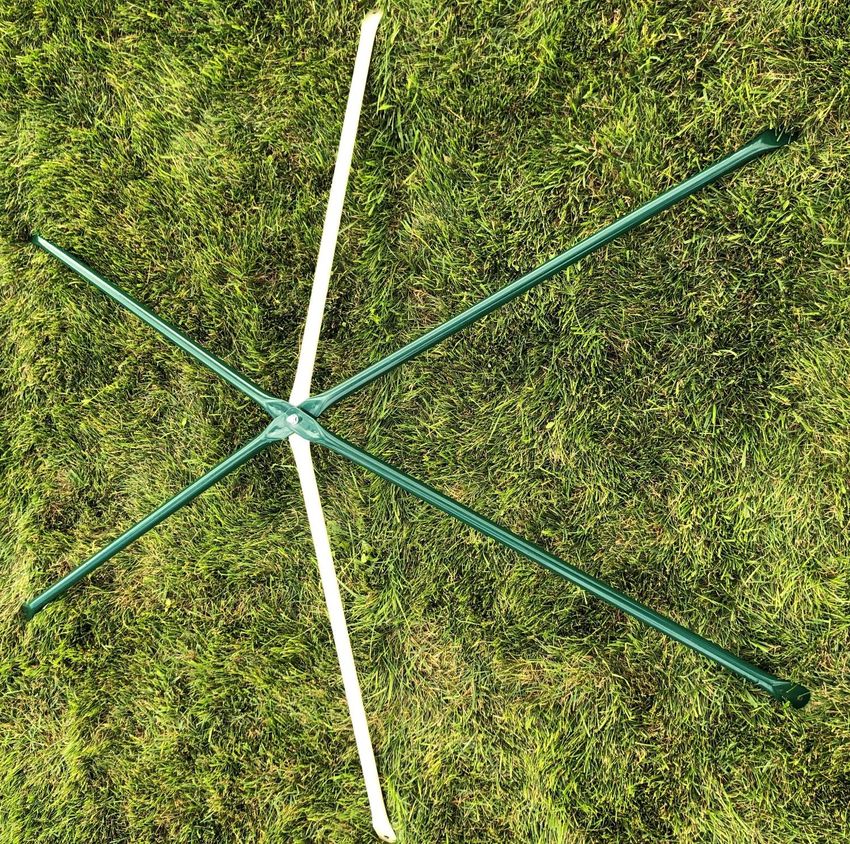
and settle, and should be periodically refilled to maintain at least a 9-inch depth.
           b. Use a minimum of 6 inches of protective surfacing for play equipment less than
               4 feet in height. If maintained properly, this should be adequate. (At depths
               less than 6 inches, the protective material is too easily displaced or compacted.)
               NOTE: Do not install home playground equipment over concrete, asphalt, or
               any other hard surface. A fall onto a hard surface can result in serious injury to
               the equipment user. Grass and dirt are not considered protective surfacing
               because wear and environmental factors can reduce their shock absorbing
               effectiveness. Carpeting and thin mats are generally not adequate protective
               surfacing. Ground level equipment – such as a sandbox, activity wall,
               playhouse or other equipment that has no elevated play surface – does not need
               any protective surfacing.
           c. Use containment, such as digging out around the perimeter and/or lining the
               perimeter with landscape edging. Don’t forget to account for water drainage.
           d. Check and maintain the depth of the loose-fill surfacing material. To maintain
               the right amount of loose-fill materials, mark the correct level on play
               equipment support posts. That way you can easily see when to replenish and/or
               redistribute the surfacing.
           e. Do not install loose fill surfacing over hard surfaces such as concrete or asphalt.
   2. Poured-In-Place Surfaces or Pre-Manufactured Rubber Tiles:
      You may be interested in using surfacing other than loose-fill materials – like rubber
      tiles or poured-in-place surfaces.
           a. Installations of these surfaces generally require a professional and are not “do-
               it-yourself” projects.
           b. Review surface specifications before purchasing this type of surfacing. Ask the
               installer/manufacturer for a report showing that the product has been tested to
               the following safety standard: ASTM F1292 Standard Specification for Impact
               Attenuation of Surfacing Materials within the Use Zone of Playground
               Equipment. This report should show the specific height for which the surface
               is intended to protect against serious head injury. This height should be equal
               to or greater than the fall height – vertical distance between a designated play
               surface (elevated surface for standing, sitting, or climbing) and the protective
               surfacing below – of your play equipment.
           c. Check the protective surfacing frequently for wear.
   3. Placement - Proper placement and maintenance of protective surfacing is essential. Be
      sure to:
           a. Extend surfacing at least 6 feet from the equipment in all directions.
           b. For to-fro swings, extend protective surfacing in front of and behind the swing
               to a distance equal to twice the height of the top bar from which the swing is
               suspended.
           c. For tire swings, extend surfacing in a circle whose radius is equal to the height
               of the suspending chain or rope, plus 6 feet in all directions.
5|Page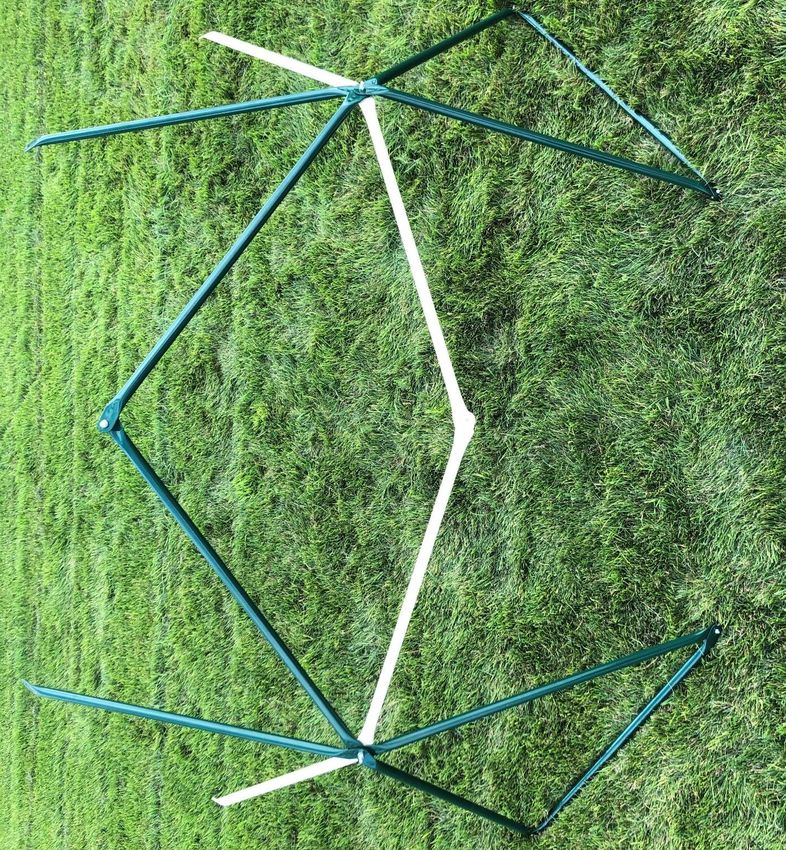
Parts List:
ID           Item Description                         Qty
GT            38 ½” Dark Green Tube                     35

TT            33 ¼” Tan Tube                                  30

HH           Handhold                                         16

Hardware List:
ID          Item Description                          Qty
LB             8mm x 45mm Button Head Bolt             16

BB              8mm x 25mm Button Head Bolt             10

TN              8mm x 25mm Thru Nut                           16

WS              8mm Washer                                        56

NN             13mm Nylock Nut/ White inside             16

NN             13mm Nylock Nut/ Blue inside              10

AR             5mm Allen Wrench                               2

HR             13mm Hand Wrench                                1

Recommended to use for faster assembly 13 mm Socket
6|Page

Take a Bolt (LB), slide a Washer (WS) over top, then start by placing two of the Tan Tubes (TT)
and place four of the Dark Green Tubes (GT) in the order shown from the picture below. Slide
another Washer (WS) over the top of the 6 Tubes and the Bolt (LB). Place a Nylock Nut (NN)
on top. Tighten the Nylock Nut (NN) with the Wrench (AR) and tighten down to the Bolt (LB)
until there is no movement. Do this step five times until you have 5 star shape figures.

                                5                             4

                 1                                                              2

                               6                               3

  -Note: Make sure all 6 tubes are in a star shape before being tightened down, also
                          make sure Nut goes on the outside.

7|Page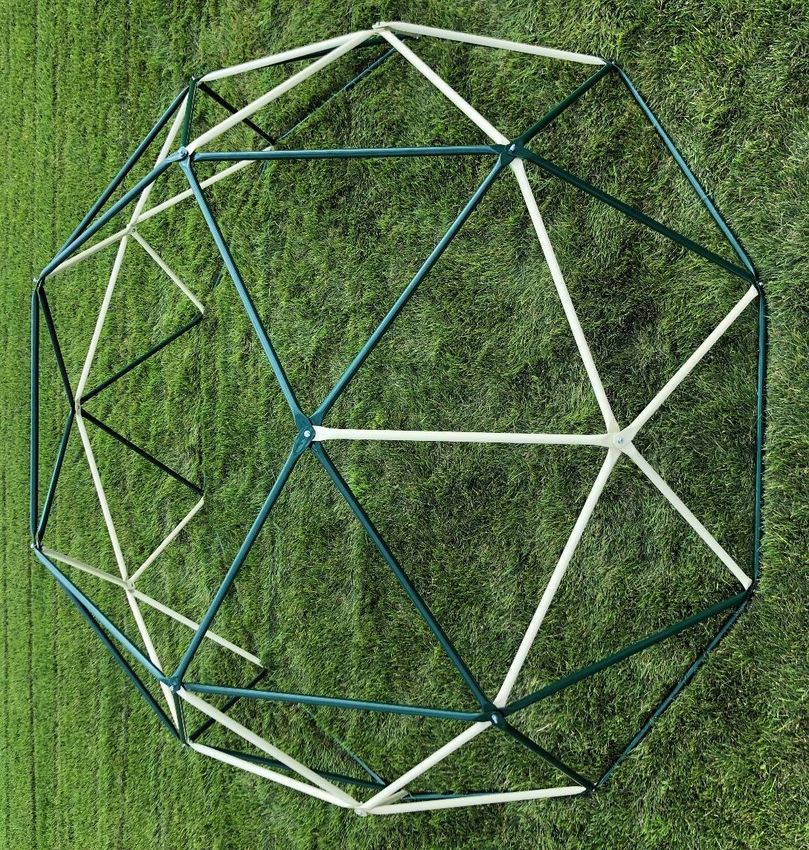
Add a Dark Green Tube (GT) to the bottom of the Tubes #1 & 2 shown below. Slide a Bolt (BB)
through a Washer (WS) and the two Dark Green Tubes (GT). Place another Washer (WS) over
   top and a Nylock Nut (NN). Only tighten down finger tight for removal later. Follow same
  steps for assembly on the other end. Then do this to ALL five star shape figures made from
                                           Page 7.

              1                                   2

-Note: Repeat this step on all five figures assembled on Page 7.

 -Note: Make sure to use the 8mm x 25mm Bolt and the Nylock Nut. Ensure Nut is on
                  the inside of the Jungle Gym as shown above for all bottom tubes.
8|Page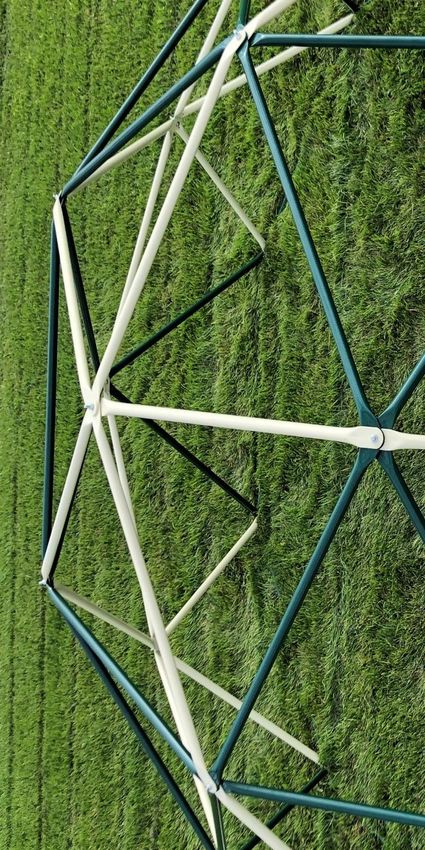
Place two of the star shaped figures together. Secure the Green Tubes together at the top
  joint as shown below, as well as the Tan Tubes together. Place a Bolt (LB) through a Washer
 (WS) then through the Dark Green Tubes (GT) and another Bolt throught the Tan Tubes (TT).
Place another Washer (WS) over the Bolt (LB) and a Nylock Nut (NN), make sure its only finger
                                          tight for now.

 -Note: The Jungle Gym should be stood upright to complete this step and the rest of
                                   the assembly.
9|Page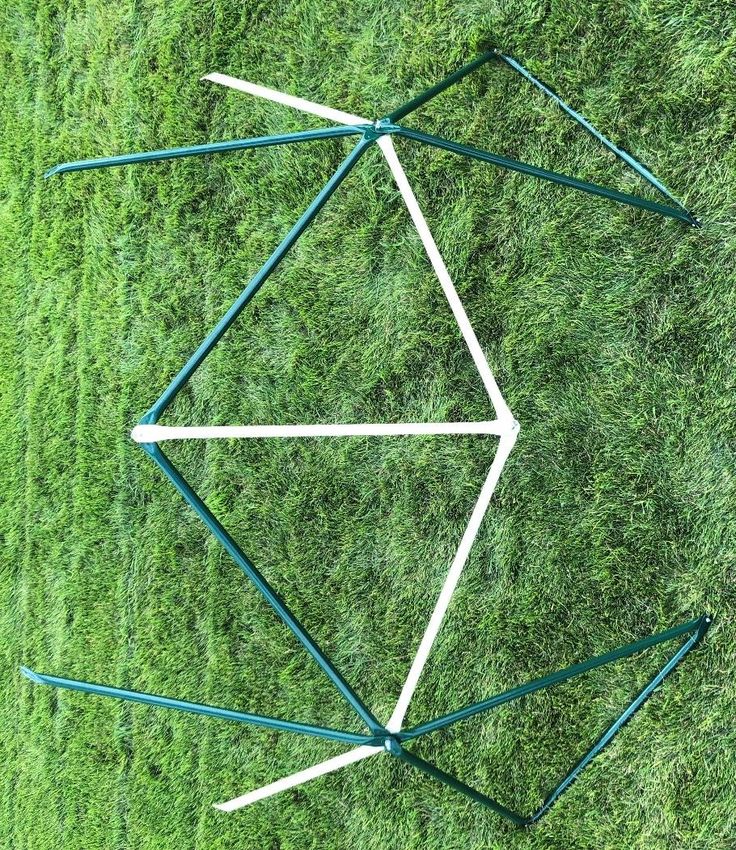
Add in an additional Tan Tube (TT). Undo Bolt from the two Green Tubes on top, add in the
Tan tube. Put Hardware back through all 3 tubes, tightening it back down only finger tight.
Repeat this step with the two Tan Tubes below.
Now add in two more additional Tan Tubes (TT). Undo the middle Tan Tubes shown below.
Add in the two new Tan Tubes, putting the Hardware back through the now 5 Tan tubes.
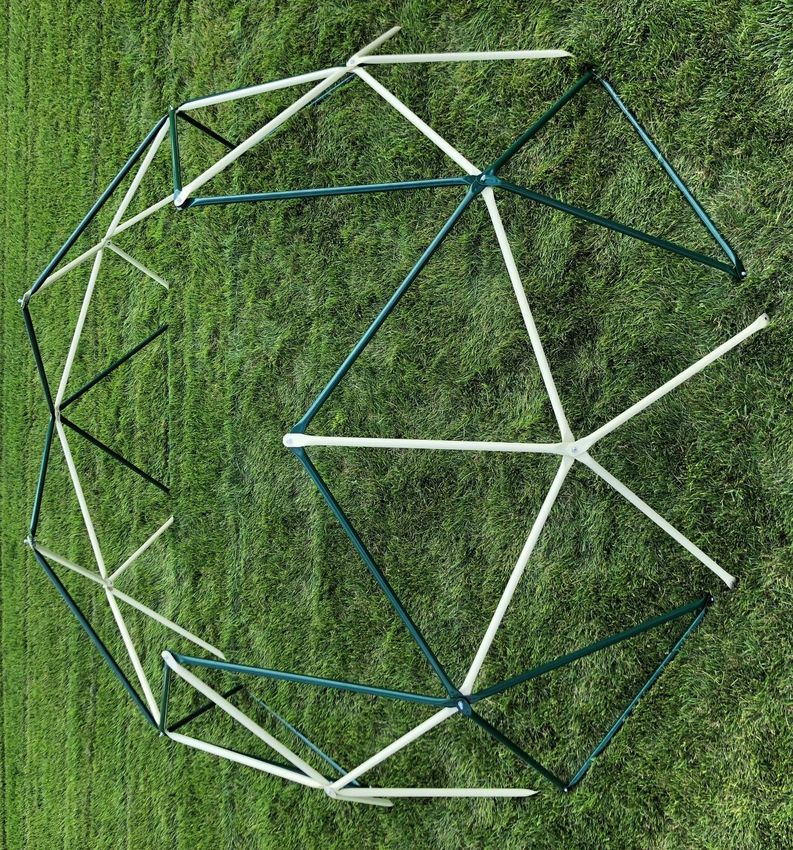
10 | P a g eRepeat the steps from Pages 9 & 10 until you have all 5 star shape figures standing and
bolted together in a full circle. This is what it should look like when those steps are
completed.
-Note: Only tighten down the Hardware finger tight.
11 | P a g eAdd Dark Green Tubes (GT) to the existing joints all around the bottom of the Jungle Gym.
There should already be Green Tubes on the bottom of all Green tubes. Starting by replacing
the order of the tubes shown below. Remove the Hardware, put the bottom Green Tubes on
the outside of the Jungle Gym. Tighten down Completely.
-Note: Make sure all Bolts on the bottom go in with the head of the Bolt on the
outside, to prevent injury.
12 | P a g eNext step is to add in additional Green Tubes (Arrows) to the top section of the Jungle Gym.
Starting with removing the Hardware and adding in a Green Tube, you should have 5 tubes on
each Bolt. The Green Tubes you are adding in should be on the top as shown below. Only
tighten down finger tight.
-This is what your Jungle Gym
should look like after you have
completed all the previous →
steps.
13 | P a g eConnect the five leftover Tan Tubes (TT) together making a star shape figure like shown in
picture below. Slide a Bolt (LB) and Washer (WS) through the five Tan Tubes in the order
shown below. Secure with a Washer (WS) and a Nylock Nut (NN). Tighten down completely.
3
1 2
4 5
-Note: This is the top of the Jungle Gym.
14 | P a g eTaking the 5 Tan Tube figure you just made above and placing on top of the Jungle Gym, using another person to help hold while adding into the existing joints around the Jungle Gym. Go around and tighten all the bolts down. Do Not Allow Children to play on the Jungle Gym before the handholds are in place. 15 | P a g e
Your Jungle Gym should now look like the picture shown below.

16 | P a g e
Attach all 16 Handholds (HH) to each of the joints except, not including the bottom 10
   touching the ground. Attach the Handholds (HH) by sliding in the Thru Nut (TN) into the
 Handhold (HH). Secure each Handhold (HH) down with the Thru Nut (TN) to the existing Bolt
                                             (LB).

                              LB

                              WS

                              WS

                              NN

                              HH

                              TN

17 | P a g e
Make sure all Handholds are secure and will not spin around before children use the
Jungle Gym.
-Note: When moving the Jungle Gym, do not slide the Jungle Gym or tip it on its side.
This may cause the Jungle Gym to lose its shape. Instead, use several people to lift the
Jungle Gym and move it to the new location.
18 | P a g eDISASSEMBLY
To disassemble (take apart) the Jungle Gym, follow the assembly steps in reverse order. Use
gloves to protect your hands from pinch points while taking apart.
REPLACEMENT PARTS
To order replacement parts please visit our website at www.PropelTrampolines.com. If you
need assistance ordering parts or have other questions about your Jungle Gym, please call the
customer service number listed in the Information section of our website.
LIMITED WARRANTY
PROPEL warrants its Jungle Gym product to be free from defects in material and workmanship
under normal use and service conditions. The powder coated steel frame is warranted for one (1)
year from the date of purchase. All other parts are warranted for ninety (90) days from the date of
purchase.
All warranty coverage extends only to the original retail purchaser from the original date of
purchase. Our obligation under this warranty is limited to replacing or repairing the product at our
discretion. All products for which a warranty claim is made must be received by us at one of our
authorized service centers. Freight must be prepaid and accompanied by proof of purchase. All
returns must be pre-authorized. This Warranty does not extend to any product, or damage to a
product that is caused by or attributable to freight damage, abuse, misuse, improper or abnormal
usage, act of God, storm damage, installation or use of accessories, repairs not performed by our
authorized service center, and to products used for commercial or rental purposes. No other warranty
expressed or implied beyond that specifically set forth above is authorized.
Propel Trampolines is not responsible or liable for indirect, special, or consequential damages arising
out of, or in connection with the use or performance of this product. Propel is not responsible for
other damages with respect to any economic loss, loss of property, loss of revenue or profits, loss of
enjoyment or use, cost of removal or installation, and any other consequential damages. In the
United States of America some states do not allow the exclusion or limitation of incidental or
consequential damages. Accordingly, the above limitation may not apply to you.
The warranty extended hereunder is in lieu of all other warranties, and any implied warranty of
merchantability or fitness for a particular purpose is limited in its scope and duration to the terms
set forth herein. In the United States of America some states do not allow limitations on how long
an implied warranty lasts. Accordingly, the above limitation may not apply to you.
This warranty gives you specific legal rights. You may also have other rights which vary from state
to state in the United States of America.
19 | P a g eYou can also read