INSTRUCTIONS FOR USE BEDIENUNGSANLEITUNG DISHWASHER GESCHIRRSPÜLER - VW247M - Coolblue
←
→
Page content transcription
If your browser does not render page correctly, please read the page content below
INSTRUCTIONS FOR USE
BEDIENUNGSANLEITUNG

DISHWASHER
GESCHIRRSPÜLER

VW247M
EN     Instructions for use              EN 3 - EN 25
DE     Bedienungsanleitung               DE 3 - DE 25

Pictograms used - Benutzte Piktogramme

Important information - Wissenswertes

Tip - Tipp
SAFETY REGULATIONS
        IE LU AT NL     BE      DE   DE   GB   IE FR LUBE AT   NO NL SE
                                                                     BE                      DKDE   DE
                                                                                                     FI   G

Contact a registered installer to fit your appliance
(see “Installation instructions”). Do not connect the
appliance to the electrical mains until the installation is
complete.

This appliance is intended to be used in household and
similar applications such as:
  ▷ staff kitchen areas in shops, offices and other working
    environments;
  ▷ farmhouses;
  ▷ by clients in hotels, motels and other residential type
    environments;
  ▷ bed and breakfast type environments.

For EN60335-1:
• This appliance can be used by children aged from
  8 years and above and persons with reduced physical,
  sensory or mental capabilities or lack of experience
  and knowledge if they have been given supervision or
  instruction concerning use of the appliance in a safe
  way and understand the hazards involved. Children
  shall not play with the appliance. Cleaning and user
  maintenance shall not be done by children without
                                                                          Original instruction

  supervision.
SAFETY REGULATIONS

For IEC60335-1:
• This appliance is not intended for use by persons
  (including children) with reduced physical, sensory
  or mental capabilities, or lack of experience and
  knowledge, unless they have been given supervision or
  instruction concerning use of the appliance by a person
  responsible for their safety.
• Packaging material could be dangerous for children!
• This appliance is for indoor household use only.
• To protect against the risk of electrical shock, do not
  immerse the unit, cord or plug in water or other liquid.
• Please unplug before cleaning and performing
  maintenance on the appliance.
• Use a soft cloth moistened with mild soap, and then
  use a dry cloth to wipe it again.

Earthing Instructions
• This appliance must be earthed. In the event of a
  malfunction or breakdown, earthing will reduce the
  risk of an electric shock by providing a path of least
  resistance of electric current. This appliance is equipped
  with an earthing conductor plug.
• The plug must be plugged into an appropriate outlet
  that is installed and earthed in a ccordance with all local
  codes and ordinances.
• Improper connection of the equipment-earthing
  conductor can result in the risk of an electric shock.
SAFETY REGULATIONS

• Check with a qualified electrician or service
  representative if you are in doubt whether the appliance
  is properly grounded.
• Do not modify the plug provided with the appliance, if it
  does not fit the outlet.
• Have a proper outlet installed by a qualified electrician.
• Do not abuse, sit on, or stand on the door or dish rack
  of the dishwasher.
• Do not operate your dishwasher unless all enclosure
  panels are properly in place.
• Open the door very carefully if the dishwasher is
  operating, there is a risk of water squirting out.
• Do not place any heavy objects on or stand on the door
  when it is open. The appliance could tip forward.

When loading items to be washed:
 ▷ Locate sharp items so that they are not likely to
   damage the door seal;
 ▷ Warning: Knives and other utensils with sharp points
   must be loaded in the basket with their points facing
   down or placed in a horizontal position.

• Some dishwasher detergents are strongly alkaline.
  They can be extremely dangerous if swallowed.
  Avoid contact with the skin and eyes and keep children
  away from the dishwasher when the door is open.

SAFETY REGULATIONS

• Check that the detergent powder is empty after
  completion of the wash cycle.
• Do not wash plastic items unless they are marked
  “dishwasher safe” or the equivalent.
• For unmarked plastic items not so marked, check the
  manufacturer’s recommendations.
• Use only detergent and rinse agents recommended for
  use in an automatic dishwasher.
• Never use soap, laundry detergent, or hand washing
  detergent in your dishwasher.
• The door should not be left open, since this could
  increase the risk of tripping.
• If the supply cord is damaged, it must be replaced
  by the manufacturer or its service agent or a similarly
  qualified person in order to avoid a hazard.
• During installation, the power supply must not be
  excessively or dangerously bent or flattened.
• Do not tamper with controls.
• The appliance needs to be connected to the main water
  valve using new hose sets. Old sets should not be
  reused.
• To save energy, the appliance will go to standby mode
  automatically when there is no operation during some
  time.

CONTENTS

Your dishwasher
                  Introduction                              4

Description
                  Control panel                             5
                  Interior                                  6

Operation
                  Switching on                              7
                  Cycle selection table                    10
                  Regeneration salt (water softener)       11
                  Reset                                    12
                  Setting the water hardness               12
                  Rinse aid reservoir                      12
                  Dishwasher detergents                    14

Loading
                  Loading the baskets                      16
                  Damage to glassware and other crockery   19

Maintenance
                  Filter system                            20
                  Cleaning the spray arms                  21
                  Cleaning the door                        21

Errors
                  What should I do, if...                  22
                  Interference table                       22
                  Error codes                              24

Appendix
                  Disposal                                 25

                                                                EN 3
YOUR DISHWASHER

       Introduction
                      You have opted to purchase an Etna dishwasher.
                      Optimum user comfort and easy operation were paramount during
                      the development of this product.

                      This manual describes how you can get the most out of your dishwasher.
                      It provides you with information on how to operate the appliance, as well
                      as background information about how it works. You will furthermore also
                      find maintenance tips.

                      The safety instructions that are relevant during the installation are included
                      in the installation guide. This is intended for the installation technician.

                      Read this manual before using the appliance.
                      Keep this manual in a safe place so that the next possible user can also
                      benefit from it.

EN 4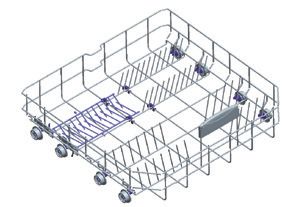
DESCRIPTION

Control panel

                3             1       2            9 4 9 5             6    7   8

                    1.   On/Off button
                    2.   Program button
                    3.   Program display
                    4.   Half load button
                    5.   Delayed start button
                    6.   Options button
                    7.   Extra hygiene / extra dry indicators
                    8.   Salt / rinse aid indicators
                    9.   Upper basket / lower basket half load indicators

                                                                                    EN 5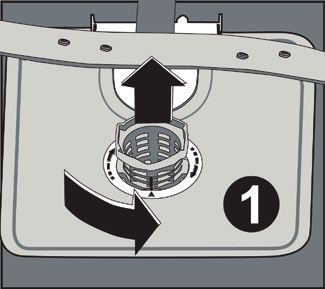
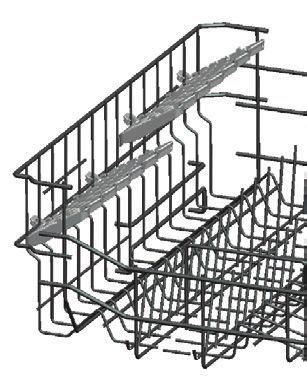
DESCRIPTION

   Interior

                                                           12

                 1.    upper basket
                 2.    upper spray arm
                 3.    lower basket
                 4.    lower spray arm
                 5.    filters
                 6.    type plate
                 7.    operating panel
                 8.    detergent and rinse aid reservoir
                 9.    cutlery basket
                 10.   salt reservoir
                 11.   guide rail top basket
                 12.   active drying unit

EN 6
OPERATION
Switching on
1. Open the door of the dishwasher.
2. Press the ‘on-off’ button to switch on the device.
The check light End Program is on |
3. Select the desired program (see ‘program selection table’). Select a
cycle using the programming button.
The check light that belongs to the selected program is on.
4. Close the door of the dishwasher.
The dishwasher will automatically start running the selected cycle.
The remaining program time appears on the display.
Selecting a half load
Press the ‘half load’ button to activate the half load cycle. In the half
loading program, you can use both the upper and lower basket and
both baskets simultaneously.
For a small quantity of dirty dishes, in both the upper and lower basket,
repeatedly press the ‘half load’ button until the indicators of upper and
lower basket light up.
For a small quantity of dirty dishes in the upper basket, repeatedly
press the ‘half load’ button until the indicator of the upper basket
lights up.
For a small quantity of dirty dishes in the lower basket, repeatedly press
the ‘half load’ button until the indicator of the lower basket lights up.
Delayed start time
If you want the dishwasher to switch on at a later time, you can use the
‘delayed start’ button. You can choose between a delay time of 1, 2...
19 hours. Each press of the button changes the delay time.
The display shows the delayed start time.
Then select the desired program and close the door of the dishwasher.
Options
Press the options button once to activate the extra hygiene option.
When you activate it, the extra hygiene indicator will light up and the
washing temperature and duration changes on the selected program.
This ensures a more hygienic wash.
EN 7OPERATION
Press the options button twice to activate the extra dry option. When
you activate it, the extra dry indicator will light up and extra heating/
drying steps will be added to the selected program.
Press the button a third time to deactivate the functions, both lights will
switch off.
If an extra feature has been used on the most recent wash program,
this feature will remain active on the next selected program. To cancel
this feature on the newly selected wash program, press the feature
button until the light on the button switches off.
Note! If you decide not to start the selected program, please see the
“Stopping or changing a wash cycle” section.
When there is insufficient softening salt, the salt indicator will light up to
indicate the salt container needs filling. When there is insufficient rinse
aid, the rinse aid indicator will light up to indicate the rinse aid reservoir
needs filling.
Indicators
• Salt.
The indicator shows that you have to fill the salt container with
regeneration salt.
• Rinse aid.
The indicator shows that you have to fill the rinse aid reservoir.
Stopping or changing a wash cycle
1. Open the door.
The last selected program appears on the display.
2. Press and hold the programming button for more than 3 seconds.
The ‘End program’ indicator is blinking. ‘1’ appears on the display.
3. Close the door of the dishwasher.
The machine pumps out for about 30 seconds. Following the end
of this, an alarm signal will sound and the indicator shows that the
program has finished.
4. You can again select the desired program (see program selection
table).
5. Now close the door.
EN 8OPERATION
Note! A cycle that has already begun can only be changed in the start-
up phase. After this, the detergent will be sprayed all over the dishes or
the machine may have already pumped out the water. In that instance,
you must refill the detergent compartment (see section on Dishwasher
detergent).
Warning!
Opening the door fully during the wash cycle is dangerous. You may be
splashed with hot water from the machine.
Following the end of the wash cycle
After the washing program has finished, the ‘End program’ indicator
flashes and an alarm signal sounds 5 times. Open the door of the
dishwasher. Switch off the device with the on/off button. Wait a few
minutes before unloading the dishwasher. The dishes and cutlery will still
be very hot immediately following the end of the cycle. There is a chance
that dishes may break as a result of the heat. Moreover, the dishes dry
better when allowed to stand for a few minutes.
Flood protection switch
Your dishwasher is fitted with a safety switch that prevents too much
water from running into the appliance. The safety switch closes the
inlet valve and instructs the dishwasher to pump out the surplus
water. If there is water in machine (due to too much water being fed in
previously, or as a result of a leak), this must first be removed before the
appliance is switched on again.
EN 9OPERATION
Cycle selection table
Program Cycle selection information Description of cycle Detergent Time Energy Water Water Half
pre/main (min.) (KWh) (L) Load (L)
Eco(1) This is the standard program, Prewash 5/25 gr. 222 0.907(2) 9.0 9.0
it is suitable to clean Main wash (50 °C) 0.923(3)
normally soiled tableware Hot rinse (55 °C)
and it is the most efficient Dry
programme in terms of its
combined energy and water
consumption for that type of
tableware.
Smart Auto program for heavily Prewash 5/25 gr. 97-178 1.300- 11.8- 7.6-19.8
soiled dishes. Hot prewash (50 °C) 2.000 24.0
Main wash (60 or 70 °C)
Cold rinse
Intermediate rinse (+ or -)
Hot rinse (70 °C)
Dry
Smart Auto program for normally Prewash 5/25 gr. 89-121 1.100- 10.9- 6.7-14.3
soiled dishes. Main wash (50 or 60 °C) 1.300 18.5
Cold rinse
Intermediate rinse (+ or -)
Hot rinse (70 °C)
Dry
Smart Auto program for normally Prewash 5/25 gr. 69-92 0.700- 10.6- 6.6-13.7
soiled delicate dishes. Main wash (30 or 50 °C) 0.900 17.7
Cold rinse
Intermediate rinse (+ or -)
Hot rinse (60 °C)
Dry
50 minutes Daily dishes in 50 minutes. Main wash (65 °C) 25 gr. 50 1.000 9.5 9.5
For day-to-day dishes, such Cold Rinse
as lightly soiled or normal Hot rinse (70 °C)
plates and pans. Dry
Easy care Suitable for normally soiled Prewash 5/25 gr. 94 1.320 14.4 11.1
daily dishes. Main wash (60 °C)
Cold Rinse
Hot rinse (70 °C)
Dry
Delicate Suitable for lightly soiled Prewash 5/25 gr. 74 0.800 13.9 10.0
delicate dishes. Main wash (40 °C)
Cold Rinse
Hot rinse (60 °C)
Dry
Quick Lightly soiled dishes, such as Main wash (40 °C) 25 gr. 30 0.670 10.9 10.9
glasses, crystal and fragile Cold Rinse
porcelain. No drying. Hot rinse (50 °C)
Prewash To rinse dishes that you plan Prewash 15 0.020 4.2 4.2
to wash later that day.
(1)
This program is the test cycle.
The information for comparability test in accordance with EN 50242/EN 60436.
(2)
According to standard EN 50242
(3)
According to standard EN 60436
EN 10OPERATION
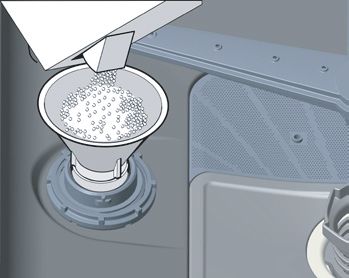
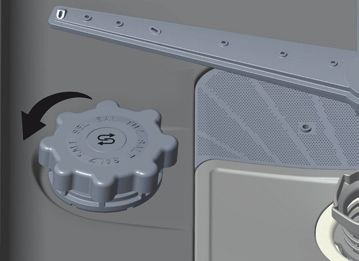
Regeneration salt (water softener)
This machine is equipped with a water softener. To use the water
softener, fill the dishwasher with salt.
1
• After first having removed the lower basket, loosen the cap of the
reservoir (1 and 2).
• Prior to filling up the reservoir for the first time, pour one litre of
water in it.
• Place the funnel in the reservoir opening. Pour about 2 kg of salt
2
in it. It is normal for a little water to flow out of the opening when
doing this. Note! Clear up any spilled salt and always run a full
cycle immediately afterwards to prevent damage to the bottom.
• Carefully tighten the cap of the reservoir.
3 Note! Always fill the salt reservoir and adjust the water hardness setting
before using the dishwasher. Refill the salt reservoir when the water
softener indicator lights up. It is possible that the light will remain lit for
a short while after the salt reservoir is filled. It will go out automatically
when enough salt has been dissolved in the water.
LT
SA
Setting the salt consumption
Adjust the salt consumption according to the table below:
4
Water German French English Indicator
hardness hardness hardness hardness
level dH dF dE
1 0-5 0-9 0-6 L1 appears on the display
2 6-11 10-20 7-14 L2 appears on the display
3 12-17 21-30 15-21 L3 appears on the display
4 18-22 31-40 22-28 L4 appears on the display
5 23-31 41-55 29-39 L5 appears on the display
6 32-50 56-90 40-64 L6 appears on the display
Your local water authority can inform you how hard your mains water is.
Adjustments can then be made according to the above table.
The standard water hardness level is set at level 3.
EN 11OPERATION
Reset
Open the door of the dishwasher
The indicator of the program selected last is flashing.
Press and hold the programming button for more than 3 seconds.
The ‘End Program’ indicator is flashing. The indicator of the program
selected last turns off
Close the door of the dishwasher.
The machine pumps out for about 30 seconds. Following the end of
this, a sound signal will click 5 times and the indicator shows that the
program has finished.
Switch off the dishwasher with the on/off button.
Setting the water hardness
Press the program button and keep it pressed.
Switch on the dishwasher simultaneously with the on/off button.
Keep the program selection button pressed until “SL” disappears from
the display. Release the program selection button after “SL” disappears
from the display.
Your machine displays the latest entered water hardness setting.
Water hardness can be adjusted by the program selection button
according to Table of Water Hardness Level Settings.
After selecting the desired setting, press the on/off button.
The set value is stored in the memory.
Rinse aid reservoir
Rinse aid is added during the final rinse. Rinse aid prevents traces of water
droplets being left behind on the clean dishes. Moreover, it ensures that the
dishes dry quicker, since the water drains off more easily.
The dishwasher is designed for use with liquid rinse aid. The rinse aid
reservoir is located on the inside of the door, alongside the detergent
compartment.
EN 12OPERATION
Filling the rinse-aid and setting
To fill the rinse aid compartment, open the rinse-aid compartment cap.
Fill the compartment with rinse aid to the MAX level and then close the
cap.
Be careful not to overfill the rinse aid compartment and wipe up any
spills.
In order to change the rinse aid level, follow the below steps
before turning on the machine:
1. Push the programme button and hold it down.
2. Turn on the machine.
3. Hold down the programme button until “rA” disappears from the
display.
▷ Rinse aid set follows water hardness set.
▷ The machine will display the current setting.
4. Set the level by pushing the programme button.
5. Switch off the machine to save the setting.
The factory setting is “4”.
• If the dishes are not drying properly or are spotted, increase the
level. If blue stains form on your dishes, decrease the level.
Level Brightener Dose Indicator
1 Rinse-aid not dispensed r1
2 1 dose is dispensed r2
3 2 doses are dispensed r3
4 3 doses dispensed r4
5 4 doses dispensed r5
EN 13OPERATION
Dishwasher detergents
The chemicals in dishwashing detergents remove the dirt, break it
down and make sure that the dirt is drained from the dishwasher.
Most dishwashing detergents available in the store are suitable for this
purpose.
Warning!
Dishwasher detergent is a corrosive product. It should therefore be kept
out of the reach of children. If swallowed, consult a doctor immediately
and take the packaging with you.
Concentrated detergent
Based on their chemical composition, 2 different types of concentrated
detergent can be distinguished:
• Conventional alkaline detergents with corrosive ingredients.
• Low-alkaline concentrated detergents with natural enzymes.
The use of concentrated dishwashing detergent in combination with
“normal” washing programs produces less contamination and is good
for your dishes: these washing programs are specifically intended for
dirt-dissolving characteristics of the enzymes in concentrated dishwashing
detergents. This means that “normal” wash cycles with concentrated
detergent achieve the same results as an intensive wash cycle.
Dishwasher tablets
Dishwasher tablets from different manufacturers dissolve at different
rates. This means that, during short wash cycles, certain types of
dishwasher tablet do not fully dissolve, as a result of which their
cleaning action is reduced. Dishwasher tablets should therefore chiefly
be used in combination with long wash cycles, so that the dish washer
tablet has time to fully dissolve.
When you switch from dishwashing tablets to a traditional dishwashing
detergent, you have to make sure that the salt conttainer and the rinse
agent reservoir are filled.
EN 14OPERATION
Detergent compartment
Your dishwasher uses less detergent and rinse agent than conventional
dishwashers. Generally speaking, just one measuring spoon of detergent
powder is needed for a normal wash cycle. Use more detergent if your
dishes are more heavily soiled. Fill the soap compartment immediately
prior to starting the cycle. Filling it prior to this may result in the detergent
becoming damp and therefore not fully dissolving.
Note! The table on page 10 shows the amount of detergent required
for the different cycles. These are averages. A different dosage may be
necessary, depending on the hardness of the water and how soiled the
dishes are.
Filling
DE
TE
RG
EN
T
1. Press the release catch if the lid is closed.
The lid will slide open.
2. Fill the detergent compartment immediately prior to starting a wash cycle.
The markings in the detergent compartment indicate the dosage.
• The container has a capacity of maximum 45 gr.
Fill up the container with 25 gr. of the detergent for very dirty dishes
and 15 gr. for normal dishes.
Use only detergents that are specifically designed for dishwashers.
Store the detergent in a cool and dry place. Only fill the detergent
compartment with detergent when you are running a wash cycle
immediately afterwards.
EN 15LOADING
Loading the baskets
Using the upper basket
The upper basket is designed for fragile, light dishes, such as glasses,
cups and saucers, plates, small bowls and shallow (not particularly
dirty) pans.
Place the dishes in the basket in such a way as to ensure they cannot
move when sprayed. The height of the upper basket can be adjusted.
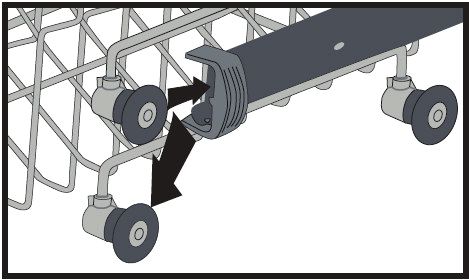
Height adjustment upper basket
Top basket of your machine is in upper position. When it is in this
position, you can place big items such as pans, etc. on lower basket.
When you take top basket to lower position, you can place and wash
big sized plates on the top basket.
1. Open the basket retaining parts at the end of top basket rails by
turning them to the sides.
2. Take the basket out.
3. Change the position of the wheels; reinstall the basket to the rail.
4. Close basket retainer parts.
Height Adjustable Rack
1
The height adjustable racks enable glasses and cups to be placed on
2 or under the racks. The racks can be adjusted to 2 different heights.
Cutlery and utensils can also be placed on the racks horizontally.
Using the lower basket
We advise you to place large objects that are hardest to clean in the
lower basket: pots, pans, pan lids, oven dishes and bowls. Casserole
dishes and pan lids should preferably be placed at the side of the basket.
This will ensure that they do not obstruct the spray arm when it is turning.
• Saucepans, serving dishes etc. must always be placed upside
down in the basket.
• Deep bowls should be tilted, with the opening facing downwards to
allow water to escape.
• The lower basket can be adjusted to allow for larger, or more, pots
and pans.
EN 16LOADING
1 Folding Racks
a Folding racks consisting of two parts that are located on the lower
b
basket of your machine are designed in order to let you place big
items easier such as pots, pans, etc. If requested, each part can be
2
folded separately, or all of them can be folded and larger spaces can be
obtained.
Cutlery basket
The cutlery basket is used in the bottom basket. Cutlery should be
placed in the cutlery basket with the handles pointing down. Long
kitchen utensils such as wooden spoons have to be in a position lying
down (horizontal) on the middle rack in the top basket.
Warning!
Take care to ensure that no objects are sticking through the bottom
of the cutlery basket, as this will obstruct the spray arm.
EN 17LOADING
Cutlery/crockery unsuitable for the dishwasher
• Cutlery with a wooden, porcelain or mother of pearl handle
• Plastic objects that are not heat-resistant
• Cutlery with glued elements that are not heat-resistant
• Glued cutlery or crockery
• Pewter or copper objects
• Lead crystal glassware
• Steel objects that are prone to rust
• Wooden dishes
• Objects manufactured from synthetic fibres
Cutlery/crockery with limited suitability for use in the dishwasher
• Certain types of glass can become dull after undergoing a large
number of wash cycles
• Silver and aluminium may tarnish after use in the dishwasher
• Glazed patters may fade as a result of regular washing
Note! Do not place any objects soiled with cigarette ash, candle wax,
varnish or paint in the dishwasher. When buying new kitchen utensils,
ensure that they are suitable for the dishwasher.
Do not overload the dishwasher. There is only room for 12 standard
settings. Do not place cooking utensils that are unsuitable for
dishwashers inside. This is essential to ensure good washing results
and a low energy consumption.
Placing cutlery and crockery in the dishwasher
Before placing the dishes in the dishwasher, you must:
• Remove any large bits of leftover food.
• Leave caked and burnt on leftover food to soak for a while.
When inserting the dishes, take care to ensure that:
• The spray arm is not obstructed by the dishes.
• Hollow objects are placed with the opening facing downwards,
to ensure that that cannot hold the water.
EN 18LOADING
Plates and cutlery must not cover each other
• Glassware items must not touch, otherwise damage can occur.
• Place large objects that are difficult to clean in the lower basket.
• The upper basket is specially designed for lighter objects, such as
glasses and coffee and tea cups.
Warning!
• Long knives standing upright in the cutlery basket can cause injury!
• Long and/or sharp items of cutlery, such as carving knives, should
be laid (placed horizontally) in the upper basket.
Damage to glassware and other crockery
Potential causes:
• Type of glass or manufacturing process. Chemical composition
of the dishwasher detergent.
• Water temperature and duration of the wash cycle.
Proposed solution:
• Use glassware and porcelain crockery produced by manufacturers
that state that it is suitable for dishwashers.
• Use a milder/less corrosive dishwasher detergent. If needed,
ask detergent manufacturers for more information.
• Select a wash cycle with a lower temperature.
• Remove glassware and cutlery from the dishwasher as soon as
possible after the cycle has finished, to prevent damage.
EN 19MAINTENANCE
Filter system
Depending on usage, the filters may require regular rinsing under a
tap. The filtration system consists of three components: the large filter,
the coarse filter and the fine filter.
a. Fine filter: This filter holds off dirt and food remains from the
drainage pump and makes sure that these remains are not spread
in the dishes again during the program.
b. Coarse filter: Larger parts such as bone remains or pieces of glass
that could clog the drain are caught in the coarse filter. In order to
remove the waste from the filter, you must lightly squeeze the lips
on top of the filter together and then pull the filter upwards.
c. Large filter: Food remains and dirt that end up on this filter are
rinsed to the coarse filter by means of the lower spray arm.
Clean the filter group
In order to ensure the dishwasher operates at maximum efficiency, the
whole filter section must be cleaned.
The filter group efficiently removes food remains from the water and
makes sure that the washing water can continue circulating during the
washing program. It is therefore a good idea to remove larger food
remnants from the filter section after each wash cycle, by cleaning the
half-round filter and filter housing under running water.
• Remove the filter section by grasping the handle and pulling upwards.
All components in the filter section must be cleaned at least once per
month.
• Use a dishwashing brush to clean the coarse and fine filter. Put
the filter section back together again according to the illustration
opposite and then re-fit the whole filter section back into the tub
of the dishwasher.
Never use the dishwasher without the filter section. Incorrect fitting
of the filter section will result in the dishwasher no longer delivering
maximum performance. Damage to cutlery and dishes is a further
possible consequence.
EN 20MAINTENANCE
Cleaning the spray arms
It is essential that you clean the spray arms on a regular basis. In the
longer term, waste can block the nozzles and the bearings in the spray
arms. Clean the spray arms as follows:
• Turn the nut of the upper spray arm to the left to remove the arm.
• Next remove the spray arm.
• Pull the lower spray arm upward out of the retainer.
• Clean the spray arms in warm, soapy water, using a soft brush
to clean the nozzles.
• Rinse the spray arms thoroughly before fixing back in place.
Cleaning the door
Clean the edge of the door, including the sealing rubber, with a soft,
damp cloth. Take care to ensure that water does not enter the door
locking mechanism or electrical components. Spray-type cleaning
products should not be used, nor aggressive cleaning products such as
scourers. These cleaning products can damage the finish.
EN 21ERRORS
What should I do, if...
If the appliance is not functioning well, this does not always mean that
it is faulty. Try to resolve the fault yourself first. If the recommendations
below does not solve your problem, telephone our service department.
Note!
Disconnect the appliance from the power supply before beginning
repairs.
Preferably by pulling out the plug from the wall socket.
Interference table
Problem Potential causes Solution
The dishwasher is not working. Fuse is faulty or the earthing switch has been Replace the fuse or reset the isolating switch.
activated. Remove other appliances that are connected
to the same group.
The power supply is not switched on. Make sure that the dishwasher is switched on
and the door closed.
Make sure that the plug is correctly inserted into
the socket.
The water pressure is too low. Check whether the dishwasher is correctly
connected to the water mains and that the tap
is open.
The drainage pump does The water is running over. The system is designed so that it can
not shut off. automatically detect overflowing water. In that
instance, the appliance shuts off the circulation
pump and switches on the drainage pump.
Noise. Some noises are normal. Noise of rotating pump/washing noises;
the detergent compartment opening.
Cutlery is rattling in cutlery basket or Ensure that everything is loaded securely in the
something small has fallen out of the basket. dishwasher.
The motor makes an unusual noise. The pump is blocked. Contact an installer.
Contamination of the tub. Poor quality detergent. Only use detergent suitable for dishwashers
to prevent contamination.
Blocked filters. Open the door and clean the filters. Run the pre-
wash cycle.
Rinse agent has been spilled. Always wipe up spilled rinse agent immediately.
EN 22ERRORS
Problem Potential causes Solution
Dishes not dry. The rinse agent reservoir is empty. Ensure that the rinse agent reservoir is filled.
Dishes and flat objects are not Incorrect cycle. Select a higher cycle.
clean.
Baskets are incorrectly loaded. Make sure that the detergent compartment
and spray arms are not obstructed by large
dishes/pans.
Spotting and scaling on glasses Extremely hard water. Incoming water To remove spotting from glass objects:
and flat dishes. temperature is low. The dishwasher is Remove all metal objects from the dishwasher.
overloaded. Use the prescribed quantity of detergent.
Baskets are incorrectly loaded. Old or damp Select the longest cycle. Allow the dishwasher
detergent. Rinse agent reservoir is empty. to run for approximately 18 to 22 minutes.
Incorrect detergent dosage. It should by then have reached the main wash
cycle. Open the door carefully and pour 2 cups
of white vinegar into the base. Close the door
and allow the dishwasher to complete its
cycle. If vinegar does not work: Repeat the
above steps, but use a quarter cup (60 ml) of
citric acid crystals in place of white vinegar.
Cloudy stains on the glassware. Combination of soft water and too much Use less detergent and choose the glass cycle,
detergent. which you can use to clean glassware.
Yellow or brown scale on the Traces of iron in the water may cause spotting Contact a manufacturer of water softeners for
inside of the tub. to the tub of the dishwasher. a special filter.
White scale on the inside of Hard water. Increase salt consumption setting
the tub.
Dishwasher detergent is left in The detergent compartment is blocked by Load the baskets so that the dishes no longer
the detergent compartment. dishes. block the detergent compartment.
Clean the upper spray arm.
Steam. When opening the door. This is possible at the end of the cycle.
Black or grey stains on the Aluminium cooking utensils have scraped Aluminium can tarnish.
dishes. the dishes.
Water remains under the filters. This is normal. A small amount of water around the drain on
the rear of the tub base keeps the seal flexible.
The dishwasher is leaking. Rinse agent reservoir too full or rinse agent is Take care not to overfill the rinse agent
leaking. reservoir. Spilled rinse agent can lead to foam/
flooding. Wipe up spilled rinse agent with
a damp cloth.
The dishwasher is not standing level. Adjust the dishwasher so that it is standing
level.
EN 23ERRORS
Error codes
Problem Potential causes Solution
FF Insufficient water supply • Make sure that the water faucet is completely open and that there
is no crack in the supply hose
• Check if the supply hose is clogged
• Restart the dishwasher
• Please contact the service department if the problem persists
F5 Pressure system failure • Please contact the service department
F3 Flooding safety enabled • Close the water faucet and contact the service department
F2 The dishwasher is not pumping out • Check if the drainage hose is connected
• Check the bottom filter and filter group
• Restart the dishwasher and terminate the last selected program
• Please contact the service department if the problem persists
F8 Heating error • Please contact the service department
F1 Flooding sound signal activated • Turn off the dishwasher and close the water faucet
• Please contact the service department
FE Interference in the electronics • Please contact the service department
F7 Temperature in the machine is too high • Please contact the service department
F9 Interference of divisor position • Please contact the service department
F6 Interference of heating sensor • Please contact the service department
HI High voltage failure • Please contact the service department
LO Low voltage failure • Please contact the service department
Call an authorised service if the problem still persists after the
controls or in case of any malfunction not described above.
EN 24APPENDIX
Disposal
Dispose of packaging and device
This device is manufactured with durable materials. This appliance
must be disposed of responsibly at the end of its service life.
The government can provide you with information about this.
The packaging of the appliance is recyclable. The following can be
used:
• cardboard;
• polyethylene film (PE);
• CFK-free polystyrene (PS – hard foam).
The materials should be disposed of in a responsible manner and in
accordance with government regulations.
The symbol of a crossed out garbage can is placed on the product
to point to the obligation to process electrical household appliances
separately. This means that the appliance may not be included with
normal domestic refuse at the end of its service life. The device has
to be brought to a special centre for separated waste collection of the
municipality or to a point of sale that provides this service.
The separate processing of a household device prevents possible
negative consequences for the environment and the health that is
caused by inappropriate processing. It ensures that the material that
appliance consists of, can be recovered to obtain a significant saving
of energy and raw materials.
Note! The packaging material may be hazardous for children.
Declaration of conformity
We hereby declare that our products satisfy the applicable European
directives, orders and regulations, as well as the requirements stated in
the referenced standards.
EN 25EN 26
SICHERHEITSHINWEISE
       IE LU AT  NL IEBE   LUIE   ATLU
                                    DE   NL
                                         AT
                                         DE   GB       FR AT
                                              IE NL LUBE
                                              BE           BE
                                                          DE      DENO
                                                                DENL  BE
                                                                     GB     FR
                                                                           GB
                                                                       DE SE     DEFR
                                                                                 BE    BE
                                                                                    DKDE        N
                                                                                         NOGBFI S

Mit dem Einbau Ihres Geräts sollten Sie einen
qualifizierten Installateur beauftragen (siehe
„Installationsanweisungen“). Die Installation muss
vollständig abgeschlossen sein, bevor Sie das Gerät an
das Stromnetz anschließen.

Dieses Gerät ist für den Einsatz im Haushalt oder in
vergleichbaren Umgebungen vorgesehen, zum Beispiel:
  ▷ Teeküchenbereiche in Geschäften, Büros und anderen
    Arbeitsumgebungen,
  ▷ Landhäuser,
  ▷ Gästezimmer in Hotels und anderen
    Übernachtungseinrichtungen,
  ▷ Pensionen.

Für EN60335-1:
• Dieses Gerät kann von Kindern ab einem Alter von
  8 Jahren oder von Personen mit eingeschränkten
  physischen, sensorischen oder mentalen Fähigkeiten
  oder mangelnder Erfahrung verwendet werden, wenn
                                                                                  Übersetzung der Originalanleitung

  sie dabei beaufsichtigt werden oder in der sicheren
  Bedienung des Geräts angemessen unterwiesen wurden
  und die damit verbundenen Gefahren verstehen. Kinder
  dürfen nicht mit dem Gerät spielen. Kinder dürfen das
  Gerät nicht ohne Aufsicht reinigen oder warten.
SICHERHEITSHINWEISE Für IEC60335-1: • Dieses Gerät darf nicht von Personen (einschließlich Kindern) mit eingeschränkten physischen, sensorischen oder geistigen Fähigkeiten oder von im Umgang mit elektrischen Geräten unerfahrenen Personen verwendet werden, es sei denn, diese werden von Personen beaufsichtigt und angeleitet, die für ihre Sicherheit verantwortlich sind. • Verpackungsmaterial kann für Kinder eine Gefahrenquelle darstellen! • Dieses Gerät ist ausschließlich für die Verwendung in Innenräumen gedacht. • Um Stromschläge zu vermeiden, Gerät, Kabel und Stecker NICHT in Wasser oder andere Flüssigkeiten tauchen! • Netzstecker ziehen, bevor Sie mit Reinigungs- oder Wartungsarbeiten am Gerät beginnen. • Verwenden Sie zum Reinigen ein weiches Tuch und mildes Reinigungsmittel. Mit einem trockenen Tuch trockenwischen. Hinweise zur Erdung • Dieses Gerät muss jederzeit geerdet sein. Bei Störungen und Beschädigungen verringert die Erdung die Gefahr eines elektrischen Schlages, weil sie für den elektrischen Strom einen Weg des geringsten Widerstandes bietet. Das Gerät ist mit einem Schutzkontaktstecker ausgestattet. • Verbinden Sie diesen Stecker mit einer geeigneten
SICHERHEITSHINWEISE

    Schukosteckdose, die in Übereinstimmung mit allen
    geltenden Vorschriften installiert wurde.
•   Bei fehlerhaftem Anschluss des Erdungsleiters kann die
    Gefahr eines elektrischen Schlages bestehen.
•   Wenn Sie Zweifel an der korrekten Erdung des Geräts
    haben, wenden Sie sich an einen Elektriker.
•   Modifizieren Sie unter keinen Umständen den
    mitgelieferten Stecker, falls dieser nicht in die Steckdose
    passt.
•   Lassen Sie von einem Elektriker eine geeignete
    Steckdose installieren.
•   Tür und Geschirrkörbe des Geschirrspülers nicht
    missbräuchlich verwenden, nicht darauf setzen oder
    stehen.
•   Geschirrspüler nur in Betrieb setzen, wenn alle
    Gehäuseabdeckungen korrekt montiert sind.
•   Falls Sie die Tür während des laufenden Betriebs öffnen
    wollen, äußerst vorsichtig vorgehen. Es kann heißes
    Wasser herausspritzen.
•   Nicht auf die geöffnete Tür stellen. Keine schweren
    Objekte auf die geöffnete Tür stellen. Das Gerät könnte
    nach vorn kippen.

Beim Beladen:
 ▷ Darauf achten, dass spitze Objekte die Türabdichtung
   nicht beschädigen.
 ▷ Achtung: Messer und andere Utensilien mit scharfen
   Spitzen so in den Korb stellen, dass die Spitzen nach
   unten zeigen oder horizontal ausgerichtet sind.
SICHERHEITSHINWEISE • Einige Reiniger für Geschirrspüler sind stark alkalisch. Gefahr beim Verschlucken! Kontakt mit Haut und Augen vermeiden. Bei geöffneter Gerätetür Kinder vom Geschirrspüler fernhalten. • Vergewissern Sie sich nach dem Ende des Spülzyklus, dass der Pulverbehälter leer ist. • Kunststoffteile niemals im Geschirrspüler spülen, wenn diese nicht ausdrücklich als „Geschirrspülergeeignet“ gekennzeichnet sind. • Bei Gegenständen ohne Kennzeichnung Hinweise des Herstellers beachten. • Verwenden Sie ausschließlich Reiniger und Klarspüler, die für Geschirrspüler vorgesehen sind. • Im Geschirrspüler niemals Seife, Waschmittel oder Handwaschmittel verwenden. • Gerätetür nicht geöffnet lassen, weil dann immer Kippgefahr besteht! • Wenn das Anschlusskabel beschädigt ist, darf es nur vom Hersteller, vom Kundendienst oder von einem Elektriker ausgetauscht werden. Bei Nichtbeachtung kann es zu gefährlichen Situationen kommen. • Bei der Installation darf das Stromkabel nicht geknickt oder gequetscht werden. • Steuerelemente nicht manipulieren. • Das Gerät muss mit neuen Schläuchen an die Wasserversorgung angeschlossen werden. Alte Schläuche nicht wiederverwenden. • Um Energie zu sparen, schaltet sich das Gerät automatisch im Standbymodus wenn einige Zeit kein Bedienvorgang erfolgt.
INHALT

Ihre Geschirrspülmaschine
                  Einleitung                          4

Beschreibung
                  Bedienfeld                          5
                  Innenausstattung                    6

Bedienung
                  Einschalten                         7
                  Programmwahl-Tabelle               10
                  Regeneriersalz (Wasserenthärter)   11
                  Zurücksetzen                       12
                  Wasserhärte einstellen             12
                  Klarspülerbehälter                 12
                  Spülmaschinenreiniger              14

Beladen
                  Die Körbe beladen                  16
                  Schäden an Gläsern und Geschirr    19

Pflege
                  Filtersystem                       20
                  Sprüharme reinigen                 21
                  Tür reinigen                       21

Störungen
                  Wie gehe ich vor, wenn ...         22
                  Störungstabelle                    22
                  Fehlercodes                        24

Anlage
                  Entsorgen                          25

                                                          DE 3
IHRE GESCHIRRSPÜLMASCHINE
Einleitung
Sie haben sich für eine Geschirrspülmaschine von Etna entschieden.
Ein optimaler Anwendungskomfort und eine einfache Bedienung standen bei
der Entwicklung dieses Produktes an erster Stelle.
In dieser Anleitung wird beschrieben, wie Sie die Geschirrspülmaschine
optimal nutzen. Hier finden Sie Informationen zur Bedienung und
Hintergrundinformationen zur Funktionsweise des Geräts. Daneben erhalten
Sie Tipps zur Pflege des Geräts.
Die für die Installation relevanten Sicherheitsvorschriften sind in der
Installationsvorschrift angegeben, die für den Installateur gedacht ist.
Lesen Sie bitte diese Bedienungsanleitung, bevor Sie das Gerät verwenden.
Bewahren Sie sie sorgfältig auf, damit sich auch eventuelle weitere Benutzer
über das Gerät informieren können.
DE 4BESCHREIBUNG
Bedienfeld
3 1 2 9 4 9 5 6 7 8
1. Ein-/Aus-Taste
2. Programmtaste
3. Programmdisplay
4. Taste „Halbe Beladung“
5. Taste „Startzeitverzögerung“
6. Optionstaste
7. Anzeigen Zusätzliche Hygiene/Extra trocken
8. Anzeigen Salz/Klarspüler
9. Anzeigen Halbe Beladung oberer Korb/unterer Korb
DE 5BESCHREIBUNG
Innenausstattung
12
1. Oberer Korb
2. Oberer Sprüharm
3. Unterer Korb
4. Unterer Sprüharm
5. Filter
6. Typenschild
7. Bedienfeld
8. Reiniger- und Klarspülerbehälter
9. Besteckkorb
10. Salzbehälter
11. Führungsschiene oberer Korb
12. Aktive Minitrocknungsanlage
DE 6BEDIENUNG
Einschalten
1. Öffnen Sie die Tür der Geschirrspülmaschine.
2. Drücken Sie die „Ein-/Aus-Taste“, um das Gerät einzuschalten.
Das Kontrolllämpchen „Programmende“ brennt.
3. Wählen Sie das gewünschte Programm (siehe „Programmwahltabelle“).
Wählen Sie das Programm mit der Programmtaste aus.
Die zu dem gewählten Programm gehörige Kontrollleuchte brennt.
4. Schließen Sie die Tür des Geschirrspülers.
Der Geschirrspüler startet automatisch mit dem ausgewählten Programm.
Auf dem Display erscheint die verbleibende Programmzeit.
Halbe Ladung auswählen
Drücken Sie auf die Taste „halbe Ladung“ um das Programm für halbe
Beladung einzuschalten. Bei dem Programm für halbe Beladung können Sie
den oberen oder den unteren Spülkorb sowie beide Spülkörbe gleichzeitig
verwenden.
Bei einer kleinen Menge an schmutzigem Geschirr in sowohl dem oberen
als auch dem unteren Korb müssen Sie wiederholt die Taste „halbe Ladung“
drücken, bis die Anzeigen von oberem und unterem Korb aufleuchten.
Bei einer kleinen Menge an schmutzigem Geschirr im oberen Korb müssen
Sie wiederholt die Taste „halbe Ladung“ drücken, bis die Anzeige des
oberen Korbs aufleuchtet.
Bei einer kleinen Menge an schmutzigem Geschirr im unteren Korb müssen
Sie wiederholt auf die Taste „halbe Ladung“ drücken, bis die Anzeige des
unteren Korbs aufleuchtet.
Startzeitverzögerung
Wenn Sie wünschen, dass sich der Geschirrspüler zu einem späteren Zeitpunkt
einschaltet, können Sie hierzu die Taste „Startzeitverzögerung“ verwenden.
Sie haben die Wahl zwischen einer Verzögerungszeit von 1, 2 ... 19 Stunden.
Mit jedem Druck auf die Taste ändert sich die Verzögerungszeit.
Das Display zeigt die Startzeitverzögerung an.
Wählen Sie anschließend das gewünschte Programm und schließen Sie die
Tür des Geschirrspülers.
Optionen
Drücken Sie die Optionstaste einmal, um die Option „Zusätzliche Hygiene“ zu
aktivieren. Wenn Sie diese Option aktivieren, leuchtet die Anzeige „Zusätzliche
Hygiene“ auf, und die Waschtemperatur und -dauer ändert sich im gewählten
Programm. Dadurch wird ein hygienischeres Waschen sichergestellt.
DE 7BEDIENUNG
Drücken Sie zweimal auf die Optionstaste, um die Option „Extra trocken“
zu aktivieren. Wenn Sie diese Option aktivieren, leuchtet die Anzeige
„Extra trocken“ auf und zusätzliche Heiz-/Trocknungsschritte werden zum
ausgewählten Programm hinzugefügt.
Drücken Sie die Taste ein drittes Mal, um die Funktionen zu deaktivieren.
Beide Leuchten erlöschen.
Wenn im letzten Waschprogramm eine zusätzliche Funktion verwendet
wurde, bleibt diese Funktion auch im nächsten gewählten Programm aktiv.
Um diese Funktion für das neu gewählte Waschprogramm zu deaktivieren,
drücken Sie die Funktionstaste, bis das Licht auf der Taste erlischt.
Hinweis! Wenn Sie sich entscheiden, das gewählte Programm nicht zu
starten, lesen Sie bitte den Abschnitt „Stoppen oder Anpassen eines
Spülprogramms“.
Wenn nicht genügend Enthärtungssalz vorhanden ist, leuchtet die
Salzanzeige auf und zeigt an, dass Salz nachgefüllt werden muss. Wenn
nicht genügend Klarspüler vorhanden ist, leuchtet die Klarspüleranzeige auf
und zeigt an, dass Klarspüler nachgefüllt werden muss.
Anzeigen
• Salz
Die Anzeige gibt an, dass Sie den Salzbehälter mit Regeneriersalz
befüllen müssen.
• Klarspüler
Die Anzeige gibt an, dass Sie den Klarspülerbehälter befüllen müssen.
Stoppen oder Anpassen eines Spülprogramms
1. Öffnen Sie die Tür.
Das zuletzt gewählte Programm erscheint auf dem Display.
2. Halten Sie die Programmtaste länger als drei Sekunden gedrückt.
Die Anzeige „Programmende“ blinkt. Auf dem Display erscheint „1“.
3. Schließen Sie die Tür der Spülmaschine.
Die Maschine pumpt etwa 30 Sekunden lang ab. Anschließend ertönt 5
Mal ein Tonsignal und die Anzeige gibt an, dass das Programm beendet
ist.
4. Sie können nun erneut das gewünschte Programm wählen (siehe
„Programmwahltabelle“).
5. Schließen Sie anschließend die Tür.
DE 8BEDIENUNG
Achtung! Ein Programm, das bereits gestartet wurde, kann nur in der
Anfangsphase noch verändert werden. Nach längerer Zeit ist das Spülmittel
bereits über das Geschirr versprüht worden oder das Waschwasser
abgepumpt worden. In diesem Fall müssen Sie das Spülmittelfach erneut
füllen (siehe Kapitel Spülmittel).
Warnung! Es ist gefährlich, während des Spülprogramms die Tür zu öffnen.
Sie können von dem Wasser getroffen werden, das aus der Maschine spritzt.
Nach Ablauf des Spülprogramms
Nach Ablauf des Spülprogramms blinkt die Anzeige „Programmende“ und
es ertönt 5 Mal ein Tonsignal. Öffnen Sie die Tür der Geschirrspülmaschine.
Schalten Sie das Gerät mit der Ein-/Aus-Taste aus. Warten Sie einige
Minuten, bevor Sie den Geschirrspüler ausräumen. Unmittelbar nach Ablauf
des Programms sind Geschirr und Besteck noch sehr heiß. Es besteht die
Gefahr, dass Geschirr durch die Hitze bricht. Wenn das Geschirr einige
Minuten in der Maschine gelassen wird, trocknet es außerdem besser.
Überlaufschutz
Ihr Geschirrspüler ist mit einer Schutzvorrichtung ausgestattet, die
dafür sorgt, dass nicht zu viel Wasser in das Gerät laufen kann. Die
Schutzvorrichtung schließt das Einlassventil und sorgt dafür, dass der
Geschirrspüler das überschüssige Wasser abpumpt. Wenn sich Wasser in
der Maschine befindet (weil zu viel Wasser eingelaufen ist oder infolge eines
Lecks), muss dies erst entfernt werden, bevor Sie den Geschirrspüler erneut
einschalten.
DE 9BEDIENUNG
Programmwahl-Tabelle
Programm Programm informationen Programm Spülmittel Zeit Energie Wasser Wasser
ablauf Vor-/ (min.) (KWh) (L) Halbe
Haupt Beladung
(L)
Eco(1) Stellt den Vorspülen 5/25 gr. 222 0,907(2) 9,0 9,0
Verschmutzungsgrad Autowäsche (50 °C) 0,923(3)
des Geschirrs fest und Heiß-Spülen (55 °C)
passt automatisch die Trocknen
Spüldauer, Temperatur und
Wassermenge.
Smart Automatikprogramm Vorspülen 5/25 gr. 97-178 1,300- 11,8- 7,6-19,8
für stark verschmutztes Heiße Vorwäsche (50 °C) 2,000 24,0
Geschirr. Autowäsche (60 oder 70 °C)
Kalt-Spülen
Zwischenspülen (+ oder -)
Heiß-Spülen (70 °C)
Trocknen
Smart Automatikprogramm für Vorspülen 5/25 gr. 89-121 1,100- 10,9- 6,7-14,3
normal verschmutztes Autowäsche (50 oder 60 °C) 1,300 18,5
Geschirr. Kalt-Spülen
Zwischenspülen (+ oder -)
Heiß-Spülen (70 °C)
Trocknen
Smart Automatikprogramm für Vorspülen 5/25 gr. 69-92 0,700- 10,6- 6,6-13,7
normal verschmutztes, Autowäsche (30 oder 50 °C) 0,900 17,7
empfindliches Geschirr. Kalt-Spülen
Zwischenspülen (+ oder -)
Heiß-Spülen (60 °C)
Trocknen
50 Minuten Täglicher Spülgang in Autowäsche (65 °C) 25 gr. 50 1,000 9,5 9,5
50 Minuten. Für täglich zu Kalt-Spülen
spülendes Geschirr wie Heiß-Spülen (70 °C)
weniger verschmutzte oder Trocknen
normale Teller und Pfannen.
Leichte Geeignet für normal Vorspülen 5/25 gr. 94 1,320 14,4 11,1
Pflege verschmutztes, tägliches Autowäsche (60 °C)
Geschirr. Kalt-Spülen
Heiß-Spülen (70 °C)
Trocknen
Schongang Geeignet für leicht Vorspülen 5/25 gr. 74 0,800 13,9 10,0
verschmutztes, Autowäsche (40 °C)
empfindliches Geschirr. Kalt-Spülen
Heiß-Spülen (60 °C)
Trocknen
Schnell Weniger verschmutztes Autowäsche (40 °C) 25 gr. 30 0,670 10,9 10,9
Geschirr, wie Gläser, Kristall Kalt-Spülen
und feines Porzellan. Heiß-Spülen (50 °C)
Spülvorgang Für Geschirr, das nur Vorspülen 15 0,020 4,2 4,2
gespült und getrocknet
werden soll.
(1)
Dieses Programm ist der Testzyklus.
Angaben zum Vergleichbarkeitstest nach EN 50242/EN 60436.
(2)
Gemäß Norm EN 50242
(3)
Gemäß Norm EN 60436
DE 10BEDIENUNG
Regeneriersalz (Wasserenthärter)
Diese Maschine ist mit einem Wasserenthärter ausgestattet. Füllen Sie
hierzu den Geschirrspüler mit Salz.
1
• Entfernen Sie den unteren Spülkorb und schrauben Sie den Deckel des
Behälters ab (1 und 2).
• Bevor Sie den Behälter zum ersten Mal befüllen, gießen Sie einen Liter
Wasser hinein (3).
• Setzen Sie den Trichter in die Öffnung des Behälters ein. Füllen Sie
2
zirka 2 kg Salz hinein (4). Es ist normal, dass hierbei etwas Wasser
aus der Öffnung austritt. Achtung! Verschüttetes Salz entfernen und
sofort danach immer ein komplettes Programm laufen lassen, um einer
Beschädigung des Bodens vorzubeugen.
• Drehen Sie den Deckel des Salzreservoirs gut zu.
3
Achtung! Befüllen Sie immer erst den Salzbehälter und stellen Sie die
Wasserhärte ein, bevor Sie die Spülmaschine in Betrieb nehmen. Befüllen
Sie den Salzbehälter, wenn das Warnlämpchen des Wasserenthärters (2)
T
SAL leuchtet. Es kann vorkommen, dass das Lämpchen auch bei gefülltem
Salzbehälter einige Zeit weiterleuchtet. Es verlischt, wenn sich ausreichend
Salz im Wasser gelöst hat.
4
Salzverbrauch einstellen
Passen Sie den Salzverbrauch entsprechend folgendem Schema an:
Niveau Deutsche Französische Englische Anzeige
Wasserhärte Härte dH Härte dF Härte dE
1 0-5 0-9 0-6 L1 erscheint auf dem Display
2 6-11 10-20 7-14 L2 erscheint auf dem Display
3 12-17 21-30 15-21 L3 erscheint auf dem Display
4 18-22 31-40 22-28 L4 erscheint auf dem Display
5 23-31 41-55 29-39 L5 erscheint auf dem Display
6 32-50 56-90 40-64 L6 erscheint auf dem Display
Informieren Sie sich bei Ihrem Wasserwerk über die Härte des Leitungs
wassers, um diesen Wert entsprechend der Tabelle unten einstellen zu
können.
Die Wasserhärte ist standardmäßig auf Niveau 3 eingestellt.
DE 11BEDIENUNG
Zurücksetzen
Öffnen Sie die Tür der Geschirrspülmaschine.
Die Anzeige des zuletzt gewählten Programms blinkt.
Halten Sie die Programmtaste länger als drei Sekunden gedrückt.
Die Anzeige „Programmende“ blinkt. Die Anzeige des zuletzt gewählten
Programms erlischt.
Schließen Sie die Tür der Spülmaschine.
Die Maschine pumpt etwa 30 Sekunden lang ab. Nach Abschluss ertönt
5 Mal ein Tonsignal und die Anzeige gibt an, dass das Programm beendet ist.
Schalten Sie das Gerät mit der Ein-/Aus-Taste aus.
Wasserhärte einstellen
Drücken Sie die Programmtaste und halten Sie diese gedrückt.
Schalten Sie die Spülmaschine gleichzeitig mit der Ein-/Aus-Taste ein.
Halten Sie die Programmtaste gedrückt, bis „SL“ nicht mehr auf dem
Display zu sehen ist.
Im Display erscheint die zuletzt eingestellte Wasserhärteeinstellung.
Stellen Sie die gewünschte Wasserhärte ein, indem Sie wiederholt die
Programmtaste drücken.
Nach erfolgter Einstellung drücken Sie die Ein-/Aus-Taste.
Der eingestellte Wert wird im Speicher gespeichert.
Klarspülerbehälter
Im letzten Spülgang wird Klarspüler hinzugegeben. Klarspüler verhindert,
das auf dem sauberen Geschirr Wasserflecken zurückbleiben. Er sorgt
außerdem dafür, dass das Geschirr schneller trocknet, indem das Wasser
von diesem abperlt.
Die Spülmaschine eignet sich für die Verwendung von flüssigem Klarspüler.
Der Klarspülerbehälter befindet sich an der Innenseite der Tür, neben dem
Behälter für das Geschirrspülmittel.
DE 12BEDIENUNG
Klarspüler einfüllen und einstellen
Öffnen Sie zum Auffüllen von Klarspüler den Deckel des Klarspülerbehälters.
Füllen Sie den Behälter bis zur MAX-Markierung mit Klarspüler und
schließen Sie den Deckel wieder.
Achten Sie darauf, den Klarspülerbehälter nicht zu überfüllen, wischen Sie
verschütteten Klarspüler auf.
Ändern Sie die Klarspülerstufe anhand der nachstehenden
Schritte, bevor Sie die Maschine einschalten:
1. Halten Sie die Programmtaste gedrückt.
2. Schalten Sie die Maschine ein.
3. Halten Sie die Programmtaste gedrückt, bis „rA“ aus der Anzeige
verschwindet.
▷ Die Klarspülereinstellung richtet sich nach der
Wasserhärteeinstellung.
▷ Die Maschine zeigt die aktuelle Einstellung an.
4. Ändern Sie die Stufe, indem Sie die Programmtaste drücken.
5. Schalten Sie zum Speichern der Einstellung die Maschine aus.
Die Werkseinstellunge ist „4“.
• Erhöhen Sie die Stufe, falls das Geschirr nicht richtig getrocknet
wird oder fleckig ist.
• Verringern Sie die Stufe, falls sich blaue Flecken am Geschirr bilden.
Niveau Klarspülerdosis Anzeige
1 Kein Klarspüler wurde ausgegeben r1
2 1 Dosis ausgegeben r2
3 2 Dosen ausgegeben r3
4 3 Dosen ausgegeben r4
5 4 Dosen ausgegeben r5
DE 13You can also read