Infrastructure Trial Readiness Guide for 2021 MCAS Computer-Based Testing - MCAS ...
←
→
Page content transcription
If your browser does not render page correctly, please read the page content below
Infrastructure Trial Readiness Guide for 2021
MCAS Computer-Based Testing
March 2021

Massachusetts Department of Elementary and Secondary Education
75 Pleasant Street, Malden, MA 02148-4906
Phone 781-338-3000 TTY: N.E.T. Relay 800-439-2370
www.doe.mass.edu
This document was prepared by the
                           Massachusetts Department of Elementary and Secondary Education
                                                  Jeffrey C. Riley
                                                  Commissioner

The Massachusetts Department of Elementary and Secondary Education, an affirmative action employer, is committed to
                ensuring that all of its programs and facilities are accessible to all members of the public.
We do not discriminate on the basis of age, color, disability, national origin, race, religion, sex, gender identity, or sexual
                                                        orientation.
     Inquiries regarding the Department’s compliance with Title IX and other civil rights laws may be directed to the
             Human Resources Director, 75 Pleasant St., Malden, MA 02148-4906. Phone: 781-338-6105.

                     © 2021 Massachusetts Department of Elementary and Secondary Education
Permission is hereby granted to copy any or all parts of this document for non-commercial educational purposes. Please
                   credit the “Massachusetts Department of Elementary and Secondary Education.”

                                         This document printed on recycled paper

                           Massachusetts Department of Elementary and Secondary Education
                                    75 Pleasant Street, Malden, MA 02148-4906
                                Phone 781-338-3000 TTY: N.E.T. Relay 800-439-2370
                                                www.doe.mass.edu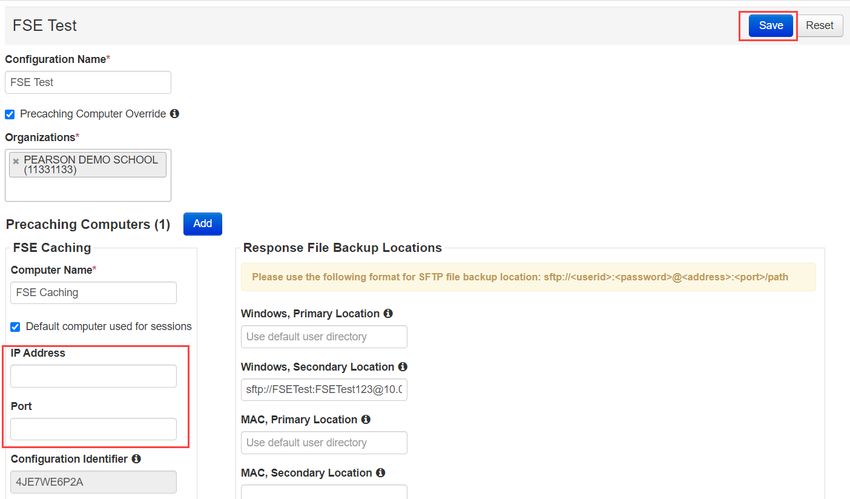
Important Contact Information and Resources

Contact:            MCAS Service Center
For questions on:        •  general test administration support
                         •  PearsonAccessnext and TestNav such as
                               o user accounts
                               o technology support and readiness
                               o Infrastructure Trials and ProctorCache
                               o viewing student records and organizations
                               o the SR/PNP process and loading files
                        • logistical support, including filling out the Materials Summary and the
                            PCPA
                        • locating resources
                        • shipments of materials
Hours:              7:00 a.m.–5:00 p.m., Monday–Friday
Web:                mcas.pearsonsupport.com
Email:              mcas@cognia.org
Telephone:          800-737-5103
Fax:                603-516-1121

Contact:            ESE Office of Student Assessment Services
For questions on:       •    policy, such as assigning accessibility features and accommodations
                        •    student participation
                        •    testing irregularities, including test security incidents and technology failures
                        •    undoing test submissions for CBT
                        •    student data and SIMS (See note below regarding SIMS.)

                       Questions regarding SIMS data should be directed to the district’s SIMS contact (go to
                       profiles.doe.mass.edu/search/search.aspx?leftNavID=11239, select SIMS Contact from
                       the Function menu, and click Get Results).
Hours:              8:00 a.m.–5:00 p.m., Monday–Friday during test administration windows

                    Between 7:00 a.m. and 8:00 a.m. during the test administration windows, MCAS Service
                    Center representatives will receive calls to 781-338-3625, answer questions regarding
                    logistics, and take messages for Department staff, which will be returned during our regular
                    business hours.
Web:                www.doe.mass.edu/mcas/admin.html
Email:              mcas@doe.mass.edu
Telephone:          781-338-3625
Fax:                781-338-3630

                                                                                                             i
Contact:            Pearson Technology Support Specialists
For questions on:       •    Technology set-up and site readiness
                        •    Questions about TestNav
                        •    ProctorCache set-up
                        •    TestNav configurations in PearsonAccessnext
                        •    Error messages or questions on creating PearsonAccessnext sessions or
                             TestNav configurations
                         • Infrastructure Trials (set-up as well as debriefing)
Hours:              10:00 a.m.–5:30 p.m., Monday–Friday
Web:                http://mcas.pearsonsupport.com/technology-setup/
                    Use the link above to schedule one-on-one support from Pearson's support
                    specialists (i.e., Field Services Engineering). Technology coordinators may schedule
                    a 15-, 30-, or 60-minute phone meeting with the Field Services Engineering team
                    for "office hours" support.

                                                                                                           ii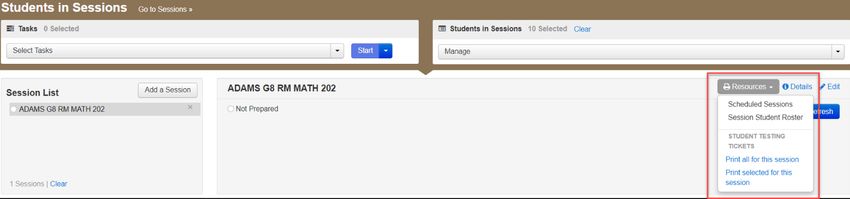
Table of Contents

Important Contact Information and Resources ............................................................. i

I. Infrastructure Trial Overview ........................................................................................ 1

II. Using the PearsonAccess next Training Site ............................................................... 3

III. Technology Set-Up ...................................................................................................... 4

IV. Generating Sample Student Records ..................................................................... 15

V. Administering Accommodated Practice Tests ....................................................... 17

VI. Creating PearsonAccessnext Sessions .................................................................... 20

VII. Preparing and Administering the Infrastructure Trial ......................................... 24

VIII. The Day of the Infrastructure Trial ........................................................................ 26

IX. Steps for the Test Administrator to Administer the Infrastructure Trial Practice
Tests .................................................................................................................................. 27

X. Monitoring the Infrastructure Trial ........................................................................... 31

XI. Follow-up .................................................................................................................... 36

Appendix A: Terms Related to Computer-Based Testing ......................................... 37

Appendix B: ProctorCache Recommendation for 2021 MCAS Computer-Based
Testing .............................................................................................................................. 38

Appendix C: Best Practices for MCAS Computer-Based Testing Set-Up,
Administration, and Troubleshooting .......................................................................... 43
I. Infrastructure Trial Overview

A. Purpose and General Overview
An Infrastructure Trial is an opportunity for districts, schools, and students to prepare for MCAS
computer-based testing (CBT) by simulating test-day network utilization. This “dress rehearsal” will help
to confirm that all testing devices are properly configured, that school and district networks can handle
online testing, and that staff members are familiar with their role in administering an online test.

This trial is also an opportunity to introduce students to TestNav and practice using the online tools.

Conducting an Infrastructure Trial provides the school with a scheduled opportunity to practice
administering a test in a low‐stakes environment that can identify possible problems with technology
and communication. This process will help avoid delays or issues during operational testing. Unlike
during an operational administration, this trial will not use real student information (sample students
will be created in the PearsonAccessnext training site), but many of the other steps for an operational
administration will be followed.

The Infrastructure Trial confirms:
    • TestNav is configured correctly
    • If precaching, the ProctorCache machine is properly configured to deliver test content to devices
    • Devices can successfully run TestNav
    • Participating staff know how to monitor and manage a computer-based MCAS test
    • Students are familiar with the computer-based tools and format

Note that students participating in the Infrastructure Trial practice test will not receive a score at the
end of the session; if schools would like for students’ practice tests to receive a score, schools should
also administer the practice tests outside of the Infrastructure Trial. Scorable practice tests are available
in the MCAS Resource Center and the TestNav Application login screen under the Sign In button as
shown below.

                                                                                                            1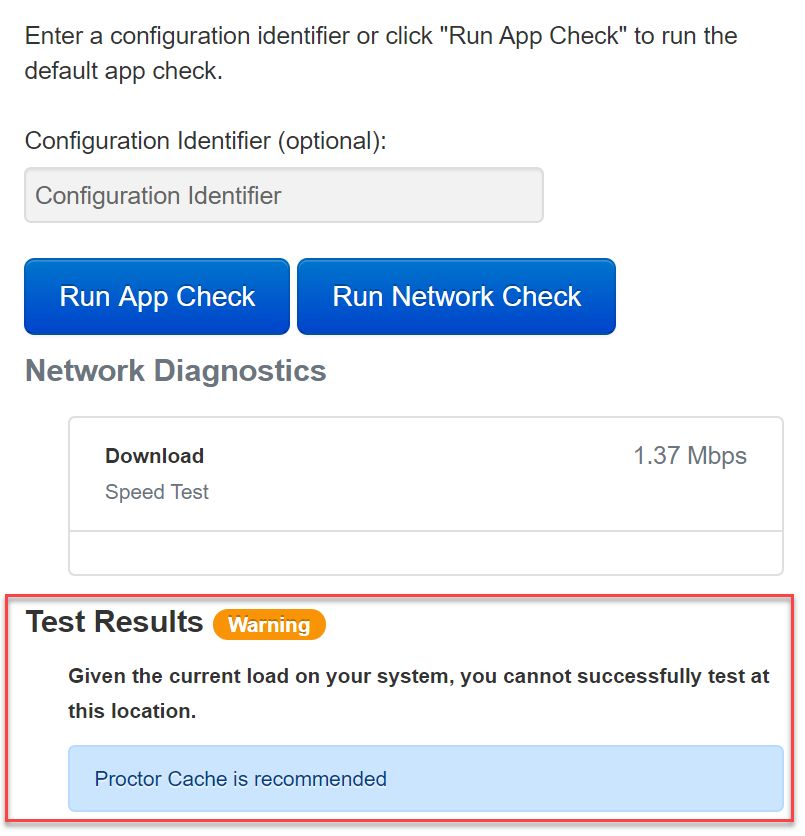
B. Scheduling the Infrastructure Trial
New for 2021, if your organization has previously successfully administered school-wide CBT, and you
are able to confirm the five bulleted items on the previous page, your organization may not need to
conduct an Infrastructure Trial.

If one or more items in this list cannot be confirmed, or if your technology setup has significantly
changed since the last CBT administration (including schools that will be using Bring Your Own Device for
the first time), an Infrastructure Trial is recommended.

The Infrastructure Trial should take approximately 60 minutes to administer. However, additional time is
needed for the following set-up tasks prior to administration: training staff, creating sample student
records, creating sessions, and configuring the network. The time involved will vary depending on the
size of the school and the number of students testing at a given time.

See the testing schedule and administration deadlines for the recommended windows for conducting an
Infrastructure Trial.

New for 2021: Please note the number of sessions available for each practice test for the Infrastructure
Trial below.
 Grades/Subjects                 Sessions shown in PAN:            Students will take:
 ELA (grades 3-8 and 10)         1 session                         1 session
 STE (grades 5 and 8)            2 sessions*                       1 session
 Math (grades 3, 5, and 6)       1 session                         1 session (randomly assigned to
                                                                   session 1 or 2)
 Mathematics (grade 4)           2 sessions*                       1 session (randomly assigned to
                                                                   session 1 or 2)
 Mathematics (grades 7 and 8)    1 session                         1 session (randomly assigned
                                                                   calculator or non-calculator session)
 Mathematics (grade 10)          3 sessions**                      2 sessions
*Ignore the second session in the Infrastructure Trial. In operational testing, the second session will consist of the
questionnaire.
**Ignore the third session in the Infrastructure Trial. In operational testing, the third session will consist of the
questionnaire.

C. Individuals to Include in the Infrastructure Trial
Everyone who will be involved in operational testing should be involved in the Infrastructure Trial. This
may include the following:
    • District test coordinator
    • Principal or school test coordinator
    • Test administrators
    • Technology coordinator
    • Students

Note: Due to reduced staff and students in schools, scaled-down versions of Infrastructure Trials are
acceptable. These scaled-down versions should mimic as closely as possible the testing environments on
test day.

D. Planning an Infrastructure Trial
                                                                                                                         2
Steps for the district test coordinator or principal/school test coordinator

1. Create a communication plan for the Infrastructure Trial.
    A best practice is developing a communication plan for all of the staff members who have a role in
    administering computer‐based tests.

    Principals or test coordinators should establish communication with technology staff before the test
    schedule is set. The plan should document how to reach technology staff during operational testing
    as well as which individual (the technology coordinator or designee) will be designated to contact
    the MCAS Service Center in case of technology issues.

2. Schedule the Infrastructure Trial.
    Schedule the following activities as part of the Infrastructure Trial:
       • Consult with the technology coordinator, and confirm that all of the student testing devices
           meet the technical specifications.
       • Designate appropriate testing locations (see guidance in the Principal’s Administration
           Manual).
       • Ensure technology staff have set up, installed, and configured all necessary software.
       • Train all staff involved in the Infrastructure Trial.
       • Identify all students who will participate in the Infrastructure Trial.
           A trial can be conducted with any number of students, but it is recommended that you
           include the maximum number of students you expect to be testing at the same time so that
           your trial approximates the anticipated load on your network.
       • Have students practice TestNav navigation and tools by using the tutorial found at
           mcas.pearsonsupport.com/student/.
       • Districts with a district test coordinator should inform their schools whether there will be a
           district schedule for administering the Infrastructure Trial.

II. Using the PearsonAccess next Training Site
Steps for the district test coordinator, principal/school test coordinator, test
administrators, and the technology coordinator

The PearsonAccessnext (PAN) training site is used for the Infrastructure Trial (instead of the operational
site) to create sample students, create PAN Sessions, set up TestNav configurations, and monitor
student test progress.

Schools should create accounts for test administrators, as well as any other necessary staff members,
following instructions in the Guide to Managing Users in PearsonAccessnext, available online in the MCAS
Resource Center under the User Information dropdown. New users who need access to multiple schools
in a district, such as technology coordinators, should contact a district user for a PAN account. The MCAS
Service Center can provide support if there are questions about adding new users.

Confirm that all staff members participating in the Infrastructure Trial have a user account for the
training site and have been assigned their appropriate roles. To find a user in PearsonAccessnext, select
Users from the Setup dropdown menu. Here, search by last name or select Show All (the button next to
the search button). To see a user’s assigned role, click on the icon and select the Roles tab. Refer to

                                                                                                             3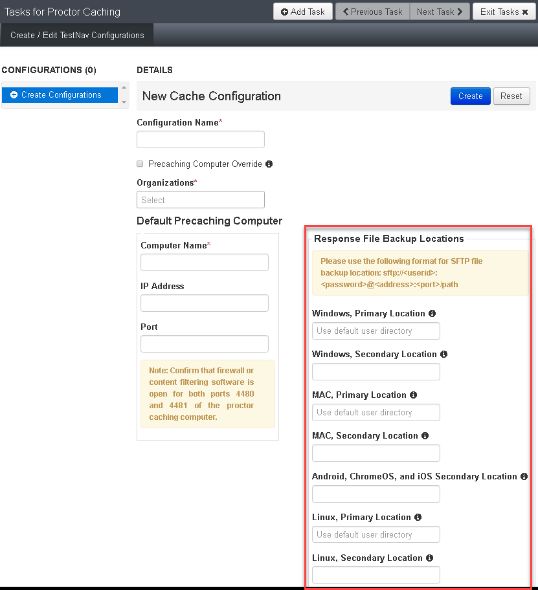
the User Role Matrix and the Guide to Managing Users in PearsonAccessnext on the MCAS Resource
Center for more information about creating users and assigning roles, if needed.

Note that users with accounts from last school year may have been disabled due to inactivity or because
the accounts were created with an “Active End Date.” Test coordinators should edit these accounts
through the user interface or a file upload to restore access to PAN. Once this is completed, users should
update their passwords.

To log in to the training site for the first time (if you received an email notifying you of a new PAN
account):
    • Click on the link in the email.
    • Create a password. You will be prompted to enter it twice; then, click Set Password; and then,
        click OK.
    • To return to the training site, go to https://trng-mcas.pearsonaccessnext.com/.
    • Click Sign In, and enter your username and password on the next screen. Then select Login.
        Read the Privacy Policy and Terms and Conditions of Use, and then click Accept.

Note: The training site can be distinguished from the operational site by its brown banner at the top of
most screens in PAN:

To log in to the training site for the first time (if you received an email notifying you of updated
permissions to your PAN account):
    • Go to https://trng-mcas.pearsonaccessnext.com/.
    • Click Sign In, and on the next screen enter your username and password from the operational
        site. Then select Login.

To reset your password (if needed):
    • Go to https://trng-mcas.pearsonaccessnext.com/.
    • Click on the Forgot Password link.
    • Enter your username and email address (typically these will be the same), and then click
        Request Password Reset.

Notes on logging in:
   • If you reset your password to the training site, you will automatically reset your password for
       the operational site, since usernames and passwords for both sites will always match.
   • Users have five opportunities to log in correctly. After five unsuccessful attempts, the account
       will be locked, and the user will need to click Forgot Password on the home screen to reset the
       account password.

III. Technology Set-Up
Steps for the technology coordinator before, during, and after the Infrastructure Trial

1. Review responsibilities for the Infrastructure Trial.
    The technology coordinator and technology staff will need to review roles and responsibilities for
    preparing schools to conduct the Infrastructure Trial and inform principals in the district. The
    technology coordinator and technology staff will need to determine local responsibilities, including
                                                                                                           4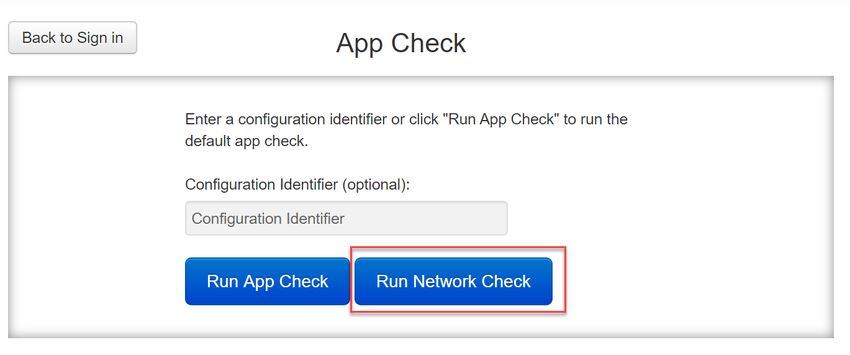
configuring devices and how information will be shared across the team for preparing the school to
   conduct the Infrastructure Trial. Once these roles and responsibilities have been established, they
   need to be shared with the principal.

2. Configure Internet firewalls, content filters, and spam filters.
   •   Configure Internet firewalls, content filters, or spam filters to allow access to the Pearson
       domain. Verify content filter/firewalls and allow the appropriate sites, including:
           o *.testnav.com:80
           o *.testnav.com:443
           o *. pearsontestcontent.com
           o *. usertrust.com
           o *. comodoca.com
           o *. thawte.com
           o *. google‐analytics.com (recommended, but not required)
       Allow local file access to the home directory.

   •   Configure the common applications listed below so that they will not launch on any student
       testing devices during the Infrastructure Trial or during operational testing:
           o Anti‐virus software performing automatic updates
           o Power management software on laptops warning of low battery levels
           o Screen savers and sleep mode
           o Email with auto message notification
           o Calendar applications with notifications, such as Google Calendar
           o Pop-up blockers
           o Set automatic updates (iTunes)
           o Windows Accelerator
           o Mac OS three finger tap gesture on Macintosh computers with trackpads
           o Any other application that could have a popup message

3. Download the device-specific TestNav app.
   For desktop computers, laptops, iPads, Chromebooks, or Androids, download a device‐specific
   TestNav application from the Apple Store, the Google Chrome Web Store, Google Play, or go to
   http://mcas.pearsonsupport.com/technology-setup/. Instructions on setting up and managing these
   devices are available at https://support.assessment.pearson.com/x/HgACAQ.

4. Test the “lock down” settings.
   Student testing devices must be able to operate in a “lock down” state to temporarily disable
   features and applications that could present a security risk.

   Schools can test the security lock down settings following these steps:

       •   For the TestNav app, open TestNav and navigate to the Massachusetts sign in page, and
           then click the user icon in the top right and choose “App Check” from the menu.
       •   A success message should display within a few seconds.
       •   If there is an error message, review the device setup instructions for the TestNav app or
           contact the MCAS Service Center.
       •   If the Configuration Identifier is entered, the App Check will also verify that the device has
           the appropriate permissions to the primary and, if specified, the secondary save locations.
           The identifier can be found in PAN on the Create/Edit TestNav Configuration page (Setup >
                                                                                                            5
TestNav Configurations > Create/Edit TestNav Configurations).
Note: ChromeOS devices: Peer-to-peer (P2P) networking should be disabled on ChromeOS devices.
If it is available, devices can automatically update Chrome from nearby devices of the same model,
resulting in an interruption in testing. Turn off this option in the Google Admin Console; it will help
reduce errors and/or interruptions during testing. See Appendix B, section 1 (Technology Set-Up) for
instructions on how to disable P2P networking on Chromebooks.
Note: ChromeOS devices should have accessibility features disabled prior to testing.
5. Run the Network Check in TestNav
Follow these instructions to test your network in TestNav and confirm if ProctorCache is needed.
In the TestNav app, click on the User dropdown and select App Check.
On the next screen, click Run Network Check.
On the following screen, you will be asked to enter a number of devices. This number should match
as closely as possible the number of devices that will be used during testing on test day. Once a
number has been entered, click Start Diagnostics Test.
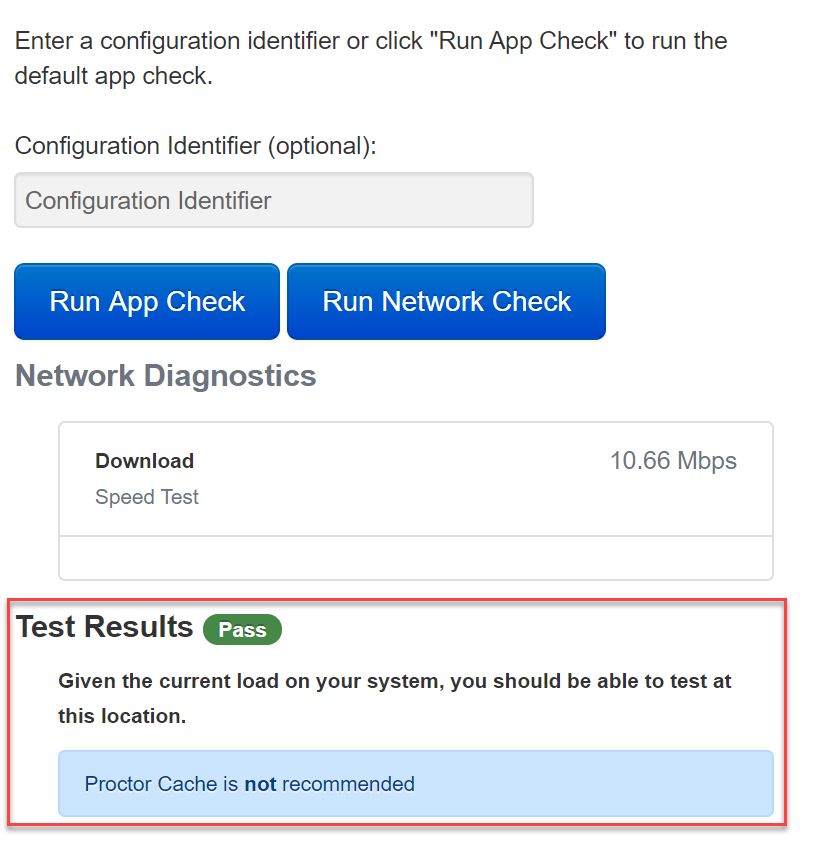
6Following this test, you will receive a message informing you whether ProctorCache is
recommended based on your network and number of devices entered.
If ProctorCache is not recommended, you will receive a message with a green Pass icon.
If Proctor Cache is recommended, you will receive a message with an orange Warning icon.
76. Review Appendix B: ProctorCache Recommendation for Winter/Spring 2021 MCAS
Computer-Based Testing.
Follow the instructions to install, disable, or re-enable ProctorCache depending on the result of the
Network Check.
7. Create the TestNav configuration.
The TestNav configuration enables you to set up Response File Backup Locations. If ProctorCache is
used, the TestNav configuration will notify the student device where to access test content from the
precaching machine once content becomes available. You may also change the default save location
for encrypted backup files for TestNav in the TestNav configuration.
To create a TestNav configuration for your organization, select TestNav Configurations from the
Setup menu on the PearsonAccessnext homepage, and select Create/Edit Configurations from the
Select Tasks dropdown menu, and complete the following steps.
8a. Complete the “Details” fields.
• Enter a Configuration Name.
• If using ProctorCache, select the Precaching Computer Override option (recommended
for most devices/configurations). If selected, this will allow students to continue testing,
even if they lose connection to the ProctorCache computer. This may slow the loading
time of the tests as the testing devices will no longer be getting content from a local
device, but there will be no testing disruption.
• Select the school/organization that will use this configuration from the Organizations
dropdown menu.
9b. If using ProctorCache, complete the “Default Precaching Computer” fields.
• Enter a Computer Name for the precaching machine.
• Enter an internal network IP Address of the precaching machine.
• Enter the Port number for the precaching machine, which will be 4480 for Pearson
supplied ProctorCache software. If you will be using a non-Pearson supplied caching
solution, uncheck the box next to “Uses Pearson Precaching Software” and then use the
correct port for the non-Pearson software.
10c. Complete the “Response File Backup Locations” fields.
Note: Whether or not you are using ProctorCache, if you do not already have a Secondary
save location set up, you will need to enter a Configuration Name, Organization, and
Computer Name for the locations to save student response files.
• For the primary location, leave this field blank so the default remains the device the
student is using to test. The Department recommends that a secondary save location
also be designated on an internal network location.
• Enter the Secondary save locations for the students’ response files, which will be
encrypted. There are options for Windows, Mac, and Linux devices, and there is an
option to use an SFTP file backup location for mobile devices.
11d. Click “Create” to complete the configuration.
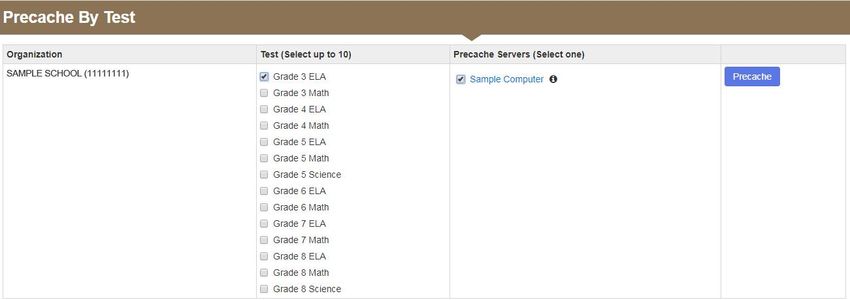
8. If using ProctorCache, precache test content by using the “Precache by Test” function.
a. Select “Precache by Test” from the “Setup” dropdown menu.
12b. Select the test(s) to cache and the “Precache Server,” and then click “Precache.”
c. Click “Precache” in the pop-up message confirming the precaching computer.
d. While precaching test content, you may see an additional prompt depending on the Browser
that is being used. If you do not confirm, the content will not be cached. More information can
be found on the Pearson Support Site. Note: If using Google Chrome, you may need to select the
popup window from your task bar, as it may be minimized.
Google Chrome Firefox
13e. A new window will open the ProctorCache diagnostic screen showing the precaching status.
You may need to enable pop-ups in your browser for PearsonAccessnext to see this screen.
9. Perform a “Preliminary System Test” (recommended).
Prior to students taking part in the Infrastructure Trial, the technology coordinator should perform a
Preliminary System Test. The Preliminary System Test is an informal, small‐scale Infrastructure Trial
to help ensure systems are set up and in place before students participate. Technology coordinators
should work with the principal or school test coordinator to follow the steps to create sample
student records and a PAN Session. Then, technology staff should log in to several student devices
and access a practice test to confirm that the devices are able to use TestNav.
10. Perform the following steps during the Infrastructure Trial.
a. If applicable, ensure ProctorCache software is running.
Locate the caching computer’s IP address and, then in your browser, type http://:4480 and then press Enter to view the ProctorCache interface. View three tabs: Tests,
Clients, and Help. Select the Tests tab for information about test content and caching status.
Select the Clients tab to monitor client connectivity.
b. Monitor network performance for slowdowns or ISP bandwidth usage.
• If testing devices are using a wireless connection, monitor the connections and verify that
access point placement is sufficient for online testing
• Provide technology support as needed to the principal or school test coordinator and to test
administrators.
11. Perform the following steps after the Infrastructure Trial.
a. If you used ProctorCache, purge cached test content (recommended).
Note that if content is not purged, it will show in the caching interface in the next CBT
administration.
In your browser, type http://:4480 and press Enter to view the ProctorCache
interface. Choose the Tests tab to select the content to purge. A password is required to purge;
the default password is t35t1n6.
14b. Follow up on any issues that were identified.
Following the Infrastructure Trial, there may be a need for technical follow-up and resolution
prior to the operational test administration. Feedback from staff and students regarding
TestNav performance, device connectivity, network performance, and access point placement
should be used to conduct follow-up activities with the Infrastructure Trial team.
IV. Generating Sample Student Records
Steps for the district test coordinator or principal/school test coordinator
The Department recommends using sample student records instead of actual student data. Schools
should determine the maximum number of expected concurrent testers during operational testing (e.g.,
300 students testing on one day at 10:00 a.m.) in order to conduct their Infrastructure Trial with the
same number of concurrent testers. The principal or test coordinator will then need to create sample
student records in the training site, creating as many sample records as the number of students
expected to participate in the Infrastructure Trial, as well as a 10 percent overage in case of login
complications.
Note: The ability to generate sample student records exists only on the PearsonAccessnext training site
(this cannot be done in the operational site).
To create sample student records:
1. Log in to the MCAS training site.
Confirm that the correct administration is selected in the top right hand corner of PearsonAccess next.
2. Click “Setup,” and then select “Students” from the dropdown menu.
3. Select “Generate Sample Students” from the “Select Tasks” dropdown menu, and then
click “Start.”
154. Populate the following fields in the “Generate Sample Students” screen, and then click
“Generate.”
• Organization: Select your school/organization.
• Group: Select Create New Group, and enter a group name that is easy to find (e.g., grade,
subject, and location). This will be used later to add students to a PearsonAccessnext Session (see
Section VI on pages 19–23).
Note: Creating groups is only available in the training site to facilitate adding sample students to
test sessions. Student groups should not be used for operational testing.
• Student Grade: Select the grade in which the students are reported in SIMS.
• Test: Select the appropriate subject area test from the dropdown menu.
• Test Format: Select Online.
• Number of Students: Enter the number of students, up to a maximum of 99. It is recommended
that you create at least 10 percent more students than needed, in case additional student
testing tickets are needed.
16• Repeat steps 2–4 for each grade/subject for each group of sample students to be created.
• Upon request, DESE can place a pre-populated CSV file of sample students in schools’ MCAS
2021 Data folder in DropBox Central.
o Records are representative of students in each school and include some pre-populated
accommodations available the Infrastructure Trial.
o After accessing the CSV file from DropBox, schools can assign appropriate session names
and then import the file into the PAN Training Site.
• Contact the Department’s Office of Student Assessment Services at mcas@doe.mass.edu to
make this request.
V. Administering Accommodated Practice Tests
Steps for the district test coordinator or principal/school test coordinator
Most, but not all, accommodations and accessibility features are available for the practice tests
administered as part of the Infrastructure Trial. It is recommended to test third party software and
hardware prior to live testing to ensure compatibility with the app.
The following SR/PNP-enabled accessibility features are available for practice tests in the Infrastructure
Trial:
• Alternative Background and Font Color: The Alternative Background and Font Color is available
for all of the grades 3–8 and 10 practice tests.
17• Answer Masking: Answer Masking is available for all of the practice tests (listed above).
• Alternate Cursor/Mouse Pointer: Larger sizes and colors for the cursor are available for all
practice tests (listed above).
The following accommodations are available for practice tests in the Infrastructure Trial. Where noted
by an asterisk, practice test editions are only accessed in the Infrastructure Trial and not via the app or in
the MCAS Resource Center.
• Text-to-Speech: Text-to-Speech is available for all of the practice tests.
• Compatible Assistive Technology*: The Compatible Assistive Technology accommodated test
Form is available only for the grade 3 ELA practice test; it is meant to be a sample for school
staff to ensure that students’ external AT software/hardware function as expected with TestNav
prior to operational testing.
• Screen Reader*: The Screen Reader accommodation is available only for the grade 3
Mathematics practice test; it is meant to be a sample for school staff to ensure that students’
external Screen Readers (e.g., JAWS) function as expected with TestNav prior to operational
testing.
• Web Extensions: Co:Writer Universal and Read&Write web extensions are available for students
who have speech-to-text and/or word prediction listed in their IEP or 504 plan. It is not
necessary for Co:Writer Universal and/or Read&Write to be installed on a student's browser or
computer, nor is a software license required. These are available for grades 3-8 ELA and grade 5
and 8 STE and 10 ELA practice tests. Web Extensions are not available on the Mathematics tests
because they are unable to function correctly due to the conflicting requirements of the
equation editor.
• Human Reader/Human Signer: These accommodations involve assigning a proctor testing
ticket, so the students must be placed in a separate PearsonAccessnext Session marked as a
Human Reader/Human Signer session. No responses should be entered into the test using a
Proctor Testing Ticket, as the responses will not be saved. (Students will log in and respond
using their student testing tickets.) More information on this can be found in the Guide to the
Student Registration/Personal Needs Profile (SR/PNP) Process. These accommodations are
available for all of the practice tests (listed above).
• Spell-Checker: The Spell-Checker accommodation is available for all grades 3–8 and 10 ELA
practice tests.
For more information about accessibility features and accommodations, refer to the Guide to the
Student Registration/Personal Needs Profile (SR/PNP) Process. For information about assistive
technology, refer to the Guidelines for Using Assistive Technology as an MCAS Test Accommodation.
These accessibility features and accommodations, including accommodated test forms, must be
assigned prior to preparing and starting a PearsonAccessnext Session. Use the following steps to assign
accessibility features and accommodations.
1. Click “Setup,” and then select “Students” from the dropdown menu.
182. Select the student whose test will be assigned an accommodation, and select “Manage
Student Tests” from the “Select Tasks” dropdown menu.
3. Select the subject area test on the left-hand side of the screen, and select the appropriate
accessibility features and/or accommodations.
194. Recommended: Revise the sample student name so that the accommodated test is easier
to find. Select the “Add Task” button on the top black bar, and then select “Create/Edit
Student” and select the student record on the left to update the name and click “Save.”
VI. Creating PearsonAccessnext Sessions
Steps for the district test coordinator or principal/school test coordinator
After sample student records have been created, the district test coordinator, principal or school test
coordinator will need to create online PearsonAccessnext Sessions for the sample student practice tests,
20which are grade- and subject-specific. A PearsonAccessnext Session is an electronic grouping of students
in PearsonAccessnext who will be testing at the same time and place. (This is different from subject test
sessions, which is a term used for administration.)
Recommendations for creating PearsonAccessnext Sessions:
• Create a unique PearsonAccessnext Session for each group that will be testing.
• Include the subject, testing location, and the name of the test administrator in the name of the
PearsonAccessnext Session.
1. Create PearsonAccessnext Sessions.
a. Click “Testing,” and then select “Sessions” from the dropdown menu.
b. Click “Select Tasks,” select “Create/Edit Sessions,” and then click the blue “Start” button.
c. Complete the “Details” screen.
• Enter the Session Name, and then select the Organization from the dropdown menu.
• Complete the Test & Form section by selecting the Test Assigned dropdown menu and
choosing the appropriate practice test from the dropdown.
• Set Form Group Type to Standard from the Form Group Type dropdown.
Note: Do not select the “Remote” option in the dropdown menu. Remote MCAS testing is
not available at this time.
• If using ProctorCache, select the Precaching Computer from the dropdown menu.
• Enter the Scheduled Start Date and the Scheduled Start Time. (These are meant to be used
for planning purposes only; entering incorrect information will not have an effect on when
the practice tests can actually be administered.)
21• Click in the box underneath “Students” to add individual students or click on the dropdown
arrow next to the school code to instead find by group name created in section IV above (as
shown in the following step).
d. When selecting the option to find groups, the screen changes as shown below:
e. Click “Create.”
2. How to add additional sample student records to a PearsonAccess next Session that has
already been created (if necessary):
Follow the steps below to add student records to PearsonAccessnext Sessions, if the students were
not included in the Session when it was created.
a. Click “Testing,” and then select “Students in Sessions” from the dropdown menu.
22b. Select “Add a Session,” and search for the name of the Session to which you will add students.
c. Select the checkbox next to the name of the Session, and then click “Add Selected.”
d. Click on the “Tasks” menu, and select “Add Students to Sessions.” Then click “Start.”
23e. In the “Find Available Students” box, find students to add to the Session.
Search for students by last name or select the “Show all Results” checkbox to see all available
students. To add students from a previously created group, select the blue dropdown and select
the “by Group” option.
f. Select the student(s) to be added and click the “Add” button.
VII. Preparing and Administering the Infrastructure Trial
Steps for the district test coordinator or principal/school test coordinator
1. Prepare each PAN Session.
PAN Sessions must be prepared by the principal or school test coordinator before they can be
started. Preparing a PAN Session assigns the test form for the students, so it is important to make
sure PNP information has been updated so sample students can be assigned an accommodated
form as necessary. Preparing a PAN Session may take a few minutes depending on the number of
students in the Session; preparing multiple PAN Sessions may take a longer time. It is recommended
to prepare Sessions the day before planned testing to ensure that all forms are assigned correctly.
a. Go to the “Testing” tab and click “Students in Sessions.”
24b. Locate and click the session name from the Session List.
The Sessions Details screen will appear for the PAN Session selected. If multiple PAN
Sessions are selected, the option to Combine View and Prepare all Sessions appears.
c. Click the blue “Prepare Session” or “Prepare All Sessions” button.
d. For grades 7 and 8 Mathematics: Determine which students need calculators. After
sessions have been prepared, scroll down on the Students in Sessions screen. The number
in the Form column on the Students in Sessions screen will end with either “01” or “02”.
Students with forms that end in “01” have been assigned the noncalculator session.
Students with forms that end in “02” have been assigned the calculator session.
2. Print student testing tickets.
Student testing tickets include a login ID and password to log in to the practice tests, and are
generated for each student added to a PAN Session.
a. Once logged in to the training site, click “Testing,” and then select “Students in Sessions” from
the dropdown menu.
25b. Select “Add a Session,” and then search for the PearsonAccessnext Session.
c. Select the checkbox next to the Session name, and click “Add Selected.”
d. To print student testing tickets, click on the “Resources” dropdown. There will be options to
print tickets for all students or selected students.
3. The principal/school test coordinator or test administrators should verify the following
with technology staff:
• All devices to be used for testing are charged.
• Sufficient power cords and power strips are available.
• Accessories, such as external keyboards for tablets and headphones for students using
the text-to-speech edition, are available and in working order prior to testing.
VIII. The Day of the Infrastructure Trial
Steps for the district test coordinator or principal/school test coordinator
1. Start the PAN Session.
a. Click “Testing”, and then select “Students in Sessions” from the dropdown menu. (See a screen
26shot on page 23.)
b. In the “Session List”, click on the names of the Sessions to start.
The Session Details screen will then appear for the selected Session(s). (If two or more Sessions
were selected, options to Combine View and Start All Sessions will appear.)
c. On the “Session Details” screen, click on the green “Start Session” (or “Start All Sessions”
button). After clicking this button, it will change to a Stop Session button.
2. Prepare testing devices: Launch the TestNav app on all testing devices.
3. Distribute student testing tickets and proctor testing tickets if applicable: Ensure that test
administrators have the student testing tickets for all students assigned to them, and proctor testing
tickets for the Human Reader or Human Signer accommodations. Make sure you do not hand out
proctor testing tickets to students since responses are NOT saved in a test accessed with a proctor
testing ticket.
4. Direct test administrators and students to testing locations: Direct test administrators and
students to their assigned computer lab or other testing location.
5. Conduct the test sessions: Test administrators will unlock the Sessions and have the students log
in to TestNav. This marks the beginning of the test session. The following section contains steps for
test administrators during the Infrastructure Trial session.
6. Oversee test administration: During each test session, principals or school test coordinators
should monitor the administration to ensure that testing is being completed as expected.
7. Complete testing: Students will complete one session for ELA, one session for grades 5 and 8 STE,
one session for grades 3-8 Mathematics, and two sessions for grade 10 Mathematics.
Note: Students will see additional sessions for grade 4 math and grades 5 and 8 STE, which can be
ignored.
IX. Steps for the Test Administrator to Administer the Infrastructure
Trial Practice Tests
A. Materials Needed for Infrastructure Trial
271. You will need the following materials available in your testing space prior to the
Infrastructure Trial:
• testing devices for students
• a computer with which to monitor testing sessions
2. Prior to the Infrastructure Trial, you will receive the following materials for students
assigned to you by the principal or school test coordinator:
• student testing tickets
• proctor testing tickets for Human Reader or Human Signer accommodations, if applicable
• scratch paper and pencils
• For grades 7 and 8 mathematics:
o a list of which students have been assigned Mathematics Session 1 and which have been
assigned Mathematics Session 2
o handheld calculators (five-function calculators at minimum, although scientific or
graphing calculators are recommended) for those students who have been assigned
Mathematics Session 2 and who want to use a handheld calculator in addition to the
calculators in TestNav. Students may also use their own handheld calculator.
3. Additional Preparations for Computer-Based Testing
• Ensure all devices to be used for testing are charged.
• Make sure sufficient power cords and power strips are available.
• Confirm that accessories, such as external keyboards for tablets and headphones for students
using the text-to-speech edition, are available and in working order prior to testing.
B. Before Students Arrive
1. On the test administrator device, log in to the PearsonAccessnext training site
(https://trng-mcas.pearsonaccessnext.com) and view your PAN Session on the
Students in Sessions page.
2. Start your PAN Session.
3. Unlock students’ tests.
Students’ tests will be locked, by default, in the Students in Sessions screen when a
PearsonAccessnext Session is started. Students will not be able to log in until the test session has
been unlocked by the test administrator. The test administrator can unlock a test session for the
entire class by selecting the unlock bar at the top of the Students in Sessions page.
Individual students’ tests can also be unlocked one at a time by selecting the lock dropdown for a
test session found to the right of the student’s name on the Students in Sessions page.
28C. Administer Infrastructure Trial (use of the script is optional)
The following script is provided in order to assist test administrators with the administration of the
Infrastructure Trial practice test. Unlike the scripts in the Test Administrator’s Manuals for use during
testing, test administrators are not required to read the script verbatim.
1. Say to students:
“Our school is about to begin a practice session for the computer-based MCAS test.
This is an opportunity for you to practice MCAS questions in an environment similar
to that of the real test. You should use this practice test to become more familiar
with the computer-based testing system, and with MCAS questions. Your responses
on this practice test will not affect your actual MCAS scores in any way.”
2. Then say to the students:
“I will now distribute scratch paper for you to use during the session. If at any point
you need more, raise your hand and I will give you an additional sheet. You may have
up to three pages of scratch paper at one time.”
3. For students using the text-to-speech or screen reader accommodation, which requires
headphones, say:
“Put on your headphones and make sure they are plugged in. On your screen next to
the ‘Sign In’ button, click the link that says ‘Test Audio.’ Confirm you can hear through
your headphones and adjust the volume as needed.”
4. Then say:
“I will now distribute the student testing tickets. Do not sign in until I instruct you to
do so.”
5. Distribute the student testing tickets. Testing tickets may or may not have student names on
them depending on how the tests were set up for Infrastructure Trial. Make sure you do not
hand out proctor testing tickets to students since responses are NOT saved in a test accessed
with a proctor testing ticket.
6. Say to students:
“Now, on the computer, enter the username that is shown on your student testing
ticket. Your username is a number that is 10 digits long.”
Assist any students who need help entering their usernames. Then say:
“Now, on the computer, enter the password that is shown on your student testing
ticket.”
Assist any students who need help entering their passwords.
29Then say:
“Now, click the button that says ‘Sign In.’”
Walk around the room and make sure that all students have successfully signed in. Assist any
students who did not successfully sign in. You may retype usernames and passwords for
students, if necessary. Either collect the student testing tickets at this time, or at the end of the
session.
7. For grade 4 Math, grades 5 and 8 STE, and high school ELA and Math: Once students are
properly signed in, say:
“Your computer screen should now be at the ‘Available Tests’ screen.”
Click the blue button on the screen that says ‘Start.’ You should now see a screen that
says ‘Welcome.’
For all others: Once students are properly signed in, say:
“Your computer screen should now be at the ‘Welcome’ screen.”
8. For grades 7 and 8 mathematics, say:
“Please keep your testing ticket with you and do not use it for scratch paper. I will
need to collect it at the end of this test session.
Click the box in the middle of the screen that says ‘Start.’
If your screen says ‘Session 1’ at the top, then you have been assigned a noncalculator
session. The Session 1 questions have been designed to be answered without the use
of a calculator. Your computer-based test will not include a calculator and you may
not use a handheld calculator during the session.
If your screen says ‘Session 2’ at the top, then you have been assigned a calculator
session. You may use the calculators included in your computer-based test or a
handheld calculator during this session.
Neither Session 1 nor Session 2 is easier or more difficult than the other, so do not be
concerned about which session you are taking or whether you are allowed to use a
calculator or not. Just do your best on each question.
Answer any questions that students have. Using your list of which students have been assigned
Session 1 and which students have been assigned Session 2, ensure that students taking Session
1 do not use handheld calculators (unless they receive special access accommodation SA4).
Distribute handheld calculators to students taking Session 2 who want to use them.
For all other tests, say to the students:
“Please keep your testing ticket with you and do not use it for scratch paper. I will
need to collect it at the end of this test session.
Click the box in the middle of the screen that says ‘Start.’ You should now see a screen
that says ‘Session 1’ at the top and states the number of questions below. If your
screen does not say ‘Session 1,’ please raise your hand.”
Note: Grades 3-8 Mathematics will see either Session 1 or 2.
30Note: Students who are completing session 2 of the grade 10 Mathematics test should
see a screen that says ‘Session 2’ at the top and states the number of questions below.
Assist any students who are not at the correct screen.
9. Then say to all students:
“Please read the directions that are on your screen.”
Pause to allow students to read the directions.
10. Then say to all students:
“Click the ‘Start’ button. You may now begin your test.”
11. At the end of the session, say to any students still working:
“This is the end of the time scheduled for this session. At the top of the screen, click
‘Review’ and then click ‘End of Section.’ Click the ‘Submit Final Answers’ button to
submit your answers. On the popup screen, confirm you’d like to ‘Submit Final
Answers.’ When you’ve submitted your answers, exit the test by going to the User
Dropdown Menu at the top, right hand corner of the screen and click ‘Sign out of
TestNav.’”
Collect testing tickets and scratch paper. Note that students will reuse testing tickets when
doing Session 2 of the grade 10 Mathematics test.
X. Monitoring the Infrastructure Trial
Steps for the Test Administrator to Monitor a Practice Test Session as Part of the
Infrastructure Trial
A. How to Monitor PAN Sessions
Once an online test session has started, there are several tasks the test administrator may be
responsible for, including resuming students, locking/unlocking sessions, and marking tests complete.
The test administrator must have their own device to monitor the session and perform these actions.
The test administrator can use the Students in Sessions page to monitor students as they progress
through each test session. The top of the Students in Sessions page contains a status bar for each test
session. Underneath the status bar, each student will be listed, and the test administrator will be able to
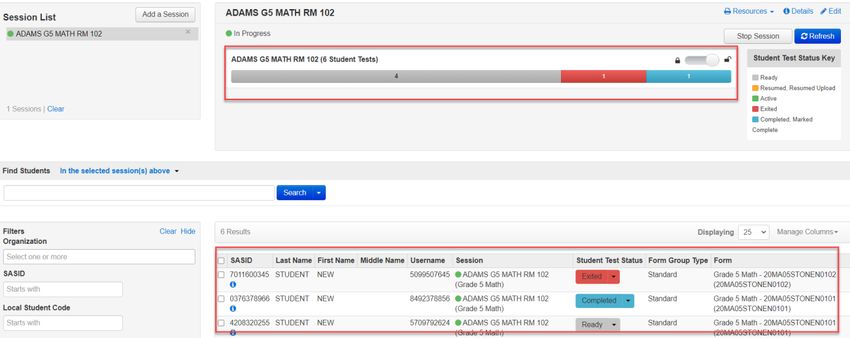
see the status of any particular student, as shown below.
31B. Test Administrator Tasks in PAN
The following table lists the statuses that may appear for a student in the Session Details and a
description of what each status indicates.
Student Status Key
Status Description
Ready The student has not logged in to the session yet, but is ready to log in.
Active The student is currently logged into the test.
The student has exited the test session, but has not submitted their
responses yet (after a test session, after logging out to take a break, or if an
error occurs). Students in Exited status will need to be resumed by a test
administrator when they are ready to reenter the test. If a student logs out
Exited
of a test session or if the testing device loses connectivity before the test is
completed (or marked complete), the test will appear in Exited status. The
test administrator will then need to resume the student’s test (and the
student will then appear as Resumed).
The student has completed the test session and has successfully submitted
Completed
their responses.
The student’s test session has been marked complete by the principal/
Marked Complete designee (the student did not submit their test in TestNav themselves).
The student is ready to log back into the test session. This status appears
after a student has completed one test session for a subject area but not
Resumed both, if a student returns from a break and is ready to continue testing in
that session, or when attempting to continue after an error occurs.
The student is ready to log back into the test session, and some responses
were not sent to the testing subcontractor’s (Pearson’s) servers before the
student exited the test. When the student logs into a test with a Resumed–
Resumed‐Upload Upload status, a staff member must be present. TestNav will prompt the user
to locate the saved responses from the designated save location and upload
them to TestNav before the student’s test can be resumed.
32C. How to Resume Students’ Tests
If students exit the test for a break, or due to technical error, their tests will need to be resumed prior to
reentering the test. Students can be resumed one at a time, or many at a time.
To resume one student at a time, go to Testing > Students in Sessions and select Resume from the
dropdown next to the student’s name.
To resume more than one student’s test, go to Testing > Students in Sessions. Be sure the PAN Session
is selected in the Session List. Check the box next to the student names whose tests are to be resumed,
and select Resume Student Tests from the Select Tasks menu. Click Start.
Select the students whose tests you would like to resume, and click Resume.
33After clicking Resume, a message will display stating Success, changes saved. Click Exit Tasks to return
to the Students in Session screen. The resumed student(s) will now be able to reenter the test.
D. How to Stop a PAN Session
Before a PAN Session can be stopped, all students in the PAN Session must be either in Completed or
Marked Complete status. You may also need to remove any students in Ready status who received
testing tickets but did not log in to the test.
To remove students in “Ready” status from a PAN Session:
• Go to Students in Sessions and check the box next to the student record(s) to be removed.
• Select Remove Students from Sessions from the Select Tasks dropdown and click Start.
Check the box beside the student record(s) and click Remove. Click Exit Tasks to return to the Students
in Sessions screen.
34To mark a student’s test complete for a student who logged on, but did not complete the test:
Go to the Student in Sessions page and check the box next to the student record(s) that need to be
marked complete.
Select Mark Student Tests Complete from the Select Tasks dropdown. Click Start.
Enter the reason for marking the test complete. Click the Mark Complete button.
Once all students in a Ready status have been removed, or are in a Completed or Marked Complete
status, select the Stop Session button on the Students in Sessions page.
35XI. Follow-up
Steps for the district test coordinator, principal/school test coordinator, test
administrators, and the technology coordinator
Once the school’s Infrastructure Trial has been completed, staff participating in it should review their
notes. Follow‐up steps include the following:
• Share any notes regarding the need for support with the principal or test coordinator.
• Report to the principal or test coordinator any issues that could not be resolved with assistance
from the MCAS Service Center.
• Schools may wish to schedule a call with Pearson’s technology support specialists to review any
issues with the Infrastructure Trial and to prepare for the test administration.
36Appendix A: Terms Related to Computer-Based Testing
PearsonAccessnext (PAN): The online test management system for principals/test coordinators,
technology coordinators, and test administrators to manage user accounts, register students, and
upload selected accessibility features and accommodations via the Student Registration/Personal Needs
Profile (SR/PNP), assign student tests, and set up Sessions. The PAN operational site is available at
mcas.pearsonaccessnext.com/.
PearsonAccessnext Training site: The online practice site to run the Infrastructure Trial. Usernames
and passwords for the training site will match those for the live site. The training site is available at trng-
mcas.pearsonaccessnext.com/.
PearsonAccessnext Session: An assigned group of students in PearsonAccessnext who will be testing at
the same time and place. (This is different from the actual “test session.”)
TestNav: This is the online test delivery platform for students. Technology requirements and set-up
instructions can be found at mcas.pearsonsupport.com/technology-setup/.
37You can also read