FIS DirectLink Merchant - User's Guide Release 16.0 - Peoples Bank
←
→
Page content transcription
If your browser does not render page correctly, please read the page content below
FIS DirectLink Merchant
 User’s Guide

 Release 16.0
 6/7/16

www.fisglobal.com
Original Publication 05/16
Latest Revisions 06/16
If you have any comments about this document, please send them to the IPSW Documentation Group
at the following address or send e‐mail to VAIAD.infodev@fisglobal.com
FIS
Documentation, IPSW Development
13454 Sunrise Valley Drive
Suite 400
Herndon, VA 20171
United States of America
Adobe® Acrobat® and Reader® are registered trademarks of Adobe Systems Incorporated in the U.S.
and/or other countries. Microsoft®, Excel®, Hyper‐V®, Internet Explorer®, Outlook®, SQL Server®,
Windows®, Windows Server®, and Windows Server System® are registered trademarks of Microsoft
Corporation in the U.S. and/or other countries. Other product and service names are used for
identification purposes only and are the property of their respective owners.
© 2016 FIS and/or its subsidiaries. All rights reserved worldwide.
This document is protected as a trade secret and under the copyright laws as the property of FIS.
Copying, reproduction, or distribution to third parties is strictly prohibited.
ii FIS DirectLink Merchant
16.0‐DLM160607U
Table of Contents
About This Manual .............................................................v
Technical Support . . . . . . . . . . . . . . . . . . . . . . . . . . . . . . . . . . . . . . . . . . . . . . . . . . . . . . . . . . . . . . . . . . vi
Chapter 1
Getting Started With FIS DirectLink Merchant ........................7
What Is FIS DirectLink Merchant? . . . . . . . . . . . . . . . . . . . . . . . . . . . . . . . . . . . . . . . . . . . . . . . . . . . . . . . . . . 7
Accessing the System. . . . . . . . . . . . . . . . . . . . . . . . . . . . . . . . . . . . . . . . . . . . . . . . . . . . . . . . . . . . . . . . . . . . 8
Example of Logon Process . . . . . . . . . . . . . . . . . . . . . . . . . . . . . . . . . . . . . . . . . . . . . . . . . . . . . . . . . . . . 8
Logging Off the System . . . . . . . . . . . . . . . . . . . . . . . . . . . . . . . . . . . . . . . . . . . . . . . . . . . . . . . . . . . . . 11
Working With the Home Page. . . . . . . . . . . . . . . . . . . . . . . . . . . . . . . . . . . . . . . . . . . . . . . . . . . . . . . . . . . . 12
User Interface Elements . . . . . . . . . . . . . . . . . . . . . . . . . . . . . . . . . . . . . . . . . . . . . . . . . . . . . . . . . . . . . . . . 13
Updating Your User Profile . . . . . . . . . . . . . . . . . . . . . . . . . . . . . . . . . . . . . . . . . . . . . . . . . . . . . . . . . . . . . . 13
Change Your User Profile Settings . . . . . . . . . . . . . . . . . . . . . . . . . . . . . . . . . . . . . . . . . . . . . . 15
Where to Go From Here . . . . . . . . . . . . . . . . . . . . . . . . . . . . . . . . . . . . . . . . . . . . . . . . . . . . . . . . . . . . . . . . 17
Chapter 2
Working With Deposits . . . . . . . . . . . . . . . . . . . . . . . . . . . . . . . . . . . . . . . . . . . . . . . . . . . . 19
About Deposits. . . . . . . . . . . . . . . . . . . . . . . . . . . . . . . . . . . . . . . . . . . . . . . . . . . . . . . . . . . . . . . . . . . . . . . . 19
Capturing Items . . . . . . . . . . . . . . . . . . . . . . . . . . . . . . . . . . . . . . . . . . . . . . . . . . . . . . . . . . . . . . . . . . . . . . . 20
Capture Process Using a Scanner . . . . . . . . . . . . . . . . . . . . . . . . . . . . . . . . . . . . . . . . . . . . . . . . . . . . . 20
Capture Process Using a Mobile Device . . . . . . . . . . . . . . . . . . . . . . . . . . . . . . . . . . . . . . . . . . . . . . . . 23
Correcting Items . . . . . . . . . . . . . . . . . . . . . . . . . . . . . . . . . . . . . . . . . . . . . . . . . . . . . . . . . . . . . . . . . . . . . . 27
Example: Missing Check Amount . . . . . . . . . . . . . . . . . . . . . . . . . . . . . . . . . . . . . . . . . . . . . . . . . . 27
Example: Duplicate Checks . . . . . . . . . . . . . . . . . . . . . . . . . . . . . . . . . . . . . . . . . . . . . . . . . . . . . . . 28
Balancing Deposits. . . . . . . . . . . . . . . . . . . . . . . . . . . . . . . . . . . . . . . . . . . . . . . . . . . . . . . . . . . . . . . . . . . . . 28
Reviewing Deposits . . . . . . . . . . . . . . . . . . . . . . . . . . . . . . . . . . . . . . . . . . . . . . . . . . . . . . . . . . . . . . . . . . . . 30
Chapter 3
Working With Reports . . . . . . . . . . . . . . . . . . . . . . . . . . . . . . . . . . . . . . . . . . . . . . . . . . . . . 33
About Running Reports . . . . . . . . . . . . . . . . . . . . . . . . . . . . . . . . . . . . . . . . . . . . . . . . . . . . . . . . . . . . . . . . . 33
The List of Reports You Can Run . . . . . . . . . . . . . . . . . . . . . . . . . . . . . . . . . . . . . . . . . . . . . . . . . . . . . . 34
Run a Deposit Report . . . . . . . . . . . . . . . . . . . . . . . . . . . . . . . . . . . . . . . . . . . . . . . . . . . . . . . . 36
User’s Guide iii
16.0‐DLM160607U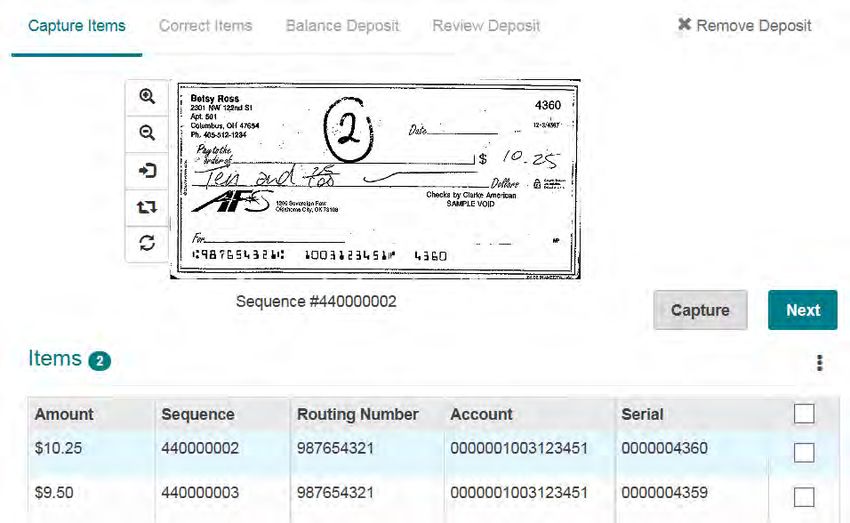
Table of Contents
Chapter 4
Researching Deposits . . . . . . . . . . . . . . . . . . . . . . . . . . . . . . . . . . . . . . . . . . . . . . . . . . . . . . 39
About Researching Deposits . . . . . . . . . . . . . . . . . . . . . . . . . . . . . . . . . . . . . . . . . . . . . . . . . . . . . . . . . . . . 40
Searching for Deposits . . . . . . . . . . . . . . . . . . . . . . . . . . . . . . . . . . . . . . . . . . . . . . . . . . . . . . . . . . . . . . . . . 40
Search for Deposits . . . . . . . . . . . . . . . . . . . . . . . . . . . . . . . . . . . . . . . . . . . . . . . . . . . . . . . . . 41
Working With Export Options . . . . . . . . . . . . . . . . . . . . . . . . . . . . . . . . . . . . . . . . . . . . . . . . . . . . . . . . 42
Working With Search Results . . . . . . . . . . . . . . . . . . . . . . . . . . . . . . . . . . . . . . . . . . . . . . . . . . . . . . . . . . . 44
Managing Saved Queries . . . . . . . . . . . . . . . . . . . . . . . . . . . . . . . . . . . . . . . . . . . . . . . . . . . . . . . . . . . . . . . 45
Save a New Query . . . . . . . . . . . . . . . . . . . . . . . . . . . . . . . . . . . . . . . . . . . . . . . . . . . . . . . . . . 46
Copying a Query . . . . . . . . . . . . . . . . . . . . . . . . . . . . . . . . . . . . . . . . . . . . . . . . . . . . . . . . . . . 46
Modify an Existing Query . . . . . . . . . . . . . . . . . . . . . . . . . . . . . . . . . . . . . . . . . . . . . . . . . . . . . 47
Remove a Query . . . . . . . . . . . . . . . . . . . . . . . . . . . . . . . . . . . . . . . . . . . . . . . . . . . . . . . . . . . . 47
Chapter 5
User Administration . . . . . . . . . . . . . . . . . . . . . . . . . . . . . . . . . . . . . . . . . . . . . . . . . . . . . . . . 49
About User Administration . . . . . . . . . . . . . . . . . . . . . . . . . . . . . . . . . . . . . . . . . . . . . . . . . . . . . . . . . . . . . 49
User Roles . . . . . . . . . . . . . . . . . . . . . . . . . . . . . . . . . . . . . . . . . . . . . . . . . . . . . . . . . . . . . . . . . . . . . . . . 50
Adding Users . . . . . . . . . . . . . . . . . . . . . . . . . . . . . . . . . . . . . . . . . . . . . . . . . . . . . . . . . . . . . . . . . . . . . . . . 50
Add a New User . . . . . . . . . . . . . . . . . . . . . . . . . . . . . . . . . . . . . . . . . . . . . . . . . . . . . . . . . . . 51
Working With Existing Users . . . . . . . . . . . . . . . . . . . . . . . . . . . . . . . . . . . . . . . . . . . . . . . . . . . . . . . . . . . . 53
Selecting Users to Work With . . . . . . . . . . . . . . . . . . . . . . . . . . . . . . . . . . . . . . . . . . . . . . . . . . . . 54
Edit a User . . . . . . . . . . . . . . . . . . . . . . . . . . . . . . . . . . . . . . . . . . . . . . . . . . . . . . . . . . . . . . . . 54
Disable a User . . . . . . . . . . . . . . . . . . . . . . . . . . . . . . . . . . . . . . . . . . . . . . . . . . . . . . . . . . . . . 56
Make a Disabled or Locked User Active Again . . . . . . . . . . . . . . . . . . . . . . . . . . . . . . . . . . . . . 57
Reset a User’s Password . . . . . . . . . . . . . . . . . . . . . . . . . . . . . . . . . . . . . . . . . . . . . . . . . . . . . . 57
Reset a User’s Security Questions . . . . . . . . . . . . . . . . . . . . . . . . . . . . . . . . . . . . . . . . . . . . . 58
Delete a User. . . . . . . . . . . . . . . . . . . . . . . . . . . . . . . . . . . . . . . . . . . . . . . . . . . . . . . . . . . . . . 58
Glossary . . . . . . . . . . . . . . . . . . . . . . . . . . . . . . . . . . . . . . . . . . . . . . . . . . . . . . . . . . . . . . . . . . . . . . . . . . 59
List of Screen Captures . . . . . . . . . . . . . . . . . . . . . . . . . . . . . . . . . . . . . . . . . . . . . . . . . . . . . . 63
Index . . . . . . . . . . . . . . . . . . . . . . . . . . . . . . . . . . . . . . . . . . . . . . . . . . . . . . . . . . . . . . . . . . . . . . . . . . . . . . 65
iv FIS DirectLink Merchant
16.0‐DLM160607U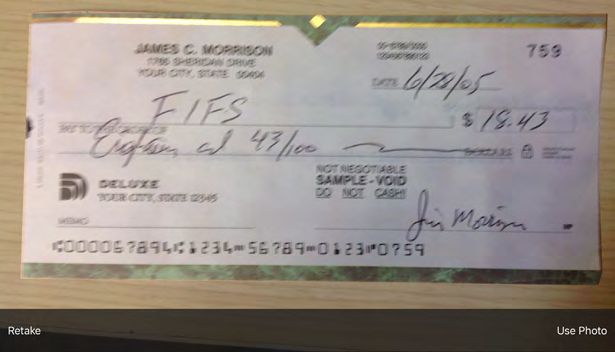
About This Manual
FIS DirectLink Merchant is a software solution that is used to remotely capture and manage
deposits. This manual is intended for the merchants who make deposits to their accounts
using FIS DirectLink Merchant.
Assumptions
This manual assumes the following:
You know how to use a web browser, like Internet Explorer.
You know how to work with common user interface elements for software, such as text
entry fields, drop-down lists, clickable icons, check boxes, and so on.
Note that FIS DirectLink Merchant was designed to work on multiple devices, such as
desktop workstations, tablets, and other mobile devices. The images in this guide are
examples of using the software on a desktop workstation; but the location of page elements
may differ based on the device you are using. Also note that if you are working on a device
that does not use a mouse, touch the appropriate place on the screen when directed in these
instructions to click or select an item.
How to Use This Manual
This manual contains three kinds of information:
Overview chapters explain what the product as a whole does. Such chapters cover
critical concepts that are a prerequisite to information in the rest of the manual.
Procedural chapters give step-by-step instructions for performing specific tasks with
the product. Within these chapters, procedures are identified by a distinctive arrow and
heading style, which is also used in the table of contents. For example:
Display the System Administration Menu
Appendixes provide reference information about system configuration and related
topics.
User’s Guide v
16.0‐DLM160607U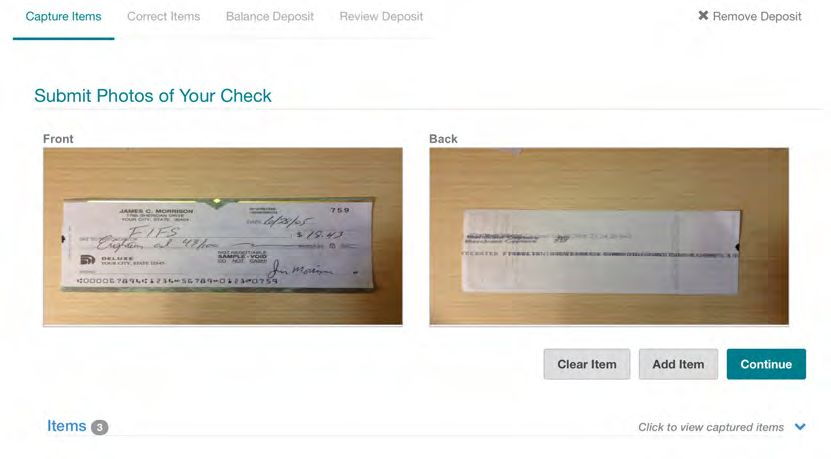
About This Manual
Text Conventions
This manual uses fonts and typefaces to connect what you read in this book to what you see
on the screen or what you need to type into the system. In particular:
A sans serif font is used for text that is displayed on viewports, windows, or dialog boxes
(the Close and OK buttons, the File menu) and for file names (/Etc/Hosts,
C:\Windows\Win.ini) that appear within the text of paragraphs.
A monospaced font is used for listing the contents of files and certain programming
terms.
A bold monospaced font identifies actual characters you should type. For example,
… type exit at the DOS prompt …
means you should type the characters e, x, i, and t.
Italic identifies a variable that you should replace with the actual text or value
appropriate for your system. For example,
… the file D:\Directory\Filename …
means you should replace D:, Directory, and Filename with the actual drive and full
pathname of the file in question. For example,
… the file C:\Windows\Win.ini …
Technical Support
FIS customers with a maintenance plan can contact FIS Technical Support in two ways:
Call 1-888-41-Touch (86824)
Visit https://clientsupport.fisglobal.com and open a ticket.
If your company does not have a current maintenance contract, you will be billed at an
hourly rate for use of these services.
vi FIS DirectLink Merchant
16.0‐DLM160607U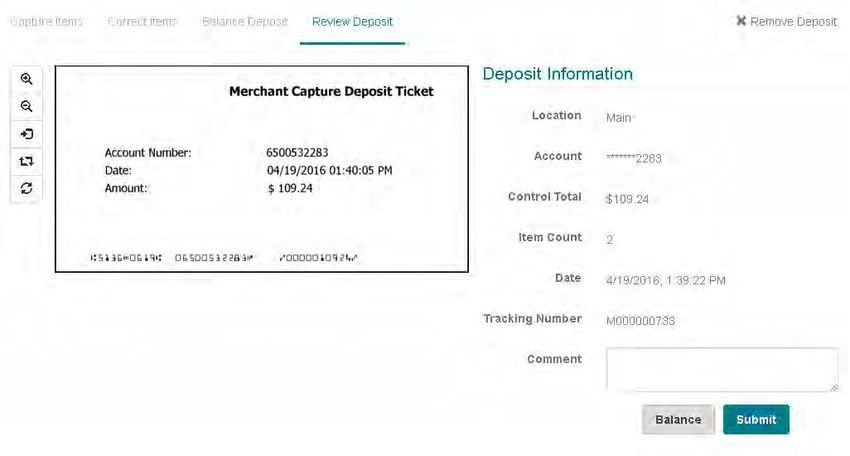
Chapter 1
Getting Started With FIS DirectLink Merchant
This chapter provides an overview of FIS DirectLink Merchant and includes the following
sections:
What Is FIS DirectLink Merchant?
Accessing the System
Working With the Home Page
User Interface Elements
Updating Your User Profile
Where to Go From Here
Note that the features you can access in FIS DirectLink Merchant depend on the roles that
have been assigned to you. For more information, consult with your system administrator.
What Is FIS DirectLink Merchant?
FIS DirectLink Merchant is a software solution that is used to remotely capture and manage
deposits. It includes server components, features for merchants who capture deposits, and
features for the institutions who manage the merchant accounts.
For merchant users, FIS DirectLink Merchant enables you to:
Convert paper-based check deposits to an electronic format for immediate and secure
delivery to your preconfigured accounts.
Run reports about the deposits that have been made with FIS DirectLink Merchant. For
example, you can run a report listing the transactions that were made on a certain date,
a report showing images of deposit checks, and so on.
Research previous deposits by defining search criteria, with the option to save searches
that you use often.
View and change your user settings, such as your email address and password.
Merchant users with administrative rights can also add new users and configure user
profiles for them, such as defining the locations and accounts the user can access.
User’s Guide 7
16.0‐DLM160607U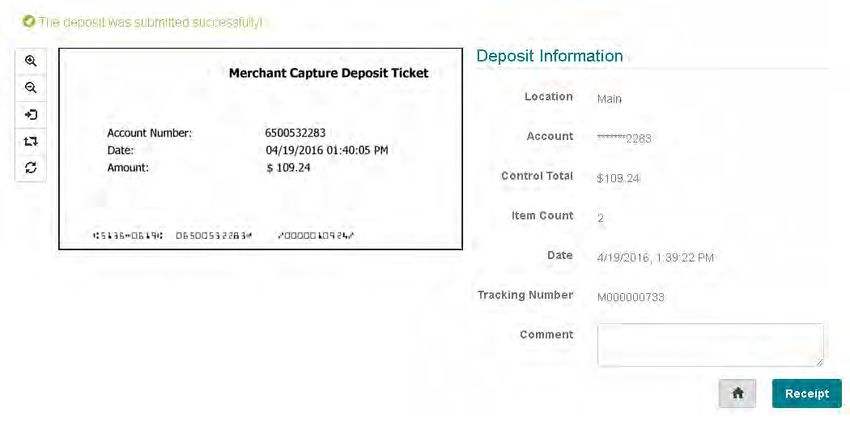
Chapter 1 Getting Started With FIS DirectLink Merchant

                                                                                        Accessing the System

Accessing the System
         FIS DirectLink Merchant uses MFA (Multi-factor Authentication) to provide additional
         security for those logging on to the system. Multi-factor authentication requires users to
         pass through multiple security gates to successfully log on.

         Depending on how your site is configured, you may only be required to set up security
         questions and password (knowledge factors) and a passphrase (verification factor). Or you
         may be required to provide a phone number (possession factor) that can be used to receive
         an access code sent via SMS, or an automated call where you can submit an access code.

         Note that some institutions implement the application so that users authenticate elsewhere,
         such as with FIS Business Online Banking, and use a single sign-on to gain access. In those
         instances, you wouldn’t see the logon options described here.

    Example of Logon Process
         When you first attempt to log on to FIS DirectLink Merchant, you are presented with a page
         that explains the secure authentication setup.

8                                                                                     FIS DirectLink Merchant
                                                                                                 16.0‐DLM160607U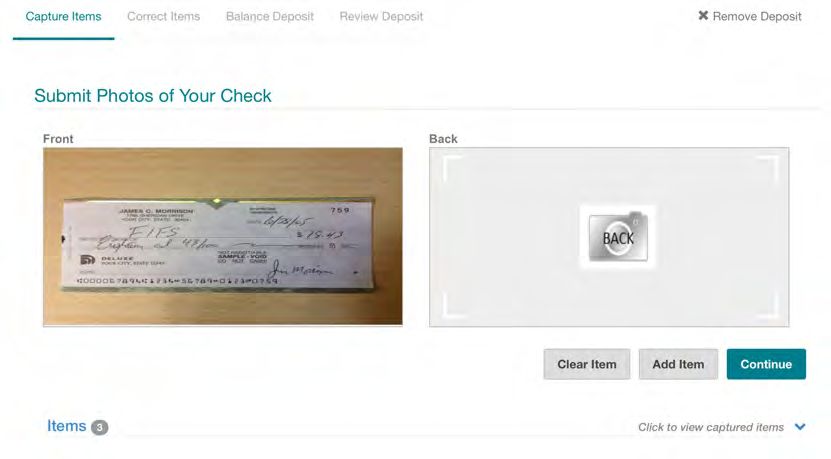
Chapter 1 Getting Started With FIS DirectLink Merchant

Accessing the System

                  Click Continue to advance to the page where you set up your personal phrase and challenge
                  questions.

                  You can select from the list of available questions, or you can choose to make up your own
                  questions. For each of the three questions you configure, you also provide an answer.

User’s Guide                                                                                                   9
16.0‐DLM160607U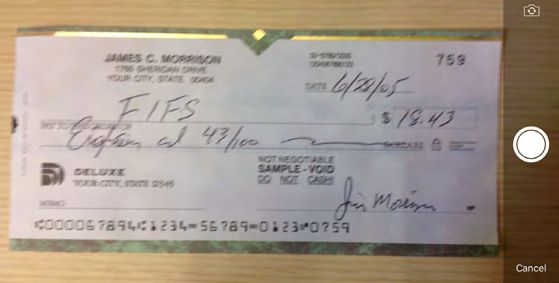
Chapter 1 Getting Started With FIS DirectLink Merchant

                                                                                   Accessing the System

     After you provide the security phrase, and set your challenge questions and responses, you
     can click Continue to advance to the Register Device page.

     If you want the system to remember this device, so that you do not need to answer the
     security questions when you log on from this device, you can select the Remember this
     device check box and click Continue.

     The system prompts you to confirm that you want to remember the device, and after you do
     so, you move on to the Review page.

10                                                                               FIS DirectLink Merchant
                                                                                            16.0‐DLM160607U
Chapter 1 Getting Started With FIS DirectLink Merchant
Accessing the System
Review your selections and enter your password again to confirm. If your site has also set
up additional identity verification, you will be prompted with a page that enables you to
select how you want to enter a system provided access code:
If you select SMS, and click Send Text, the system sends a text message with an access
code to the phone number associated with your user profile. You are then prompted to
enter that code to log on to the system.
If you select Voice and click Place Call, the system calls the phone number associated
with your profile and displays an access code on the page. After you answer the call and
provide a vocal cue, such as saying hello, the system prompts you to enter the provided
access code into your phone to log on to the system.
You can select the Remember this device check box to prevent the system from prompting
you for the access code each time you log on, or clear the check box to proceed with the
identity verification process each time you log on.
Logging Off the System
For security reasons, the system automatically logs you out if you remain idle for an
extended period of time. However, if you provide input showing you are still active when
prompted (such as moving your mouse on a workstation), the system does not log you out.
You can also log out
manually by clicking the
gear icon ( ) in the menu
bar and selecting Log Out.
User’s Guide 11
16.0‐DLM160607UChapter 1 Getting Started With FIS DirectLink Merchant
Working With the Home Page
Working With the Home Page
When you first log on to FIS DirectLink Merchant, you are brought to the Home Page. The
Home Page provides quick access to all the FIS DirectLink Merchant features and includes
important information, such as the last time you logged on and the last time you made a
deposit. It also includes lists of open/recent deposits.
Note that institutions can choose to theme the application, so logos and colors may be
different than what is shown in this example and other examples in this guide.
You can click here to return Menu options vary based on the roles You can access your user
to the home page. that have been assigned to you. settings by clicking here.
You can use these tabs to view and work You can provide values and click this button to start the
with your open and recent deposits. deposit creation process, which opens a new page.
From the Open Deposits list, you view deposits that have not yet been completed. You
can also select a deposit to continue working with it, such as to capture additional
items.
From the Recent Deposits list, you can view deposits that were completed recently. You
can also select a deposit to view it in on the Research Page.
12 FIS DirectLink Merchant
16.0‐DLM160607UChapter 1 Getting Started With FIS DirectLink Merchant
User Interface Elements
User Interface Elements
Most of the UI (User Interface) elements used within FIS DirectLink Merchant should be
familiar to users who have worked with other software applications. These include things
like drop-down lists, buttons, check boxes, and text fields.
FIS DirectLink Merchant also uses the following two icons to provide access to additional
features:
Icon Description
This icon opens a menu of additional actions you can take. For example, when
configuring the phone numbers for your user profile, you can click this icon to show
you actions you can take like Add (to add a new phone number) or Remove (to
remove a phone number).
This icon opens up a window with a list of items you can select from. For example,
when administrators assign roles to users, they can click this icon to open a window
that enables them to select the roles to assign.
Updating Your User Profile
Your User Profile settings enable you to set your display name and email address, change
your password, add and manage phone numbers, and reorder your locations and accounts.
For security reasons, FIS DirectLink Merchant requires that you change your
password at regular intervals. The system also requires that passwords exceed
CAUTION eight characters and include a mixture of:
Uppercase (A‐Z) and lowercase (a‐z) characters.
Numbers (0‐9)
Special characters (@, !, #, and so on)
User’s Guide 13
16.0‐DLM160607UChapter 1 Getting Started With FIS DirectLink Merchant
Updating Your User Profile
To access your user profile, click the gear icon ( ) in the menu bar and select User Profile.
Make changes to
these values as
appropriate.
When finished,
click the Save
button.
To change your
password, type
your existing
password in the
Old Password
field. Then
type your new
password into
both of these
fields. These
values must
match to save
your changes.
Below the entry fields, the system lists the following sections:
Locations - The location where you are accessing FIS DirectLink Merchant. For
example, this could be Main for your main office location, North for your North Street
location, and so on.
Accounts - The accounts where you can deposit the checks you scan with FIS
DirectLink Merchant. Depending on how your profile is set up, this could be a single
account or multiple accounts. For security reasons, account numbers can be masked so
that only the last four digits are shown.
Locations and accounts are configured by your system administrator when your profile is
created. You can change the order of how the locations and accounts appear in the list, but
you cannot add new ones. Consult with your administrator if you need access to a location
or account that is not associated with your profile.
14 FIS DirectLink Merchant
16.0‐DLM160607UChapter 1 Getting Started With FIS DirectLink Merchant
Updating Your User Profile
Change Your User Profile Settings
Use this procedure to change your user profile settings. Note that certain profile elements,
such as the list of scanners that you have access to, are assigned by your administrator and
cannot be changed.
1. If you haven’t already done so, click the gear icon ( ) in the menu bar and select
User Profile.
2. If you want to change your full name, type a new value in the Full Name field.
3. If you want to change your email address, type a new value in the Email field.
Note that your email address is used to send emails for password resets, so it is
important to verify what you typed is correct.
4. If you want to select a different default scanner for your profile, select a new value
from the Scanner drop-down list.
Note that the scanners you can access are determined by how your institution
configuration. If you have access to only one scanner, you cannot change this value.
Also note that this field only determines what scanner is used for your default
scanner. If you have access to multiple scanners, you can still select a different
scanner before capturing checks.
5. If you want to change your password do the following:
a. In the Old Password field, type the password you currently use for logging on to
the system.
b. In the New Password field, type your new password, keeping in mind the
recommendations about using uppercase characters, lowercase characters,
numbers, and special characters.
c. In the Confirm Password field, retype the new password.
Note that when you change your password, the system sends you an email notifying
you that the change was made.
6. If you want to add a phone number, do the following:
a. In the Phone Numbers section, click the menu icon ( ) and select Add to show
the fields for adding a phone number.
b. In the Name field, type a description for this number.
For example, you could type Office for your office phone, or Mobile for your
cell phone.
User’s Guide 15
16.0‐DLM160607UChapter 1 Getting Started With FIS DirectLink Merchant
Updating Your User Profile
c. From the Country Code drop-down list, select the country for the phone
number.
For example, you could select United States. The system uses this value to apply
the correct country code when making calls for user authentication purposes.
d. In the Phone Number field, type the phone number with area code, omitting
spaces. You can include dashes or omit them. For example:
888‐418‐6824
or
8884186824
e. If your phone number has an extension, type that value in the Ext field.
f. Click the add icon ( ) to add the number to the list.
7. If you want to remove a phone number, do the following:
a. Under Phone Numbers section, select the check box for the phone number you
want to remove.
b. Click the menu icon ( ) and select Remove.
8. If you want to change the order of the locations or accounts that have been assigned
to you, do one of the following:
Click in the list number field for the item you want to change, and drag the item
up or down in the list to change its position.
For example, if you have access to four accounts, and you want to make the last
one in the list show up as the first one, you would click in the field with the
number 4, hold down with your mouse, and drag the list item to the first
location in the list. The system then assigns that list item a number 1, with the
other accounts reordered as appropriate.
Click in the list number field for an item, and type a new number value for that
item.
For example, if you have access to three locations, and you want to make the
first item in your list the last item in your list, you would click in the field for
the first location and change the value from 1 to 3.
Note that you would typically reorder lists to make the account or location you use
most often appear as the first value in the list. That way it’s easier to select that
account or location when capturing checks or running reports.
9. When finished, click Save.
16 FIS DirectLink Merchant
16.0‐DLM160607UChapter 1 Getting Started With FIS DirectLink Merchant
Where to Go From Here
Where to Go From Here
For more information about working with FIS DirectLink Merchant, reference the different
chapters of this guide.
User Features
Working With Deposits (see page 19)
Working With Reports (see page 33)
Researching Deposits (see page 39)
Administrator Features
User Administration (see page 49)
Following the chapters there is a glossary containing all the standard terms used to describe
FIS DirectLink Merchant and its components (see page 59). There is also a list of the screen
captures used in the guide (see page 63).
User’s Guide 17
16.0‐DLM160607UThis page is intentionally left blank. 18
Chapter 2
Working With Deposits
This chapter covers working with deposits and includes the following sections:
About Deposits
Capturing Items
Correcting Items
Balancing Deposits
Reviewing Deposits
Note that you must have the appropriate user roles to be able to capture checks to make
deposits. Also note that you can only capture items for the locations and accounts you can
access.
About Deposits
Creating deposits with FIS DirectLink Merchant is a multi-step process that involves
providing the deposit information (location, account number, and deposit amount) on the
Home Page, and then capturing the images that make up that deposit.
Deposits can include a single check, where the deposit amount is the amount of that one
check; or deposits can include multiple checks, where the deposit amount is the total of
several individual checks. After one or more checks are captured, the deposit goes through
a correction step to address issues with the images, a balance step to ensure the total dollar
amount of the checks matches the deposit amount, and a review step where you confirm the
deposit is ready to be processed.
If you exit any of the steps of the deposit creation workflow before completing the deposit,
the system saves the deposit in its current state. You can then pick up where you left off by
accessing the deposit from the Open Deposits list on the Home Page. Also note that
correction and balance steps may be skipped if there are no issues with the checks that need
to be addressed.
See the following pages for more information about each of the steps in the deposit creation
process.
User’s Guide 19
16.0‐DLM160607UChapter 2 Working With Deposits
Capturing Items
Capturing Items
When you capture the items that make up a deposit, you create electronic images of those
paper checks. This can be done using the camera on your mobile device or a preconfigured
scanner. The system automatically opens the Capture Items page when you create a deposit
from the Home page, or when you click a deposit from the Open Deposits list.
If you’re using FIS DirectLink Merchant on a workstation with a scanner, the Capture
Items page provides you with a Capture button that starts the scanning process.
If you’re using FIS DirectLink Merchant from a mobile device, the Capture Items page
provides you with buttons for using the device’s camera to take pictures of the front and
back of the item.
When you finish capturing items, you move on to the next stage of the process (which could
involve correcting the images, making sure the deposit balances, or reviewing the deposit).
Capture Process Using a Scanner
When using FIS DirectLink Merchant from a workstation that is attached to a scanner, the
Capture Item pages provides you with options for connecting to the scanner, and icons for
working with captured items.
Example of Capture Items Page Before Capturing Items
Click the Capture button to start capturing the checks that make up the deposit. Captured checks are
added to the items list below.
20 FIS DirectLink Merchant
16.0‐DLM160607UChapter 2 Working With Deposits
Capturing Items
Clicking the Capture button on the Capture Items page connects to the scanner and opens a
window that enables you to view the interactions between the scanner and the software.
This includes messages like the following:
Initializing
Ready
Scanning
Capturing Item #X (... where X represents the sequence number of one of the items in the
batch of checks you are scanning. For example, if this was the second item being
scanned the message would read, Capturing Item #2.)
Processing item X of Y (where X represents the sequence number of one of the items in
the batch of checks you are scanning, and Y represents the total number of checks that
have been scanned.
Any error messages (like Jam or Double Feed)
If you click Cancel, the system cancels capturing If you click Stop Scan, the system
and stops where it is in the process. It won't finishes uploading and processing all the
upload any pending items, but will finish items, then exits to the capture page.
processing what it has already captured.
After the scanner captures the images, the Capture Items page is updated with those items.
User’s Guide 21
16.0‐DLM160607UChapter 2 Working With Deposits
Capturing Items
Example of Captured Check
You can click here to remove a deposit and all its captured items.
This option appears for all steps of the deposit process.
You can select items from the list and click here to access
a menu item that enables you to remove those items.
The Items list shows all the items that have been captured so far, and is available from most
of the subsequent pages for depositing items. From this list you can:
Select the check box for an item and click the appropriate menu option to remove it.
View an item, by selecting it from the list. The upper pane updates with the selected
image.
Sort the results by column. Click a column heading once to sort in ascending order
(0-9, a-Z). Click a column heading again to sort in descending order (Z-a, 9-0).
You can also hold down the Shift key and click multiple column headers to sort the list
in the order of the selected columns. For example, the system sorts by your first selected
column first, then your second selected column next, and so on.
To do so, click the first column you want to sort by; and then hold down the Shift
key and click the next column. The system assigns a number 1 to the first column
along with the sort arrow, and assigns a number 2 to the second column.
22 FIS DirectLink Merchant
16.0‐DLM160607UChapter 2 Working With Deposits
Capturing Items
If you hold down the Shift key and click a numbered column again, it toggles
between ascending and descending order for that column.
If you release the Shift key and click a column, it clears the numbered sort order.
The Capture Items page also includes icons that enable you to change the view of the check
you are working with. These icons are also available when viewing images on other pages.
Icon Description Icon Description
Zooms in on the image. Rotates the check 90 degrees
clockwise.
Zooms out on the image. Resets the check to the original
display.
Toggles between the front side of the
check and the back side of the check.
When you are finished capturing items, you can click Next to move on to the next part of
the process.
Capture Process Using a Mobile Device
When using FIS DirectLink Merchant from a mobile device, the Capture Items page
includes options that enable you to take photos of each of the individual checks that make
up the deposit.
The following section shows an example of capturing an item with an iPad. The menu
options and camera interface may differ based on the device being used.
User’s Guide 23
16.0‐DLM160607UChapter 2 Working With Deposits
Capturing Items
Example of Capture Items Page Before Capturing a Check
When you click the Front icon, it opens a menu option that enables
you to take a photo of the front of the item. Likewise, when you
click the Back icon, you can take a photo of the back of the item.
Example of Capturing a Check:
24 FIS DirectLink Merchant
16.0‐DLM160607UChapter 2 Working With Deposits
Capturing Items
After you take the photo, the system prompts you to confirm you want to use that image.
You can choose to use
the photo, or retake the
image by clicking the
links in at the bottom of
the window.
When you choose to use the photo, the Capture Items page is updated with the captured
image. You can then take the photo of the back of the item as well.
Example of Capture Items Page When You Take the Front Photo
User’s Guide 25
16.0‐DLM160607UChapter 2 Working With Deposits
Capturing Items
Example of Capture Items Page When You Take the Back Photo
Once you have captured items, you have multiple options:
You can click Clear Item to remove all the content for the current item, such as
removing both the Front and Back images.
You can click Add Item if you need to add additional items to this deposit. This submits
the current item for analysis, and if the item is complete, you are returned to this page
to add any additional items.
If this is the last item for the deposit, you can click Continue to submit the current item
for analysis, and if it is complete, you are transitioned to the Correct Items page (or the
Balance Page, or Review Page depending on the item’s status).
Note that you can also click the down arrow (v) to view the previously captured items for
this deposit.
You can click
here to show
or hide the
other captured
items.
You can use
these arrows
to move
through the list
of other items.
26 FIS DirectLink Merchant
16.0‐DLM160607UChapter 2 Working With Deposits
Correcting Items
Correcting Items
The Correct Items page enables you to correct problems with scanned checks. You access
this page by clicking the Next button from the Capture Items page. Depending on how your
site has been configured, FIS DirectLink Merchant could perform several verification and
validation functions for scanned and captured images. This could include:
Detecting duplicates, and identifying errors with MICR code information.
Recognizing amounts.
Testing image quality, such as skew, minimum and maximum height and length,
contrast, and so on.
If problems are found, the system prompts you to resolve them. When you finish making
the necessary adjustments, you can click Accept to move on to the Balance Deposit page. Or
if you have the appropriate user roles and the system is configured to allow it, you can click
Accept to accept items with errors that cannot be corrected. (For example, you could accept
an item flagged as a duplicate, or an item that had failed its image quality threshold.)
The following sections show examples of common corrections you might need to make.
Note that the issues you may experience will vary based on your site’s configuration. Also
note that your user rights may prevent you from editing items. For example, you may not be
able to edit MICR code fields if the data was unreadable or incorrect. For these cases, you
typically resolve issues by removing images and rescanning them.
Example: Missing Check Amount
In this example, the dollar amount for the check was incorrect. You can resolve the issue by
specifying an amount that is greater than $0.00.
You can enter the
amount here.
User’s Guide 27
16.0‐DLM160607UChapter 2 Working With Deposits
Balancing Deposits
Example: Duplicate Checks
In this example, the system determined one of the checks that was scanned matched an
existing check. You can resolve the error condition by removing that check from the deposit
as indicated.
When working with duplicate checks, If you want to remove a deposit, you can do so by clicking
the system provides you with an option here. This removes the deposit and all its captured checks.If
to view the existing image. you want to remove a single item, click the Remove button.
Balancing Deposits
When you balance deposits, you ensure the total amount of the checks you scanned
matches the total amount you entered for the deposits. For example, if the total amount of
the deposit is $2712.20, then the total amount of the items in the deposit must equal
$2712.20.
28 FIS DirectLink Merchant
16.0‐DLM160607UChapter 2 Working With Deposits
Balancing Deposits
In most instances where the amounts are balanced, FIS DirectLink Merchant automatically
advances you to the review step. But for instances where corrections are necessary, the
Balance Deposits page enables you to make changes.
You can click here to return to the Capture Items page and capture more checks.
You can adjust the total amount of the deposit here.
You can edit check values here for instances You can select an item from the list and click
where the value shown does not match the here to access the menu that enables you to
amount of the check. remove it; or you can edit the item, which
returns you to Correct Items page
The total number of items in the deposit is shown here. (In this example, only two items are shown out of
the eight that make up the deposit.)
User’s Guide 29
16.0‐DLM160607UChapter 2 Working With Deposits
Reviewing Deposits
Reviewing Deposits
When you review a deposit, you look over the deposit ticket that the system creates for you,
provide any necessary comments, and click Submit to submit the deposit. Optionally, if
there’s something amiss, you can click the Balance button to return to the Balance Deposits
page.
To access the Review Deposits page, you can click Review from the Balance Deposits page;
or if there are no issues to correct or no balancing to be done, the system advances to the
Review Deposit page when you click Next from the Capture Items page.
After reviewing the deposit for accuracy, you can type any comments and click
here to submit it. Recent deposits show up in the Recent list on the Home page.
30 FIS DirectLink Merchant
16.0‐DLM160607UChapter 2 Working With Deposits
Reviewing Deposits
After you click Submit, the system updates the page with a message confirming the deposit.
The page is also updated with new buttons that enable you to return to the Home page or
print a receipt for the deposit.
Click these buttons to return home, or to show the receipt.
The receipt is the same Receipt Detail report that you can print from the Reports page.
When
finished,
click here to
close the
window, and
return to the
page with
your
submitted
deposit.
User’s Guide 31
16.0‐DLM160607UThis page is intentionally left blank. 32
Chapter 3
Working With Reports
This chapter covers generating reports and includes the following sections:
About Running Reports
The List of Reports You Can Run
Run a Deposit Report
Note that you must have the appropriate user role to generate reports.
About Running Reports
The Reports page provides you with the ability to run reports about the deposits made
through FIS DirectLink Merchant. To access the Reports page, click the Reports menu item.
The left side of the page provides you
with the fields for generating a report.
You pick the report you want to generate,
provide the search criteria, and click
Create Report. The system generates the
report and prompts you to open it or save
it to your file system.
Files are generated as PDF files; and
when saved, these files are typically
stored in your browser’s default location
for downloads with a unique name.
However, depending on which browser
you are using, you may be able to choose
the location to save the files by clicking
the drop-down list to the right of the
Save button and selecting Save As.
If the report is taking too long to generate, or you selected the wrong report or the wrong
date, you can click Cancel to stop the report generation process.
User’s Guide 33
16.0‐DLM160607UChapter 3 Working With Reports
About Running Reports
Example of All Deposits Report
7ORLD 7IDE
5
5
!
! !
" #$ % " & '(
" $)% " & '(
"##$ %
& '(
& '(
7ORLD 7IDE
5
5
!
! !
" #$ % " & (
" $)% " & (
" $)% " & (
"##$ %
& (
& (
&&"' "##$ %
& '(
& '(
&($' "##$ % 7ORLD 7IDE
& '(
& '(
$ ,% 5 $)*+* $ ,' "
The List of Reports You Can Run
You can run the following reports about the deposits made at your site using FIS DirectLink
Merchant. Content varies by report, but all reports include the creation date and your user
name for later reference. Note that report content will vary based on the roles that have
been assigned to you. Results may include only the deposits you made, or results may
include all the deposits made for the locations and accounts that have been assigned to you.
34 FIS DirectLink Merchant
16.0‐DLM160607UChapter 3 Working With Reports
About Running Reports
Also note that selecting All for locations and accounts only returns data for all the locations
and accounts you can access (and the associated deposits you can access for those locations
and accounts).
Report Name Description
All Deposits Detail Provides a list of all the deposits made during the specified range,
for the specified locations and accounts. Includes the individual
checks, item amounts, serial numbers, account numbers, routing
numbers, and so on.
Deposit Detail Provides the details of a selected deposit, including the individual
checks, the item amounts, serial numbers, account numbers,
routing numbers, and so on.
Deposit Summary Provides a summary of the deposits made during the specified
range, for the specified locations and accounts. Includes the date of
the deposit, deposit tracking number, deposit status, person who
scanned the deposit, person who submitted the deposits, and the
counts.
Image Report Provides the details and images for a selected deposit (on a selected
date). The image report can be run three different ways:
1x3 Front Only provides the images for the deposit ticket and
only the front images of the checks that make up the deposit at
a larger size, where each image is centered in a single column
on the page.
Front + Back provides the front and back images of checks that
make up the deposit, side by side in two columns on the page.
Front Only provides only the front images the checks that make
up the deposit, side by side in two columns on the page.
All three variations of the Image Report also include the date the
deposit was submitted, the account, the status, the location, and
the deposit total.
Location Summary Provides a detailed summary of all deposits and debits made
during the specified range, for the specified locations and
accounts, grouped and summarized by location. Includes the
location name, deposit counts, debit counts, and deposit totals.
User’s Guide 35
16.0‐DLM160607UChapter 3 Working With Reports
About Running Reports
Report Name Description
Receipt Detail Provides detailed information about a specific deposit made on a
specific date. Includes the date, deposit status, location, account
number, tracking number, person who captured the deposit,
person who submitted the deposit, item type, serial number, item
number, and so on.
Note that this is the same report that is available on the Deposit
Completed page.
User Summary Provides summary information about deposits made by users
during a specified time frame, for the specified locations and
accounts, grouped and summarized by user. Includes deposit
counts, debit counts, and deposit totals by user.
Run a Deposit Report
Use this procedure to run deposit reports for FIS DirectLink Merchant. Note that available
search criteria varies by report.
1. If you haven’t already done so, log on to FIS DirectLink Merchant and click Reports
in the menu bar to show the fields for running reports.
2. From the Report drop-down list, select the report you want to run.
For a detailed description of the available reports, see the previous section.
3. Provide values for the report search criteria as appropriate for that report:
Start Date: The starting date for the range of dates you want to search; or a
single search date. You can type a date manually in MM/DD/YYYY format or pick
the date from a calendar. By default, today’s date.
End Date: The ending date for the range of dates you want to search. You can
type a date manually in MM/DD/YYYY format or pick the date from a calendar.
Location: The location used for the deposit. Select a location, or select All to
include all available locations. Available locations are determined by your site
administrator.
Account: The account used for the deposit. Select an account, or select All to
include all available accounts. Available accounts are determined by your site
administrator.
36 FIS DirectLink Merchant
16.0‐DLM160607UChapter 3 Working With Reports
About Running Reports
Tracking Number: The tracking number provided when the deposit was
submitted. Select a date first, and then you can select the tracking number from
the drop-down list.
4. Click Create Report.
User’s Guide 37
16.0‐DLM160607UThis page is intentionally left blank. 38
Chapter 4
Researching Deposits
This chapter covers researching deposits and includes the following sections:
About Researching Deposits
Searching for Deposits
Working With Search Results
Managing Saved Queries
Note that you must have the appropriate user roles to search for deposits with the Research
page, work with the search results, or manage saved queries.
Also note that depending on the roles that have been assigned to you, you may only be able
to search for your own deposits, not the deposits made by other users.
User’s Guide 39
16.0‐DLM160607UChapter 4 Researching Deposits
About Researching Deposits
About Researching Deposits
The Research Page enables you to search for previously made deposits, using search criteria
you define or saved queries. A saved query is a named set of search criteria you saved for
yourself, or that was saved at the merchant level so all of your merchant’s users can access it.
To access the Research Page, click Research from the menu bar.
The left pane provides you with fields for searching, options for configuring how
content is exported, and the menu options for managing saved queries.
The lower right pane provides a list of items that match your search criteria, and
options for working with those results.
The upper right pane shows you the image for items you select from the list.
Searching for Deposits
When you search for deposits, you specify values for search criteria or select a saved query.
The system returns the matching results, enabling you to work with them as described in
the next section.
Note that you can only limit your search results by locations and accounts you can access.
Also note that you can only view results for the locations and accounts you can access.
40 FIS DirectLink Merchant
16.0‐DLM160607UChapter 4 Researching Deposits
Searching for Deposits
Search for Deposits
1. If you haven’t already done so, log on to FIS DirectLink Merchant and click
Research from the menu bar to show the fields for researching deposits.
2. If you want to search using a previously saved query, select the query from the
Saved Queries drop-down list.
3. In the Start Date field, type the start of the date range you want to search; or click
the calendar icon to open a window that enables you to pick a date from a calendar.
By default, the current date is filled in for you.
4. In the End Date field, type the end of the date range you want to search; or click the
calendar icon to open a window that enables you to pick a date from a calendar.
By default, the current date is filled in for you.
5. If you want to search without making changes to the query, skip to step 10.
Otherwise, continue with the steps of this procedure, replacing the existing values
as appropriate.
6. If you want to limit your search further, click the down arrow to show additional
search fields.
If you want to limit your search by location, select a value from the Location
drop-down list.
If you want to limit your search by account, select a value from the Account list.
7. If you want to limit your search results by an additional field, click the Add Field
button to add a new line of search fields, and do the following:
a. From the drop-down list, select the field you want to limit the list by.
b. From the operator drop-down list, select the operator you want to use for query
line.
Choices include = (equal to), < (less than), > (greater than), >= (greater than or
equal to),Chapter 4 Researching Deposits
Searching for Deposits
9. If you want to configure export options, click the down arrow to the right of the
Export Options heading and provide the appropriate values. For more information,
see the next section.
10. If you made a mistake and need to start over, click Clear to reset the search query to
the default. Otherwise, Click Search.
The system searches for items matching your criteria, and updates the list in the
right pane as appropriate.
Working With Export Options
When you work with search results as described in the next section, you have the option of
exporting search results. The left pane of the Research Page provides you with Export
Options that are used to format exported results.
You can configure
how amounts and
dates are formated,
which delimiter is
used to separate
columns, whether
to include column An example of how the
names, and whether text would be formatted
to wrap field values based on your input is
with quotes. shown below the fields.
This table provides more information about the options you can set. Note that these options
do not apply to how data is formatted in the grid; they apply only to how exported data is
formatted. Also note that if you configure these options and save your query, these choices
are saved as part of that query.
Field Description
Amount Format How you want exported amounts to be formatted. Options include:
10 digit (0000123400), Comma (1234,00), Decimal (1234.00), Dollar
($1,234.00), Numeric (1,234.00) and Whole number (123400).
42 FIS DirectLink Merchant
16.0‐DLM160607UChapter 4 Researching Deposits
Searching for Deposits
Field Description
Date Format How you want exported dates to be formatted. Type how you want
the format the date using standard date and time format strings.
For example, you could type:
M/d/yyyy hh:mm:ss tt
... where M= month, d = day, yyyy = year, hh = hour (12 hour
notation), mm = minutes, ss = seconds, and tt= AM or PM.
You can also use common dividers between the variables. For
example, the slash (/) is often used between date components, and
the colon (:) is often used between time components.
FIS DirectLink Merchant supports all standard date format strings,
not just what is listed above. For example, for day, you could use:
d, the day without a leading zero, such as 9.
dd, the day with the leading zero, such as 09.
ddd, the abbreviated name of the day of the week, such as Mon.
dddd, the full name of the day of the week, such as Monday.
Or you could use HH for the hour using a 24 hour clock; MMMM
for the full name of the month; and so on.
Delimiter The delimiter character to use between the exported values. You
can select one of the common delimiters, such as Comma ( , ),
SemiColon ( ; ), Tab or Space. Or, you can select Custom and type a
value in the provided field, such as a pipe character ( | ).
Export Column Names Whether you want the first line of the exported file to include the
column headers, such as Sequence, Account Number, Serial, and so
on.
Select the check box to include the column names.
Clear the check box to exclude the column names.
Fields with Quotes Whether to enclose the values of fields in quotes. This must be
used for instances where field values may contain the character
used as a delimiter. For example, if you have amounts formatted as
Comma and you choose Comma as the delimiter.
Select the check box to enclose the values in quotes.
"123456789","001234567890","","98765432","3000,00"
Clear the check box to omit quotes. (Only used if there’s no
chance of delimiter characters being present in the field values.)
123456789|001234567890||98765432|3000,00
User’s Guide 43
16.0‐DLM160607UChapter 4 Researching Deposits
Working With Search Results
Working With Search Results
When you complete a search, the system provides you with a list of results that match the
search. For example, if you search for all deposits made on a particular day, the system
returns a list of the deposits matching that date.
From this list, you can:
View an item, by selecting it from the list. The upper pane updates with the selected
image.
Sort the results by column. Click a column heading once to sort in ascending order
(0-9, a-Z). Click a column heading again to sort in descending order (Z-a, 9-0).
You can also hold down the Shift key and click multiple column headers to sort the list
in the order of the selected columns. For example, the system sorts by your first selected
column first, then your second selected column next, and so on.
To do so, click the first column you want to sort by; and then hold down the Shift
key and click the next column. The system assigns a number 1 to the first column
along with the sort arrow, and assigns a number 2 to the second column.
If you hold down the Shift key and click a numbered column again, it toggles
between ascending and descending order for that column.
If you release the Shift key and click a column, it clears the numbered sort order.
Reorder columns by clicking a column heading and dragging it left or right.
44 FIS DirectLink Merchant
16.0‐DLM160607UChapter 4 Researching Deposits
Managing Saved Queries
You can also click the menu icon ( ) to access additional features. This includes:
Select Columns - Select this option to open a window that enables you to select the
columns you want to include in the display. When finished you can click Done to return
to the list of items.
Export Results - Select this option to export the results as a CSV (Comma Separated
Values) file.
Note that results are exported as shown in the items list. So if you’ve reordered
columns, selected only a subset of columns, and sorted by a column, the exported
results will be formatted with those selections.
Also note that the field data for the results is formatted based on how you’ve
configured your Export Options, as described in Working With Export Options on
page 42.
When saved, exported results are typically stored in your browser’s default download
location with the name of the saved query (if using one), or Data Export.csv. However,
depending on your browser, you may be able to choose the location to save the files by
clicking the drop-down list to the right of the Save button and selecting Save As.
Print Selected Item - Select an item from the list and select this option to run the Item
Detail report for the item.
Print Deposit - Select and item from the list and select this option to print the Deposit
Detail report for the selected deposit.
Print Deposit and Images - Select an item from the list and select this option to print the
Deposit Image report (1x3 Front Only) for that item.
View Deposit - Select this item to view only the list of items that make up the selected
item’s deposit. When finished you can click Back to Items to return to the list of items.
Managing Saved Queries
If you have been assigned the appropriate user roles, you can manage saved queries. This
includes:
Adding, updating, and removing queries for yourself.
Adding, updating, and removing queries for your site.
User’s Guide 45
16.0‐DLM160607UChapter 4 Researching Deposits
Managing Saved Queries
You can also use the search criteria defined in existing queries to create new ones. Note that
saved queries do not include values for the date range fields. New values for date fields must
be provided when searches are run.
Save a New Query
1. If you haven’t already done so, log on to FIS DirectLink Merchant and click
Research from the menu bar to show the fields for researching deposits.
2. Select a value from the Saved Queries drop-down list to update the page with that
query’s search criteria.
3. In the Saved Queries field, type the name for the new saved query.
4. Provide search criteria, as described in Search for Deposits on page 41; and
configure export options as described in Working With Export Options on page 42.
5. Click the Research Options menu icon ( ), and select one of the following:
Save, to save the query for yourself. The query will appear as a saved query for
you, but will not be available for other users.
Save to Merchant, to save the query for your site. All users who can access the
Research page will be able to work with the query.
The system displays a message that the query was saved successfully.
Copying a Query
Use this procedure to create a new query, using the criteria from an existing query. This is
typically done when copying a query to make a small change to the criteria, or when trying
to save an existing query with a different search type (for example, using a merchant query,
making small changes, and saving the query as one only you can access).
1. If you haven’t already done so, log on to FIS DirectLink Merchant and click
Research from the menu bar to show the fields for researching deposits.
2. Select a value from the Saved Queries drop-down list to update the page with that
query’s search criteria.
3. In the Saved Queries field, replace the name of the original saved query with the
name for the new saved query.
You can click the x to clear the field and type the new name, or manually select the
existing text to replace it.
46 FIS DirectLink Merchant
16.0‐DLM160607UYou can also read