Circular Leaf Block - JUNE 2021 - The National Quilt Museum
←
→
Page content transcription
If your browser does not render page correctly, please read the page content below

QuiltMuseum.org/BlockOfTheMonth
                                                JUNE 2021

Circular Leaf Block
inspired by Baltimore Goes Modern by Cathy Erickson
                                                 Quilt by: Cathy Erickson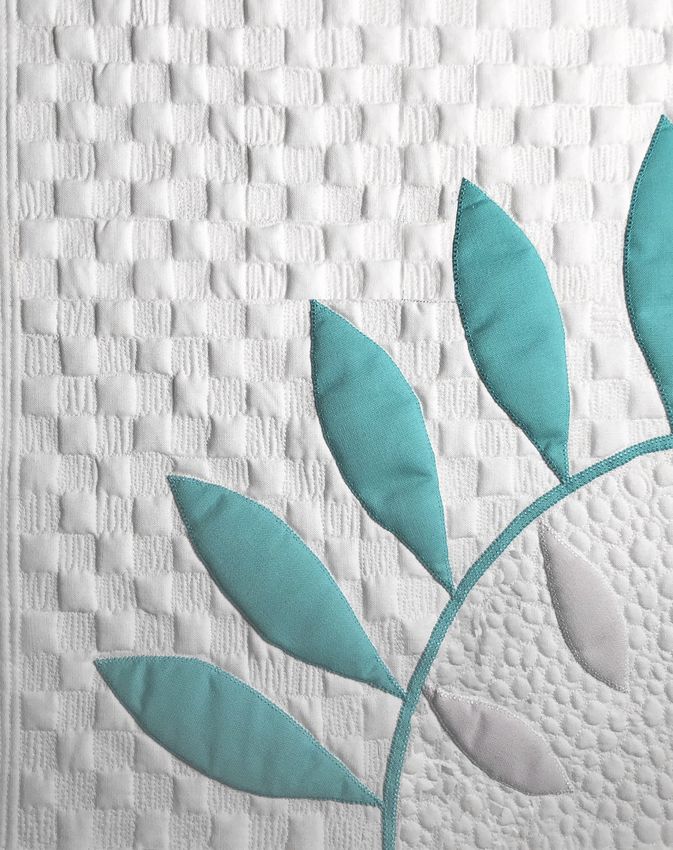
JUNE 2021

Featured Artist: Cathy Erickson
                         Cathy Erickson made her first quilt in 1996
Cathy Erickson           while waiting for her daughter during
                         dance class. In 2015 Cathy was caught
                         up in the modern quilt movement. This
                         was the beginning of her series "Baltimore
                         Goes Modern." Her quilts use blocks
                         from antique Baltimore Album Quilts
                         as inspiration for modern quilts. She
                         uses large blocks, modern colors,
                         deconstruction, and graphic quilting to add
                         a modern twist to very traditional appliqué
                         blocks.

                         Website: www.cathyericksonquilts.com

                         Website: www.cathyerickson.net

                         Instagram: @quiltingcat2

                                                              Page 2
JUNE 2021

Inspiration
 For the June Block of the Month, I wanted to choose an inspiration that fit in with my
"Baltimore Goes Modern" series. In my series I always start with a block that is found in my
 collection of antique album quilts. The Baltimore quilters had a wonderful fascination with
 leaves. Leaves in circular designs are particularly interesting.

Cherry and Leaf block by Cornelia Chamberlain

The above Baltimore Album block is from a quilt by Cornelia Chamberlain (1820-1895). Cor-
nelia lived in Maryland her entire life. In 1850 she was living close to downtown Baltimore.
Her husband was a shoemaker and they had 4 children as per the 1850 census. Her home
was close to other documented Baltimore Album quilters.

                                                                                         Page 3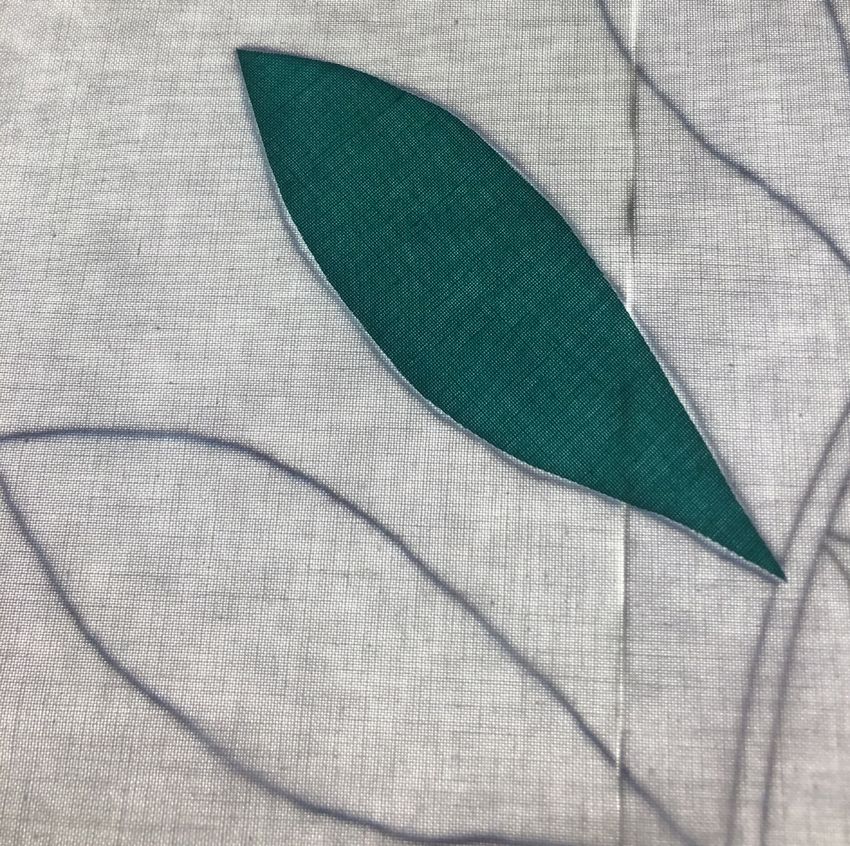
JUNE 2021

Inspiration
Cornelia has another leaf block on her quilt that includes cherries and several other blocks
that have leaves and flowers.

            Cherry and Leaf block by Cornelia Chamberlain

                                                                                         Page 4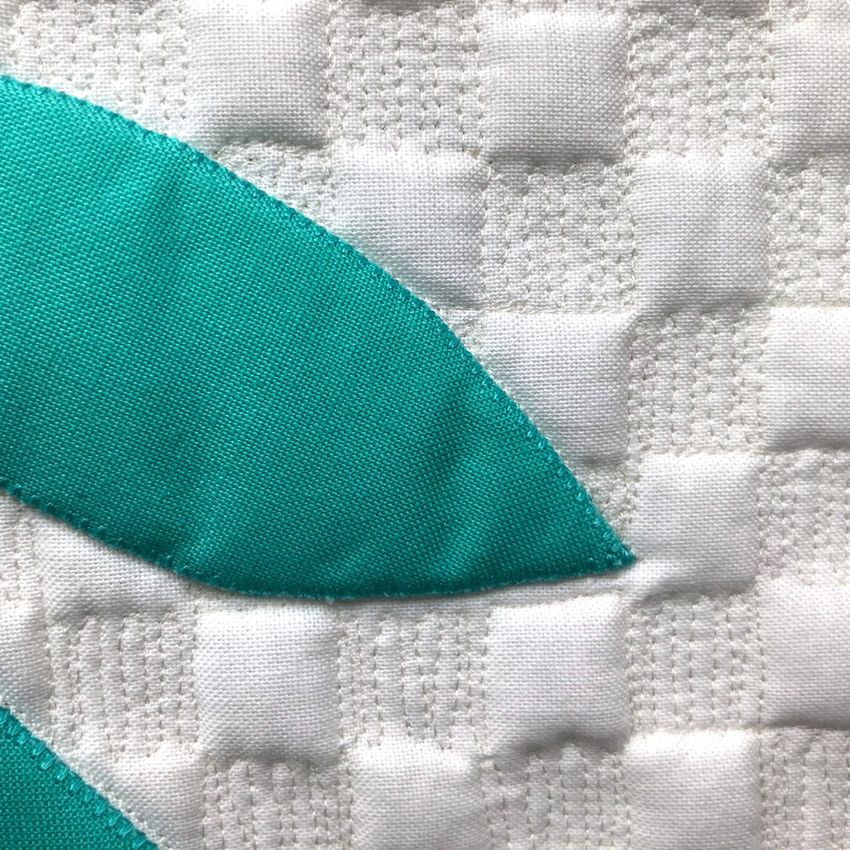
JUNE 2021

Inspiration
            Quilt by Cornelia Chamberlain

Here is that Baltimore Album quilt that those two blocks came from. It is unknown if all the
blocks were made by Cornelia. The wide variety of designs of wreaths almost suggests that
more than one quilter was involved. Each quilter put their own spin on a circular design with
different arrangements of leaves, flowers, cherries, and grapes.
In my "Baltimore Goes Modern" series I love to go big with large blocks, modern colors,
graphic quilting, and deconstructed blocks. That is why I chose to use only a quarter of a cir-
cle for my block design. There is also plenty of space for graphic quilting.

                                                                                          Page 5
JUNE 2021

Sample Block

                                                                Sample by: Cathy Erickson

Supplies:                                         •   100 weight, 60 weight, or 50 weight thread
• 13 ½” x 13 ½” fabric for background                 for quilting
• ¼ yard fabric for large leaves & stem           •   I quilted my block with 100 wt. silk thread and
• Fabric scraps for small leaves                      used a 70/10 needle.
• 14” x 14” square piece of batting               •   10"x15" piece of freezer paper:
• 14” x 14” fabric for backing fabric             •   Water-soluble marking pen for marking quilt
• Light-weight fusible                                designs
• Stabilizer for machine appliqué (i.e. iron on   •   Light Box
   tear away stabilizer)
• 40 weight thread for machine appliqué in
   colors to match leaf colors
                                                                                              Page 6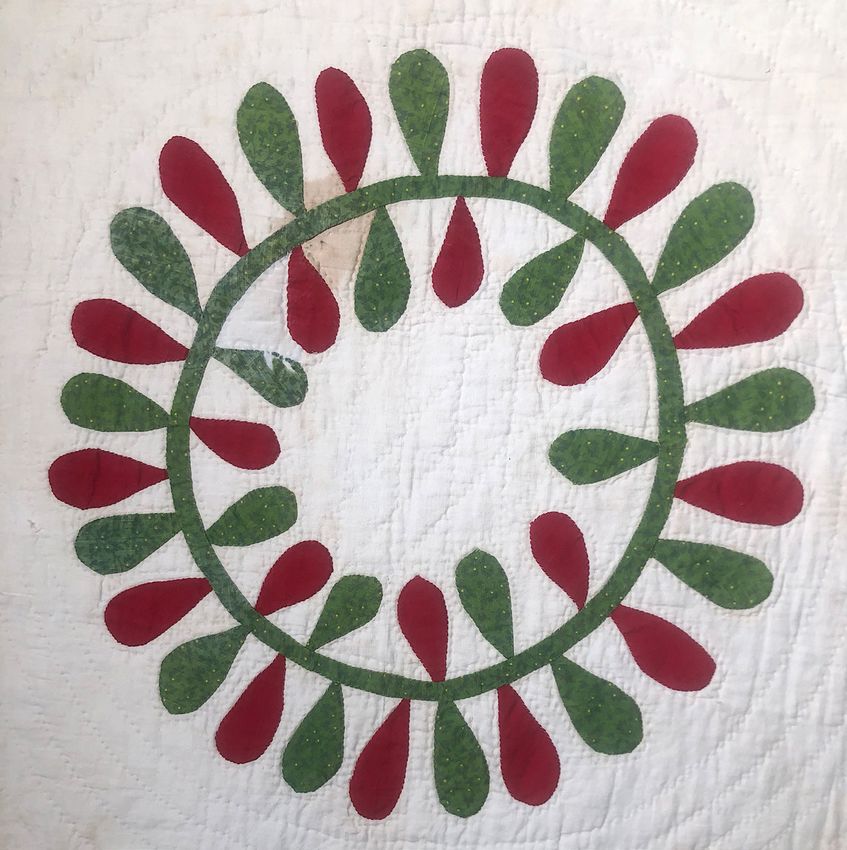
JUNE 2021

Instructions
To begin, print off Pages 18 to 22. The block is divided into four sections. Page 22 has the
pattern pieces used to make the block. After printing off each page, measure each large square
to verify that it is 6 ¾ inches by 6 ¾ inches.

Cut out the four squares on Pages 18 to 21 along the lines. Arrange the cut out blocks so that
the grey edges match, as well as the leaves on each block. Tape the four blocks together to
make a finished pattern square that is 13 ½ by 13 ½ inches. The pattern will be used for the
placement of the appliqué leaves.

Machine Appliqué:
The instructions I am supplying here are for machine appliqué using fusing. If you are more
used to hand appliqué please use the leaf patterns on Page 22 for the finished leaf sizes. Then
hand appliqué using your favorite technique.

                                                                                         Page 7
JUNE 2021

Instructions
               1. Print out Page 22 with the Pattern Piece
Photo 1           outlines.

               2. Using a light box or window trace the
                  pattern pieces from Page 22 onto the
                  dull side of the freezer paper. You’ll
                  need to trace out 5 large leaves, 3 small
                  leaves, and 1 curved stem (Photo 1).

               Tip: Freezer paper shrinks when you iron
               it. So it is important to pre-shrink it before
               using it for patterns. In general cut a
               square of freezer paper, iron it on the dull
               side about three times in order to shrink
               the paper as much as possible. After that is
               done, it is ready for use in making patterns.

               3. Mark the letter C on one end of each
                  leaf. This is the part of the leaf that
                  touches the center circle. Use a pencil
                  for the tracing part. An ink pen might
                  transfer to the iron and a permanent
                  marker can transfer though the paper
                  onto the fabric. This is especially
                  noticeable if the fabric is light in color.
               4. Apply lightweight fusing to the back
                  of the fabric for the leaves and stem.
                  Use the instructions for fusing that are
                  supplied with the paper backed fusible.
                  Leave the fusible paper backing in place.

                                                         Page 8
JUNE 2021

Instructions
               5. Cut the freezer pattern pieces apart.
Photo 2           Place the shiny side of the large leaves
                  and stem onto the right side of the leaf
                  fabric. Iron the freezer paper pieces to
                  the right side of the fabric.

               6. Repeat with the three small leaf freezer
                  paper pieces onto the right side of the
                  fabric (Photo 2).

               7. Using scissors, cut out the shapes on the
                  line. If the freezer paper comes loose
Photo 3
                  while cutting, re-iron it to the fabric.

               8. Once all the pieces are cut out, remove
                  the fusible backing paper and freezer
                  paper.

               9. There are several ways to position the
                  leaves on the background fabric.

               ONE: Place the pattern for the block
               on a light box. Using the outline as a
               guide, arrange the leaves in place. When
               removing the freezer paper, note which
               end had the C, as that is the point which
               will touch the stem (Photo 3).

                                                     Page 9
JUNE 2021

Instructions
               TWO: From the bottom right hand corner
Photo 4        of your background fabric, measure 6 ¼”
               up and 6 ¼” to the left, and mark those
               spots on the edge of the fabric. Use those
               marks as a guide for placing the stem
               (Photo 4).

               10. Continue until all the leaves and stem
                   are in place and freezer paper is
                   removed (Photo 5).

               11. Carefully move the block, with pieces
                   in place, to the iron. If needed, pin the
                   pieces in place before moving. Remove
                   the pins and make sure the pieces are
                   in place. Press and fuse the appliqué
                   pieces with the iron.
Photo 5

               TIP: It is crucial to have a clean iron
               when the background fabric is white or a
               light fabric. If in doubt, use a cover cloth
               between the iron and your block.

               12. Next add a machine appliqué stabilizer
                   to the back of your block. Using a tear
                   away stabilizer is the best choice for
                   this block. Follow instructions on the
                   packaging for use.

                                                      Page 10
JUNE 2021
Instructions
13. Appliqué the edge of each piece with a
Photo 6 blanket stitch. I used a 40 weight thread
that closely matches the fabric color
of the leaf. Before I work on a block, I
always have a practice sample that is
just a leaf or two to practice on. This
allows me try out different colors of
threads as well as perfect my machine
appliqué stitching (Photo 6).
14. Remove the stabilizer carefully from
the back. Since the buttonhole stitches
almost touch on the stem piece, the
Photo 7
stabilizer here may be left in place.
15. Use a needle to take the end and
beginning threads to the back of the
block. Tie a knot and then thread a
needle and work the stitches through
the buttonhole stitching. The goal is to
not have dark threads show through the
background fabric (Photo 7).
16. Press the top to give it a crisp flat look.
In an antique block the quilting would
normally be the same for the entire block.
Sometimes flowers, leaves, and feathers
are included in the background quilting.
To achieve a modern look, I usually break
up a block into at least 3 different areas of
Page 11JUNE 2021
Quilting
quilting. I like to use circles, squares, and lines as graphic additions. In a large quilt I will grid
off dozens of different quilting areas and often use more than a dozen different stitches.
Shown below are the main stitches used on this block.
I feel comfortable marking my quilt design on the top before I actually layer the top with
batting and a back. This allows me to consider the quilting as a design element. To mark the
½ inch squares done in a checkerboard style
Straight lines done with a walking foot using a free motion quilting foot
Circle
quilting or
pebbles
done with
a free mo-
tion foot.
Circles are
quilted in
different
shapes and
sizes. The
end result
is quite
organic.
Page 12JUNE 2021
Quilting quilt block, use a water soluble blue pen.
Be sure to test that the pen you use for
marking is water removable by testing on a
small scrap of background fabric.
1. For the area that is straight lines,
measure 2" in from the left side edge of
the block and draw a vertical line.
From this line, mark a square grid
across the remaining background fabric
every 1⁄2" horizontally and vertically.
The lower right area below the stem
does not need to be marked (Photo 8).
2. Once the top is marked, layer it with the
batting and backing fabric.
Photo 8 3. Baste the layers together. I hand baste
mine and I stabilize all the layers
together by pinning the block to a foam
Page 13JUNE 2021
Quilting
core board. Start with basting the outer
Photo 9 edge followed by basting about every
3 to 4 inches. I also hand baste about
a quarter inch away from the stem.
The basting is removed while machine
quilting the piece (Photo 9).
You can also pin baste the layers
together.
The age-hold question of quilting is “Where
do I start?” I almost always start with the
straight line quilting, followed by in-the-
ditch quilting around every shape. Last is
the free-motion quilting.
Page 14JUNE 2021
Quilting
4. Stitch straight lines from right to left to
Photo 10 fill the 2" space, spacing lines about
1
⁄4" - 1⁄8" apart (Photo 10).
5. Using thread that matches the
background fabric, outline stitch around
all the shapes. I do the outline stitch
with my free-motion sewing foot.
Before starting free motion quilting I
always practice first to make sure the
machine tension is correct. For practice
I have a small sandwich made up of the
fabrics and batting I am using on the
quilt. Practice also warms me up for the
intensity of doing outline quilting.
6. Next I move on to quilting the free-
motion squares. Using your water
soluable pen, mark every other square
with a dot, like a checkerboard. These
are the squares that will be filled in with
quilting.
7. I’ve drawn the stitching path that I
approximately follow as a reference
(Photo 11). I travel from square to
square along the marked lines. Some
squares might have more lines in them
than others, but that is okay (Photo 12).
Page 15JUNE 2021
Quilting
Photo 11
8. Quilting circles or pebbles are done
free-motion as well. These will be added
in the bottom right corner, around the
small leaves. The stitch starts by making
a circle on the background fabric. Next
quilt another circle next to it, touching
on one side. Third step is to make
another circle but try a different size.
Fourth step is to make another circle….
and so on... (Photo 13).
Photo 12
9. Finish quilting all the circles/pebbles in
the lower right hand corner of the block.
10. Remove any basting stitches/pins that
remain in the quilt.
11. Once the block is completely quilted
Photo 13
Page 16JUNE 2021
Quilting it is time to remove the marking lines.
Follow the instructions offered for your
Photo 14 marking tool of use.
I soak the block in cold water to remove
my blue lines. I soak it once, let the
water in the basin drain, soak it again
with fresh cold water, and then let the
water drain, and finally soak it for a
third time with cold water. At this point
there should be no visible blue lines on
the block. If you see any lines, soak in
cold water again. After that I place the
block on a thick towel and allow it to air
dry. I do not squeeze the water out of
the block as that tends to leave wrinkles
that I would have to iron out.
12. Once the block is completely dry, lightly
press the block to flatten it.
13.Trim the finished block to 12 ½” x 12 ½”
in size (Photo 14).
Finished?
Fantastic!
Page 17JUNE 2021
Upper Left Corner of Quilt Block
Page 18JUNE 2021
Upper Right Corner of Quilt Block
Page 19JUNE 2021
Lower Left Side of Quilt Block
Page 20JUNE 2021
Lower Right Side of Block
Page 21JUNE 2021
Pattern Pieces Used to Make the Block
C
C
Page 22You can also read