Choosing Gear for your
Smaart Measurement System
←
→
Page content transcription
If your browser does not render page correctly, please read the page content below
Choosing Gear for your Smaart Measurement System
Smaart Gear Choices |2

Contents
Introduction ......................................................................................................................... 3
Choosing A Computer .......................................................................................................... 4
Choosing an Audio Interface ............................................................................................... 5
   Audio Drivers ................................................................................................................... 6
   Remote Control and Gain Reporting ............................................................................... 6
Choosing a Measurement Mic ............................................................................................. 7
   Mic Correction Files ......................................................................................................... 8
   Omnidirectional Microphone Types: Free Field, Diffuse Field, Pressure Field ............... 8
Special Considerations for SPL Measurement..................................................................... 9
   Sound Level Calibrators ................................................................................................... 9
Example Measurement Rig Setups .................................................................................... 11
   2x2 Audio Interface ....................................................................................................... 11
   Multi-channel IO ............................................................................................................ 12
   Network IO..................................................................................................................... 12

© 2021 Rational Acoustics, LLC. All rights reserved.
Smaart Gear Choices |3

Introduction
Smaart® is a software-based audio analyzer. Unlike hardware-based, turnkey
measurement systems, Smaart can be used with a wide variety of hardware options to
suit a range of measurement applications. There is no one-size-fits-all Smaart rig – each
user must configure a system that suits their individual needs and budget.

This document is intended as a guide to help users better understand some of the
relative merits and trade-offs associated with the many choices for components of a
Smaart-based measurement system. This will help you make cost-effective choices
when selecting specific equipment for a particular application.
A complete Smaart measurement system consists of three main components:
     1. Host Computer (Signal Processing)
     2. Audio Interface (Signal Acquisition)
     3. Measurement Microphone(s) – (Acoustical Probe)
For each of these components, what you need is a function of how you use (or intend to
use) Smaart. Does the rig need to be rugged and quickly deployable enough for touring,
or will it sit on a workbench? Does the hardware need to be rack mountable, or fit in a
backpack? Give some thought to your needs and priorities in order to make wise gear
investments and end up with the right tools for the job. This document will explore
some considerations in each of the above categories.
For more information on how to operate Smaart software, measurement theory, and
application, see the Smaart v8 User Guide.

© 2021 Rational Acoustics, LLC. All rights reserved.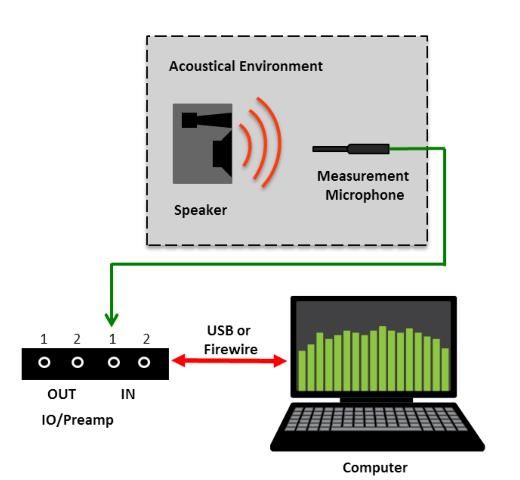
Smaart Gear Choices |4

Choosing A Computer
Smaart software is available for both macOS and Windows operating systems. The
software is functionally identical on both platforms. Full versions of Smaart will not
currently run on mobile device operating systems.
If you already have a computer and are not sure whether it can run Smaart to your
satisfaction, the best way to know for sure is to download the demo version of the
software and try it out. Learn more about the demo and access downloads here.
Some additional considerations:
     • When selecting a new computer for use with Smaart, keep in mind that Smaart
       will run comfortably on virtually all modern “office” and “workstation”
       computers, although more powerful computers will allow for more demanding
       measurement sessions with more simultaneous measurements.
     • Smaart can be fairly graphics intensive, particularly when graphing multiple live
       plots, and this can form a bottleneck on “netbooks” or other light-duty
       computers with basic or integrated graphics processors.
     • When purchasing a new computer, it is always a good idea to over-spec CPU
       (Central Processing Unit, the “brain” of your computer), GPU (Graphics
       Processing Unit, or “video card”) and RAM (memory) in order to maximize the
       useful lifespan of the computer.
     • If you are planning a “one size fits all” computer, it is important to consider the
       processing demands of other applications, especially if you plan to run multiple
       applications simultaneously, as is often the case for computers used in a live
       production environment.
     • Lastly, consider how you plan to get signals into and out of Smaart – what type of
       connection your audio interface requires – and make sure the computer has the
       proper ports (or adapters).
You can view the most up to date Recommended System Requirements for current
software versions on our website. If you are considering updating your computer’s OS
and have concerns about compatibility, or have any questions about hardware, visit our
support portal for the most current information.

© 2021 Rational Acoustics, LLC. All rights reserved.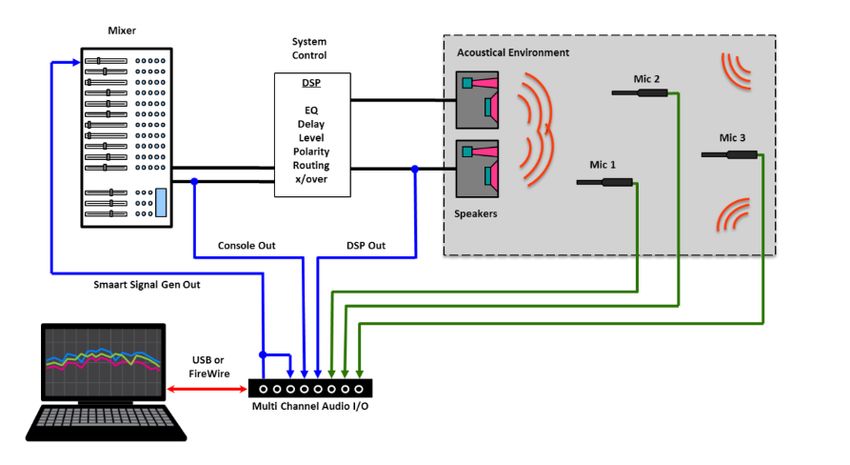
Smaart Gear Choices |5

Choosing an Audio Interface
An audio interface is used to convert between the analog voltage signals that flow
through our sound systems and digital values that computer software can understand
and analyze, using Analog to Digital converters (A/D) and Digital to Analog convertors
(D/A). In other words, the audio interface is how we transport signals into and out of the
computer (which is why audio interfaces are also referred to as Audio I/O).
When using a measurement microphone to capture acoustic signals, a microphone
preamplifier is used to amplify the relatively low signal levels created by the microphone
to a higher level before they are sent to the A/D converter. Some of the signals you
want to analyze may already be in digital form, and can be connected to an audio
interface via AES/EBU or S/PDIF, or via a networked audio protocol such as Dante or
AVB.
When choosing an audio interface, therefore, it’s important to consider how many
signals and what type of signals you want to be able to input simultaneously. At a bare
minimum, for making typical two-channel (transfer function) acoustic measurements in
Smaart, you will need an interface with at least one mic input (XLR connector with
preamp) and one line-level input (typically TRS). If you plan to use multiple microphones
to measure from multiple locations simultaneously, you will want a larger interface with
more mic inputs – common options include 4-mic and 8-mic interfaces. Since
measurement microphones are condenser microphones, the mic preamps must offer
Phantom power (+48V) capability.
The good news is that almost all modern professional or “music industry (MI)” grade
audio interfaces are of suitable quality for use with Smaart and will support base sample
rates of 44.1 kHz and 48 kHz. Higher sample rates such as 96 kHz are not required for
acoustic measurement but can offer some benefit when testing electronic equipment,
as they allow the analyzer to “see” higher frequencies. The Rational Acoustics webstore
offers a selection of recommended audio interfaces that we’ve found work well for
Smaart measurement. If you have questions or concerns about whether a particular
interface is right for your needs, please contact support via our support portal.
One special consideration exists when choosing audio interfaces and measurement
microphones for SPL measurement at concert levels: the mic preamps on the interface
must be able to accommodate the signal voltages produced by your measurement
microphone at high acoustic levels. For more information on this, see “Special
Considerations for SPL Measurement” below.

© 2021 Rational Acoustics, LLC. All rights reserved.
Smaart Gear Choices |6

Audio Drivers
On macOS machines, Smaart will be able to see and utilize any audio device that the
computer recognizes as a valid CoreAudio device. On Windows, Smaart can see and
utilize any audio device that Windows recognizes as a valid WDM/Wave or ASIO device.
Simple two-channel USB devices may be “plug and play.” Multi-channel devices offering
more than two inputs require ASIO drivers to be recognized by Windows (and therefore
seen by Smaart).
The rule of thumb is: if your operating system can see the audio device, Smaart will be
able to as well. Therefore, it’s important to make sure that your device is connected,
powered on, and recognized by your operating system before launching Smaart.
Rational Acoustics does not maintain a list of compatible audio interfaces for use with
Smaart. In general, if the device you are considering is still supported by its
manufacturer, it will still be supported on current operating systems and therefore
compatible with Smaart.
Remote Control and Gain Reporting
Some interfaces have the ability to report their preamp gain levels to the computer, and
have their gain settings controlled remotely via software.
In particular, the Roland OCTA-CAPTURE interface is an 8-preamp audio interface that
has the ability for remote gain control. Smaart detects when a Roland OCTA-CAPTURE
device is connected and will automatically enable user-adjustable gain and phantom
power controls, allowing the preamps to be controlled directly from within Smaart.
This functionality is not required, as the
gain can always be set manually using
the front panel controls, and in general
a measurement session that starts by
setting the properly gain structure into
the analyzer should proceed without
issue. However, some users appreciate
the convenience, particularly in a
touring or install situation where the
interface may be installed in a rack and
not easily physically accessible to the
user.

© 2021 Rational Acoustics, LLC. All rights reserved.
Smaart Gear Choices |7
Choosing a Measurement Mic
A measurement microphone is our window into the acoustical environment. There are
many models in common use with Smaart rigs, spanning a wide range of price points. To
help you decide which mic is right for you, we will consider the required tolerances and
desired use case.
Since measurement microphones are designed to capture an acoustic signal without
coloring it, they are designed to be omnidirectional with a flat frequency response.
Even an inexpensive measurement microphone can be expected to produce a nearly-
omnidirectional polar pattern and nominally flat frequency response between 50 Hz and
5 kHz, and be “reasonably” flat between 30 Hz and 18 kHz. For a large number of
measurement applications, a relatively inexpensive measurement microphone that fits
this general description might be all you need for your Smaart rig.
The cost of a measurement microphone starts to increase when you:
• Expand the flattest part of its response curve to higher and lower frequencies
• Extend its dynamic range, increasing Max SPL or decreasing self-noise, or both
• Tighten unit-to-unit tolerances for overall frequency response
• Provide individually measured frequency response data for each microphone
• Increase the useful operating temperature range
• Ruggedize, moisture-proof or otherwise extend environmental capabilities
Although expensive measurement microphones are objectively “better” in some or all of
the above ways, not every application may require or even benefit from the added
expense.
In a typical field measurement scenario, the environmental factors such as background
noise and wind can limit the repeatability of measurements to the point that the
difference between a “pretty good” measurement mic and an “excellent” measurement
mic can easily be lost. Some touring engineers choose to travel with modestly priced
measurement microphones to make it easier to cope with a lost or damaged
microphone on the road.
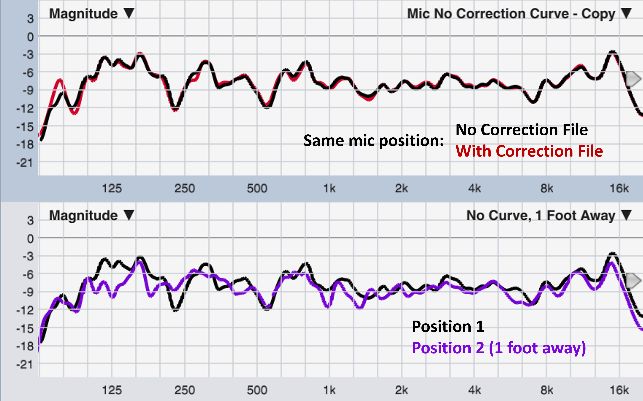
© 2021 Rational Acoustics, LLC. All rights reserved.Smaart Gear Choices |8 Mic Correction Files Some measurement mics include files with individually-measured frequency response data that can be loaded into Smaart to correct for deviations in the microphone’s magnitude response. With mics of reputable quality, these deviations tend to be very minor throughout most of the audible range (tenths of a dB). Although this is important information for laboratory test conditions, these small deviations are dwarfed by the natural variance that occurs when measuring in acoustic spaces simply by moving the mic a short distance. The top pane of the image at right shows a measurement taken from the same microphone position with (red) and without (black) a correction file in use, and the bottom pane shows the variance caused by moving the microphone a foot away. For this reason, mic correction files (often referred to as “calibration files”) are not necessary for typical field measurement work. However, there is a benefit to buying a microphone that includes individual correction data: the confidence that the manufacturer has tested the microphone and it is performing within its design tolerances. In other words: if your mic is of high enough quality to come with a correction file, it is probably of high enough quality not to need it. Omnidirectional Microphone Types: Free Field, Diffuse Field, Pressure Field Intuitively, one might expect “omnidirectional” to mean a microphone that is equally sensitive in all directions across the full audio spectrum, but in practice even the very best omnidirectional measurement microphones exhibit some directional characteristics at higher frequencies, where the diameter of the diaphragm starts to become significant with respect to wavelength. Omnidirectional measurement mics can be classified as Free Field, Diffuse Field/Random Incidence, or Pressure Field based on these directional characteristics, which are generally restricted to the top octave of the response and most noticeable in the nearfield of a loudspeaker. In practice, the difference is that free field microphones are designed to correct for this loading effect when pointed directly at the source, whereas diffuse field microphones are designed to be pointed straight up (90° off axis from the source). The most © 2021 Rational Acoustics, LLC. All rights reserved.
Smaart Gear Choices |9

important thing is to be consistent with how you aim the microphone as you move it
around the space.

Special Considerations for SPL Measurement
SPL measurement at concert levels places some unique demands on the measurement
equipment, and we must consider these for optimal results.
At concert levels, the microphone is subjected to acoustic pressures several orders of
magnitude higher than during a typical measurement session. As a rule of thumb, for
typical live music material, the instantaneous peaks will be approximately 35 dB above
the average A-weighted SPL. Therefore, the measurement microphone should be rated
for a Max SPL of at least 135 dB – 140 dB to safely accommodate signal peaks without
overload. (When it comes to SPL measurement, even occasional overloads are
problematic as they flush averaging buffers and potentially invalidate large time ranges
of log data.)
The next thing to consider after max SPL is the voltage that the mic creates at those
levels. Mics with relatively high sensitivity will produce large voltages that can overload
a typical mic preamp. The microphone and audio interface must be chosen to work
together as a pair, by selecting an interface with a max mic input level able to
accommodate the voltages created by the microphone during the event.
Mic sensitivity is usually indicated as mV / Pa, which is the output voltage at 1 Pascal (94
dB SPL). Since our target of 140 dB SPL is 200 times 94 dB SPL, you can quickly
determine the mic’s output voltage at 140 dB SPL by multiplying its sensitivity by 200.
For example, if your measurement mic has a sensitivity of 36 mV/Pa, then at 140 dB SPL,
it will produce an output voltage of 7.2Vrms (+19 dBu), which will overload most mic
preamps.
A lower sensitivity measurement microphone that we have found works very well for
SPL measurement is the iSemCon EMX-7150, with a sensitivity of about 6 mV/Pa. At 140
dB SPL, that mic produces about 1.2Vrms (+3.8 dBu), which can be comfortably
accommodated by most preamps.
Sound Level Calibrators
In order to measure SPL, Smaart needs to know what acoustic pressure at the mic
caused the signal levels it’s seeing. This can be accomplished by running the calibration
routine using a sound level calibrator.

© 2021 Rational Acoustics, LLC. All rights reserved.
S m a a r t G e a r C h o i c e s | 10

Calibration is not required for standard transfer function and spectrum
measurements. It is only required for measuring SPL.
A sound level calibrator works by generating a known SPL at the diaphragm of the
microphone, which Smaart can correlate with the incoming signal level, thus
establishing the sensitivity of the entire signal chain, from mic to interface.
There are two basic types (electronic and piston-phone) and three standardized classes
of accuracy (Classes 1, 2, and LS). Class LS calibrators are intended for lab use and are
seldom seen by most humans. Class 1 devices have output tolerances of +/- 0.4 dB, and
Class 2 devices have output tolerances of +/- 0.75 dB. Most calibrators generate a 1
kHz, although some produce lower frequencies such as 250 Hz.
Sound level calibrators, like microphones, are not all created equal. A fully class
compliant calibrator will always come with a certificate of calibration, ensuring that it
meets all standardized requirements for its classification. If a calibrator does not come
with a certificate of calibration, all bets are off. We have seen inexpensive calibrators
vary by as much as 2 dB from a Class 1 reference device, and as much as 3 dB from unit
to unit. For sound exposure measurements (NIOSH dose), 3 dB represents 100% error,
which is far too inaccurate to be meaningful.
A realistic goal for SPL calibration accuracy is to be within +/- 1 dB, and that can be
easily accomplished with a well-made and certified Class 2 calibrator or better. As with
microphones, full compliance testing adds significantly to production costs. If you don’t
see any mention of calibration and it’s a lower cost device, then you probably want to
assume that only a less stringent production line test of some kind was done.

© 2021 Rational Acoustics, LLC. All rights reserved.
S m a a r t G e a r C h o i c e s | 11
Example Measurement Rig Setups
2x2 Audio Interface
A basic two-in, two-out audio interface is a common solution for quick deployment and
portability, and is capable of performing the bulk of measurement field work when
multi-channel and multi-microphone measurements
are not required.
Although dual-channel measurements are preferred
for system alignment work, single-channel analysis,
such as the setup shown at right, remains very useful
for a variety of tasks including monitoring the tonal
balance of a mix with RTA or spectrograph, feedback
elimination, and measuring SPL and Leq. Single-
channel configurations can also be used to gather
“direct” impulse response measurements using an
Single Channel Measurement setup
external impulsive noise source (shot/pop/clap).
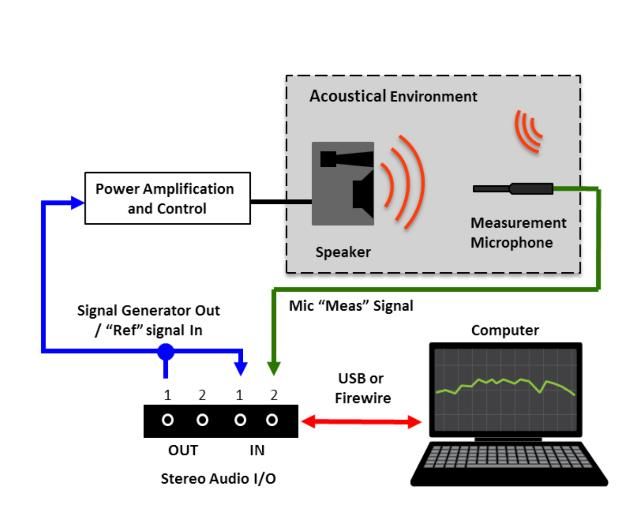
System response measurements (Transfer Function measurements) are comparative
measurements, taken by comparing what went into the system against what came out
of the system. This measurement type is essential for sound system alignment tasks, as
unlike signal channel (RTA) measurements,
transfer function measurements are not “time
blind.” Dual channel measurements can
characterize the system’s response both in time
and frequency domains, generating Magnitude,
Phase, Coherence, and Impulse Response data.
In the example at right, Smaart’s internal signal
generator is used to excite the system. The
output is split, to drive the sound system and
also physically “looped back” into an input
channel, which will act as the Reference signal Dual Channel Measurement setup
for the transfer funtion meausrment.
Note: Although Smaart has the ability to internally reference the signal generator
directly, (“software loopback”), this is not a recommended practice. This can result in
erroneous delay times and clock drift, and in general it is recommended to use a hard-
wired loopback, keeping both the measurement and reference signals on the same
clock.
© 2021 Rational Acoustics, LLC. All rights reserved.S m a a r t G e a r C h o i c e s | 12
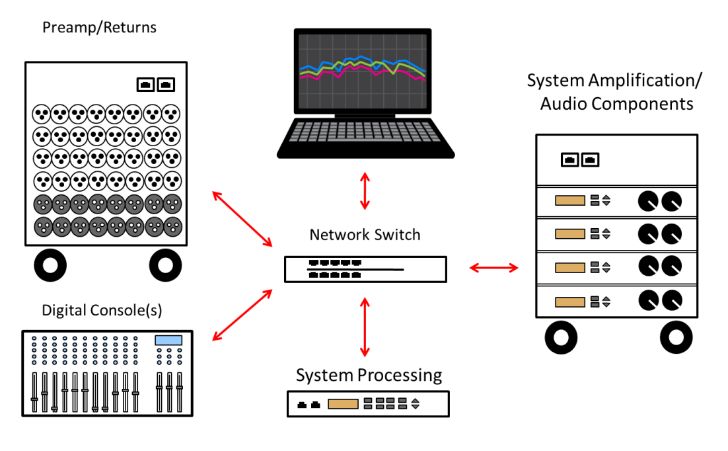
Multi-channel IO
Smaart can run and display as many simultaneous realtime Spectrum and Transfer
Function measurements, and live averages of individual measurements, as your
computer and hardware can accommodate (there is no software-imposed limitation).
Multi-channel IO capability allows you to place multiple microphones around the space
to compare measurements taken at different positions, which is a real time saver when
working with larger, more
complex systems.
In this example, we have three
measurement microphones
placed throughout the system’s
coverage area, as well as
electronic measurement points
pre-processing, post-processing,
and a hardwired loopback.
Multi-Channel Measurement Setup
This allows multiple transfer function
measurements to isolate the response of various system elements. For example, a
transfer function measurement between Console Out and DSP Out will allow direct
measurement of the response of the system processing and EQ filters.
Network IO
The professional audio world is becoming
increasingly networked – in some cases,
the signal path is entirely digital from the
preamp all the way to the power
amplifiers. Digital signals can be routed
into Smaart via a variety of methods
depending on the specific digital
networking protocols in use.
In this example, the audio network is Networked Measurement Setup
using the Dante network protocol, and Dante
Virtual Soundcard has been installed on the computer, allowing Smaart to recognize the
virtual soundcard as an audio interface. The ability to analyze any signal on the network
provides extremely powerful measurement configuration possibilities.
© 2021 Rational Acoustics, LLC. All rights reserved.You can also read


