All Star Virtual Sampler Platter - Global Quilt Connection
←
→
Page content transcription
If your browser does not render page correctly, please read the page content below
All Star Virtual Sampler Platter
             Brought to you by the Global Quilt Connection
                            Sue Bleiweiss
                             Lyric Kinard
                              Mel Beach

                        October 2, 3-6pm eastern
   April Sproule Japanese Boro Style Patches, Stitching without a Hoop
            Brandy Maslowski Fibre Art Frenzy Wine Bottle Bag
  Candy Grisham Perfect Mitered Corners on Borders - Every Time Carole
               Lyles Shaw Pressing Secrets for Improv Blocks
    Daisy Aschehoug Simple Basting Yricks for Sewing Quarter Circle
                 Squares Jane Hauprich Free Motion Frolic
                Jane Haworth Abstract Animal Fabric Collage
          Jenny Kae Parks How Quilters Can Use the Color Wheel
           Tori McElwain Quilting Motifs - Design with Confidence

                        October 3, 3-6pm eastern
          Kena Tangi Dorsey Getting Started with Portrait Quilts
                 MJ Kinman Diamonds & Drama Queens
         Rhonda Denney You’re using WHAT to Color on Fabric?
                     Sandra Chandler Field of Denim
             Susie Monday Design Fabrics with Pattern Apps
             Tina Craig Improv English Paper Pieced Mug Mat
       Julia McLeod Ties to Quilting - Using Neckties in your Quilts
                Sarah Goer Cutting Tips for Improv Piecing
                  Lisa Walton Further Fusion Adventures

         www.globalquiltconnection.com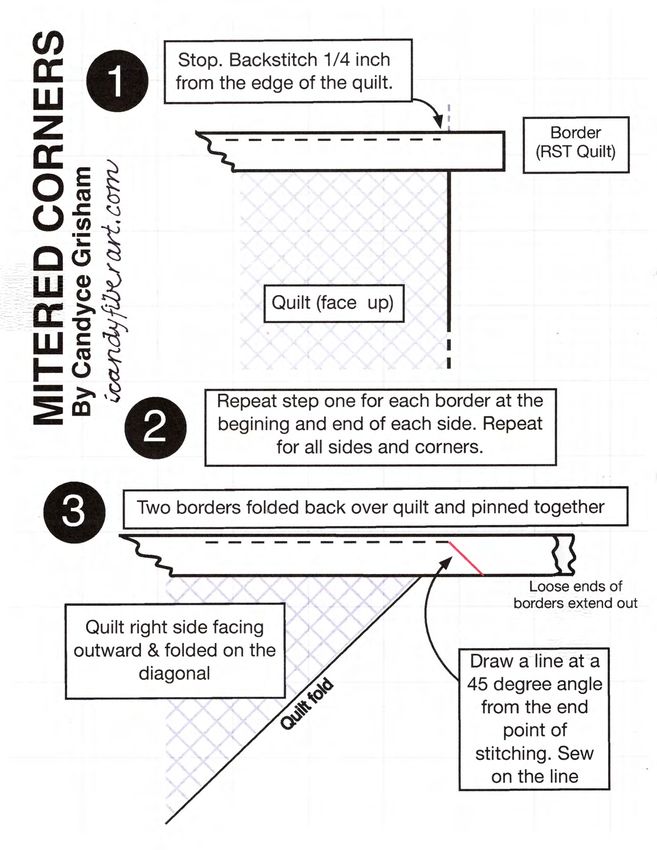
Japanese Boro Hand Stitched Patches,
                      Stitching Without a Hoop
                                                   with

                                     April Sproule
                                                                                           paint         stitch
                                                                                                   and
LINKS TO:                                                                                  WORKSHOPS

    Full Sized Ginkgo Pattern and Templates           I. Raw Edge Hand Applique
    Top 5 Basic Hand Embroidery Stitches              A. Trace template pattern pieces onto unwaxed
                                                      side of the freezer paper. Iron to back side of
    ALL WORKSHOPS / PRESENTATIONS                     applique fabrics. Don’t use freezer paper on pa-
      email: aprilsp@sproulestudios.com               per shapes. Trace the shapes onto paper from
                                                      the full-sized pattern instead.
                                                      B. Ginkgo Leaf: on right side of the fabric, trace
                                                      the leaf veins onto the fabric with a fabric marker.
                                                      C. Pin/baste the 3 shapes to the background.
                                                      Stitch down with the overcast applique stitch.

                                                      II. Stitching Without a Hoop
                                                      A. Stitch Tension: probably the most import-
                                                      ant thing to be aware of.
                                                      - Take a few stitches, gently smooth out your
                                                      fabric, make sure your stitches aren’t too tight,
                                                      but also make sure stitches aren’t too loose.
                                                      B. Stitch Density: the closer together your
                                                      stitching is, the more your work will tend to draw
                                                      up or pucker. It’s fine to have more stitching in
                                                      one area than another, but it still needs to be
I. Supplies:                                          distributed somewhat evenly.
•    DMC 6 stranded Cotton Embroidery Floss           C. Steam Blocking: this is the most import-
#732, Med. Olive       #3846, Bright Turquoise        ant step! Stitch a while, stop and gently steam
#165, Chartreuse       #3809, Dk. Turquoise           your piece from the back side. Never put pres-
#720, Burnt Orange     #3766, Lt. Blue                sure directly on the piece as this will flatten out
#349, Red              #3866, Soft White              your stitches.
#3765, Med. Blue                                      C. Working in Stages: think of stitching in
Fabric Markers:                                       stages where you outline your shapes, do basic
- Frixion Pens #31557 heat erasable                   stitching in different areas, and then start filling
- Stabilo White Pencil #8052, water erasable          in the details.
                                                                        - Mark a little
•    Background Fabric, 8.5” square
•    Ginkgo Leaf, 6”x 7” green fabric                                  - Stitch a little
•    Curved shapes, 7.5” square, fabric or paper                       - Steam a little
•    Hand embroidery needles, beeswax
                                                                          Repeat !
•    Black Ultrafine Point Sharpie for paper
•    Freezer paper, 9” x 12”

           W W W. S P R O U L E S T U D I O S . C O M
FABRIC & SUPPLIES                                                                                       Brandy Maslowski

   12” x 20” fabric base, 24” rib-
bon, strings or fibre for the bag
tie and embellishment. Also,
bring some fabric scraps bigger
than 5” x 8”to practice painting.

    Fabric paint, acrylic paint
with fabric medium or screen
printing ink.

    Recycled items that would make a good print including bottle caps, sponges, stick-
ers, lace, corks, rope, foam, or even an old potato masher.

    Masking or painter’s tape, a paint brush or foam brush, and a pencil and paper.

                      PAINT | EMBELLISHMENT | ASSEMBLY

1. CUT your fabric to 12” x 20” for the bag. If you have a directional print, the 20”
    length is top to bottom adn the top 4” will be folded inside and unseen. Note: The
    embellished (painted) area of the wine bottle bag will be between 3” and 8” from
    the bottom of the bag. (Optional: tape it out)

2. LAYOUT the fabrics, ribbons, yarns, paint bottles and any other embellishments to
    choose what pleases you most.

3. DRAW out a sketchy design you want to follow on paper.
4. STAMP and PAINT the area as desired. (practice painting on scraps first) Once it is
    dry couch on some beautiful yarn to complement the paint and add texture.
5. FOLD the bag lengthwise right sides together inserting the ribbon 9”- 10” down
    from the top. SEW the bottom and then the long side capturing the ribbon.

6. PULL the ribbon up so it is hanging out of the top of the bag.

7. CREATE a boxed bottom by folding the 2 corners in triangles and marking 1 1/4 in.
    MEASURE to be sure the bottom will be square. SEW on marked lines. SNIP off the
    triangles.

8. STUFF the ribbon into the bottom of the bag. (still inside out)

9. FOLD the cuff down 4” and remove the wide base of your machine to sew the cuff.
    Be sure the cuff measure 4” on both sides and lies completely flat. SEW the top edge
    (your bobbin thread will be on the decorative side). Then SEW a 1/4” seam al-
    lowance on the raw edge 4” in from the finished top of the bag, carefully turning it
    around your machine base.

10. TURN your bag right side out, CLIP all threads and VOILA! You have a lovely gift!

         C o p y r i g h t 2 0 2 1 Q u i l t e r o n F i r e | S u m m e r l a n d , B C | 2 5 0 - 7 1 8 - 1 7 1 8 | w w w. q u i l t e r o n f i r e . c o m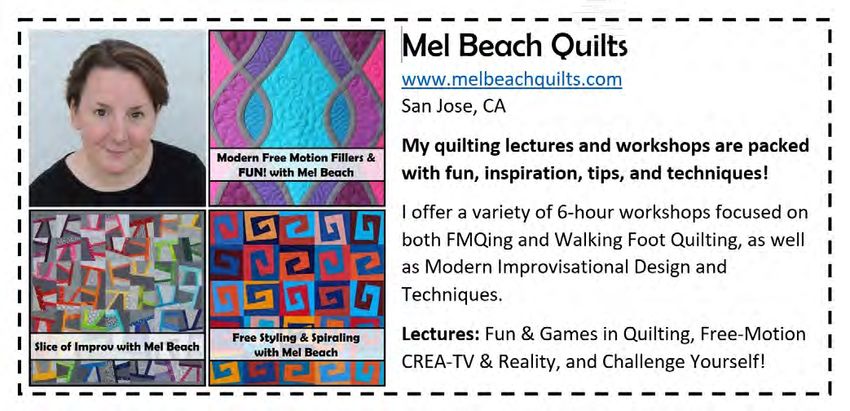
❖

❖
❖
❖

❖
❖
❖
❖

❖

❖

❖
❖

❖
❖
❖
❖

Three Ways to Sew Quarter Circle Squares
  with Daisy Aschehoug
                                                                                                                          Place under presser
  NO-BASTE METHOD                                                                                                         foot and align the
                                                                                                                          curved edge of both
  With the convex piece on the bottom and the concave piece on top (right sides                                           fabrics by hand as
  together), sew along the curve with a scant 1⁄4” seam allowance.                                  Convex                you slowly sew.

  IMPORTANT: If your seam allowance is too big, your block will finish too small.                                   Concave

  PIN-BASTE AND GLUE-BASTE METHODS

                                                                     1. Mark the center of both curves by folding the piece in
                                                                     half along the curve. Finger press a crease or mark with a
                                                                     pencil or chalk.
                                          Template B
            Template A

   2. Place the concave piece on top of the convex piece, right sides together. Line up
   the center creases.
    Third

                         First pin
                                          3. To pin baste, place a pin in the center creases. Place pins at either end. Fill in
                                          between with pins.

                                 Second

4. To glue baste, start at the center and apply a small line of glue on the convex piece. Press the concave piece into the glue,
starting at the center and working towards the edge. Apply another small line of glue, working from center towards the opposite
edge. Finish attaching the concave piece. Sew along the curve with a scant 1⁄4” seam allowance.

Download free 6” quarter circle square paper templates at https://warmfolk.com/collections/templates
Workshops, lectures, patterns, glue pens, acrylic templates - all avaailalbe at warmfolk.com!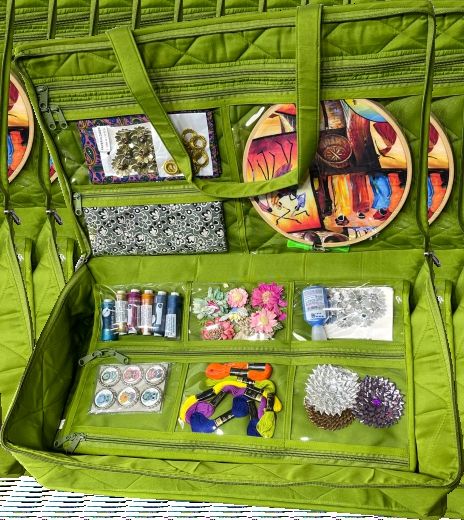
Free motion quilting tips and
                                       Free Motion                  Let’s open your eyes to expanding
tricks for designs that can give                                    ordinary designs to extraordinary
you a lot of freedom to play and           Frolic!!                 designs and having fun!!!
have fun!!                            With Jane Hauprich
                Key to free motion quilting is doodling!!! Get your pencils ready!!!

                                                                                         Check my
                                                                                         website for
                                                                                         upcoming
                                                                                         classes!!!

                                   Building a design in layers!!

 Website/Blog: www.stitchbystitchcustomquilting.com                   Instagram: @JaneStitchByStich
 Facebook: https://www.facebook.com/JanesStitchByStitch               YouTube: Jane Hauprich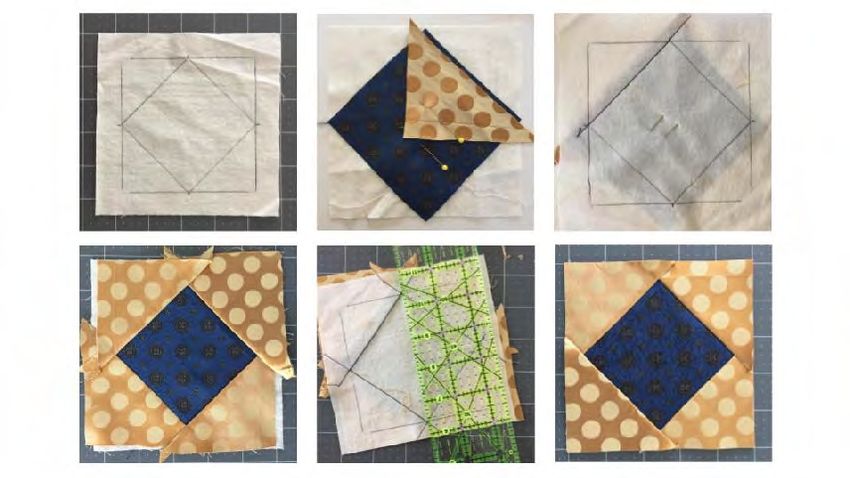
The Color Wheel - The Quilter's Secret Weapon
How to make your quilts pop, sparkle and shine!
With Jenny Kae Parks - Quilt Designer, Teacher and Video Host

                         The Color Wheel
                         The color wheel was discovered by Sir Isaac Newton when he tried to
                         bend rainbows. It is an explaination of the natural arrangement and
                         variety of color. You just can't do color better than nature.
                         The two ways to use color in quilts are harmony and contrast. Harmony
                         uses the blend of similar colors. Contrast uses the opposites. Harmony
                         gives the setting while contrast gives the spark.

                         Here are three color schemes you can use today.

                         Complementary
                         Complementary uses two colors on opposite sides of the color wheel.
                         For example - Red and Green.

                         Split-Complementary
                         Split-Complementary uses one color and the colors on both sides of
                         it's complement. For example - Orange and Green-Blue/Violet-Blue

                         Analogous-Complementary
                         Analogous-Complementary uses three to five adjecent colors and one
                         complement. For example - Blue-Violet/Violet/Red-Violet/Violet-Red
                         and Green/Yellow.

Things to remember -
  It is not a rule you must obey. It is a guide, an inspiration.
  Contrast will give your quilts pop and life.
  Lights, mediums, darks and brights will make your quilts sparkle and shine.

"Thank you" gift - Save 25% off The Quilter's Color Course AND my favorite color
wheel. Use coupon code GQC2521. Valid until 10/11/21.
                                  www.JennyKaeQuilts.com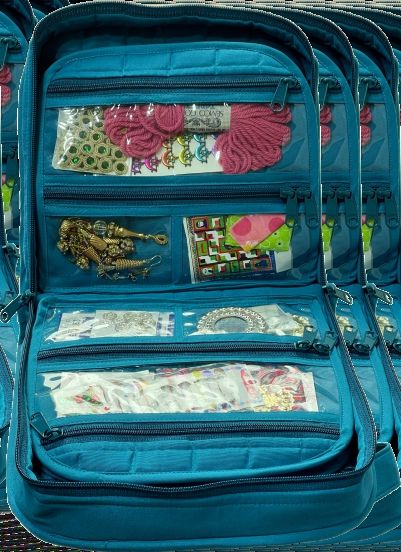
Tori McElwain
                                                                                        www.TheQuiltPatchByTori.com

                                        Quilting Motifs: Design with Confidence
         Harmony and Contrast: How to pick your quilting motifs block by block with the whole quilt in mind.

Designing your quilting
should be fun! Let me help       Look at the movement in the block: is it geometric? With strong shapes and lines? Is
you break down the               it more flowy or organic with a swirl? What stands out to you? It’s all about personal
process of choosing your         preference, be sure to pay attention to what you like in the quilt design.
favorite quilting motifs or
designs using harmony
and contrast.                                       Harmony: Blending in!
    A harmonizing quilting design compliments the quilt and can disappear into the
                      background or is only noticeable up close
    • Echo the design
    • Match the movement in the quilt pattern (i.e. swirls with swirly blocks, lines
        with squares)
    • Lines are also harmonious with points

                                                             Contrast: Standing out!
                          Adding an extra layer to the quilt design. Contrast is seeing the movement and doing the
                                                                opposite effect.

                         •      Soften points or lines with a flowy motif or curves such as orange peels, loops, or
                         swirls
                         •      Add structure with lines for a swirly or twisting block

                                            With the Whole Quilt in Mind:
 How will this look when you step back and see the full quilt? For example, swirls or meander (stipple) flow
 through the quilt, lines can break the quilt into sections, or an orange peel design in geometric shapes can add
 softness and allow each block to stand out on its own.

                              A few notes to keep in mind:

     •     For custom quilting, choose 2-3 motifs for the overall quilt design
     •     Thread color – what blends in best with the colors in the fabric? Or
           for some contrast, what color could be brought out?

  If you’d like to dive in deeper, I offer in person and virtual workshops for individuals and Quilt Guilds. See all
             the information for upcoming workshops on my website at www.thequiltpatchbytori.com .

                                     @quilt_patch                  The Quilt Patch by Tori
HAND CRAFTED EDUCATORS & QUILT GUILDS
&FAIRLY TRADED
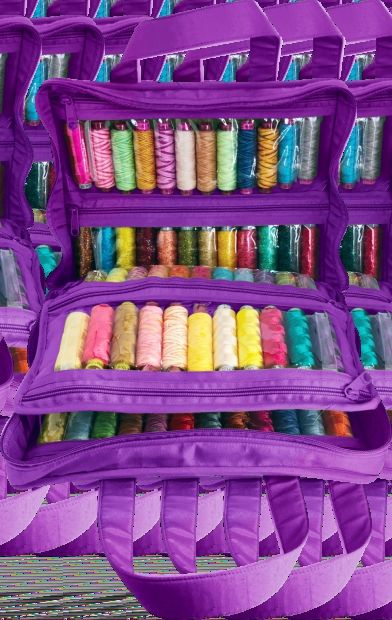
WELCOME TO YAZZII CRAFT BAGS
SKU#
Mini C: 14
Ogran raft
iz
(Large er
)
10% DISCOUNT
OFFER
SKU#: 140
All CLICK HERE Oval Craft Bag
ii Carry-
Yazz SKU#: 120
SEE OUR FULL RANGE
SKU#: 340
4 Pocket SKU#: 635
Organizer
100+ Ultimate
Thread Organizer
INSPIRATIONAL
IDEAS FOR
YAZZII BAGS
Designed in Australia
Accessories not included
/yazziicraft /YazziiCraftBags /yazziicraftbags /yazziicraftbagsEmail: kena@kenaquiltstudio.com
Website: www.kenaquiltstudio.com
Facebook & IG: @kenaquilts
Learn How to Make Raw Edge Appliqué Portrait Quilts with Kena!
DESCRIPTION: Learn an easy method of raw edge appliqué using a template from my pattern “Garden
Window”
FABRICS NEEDED:
● 1 Fat Quarter - Background Fabric for Appliqué
● 10” square - Fabric for hair
● 10” square - Fabric for face and neck
● 10” square - Fabric for shoulders
● 2 ½” square - Fabric for eyelashes
● 2 ½” square - Fabric for lips
SUPPLIES NEEDED:
● Appliqué Template (included with pdf)
● Two-Sided Paper-backed Fusible Web (such as Steam-A-Seam 2 or EZ-Steam II)
● Pencil, Eraser and Sharpies
● Light box or Backlight from a window in your home
● Tape - Painters/Masking or Scotch
● Sharp fabric or appliqué scissors AND regular scissors for cutting paper
● Sewing pins
INSTRUCTIONS:
● Print out a copy of the attached appliqué template. (Use lightbox or window for next step)
● Turn over the printed out image then re-trace it from the “wrong-side of the copy onto one side of a
paper-backed fusible web sheet (You can tape to a window if not using a lightbox)
● Remove the paper-backing from the opposite( non-traced) side and position the fusible web
adhesive on the “wrong-side” of each of your fabric selections for your appliqué
● Cut around each shape of the appliqué designs along the traced lines.
● Arrange the cut out pieces on to a background fabric to “audition” the placement you want
● Once you are satisfied with the layout, peel off the remaining paper to expose the “sticky” fusible
web that is on the back of the appliqué and place the shapes in the arrangement that you like – it
will hold temporarily until you are ready to iron it down permanently.
*Enlarge to fit on letter
size copy paper and
printMJ Kinman presents
Dancing with Diamonds:
An Introduction to Piecing with Freezer Paper
Hello! Supplies
I like to say I make the biggest Freezer paper (4 sheets) -- Sourcing options are discussed
diamonds in the world, but instead of in the PDF instructions
using the hardest substances on Printer (either at home or at a copy/office supply center)
earth, I use the softest -- fabric. Regular copy paper
Highlighters (2 in different colors)
Join me on October 3, 2021, at the Double-sided tape or Washi tape
Global Quilt Connection's All-Star
Rotary cutter and mat (you may want 2 rotary cutters; 1 to
Sampler Platter as I demonstrate the
cut freezer paper and 1 to cut fabric)
technique I've been using for over
12" ruler with 1/4" seam measurement
25 years to create my giant gem
Basic sewing supplies, including seam ripper and tweezers
quilts -- traditional piecing using
Fabric marking tools
freezer paper as templates.
Basic sewing machine
The Technique
Summary of Instructions
Learn to use freezer paper to
create my sparkling dancing 1. Print pattern on freezer paper & regular copy paper.
diamond "En Pointe". 2. Select a range of fabrics for your gem.
If you can put two pieces of 3. Cut apart freezer paper "facets" & sort by color code.
fabric with right sides together, 4. Iron freezer paper facets to the RIGHT side of fabric
YOU CAN DO THIS! leaving a 3/4-inch gap between the facets.
The Pattern 5. Cut out facets with a quarter-inch seam allowance around
each edge.
My "En Pointe" pattern has only 6. Sort by section code and arrange facets in piecing order.
13 pieces, a perfect way to learn
7. Using the "Piece Plan" as your guide, sew fabric facets
how to use freezer paper
into units using hash marks to ensure alignment.
techniques.
CLICK HERE to download the
8. Sew facets together with a seam allowance that's just a
free pattern from my website. needle-width shy of a quarter-inch to avoid catching the
freezer paper on the inside of the fabric sandwich.
9. Open the unit and press seam to the side that allows the
fabric to lay the flattest on top. If no difference, press to
the dark fabric.
MJ Kinman, Textile Artist
Email: MJKinman709@gmail.com
Cell: 502-287-3034
Website: www.MJKinman.com
Louisville, KentuckyYou're using WHAT to Rhonda Denney - Cap Rock Inspirations, LLC
color on Fabric!?!
Website: www.RhondaDenney.com
Email: Rhonda@RhondaDenney.com
Facebook: Rhonda Denney - Pigment Patchwork
Instagram.com: rhondadenneypigmentpatchwork
Makeup? On fabric? Yes! It is basically pigment! Repurpose old makeup to create unique,
one-of-a-kind greeting cards, or a framed piece of art!
1. Use a pattern or just draw freehand. I am using my Butterflies pattern. You
can get a free PDF of this pattern by going to my website
RhondaDenney.com.
2. Cut a piece of pre-washed fabric (light color is best) to fit your pattern. To
stabilize the fabric for coloring I use a piece of Freezer Paper (FP) cut to
size. Iron the fabric to the shiny side of the FP until it is secure.
3. Transfer the pattern to the Fabric/FP. I recommend using a fine-tip pencil.
Make your lines light to minimize them showing through on your final
results. You decide what lines to transfer.
4. Gather up any face pigments (make-up) - samples, outdated makeup or
leftovers. Decide a color palette or just “go with the flow”!
5. Use make-up brushes/ applicators to color on the surface of the fabric
(you may want to test colors on a separate piece of fabric first). Use other
pigments to enhance your design. Careful! Not too thick.
6. Have fun!
7. Use a hot iron (no steam) to set your colors. Use Parchment Paper to
protect your ironing surface & iron. Use paper towels/ paper on top to
absorb extra pigment and wax (most make-up is wax-based).
8. Add more pigment and iron to add more color.
9. When complete,
trim and glue to cardstock to make a beautiful one-of-kind greeting
card, or
sandwich and add stitching and edge treatment to make a unique small
quilted piece.
10. I do not recommend washing these; only spot cleaning if necessary.
Rhonda Denney is a fiber artist, coach and teacher of her techniques called
Pigment Patchwork. She offers in-house & Zoom-based presentations and
workshops to groups & guilds. See her website www.RhondaDenney.com
for info and details.
All-Star Special!
Rhonda now offers a unique multi-platform training experience that
10% Discount on Rhnda's 8-wk Get
supports your own busy schedule, using her Pigment-Patchwork
application! If you are interested in learning to color on fabric using Pigment Confident (GPC) Challenge for
pigments, Rhonda’s 8-wk Get Pigment Confident (GPC) Challenge is just the All-Star Sampler Teacher Event
ticket! To learn more go to www.RhondaDenney.com. To see if this participants from now to December 1,
Challenge is right for you, Click here. 2021. Mention the code ALLSTAR. Fill
To sign-up for Rhonda's newsletter click here. out an application here.Sandra Lee Chandler
Field of Denim All-Star Sampler
Field of Denim Demo
1. Collect your denim jeans
5. After removing the belt loops you need to
now use your seam ripper to remove the
stitching from waistband top
2. Remove belt loops
6. Press the waist band
3. Start deconstruction of your jeans at the
waistband near the buttonhole
Supplies:
• Garments like jeans or pants to deconstruct
4. I like to use my seam ripper, but you can all
• Seam Ripper
so use a rotary blade to remove your belt
• Rotary Blade
loops
• Iron and Ironing Board
www.sandraleedesign.com sandraleedesign@gmail.comDesign Fabrics with Pattern Apps Susie Monday For Guilds: http://susiemonday.com/#/workshops/ For individuals: http://susiemonday.com/#/online-courses/ This short demo highlights just one of the many skills included in my online iPad courses, in featured presentations and for guild lectures and workshops. Learn to design original repeat patterned fabrics starting with photos or drawing with inexpensive apps on an iPad or other tablet. Upload to Spoonflower or another POD site for yardage printed on a variety of textiles -- or use your own inkjet printer. Use apps to design repeats, kaleidoscopic images and grid collages. Email susiemonday@gmail.com for coupon discounts for my individual courses. Pattern apps to try: Some of the apps listed below are Apple only (IOS) but others are also available at Google Play Store -- search by app name. THese are all tablet or smart phone apps, but some may have desktop versions. Many of these are free or very low cost, although more and more apps are now being offered on subscription basis. Try the free and inexpensive ones first! Grid Collages: Pixlr -- mobile app PicCollage SplitPic Kaleidoscopic Effects and Other Symmetries: Doodle Dandy iOrnament KaleidoFree Kaleidomatic Design Repeats and Other Patterns: MegaPhoto Panographic Photo Many of these apps have instructions in their HELP menus. Some are quite intuitive; others not so much! More help can be found on YouTube, Vimeo or developer sites -- just search by app name. My online courses (individual online and group workshops) include detailed tutorials for many of these and other apps.
Improvisational
                                                         English Paper Pieced
                                                               Mug Mat
                                                            with Tina Craig
                                                         Seaside-Stitches.com

Supplies
Paper: 1 page of medium weight
        card stock
Fabric: Scraps, strips, pre-cuts for front
        9” X 12” for backing
        9” X 12” piece of batting
        (1) 2.25” strip for binding
Hand-piecing needles: Milliners or straw
        needle, size 10 or 11
Piecing thread: I prefer Superior bottom
        line 60wt polyester
Fabric glue pen or washable glue stick
Scissors for paper, fabric and thread
Colored pencils (optional)

How To
1) Use the full sheet of paper or trim to the desired finished size such as 5” X 7” or 8” X 10”.
2) Draw a few lines across the page in a random pattern, at various angles. Your lines don’t
    have to be straight! If you have some EPP experience, try some gentle curves!
3) Color in the shapes (optional).
4) Number the shapes and take a photo of your design for reference.
5) Cut apart the shapes with paper scissors.
6) Cut fabric to fit each paper shape, adding 3/8” seam allowance to each side.
7) Baste fabric to each shape, either with stitches or glue.
8) Stitch together the shapes using your favorite EPP stitch.
9) Remove papers and press.
10) Layer quilt top with batting and backing and quilt as desired.
11) Add binding and a label.
12) Post a photo to Instagram any Monday. Tag @seasidestitches and use #MugMatMonday.

     Please visit my website for more information and to subscribe to my monthly newsletter.
                  Use code ALLSTAR25 to receive 25% off my on-demand EPP class!
                                      Seaside-Stitches.com

                           ©2021 Tina Craig - For Personal Use Only
Julia McLeod
Piecing with Necktie Silks GQC Sampler October 2021
Neckties can be found in plentiful supply at thrift stores and in the closets of the men in
your life. Get a handful together in colors you love and piece something beautiful!
My ‘Three Ss of Quilting with Silk’ are as follows:
• Seam Allowance - use a larger one than you would typically - ½” is good
• Stabilize silks with iron on fusible - Pellon 880F, P44F or Quilters Select Fabric Prep
• Support your blocks with a leave-in fabric foundation
You can purchase pre-printed foundation fabrics: Benartex’s Foundation by the Yard
is printed onto muslin. A lighter weight product is made by EZ Piecing
You can draft foundations yourself, as in today's demo of this 6” Diamond in the Square
1.In the center of a 5½” square of muslin, using a ball point pen, draw a 4” square. Mark the centers of
each side of this square and join those points to create a diamond in the square.
2. From your silk fabrics, cut one 3 ½” square for the center. Cut two 4” squares and slice them
diagonally to make four corner triangles.
3. With the ink side of your foundation face down, preferably on a white surface, pin the center square
of silk in place. Position the first corner triangle as it’s going to appear in the finished block then,
‘hingeing’ along the sewing line, turn it face down and pin. Flip the whole block over and sew from the
inked side of the foundation.
On the right side, fold the corner triangle back and press. Repeat for the other three corners. Trim your
block to 5” by adding a ½” seam allowance on each side.
Contact me to find out more about my lectures and workshops!
www.JuliaMcLeodQuilts.com 925 360 3298 juliamcleodquilts@gmail.comCutting Tips for
Improv Piecing
with Sarah Goer
1. Stack three fabrics, a light, a medium, and a
dark.
2. Cut the stack. (This is improv, this cut can be
anywhere, made with or without a ruler.)
3. Still in stacks, cut one section into two.
4. Rearrange the pieces in your stacks. Leave one
stack as is. Move the top piece to the bottom in
the next stack. Move the top two pieces to the
bottom in the third stack.
5. Sew together your first seam. (This will be the
last cut you made.) Trim edge straight if need-
ed.
Tools and Supplies:
6. Sew the final seam together. Repeat for other
• fabric (large scraps or larger)
two blocks. Trim up your units into same-sized
• rotary cutter and mat
squares or rectangles for ease of piecing to-
• acrylic ruler
gether.
1 2 3 4 5 6
Tips:
• Your starting fabrics don’t need to be the same exact Sarah enjoys teaching Planned
size, as you’ll trim down your final units.
• Use the same number of fabrics as you have pieces in Improv piecing without any specialty
your finished block for the most visual interest. tools. She is available for live pre-
• Use a variety of values (light, light-medium, dark-medi- sentations and workshops on Zoom
um, dark) for the most dynamic composition. for guilds and groups. Read more at:
• Your cuts can be done freehand or with a ruler. www.sarahgoerquilts.com/teaching
• Play with the layout of your final units, both in position
and orientation.
• Try again with a different number of pieces or a different 20% off for on-demand classes for
style of cuts. individuals through Dec. 1, 2021
• Consider using gentle curves. with code ALLSTAR:
www.sarahgoerquilts.com/classes
Stay up to date with Sarah and
Sarah Goer Quilts enjoy color and design inspiration by
sarahgoerquilts@gmail.com subscribing to Sarah’s newsletter at:
www.sarahgoerquilts.com eepurl.com/dhaqI9
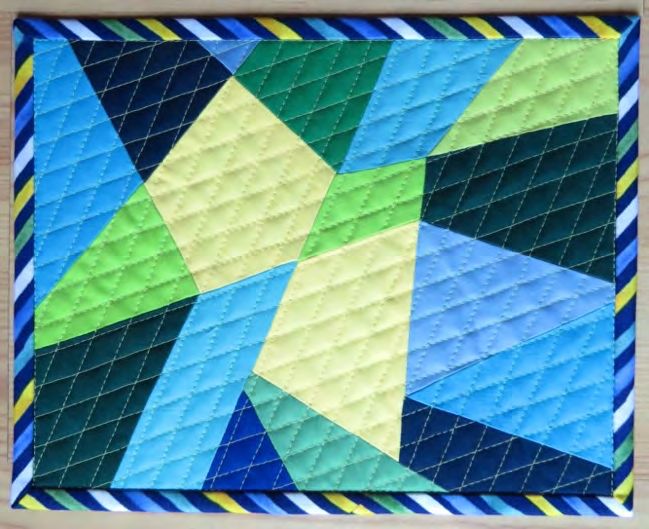
bold color. geometric design. inspiration. (note: that’s a capital i before the 9)Lisa Walton – Sydney Australia
FURTHER FUSION ADVENTURES
This sample was created with a panel made in Lisa’s FANTASTIC FUSION class.
All the fabric has been cut freehand and then fused into blocks which are then combined. It can
also be made with interesting multicoloured, painted or dyed fabric.
Batiks and hand dyes are most suitable.
●Select an interes,ng mul,coloured piece of fabric 16” square & fuse the back with
fusible web – Mistyfuse or WonderUnder
●Cut 4 x 2” strips & crosscut into 2” squares (total 32 2” squares)
●Cut 4 x 4” strips & crosscut into 4” squares (total 16 4” squares)
Note – these measurements are just examples, and you can pick any size or shapes such
as rectangles or diamonds
●Cut diagonally across each square
● On background fabric draw a grid of 2” squares with light pencil or
erasable pen & using that as a guide layout the triangles in a pleasing design
●When you are happy with the design, iron the fused pieces into posi,on &
add baNng and wadding & quilt
This project was created as a further development in Lisa’s Fantas,c Fusion workshop which requires no sewing
and is an exci,ng and freeing way to create unique and original quilts.
Here is a link to the full selec,on of Lisa’s Workshops and Lectures - hWps://lisawaltonar,st.com/workshops/
Lisa currently has two lectures & three available in person online workshops including Fantas,c Fusion as well
as Beading Embellishment and Photo to Quilt.
Fantas,c Fusion is also available as an On Demand workshop for those who wish to do it at their own pace.
This project can also be seen on Lisa’s YouTube Channel along with her popular Quilt Stories
Lisa Walton
www.lisawaltonar,st.com
lisa@lisawaltonar,st.comThe Global Quilt Connection Team
You can also read