2010 Subaru Outback and Legacy Navigation Hacks
←
→
Page content transcription
If your browser does not render page correctly, please read the page content below

2010 Subaru Outback and Legacy Navigation Hacks
§ Control lockout override via grounding of unused e-brake input
§ Rear camera input switch
DISCLAIMER: Anyone following these instructions is doing so at their own risk
and agrees to not hold me liable for any damage caused as a result of
reproducing my experiences that I am documenting here for your reference only.
Parts needed:
For lockout override:
§ CD-ROM internal analog audio cable
For rear camera:
§ 16 or 18 gauge copper stranded automotive grade wire
§ (2) Vampire taps for 16 or 18 gauge wire
§ Push-button automotive switch (Pep Boys: Pilot Automotive P/N PL-SW28B $5.99 – Note: I found this
in the mods section of the store, not the electrical parts)
http://www.pilotautomotive.com/distributors.aspx
§ (3) butt connectors or wire nuts suitable for joining 2 16/18 gauge wires
§ Electrical tape suggested to strap wires to prevent vibration
Tools needed:
§ Philips screwdrivers, #1 and #2 (one regular length and one long-shaft #2 Philips is helpful)
§ Trim pull tool, or small plastic chisel/scraper, or rubber coated flathead screwdriver
§ Voltage/continuity meter is helpful
§ Painters tape and towels to protect car
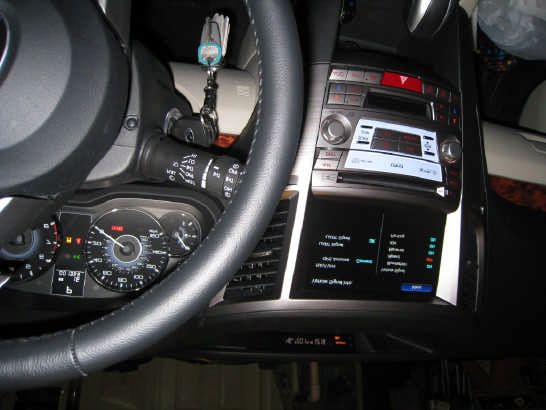
PART 1: REMOVAL OF BEZEL
Subaru’s instructions indicate that the bezel can be removed by hand. No one on any message board seems
to be able to do this. The solution many have found is to use a trim removal tool. I bought a cheap one at Wal-
Mart and quickly found that any small plastic chisel or rubber-coated screwdriver will do. The trick is to get just
enough leverage using the tool from inside the vents to pop off the corners. Using your fingers just isn’t quite
enough.
As you can see, I did use a cheap trim
removal tool, but found using the stubbier
end worked better for me.

Insert any kind of soft (plastic or rubber) tool
with a thin edge into the vent and feel for the
lip underneath.

The hardest part is to get the willpower to
give it a good, firm yank towards you. Every
time I pulled off another section, I swore it
was going to break in half.

…But I took my time and it didn’t.

Reference the drawing above to see the
locations of the actual latches (dotted
circles). Once you get the first corner out,
the rest gets a lot easier.
Use your hands and fingertips to yank out
across the top and into the other corner.

Then use both hands to pull out both sides
while working your way down toward the
climate control.

I found using the trim tool helpful as shown
here for gently prying as I got closer to the
bottom.

Note the painters tape in the photo, as
recommended by Subaru, along the side of
the gauge cluster to prevent scratches.

When you pry up into the vent, you might
pop out the vent assembly from the bezel,
like I did.

Don’t panic. Reassemble by inserting the
fingers at the top to the inside of the slots
(both circled) in the vent assembly. Then
everything just snaps back in.
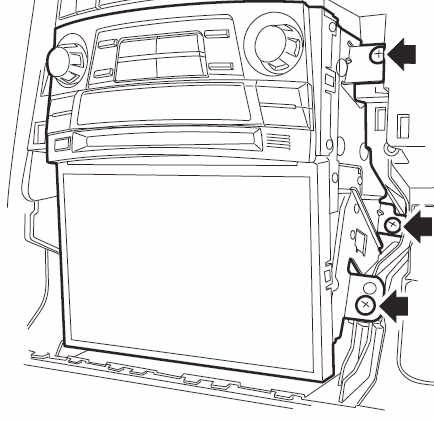
Here’s what the bezel looks like from the
inside. The yellow areas are the snap-in
fasteners that you worked so hard to remove
in the steps above.

Next step below: Remove the 6 screws that
hold in the assembly. The middle ones are
recessed pretty far back. I suggest a long-
neck Philips screwdriver and/or magnetic bits
to remove them.

Before pulling out the nav unit, pile up towels in the
center console up to the level of the climate control,
so the nav has somewhere to rest.

You may also wish to first apply painters tape onto
the front of the climate control and work it into the
crevice above.

Pull the nav straight out, be careful not to scrape it
against any trim. There is very little travel with the
harnesses in the back; you will only be able to pull
it out about 2 inches beyond the front of the dash.

While pulling it out, try to put a towel under over the
top of the climate control if you didn’t already put
painters tape there. (I scraped a small chip in mine
by not doing this at first.)

PART 2: HACKING THE NAV CONTROL LOCKOUT BY GROUNDING THE
UNUSED E-BRAKE INPUT
With a CD-ROM internal
analog audio connector, use a
small screwdriver to pry the
plastic clip in the connector up
so you can slide out one
connector pin and wire. Strip
down the casing 6-10” and
cut. Discard the rest of the
CD-ROM cable. All you need
is what is shown in the picture
on the far right.

In the green connector shown, push the end
of the CD-ROM wire with the connector pin
into the unused hole (pin #2 on connector
i145) between the Green and the
Brown/Yellow wire. Keep pushing it in until
you feel it firmly engage with the pin from the
nav. It may take a few tries to align it right.
You’ll know when you get it, you’ll feel a firm
engagement, and it won’t slide out easily if
you give it a little tug.

On the other side (the passenger side of the
car) there is a large black ground lug
(circled). There is a small screw holding it on.
Use a #1 Philips to loosen the screw. Strip
the other end of the CD-ROM wire and tuck it
behind the plate that the screw is holding on,
then retighten.

Key on the ignition to get the nav to boot up.

Switch to the audio screen and make sure the audio
power is off so you see the black screen that says
“Audio Off”. The following will ONLY work on
that exact screen.

Now touch the far left of the screen (vertically
centered), then the far right. Repeat left, right, left
right. After the 6th touch, you’ll see the diagnostic
menu.

Press the Vehicle Signal Info. If you see “ON” for
Parking, congratulations, you’ve just hacked your
nav!

Proceed to reassemble your nav and bezel OR proceed on to Part 3 if you want to
hack the rear camera.
PART 3: REAR CAMERA INPUT MANUAL OVERRIDE
When the nav receives a 12V signal from the reverse lights, it overrides all other visual functions and displays
the image from the rear camera. This hack gives you the ability to introduce a 12V signal at any time causing
the rear camera image to be displayed immediately, which is useful for checking your parking position or
glancing behind you when you are towing.

NOTE: There is a somewhat undesirable side effect: since the override is done by splicing 12v into the reverse
light input, switching into rear camera mode when in park, drive, etc. causes the backup lights to turn on!
While this would limit the practicality of this function driving down the highway (say to check on your trailer), it
actually helps if you want to see your position in a dark garage or a pull-through parking space at night since
the reverse lights illuminate the camera image.

Another side-effect is that when you are actually in reverse, the light on the pushbutton switch illuminates,
since the lines are in parallel. It’s actually kind of cool.

This is the most difficult part that I experienced. You need to install a vampire tap into the Yellow/Red wire*
(Pin #3 on connector i144), but the harness is heavily wrapped in electrical tape with metal shielding under it.

* I chose this wire because I confirmed it is a 12v ignition-switched source. You are free to use a different wire if you know a 12v source
to tap into, just make sure it is not a constant-power on source or else you risk draining your battery if the button is pressed while the
car is off (reverse lights would be on!)

Cut away just enough of the tape and shielding to be able to slip on the vampire tap. I found the cluster of
wires to be very tight and had to work at it for a while.

Into the other half of the vampire tap, insert an unstripped 16/18 gauge wire, at least 2 feet long. Crimp the
vampire tap and make sure it’s strong and clamped together properly.

The first tap described above is shown circled on the right (below the overexposed connector).

The second tap is on the green connector, the same one that you hacked above. (You will need to temporarily
remove the CD-ROM wire and the green connector itself to perform this step.)

In the green connector, tap into the Brown/Yellow wire (Pin#3 Connector i145). This wire is the 12V input from
the rear reverse lights. Into the other half of the vampire tap, insert an unstripped 16/18 gauge wire, at least 2
feet long.

I suggest using a different color than the first tap, or at least label the other end of the wire, as you need
to tell these apart after you fish them through the console.

Not shown in this picture – Cut a third wire (suggest black) of approx 2 feet in length which you will tap into the
ground lug behind the nav, the same ground as the control lockout override wire.

Behind the gear shifter, pull up and out
the textured rubber mat from inside the
cubby. It comes out easily by prying the
edge up with your fingernail or a flat tip
screwdriver. (TIP: This is also a good-to-
know to make it easy to clean the mat
when it gets dirty.)

By removing the mat, you will expose a
large opening from which you can easily
access underneath the console without
further removal of components.

Fish a long wire (red wire shown here)
under the console and push it back
towards the firewall.

Then, from behind the nav unit (which is
pulled out), reach your arm down the
large cavity to find the fish wire and pull it
up.
Attach the fish wire in any way you desire
(shown here with a large wire nut) to
three wires, for a total of four wires
attached together:
    1) The 12v wire tapped into
        Brown/Yellow
    2) The wire tapped into the reverse
        signal line
    3) The third wire which you will tap
        into ground. (Hard to see here,
        but I used a black 18 ga wire for
        this; it’s behind the red wires in
        the photo.)
    4) The fish wire

Carefully pull the wires down through the cubby slot. Trim off the
excess length of wire so there’s only about 6” or so of slack.

Attach the 12v power wire to the red wire on the pushbutton
switch.

Attach the wire from the reverse signal wire to the white wire
on the switch.

Attach the ground wire to the black wire on the switch. At this
time, make sure you have attached the other end of the
ground to the ground lug behind the nav, the same ground
as the control lockout override wire.

As shown here, I secured the wires with wire nuts reinforced
with electrical tape. It’s probably more appropriate to use butt
connectors. I suggest consulting with an automotive expert.
Bundle the 3 wires with electrical tape if
desired, to keep them from rattling around
under the console, then tuck them down into
the console so only the black switch wire is
sticking out.

I suggest you push the wires towards the
passenger side, so the gearshift plastic shield
does not interfere with the wires. (You will be
able to see the shield looking down through
the slot.)

This is the tricky part that takes a little
finessing—run the black wire under the
rubber mat and attempt to leave just enough
wire exposed so that you can wrap the wire
under the switch housing, which in turn holds
down and hides the protruding edge of the
rubber mat.

The switch has an adhesive backing. Adhere
it as shown here. If you did as good a job as I
did, you will barely be able to see any visible
wire protrusion and you will have succeeded
at making this mod with no drilling or
cutting. Congratulations!

When you push the button (with the car running or with the ignition on Accessory),
the switch will glow blue and your reverse lights will illuminate. Use this feature
sparingly while driving to avoid alarming other drives (TIP: I plan to also use it
to warn tailgaters!)

It will also glow blue when you place the gear selector in reverse, since it is picking
up the 12v from the reverse light.

Here you can see in the
orange circle that I am
in Park.

But as shown in the
diagnostic screen, both
“Reverse” and “Parking”
say “On” as a result of
the mods performed
here.

Down in the green
circle, you can see the
switch, which is
activated (hence
“reverse on”) with the
faint blue LED visible
(washed out by the flash
– it’s actually much
brighter; see close-up
on previous page.)

Final Notes:
² The most useful benefit of the nav control override hack is that you are now free to change iPod album
  selections while in motion, beyond changing tracks within a Playlist. The inability to jump from album to
  album while driving made the iPod interface absolutely worthless in my opinion. And since the USB flash
  memory interface (not to be confused with the iPod interface) only lets you see albums in the order they
  were saved to the memory, it’s archaic trying to find anything if you have more than a couple dozen
  albums, especially since it doesn’t let you sort by artist or album. If you do this hack and you were using a
  USB flash drive – get an iPod, you’ll be happy!
  o FYI, I bought a used 30 GB iPod gen 5 on eBay for $70. I now have 250 albums tucked away in my
      armrest, accessible at any time by artist, album, genre, playlist, etc.

² As a result of losing power to your nav, it will lose your radio presets, all of you nav preferences, and your
  currently selected destination state.
  o It will remember your Bluetooth settings, phonebook, speed dial list, and all of your custom points of
      interest. (Whew!)

² I spent about 4 hours physically in my car to do all of the above, but it included a lot of testing and
  research. If you follow this guide, expect to be able to accomplish it in about 2 hours or even less.
  o If you’re just doing the control lockout override hack, figure on 30 minutes. Heck, I could do that now in
      10 after doing it once – pop off trim, remove 6 screws, insert CD-ROM wire, connect to ground lug,
      reassemble, done!

² I spent about 5 hours creating this document for other Subaru enthusiasts. I hope it is appreciated.
  Please spread the word so my efforts weren’t in vain.
You can also read