WEASEL LITE User Manual - SSI Schaefer
←
→
Page content transcription
If your browser does not render page correctly, please read the page content below

WEASEL® LITE
User Manual

Weasel® Lite User Manual

   Created by                Dennis Chong
   State                     Final
   Approved by               Markus Külken
   Approved on               2021-03-29

 Fritz Schaefer GmbH
 Fritz-Schaefer-Str. 20
 57290 Neunkirchen/ Siegerland
 Germany

 Phone +49 (2735) 70-1
 Fax: +49 (2735) 70-396
 info@ssi-schaefer.com
 ssi-schaefer.com

 © 2021 SSI SCHAEFER, all rights reserved

 This publication may neither be reproduced, transmitted nor stored in a retrieval system, including but
 not limited to, written material, printed matter, punch cards, film, microfilm or microfiche, magnetic tapes
 or discs or any other electronic media form including optically readable tapes or discs, laser discs, and
 any other form of computer storage, without the prior written consent of SSI SCHAEFER.

 Disclosed matters and/or concepts of the present documentation are or will be protected by intellectual
 property rights.

Weasel® Lite User Manual                                                                                  2/33
Weasel® Lite User Manual

 Contents

 1       Let’s get started ............................................................................................................................. 4
         1.1 Further information ................................................................................................................ 4

 2       About the travel path ..................................................................................................................... 5
         2.1 Material flow planning ........................................................................................................... 5
         2.2 Planning your travel path ...................................................................................................... 6
         2.3 Tracks ...................................................................................................................................... 9
         2.4 Markers.................................................................................................................................. 12
         2.5 Stations ................................................................................................................................. 15
         2.6 Station groups ...................................................................................................................... 20

 3       About the app ............................................................................................................................... 21
         3.1 Installation ............................................................................................................................ 21
         3.2 Use ......................................................................................................................................... 21
         3.3 Configuration ........................................................................................................................ 22
         3.4 Defining actions ................................................................................................................... 22
         3.5 Triggering actions ................................................................................................................ 23
         3.6 Service function ................................................................................................................... 23

 4       About the vehicle ......................................................................................................................... 24
         4.1 Components ......................................................................................................................... 24
         4.2 Conditions of use ................................................................................................................. 25
         4.3 Localization and navigation ................................................................................................ 25
         4.4 Communication .................................................................................................................... 25
         4.5 Battery ................................................................................................................................... 26
         4.6 Charger.................................................................................................................................. 26
         4.7 LEDs ...................................................................................................................................... 26
         4.8 Commissioning .................................................................................................................... 27
         4.9 Operation .............................................................................................................................. 28
         4.10 Troubleshooting ................................................................................................................... 29

 5       About transfer stations ............................................................................................................... 31
         5.1 Tracks .................................................................................................................................... 31
         5.2 Markers.................................................................................................................................. 32
         5.3 Assembly .............................................................................................................................. 32

 6       About extensions ......................................................................................................................... 33
         6.1 Weasel® Classic.................................................................................................................... 33

Weasel® Lite User Manual                                                                                                                                 3/33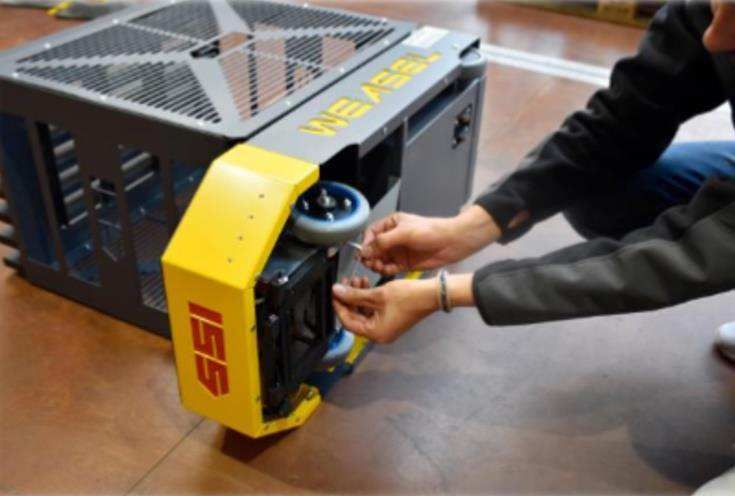
Weasel® Lite User Manual
1 Let’s get started
Congratulations on the purchase of your Weasel® Lite system. As an Automated Guided Vehicle system,
Weasel® Lite will enable you to automate your transport tasks without having to think about IT, such as
servers and WLAN. You will only need:
A travel path consisting of tracks and markers to define where the Weasel vehicles drive, and which
rules apply.
A tablet (or smartphone) at the stations to instruct Weasels via the Weasel ® Lite App.
One (or more) Weasel(s), including battery and charger.
This user manual will guide you all the way from the design phase, system assembly to the operation of
your Weasel® Lite system. Also refer to the Operating Manuals you received together with your Weasel®
Lite components. These documents also contain important safety information.
Weasel® Lite was designed for independent installation and commissioning by the customer, who can
combine the individual components according to his specific needs. The operator of the Weasel® Lite
system shall bear the responsibility for the combination of the individual components. Owing to the wide
range of custom options and different conditions, we, as the manufacturer, cannot be held responsible
for your chosen combination. In particular, we cannot guarantee that the individual products will serve
your purpose. If you prefer our specialist staff to carry out installation and commissioning, please contact
us.
1.1 Further information
For more information including accessories for your Weasel® Lite system, visit us at:
https://www.ssi-schaefer.com/en-de/weasel-lite
If you have any questions or concerns regarding your Weasel® Lite system, simply contact our
Support team by phone or e-mail from Monday to Friday from 08:00 to 17:00 hrs at:
E-mail: helpdesk.giebelstadt@ssi-schaefer.com
Phone: +49 (09334) 979-0
Weasel® Lite User Manual 4/33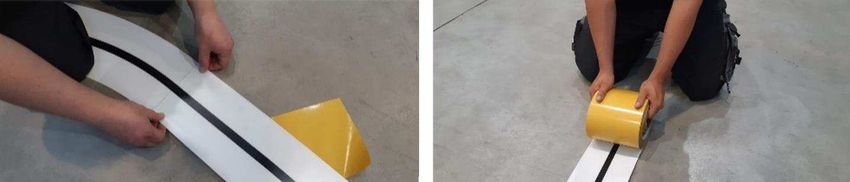
Weasel® Lite User Manual 2 About the travel path The travel path defines the course of your Weasel, the location of goods loading/unloading stations and the rules the Weasels have to follow on their way. You can customize the travel path to meet your specific requirements. Once your needs change, you can easily adjust your travel path to the new situation. The following chapters will describe the rules you should follow when planning and implementing your travel path. 2.1 Material flow planning Before you design your travel path, you should have an idea of how the materials to be handled by your Weasel vehicles are to be moved, i.e. definition of sources and sinks as well as the routes to be taken. This is also referred to as the Material Flow, and you will certainly have an idea of how your material flow will be based on your existing operational processes. Sources are locations where a transport demand arises. Your Weasels will be loaded with products at these locations. Examples of sources include receiving areas, as well as production, assembly, or picking areas, where goods for the warehouse or the shipping area are generated. Sinks are locations where the transports are finished. At these locations, the products on your Weasels will unloaded. Examples of sinks include the shipping area, as well as production, assembly, or picking areas, which need to be supplied with goods from the warehouse. Locations used both as destinations for material transport and as places where a transport demand arises are Sources and Sinks at the same time. Typical examples include production, assembly, or picking areas, that require goods that have to be transported further. All sources and sinks (including combinations) are considered as Stations in the Weasel system, i.e. special locations in the travel path where materials enter or leave the system. We recommend that you make a sketch and mark the positions of your stations. Perhaps you even have a drawing of the area ready? Indicate which stations are sources, sinks or combinations of both. We also suggest that you indicate the available transport routes between these stations, too. With this done, you can plan your travel path. Weasel® Lite User Manual 5/33

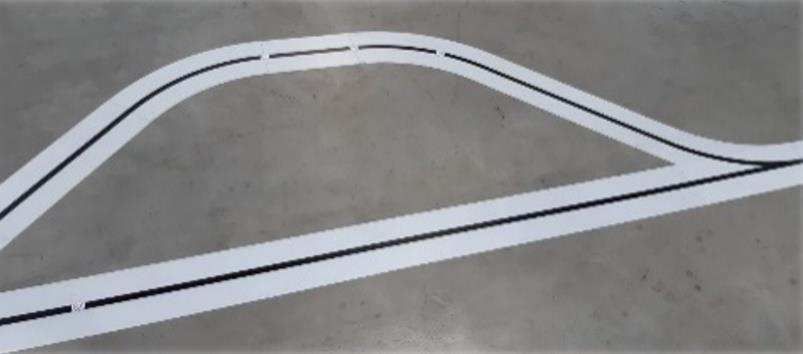
Weasel® Lite User Manual

 2.2       Planning your travel path

 Each Weasel® Lite travel path is composed of a circuit track, also referred to as the Main Loop, where
 the Weasels circulate in the defined direction. You can add any number of stations branching off the
 main loop. At these stations, the Weasels can pick up goods (source) and/or drop off goods (sink). The
 main loop can be as long and as wide as you wish. It may also include bends, as long as a closed loop
 is created. The stations branching off the main loop may have different shapes. The simplest stations
 are so-called Bays arranged in parallel with the main loop. The station design options will be detailed
 later in this manual. For the time being, you can assume a minimum length of 4 meters and a minimum
 width of 1 meter per bay.

 Based on your sketch, draw a course of your main loop which connects all stations to one another (e.g.
 bays). Note that your Weasels can only move in one direction. Obstacles should also be taken into
 consideration. The following sketch shows an example of a main loop and four stations designed as
 bays.

 Fig. 1 | Simple travel path sketch

 Before turning your sketch into a real travel path using prefab track elements, you should know and
 follow some rules regarding distances and stop positions. Amend your first travel path draft if any of
 these rules are violated:

   Distance rule                                                        Sketch

   Distance to oncoming traffic: Oncoming traffic typically
   occurs if opposite sections of the main loop come close to
   one another. A minimum distance of 80 cm must be kept
   between opposite tracks. This ensures that your Weasels
   have sufficient space to pass without blockings.

   Distance in parallel traffic: Parallel traffic typically occurs at
   stations. To ensure that Weasels stopping in stations will not
   prevent other Weasels from passing, a minimum distance
   must of 80 cm must be kept between parallel tracks. This

Weasel® Lite User Manual                                                                             6/33

Weasel® Lite User Manual

   ensures that your Weasels have sufficient space to pass
   without blockings.

   Distance between stations: Exit and entrance lanes of
   stations should never overlap, i.e. a station exit is followed
   by a station re-entrance into the main loop, before another
   station exit appears downstream. A minimum distance of 70
   cm should be kept between exit and entrance of different
   stations to provide sufficient space for the markers required.
   Nested stations and crossings should be avoided in the
   travel path.

   Distance to walls: To guarantee smooth operation of your
   Weasels, there must not be any obstacles near the travel
   path. The distance between the track and walls running in
   parallel with the travel path should be sufficient to allow safe
   walking between the walls and the track without the risk of
   colliding with the Weasels (especially in case of emergency).
   The minimum distance from walls should not be less than 1
   m.

   Stop position with fine positioning: As you will learn later,
   markers are placed along the travel path to instruct your
   Weasels on what to do. Some markers, e.g. station markers,
   instruct the Weasels to perform a controlled stop. Upstream
   of each station marker, a fine positioning marker must be
   provided in order to ensure that the Weasel will slow down
   and stop at the right position with a tolerance of just a few
   millimeters. The front edge of the Weasel will come to a halt
   at a distance of approx. 15 cm downstream of the station
   marker.

   Stop position without fine positioning: Other markers,
   e.g. entrance or request markers will tell the Weasel to stop
   spontaneously. In this case, there is no fine positioning
   function. For this reason, it will take longer for the Weasel to
   come a halt. The distance between the marker and the front
   edge may be up to 50 cm when the Weasel has come to a
   halt. Depending on the floor quality, the distance may be
   shorter. This should be considered when it comes to
   planning the stations as we did in the station patterns
   presented in section 2.5.

Weasel® Lite User Manual                                              7/33
Weasel® Lite User Manual

   Field of view in curves: The distance rules mentioned
   above are simple and can be verified easily. These rules will
   be sufficient in many cases. However, if there are
   bottlenecks in the area of bends, these rules may not be
   precise enough. In bends, the turning of the drive unit must
   be taken into consideration. In this case, you will have to
   check the field of view of the distance sensors. While the
   vehicle contour will require a certain travel distance behind
   bends to be in line with the travel path again, the drive unit
   and, as a consequence, the distance sensors will be turning
   while the Weasel is traveling through the bend. Based on the
   current position of the drive unit, there must always be a
   clear area of 50 cm to the front and a 10 cm clearance on
   the side.

 If you need digital assistance when planning your travel path, you may want to use our free
 planning/design software which is available for download on our website. With this software, you can
 design your Weasel® Lite travel path easily.

 Fig. 2 | Weasel® Lite Designer software

Weasel® Lite User Manual                                                                          8/33

Weasel® Lite User Manual

 2.3       Tracks

 Your Weasels follow an optical track, i.e. a black line against a light background. In this way, you can
 define, understand, and change the travel path easily. The optical track is composed of track elements
 which can simply be affixed on the floor. With these track elements, you can define both the shape of
 the main loop and all stations (e.g. as bays). A variety of such track elements is already included in your
 Weasel® Lite Starter Kit. Additional elements can be purchased at any time.

 For installation of the track elements, you will need a pencil, a square and a box knife for cutting the
 track elements to size, especially for cutting the straights off the reel. In addition, you will need a tape
 measure for aligning the track and checking if the required distances are kept. Adhesive tape may be
 useful for temporary alignment of track elements before affixing them finally. For long straight sections,
 you can also use a chalk line or line laser.

 The following table lists all track elements available for designing your Weasel ® Lite travel path. Before
 affixing the track elements, we recommend to just place them on the floor and check the travel path
 once again. It is often easier to identify potential problems (e.g. obstacles) when you actually see the
 travel path in the field. You may also want to fix the track elements temporarily using standard adhesive
 tape for this purpose.

   Track element                                                        Sketch

   Straights: Straights come on 25m reels. These track elements
   are used for all straight sections in your travel path. Simply cut
   the required length off the reel by means of a box knife.

Weasel® Lite User Manual                                                                                  9/33
Weasel® Lite User Manual

   Curves: Bend sections are supplied as 45° curve elements.
   For 90° curves and U-turns you will need two and four of these
   elements, respectively. The curve radius is 600 mm. This
   element can be used both for turns in the main loop and for
   station entrances/exits.

   Switches: Switches are track elements which enable switching
   from one track to another, i.e. diverters and mergers. Normally,
   they are used for station entrances/exits. Please note that there
   are two variants: Left switches and right switches.

 Once you are convinced that your travel path is correct, you can affix the track elements. In order for
 the track elements to stick to the floor properly, make sure to remove any dirt, dust grease and moisture.
 Remove the film and press the track element onto the floor firmly. Smooth out the tape to remove any
 bubbles.

 In the case of longer sections, we recommend that two persons do the job. Align the track by pulling the
 ends slightly. Then, starting at one end, remove the film and affix the track on the floor. Smooth out to
 remove any bubbles. You may also want to use a chalk line or laser to ensure that the track is aligned
 perfectly.

Weasel® Lite User Manual                                                                               10/33
Weasel® Lite User Manual

 Fig. 3 | Affixing long track elements

Weasel® Lite User Manual                 11/33
Weasel® Lite User Manual

 2.4       Markers

 Markers form the heart of your Weasel® Lite system. They define how the Weasels will move along the
 travel path. They identify stop, waiting and turning points for stations. Markers are RFID transponders
 affixed on the track. They contain information which is scanned by the passing Weasels (contactless
 scanning). Each marker has a symbol attached to it so that you always know what type of marker it is.

 Markers are affixed on the track directly. Remove the film and press the marker onto the track such that
 the center of the marker is on the black axis of the track. After that fix one of the transparent round
 adhesive protectors to protect the mark. You may also place the marker on the travel path without
 affixing them and affix them later after successful test runs.

 The markers are designed to stick well on the track once they are affixed. If you still need to remove a
 marker, carefully peel off the round adhesive protector and then use a box knife to carefully separate
 the marker from the track.

 Fig. 4 | Affixing and protecting markers

 There is a variety of markers, which gives you a wide range of design options. The combinations options
 for creating stations using the right markers and the right track elements will be described later. If you
 want to deviate from these patterns, please note that a minimum distance of 30 cm must be provided
 between all markers to ensure that they can be read from passing weasel vehicles without interference.

 The following is an overview of the markers which are available.

   Symbol             Marker

                      Station: This marker defines the position of a station (Station 1 in illustration), that is the
                      position where transport goods are to be loaded or unloaded. Weasels which are on their
                      way to this station will stop here and wait for a new destination to be entered via the app.

                      Fine positioning: This marker indicates that there is a station ahead (Station 1 in
                      illustration). Weasels travel at a speed of 1 meter per second in order to execute their
                      transport tasks as quickly as possible. For this reason, they must slow down before they
                      reach a station so that they will stop in the station accurately. The Fine Positioning marker
                      should be placed approx. 40 cm upstream of the Station marker.

                      Turn: This marker indicates that there is a station (Station 1 in illustration) at the next
                      switch to the left or to the right (to the left in illustration). A Weasel on its way to this station
                      will turn right/left at the next switch. This marker should be placed approx. 10 cm upstream
                      of the switch element.

Weasel® Lite User Manual                                                                                             12/33
Weasel® Lite User Manual
Request: With this marker, you can instruct free Weasels to check if there is a request from
a station (Station 1 in illustration). A Weasel circulating without destination will stop at this
marker and check if there is an app call within its range. If such a call exists, the Weasel will
accept the requesting station as its new destination and move on. If no call exists, it will
continue to circulate without destination. This marker should be placed at least 60 cm
upstream of the next turn marker.
Attention Entrance: This marker indicates that there is an entrance ahead, i.e. another
track merging with this track at a switch. This is the case, for example, at locations where a
station (Station 1 in illustration) rejoins the main loop again. Note that this marker is placed
on the main loop. Weasels passing this marker will stop and wait to check if another
Weasel is about to leave the station and re-enter the loop. If this is not the case, it will move
on. This marker is always used in combination with the Entrance marker. The Attention
Entrance marker should be placed approx. 160cm upstream of the track element
representing the merging switch.
Entrance: This marker indicates an entrance and is needed at locations where this track
rejoins another track. This is the case, for example, at locations where a station (Station 1
in illustration) rejoins the main loop again. Note that this marker is placed on the station
track. Weasels passing this marker will stop and signal their intention to enter the loop.
Then, it will move on. This marker is always used in combination with the Attention
Entrance marker. The Entrance marker should be placed approx. 100cm upstream of the
track element representing the merging switch.
New Destination: This marker will only be required if you want to cancel the current
destination of a passing Weasel vehicles and set another station (Station 1 in illustration) as
the new destination. Typically, this is done using the app while the Weasel is waiting for you
at a station. This is why this marker is not used often. However, as “loose marker” it is ideal
to catch a moving Weasel and guide it to a certain station (e.g. for maintenance).
Clear Destination: This marker will only be required if you want to delete the current
destination of a passing Weasel vehicle. Typically, this is done using the app while the
Weasel is waiting for you at a station. This is why this marker is not used often. However,
as “loose marker” it is ideal to catch a moving Weasel and delete its current destination
(e.g. after incorrect commands). Alternatively, a simple restart of the Weasel will have the
same effect.
Speed Limit: These markers are used for defining areas with a speed limit. A speed of 30,
for example, means that the Weasels, as from this point, may only travel at 30% of their
maximum speed (i.e. 0.3 meters per second). The speed limit applies until it is canceled by
a corresponding marker. If a station is equipped with loading/unloading transfer stations, for
example, the passing speed must be reduced to 30% for safety reasons.
No Speed Limit: This marker cancels the current speed limit. As from this point, the
Weasel is allowed to run at maximum speed (1 meter per second) again.
Turn (Station Group): This marker indicates that there is a group of stations (Station
Group 0 in illustration) at the next switch to the left or to the right (to the left in illustration).
They are only used if you use secondary loops in addition to the main loop. Station groups
Weasel® Lite User Manual 13/33Weasel® Lite User Manual
and secondary loops will be detailed in section 2.6. This marker should be placed approx.
10 cm upstream of the switch element.
Request (Station Group): This marker serve the same purpose as the Request marker.
However, it is not linked to a specific station but a group of stations (Station Group 0 in
illustration). Weasel vehicles circulating without current destination will stop at this marker
and check if there is an app call within their range and will accept any call provided it comes
from a station of this station group. This may be useful, for example, where stations are
organized in the form of harps. Station groups and station harps will be detailed in section
2.6. This marker should be placed approx. 60 cm upstream of the next Turn mark.
Charging Station: This marker defines the position of the charging station in the travel
path. The charging Station is approached by free Weasels (without destination) with low
battery level. Weasels will wait at this marker until a charged battery is installed. You will
only need this marker if you plan to use a charging station. Details will be provided in
section 2.5.
Fine Positioning (Charging Station): This marker corresponds to the Fine Positioning
marker but is used for the charging station. They indicate that there is a charging station
ahead and ensures that the Weasel slows down for accurate positioning. This marker
should be placed approx. 40 cm upstream of the charging station marker. You will only
need this marker if you plan to use a charging station. Details will be provided in section
2.5.
Turn (Charging Station): This marker corresponds to the Turn marker but is used for the
charging station. Like in any other station, the charging station must be indicated upstream
of switches. This marker should be placed approx. 10 cm upstream of the switch element.
You will only need this marker if you plan to use a charging station. Details will be provided
in section 2.5.
Attention Entrance (Charging Station): This marker corresponds to the Attention
Entrance marker but is used for the charging station. Placed on the main loop, it indicates
that there is an entrance from a charging station ahead to enable rejoining Weasels to
pass. This marker should be placed approx. 160cm upstream of the track element
representing the merging switch. You will only need this marker if you plan to use a
charging station. Details will be provided in section 2.5.
Entrance (Charging Station): This marker corresponds to the Entrance marker but is used
for the charging stations. It indicates that there is an entrance back to main loop ahead.
This marker should be placed approx. 100cm upstream of the track element representing
the merging switch. You will only need this marker if you plan to use a charging station.
Details will be provided in section 2.5.
Sensors Off - Left: This marker is not included in the Weasel® Starter Kit but is available
as a special marker. It is used for defining an area where the left sensor pairs are disabled.
This is useful when Weasels must pass cramped areas. In this case, the distance between
the middle of the track and an obstacle can be reduced to 25 cm, provided that the vehicle
is in parallel with the obstacle. Note, however, that in such areas there is the risk of
collisions with obstacles and accessibility is no longer guaranteed. This marker should only
be used if there are no other options. The sensors will remain disabled until they are
Weasel® Lite User Manual 14/33Weasel® Lite User Manual
reactivated by the corresponding marker. Note that all areas where the safety level is
reduced by partly/fully disabled sensors must be protected by optical means or additional
warning facilities (optical or acoustic). Follow the instructions provided in the operating
manual.
Sensors Off - Right: This marker is not included in the Weasel® Starter Kit but is available
as a special marker. It is used for defining an area where the right sensor pairs are
disabled. This is useful when Weasels must pass cramped areas. In this case, the distance
between the middle of the track and an obstacle can be reduced to 25 cm, provided that the
vehicle is in parallel with the obstacle. Note, however, that in such areas there is the risk of
collisions with obstacles and accessibility is no longer guaranteed. This marker should only
be used if there are no other options. The sensors will remain disabled until they are
reactivated by the corresponding marker. Note that all areas where the safety level is
reduced by partly/fully disabled sensors must be protected by optical means or additional
warning facilities (optical or acoustic). Follow the instructions provided in the operating
manual.
Sensors Off - All: This marker is not included in the Weasel® Starter Kit but is available as
a special marker. It is used for defining an area where both sensor pairs are disabled, i.e.
the Weasel will be “blind”. This is useful when Weasels must pass cramped areas. In this
case, the distance between the middle of the track and obstacle on both sides can be
reduced to 25 cm, provided that the vehicle is in parallel with the obstacles. Note, however,
that in such areas there is the risk of collisions with obstacles and accessibility is no longer
guaranteed. This marker should only be used if there are no other options. The sensors will
remain disabled until they are reactivated by the corresponding marker. Note that all areas
where the safety level is reduced by partly/fully disabled sensors must be protected by
optical means or additional warning facilities (optical or acoustic). Follow the instructions
provided in the operating manual.
Sensors On - All: This marker is not included in the Weasel® Starter Kit but is available as
a special marker. It enables sensors which were disabled before.
2.5 Stations
Stations are locations in the travel path where your Weasels will be loaded (sources) or unloaded (sinks).
The charging station is an exception. All stations are composed of tracks and markers as described in
the previous sections. Stations may be simple stop points where the goods are loaded/unloaded
manually or areas where loading and unloading transfer stations (available for upgrading your Weasel®
Lite system) are used. Transfer stations will be detailed in chapter 5.
Note each station is always assigned a unique number (1 to 999) which must only be assigned once in
the travel path. With the Weasel® Lite Starter Kit, you can install 5 stations, for example. If you require
additional track elements and markers you may order them later at any time. Typically, a tablet (or
smartphone) is assigned to a station to enable calling Weasels or instructing Weasels once they reach
the station.
Although the available track elements and markers enable a great number of variation options, most
applications can be implemented following two simple patterns which can be combined to form a travel
Weasel® Lite User Manual 15/33Weasel® Lite User Manual path: Station Bays and Station Harps. The charging stations are an exception. On the following pages, we will present these patterns. Fig. 5 | Completely installed station bay Weasel® Lite User Manual 16/33
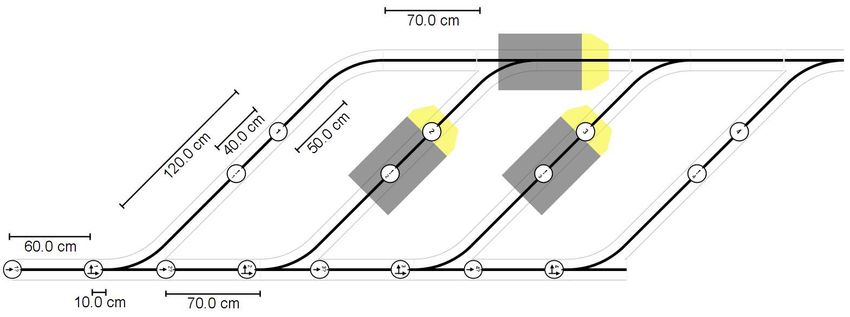
Weasel® Lite User Manual

 Station Bays

 Bays are the simplest, most flexible, and most frequent station pattern. Typically, a bay is assigned to a
 workstation and vice versa. Bays comprise a switch to exit the main track and a switch for re-entering
 the main track. The section between exit and entrance can be designed as required (with additional
 bends and straights, etc.) as long as they are connected to the main track via exits/entrances and there
 are no switches within the bay.

 In the case of a bay, the exit switch is always indicated upstream by means of a Turn marker (e.g. Turn
 Left marker as shown in the following illustration). The actual Station marker (i.e. the stop position for
 the Weasels) is located in the bay itself. Upstream of this marker, there must be a Fine Positioning
 marker. For traffic control, an Entrance marker is required upstream of the re-entrance switch into the
 main loop. An Attention Entrance marker must be provided in the bay upstream of the same switch. If
 the station is a source (or source/sink combination), i.e. free Weasels can be called from here via an
 app, a Request marker must also be provided upstream of the Turn marker.

 When the minimum distances as shown in the illustration are kept, the total length of station bay
 (including the position of the optional Request marker) is at least 400 cm, the minimum width is 80 cm.
 In case you plan to build this bay as shown in the illustration, please note that the straight section of the
 main loop (between the two switches) is approximately 250 cm long, whereas the straight section inside
 the station (between the curves) is approximately 80 cm long. However, you can use any width or length
 for your bay or even realize courses with additional bends, etc. When doing this, you should note,
 however, that the app communicating with your Weasel vehicles at the Station and Request marker
 must not be too far away. A range of approximately 5 meters can be assumed (up to 10 meters if
 conditions are favorable).

 Fig. 6 | Pattern of a station bay

Weasel® Lite User Manual                                                                                  17/33
Weasel® Lite User Manual

 Station Harps

 Harps are used instead of bays where many stations are to be arranged in small areas where they can
 be served by one workstation. In order to save space, the stations in a harp are arranged diagonally or
 perpendicular to the main loop and use a common re-entrance back into the main loop. Generally, the
 same markers are used for stations in a harp as in the case of a station bay. Only the track elements
 are combined in a different way. Since the stations in a harp are only served by one workstation, markers
 controlling the traffic at the merge sections are normally not required (normally there is not enough space
 for this). Instead, it is assumed that two Weasels will never be assigned or released at the same time.

 Between the stations, there should be sufficient space for the personnel loading and unloading the
 Weasels. The layout should also consider the side from which the Weasels are to be loaded/unloaded
 and what type of products are handled. The app communicating with the Weasel vehicles at the Station
 and Request marker must not be too far away. A range of approximately 5 meters can be assumed (up
 to 10 meters if conditions are favorable). If possible, with regard to the available space, you may even
 use a Group Request marker at the beginning of the harp instead of individual requests for each station.

 Fig. 7 | Pattern of a station harp

Weasel® Lite User Manual                                                                                18/33
Weasel® Lite User Manual The Charging Station A charging station may be useful depending on the daily operating time of your Weasels. Two batteries are included in the Weasel standard scope of supply. If your Weasel® Lite system is only used in one-shift operation and one single charge is enough for one day, you don’t have to install a charging station. Just remove the batteries at the end of your shift and put it into the designated chargers. At the beginning of the next shift, reinstall the fully charged batteries in the Weasels. You may use the batteries alternately for a longer battery life. If you use your Weasel® Lite system in two-shift or three-shift operation we recommend that you install a charging station which is approached by the Weasels once battery replacement is required (battery level of 30% or less). When a charging station is used, each Weasel needs two batteries: one battery is in use while the other one is being charged. Ideally, the battery chargers should be located close to the charging station. The charging station must branch off the main loop of your travel path. It should be installed at a location where free Weasels are circulating. This is important as only free Weasels will approach the charging station. The charging station is normally designed as a bay. A harp design is not required because there may only be one charging station in a Weasel® Lite system. The charging station uses the same markers as simple station bays. The markers for the charging station, however, are special variants. Request markers are not used because the charging station is no source and does not have to request free Weasels. Free Weasels (i.e. Weasels without destination) follow the Turn marker into the charging station automatically once the battery level is 30% or less. Fig. 8 | Pattern of a charging station Weasel® Lite User Manual 19/33
Weasel® Lite User Manual

 2.6       Station groups

 As described in the previous sections, Weasel® Lite systems always have a main loop with a variety of
 stations (typically bays) branching off to the left or right. In some cases, there may also be secondary
 loops within the main loop each of which may have various stations. Note that stations in secondary
 loops can only be sinks but no sources. This is due to the fact that free Weasels only travel along the
 main loop (they follow the “outer” circuit track) and will only respond to requests from stations there.

 In order for the Weasels to know into which secondary loop they have to move in order to reach a
 destination, the stations must be grouped and the corresponding Turn marker for station groups must
 be placed upstream of the exit into the secondary loop. All stations belonging to the same number range
 of 100 units form a station group. The stations in a secondary loop must be stations of the same group.
 Up to 10 groups may be defined.

 •      Group 0xx: Station 1 to 99
 •      Group 1xx: Station 100 to 199
 •      Group 2xx: Station 200 to 299
 •      Group 3xx: Station 300 to 399
 •      Group 4xx: Station 400 to 499
 •      Group 5xx: Station 500 to 599
 •      Group 6xx: Station 600 to 699
 •      Group 7xx: Station 700 to 799
 •      Group 8xx: Station 800 to 899
 •      Group 9xx: Station 900 to 999

 Fig. 9 | Main and secondary loops for three station groups

 Since every secondary loop must rejoin with the main loop, there are additional merge sections where
 traffic control is required (provided that you use more than one Weasel). These merge sections are not
 linked to stations. Simply use the markers Attention Entrance and Entrance of an unused station. The
 Entrance marker should be placed in the secondary loop to avoid unnecessary stopping of your Weasels
 in the main loop.

Weasel® Lite User Manual                                                                             20/33
Weasel® Lite User Manual

 3 About the app

 The Weasel® Lite app is an android application which enables communicating with your Weasels,
 especially while they are waiting for new instructions at a station. Communication is established via
 Bluetooth Low Energy. You don’t have to worry about how to set up or configure Bluetooth Low Energy.
 Your Weasels and the app were already configured in the factory.

 Fig. 10 | Weasel® Lite app main screen

 3.1       Installation

 When you have received tablets with the app preinstalled (e.g. with your Weasel® Lite Starter Kit), you
 don’t have to install the app yourself. If you prefer your own devices, the app is available separately for
 Android tablets or smartphones. Please note that your device must run Android Version 6.0 or higher
 and support Bluetooth Low Energy (both sending and receiving). Most devices as from Bluetooth 4.0
 will support this, but some don't. If in doubt, please consult the manufacturer.

     Before starting the app, ensure that the Bluetooth and Location tracking functions of your device
     are enabled. Both options are generally needed for technical reasons for receiving Bluetooth Low
 Energy signals with Android. Both options can normally be enabled via the quick start settings. Simply
 swipe down from the top of your screen and enable the require functions.

 3.2       Use

     Tablets and smartphones running the Weasel® Lite app should not be used for other applications.
     To avoid malfunction, you should only install/run apps which are absolutely essential for
 correct operation. For safety reasons, the device must not be connected to WLAN nor any other
 network.

Weasel® Lite User Manual                                                                                21/33
Weasel® Lite User Manual
3.3 Configuration
For each station, you will normally need a device running the Weasel ® Lite app. You may install the
device permanently at one location or use it as a mobile device. You may also want to use our optional
tablet holders.
The travel path including the stations is tailored to your needs. We recommend that you configure your
app accordingly. You will have to tell your app which station it represents and what actions are to be
made available. Actions include requesting Weasels or assigning a new destination. To configure your
app, open the menu on the top right in the title bar of the app and select “Settings”. Here, you can
configure your app as follows:
Station: Enter the number of the station (1 to 999) to represented by the app. The app can only
communicate with a Weasel if the station number set in the app matches with the station number of
the markers (request, station). Note that two apps can never use the same station number.
Lines / Columns: Here, you can define the number of lines and columns on the main screen
available for displaying the actions (buttons), i.e. the available spaces in the grid for your actions. In
this way, you can set up your own layout.
Actions: Here, you can define the individual actions required. You can add actions, remove them,
or change the order (drag & drop). You can assign your own name to each action. The actions are
arranged in the grid from the left to the right and from the top to the bottom. You may even define
“empty actions” to create spaces in the grid. This can make the app more user-friendly because for
many people, it is easier to memorize the position of a button than its symbol or name.
3.4 Defining actions
When you touch an action button, a Bluetooth signal will be transmitted which is received by all Weasels
nearby. There are the following types of actions:
Symbol Action
New destination: This action assigns a new destination to the Weasel waiting in the
station. You also have to define the destination station (1 to 999) for the action. This action
is normally used for sending Weasels to the required destination after loading. You can
define any number of these actions (with different destinations).
Done: This action releases the Weasel waiting in the station. It will then move on without
destination. This action is normally used for sending a Weasel back into the main loop after
unloading where it can respond to new requests (or move to a charging station if
necessary).
Request: With this action, you can call a free Weasel, i.e. request a Weasel for this station.
Once a free Weasel reaches the Request marker for this station, it will follow your call and
move into the station. This action is typically used in stations where the Weasels are
loaded.
Request and New Destination: This action is a combination of Request and New
Destination. Once a called Weasel has reached the station it will be ordered to move to the
new destination automatically. You also have to define the destination station (1 to 999).
Weasel® Lite User Manual 22/33Weasel® Lite User Manual
This action is typically used in combination with transfer stations for loading: Press the
corresponding button once you have placed the goods on the transfer station. Once you
have done this, you can take care of other tasks. When a Weasel reaches the station, it will
pick up the goods and know instantly to which destination it is to go next.
Request From: With this action, you can call a free Weasel, i.e. request a Weasel for this
station from the Request marker. Unlike a normal request, the Weasel is to move to an
intermediate station first (e.g. to pick up empties) and move to this station after that. You
also have to define the intermediate station (1 to 999). Once the Weasel reaches the
intermediate station and is released there, it will move to the calling station.
Empty (placeholder): This not a real action. It is used for creating empty spaces on the
main screen to enable flexible arrangement of your actions. You will only see an empty
space where this button should be displayed.
3.5 Triggering actions
Once you have defined all actions you need, the app is ready for use. To call a Weasel, assign a new
destination to a waiting Weasel or to release it, simply press the corresponding button. The status bar
at the bottom will show you the current processes, e.g. when the app is sending a signal or receiving a
valid signal. Whenever a signal from a Weasel was received, the current battery level of the vehicle will
also be displayed in the status bar.
Note that communication between the app and the Weasel will only work within a certain range, i.e.
the distance between the app and the Station marker as well as the distance between the app and
the Request marker must not be too long. The actual range depends on local conditions. You may
assume a range of 5 meters. In ideal conditions, a range of 10 meters is possible.
3.6 Service function
Each Weasel® Lite app features a Service function which can be activated via the menu in the title bar
at the top right. In this window, you will see a list of all Weasel vehicles within reach that report errors.
Normally, this list should be empty. In the event of a Weasel errors, the serial number of the drive unit,
the current battery level and an error code will be displayed here. Use this information when calling our
Support team.
Weasel® Lite User Manual 23/33Weasel® Lite User Manual
4 About the vehicle
Your Weasel is a user-friendly automated guided vehicle with easy-to-learn functions and features.
These vehicles don’t need complicated configuration. There is just one switch at the whole machine: the
on/off switch on the back of the vehicle. In the following, we will present an overview of the individual
components and show you how your Weasel works. Also refer to the instructions provided in the
operating manual.
All persons who are in the area of a Weasel® Lite vehicle, a loading station or an unloading station
must wear safety shoes.
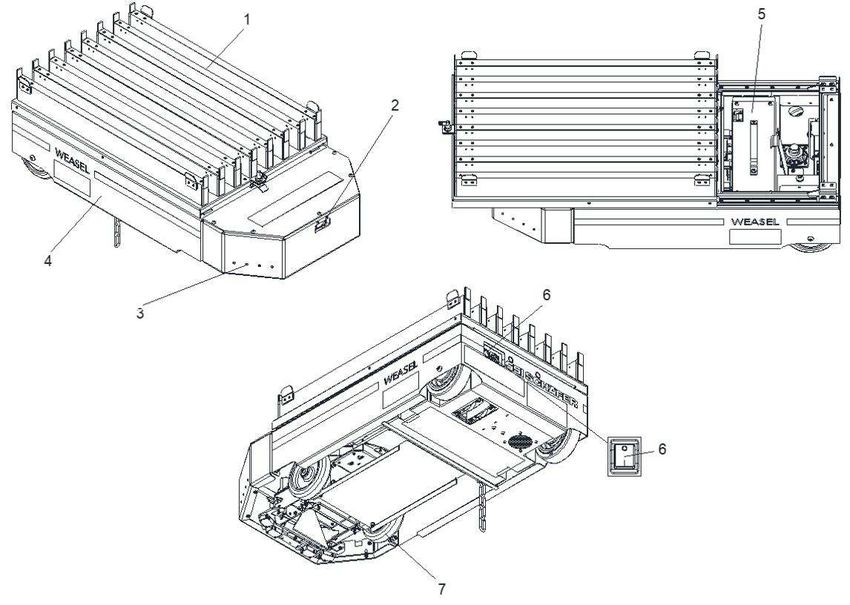
4.1 Components
1 Structure 5 Battery
2 Distance sensor (only in Weasel® Classic) 6 On/Off switch
3 LEDs 7 Drive unit
4 Chassis
The structure (1) is attached to the chassis (4). For ergonomic reasons, all standard Weasel ® Lite models
are provided with a high structure for easy manual loading and unloading. Other variants are available
upon request. The pivoted drive unit (7) is attached to the chassis. It accommodates the drive and
steering equipment, as well as all components required for track identification (camera), obstacle
Weasel® Lite User Manual 24/33Weasel® Lite User Manual
detection (distance sensors), scanning markers (RFID reader) and communication with the app
(Bluetooth module). The LEDs (3) indicate the state of the vehicle. The vehicle is powered by a
rechargeable battery (5). Weasels are equipped with 4 distance sensors for obstacle detection. They
are attached to the pivoted drive unit (7). An additional distance sensor (2) is installed in the middle of
the front cover. It is only used when you upgrade your Weasel® Lite system into a Weasel® Classic
System. The On/Off switch (6) is installed on the back of the vehicle.
4.2 Conditions of use
Your Weasel can transport bins, cartons, and similar goods with a maximum size of 600 mm x 400 mm
and a maximum weight of 35 kg. It is not allowed to transport aggressive, flammable, or explosive
materials with the Weasel.
Note that the Weasel is designed exclusively for indoor use in a temperature range of 2-50 degrees
Celsius. The driving course must not contain any inclines. Do not operate the Weasel on wet, oily,
uneven, damaged, or heavily soiled surfaces, or if it is foreseeable that the vehicle will be exposed to
significant vibrations. The floor must not be smooth and must allow electrical discharge. Technical
details can be found in the operating manual.
Furthermore, the Weasel must not be operated in ESD, ATEX (potentially explosive) or clean room
environments, on ships or in mining.
4.3 Localization and navigation
The drive unit of your Weasel features an integrated camera which enables it to follow the optical track
of the travel path. You don’t have to teach the Weasel; it is ready for use from the very start. Thanks to
the markers you placed on the travel path, the Weasel knows the location of the destination stations and
the way to these stations. You don't need any additional equipment such as wall reflectors or floor
magnets. Markers are RFID transponders that can be read contact-free using the RFID reader in the
drive unit.
Note that the markers will not work directly on or in metal or in close proximity to liquids.
4.4 Communication
Your Weasel uses Bluetooth Low Energy to communicate with the Weasel® Lite app and with other
nearby vehicles. The communication is set already at the factory, there is no further configuration
required.
Make sure that interference-free Bluetooth Low Energy communication is possible. Keep
unauthorized persons with Bluetooth Low Energy sources away, which could send willful false
signals.
Weasel® Lite User Manual 25/33Weasel® Lite User Manual
4.5 Battery
Each Weasel is powered by a maintenance-free battery. Only use
the designated batteries supplied with your Weasels. The daily
runtime of the battery, as well as its lifetime, strongly depends on
the individual use and battery age. You can expect about 8 hours
of driving time and about 8 hours of charging time. Make sure to
replace and recharge the batteries soon enough. Exhaustive
discharging may damage your battery, it may lose capacity or fail
completely.
There are two batteries provided for each Weasel. This means that a Weasel can also be used in multi-
shift operation without any problems (one battery is operating in the vehicle while the other one is being
charged). If you use a Weasel in one-shift operation only and one charge is sufficient, you can use the
batteries alternately in order to increase their life.
Always turn your Weasel off when removing/replacing the battery. Loosen the front latch of the structure
and push it towards the front. Press the side holder back and lift the battery up by the handle.
4.6 Charger
The charger is a simple device for recharging your Weasel
batteries. To charge a battery, power the charger via the mains
connector and insert the battery. The LED display of the charger
will indicate the current state:
Green (flashing): No battery inserted
Yellow (continuous light): Charging in process
Yellow (flashing): Final charging phase
Green (continuous light): Charging complete
Make sure the battery is fully charged before installing it in your Weasel. The chargers may only be
used for charging the designated batteries. They must not be used for storing any other materials.
4.7 LEDs
The LEDs of your Weasel indicate its state. Normally, the LEDs will flash at a frequency of 1 Hz (Weasel
without destination) or will have continuous light (Weasel with destination). When a Weasel turns
left/right, only one of the two LEDs will be on to indicate the current direction. Using special LED signals,
the Weasel signals that an error has occurred.
Fault signal Meaning
Flashing quickly (3 Hz) Weasel has lost track and is stopped for this reason. Lift up the
front carefully to position the pivoted drive unit with the camera
in the middle of the track. If necessary, clean and repair the
track. Once the Weasel sees the track again, it will move on.
Weasel® Lite User Manual 26/33Weasel® Lite User Manual
Flashing rapidly (8 Hz) Weasel has detected an obstacle and is stopped for this reason.
It will move on once the obstacle has been removed. Note that
your Weasel has a viewing range of both 50 cm to the front and
approx. 10 cm to the left and right. In case you cannot find an
obstacle in the direct vicinity, check the area for reflections
which might return the light of the distance sensors and
consequently confuse your Weasel.
LEDs Off The LEDs are off when the Weasel is off or when it is started.
When the LEDs are off although the Weasel is on, an error is
present. Restart the Weasel and make sure to install a fully
charged battery. If the problem persists, please contact our
Support team, and use the Service function of your Weasel®
Lite app.
4.8 Commissioning
Commissioning your Weasel is amazingly simple. You don’t have to configure anything. Simply unpack
the vehicle and remove the transportation fixtures attached to the drive unit before shipment. For that,
carefully turn the Weasel over sideways and loosen both screws using an Allen wrench. You should
keep the packaging and transportation fixtures for future use. In case you need to return the vehicle to
us for repair, you can reuse it.
Fig. 11 | Removal of transportation fixtures
Next, insert the electrical fuses into the batteries and charge the batteries. This can take a few hours.
As soon as a battery has been fully charged, you can insert it into the vehicle. Move the vehicle manually
to the driving course and make sure that the drive unit is centered over the optical track and that the
travel direction is correct. After that, you can then switch on the vehicle.
Weasel® Lite User Manual 27/33Weasel® Lite User Manual
Fig. 12 | Insertion of electrical fuses
4.9 Operation
Turning On/Off
The Weasel can be turned on/off easily by means of the on/off switch on the back. If you have forgotten
where your Weasel is moving or what it is waiting for (e.g. after manual intervention), simply turn it off
and on again so that it returns to a comprehensible state. Once switched on, your Weasel will be free
again and circulate in the loop until it is called again
Stopping
Put an obstacle on the track in order to stop approaching Weasel vehicles. The obstacle must be easily
visible on the level of the distance sensors. You can use a carton, for example. Note that waiting
Weasels (e.g. at Station markers) can start automatically once they receive an app signal. For this
reason, place also an obstacle in front of a waiting Weasel if you want it to stop.
Transporting
For manual in-house transport of your Weasel, you will need the
service rod. With the service rod, you can handle the Weasel easily
while keeping an ergonomic posture.
Before installing the service rod, stop the Weasel and turn it off.
Then, put the service rod (1) into the two holes (2) in the back of the
vehicle. After this, lift the vehicle up by pushing the service rod down
like a hand truck. Now, the vehicle can be handled easily.
Always switch off the Weasel before moving it manually. To avoid damaging the electronics, make
sure that the drive wheels of the drive unit are not in contact with the floor while you are manually
moving the vehicle.
Don't forget to remove the service rod directly after use in order to avoid injuries and material
damage (especially when moving under transfer stations).
Weasel® Lite User Manual 28/33Weasel® Lite User Manual
Removing
If Weasels are not needed over extended periods (e.g. you want to decommission it for maintenance or
repair), you will have to remove it. To do this, stop the Weasel on the travel path, then turn it off and
transport it away from the travel path. If Weasels are decommissioned for extended periods or if
maintenance or repair is required, remove the battery and recharge it if necessary.
4.10 Troubleshooting
The following list contains useful information for troubleshooting. If you don’t find the solution there, use
the Service function of the Weasel® Lite app and contact our Support team.
Problem: Vehicle stopped, LEDs flashing quickly. Vehicle lost track.
• Align the drive unit with the track manually
• Clean the travel path with cloth and, if necessary, mild soapy water
• Clean the drive and rear wheels
• Replace damaged track sections
• Carefully clean the camera and camera lights using a dry cloth
• Recharge/replace the battery
• Check the floor for unevenness (excessive vibration may cause problems with the camera
electronics)
Problem: Vehicle stopped, LEDs flashing rapidly. Vehicle has detected an obstacle.
• Remove the obstacle
• Carefully clean the distance sensors using a dry cloth
• Recharge/replace the battery
• Check the floor for unevenness (excessive vibration may cause problems with the sensor
electronics)
Problem: Vehicle stopped, LEDs off.
• Turn the vehicle off, wait for a few seconds and turn it on again
• Remove the battery and wait for 5 minutes before reinstalling it (to discharge the capacitors)
• Recharge/replace the battery
• Check the position of the battery contacts, clean them if necessary
Problem: Vehicle leaves optical track.
• Clean the travel path with cloth and, if necessary, mild soapy water
• Clean the drive and rear wheels with cloth and, if necessary, mild soapy water
• Check the floor quality (e.g. presence of moisture)
• If necessary, re-tighten the fixing screws of the drive unit
Problem: Vehicle fails to turn correctly or fails to stop at a Station or Request marker.
• Check the position and distances of the markers
• Check the station number of the markers
• Remove any interfering objects/materials (metal, cables, or water) from the area of the marker
• Replace the marker
Weasel® Lite User Manual 29/33You can also read