USER MANUAL - Vave Wireless Ultrasound
←
→
Page content transcription
If your browser does not render page correctly, please read the page content below
Vave Wireless Ultrasound

          USER MANUAL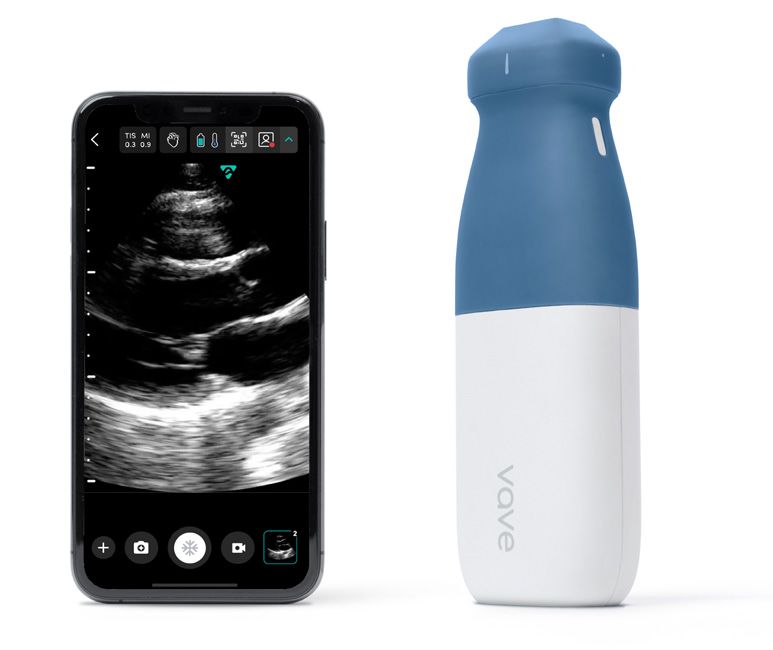
Vave Wireless Ultrasound • U S ER M A N UA L
User Manual – Vave Wireless Ultrasound . . . . . . . . . . . . . . . . . . . . . . . . . . . . . . . . . . 5
About This Manual. . . . . . . . . . . . . . . . . . . . . . . . . . . . . . . . . . . . . . . . . . . . . . . 5
Target Audience. . . . . . . . . . . . . . . . . . . . . . . . . . . . . . . . . . . . . . . . . . . . .5
Document Conventions. . . . . . . . . . . . . . . . . . . . . . . . . . . . . . . . . . . . . . . . .5
Touch Gestures. . . . . . . . . . . . . . . . . . . . . . . . . . . . . . . . . . . . . . . . . . .5
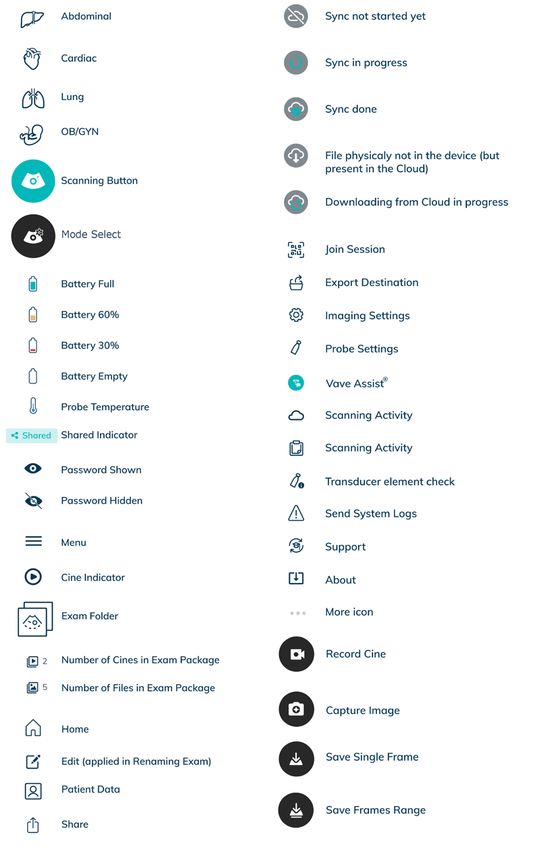
Icons . . . . . . . . . . . . . . . . . . . . . . . . . . . . . . . . . . . . . . . . . . . . . . . 5
1About the Vave Wireless Ultrasound. . . . . . . . . . . . . . . . . . . . . . . . . . . . . . . . . . 6
1.1 System Description . . . . . . . . . . . . . . . . . . . . . . . . . . . . . . . . . . . . . . . . 6
1.2 System Dimensions. . . . . . . . . . . . . . . . . . . . . . . . . . . . . . . . . . . . . . . . 7
1.3 Accessories. . . . . . . . . . . . . . . . . . . . . . . . . . . . . . . . . . . . . . . . . . . . .7
1.3.1 Battery. . . . . . . . . . . . . . . . . . . . . . . . . . . . . . . . . . . . . . . . . . . 7
1.3.2 Battery Charger. . . . . . . . . . . . . . . . . . . . . . . . . . . . . . . . . . . . . . 7
1.4 Product Usage. . . . . . . . . . . . . . . . . . . . . . . . . . . . . . . . . . . . . . . . . . 8
1.4.1 Intended Use. . . . . . . . . . . . . . . . . . . . . . . . . . . . . . . . . . . . . . . 8
1.4.2 Contraindications . . . . . . . . . . . . . . . . . . . . . . . . . . . . . . . . . . . . 10
1.5 Hardware . . . . . . . . . . . . . . . . . . . . . . . . . . . . . . . . . . . . . . . . . . . . . 11
1.5.1 Warranty. . . . . . . . . . . . . . . . . . . . . . . . . . . . . . . . . . . . . . . . . . 11
1.5.2 Disposal. . . . . . . . . . . . . . . . . . . . . . . . . . . . . . . . . . . . . . . . . . 11
1.6 Security. . . . . . . . . . . . . . . . . . . . . . . . . . . . . . . . . . . . . . . . . . . . . . 11
1.6.1 Information Security. . . . . . . . . . . . . . . . . . . . . . . . . . . . . . . . . . . 11
1.6.2 Network Security. . . . . . . . . . . . . . . . . . . . . . . . . . . . . . . . . . . . . 12
1.6.3 Confidentiality. . . . . . . . . . . . . . . . . . . . . . . . . . . . . . . . . . . . . . 13
1.6.4 Integrity. . . . . . . . . . . . . . . . . . . . . . . . . . . . . . . . . . . . . . . . . . 13
1.6.5 Availability. . . . . . . . . . . . . . . . . . . . . . . . . . . . . . . . . . . . . . . . 14
1.6.6 Accountability . . . . . . . . . . . . . . . . . . . . . . . . . . . . . . . . . . . . . . 14
1.7 System Requirements. . . . . . . . . . . . . . . . . . . . . . . . . . . . . . . . . . . . . . 14
2 Quick Tour . . . . . . . . . . . . . . . . . . . . . . . . . . . . . . . . . . . . . . . . . . . . . . . . . 15
2.1 Interface and Screens Overview. . . . . . . . . . . . . . . . . . . . . . . . . . . . . . . . 15
2.1.1 Icons. . . . . . . . . . . . . . . . . . . . . . . . . . . . . . . . . . . . . . . . . . . . 16
2.1.2 Alerts and Notifications. . . . . . . . . . . . . . . . . . . . . . . . . . . . . . . . . 16
2.1.3 Sign-in Page. . . . . . . . . . . . . . . . . . . . . . . . . . . . . . . . . . . . . . . 17
2.1.4 Menu Options. . . . . . . . . . . . . . . . . . . . . . . . . . . . . . . . . . . . . . . 17
2.1.5 How to Begin Scanning . . . . . . . . . . . . . . . . . . . . . . . . . . . . . . . . . 18
2.1.6 Enter Patient Information . . . . . . . . . . . . . . . . . . . . . . . . . . . . . . . . 18
2.1.7 Presets . . . . . . . . . . . . . . . . . . . . . . . . . . . . . . . . . . . . . . . . . . 18
2.1.8 Imaging Page. . . . . . . . . . . . . . . . . . . . . . . . . . . . . . . . . . . . . . 18
2.1.9 Gallery. . . . . . . . . . . . . . . . . . . . . . . . . . . . . . . . . . . . . . . . . . 19
2.1.10 Exams Screen . . . . . . . . . . . . . . . . . . . . . . . . . . . . . . . . . . . . . . 19
3 Using the Vave Probe. . . . . . . . . . . . . . . . . . . . . . . . . . . . . . . . . . . . . . . . . . 20
3.1 Downloading the Vave Health App. . . . . . . . . . . . . . . . . . . . . . . . . . . . . . . 20
3.1.1 iOS . . . . . . . . . . . . . . . . . . . . . . . . . . . . . . . . . . . . . . . . . . . . 20
3.1.2 Android. . . . . . . . . . . . . . . . . . . . . . . . . . . . . . . . . . . . . . . . . . 20
3.2 Updating the Vave Probe. . . . . . . . . . . . . . . . . . . . . . . . . . . . . . . . . . . . 20
3.2.1 Software Updates . . . . . . . . . . . . . . . . . . . . . . . . . . . . . . . . . . . . 20
3.2.2 Firmware Updates. . . . . . . . . . . . . . . . . . . . . . . . . . . . . . . . . . . . 20
3.3 Inserting & Removing Battery. . . . . . . . . . . . . . . . . . . . . . . . . . . . . . . . . . 21
3.3.1 Inserting the Battery. . . . . . . . . . . . . . . . . . . . . . . . . . . . . . . . . . . 21
3.3.2 Removing the Battery . . . . . . . . . . . . . . . . . . . . . . . . . . . . . . . . . . 21
3.3.3 Charging the Battery . . . . . . . . . . . . . . . . . . . . . . . . . . . . . . . . . . 21
3.4 Turning the System On & Off . . . . . . . . . . . . . . . . . . . . . . . . . . . . . . . . . . 21
3.4.1 Turning On the Vave Probe & Starting the Vave App. . . . . . . . . . . . . . . . . 21
3.4.2 Exiting the Vave App & Turning Off the Vave Probe. . . . . . . . . . . . . . . . . . 21
2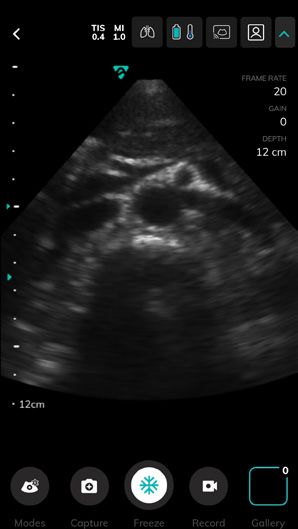
Vave Wireless Ultrasound • U S ER M A N UA L

         3.5 Account Creation, Signing In & Out . .  .  .  .  .  .  .  .  .  .  .  .  .  .  .  .  .  .  .  .  .  .  .  .  .  .  .  .  .  .  .  . 22
         		3.5.1		         Creating Account. .  .  .  .  .  .  .  .  .  .  .  .  .  .  .  .  .  .  .  .  .  .  .  .  .  .  .  .  .  .  .  .  .  .  .  . 22
         		       3.5.2 Register/Sign-In with Invitation Link.  .  .  .  .  .  .  .  .  .  .  .  .  .  .  .  .  .  .  .  .  .  .  .  .  . 22
         		3.5.3 Signing In. .  .  .  .  .  .  .  .  .  .  .  .  .  .  .  .  .  .  .  .  .  .  .  .  .  .  .  .  .  .  .  .  .  .  .  .  .  .  .  . 22
         		3.5.4 Signing Out. .  .  .  .  .  .  .  .  .  .  .  .  .  .  .  .  .  .  .  .  .  .  .  .  .  .  .  .  .  .  .  .  .  .  .  .  .  .  . 22
         		3.5.5 Forgot Password. .  .  .  .  .  .  .  .  .  .  .  .  .  .  .  .  .  .  .  .  .  .  .  .  .  .  .  .  .  .  .  .  .  .  .  . 22
             3.6 Organizations.  .  .  .  .  .  .  .  .  .  .  .  .  .  .  .  .  .  .  .  .  .  .  .  .  .  .  .  .  .  .  .  .  .  .  .  .  .  .  .  .  . 23
             3.7 Connecting Your Smart Device to a Vave Probe .  .  .  .  .  .  .  .  .  .  .  .  .  .  .  .  .  .  .  .  .  .  . 23
         		       3.7.1		 Connecting Android Device to Vave Probe .  .  .  .  .  .  .  .  .  .  .  .  .  .  .  .  .  .  .  .  .  . 23
             3.8 Managing Patient Information. .  .  .  .  .  .  .  .  .  .  .  .  .  .  .  .  .  .  .  .  .  .  .  .  .  .  .  .  .  .  .  . 23
         		       3.8.1 Entering Patient Information. .  .  .  .  .  .  .  .  .  .  .  .  .  .  .  .  .  .  .  .  .  .  .  .  .  .  .  .  .  .  . 23
             3.9 Imaging. . . . . . . . . . . . . . . . . . . . . . . . . . . . . . . . . . . . . . . . . . . . . .24
         		       3.9.1		 Imaging Display Overview.  .  .  .  .  .  .  .  .  .  .  .  .  .  .  .  .  .  .  .  .  .  .  .  .  .  .  .  .  .  . 24
         		3.9.2 Image Modes .  .  .  .  .  .  .  .  .  .  .  .  .  .  .  .  .  .  .  .  .  .  .  .  .  .  .  .  .  .  .  .  .  .  .  .  .  . 25
         		3.9.3 Preset. .  .  .  .  .  .  .  .  .  .  .  .  .  .  .  .  .  .  .  .  .  .  .  .  .  .  .  .  .  .  .  .  .  .  .  .  .  .  .  .  .  . 26
         		       3.9.4 Scan Bottom Menu .  .  .  .  .  .  .  .  .  .  .  .  .  .  .  .  .  .  .  .  .  .  .  .  .  .  .  .  .  .  .  .  .  .  . 26
         		3.9.5 Measurements and Annotations . .  .  .  .  .  .  .  .  .  .  .  .  .  .  .  .  .  .  .  .  .  .  .  .  .  .  . 26
         		       3.9.6 Vave Cast™. .  .  .  .  .  .  .  .  .  .  .  .  .  .  .  .  .  .  .  .  .  .  .  .  .  .  .  .  .  .  .  .  .  .  .  .  .  .  . 27
         		       3.9.7 Ending an Exam . .  .  .  .  .  .  .  .  .  .  .  .  .  .  .  .  .  .  .  .  .  .  .  .  .  .  .  .  .  .  .  .  .  .  .  . 28
             3.10 Review Findings . .  .  .  .  .  .  .  .  .  .  .  .  .  .  .  .  .  .  .  .  .  .  .  .  .  .  .  .  .  .  .  .  .  .  .  .  .  .  .  . 28
         		       3.10.1 Reviewing Images & Cines.  .  .  .  .  .  .  .  .  .  .  .  .  .  .  .  .  .  .  .  .  .  .  .  .  .  .  .  .  .  . 28
         		3.10.2 Manage Images. .  .  .  .  .  .  .  .  .  .  .  .  .  .  .  .  .  .  .  .  .  .  .  .  .  .  .  .  .  .  .  .  .  .  .  . 29
         		3.10.3 Manage Exams .  .  .  .  .  .  .  .  .  .  .  .  .  .  .  .  .  .  .  .  .  .  .  .  .  .  .  .  .  .  .  .  .  .  .  .  . 30
             3.11 Maintenance. .  .  .  .  .  .  .  .  .  .  .  .  .  .  .  .  .  .  .  .  .  .  .  .  .  .  .  .  .  .  .  .  .  .  .  .  .  .  .  .  .  . 31
         		       3.11.1		 Hardware Maintenance and Storage . .  .  .  .  .  .  .  .  .  .  .  .  .  .  .  .  .  .  .  .  .  .  .  . 31
             3.12 Settings. .  .  .  .  .  .  .  .  .  .  .  .  .  .  .  .  .  .  .  .  .  .  .  .  .  .  .  .  .  .  .  .  .  .  .  .  .  .  .  .  .  .  .  .  . 32
         		3.12.1 Profile Settings. .  .  .  .  .  .  .  .  .  .  .  .  .  .  .  .  .  .  .  .  .  .  .  .  .  .  .  .  .  .  .  .  .  .  .  .  . 32
         		3.12.2 Settings. .  .  .  .  .  .  .  .  .  .  .  .  .  .  .  .  .  .  .  .  .  .  .  .  .  .  .  .  .  .  .  .  .  .  .  .  .  .  .  .  . 33
             3.13 Support. .  .  .  .  .  .  .  .  .  .  .  .  .  .  .  .  .  .  .  .  .  .  .  .  .  .  .  .  .  .  .  .  .  .  .  .  .  .  .  .  .  .  .  .  . 34
         		3.13.1 Need Support?. .  .  .  .  .  .  .  .  .  .  .  .  .  .  .  .  .  .  .  .  .  .  .  .  .  .  .  .  .  .  .  .  .  .  .  .  . 34

         4      Cleaning & Disinfecting.  .  .  .  .  .  .  .  .  .  .  .  .  .  .  .  .  .  .  .  .  .  .  .  .  .  .  .  .  .  .  .  .  .  .  .  .  .  .  .  . 35
                4.1 Cleaning.  .  .  .  .  .  .  .  .  .  .  .  .  .  .  .  .  .  .  .  .  .  .  .  .  .  .  .  .  .  .  .  .  .  .  .  .  .  .  .  .  .  .  .  . 35
                4.2 Disinfecting. .  .  .  .  .  .  .  .  .  .  .  .  .  .  .  .  .  .  .  .  .  .  .  .  .  .  .  .  .  .  .  .  .  .  .  .  .  .  .  .  .  .  . 35

         5 Safety		 .  .  .  .  .  .  .  .  .  .  .  .  .  .  .  .  .  .  .  .  .  .  .  .  .  .  .  .  .  .  .  .  .  .  .  .  .  .  .  .  .  .  .  .  .  .  .  .  36
           5.1 About Diagnostic Ultrasound. .  .  .  .  .  .  .  .  .  .  .  .  .  .  .  .  .  .  .  .  .  .  .  .  .  .  .  .  .  .  .  .  . 36
         		5.1.1		    Interactions With Matter. .  .  .  .  .  .  .  .  .  .  .  .  .  .  .  .  .  .  .  .  .  .  .  .  .  .  .  .  .  .  .  . 37
         		5.1.2		    Studies .  .  .  .  .  .  .  .  .  .  .  .  .  .  .  .  .  .  .  .  .  .  .  .  .  .  .  .  .  .  .  .  .  .  .  .  .  .  .  .  .  . 37
         		5.1.3		    Biological Risks. .  .  .  .  .  .  .  .  .  .  .  .  .  .  .  .  .  .  .  .  .  .  .  .  .  .  .  .  .  .  .  .  .  .  .  .  . 37
           5.2 Safety Topics. .  .  .  .  .  .  .  .  .  .  .  .  .  .  .  .  .  .  .  .  .  .  .  .  .  .  .  .  .  .  .  .  .  .  .  .  .  .  .  .  .  . 37
         		5.2.1		    Product Safety . .  .  .  .  .  .  .  .  .  .  .  .  .  .  .  .  .  .  .  .  .  .  .  .  .  .  .  .  .  .  .  .  .  .  .  .  . 37
         		5.2.2 Battery Safety .  .  .  .  .  .  .  .  .  .  .  .  .  .  .  .  .  .  .  .  .  .  .  .  .  .  .  .  .  .  .  .  .  .  .  .  .  . 38
         		5.2.3 Cleaning Safety .  .  .  .  .  .  .  .  .  .  .  .  .  .  .  .  .  .  .  .  .  .  .  .  .  .  .  .  .  .  .  .  .  .  .  .  . 38
         		5.2.4 Clinical Safety .  .  .  .  .  .  .  .  .  .  .  .  .  .  .  .  .  .  .  .  .  .  .  .  .  .  .  .  .  .  .  .  .  .  .  .  .  . 39
         		5.2.5 Biological Safety. .  .  .  .  .  .  .  .  .  .  .  .  .  .  .  .  .  .  .  .  .  .  .  .  .  .  .  .  .  .  .  .  .  .  .  . 39
         		5.2.6 ALARA Principle .  .  .  .  .  .  .  .  .  .  .  .  .  .  .  .  .  .  .  .  .  .  .  .  .  .  .  .  .  .  .  .  .  .  .  .  . 40
         		    5.2.7 Fire & Electrical Safety. .  .  .  .  .  .  .  .  .  .  .  .  .  .  .  .  .  .  .  .  .  .  .  .  .  .  .  .  .  .  .  .  . 45
         		5.2.8 Electromagnetic Safety . .  .  .  .  .  .  .  .  .  .  .  .  .  .  .  .  .  .  .  .  .  .  .  .  .  .  .  .  .  .  .  . 45

         6 References.  .  .  .  .  .  .  .  .  .  .  .  .  .  .  .  .  .  .  .  .  .  .  .  .  .  .  .  .  .  .  .  .  .  .  .  .  .  .  .  .  .  .  .  .  .  .  .  49
           6.1 Compliance Statement . .  .  .  .  .  .  .  .  .  .  .  .  .  .  .  .  .  .  .  .  .  .  .  .  .  .  .  .  .  .  .  .  .  .  .  . 49
           6.2 The Vave Wireless Ultrasound System . .  .  .  .  .  .  .  .  .  .  .  .  .  .  .  .  .  .  .  .  .  .  .  .  .  .  .  . 49
         		6.2.1		   Product Classification . .  .  .  .  .  .  .  .  .  .  .  .  .  .  .  .  .  .  .  .  .  .  .  .  .  .  .  .  .  .  .  .  . 49
         		    6.2.2 Product Serial Number.  .  .  .  .  .  .  .  .  .  .  .  .  .  .  .  .  .  .  .  .  .  .  .  .  .  .  .  .  .  .  .  . 49
         		6.2.3 System Specifications . .  .  .  .  .  .  .  .  .  .  .  .  .  .  .  .  .  .  .  .  .  .  .  .  .  .  .  .  .  .  .  .  . 50
                                                                                                                                                                          3
Vave Wireless Ultrasound • U S ER M A N UA L

           6.3 Standards .  .  .  .  .  .  .  .  .  .  .  .  .  .  .  .  .  .  .  .  .  .  .  .  .  .  .  .  .  .  .  .  .  .  .  .  .  .  .  .  .  .  .  . 50
         		6.3.1		   Biocompatibility.  .  .  .  .  .  .  .  .  .  .  .  .  .  .  .  .  .  .  .  .  .  .  .  .  .  .  .  .  .  .  .  .  .  .  .  . 50
         		6.3.2 Electrical Safety.  .  .  .  .  .  .  .  .  .  .  .  .  .  .  .  .  .  .  .  .  .  .  .  .  .  .  .  .  .  .  .  .  .  .  .  . 50
         		6.3.3 Federal . .  .  .  .  .  .  .  .  .  .  .  .  .  .  .  .  .  .  .  .  .  .  .  .  .  .  .  .  .  .  .  .  .  .  .  .  .  .  .  .  . 51
         		6.3.4 Labeling. .  .  .  .  .  .  .  .  .  .  .  .  .  .  .  .  .  .  .  .  .  .  .  .  .  .  .  .  .  .  .  .  .  .  .  .  .  .  .  .  . 51
         		6.3.5 Quality .  .  .  .  .  .  .  .  .  .  .  .  .  .  .  .  .  .  .  .  .  .  .  .  .  .  .  .  .  .  .  .  .  .  .  .  .  .  .  .  .  . 51
         		    6.3.6 Security & Privacy.  .  .  .  .  .  .  .  .  .  .  .  .  .  .  .  .  .  .  .  .  .  .  .  .  .  .  .  .  .  .  .  .  .  .  . 52
         		6.3.7 Wireless. .  .  .  .  .  .  .  .  .  .  .  .  .  .  .  .  .  .  .  .  .  .  .  .  .  .  .  .  .  .  .  .  .  .  .  .  .  .  .  .  . 52
           6.4 Wireless Compliance with FCC and ISEDC .  .  .  .  .  .  .  .  .  .  .  .  .  .  .  .  .  .  .  .  .  .  .  .  .  . 55
           6.5 Acoustic Output Tables.  .  .  .  .  .  .  .  .  .  .  .  .  .  .  .  .  .  .  .  .  .  .  .  .  .  .  .  .  .  .  .  .  .  .  .  . 53
           6.6 Control Effects Guidance Documents.  .  .  .  .  .  .  .  .  .  .  .  .  .  .  .  .  .  .  .  .  .  .  .  .  .  .  .  . 54
           6.7 Cleaners & Disinfectants .  .  .  .  .  .  .  .  .  .  .  .  .  .  .  .  .  .  .  .  .  .  .  .  .  .  .  .  .  .  .  .  .  .  .  . 55
           6.8 Glossary of Terms . .  .  .  .  .  .  .  .  .  .  .  .  .  .  .  .  .  .  .  .  .  .  .  .  .  .  .  .  .  .  .  .  .  .  .  .  .  .  . 55
         		6.8.1		   Acoustic Outputs. .  .  .  .  .  .  .  .  .  .  .  .  .  .  .  .  .  .  .  .  .  .  .  .  .  .  .  .  .  .  .  .  .  .  .  . 55
         		6.8.2 Acoustic Artifacts. .  .  .  .  .  .  .  .  .  .  .  .  .  .  .  .  .  .  .  .  .  .  .  .  .  .  .  .  .  .  .  .  .  .  .  . 56

                                                                                                                                                                 4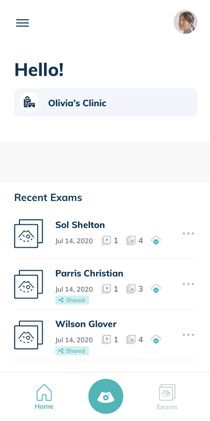
Vave Wireless Ultrasound • U S ER M A N UA L

         About This Manual

         This document is licensed as part of the purchase of the Vave Wireless Ultrasound Solution and is intended to
         meet FDA regulatory requirements. Install, operate, and maintain the Vave Wireless Ultrasound according to the
         safety and operating procedures in this manual, and only for its intended purpose. Always use the information
         in this document with sound clinical judgment and best clinical procedures. Information in this Manual is subject
         to change. To obtain the latest version, go to www.vavehealth.com. You can also obtain a printed copy of this
         manual at no additional cost, go to www.vavehealth.com and contact Vave Health.

         This document contains:
         Product Information: Description, technical specifications, and intended use
         Product Quick Start: Begin scanning
         Product Usage: Features, system set up and performance
         Product Care: Cleaning and disinfection
         Product Safety: Critical safety standards, principles, and policies
         References: Regulatory requirements, terms and conditions, glossary of terms, and acoustic output data

         Target Audience
         This document is written for trained healthcare professionals.

         Document Conventions

                   Touch Gestures

                                  Drag                                          Swipe
                                  Press and move in any direction               Press and quickly move finger left or right

                                  Tap                                           Pinch
                                  Press and release press quickly               Press with two fingers and bring them together

                                  Press and Hold                                Zoom
                                  Press and hold press                          Press with two fingers and spread them out

                   Icons

                      ! Caution         Possible risks beyond the reasonable control of Vave Health

                      X Avoid           Actions to avoid

                      »    Note         Information/Suggestions

                                                                                                                                 5
Vave Wireless Ultrasound • U S ER M A N UA L

         1 About the Vave Wireless Ultrasound

         The Vave Wireless Ultrasound is subject to the laws in the jurisdiction in which it is used. Install, use, and operate
         the product only in ways that adhere to applicable laws or regulations.

         • Using the product incorrectly, or for purposes other than intended and expressly stated in this manual may
            release Vave or its agents from some or all responsibility for resultant noncompliance, damage, or injury.
         • In compliance with part 15 of the FCC rules, operation of this device is subject to the following two conditions:
            (1) this device may not cause harmful interference, and (2) this device must accept any interference received,
            including interference that may cause undesired operation.
         • Install and operate medical equipment according to electromagnetic compatibility (EMC) guidelines.
            This product has demonstrated EMC compliance under conditions that include the use of compliant peripheral
            devices. Using portable and mobile radio-frequency (RF) communications equipment can
            affect the operation of medical equipment.
         •D o not operate the system in the presence of flammable gases or anesthetics.
         •U sers are responsible for image quality and diagnosis.
         • Keep product packaging with medical device. Do not dispose.

         1.1 System Description
         The Vave Wireless Ultrasound is a wireless, pocket-sized diagnostic ultrasound device consisting of both
         hardware and a mobile application (“Vave Health App”). The purpose of the system is to provide a low-cost, easy
         to use and high-quality ultrasound platform for teaching and clinical applications.

         The ultrasound probe (“Vave Probe”) uses a state-of-the-art piezoelectric transducer, and houses a removeable
         lithium ion battery and components required for ultrasound imaging and Wi-Fi connectivity.

         The Vave Probe can wirelessly transmit data to a mobile application (“Vave Health App”), which displays the
         ultrasound images and allows certain image parameter modifications through its user interface. The mobile
         application runs on non-proprietary commercial display devices capable of supporting wireless connections (iOS
         or Android based tablets or phones) so users can view images and control the Vave Probe on a mobile device.
         Ultrasound scans can be saved in an examination file on the device and exported for storage or printing.

                   Vave Probe			                      Vave Health App
         					(display device not included)

                                                                                                                                  6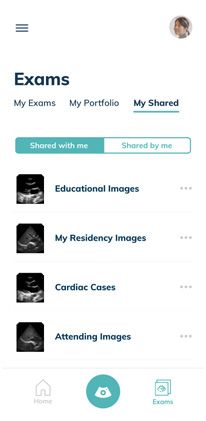
Vave Wireless Ultrasound • U S ER M A N UA L

         The Vave Probe contains a removable lithium ion battery. The battery is charged through the provided charger.

         Battery Specifications:
          Battery manufacturer                  Vave Health, Inc
          Battery type/chemistry                Lithium ion
          Battery model number                  VBT
          Battery management                    Fuel gauge with protection circuitry and temperature monitoring
          Battery life                          500 cycles
          Charger                               Input: 100-240 VAC, 50/60 Hz, 1.0-0.6 A Output: 12 VDC, 2.5 A
          Battery                               3.7 V/4800 mAh
          Charge time                           < 12 hours from an empty battery to full charge
          Scan time                             Over 1 hour of continuous operation in B-Mode

         1.2 System Dimensions

                                                Dimensions 169x54x38 mm (including battery)
          Vave Probe                            Weight 205 g (without battery)
                                                Frequency range 1.5 MHz to 3.5 MHz

                                                Dimensions 83.4x54x21.8 mm
          Vave Battery
                                                Weight 115 g

                                                Dimensions 104x59.9x44.9 mm
          Vave Charger
                                                Weight 130 g

         1.3 Accessories
         The following two accessories are provided as part of the Vave Wireless Ultrasound Solution (one battery
         and one battery charger per system). If you would like to purchase additional batteries or chargers, please
         contact Vave Health.

         Before you begin using your Vave Battery or Battery Charger, clean and disinfect it according to the
         Cleaning & Disinfecting Section 4 of this manual.

                   1.3.1 Battery
                   The Vave Battery is a removable Li-ion battery, rechargeable only through the Vave Battery Charger.
                   The battery is rated for IP67 and has been tested to IEC 62133 to ensure patient and operator safety.

                   1.3.2 Battery Charger
                   The Vave Battery charger is a charging unit exclusively intended to charge the Vave Battery. The charger consists of
                   electronic components that control the charge profile and an LED light to indicate the charging status of the battery.

                   The battery charger unit includes an off-the-shelf, medical-grade AC/DC wall adapter. The battery charger has
                   been tested to IEC 60601-1 and IEC 60601-1-2 to ensure patient and operator safety.

                   For further information regarding the battery, see:

                                                                                                                                        7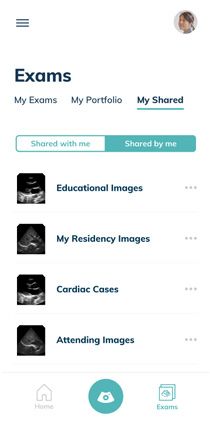
Vave Wireless Ultrasound • U S ER M A N UA L

                   Battery Specifications Section 1.1 System Description (Battery Specifications), 1.2 System Dimensions (Battery &
                   Battery Chargeetyr Dimensions), 3.3 Inserting & Removing Battery (Inserting, Removing, Charging the Battery),
                   3.14.1 Hardware Maintenance and Store (Recharging Batteries), 5.2.2. Battery Safety.

                   1.4 Product Usage

                   1.4.1 Intended Use
                   The Vave Probe is intended for diagnostic ultrasound imaging in, M-Mode and Color Doppler Mode. It is indicated
                   for diagnostic ultrasound imaging in the following applications: Fetal/Obstetrics, Abdominal (includes Gynecology,
                   Renal, and Urology), Pediatric, Thoracic/Pleural, Cardiac Adult, Cardiac Pediatric, Peripheral Vessel, and procedural
                   guidance of needles into the body.

                   The Vave Probe is a transportable system that is intended for use in environments where healthcare
                   is provided by trained healthcare professionals.

                   Diagnostic Ultrasound Indications for Use
                   System: Vave Probe
                   Transducer: Phased Array
                   Intended Use: Diagnostic ultrasound imaging of the human body as in the chart on the following page.

                                                                                                                                       8
Vave Wireless Ultrasound • U S ER M A N UA L

                          Clinical Application                                            Mode of Operation

               General                     Specific                                                   Color       Combined     Other*
            (Track 1 Only)              (Tracks 1 & 3)           B        M       PWD      CWD       Doppler      (Specify)   (Specify)

              Ophthalmic        Ophthalmic

                                Fetal                           N         N                              N        B+M, B+C

                                Abdominal                       N         N                              N        B+M, B+C

                                Intra-operative (Specify)

                                Intra-operative (Neuro)

                                Laparoscopic

                                Pediatric                       N         N                              N        B+M, B+C

                                Small Organ (Specify)

                                Neonatal Cephalic

            Fetal Imaging       Adult Cephalic
               & Other
                                Trans-rectal

                                Trans-vaginal

                                Trans-urethral

                                Trans-esoph. (non-Card.)

                                Musculo-skeletal
                                (Conventional)

                                Musculo-skeletal
                                (Superficial)
                                Intravascular

                                Other (Thoracic/ Pleural)       N         N                              N        B+M, B+C

                                Cardiac Adult                   N         N                              N        B+M, B+C

                                Cardiac Pediatric               N         N                              N        B+M, B+C

                                Intravascular (Cardiac)
                Cardiac
                                Trans-esoph. (Cardiac)

                                Intra-cardiac

                                Other (Specify)

                                Peripheral vessel               N         N                              N        B+M, B+C
                                Other (Nonvascular)             N         N                              N        B+M, B+C
          N = new indication; P = previously cleared by FDA; E = added under this appendix
          * Examples of other modes of operation may include: A-mode, Amplitude Doppler, 3-D Imaging, Harmonic Imaging,
             Tissue Motion Doppler, and Color Velocity Imaging

                   Includes imaging to assist in a) needle and catheter placements in vascular or other anatomical structures and
                    b) guidance for nerve block procedures.

                   • Abdominal includes gynecology, renal and urology
                   • Thoracic/pleural detection of fluid and pleural motion/sliding
                   • Peripheral vessel includes arteries and veins
                   • Non-vascular is image guidance for freehand needle/catheter placement

                                                                                                                                          9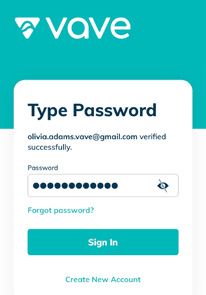
Vave Wireless Ultrasound • U S ER M A N UA L

                   For Use in Surgical Environments
                   Before you use the Vave Probe for intra-operative procedures, follow the instructions for high-level disinfection
                    (for instructions see page 32), then cover the Vave Probe with a sterile sheath:
                    • Use only CIVCO REF 610-1212.
                    • Download the usage instructions from http://civco.com and read all the information before use.

                    hen you have finished using the Vave Probe, immediately clean it (for instructions, see the “Cleaning and
                   W
                   Disinfecting” section of this User Manual), followed by another high-level disinfection.

                   If the sheath breaks during the intra-operative procedure, dispose the sheath and follow the same cleaning and
                    high-level disinfection process as above, then cover the Vave Probe with a new sheath before continuing use.

                   Additional Usage Notes:
                   •C  ircumstances in the patient’s environment may negatively impact the scanner and the exam. For example:
                      (1) Chemicals and gases in the operating room. (2) Altitudes below -382 m or above 4000 m.
                   • Vulnerable patients, such as children and pregnant/nursing women, may be more prone to negative
                      effects from prolonged exposure to acoustic energy during scanner use.
                   •B  iological incompatibility may exist between scanner materials and the biological tissues, cells,
                      and body fluids of the patient/user.
                   •U  sing the scanner in the patient environment may be unsafe in conditions of extremes in humidity
                      (RH90%) or extreme temperature (40°C / 104°F ).
                   •U  sers should be trained healthcare professionals (e.g., doctors, nurses, technicians) with
                      previous training in ultrasound.
                    ! Caution: Federal law restricts this device to sale by or on the order of a physician

                   Symbols Glossary
                   These symbols are included in our product literature and industrial design in compliance with ISO and IEC
                   regulatory standards. Please consult the table below for each symbol and its meaning.

                   Standard Icon Glossary

                                    IEC 60417 - 5172 Class II equipment

                                    IEC 60417 - 5333 Type BF applied part

                                    ISO 7010 - M002 Refer to instruction manual/booklet

                                    ISO 7000 - 1641 Operator’s manual; operating instructions

                                    ISO 7010 - W001 General warning sign

                                    Additional symbols: Caution

                   1.4.2 Contraindications
                   The Vave Wireless Ultrasound is not intended for use in the following situations:
                   • Introducing the Vave Probe within a body cavity or organ (= endocavitary use, e.g. rectum, vagina or esophagus)

                                                                                                                                        10
Vave Wireless Ultrasound • U S ER M A N UA L
1.5 Hardware
1.5.1 Warranty
Your Vave Probe includes a minimum one-year warranty. See www.vavehealth.com for current information/
1.5.2 Disposal
Vave Probe and accessories are designed and manufactured in alignment with environmental protection standards.
Disposal should follow the same standards. Vave Probe materials required for quality treatment and functionality
can be environmentally hazardous if improperly disposed. Please follow all local, state, and federal regulations or
return materials to Vave Health.
1.6 Security
1.6.1 Information Security
Protecting the privacy and security of patient health information is an important responsibility of the healthcare
provider and medical device manufacturer. The Vave Health App and Vave Probe are designed to safeguard the
confidentiality, integrity, and availability of electronic patient information and reduce the risk of security breaches. It
is the users’ responsibility to use the Vave Probe in accordance with this guide, security guidance, the policies of your
institution, and regulatory requirements.
Vave Health’s Role in Product Security
Vave Health conducts ongoing security assessments and testing to identify potential security weaknesses in the Vave
Health platform. The Vave Health product engineering team monitors for vulnerabilities in our software, third-party
software, and mobile operating systems. With that information, the Vave engineering team revises its software and
systems, implements security controls, and releases software patches to minimize security threats.
Users’ Role in Product Security
Warning: Unauthorized modifications to your mobile device (“rooting” or “jailbreaking”) can cause the ultrasound
system to malfunction, lead to data theft, or potential misdiagnosis. The Vave App is designed to detect unauthorized
modifications to your device and will not run if the device has been modified.
Warning: To minimize the risk to patient data security, Vave Health recommends you install applications only from
trusted sources and limit their installation and use to healthcare and business needs.
Secure Device Use
It is your responsibility to use the Vave Probe as described in the “Using the Vave Probe” and “Security Guidelines”
sections in this manual. Consult your Healthcare Information Technology Security team to ensure your mobile device
is configured in accordance with your specific site requirements and data export/sharing policies.
11Vave Wireless Ultrasound • U S ER M A N UA L
Security Updates
The Vave Platform restricts device firmware updates to authorized software distributed through the Vave Health
App. It is your responsibility to upgrade the Vave Probe and Firmware as described in the “Updating the Vave
Probe” section of this manual. In addition, it is your responsibility to upgrade and apply operating system and
security updates to your mobile device.
iOS Operating System Updates
1. Connect your device to both a power source and trusted Wi-Fi
2. Tap Settings > General > Software Update
3. Tap Download and Install.
Android Operating System Updates
1. Connect your device to power and trusted Wi-Fi
2. Open Settings
3. Select About Device or About Phone
4. Tap Check for Updates
5. Install (Install Now, Reboot and Install, or Install System Software) as prompted.
1.6.2 Network Security
Warning: Connecting to an untrusted wireless access point or network may allow malicious parties to see your
Wi-Fi signals, perform harmful actions, and view communications from your mobile device.
Your mobile device connects to the Vave Probe using a private Wi-Fi network that supports WPA2 encryption
(Wi-Fi Protected Access). The Wi-Fi password is unique to your Vave Probe.
The Wi-Fi SSID and serial number of the Vave Probe are listed on the label affixed to the Vave Probe. The serial
number will be your Wi-Fi WPA2 passcode. For instructions, see the “Connecting Your mobile device to a Vave
Probe” section of this guide.
You are able to connect your mobile device to your local institution network and the internet using Wi-Fi or cellular
device connection. When connecting to Wi-Fi, we recommend that you only connect to networks that are secured
with WPA2 using a password or certificate.
For information on connecting your mobile device to your institution’s Wi-Fi network, follow the instructions of your
Information Technology team and refer to your network equipment documentation.
Credential Security
Warning: Change your Vave Health account password if you suspect it may have been revealed, discovered,
or otherwise compromised.
It is your responsibility to protect your security credentials (i.e. your UserID/Email and password) used to sign-
in to the Vave App. We recommend to use strong passwords that are at least 10 characters and include special
characters or a long passphrase.
We recommend you use a unique, dedicated password for your Vave Health App. Never reveal your password to
anyone and change your password if you suspect compromise.
Device Access
To prevent unauthorized access to the Vave Health App, ensure your mobile device requires a passcode, PIN,
pattern or biometric identification for access. We recommend configuring your mobile device to lock after a
maximum of 15 minutes of inactivity.
12Vave Wireless Ultrasound • U S ER M A N UA L
Encryption
The Vave Health App automatically encrypts information and images contained within the Vave Health App. For
additional protection, we recommend enabling device encryption to help ensure all data stored on the system is
protected and increase the strength of your access-control, rendering data unrecoverable by unauthorized users.
Physical Device Control
You and your healthcare organization should control and limit physical access to the Vave Probe to prevent
accidental, casual, or deliberate contact by unauthorized individuals.
Report any loss of theft of your Vave Probe or mobile device to your security and/or privacy officer.
Visual Access Control
Minimize unauthorized visual access to protected patient information by maintaining awareness of where the device
is being used, positioning the device to prevent viewing from over-the-shoulder, through doorways, hallways, and
other traffic areas.
Image Export, Transmission, and Upload
Normal operation of the device operates over the secure/encrypted dedicated Wi-Fi network between the mobile
device and Vave Probe and Vave Health App encrypted data store.
Exported data that is saved to the local “camera roll” of the device and is no longer protected by Vave Health App
credentials. Exported data is de-identified to minimize the risk of data breach.
Exported images may also be shared or emailed via your local institution Wi-Fi network, cellular network, text/SMS,
or other public Wi-Fi network. Follow your institution’s policy on the proper and approved use of institution email,
personal email services and text/SMS when attempting to export or share data from the Vave Probe.
Warning: Personal email services, text/SMS, and untrusted Wi-Fi networks may not be secure and could compromise
patient privacy.
! Caution:
Any individual with biometric, password, or PIN access to your mobile device will be able to view and
access de-identified images in your camera roll.
1.6.3 Confidentiality
Patient Information in the Vave App is encrypted in storage — and in transmit between the probe and app — using
industry standard AES encryption to reduce the risk of data breach if the device is lost or stolen.
Credential information (passwords) for the Vave Health App is stored using a one-way cryptographic function in a
secure key enclave on the mobile device.
Images shared or exported to a saved scan folder or to the camera roll are de-identified and do not contain
Protected Health Information (PHI). We recommend ultrasound images are reasonably secured and access
to image data be restricted when possible. We recommend deleting images in the local camera roll when
no-longer needed.
1.6.4 Integrity
Integrity of the data transmitted between the Vave Probe and the Vave Health App is assured as follows:
• Authentication and encryption reduce the risk of a malicious user interception, viewing, or modifying data.
• Integrity checks ensure the completion and validity of image data received
– TCP channels are used to ensure that image information is delivered correctly
– UDP channels are used for image transmission with checksums
– If data for an image is incomplete or invalid, the entire image frame is discarded
13Vave Wireless Ultrasound • U S ER M A N UA L
1.6.5 Availability
Images and cines are maintained in the Vave Health App until they are deleted by the user. After a large number of
images are stored, the device storage may become full, requiring image deletions before storing additional images.
The Vave Health App requires an internet connection to register a new user and/or Vave Probe. The internet is
required when logging in to the Vave Health App after logging out, Vave Health App update, or after a period of 30
days. Unless logged out, users can stay logged into the Vave Health App for 30 days without an internet connection.
Images are maintained locally on the mobile device. Device Failure, accidental deletion, or device reset will erase all
images on the mobile device. To maintain long term availability of images, the mobile device should be backed up
— or images exported and saved on an external system.
1.6.6 Accountability
If you suspect that your password has been compromised, suspect that your device may be infected with malware,
or the behavior of the device is not as expected, you should immediately notify the privacy and/or security personnel
at your institution. Additionally; you should Contact Vave Health Customer Support as specified in the “Help” section
of this manual.
1.7 System Requirements
Using the Vave Wireless Ultrasound with a smart device that does not meet the minimum requirements may
result in low-quality images, unexpected results and possible misdiagnoses.
iOS Devices:
Minumum Device Requirements
• Operating System: iOS 12+
• Processor: CPU: A10+
• Technical Features: GPU: PowerVR Series 7+. RAM: 2 GB+
Recommended Requirements
• Operating System: iOS 13+
• Processor: CPU: A11+
• Technical Features: Apple GPU. RAM: 3 GB+
Android Devices
Minumum Device Requirements
• Operating System: Android™ 6+
• Processor: CPU: Quad-core+
• Technical Features: GPU: Dedicated GPU. RAM: 3 GB+
Recommended Requirements
• Operating System: Android™ 8+
• Processor: CPU: Octa-core
• Technical Features: GPU: Dedicated GPU. RAM: 3 GB+
14Vave Wireless Ultrasound • U S ER M A N UA L
2 Quick Tour
2.1 Interface and Screens Overview
2.1.1 Icons
15Vave Wireless Ultrasound • U S ER M A N UA L
2.1.2 Alerts and Notifications
Use the table below to identify and understand alerts displayed in the Vave interface.
Vave Health App Interface Alerts
Password Error
If you do not enter the correct password, you will be
prompted to try again to enter the correct password.
Wrong Email Format
You’ll see this warning when the email address you entered is
not typed with an “@” symbol or does not meet internet email
format standards.
Sign-in Failure
This alert will appear if you submitted a password doesn’t match
the email address you entered —or if no account has been
created with the email address you entered.
Low Battery
If your probe is running out of battery power, a
low battery alert will appear on top of the screen.
Temperature Alerts
To protect your device, the probe’s software will alert you to
potential overheating, and if the probe gets too hot, it will give
you a 30-second warning before automatically shutting down.
No Wi-Fi
This alert shows up if you are not connected to the
internet when trying to register new probe.
Required Update
If there is a required update for the probe available,
you will see a required update alert.
Optional Update
If there is an optional update for the probe available,
you will see an optional update alert.
16Vave Wireless Ultrasound • U S ER M A N UA L
2.1.3 Sign-in Page
When you open the Vave
Health App, it displays a
sign-in screen for your user
ID/Email and password.
After tapping Continue, you
can enter your password
and tap Sign In to submit the
password and log in.
Forgot Password: Enter your
email to receive a verification
code to be entered on your
phone so you can reset your
password.
2.1.4 Menu Options:
Home Scan Exams
Navigate your device: Select your scanning tools: See collections of exams
you have completed:
• Your Organization •T
op Menu: TI/MI, Presets,
• Recent Exams Probe Battery and •M
y Exams: Exams you
• Settings Tempertaure, Patient have performed
Information and Data •M
y Portfolio: Organize
•B
ottom Menu: Imaging your exams into folders
Mode, Image Capture and •M
y Shared: Exams that
Image Gallery you have shared or have
been shared with you.
17Vave Wireless Ultrasound • U S ER M A N UA L
2.1.5 How to Begin Scanning
Once you’re signed in, you will see the Home screen. Now, turn the probe on. To start scanning, tap the circular
Scan button in the center of the bottom menu, and the app will guide you through the connection process.
Once you’re connected to the probe, you can start an ultrasound scan.
2.1.6 Enter Patient Information
Now you can enter Patient Information by tapping on the patient icon in the top menu on the right:
2.1.7 Presets
Next you can choose from the following optimized imaging presets:
• Cardiac
• Abdominal
• Lung
• OB/GYN
2.1.8 Imaging Page
Here you can manipulate the visualization of the image (depth, gain) — and freeze or save images/movie clips
18Vave Wireless Ultrasound • U S ER M A N UA L
2.1.9 Gallery
During imaging sessions, you can evaluate and edit images and cines acquired during the exam, access Patient
Data, Exam Notes and Discussions. When finished, tap the End Exam button at the bottom of the screen.
2.1.10 Exams Screen
Tap the Exams icon in the bottom-right corner of your Home screen to review
all of your Exams and access My Portfolio and My Shared tabs.
19Vave Wireless Ultrasound • U S ER M A N UA L
3 Using The Vave Probe
This chapter explains how to install and use your Vave Probe safely and effectively. Refer to the safety section of
this manual before handling the Vave Probe.
! Ensure your mobile device requires a passcode, PIN, pattern or biometric identification for access.
We recommend configuring the device to lock after a maximum of 15 minutes of inactivity.
! Ensure your mobile device follows your institution’s security policy.
3.1 Downloading the Vave Health App
3.1.1 iOS
Operating system required: iOS 12+
To download the Vave Health App:
• Go to the App store and search for the Vave Health App
• To download, tap the Install button and follow the on-screen instructions
• To launch, tap the Open button
• If you can’t find the App, your device might not meet the minimum
requirements or the App might not be available in your country
3.1.2 Android
Operating system required: Android™ 6+
Before downloading the Vave Health App, you need to have an Google Play Store account. If you can’t find the App,
your device might not meet the minimum requirements or the App might not be available in your country.
• Go to the app store and search for the Vave Health App
• To download, tap the Install button and follow the on-screen instructions
• To launch, tap the Open button
3.2 Updating the Vave Probe
3.2.1 Software Updates
Update notifications will appear in the Vave Health App, as well as in the App store or Google Play Store when
they become available. If the update is mandatory, you will not be able to use the Vave Health App until you have
downloaded the update.
3.2.2 Firmware Updates
After you connect to the probe’s Wi-Fi, a red “Firmware Update Available” notification will appear if a firmware
update is needed. Tap on the “Update” button to install, and a loading screen will show the update progress.
20Vave Wireless Ultrasound • U S ER M A N UA L
3.3 Inserting & Removing Battery
For more information regarding battery usage please refer to the Maintenance Section 3.11 of this manual.
3.3.1 Inserting the Battery
To insert the battery into the Vave Probe:
1. Make sure that the battery contacts are facing downward and that the battery label is facing the Vave Probe.
2. Slide the battery into the Vave Probe until it locks into place.
3.3.2 Removing the Battery
To remove the battery from the Vave Probe:
1. Pull the battery away from the Vave Probe
2. Slide the battery out of the Vave Probe
3.3.3 Charging the Battery
• Connect the line cord of the AC power adapter to an indoor electrical outlet
• Connect the AC power adapter to the receptacle on the battery charger
• Remove the battery from the Vave Probe by following the instructions on Removing the Battery above
• Insert the battery into a slot on the battery charger
3.4 Turning the System On & Off
Make sure you have the Vave Probe, and also your smart device with the Vave Health App installed.
3.4.1 Turning On the Vave Probe & Starting the Vave Health App
• To turn on the Vave Probe, press the power button on the probe for 1 second
• The blue light on the probe base will turn on, changing to green when the probe is ready to be connected
• Now open the Vave Health App on your smart device’s home screen
3.4.2 Exiting the Vave Health App & Turning Off the Vave Probe
• To close the App, simply exit the Vave Health App — any open exam will be saved,
even if you close the app without ending the current exam session
• To turn off the probe, press the power button on the probe, and the light will turn off
21Vave Wireless Ultrasound • U S ER M A N UA L
3.5 Account Creation, Signing In & Out
3.5.1 Creating Account
1. Open the Vave Health App and tap the “Create New Account” button on the Sign In screen
2. Enter your email address and create a password that you will use each time you sign in
3. Read and agree to the Terms of Service and Privacy Policy
4. Open your email account and follow the link to validate your email sent by Vave Health
5. Now return to the Vave Health App and complete your profile
3.5.2 Register/Sign-In with Invitation Link
If your account is being set up or provisioned by your organization's administrator, you will receive an email
with a link inviting you to register or sign-in to your account. Simply follow the link to finish creating your profile.
3.5.3 Signing In
To sign in, open your App and enter your email and Password.
3.5.4 Signing Out
You can log out of your account at any time from your profile settings page.
Note: You will be automatically signed out after 30 days.
3.5.5 Forgot Password
1. To reset your password, enter the email address you used to sign up and tap the “Continue” button
2. When the app prompts you to enter your password, tap the “Forgot password?” link,
then enter your email address and tap “Continue” to receive your verification code
3. Now go to your email account and copy the verification code
4. E nter the verification code in the app and create your new password
5. Your new password is set — just reenter it one more time to proceed
22Vave Wireless Ultrasound • U S ER M A N UA L
3.6 Organizations
If you are affiliated with an organization for which you perform ultrasound exams,
your organization's admin will need to add you as a member.
• If you belong to multiple organizations, you can switch
between them by tapping the hamburger menu ( Ξ ) at the
top left of the Home screen
• Exams are tied to the organization selected when scanning
• When you change organizations, you will only see Exams
cataloged for that organization
3.7 Connecting Your Smart Device to the Vave Probe
3.7.1 Connecting Your Device to the Vave Probe
1. Open the Vave Health App and turn on your probe
2. Tap the circular Scan button in the center of the bottom menu on
the Home screen and wait for the light to turn from blue to green
3. The App guides you through the connection process and when connected,
the Imaging screen appears and you can start an ultrasound scan
Note: You can manually connect your Probe
before entering the App by going to your
Wi-Fi settings and selecting the Wi-Fi network
beginning with “VAVE-VP3”.
3.8 Managing Patient Information
3.8.1 Entering Patient Information
You can enter Patient Information either during a scanning session by selecting the Patient Icon on
the top menu or in the Exams tab by selecting the “Patient Info” section in the Exams detail screen.
! Please make sure that you entered the correct patient information and always
be sure to follow your institution’s policies regarding Patient Health Information.
23Vave Wireless Ultrasound • U S ER M A N UA L
3.9 Imaging
Typical use of the Vave Probe is 5 minutes of continuous scanning,
followed by 10 minutes in standby mode or powered off.
3.9.1 Imaging Display Overview
The imaging display
screen includes:
• Exam Information
(MI and TI values)
• Image Information
(Preset, Frame Rate, etc.)
• An ultrasound image in
the center of the screen
• Image/Video Capture
• Mode Select (Fast Flow, etc.)
• Freeze Button
• Image Gallery
• To adjust Depth, swipe up (shallower) or down (deeper) over the ruler on the left side of the screen
• To manually adjust Gain, swipe left-to-right (increase) or right-to-left (decrease) on the ultrasound image
• You can adjust the Focal Point to a depth of 8 cm or less with a long press on the desired location
in the ruler area. The teal triangle to the left of the ruler indicates the current focal depth:
Zoom In/Zoom Out Captured Images (not while scanning)
•U se the pinch/zoom gesture to zoom in/out of an area on the image
• Once zoomed in, you can move the image by dragging your finger
24Vave Wireless Ultrasound • U S ER M A N UA L
3.9.2 Image Modes
Tapping the Modes icon in the bottom left corner will open a Mode bar with a choice of three modes: Fast Flow,
Slow Flow and M-Mode. To exit a mode, tap the red "End" button in the Mode bar at the bottom of the screen.
B-Mode (Default)
• When you start an exam, the Vave Probe defaults to B-Mode — or brightness mode, sometimes
referred to as "2D Mode" with two-dimensional imaging displayed in grayscale.
Color Doppler Mode
• To access Color Doppler Mode, tap either Fast Flow or Slow Flow in the Mode bar beneath the scanning image
• Adjust your region of interest — indicated by a white line — by pinching your app screen to adjust the width
and lateral position, and the proximal and distal bounds of the box
• You can also drag and drop the region of interest to a different location
M-Mode
• Choose M-Mode in the Mode bar — once chosen, you can initiate M-Mode by setting your M-Mode cursor
• When you release the M-Mode cursor, the M-Mode strip appears just below the B-Mode reference image
• You can further adjust the M-Mode cursor on the B-mode reference image while the M-Mode strip is displayed
• After pressing the freeze button, you can scroll back and forth through the M-Mode strip
25Vave Wireless Ultrasound • U S ER M A N UA L
3.9.3 Preset
From the imaging screen, you can change presets by tapping the preset icon in the top menu,
which allows you to choose from the following preset options:
• Cardiac
• Abdominal
• Lung
• OB/GYN
3.9.4 Scan Bottom Menu
Bottom menu contains Modes icon, Capture tools and the Gallery icon.
Mode
To select your desired mode, tap the Mode icon at the bottom left of the screen to
activate the Mode bar. To exit the mode, tap the red End button in the Mode bar.
Snap, Freeze/Unfreeze, Save Image and Cines
• To save an image directly to the gallery, tap the camera icon
• To freeze/unfreeze a live image, tap the snowflake icon
and then adjust the frame by horizontally sliding the frame slider.
•T o save a frozen image, tap the save image icon to the left
of the freeze button. To save the frozen cine, press the save
cine icon to the right of the freeze button.
• To record a cine, tap the record icon during live imaging;
to stop the recording, tap the record icon again, and your
recording will be automatically saved to the Exam.
3.9.5 Measurements and Annotations
From scanning screen, after freezing the image, you can access the following tools:
Linear Measurements, Area Measurements and Text Annotations:
Linear Measurement
•T o move a linear measurement, drag and drop the ends of the line
26Vave Wireless Ultrasound • U S ER M A N UA L
Area Measurements
• To adjust an area measurement, you can drag and drop the whole area measurement or
adjust size and shape by dragging and dropping individual points of the area outline
Text Annotations
• Tap the "T" Type icon to activate annotations — a text box and keyboard will appear so you can start typing notes
• When finished, tap the image — the text box and keyboard will disappear, and the text will turn green
• You can now drag the text to any point on the screen —or delete it by tapping the trash can at the bottom
• When positioned, tap the image to complete the annotation, and the text will turn to white
3.9.6 Vave Cast™
To allow others to view a live scanning session, tap the QR code icon on the scanning screen to broadcast your
imaging session. Your potential viewers will need to sign in to the Vave Health App to join. This will allow them to
view images, but doesn't allow them to make any adjustments.
27Vave Wireless Ultrasound • U S ER M A N UA L
9.7 Ending an Exam
To end an exam, tap the back button in the top left corner of the
imaging screen or choose “End Exam” on the Gallery screen
3.10 Review Findings
When you have finished imaging, you can evaluate and edit the exam images and cines.
Saved Exams:
• To view your saved exams, tap the Exams icon in the bottom menu from your Home screen,
where you will see three sections: “My Exams”, “My Portfolio” and “My Shared”
• Each section can have several folders — tap a folder name to open and view
the ultrasound images
• In the “My Portfolio” section you can collect and organize ultrasound images
• To add a new folder, tap “+ Create New Folder" and name the folder
3.10.1 Reviewing Images & Cines
Go to My Exams. Tap on a specific exam, then select Gallery to view all images from that exam. In the Gallery,
you can review saved images/cines — and simply tap on an image to open a detailed image view.
28Vave Wireless Ultrasound • U S ER M A N UA L
3.10.2 Manage Images
To select several images/cines: tap the select option and tap the images/cines you want to select.
To delete images/cines: select the image(s)/cine(s) and tap the trash icon.
To export/share images/cines:
1. Select the image(s)/cine(s) and tap the Share icon
2. Export/share Options will appear:
• Send via Email
• Copy Exam to my Portfolio
• Save to Camera Roll
• Send to PACS (if configured)
3. Choose your desired export option, follow the instructions, and a de-identified copy of the image will be exported:
To add images/cines to a saved scan folder:
1. Select the images and cines you wish to share
2. Tap the Share Icon for a popup list of potential places to send the files
3. Select “Copy to My Portfolio” and select the folder where you would like
to store the documents — or tap + to add a new folder
4. A de-identified copy of the images will be added to your chosen folder
! Exported images will be de-identified to remove any Patient Health Information (PHI)
! Make sure you follow hospital procedures regarding PHI
29Vave Wireless Ultrasound • U S ER M A N UA L
3.10.3 Manage Exams
1. Tap the three dots to the right of your desired exam
2. Options to export and share your exams will appear:
• Share
• Send via Email
• Save Exam to My Portfolio
• Save to Camera Roll
• Send to PACS
• Delete
To Share:
1. On the Exams screen, tap the session you would like to share and input your recipient’s email address.
2. To review your shared Exams, go to the “My Shared” tab and select “Shared by me” or "Shared with me”
Exam Discussion
The person you share an exam with can take part in your exam discussion. To view the discussion,
go to the Exams screen, tap on the specific exam and then tap the Discussion tab.
30Vave Wireless Ultrasound • U S ER M A N UA L
Vave Assist™
To access Vave Assist, tap the Exams button in the lower right corner and open the exam you
want to share. The "Share Exam with" icon will appear in the top right corner — just tap the icon,
and the exam will be shared for feedback.
3.11 Maintenance
The only maintenance required is to clean and disinfect the Vave Probe and battery according to the instructions
in the Cleaning & Disinfecting Section 4 of this manual. Perform maintenance regularly and as needed. The
system must be serviced by trained personnel only. Failing to regularly maintain or verify
your Vave Probe may lead to undetected performance errors.
3.11.1 Hardware Maintenance and Storage
Recharging Batteries
When you receive your Vave Probe, charge the battery to 100% before use.
• Because the Vave Probe is battery-operated, you must recharge the battery when necessary. An empty
battery takes approximately 4 hours to fully charge. Once fully charged, a battery has approximately
2 hours of typical scanning time.
• Charge the battery using only the specified charger. Connecting the battery charger to a power supply
not manufactured by Vave may expose the battery to the incorrect voltage/current, which could damage
the battery charger.
•D o not charge the battery while on board an aircraft. Charging the battery in a rotary-wing airborne
ambulance may cause the battery charger’s power supply to interfere with the aircraft’s electrical system.
• The battery power level of the Vave Probe is displayed in the Vave App when the probe is connected to
your smart device. When the battery reaches a charge level equal to less than 10 minutes of residual
scanning time, a visual warning is presented to the user.
Storing Scanners
To protect your Vave Probe:
» Dry thoroughly before storage
» Avoid storing in extreme temperatures
» Avoid
placing under direct sunlight for prolonged periods of time, as it may discolor
the housing’s finish but will not impact the Vave Probe’s safety and performance
» Store separately from other equipment — more details can be found in the System Specifications
Section 6.2.3 of this manual under “Environmental Operating, Transient and Storage Conditions”
31Vave Wireless Ultrasound • U S ER M A N UA L
3.12 Settings
3.12.1 Profile Settings
From the Home screen, you can tap on the user avatar in the upper-right corner to open profile settings.
There, you can change your profile, log out of your account or reset your password. You can also change
your avatar by uploading an image/photo. The email address is tied to an account and cannot be
changed by the user. To use a new email, you will need to create a new account.
3.12.2 Settings
You can access the Settings menu panel by tapping the hamburger menu ( Ξ )
in the top left corner. On the side menu:
• Join Vave Cast™
• PACS Configuration
• Imaging Settings
• Support
• About
• Vave Cloud
• Profile Settings
Join Vave Cast™
This allows you to view someone else's Vave Cast session. At the beginning of a session, a QR code will be
displayed on the scanning screen. Simply position your device's camera over the QR code and tap accept to
start viewing their screen. This is a view-only mode, so you will not be able to make adjustments to the image.
32Vave Wireless Ultrasound • U S ER M A N UA L
PACS Configuration
You can select an existing PACS configuration or set up a new one — to set up a new one, you will
need to contact your Organization Admin to get the Organization IP Address and Port Number.
Imaging Settings
You can adjust the Cardiac Probe Marker Orientation and the Cine Length:
• Cardiac Orientation: By default the probe marker on the
ultrasound image for the cardiac preset is on the right side.
Here you can change the probe marker to the left side.
• Cine Max Length: The dropdown menu gives you the option
to adjust the time a forward recorded cine will be recorded
by number of frames.
• Apply Annotations To: By default annotations get applied
to the whole cine, but you can change to single-frame
annotation.
• In the About Section, you can view your App version and
Firmware version (if connected to your Vave Probe).
Transducer Element Check
When the Vave Probe is connected, tap the "Check" button
to perform transducer element check.
33Vave Wireless Ultrasound • U S ER M A N UA L
Vave Cloud™
• Images you acquire are automatically uploaded
and synced to the Vave cloud by default
• If you wish to disable automatic image uploading and sync,
you may turn off Vave Cloud Sync in Sync Settings
•N OTE: When Cloud Sync is disabled, you cannot access
powerful features such as exam discussion, sharing, etc.
3.13 Support
3.13.1 Need Support?
You'll find the Support menu simply by tapping the hamburger menu ( Ξ ) in the upper left corner of the screen.
There you can access the User Manual, a video Walkthrough and Frequently Asked Questions (FAQs).
If you require additional assistance,
please contact Vave Health at
www.vavehealth.com
34Vave Wireless Ultrasound • U S ER M A N UA L
4 Cleaning & Disinfecting
It is your responsibility to appropriately clean and disinfect your compatible smart device in accordance with
the device manufacturer’s instructions and with your institution’s policies for cleaning and disinfecting of
medical devices. This chapter will guide you through the cleaning and disinfecting process for the Vave Probe.
When cleaning and disinfecting your Vave Probe:
• Follow the procedures in the order they are listed in this guide, without skipping any steps
• Use only cleaning solutions approved by Vave Health, as other solutions may be incompatible and damaging
• For a list of compatible disinfectants, see the Cleaning & Disinfecting Sections 4.1 & 4.2 below.
• Check expiration dates, recommended product concentration, duration of disinfection and solution efficacy
• Wear appropriate personal protective equipment (PPE), such as eyewear and gloves, as recommended
by the chemical manufacturer
! T
he transducer may not withstand the repetitive cleaning or disinfecting processes specified
in this manual and this may damage or deteriorate its safety provisions
! C
leaning or disinfecting the transducer while the battery is installed, may cause the battery
to short-circuit and overheat, causing an electric shock or burn
! D
uring an emergency, when the transducer may be used to examine multiple patients in
a short period of time, the lack of proper cleaning and disinfection between patients may
spread infections to other patients and users
4.1 Cleaning
Before cleaning, visually inspect the probe for any unacceptable deterioration, such as corrosion, discoloration,
pitting, or cracked seals. If any damage is evident, discontinue use and contact Vave Health.
If the device does not have visual damage, prepare the cleaning solution and follow the procedure below.
1. Turn off the probe
2. Remove the battery from the probe
3. Use a compatible premoistened disinfectant wipe (CaviWipes™) to wipe
the entire exterior of the transducer and battery until thoroughly cleaned
4. If necessary, repeat step 3 with new cleaning material until all gel,
particulate matter and bodily fluids have been removed
5. After cleaning the probe, wipe the exterior surface with a clean, non-abrasive, dry cloth
4.2 Disinfecting
Before you begin disinfection, make sure you have cleaned the Vave Probe according to the previous Cleaning
Section 4.1. Next, determine the level of cleaning and disinfection required for your Vave Probe, based on the
Spaulding classification system. Following the correct classification will help reduce cross-contamination and
the spread of infection.
Each Spaulding classification mandates a specific level of cleaning and disinfection of equipment, before it can
be used for the next exam. Determine the Spaulding classification based on Use.
35You can also read