QUANTUM SPARK 1600 / 1800 APPLIANCE R80.20.XX - Getting Started Guide - 21 March 2021 - Check Point ...
←
→
Page content transcription
If your browser does not render page correctly, please read the page content below

21 March 2021

                                               QUANTUM SPARK 1600 /
                                                 1800 APPLIANCE

                                                     R80.20.XX

                                                  Getting Started Guide
Models: V82, V83 [Classification: Protected]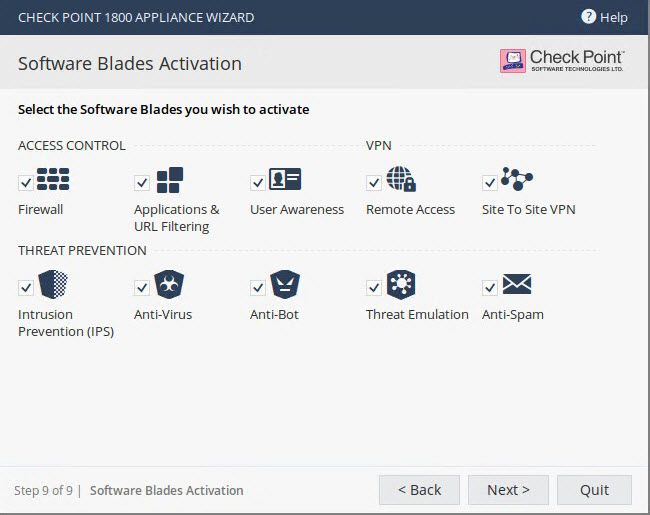
Check Point Copyright Notice

Check Point Copyright Notice
© 2020 Check Point Software Technologies Ltd.

All rights reserved. This product and related documentation are protected by copyright and distributed
under licensing restricting their use, copying, distribution, and decompilation. No part of this product or
related documentation may be reproduced in any form or by any means without prior written authorization
of Check Point. While every precaution has been taken in the preparation of this book, Check Point
assumes no responsibility for errors or omissions. This publication and features described herein are
subject to change without notice.

RESTRICTED RIGHTS LEGEND:
Use, duplication, or disclosure by the government is subject to restrictions as set forth in subparagraph (c)
(1)(ii) of the Rights in Technical Data and Computer Software clause at DFARS 252.227-7013 and FAR
52.227-19.

TRADEMARKS:
Refer to the Copyright page for a list of our trademarks.
Refer to the Third Party copyright notices for a list of relevant copyrights and third-party licenses.

                                     Quantum Spark 1600 / 1800 Appliance R80.20.XX Getting Started Guide | 2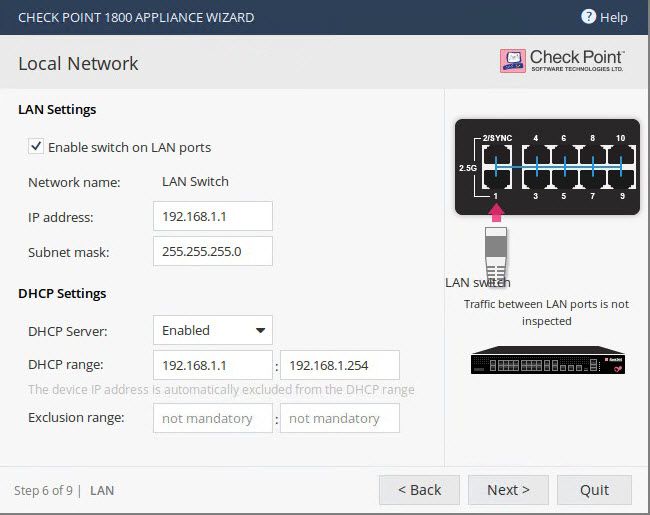
Quantum Spark 1600 / 1800 Appliance R80.20.XX Getting Started Guide

Important Information
            Latest Software
            We recommend that you install the most recent software release to stay up-to-date with the
            latest functional improvements, stability fixes, security enhancements and protection
            against new and evolving attacks.

            Certifications
            For third party independent certification of Check Point products, see the Check Point
            Certifications page.

            Check Point 1600 and 1800 Appliances
            For more about these appliances, see the 1600 and 1800 Appliance home page.

            Latest Version of this Document in English
            Open the latest English version of this document in a Web browser.
            Download the latest English version of this document in PDF format.

            Feedback
            Check Point is engaged in a continuous effort to improve its documentation.
            Please help us by sending your comments.

Revision History

 Date                     Description

 21 March 2021            Clarified central management by Security Management Server

 02 February 2021         Rebranded as Quantum Spark Appliances

 10 December 2020         First release of this document

                                Quantum Spark 1600 / 1800 Appliance R80.20.XX Getting Started Guide | 3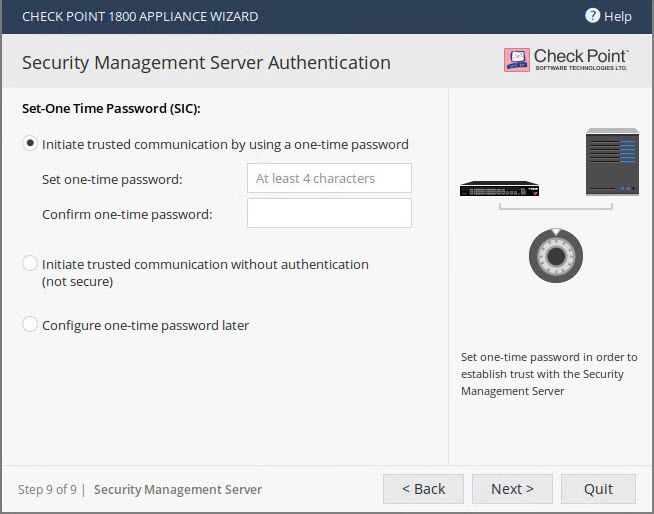
Table of Contents

Table of Contents
 Introduction                                                                                         6
 Quantum Spark 1600 / 1800 Appliance                                                                  7
 Shipping Carton Contents                                                                             8
 Setting up the Appliance                                                                             9
 Connecting the Cables                                                                               10
 First Time Deployment Options                                                                       11
 Appliance Diagrams and Specifications                                                               12
   Front Panel                                                                                       13
     Front Panel on a 1600 Appliance                                                                 13
     Front Panel on a 1800 Appliance                                                                 15
     Management LED                                                                                  16
     Network LEDs                                                                                    17
   Back Panel                                                                                        19
 Using the First Time Configuration Wizard                                                           20
   Welcome                                                                                           21
     Zero Touch                                                                                      21
   Authentication Details                                                                            23
   Appliance Date and Time Settings                                                                  24
   Appliance Name                                                                                    25
   Security Policy Management                                                                        26
   Internet Connection                                                                               27
   Local Network                                                                                     29
   Administrator Access                                                                              30
   Appliance Registration                                                                            32
   Security Management Server Authentication                                                         35
   Security Management Server Connection                                                             36
   Software Blade Activation                                                                         38
   Summary                                                                                           39
 Zero Touch Cloud Service                                                                            40
 USB Drive                                                                                           41

                                 Quantum Spark 1600 / 1800 Appliance R80.20.XX Getting Started Guide | 4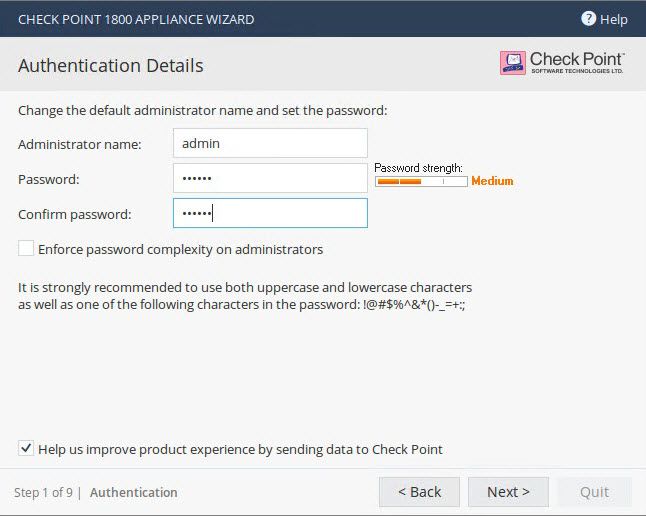
Table of Contents

Health and Safety Information                                                                        42
  Information sur la Santé et la Sécurité                                                            48
Support                                                                                              53

                                 Quantum Spark 1600 / 1800 Appliance R80.20.XX Getting Started Guide | 5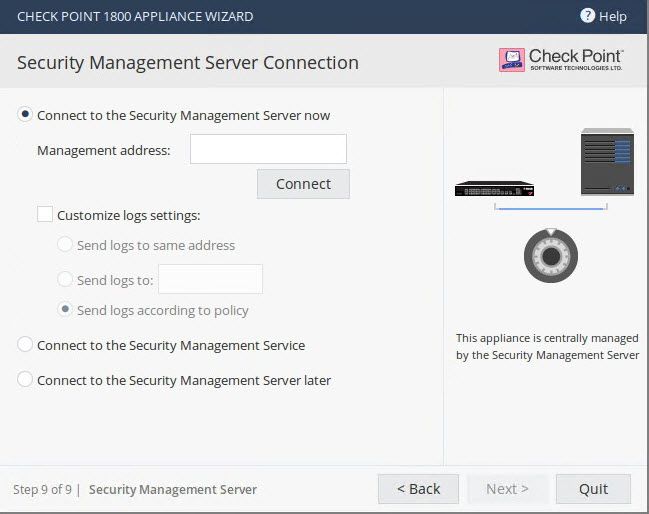
Introduction

Introduction
Thank you for choosing Check Point's Internet Security Product Suite. Check Point products provide your
business with the most up to date and secure solutions available today.
Check Point also delivers worldwide technical services including educational, professional, and support
services through a network of Authorized Training Centers, Certified Support Partners, and Check Point
technical support personnel to ensure that you get the most out of your security investment.
For more information about the appliance, see the Quantum Spark 1500, 1600 and 1800 Appliance
Series Administration Guide.
For more technical information, go to Check Point Support Center.

                                   Quantum Spark 1600 / 1800 Appliance R80.20.XX Getting Started Guide | 6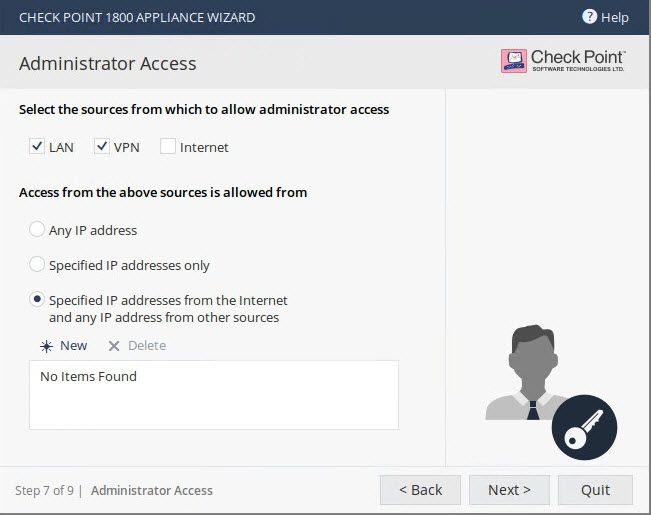
Quantum Spark 1600 / 1800 Appliance

Quantum Spark 1600 / 1800
Appliance
The Quantum Spark 1600 / 1800 Security Appliances, part of the new 1500 / 1600 / 1800 Appliance family,
deliver enterprise-grade security and run the R80 code base in an all-in-one security solution to protect
Medium Business employees, network and data from cyber-theft.
The 1600 / 1800 Security Gateways offer integrated, multi-layered security in a 1U form factor, a high
performance platform which is easy and simple to configure and manage. The Security Gateway offers
firewall, VPN, Anti-Virus, Application Visibility and Control, URL Filtering, Email Security, and SandBlast
Zero-Day Protection.
Quantum Spark 1600 / 1800 Security Appliances can be managed:
   n   Locally - In a Web interface
   n   Centrally - The Security Gateway is managed by a remote Security Management Server in
       SmartConsole, or by means of a cloud-based Quantum Spark Security Management Portal (SMP).

                                      Quantum Spark 1600 / 1800 Appliance R80.20.XX Getting Started Guide | 7
Shipping Carton Contents

Shipping Carton Contents
Item             Quantity   Description

Appliance        1          1600 or 1800 Appliance.

LAN cable        1 (1600)   1.8m - RJ45 to RJ45, CAT5e (for 1600) or CAT6e (for 1800), shielded,
                 2 (1800)   STP, black color.

Console cable    1          1m, USB type-C to USB-2.0 type-A, black color.

Power cord       1 (1600)   Plug types: US, UK, EU and AUS/NZ, India, China, Japan.
                 2 (1800)

Rubber feet      4          Not assembled.

AC cord tie      1 (1600)   Cable ties to hold the power cords.
                 2 (1800)   Thread these ties directly into the back panel of the appliance.

Rack Mount kit   1          Brackets + screws, side ears.

Guides           1          Quantum Spark 1600/1800 Appliance Quick Start Guide.

License          1          End user license agreement.
Agreement

                            Quantum Spark 1600 / 1800 Appliance R80.20.XX Getting Started Guide | 8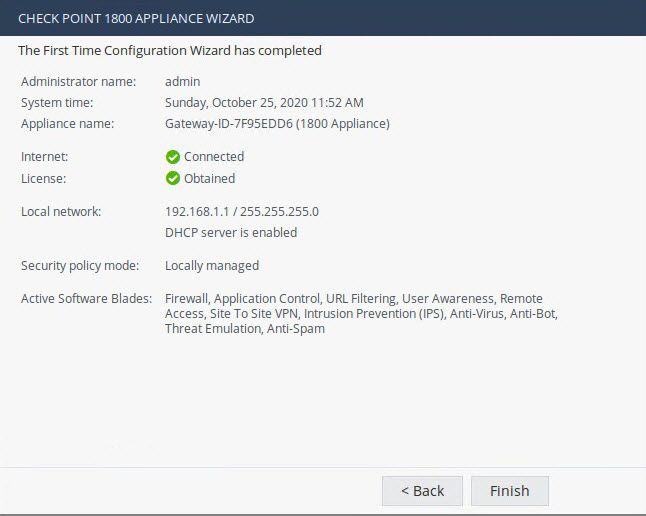
Setting up the Appliance

Setting up the Appliance
1. Remove the Quantum Spark 1600 / 1800 Appliance from the shipping carton and place it on a
   tabletop.
   For other mounting options, see below.
2. Optional - Remove the transparent protective sticker from the front panel of the appliance.
3. Identify the network interface marked as LAN1. This interface is preconfigured with the IP address
   192.168.1.1.

                                Quantum Spark 1600 / 1800 Appliance R80.20.XX Getting Started Guide | 9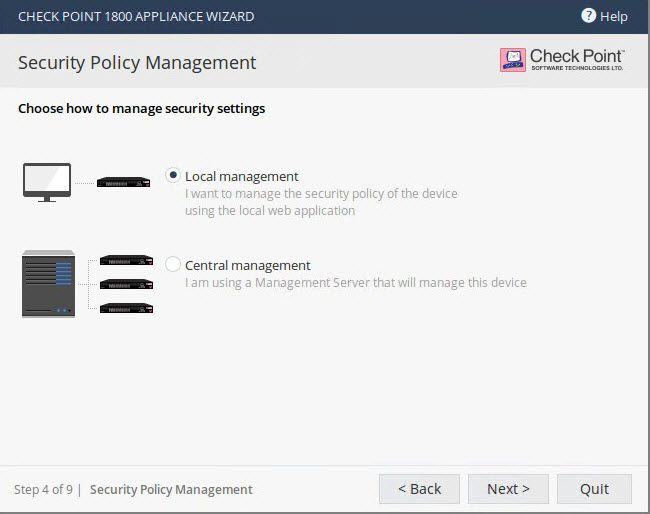
Connecting the Cables

Connecting the Cables
  1. Connect the power cord.
      Note - Quantum Spark 1800 appliance has 2 power cords and both must be connected.
  2. When the appliance is turned on, the Power LED on the front panel lights up in red for a short period.
      The LED then turns blue and starts to blink. This shows a boot is in progress and firmware is being
      installed.
      When the LED turns a solid blue, the appliance is ready for login.
      Note - The LED is red if there is an alert or error.
  3. Connect the standard network cable to the LAN1 port and to the network adapter on your PC.
  4. If you use an external modem:
      Connect the Ethernet cable to the WAN port on the appliance back panel and plug it into your
      external modem or router’s PC/LAN network port. The Internet LED on the appliance front panel
      lights up when the Ethernet is connected.
Note - Wait 10 seconds between power cycles (off and on).

                                    Quantum Spark 1600 / 1800 Appliance R80.20.XX Getting Started Guide | 10
First Time Deployment Options
First Time Deployment Options
There are different options for first time deployment of your gateways:
n "Using the First Time Configuration Wizard" on page 20
n "Zero Touch Cloud Service" on page 40
n "USB Drive" on page 41
Quantum Spark 1600 / 1800 Appliance R80.20.XX Getting Started Guide | 11Appliance Diagrams and Specifications
Appliance Diagrams and
Specifications
This structure describes the different features in the front and back panels of these appliances:
1600 Appliance
Quantum Spark 1600 / 1800 Appliance R80.20.XX Getting Started Guide | 12Appliance Diagrams and Specifications
1800 Appliance
Front Panel
This section describes the Front Panel on 1600 and 1800 Appliances - LEDs, ports, and buttons.
Front Panel on a 1600 Appliance
Note - There is only one set of LEDs. These LEDs show different colors depending on what activity is
occurring.
Quantum Spark 1600 / 1800 Appliance R80.20.XX Getting Started Guide | 13Appliance Diagrams and Specifications
Key Item Description
1 LEDs From top to bottom:
n Management
l No management - Off
l Colors - See below
n Internet
l No internet connection - Off
l Connecting to the internet - Blinking blue
l Connected - Blue
l Connection failure - Blinking red
n Power/Status
l Normal operation - Solid blue
l Boot in progress or installing firmware - Blinking blue
l Error/Alert - Red
2 Console There are two console ports for the serial console cable: Type-C and RJ45.
Type-C has priority when both are connected. Baud rate: 115200
3 DMZ ports The DMZ is a combo port of SFP and RJ45 (on the right).
Only one can operate a time when plugged in and connected.
RJ45 - supports 10/100/1000MbE.
SFP - supports 1000MbE.
4 LAN ports LAN ports 1-16 - support 10/100/1000MbE.
LAN 1 and LAN 2 (Sync) also support 2.5GbE.
5 SD card Insert micro-SD card here.
slot
6 WAN ports Two WAN ports, each of which is a combo port of SFP and RJ45 (on the right).
Only one can operate a time when plugged in and connected.
RJ45 - supports 10/100/1000MbE
SFP - supports 1000MbE
7 USB3.0 Two USB ports 3.0 for software download.
8 Factory Press the button continuously for 12 seconds to restore the appliance to its
Default factory default.
All user parameters previously configured are removed.
9 Service tag Shows the regulated module, serial number, and the MAC address.
10 Side For rack mount.
brackets
Quantum Spark 1600 / 1800 Appliance R80.20.XX Getting Started Guide | 14Appliance Diagrams and Specifications
Front Panel on a 1800 Appliance
Note - There is only one set of LEDs. These LEDs show different colors depending on what activity is
occurring.
Key Item Description
1 LEDs From top to bottom:
n Storage memory - SSD storage memory. Bi-color blue/red
displays SSD status.
l No SSD access - Blue Off, Red Off
l SSD failure - Blue Off, Red On
n Power redundancy - Shows the status of the 2 internal PSUs.
Single red LED
l Normal Operation - Off.
l Power Redundancy Active - On
n Management - See below
n Internet
l No internet connection - Off
l Connecting to the internet - Blinking blue
l Connected - Blue
l Connection failure - Blinking red
n Power/Status
l Normal operation - Solid blue
l Boot in progress or installing firmware - Blinking blue
l Error/Alert - Red
2 Console There are two console ports for the serial console cable: Type-C and RJ45.
Type-C has priority when both are connected. Baud rate: 115200.
3 DMZ ports The DMZ is a combo port of SFP and RJ45 (on the right).
Only one can operate a time once plugged in and connected.
RJ45 - supports 10/100/1000/2500/5000MbE and 10GbE.
SFP - supports 10GbE.
4 LAN ports LAN ports 1-18 - support 10/100/1000MbE.
LAN 1 and LAN 2 (Sync) also support 2.5GbE.
Quantum Spark 1600 / 1800 Appliance R80.20.XX Getting Started Guide | 15Appliance Diagrams and Specifications
Key Item Description
5 SD card Insert micro-SD card here.
slot
6 WAN and Two WAN ports each of which is a combo port of SFP and RJ45 (on the right).
WAN-B Only one can operate a time once plugged in and connected.
ports RJ45 - supports 10/100/1000MbE.
SFP - supports 1000MbE.
7 EXT port Management port - supports 10/100/1000MbE.
8 USB3.0 USB port 3.0 for software download.
9 Factory Press the button continuously for 12 seconds to restore the appliance to its
Default factory default.
All user parameters previously configured are removed.
10 Service tag Shows the regulated module, serial number, and the MAC address.
11 Side For rack mount.
brackets
Management LED
The Management LED shows the status of the retries mechanism:
Management LED
Action
Activity
Zero Touch is running. Blinks red (slowly)
Successfully connected to Zero Touch Cloud Server and saved the Blinks red (rapidly)
deployment script.
Zero Touch process is completed. SMP activation is not needed. LED off
Activation sleeping time. Blinks blue (slowly)
Reactivation. Blinks blue (rapidly)
SMP is connected. Solid blue.
SMP mode is off. LED off
Gateway failed to connect to the SMP and will exit from the retry script. Constant red.
Quantum Spark 1600 / 1800 Appliance R80.20.XX Getting Started Guide | 16Appliance Diagrams and Specifications
Wait times before retry:
Failure Waiting Time
1st 2 minutes
2nd 4 minutes
3rd 8 minutes
4th 16 minutes
Subsequent Retries every 16 minutes until Cloud Services are successfully activated
Network LEDs
The table below describes the network LEDs (RJ45 WAN and LAN ports and the SFP).
Each port uses a bi-color LED (green/amber) to reflect the link/activity and speed, from 10M to 1GbE.
This also applies to the DMZ port of the 1600 appliance.
Link/Act LED1 Speed LED2
RJ45 and 1G SFP
(Green) (Amber)
No link Off Off
1G link ON Off
1G Act Blink ON
100M link ON Off
100M Act Blink Off
10M link ON Off
10M Act Blink Off
Quantum Spark 1600 / 1800 Appliance R80.20.XX Getting Started Guide | 17Appliance Diagrams and Specifications
For 1800 appliances only:
2xRJ45 2.5GbE ports
Two bi-color (green and amber) LEDs per ports
Link/Act Speed
2.5GbE RJ45
LED #1 (bi-color) LED #2 (bi-color)
Green Amber Green Amber
No link Off Off Off Off
2.5G link On Off
2.5G Act Blink Off
1G link On On
1G Act Blink On
100M link On Blink
100M Act Blink Blink
10M link On Off
10M Act Blink Off
RJ45 and SFP 10GbE port
Link/Act Speed
10GbE RJ45
LED1 (Bi-color) LED2 (Bi-color)
Green Amber Green Amber
10G link On On
10G Act Blink On
5G link On Blink
5G Act Blink Blink
Quantum Spark 1600 / 1800 Appliance R80.20.XX Getting Started Guide | 18Back Panel
Back Panel
1600 Appliance
1800 Appliance
Key Item Description
1 Side brackets For rack mount.
2 Power cord Plug the power adapter cord in here.
socket
3 Cable tie holes Thread cable tie through these holes.
4 Power on/off 0 - Off
switch 1 - On
5 Fans Cooling function.
6 Ground screw Protective earthing.
For more information, refer to the "Health and Safety Information" on
page 42.
Quantum Spark 1600 / 1800 Appliance R80.20.XX Getting Started Guide | 19Using the First Time Configuration Wizard
Using the First Time Configuration
Wizard
Configure the Quantum Spark Appliance with the First Time Configuration Wizard.
To close the wizard and save configured settings, click Quit.
Note - In the First Time Configuration Wizard, you may not see all the pages described in this guide. The
pages that show in the wizard depend on your appliance model and the options you select.
Quantum Spark 1600 / 1800 Appliance R80.20.XX Getting Started Guide | 20Welcome
Welcome
The Welcome page introduces the product and shows the name of your appliance.
You can connect to the Zero Touch server to fetch settings automatically from the cloud.
To change the language of the WebUI application:
Select the language link at the top of the page.
Note - Only English is allowed as the input language.
Zero Touch
Zero Touch enables a gateway to automatically fetch settings from the cloud when it is connected to the
internet for the first time.
Note - You cannot use Zero Touch if you connect to the internet with a proxy server.
If the gateway connects to the internet through DHCP, the gateway will fetch the Zero Touch settings
without any additional action. If no DHCP service is available, you must run the First Time Configuration
Wizard, configure the Internet Connection settings, and then fetch the settings from the Zero Touch
server.
To connect to the Zero Touch server:
1. In the Welcome page, click Fetch Settings from the cloud.
2. In the window that opens, click OK to confirm that you want to proceed.
3. The Internet connection page opens. Configure your Internet connection and click Connect.
4. The Fetching settings from the cloud window opens and shows the Connecting to the service
provider status. This process may take several minutes.
5. If you fail to connect, an error message appears. Possible errors include:
Quantum Spark 1600 / 1800 Appliance R80.20.XX Getting Started Guide | 21Welcome
n Internet connection is not configured correctly.
n Internet connection is through a proxy server.
n Zero Touch is already running.
n Zero Touch service already completed.
n The First Time Configuration Wizard already completed.
n Zero Touch service is disabled.
Where applicable, click Retry now to connect again.
6. After you connect to the server, the settings are automatically downloaded and installed. The status
is shown in the Fetching settings from the cloud window. It may take several minutes until the
installation is complete.
7. Click Finish.
Note - If a collision is detected between an internal network (LAN) and an IP returned using DHCP (WAN),
the conflicting LAN address is changed automatically. If a colliding LAN IP address is changed, a message
appears in the system logs.
When you reconnect to the WebUI or click Refresh, the browser opens to show the status of the installation
process.
After the gateway downloads and successfully applies the settings, it does not connect to the Zero Touch
server again.
Quantum Spark 1600 / 1800 Appliance R80.20.XX Getting Started Guide | 22Authentication Details
Authentication Details
In the Authentication Details page, enter the required details to log in to the appliance WebUI, or if the
wizard terminates abnormally:
n Administrator Name - We recommend that you change the default "admin" login name of the
administrator. The name is case sensitive.
n Password - A strong password has a minimum of 6 characters with at least one capital letter, one
lower case letter, and a special character. Use the Password strength meter to measure the
strength of your password.
Note - The meter is only an indicator and does not enforce creation of a password with a specified
number of character or character combination. To enforce password complexity, click the check
box.
n Confirm Password - Enter the password again.
n Country - Select a country from the list (for wireless network models).
The country where the license is set determines the wireless frequency and parameters, as the
regulations vary according to region.
If you are using a trial license, only basic radio settings , are allowed in all zones. A warning that
selected wireless radio settings are not applied shows on the Summary page and also on the
Device > License page. For more information on basic wireless radio settings, see sk159693.
If you select a country and install a valid license, but the wireless region of the device does not match
the selected country, a warning message shows and you must edit the country information. When
the country and wireless region match, you see the full settings.
Quantum Spark 1600 / 1800 Appliance R80.20.XX Getting Started Guide | 23Appliance Date and Time Settings
Appliance Date and Time Settings
In the Appliance Date and Time Settings page, configure the appliance's date, time, and time zone
settings manually or use the Network Time Protocol option.
If you select the option Set the time manually , the appliance uses the date and time from your computer
as the initial values. If necessary, change the time zone setting to show your correct location. Daylight
Savings Time is automatically enabled by default. You can change this in the WebUI application on the
Device > Date and Time page.
n Date - The date on your computer appears by default. If required, set a different date.
n Time - The time on your computer appears by default. If required, set a different time.
n Time Zone - The time zone on your computer appears by default. If required, select a time zone
setting to reflect your exact location.
n Primary NTP server - The IP or host name of the primary NTP server. The default server is
ntp.checkpoint.com
n Secondary NTP server - The IP or host name of the secondary NTP server. The default server is
ntp2.checkpoint.com
Quantum Spark 1600 / 1800 Appliance R80.20.XX Getting Started Guide | 24Appliance Name
Appliance Name
In the Appliance Name page, enter a name to identify the appliance, and enter a domain name (optional).
When the gateway performs DNS resolving for a specified object’s name, the domain name is appended to
the object name. This lets hosts in the network look up hosts by their internal names.
Quantum Spark 1600 / 1800 Appliance R80.20.XX Getting Started Guide | 25Security Policy Management
Security Policy Management
In the Security Policy Management page, select how to manage security settings:
n Central management - A remote Security Management Server manages the Security Gateway in
SmartConsole with a network object and security policy.
n Local management - The appliance uses a web application to manage the security policy. After you
configure the appliance with the First Time Configuration Wizard, the default security policy is
enforced automatically. With the appliance WebUI, you can configure the Software Blades you
activated and fine tune the security policy.
This Getting Started Guide describes how to configure both locally and centrally managed deployments.
Quantum Spark 1600 / 1800 Appliance R80.20.XX Getting Started Guide | 26Internet Connection
Internet Connection
In the Internet Connection page, configure your Internet connectivity details or select Configure Internet
connection later.
To configure Internet connection now:
1. Select Configure Internet connection now.
2. From the Connection type drop down list, select the protocol used to connect to the Internet.
3. Enter the fields for the selected connection protocol. The information you must enter is different for
each protocol. You can get it from your Internet Service Provider (ISP).
n Static IP - A fixed (non-dynamic) IP address.
n DHCP - Dynamic Host Configuration Protocol (DHCP) automatically issues IP addresses
within a specified range to devices on a network. This is a common option when you connect
through a cable modem.
n PPPoE (PPP over Ethernet) - A network protocol for encapsulating Point-to-Point Protocol
(PPP) frames inside Ethernet frames. It is used mainly with DSL services where individual
users connect to the DSL modem over Ethernet and Metro Ethernet networks. Enter the ISP
login user name and ISP login password. Note - In the First Time Configuration Wizard,
only dynamic IP is supported.
n PPTP - The Point-to-Point Tunneling Protocol (PPTP) implements virtual private networks.
PPTP uses a control channel over TCP and a GRE tunnel operating to encapsulate PPP
packets.
n L2TP - Layer 2 Tunneling Protocol (L2TP) is a tunneling protocol used to support virtual
private networks (VPNs). It does not provide any encryption or confidentiality. It relies on an
encryption protocol that it passes within the tunnel to provide privacy.
n Cellular - This is for appliances with an internal LTE modem. Both SIM cards are used for the
internet connection with a failover between them.
n Cellular Modem - Connect to the Internet with a cellular modem to the ISP through a 3G or
4G network. For this option, select the USB/Serial option in the Interface name.
Note - Only one cellular modem is supported. Appliances with an internal LTE modem do not
support an external USB modem.
n Bridge - Connects multiple network segments at the data link layer (Layer 2).
n DNS Server (Static IP and Bridge connections) - Enter the DNS server address information in
the relevant fields. For DHCP, PPPoE, PPTP, L2TP, Cellular, and the DNS settings are
supplied by your service provider. You can override these settings later in the WebUI
application, under Device > DNS.
We recommend that you configure the DNS as the appliance needs to perform DNS resolving for different
functions. For example, to connect to Check Point User Center during license activation or when
Application Control, Web Filtering, Anti-Virus, or Anti-Spam services are enabled.
To test your ISP connection status:
Click Connect.
Quantum Spark 1600 / 1800 Appliance R80.20.XX Getting Started Guide | 27Internet Connection
The appliance connects to your ISP. Success or failure shows at the bottom of the page.
Quantum Spark 1600 / 1800 Appliance R80.20.XX Getting Started Guide | 28Local Network
Local Network
In the Local Network page, select to enable or disable switch on LAN ports and configure your network
settings. By default, they are enabled. You can change the IP address and stay connected as the
appliance's original IP is kept as an alias IP until the first time you boot the appliance.
Tell me about the fields...
n Enable switch on LAN ports - Aggregates all LAN ports to act as a switch with one IP address for
the switch. If this option is disabled (checkbox is cleared), the local network is defined as LAN1 only.
n Network name - Enter the network name.
n IP address - You can modify the IP address and maintain connectivity. The appliance's original IP is
kept as an alias IP to maintain connectivity until the wizard is completed.
n Subnet mask - Enter the subnet mask.
n DHCP server and range fields - DHCP is enabled by default with a default network range. Make
sure to set the appropriate range and do not include predefined static IPs in your network.
n Exclusion range - Set the exclusion range for IP addresses that are not defined by the DHCP
server. Define the range of IP addresses that the DHCP excludes when IP addresses are assigned
in the network. The appliance's IP address is automatically excluded from the range. For example, if
the appliance IP is 1.1.1.1 the range also starts from 1.1.1.1, but excludes its own IP address.
Important - If you choose to disable the switch on LAN ports (clear the checkbox), make sure your network
cable is placed in the LAN1 port. Otherwise, connectivity will be lost when you click Next.
Quantum Spark 1600 / 1800 Appliance R80.20.XX Getting Started Guide | 29Administrator Access
Administrator Access
In the Administrator Access page, configure if administrators can use the appliance from a specified IP
address or any IP address.
To configure administrator access:
1. Select the sources from where administrators are allowed access:
n LAN - All internal physical ports.
n Trusted wireless - A known wireless network.
n VPN - Using encrypted traffic through VPN tunnels from a remote site or using a remote
access client.
n Internet - Clear traffic from the Internet (not recommended).
2. Select the IP address from which the administrator can access the appliance:
n Any IP address .
n Specified IP addresses only - Select this option to let administrators access the appliance
from a specified IP address or network. Click New to configure the IP address information.
n Specified IP addresses from the Internet and any IP address from other sources - Select
this option to allow administrator access from the Internet from specific IP addresses only and
access from other selected sources from any IP address. This option is the default.
To specify IP addresses:
1. Click New.
2. In the IP Address Configuration window, select an option:
n Specific IP address - Enter the IP address or click Get IP from my computer.
n Specific network - Enter the Network IP address and Subnet mask .
3. Click Apply .
Quantum Spark 1600 / 1800 Appliance R80.20.XX Getting Started Guide | 30Administrator Access Quantum Spark 1600 / 1800 Appliance R80.20.XX Getting Started Guide | 31
Appliance Registration

Appliance Registration
The appliance can connect to the Check Point User Center with its credentials to pull the license
information and activate the appliance.

If you have Internet connectivity configured:
Click Activate License.
You are notified that you successfully activated the appliance and you are shown the status of your license
for each Software Blade.

If you are working offline while configuring the appliance:
   1. From a computer with authorized access to the Check Point User Center, follow one of these
      procedures:
          n   Use your User Center account

                   a. Log in to your User Center account.
                   b. Select the specified container of your appliance.
                   c. From the Product Information tab, click License > Activate.
                       This message appears: "Licenses were generated successfully".
                   d. Click Get Activation File and save the file locally.

          n   Register your appliance

                   a. Go to: https://smbregistration.checkpoint.com
                   b. Enter your appliance details and click Activate.
                       This message appears: "Licenses were generated successfully".
                   c. Click Get Activation File and save the file locally.

   2. In the Appliance Activation page of the First Time Configuration Wizard, click Offline.
      The Import from File window opens
   3. Browse to the activation file you downloaded and click Import. The activation process starts.
      You are notified that you successfully activated the appliance and you are shown the status of your
      license for each blade.
If there is a proxy between your appliance and the Internet, you must configure the proxy details before
you can activate your license.

To configure the proxy details:
   1. Click Set proxy .
   2. Select Use proxy server and enter the proxy server Address and Port.

                                   Quantum Spark 1600 / 1800 Appliance R80.20.XX Getting Started Guide | 32
Appliance Registration
3. Click Apply .
4. Click Activate License.
You are notified that you successfully activated the appliance and you are shown the status of your license
for each blade.
To postpone appliance registration and get a 30-day trial license:
1. Click Next.
The License activation was not complete notification message is shown.
2. Click OK.
The appliance uses a 30-day trial license for all blades. You can register the appliance later in the
WebUI from the Device > License page.
If your device is not paired with a User Center account, you must create an account or ask your company
administrator to create one for you.
To create a new User Center account (for Locally Managed appliances only):
1. Click Activate License.
The Appliance Registration window opens.
2. Select Create a new User Center account and click Next.
3. In the new window, enter:
n First name
n Last Name
Quantum Spark 1600 / 1800 Appliance R80.20.XX Getting Started Guide | 33Appliance Registration
n Email . You must enter this a second time to confirm.
n Company - This is the Account Name to which the appliance is paired.
4. Click Next.
The Software Blades Activation page opens.
Quantum Spark 1600 / 1800 Appliance R80.20.XX Getting Started Guide | 34Security Management Server Authentication
Security Management Server Authentication
For Centrally Managed appliances only:
When you select central management as your security policy management method, the Security
Management Server Authentication page opens.
Select an option to authenticate trusted communication with the Security Management Server:
n Initiate trusted communication securely by using a one-time password - The one-time
password is used to authenticate communication between the appliance and the Security
Management Server securely.
Enter a one-time password and confirm it. This password is only used for establishing the initial
trust. When established, trust is based on security certificates.
Important - This password must be identical for the Secure Communication
authentication one-time password configured for the appliance object in the
SmartConsole of the Security Management Server.
n Initiate trusted communication without authentication (not secure) - Use this option only if there is
no risk of malicious behavior (for example, when in a lab setting).
n Configure one-time password later - Set the one-time password at a different time using the
WebUI application.
Quantum Spark 1600 / 1800 Appliance R80.20.XX Getting Started Guide | 35Security Management Server Connection
Security Management Server Connection
For Centrally managed appliances only:
After you set a one-time password for the Security Management Server and the appliance, you can
connect to the Security Management Server to establish trust between the Security Management Server
and the appliance.
To connect to the Security Management Server, select one of these:
n Connect to the Security Management Server now.
n Connect to the Security Management Server later.
If you select to connect now, enter the data for these fields:
n Management address - Enter the IP address or host name of the Security Management Server.
n Connect - When you successfully connect to the Security Management Server, the security policy
will automatically be fetched and installed.
n If the Security Management Server is deployed behind a 3rd party NAT device, select Always use
the above address to connect to the Security Management Server. Manually enter the IP
address or the host name of the appliance should connect to reach the Security Management
Server.
If you enter an IP address, it will override the automatic mechanism that determines the routable
IP address of the Security Management Server for each appliance.
If you enter a host name, it is saved and the Security Gateway will re-resolve the name of the
IP address changes. This configuration can be edited later in the Home > Security Management
page of the WebUI.
If you do not select this checkbox and you use a host name to fetch the policy, when the policy is
fetched, the Security Management Server IP is set to the IP address in the policy.
Select where to send logs:
l Send logs to same address - The logs are sent to the IP address entered on this page for
the Security Management Server.
l Send logs to - Enter the IP address of a log server.
l Send logs according to policy - The logs are sent according to the log server definitions that
are defined in the policy.
Quantum Spark 1600 / 1800 Appliance R80.20.XX Getting Started Guide | 36Security Management Server Connection Quantum Spark 1600 / 1800 Appliance R80.20.XX Getting Started Guide | 37
Software Blade Activation

Software Blade Activation
Select the Software Blades to activate on this appliance.
QoS (bandwidth control) can only be activated from the WebUI after completing the First Time
Configuration Wizard.

                                  Quantum Spark 1600 / 1800 Appliance R80.20.XX Getting Started Guide | 38
Summary
Summary
The Summary page shows the details of the elements configured with the First Time Configuration
Wizard.
Click Finish to complete the First Time Configuration Wizard.
The WebUI opens on the Home > System page.
To back up the system configuration in the WebUI:
Go to Device > System Operations > Backup.
Quantum Spark 1600 / 1800 Appliance R80.20.XX Getting Started Guide | 39Zero Touch Cloud Service
Zero Touch Cloud Service
The Zero Touch Cloud Service lets you easily manage the initial deployment of your gateways in the Zero
Touch portal.
Zero Touch enables a gateway to automatically fetch settings from the cloud when it is connected to the
internet for the first time.
Note - If you already used the First Time Configuration Wizard to configure your appliance, you cannot use
the Zero Touch Cloud service. If you start the First Time Configuration Wizard while the Zero Touch
settings are being installed, the installation process terminates.
If the gateway connects to the internet via DHCP, the gateway will fetch the Zero Touch settings without
any additional action. If no DHCP service is available, you must run the First Time Configuration Wizard,
configure the Internet Connection settings, and then fetch the settings from the Zero Touch server.
To connect to the Zero Touch server from the First Time Configuration Wizard:
1. In the Welcome page of the First Time Configuration Wizard, click Fetch Settings from the cloud.
2. In the window that opens, click Yes to confirm that you want to proceed.
3. The Internet connection page of the First Time Configuration Wizard opens. Configure your
Internet connection and click Connect.
The settings are automatically downloaded and installed.
A new window opens and shows the installation status. It may take several minutes until the
installation is complete.
When you reconnect to the appliance WebUI or click Refresh, you may see one of these:
n Login page - This means the process ended successfully and your settings are installed.
n Welcome page of the First Time Configuration Wizard - The process is still running. The settings
are installing or they do not exist in the cloud.
Note - If you click Next on the Welcome page, the Zero Touch settings installation process
terminates
n Page not found - The appliance local IP address may have been changed by the cloud settings
installation. Try http://my.firewall or consult your administrator for the new local IP address.
After the gateway downloads and successfully applies the settings, it does not connect to the Zero Touch
server again.
For more information on how to use Zero Touch, see sk116375 and the R80.20 Zero Touch Web Portal
Admin Guide.
Retries mechanism:
During cloud activation, there are sometimes temporary issues which prevent the gateway from activating
Cloud Services. See the Management LED description in the Front Panel section.
Quantum Spark 1600 / 1800 Appliance R80.20.XX Getting Started Guide | 40USB Drive
USB Drive
The USB drive can be used for rapid deployment of configuration files, or to install an image, without using
the First Time Configuration Wizard.
The configuration file lets you configure more settings and parameters than are available in the First Time
Configuration Wizard
You can deploy configuration files in these conditions:
n An appliance with default settings is not configured at all.
n An appliance that already has an existing configuration.
The appliance starts, automatically mounts the USB drive, and searches the root directory for a
configuration file.
Note - The USB drive must be formatted in FAT32.
Quantum Spark 1600 / 1800 Appliance R80.20.XX Getting Started Guide | 41Health and Safety Information
Health and Safety Information
Read these warnings before setting up or using the appliance.
Warning - Do not block air vents. A minimum 1/2 inch (1,27 cm) clearance is required.
Warning - This appliance does not contain any user-serviceable parts. Do not remove
any covers or attempt to gain access to the inside of the product. Opening the device or
modifying it in any way has the risk of personal injury and will void your warranty. The
following instructions are for trained service personnel only.
Power Supply Information
The appliance contains an embedded power supply AC-DC. The 1600 appliance contains a single power
supply and the 1800 contains a dual power supply.
To prevent damage to any system, it is important to handle all parts with care.
For 1800 Appliance only:
Caution, Shock hazard
Disconnect all power sources.
Quantum Spark 1600 / 1800 Appliance R80.20.XX Getting Started Guide | 42Health and Safety Information
IMPORTANT SAFETY INSTRUCTIONS: Basic safety precautions should always be followed to reduce
the risk of fire, electric shock and injury to persons, including the following:
n Do not use this product near water for example, near a bathtub, washbowl, kitchen sink or laundry
tub, in a wet basement or near a swimming pool.
n Use only the power cord and batteries indicated in this manual. Do not dispose of batteries in a fire.
They may explode. Check with local codes for possible special disposal instructions.
n This equipment is not suitable for use in locations where children are likely to be present.
n Make sure to connect the power cord to a socket-outlet with a grounded connection.
n Never open the equipment. For safety reasons, the equipment should be opened only by a qualified
skilled person authorized by Check Point.
Connecting Earth Ground to Equipment
Warning - The equipment has a separate protective earthing terminal on the chassis
that must be permanently
connected to earth ground to adequately ground the chassis and protect the operator
from electrical hazards.
Caution - Before equipment installation begins, ensure that a service personnel has
attached an appropriate grounding
lug to the grounding cable supplied.
To connect earth ground to equipment:
1. Connect one end of the grounding cable to a proper earth ground.
2. Place the ground lug attached to the ground cable over the protective earthing terminal.
3. Secure the grounding lug to the protective earthing terminal with washers and screws
4. Dress the grounding cable and ensure that it does not touch or block access to other components.
Warning - Before powering on the equipment, connect the frame of the equipment to
earth. For the earthing wire, green and yellow insulation is required and the cross-
sectional area of the conductor must be more than 0.75mm2 or 18 AWG.
Warning - The protective earthing terminal with washers and screws where a screw is
threaded into it should not be less than twice the pitch of the screw thread, at least
3.5mm diameter; star washers or spring washers can be used.
Warning - After power is off and disconnected from the equipment, then disconnect the
frame of the equipment to earth.
Quantum Spark 1600 / 1800 Appliance R80.20.XX Getting Started Guide | 43Health and Safety Information
Caution - Risk of explosion if the battery is replaced by an incorrect type.
Warning - This is a class 1 Laser product. Use only IEC 60825-1 certified Optical Fiber
Transceiver with minimum operating temperature at 75 degree C.(for EU)
Laser Class 1 optical transceiver shall be used only. (for UL)
For North America only
Warning message for using product in ITE environment:
Suitable for installation in Information Technology Rooms in accordance with Article 645 of the National
Electrical Code and NFPA 75.
For California:
Perchlorate Material - special handling may apply. See
http://www.dtsc.ca.gov/hazardouswaste/perchlorate
The foregoing notice is provided in accordance with California Code of Regulations Title 22, Division 4.5,
Chapter 33. Best Management Practices for Perchlorate Materials. This product, part, or both may include
a lithium manganese dioxide battery which contains a perchlorate substance.
Proposition 65 Chemical
Chemicals identified by the State of California, pursuant to the requirements of the California Safe Drinking
Water and Toxic Enforcement Act of 1986, California Health & Safety Code s. 25249.5, et seq.
("Proposition 65"), that is "known to the State to cause cancer or reproductive toxicity." See
http://www.calepa.ca.gov.
WARNING:
Handling the cord on this product will expose you to lead, a chemical known to the State of California to
cause cancer, and birth defects or other reproductive harm. Wash hands after handling.
Declaration of Conformity
Manufacturer's Name: Check Point Software Technologies Ltd.
Manufacturer's Address: 5 Shlomo Kaplan Street, Tel Aviv 67897, Israel
Model Number: V-82, V-83
Product Options: 1600 / 1800 Appliance Wired
Date First Applied: December 2020
Declares under our sole responsibility, that the products conform to the following Product Specifications:
Quantum Spark 1600 / 1800 Appliance R80.20.XX Getting Started Guide | 44Health and Safety Information
Certification Type
CE EN 55032:2015 + AC:2016, Class B EMC/EMI
CE EN 55032:2012 + AC:2013, Class B
CE EN 61000-3-2:2014
CE EN 61000-3-3:2013
CE EN 55024:2010 / A1:2015
CE EN 55024:2010
FCC Part 15B
AS/NZS CISPR32
ICES-003
VCCI, V-3/2015.4 , V4/2012.04, Class B VCCI CISPR 32:2016
EN 62368-1 Safety
CB IEC 62368-1
CSA/UL_ULc 62368-1 (Ed 2/3)
AS/NZS 62368.1:2018
J 62368-1
ROHS10, REACH Environmental
Date and Place of Issue: Tel Aviv, Israel December 2020
Testing lab
Address: No 9 Harrison Road, Harrison Industrial Building, #05-01
Issued By: Bureau Veritas Consumer Products Services (H.K.) Ltd., Taoyuan Branch Ling Kou
Laboratories
Lab No. 47-2, 14th Ling, Chia Pau Vil., Lin Kou Dist., New Taipei City, Taiwan
Address:
Quantum Spark 1600 / 1800 Appliance R80.20.XX Getting Started Guide | 45Health and Safety Information
European Union (EU) Electromagnetic and Safety Compatibility Directive
This product is herewith confirmed to comply with the requirements set out in the Council Directive on the
Approximation of the Laws of the Member States relating to Electromagnetic Compatibility Directives
2004/108/EC and 2014/30/EU. This product is in conformity with Low Voltage Directives 2006/95/EC and
2014/35/EU. This product complies with the requirements in the Council Directives 2006/95/EC and
2014/35/EU relating to electrical equipment designed for use within certain voltage limits and the
Amendment Directive 93/68/EEC.
Federal Communications Commission (FCC) Notice (US)
This equipment has been tested and found to comply with the limits for a Class A digital device, pursuant to
part 15 of the FCC Rules. These limits are designed to provide reasonable protection against harmful
interference when the equipment is operated in a commercial environment. This equipment generates,
uses, and can radiate radio frequency energy and, if not installed and used in accordance with the
instruction manual, may cause harmful interference to radio communications. Operation of this equipment
in a residential area is likely to cause harmful interference in which case the user will be required to correct
the interference at his own expense.
FCC Radiation Exposure Statement
This equipment complies with FCC RF radiation exposure limits set forth for an uncontrolled environment.
This equipment should be installed and operated with a minimum distance of 20 centimeters between the
radiator and your body. This device complies with Part 15 of the FCC Rules. Operation is subject to the
following two conditions:
Compliance Information
1. This device may not cause harmful interference, and
2. This device must accept any interference received, including interference that may cause undesired
operation.
This transmitter must not be co-located or operating in conjunction with any other antenna or transmitter.
Canadian Department Compliance Statement
This device complies with Industry Canada ICES-003 rules.
Japan Class B Compliance Statement
This is a Class B product based on the standard of the Voluntary Control Council for Interference (VCCI).
If this equipment is used in a domestic environment, radio interference may occur, in which case the user
may be required to take corrective actions.
Physical and environmental reliability Description
Operating Conditions Vibrations and Shock Based on EN 300 019-2-3.
Temperature: 0°C ~ 40°C
Quantum Spark 1600 / 1800 Appliance R80.20.XX Getting Started Guide | 46Health and Safety Information
Physical and environmental reliability Description
Storage Conditions Temperature: (-40)°C ~ 60°C.
Humidity: 95%, non-condensed.
Vibrations and Shock based on EN 300 019-2-1.
Transportation Conditions Temperature: (-40)°C ~ 85°C.
Humidity: 95%, non-condensed.
Vibrations and Shock based on EN 300 019-2-2.
Product Disposal
This symbol on the product or on its packaging indicates that this product must not be disposed of with your
other household waste. Instead, it is your responsibility to dispose of your waste equipment by handing it
over to a distributor for designated collection point for the recycling of waste electrical and electronic
equipment. The separate collection and recycling of your waste equipment at the time of disposal will help
to conserve natural resources and ensure that it is recycled in a manner that protects human health and
the environment. For more information about where you can drop off your waste equipment for recycling,
please contact your local city office or your household waste disposal service.
Quantum Spark 1600 / 1800 Appliance R80.20.XX Getting Started Guide | 47Information sur la Santé et la Sécurité
Information sur la Santé et la Sécurité
Avant de mettre en place ou d'utiliser l'appareil, veuillez lire les avertissements suivants.
Avertissement - Ne pas obturer les aérations. Il faut laisser au moins 1,27 cm d'espace libre.
Avertissement - Cet appareil ne contient aucune pièce remplaçable par l'utilisateur.
Ne pas retirer de capot ni tenter d'atteindre l'intérieur. L'ouverture ou la modification de
l'appareil peut entraîner un risque de blessure et invalidera la garantie. Les instructions
suivantes sont réservées à un personnel de maintenance formé.
Information pour l'alimentation
L'appareil contient une alimentation CA-CC intégrée. L'appareil 1600 contient une seule alimentation et le
1800 contient une double alimentation.
Pour éviter d'endommager tout système, il est important de manipuler toutes les pièces avec soin.
Pour les appareils 1800 uniquement:
Attention, Danger de choc
Déconnecter toutes les sources d’énergie.
INSTRUCTIONS DE SÉCURITÉ IMPORTANTES: Des précautions de sécurité élémentaires doivent
toujours être respectées afin de réduire le risque incendie, d'électrocution ou de blessures, comme celles
qui suivent:
n Ne pas utiliser ce produit à proximité de l'eau, par exemple près d'une baignoire, d'un lavabo, d'un
évier de cuisine ou de buanderie, dans un sous-sol humide ou près d'une piscine.
n Evitez d'utiliser un téléphone (autre qu'un téléphone sans fil) par temps de foudre. Les éclaires
impliquent un risque faible d'électrocution.
n N'utilisez pas la téléphone pour signaler une fuite de gaz si vous vous tenez près de cette fuite.
n Utilisez uniquement le cordon alimentation et les piles indiquées dans ce manuel. Ne pas jeter les
piles au feu. Elles risquent d'exploser. Consultez les réglementations locales pour toute instruction
spécifique concernant leur élimination.
n Cet équipement ne convient pas pour une utilisation dans des endroits où des enfants sont
susceptibles d'être présents.
n Veillez à connecter le cordon d'alimentation à une prise de courant reliée à la terre autorisé par
Check Point.
n N'ouvrez jamais l'équipement. Pour des raisons de sécurité, les équipements ne doivent être
ouverts que par un homme de métier qualifié.
Connexion de mise à la terre à l'équipement
Avertissement - L'équipement dispose d'une borne de mise à la terre de protection
séparée sur le châssis qui doit être connecté à la terre pour mettre le châssis à la terre
de manière adéquate et protéger l'opérateur contre les risques lectriques.
Attention - Avant de commencer l'installation de l'équipement, assurez-vous qu'un
personnel de service a connecté une mise à la terre appropriée cosse au câble de
mise à la terre fourni.
Quantum Spark 1600 / 1800 Appliance R80.20.XX Getting Started Guide | 48Information sur la Santé et la Sécurité
Pour connecter de mise à la terre à l'équipement:
1. Connectez une extrémité du câble de mise à la terre à une prise de terre appropriée.
2. Placez la cosse de terre attachée au câble de terre sur la borne de mise à la terre de protection.
3. Fixez la cosse de mise à la terre à la borne de mise à la terre de protection avec des rondelles et des
vis.
4. Habillez le câble de mise à la terre et assurez-vous qu'il ne touche ni ne bloque l'accès aux autres
composants.
Avertissement - Avant de mettre l'équipement sous tension, connectez le châssis de
l'équipement à la terre. Pour fil de terre, vert et une isolation jaune est requise et la
section transversale du conducteur doit être supérieure à 0,75 mm ou 18 AWG.
Avertissement - La borne de mise à la terre de protection avec rondelles et vis dans
lesquelles une vis est vissée ne doit pas être moins de deux fois le pas du filetage de la
vis, au moins 3,5 mm de diamètre; Des rondelles en étoile ou des rondelles à ressort
peuvent être utilisées.
Avertissement - Après la mise hors tension et la déconnexion de l'équipement,
déconnectez le châssis de l'équipement pour mise à la terre
Attention - - Risque d'explosion en cas de remplacement de la pile par une pile de type
incorrect.
Avertissement - Ceci est un produit Laser de Classe 1. Utilisez uniquement un
émetteur-récepteur à fibre optique certifié CEI 60825-1 avec une température de
fonctionnement minimale de 75 degrés C (l'UE)
Ceci est un produit Laser de Classe 1 avec l’émetteur-récepteur à fibre optique,
conformément. (UL)
Pour l'Amérique du Nord uniquement
Message d'avertissement pour l'utilisation du produit dans l'environnement ITE:
Peut être installé dans des salles de matériel de traitement de l’information conformément à l’article 645 du
National Electrical Code et à la NFPA 75
Pour la Californie:
Matériau perchloraté: manipulation spéciale potentiellement requise. Voir
http://www.dtsc.ca.gov/hazardouswaste/perchlorate
L'avis suivant est fourni conformément au California Code of Regulations, titre 22, division 4.5, chapitre 33.
Meilleures pratiques de manipulation des matériaux perchloratés. Ce produit, cette pièce ou les deux
peuvent contenir une pile au dioxyde de lithium manganèse, qui contient une substance perchloratée.
Produits chimiques « Proposition 65
Les produits chimiques identifiés par l'état de Californie, conformément aux exigences du California Safe
Drinking Water and Toxic Enforcement Act of 1986 du California Health & Safety Code s. 25249.5, et seq.
(« Proposition 65 »), qui sont « connus par l'état pour être cancérigène ou être toxiques pour la
reproduction» (voir http://www.calepa.ca.gov).
AVERTISSEMENT:
Quantum Spark 1600 / 1800 Appliance R80.20.XX Getting Started Guide | 49Information sur la Santé et la Sécurité
La manipulation de ce cordon vous expose au contact du plomb, un élément reconnue par l'état de
Californie pour être cancérigène, provoquer des malformations à la naissance et autres dommages
relatifs à la reproduction. Se laver les mains après toute manipulation.
Déclaration de conformité
Nom du constructeur: Check Point Software Technologies Ltd.
Adresse du constructeur: 5 Shlomo Kaplan Street, Tel Aviv 67897, Israel
Numéro de modèle: V-82, V-83
Options de produit: 1600 / 1800 Appliance Wired
Date de demande initiale: Décembre 2020
Déclare sous son entière responsabilité que les produits sont conformes aux normes produit suivantes:
Certification Type
CE EN 55032:2015 + AC:2016, Class B EMC/EMI
CE EN 55032:2012 + AC:2013, Class B
CE EN 61000-3-2:2014
CE EN 61000-3-3:2013
CE EN 55024:2010 / A1:2015
CE EN 55024:2010
FCC Part 15B
AS/NZS CISPR32
ICES-003
VCCI, V-3/2015.4 , V4/2012.04,Class B VCCI CISPR 32:2016
EN 62368-1 Sécurité
CB IEC 62368-1
CSA/UL_ULc 62368-1 (Ed 2/3?)
AS/NZS 62368.1:2018
J 62368-1
ROHS10, REACH Environnement
Date et lieu d'émission: Décembre 2020, Tel Aviv, Israël
Laboratoire d'essais
Adresse: No 9 Harrison Road, Harrison Industrial Building, #05-01
Délivré par: Bureau Veritas Consumer Products Services (H.K.) Ltd., Taoyuan Branch Ling
Kou Laboratories
Adresse du No. 47-2, 14th Ling, Chia Pau Vil., Lin Kou Dist., New Taipei City, Taiwan
laboratoire:
Directive de l'Union européenne relative à la compatibilité électromagnétique
Quantum Spark 1600 / 1800 Appliance R80.20.XX Getting Started Guide | 50You can also read