Qualys Browser Recorder - User Guide Version 1.2.21 October 22, 2020
←
→
Page content transcription
If your browser does not render page correctly, please read the page content below

Qualys Browser Recorder
User Guide

Version 1.2.21

October 22, 2020

        Verity Confidential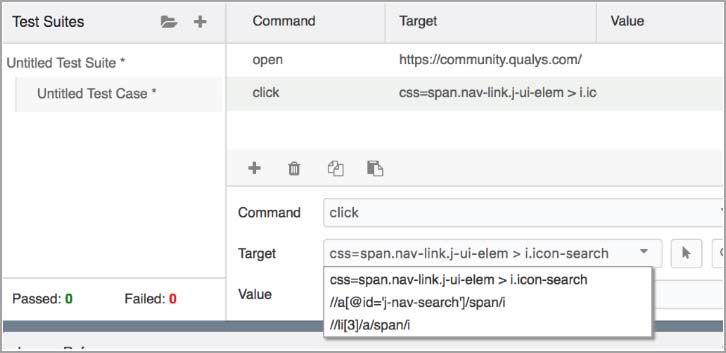
Copyright 2019 - 2021 by Qualys, Inc. All Rights Reserved. Qualys and the Qualys logo are registered trademarks of Qualys, Inc. All other trademarks are the property of their respective owners. Qualys, Inc. 919 E Hillsdale Blvd 4th Floor Foster City, CA 94404 1 (650) 801 6100
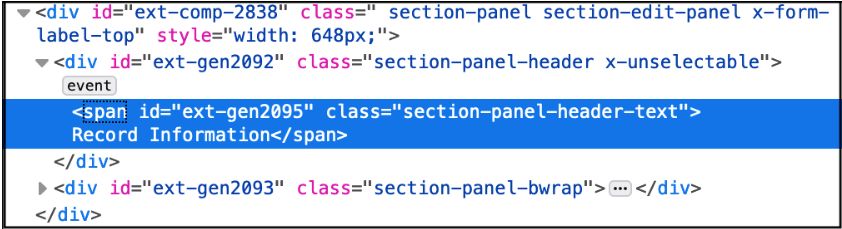
Table of Contents
Preface................................................................................................................. 5
About Qualys ........................................................................................................................... 5

Get Started ......................................................................................................... 6
      Introduction to Qualys Browser Recorder ...................................................................... 6
      Qualys Browser Recorder Features ................................................................................. 6
      Qualys Browser Recorder Version ................................................................................... 6

Installation .......................................................................................................... 7
Qualys Browser Recorder Prerequisite .................................................................................. 7
Installing Qualys Browser Recorder ...................................................................................... 7
    What happens next? ......................................................................................................... 8
    How do I access Qualys Browser Recorder? ................................................................... 8
Uninstalling Qualys Browser Recorder ................................................................................. 9

Qualys Browser Recorder User Interface.................................................. 10
Knowing Qualys Browser Recorder ..................................................................................... 11
Tool Bar ................................................................................................................................... 11
   Test Suite Pane ................................................................................................................ 12
   Editor Pane ....................................................................................................................... 13
   Log Pane ........................................................................................................................... 14
   Reference Pane ................................................................................................................ 15
   Save Pane ......................................................................................................................... 15
Hot Keys .................................................................................................................................. 17
Commands Supported .......................................................................................................... 17

Building Test Cases ........................................................................................ 19
Step 1: Recording ................................................................................................................... 19
Step 2: Editing ........................................................................................................................ 19
   Inserting a Command ..................................................................................................... 19
   Editing a Command ........................................................................................................ 20
Step 3: Saving a test case ...................................................................................................... 20
Step 4: Running test cases .................................................................................................... 21
   Run a Test Case ............................................................................................................... 21
   Run a Test Suite .............................................................................................................. 21
   Stop and Start .................................................................................................................. 21
   Stop in the Middle ........................................................................................................... 21
   Run Any Single Command ............................................................................................. 21
Example .................................................................................................................................. 22

                                                                             Verity Confidential
Configure Input of Time-Based One-Time Password (TOTP) ............. 25
Troubleshooting.............................................................................................. 27
Troubleshooting: General QBR usage .................................................................................. 27
   1) Save the script with .xml extension or specify a location for saving the script .. 27
   2) Element not found when playing back the script ................................................... 27
   3) Manually identifying targets for QBR commands ................................................... 27
   4) Activating fields that require user action ................................................................ 29
   5) Handling a popup window ......................................................................................... 29
Troubleshooting: Script playback in Qualys WAS scan .................................................... 30
   1) Review QID 150100 (Selenium Diagnostics) in your scan report ........................... 30
   2) Verifying that authentication was successful during the scan ............................. 30
   3) Leveraging "waitForElementPresent" for successful playback in WAS ................. 31
   4) Prevent auto-login when recording an authentication script ................................ 32
   5) Using a single authentication script for different apps that use a common SSO 32

Command Reference .....................................................................................34

Preface
                                                                                   Preface

Preface
Welcome to Qualys Browser Recorder! This user guide describes how to install Qualys
Browser Recorder extension in your Chrome browser.
USE OF THIS EXTENSION SHALL BE DEEMED TO BE ACCEPTANCE OF THESE TERMS. THIS
EXTENSION IS PROVIDED TO YOU "AS IS." TO THE EXTENT PERMITTED BY LAW, QUALYS
HEREBY DISCLAIMS ALL LIABILITY FOR THE PROVISION OR USE OF THIS EXTENSION.

About Qualys
Qualys, Inc. (NASDAQ: QLYS) is a pioneer and leading provider of cloud-based security and
compliance solutions. The Qualys Cloud Platform and its integrated apps help businesses
simplify security operations and lower the cost of compliance by delivering critical
security intelligence on demand and automating the full spectrum of auditing,
compliance and protection for IT systems and web applications.
Founded in 1999, Qualys has established strategic partnerships with leading managed
service providers and consulting organizations including Accenture, BT, Cognizant
Technology Solutions, Deutsche Telekom, Fujitsu, HCL, HP Enterprise, IBM, Infosys, NTT,
Optiv, SecureWorks, Tata Communications, Verizon and Wipro. The company is also a
founding member of the Cloud Security Alliance (CSA).
You can try the security and compliance solutions offered by Qualys for free using Qualys
Community Edition.
For more information, please visit www.qualys.com

                                            5
Get Started
Get Started
Thank you for your interest in Qualys Browser Recorder!
This document tells you all about Qualys Browser Recorder. We'll tell you about the
requirements, Installation Steps, Uninstallation Steps, features and more.
Introduction to Qualys Browser Recorder
Qualys Browser Recorder is a free browser extension to record & play back scripts for web
application automation testing. Qualys Browser Recorder includes the entire Selenium
Core, allowing you to capture web elements and record actions in the browser to let you
generate, edit, and play back automated test cases quickly and easily. It also allows you to
select a UI element from the browser’s currently displayed page and then select from a list
of Selenium commands with parameters.
Let’s see how Qualys Browser Recorder evolved:
- Qualys Web Application Scanning (WAS) supported playing back scripts recorded from
the old Selenium IDE Firefox extension, which broke when Firefox 55 was released
- The scripts allow the scanner to navigate complex authentication and workflows
- This new Chrome extension is designed to be essentially a more powerful and modern
replacement for Selenium IDE
- It’s designed to be compatible with existing scripts recorded originally from Selenium IDE
If you are not familiar with Qualys WAS or the other security and compliance solutions
offered by Qualys, feel free to try the Qualys Community Edition.
Qualys Browser Recorder Features
Qualys Browser Recorder was developed based on Web Extensions API and supports
running on Chrome browser. It retains all the features of the Selenium IDE and provides
numerous advanced enhancements.
-Allows you to save test case scripts in HTML format
-Easy to use interface style and locators with target element selection.
-Supports opening, editing and running multiple test suites in one panel.
-Supports automatic triggering of test suites and processing them sequentially.
Qualys Browser Recorder Version
You can easily locate the version of Qualys Browser Recorder above the toolbar.
6Qualys Browser Recorder Prerequisite
Installation
Installation
It's easy to install Qualys Browser Recorder. We'll walk you through the steps quickly.
Qualys Browser Recorder Prerequisite
Installing Qualys Browser Recorder
Uninstalling Qualys Browser Recorder
Qualys Browser Recorder Prerequisite
You just need to download and install the latest version of the Chrome web browser.
The user needs to be aware of basics of Javascript and HTML concepts to execute effective
and successful automation test scripts.
QBR can also be installed and used with the latest Microsoft Edge browser.
Installing Qualys Browser Recorder
Here are the steps for quick installation of Qualys Browser Recorder:
Step 1: Open the Google Chrome browser and go to Chrome Store. Search for Qualys
Browser Recorder in the Chrome store.
USE OF THIS EXTENSION SHALL BE DEEMED TO BE ACCEPTANCE OF THESE TERMS. THIS
EXTENSION IS PROVIDED TO YOU "AS IS." TO THE EXTENT PERMITTED BY LAW, QUALYS
HEREBY DISCLAIMS ALL LIABILITY FOR THE PROVISION OR USE OF THIS EXTENSION.
Step 2: Once the web page is loaded, click Add to Chrome.
7Installing Qualys Browser Recorder
Installation
Step 3: Click Add extension in the new pop-up window that is displayed.
What happens next?
As soon as you complete the installation steps, a small pop window is displayed indicating
Qualys Browser Recorder has been successfully added to your browser.
How do I access Qualys Browser Recorder?
Simply click the Qualys Browser Recorder icon in the menu bar to access and use
Qualys Browser Recorder anytime you want.
8Uninstalling Qualys Browser Recorder
Installation
Uninstalling Qualys Browser Recorder
Step 1: Open Chrome browser and right-click on Qualys Browser Recorder icon in the
menu bar. and simply select Remove from Chrome or select Manage Extensions.
The Extension web page opens with Qualys Browser Recorder extension selected.
Step 2: Click Remove extension icon located at the bottom of the page.
Step 3: Click Remove in the Confirm Removal pop up window.
9Qualys Browser Recorder User Interface
Qualys Browser Recorder User Interface
Let us get familiar with the various tools, panes and menu options that Qualys Browser
Recorder provides us:
Tool Bar
Test Suite Pane
Editor Pane
Log Pane
Reference Pane
Save Pane
Hot Keys
Commands Supported
10Knowing Qualys Browser Recorder
Qualys Browser Recorder User Interface
Knowing Qualys Browser Recorder
Let’s take a look at the various panes and toolbar options in Qualys Browser Recorder.
Tool Bar
Become familiar with the toolbar buttons.
Icon Name Description
Record Starts and ends your recording session. Each
browser action is entered as a Selenium
command in the editor.
Playback Speed Controls the speed of your text script execution.
11Tool Bar
Qualys Browser Recorder User Interface
Icon Name Description
Play Current Test Sequentially plays all the test cases of selected
Case test suite listed in the Test Suite pane.
Play Current Test Sequentially plays all the test suites listed in the
Suite Test Suite pane.
Play Entire Test Stops your playback.
Suites
Pause/Resume Pauses or resumes your playback.
Save Allows you to display, copy and save the selected
test case script in HTML format.
Note that Selenium IDE HTML format must be
used for compatibility with Qualys Web
Application Scanning (WAS).
Test Suite Pane
The Test Suite pane is where you'll view your test suites and test cases.
--Open more than one test suite at a time.
--View the list of currently opened test suites.
--When you open a test suite, the test suite pane will
automatically list all the test cases contained in it.
--The highlighted test case is the currently selected
test case. After playback, each test case has correct or
wrong sign icon to represent if it has passed or failed
respectively. At the bottom portion is a summary of
the number of test cases that were run and failed.
12Tool Bar
Qualys Browser Recorder User Interface
Editor Pane
You can think of the editor pane as the place where all the action happens. This is where
you create and modify test case commands. After playback, each step is color-coded.
The Command, Target, and Value entry fields display the currently selected command
along with its parameters. These are entry fields where you can modify the currently
selected command. You can select a command and use the right-click menu options or
editing toolbar to achieve various tasks such as copying the command, inserting new
command or clearing all the commands, executing the command, and so on.
13Tool Bar
Qualys Browser Recorder User Interface
Editing Toolbar
Icon Name Description
Add Inserts a command
Delete Deletes the selected command.
Copy Copies the selected command
Paste Pastes the copied command
Log Pane
The Log pane displays runtime messages during execution. It provides real-time updates
as to what Qualys Browser Recorder is doing.
These messages are often useful for test case debugging. You can clear the logs by clicking
the clear logs button.
14Tool Bar
Qualys Browser Recorder User Interface
Reference Pane
The Reference pane shows a concise description of the currently selected command in the
Editor pane. It also shows the description about the locator and value to be used on that
command.
The number of parameters provided must match the number specified, the order of
parameters provided must match the order specified, and the type of parameters provided
must match the type specified. If there is a mismatch in any of these three areas, the
command will not run correctly.
Save Pane
The Save pane allows you to copy and save a test case in its raw form. Currently, two file
formats are supported: Selenium IDE HTML and Sidex HTML format. By default, scripts
are downloaded in Selenium IDE HTML format. Note that Selenium IDE HTML format is
required for compatibility with Qualys Web Applciation Scanning (WAS).
15Tool Bar
Qualys Browser Recorder User Interface
To view the test case in its native form, click the save button on the toolbar. Click the
Format drop-down to switch and change the HTML format.
It displays the test case in the native format (HTML) in which the file is stored.
16Hot Keys
Qualys Browser Recorder User Interface
Hot Keys
You could try some of the shortcut keys for common actions. Try it out.
Keys Description
Ctrl + S Save a test suite.
Ctrl + O Open a test suite.
Ctrl + P Play this test case.
Ctrl + I Insert a new command.
Ctrl + A Select all commands.
Ctrl + X Cut a command.
Ctrl + C Copy a command.
Ctrl + V Paste a command.
Del Delete the selected command (s).
Ctrl + B Toggle a breakpoint.
Commands Supported
We provide over 500 commands in Qualys Browser Recorder. This is a list of most
commonly used commands required for building a test case. See Command Reference
chapter for the complete list of commands.
Command Description
open Opens an URL in the test frame. This accepts both relative and
absolute URLs. The "open" command waits for the page to load
before proceeding, ie. the "AndWait" suffix is implicit.
click Clicks a link, button, checkbox or radio button. If the click action
causes a new page to load (like a link usually does), call
waitForPageToLoad.
waitForPageToLoad Waits for a new page to load.
waitForElementPresent Verifies that the specified element is somewhere on the page.
verifyText Gets the text of an element. This works for any element that
contains text. This command uses either the textContent (Mozilla-
like browsers) or the innerText (IE-like browsers) of the element,
which is the rendered text shown to the user.
sendKeys Simulates keystroke events on the specified element, as though
you have typed the value key-by-key.
type Sets the value of an input field, as though you have typed it in.
pause Wait for the specified amount of time (in milliseconds).
mouseOver Simulates a user hovering a mouse over the specified element.
17Commands Supported
Qualys Browser Recorder User Interface
Command Description
verifyTextPresent Verifies that the specified text pattern appears somewhere on the
rendered page shown to the user.
selectFrame Selects a frame within the current window.
18Step 1: Recording
Building Test Cases
Building Test Cases
You could build a test case from scratch involving the following steps:
Step 1: Recording
Step 2: Editing
Step 3: Saving a test case
Step 4: Running test cases
Example
Step 1: Recording
Many first-time users begin by recording a test case from their interactions with a website.
When you open Qualys Browser Recorder, the record button is at the upper right corner.
Click the record button and it will start recording your actions.
During recording, Qualys Browser Recorder automatically inserts commands into your
test case based on your actions. Typically, this may include:
--clicking a link - click or clickAndWait commands
--entering values - type command
--selecting options from a drop-down listbox - select command
--clicking check boxes or radio buttons - click command
Qualys Browser Recorder records full URL paths for commands that store URL path. For
example, the “Open” command records the full URL path of the opened Website. If you
import a script that has relative paths, Qualys Browser Recorder automatically converts
these to full paths while importing.
Step 2: Editing
Once you complete recording the interactions, you could either edit the commands or
insert new commands.
Inserting a Command
Select the command and then right-click and select Insert Command from the right-click
menu; the Qualys Browser Recorder will add a blank line just below the line you selected.
Alternatively, you can click ‘+’ in the Editing toolbar.
Now, use the command editing text fields to enter your new command and its parameters.
19Step 3: Saving a test case
Building Test Cases
Editing a Command
Simply select the line to be changed and edit it using the Command, Target, and Value
fields.
Note that advanced users can open a saved test case script in a text/xml editor and edit
the script.
Step 3: Saving a test case
Qualys Browser Recorder distinguishes between test cases and test suites. You can add
one or more test cases and form a test suite.
To save your tests for later use you can either save the individual test cases, or add the test
cases to a test suite and then save the test suite. If the test cases of your test suite have
not been saved, you’ll be prompted to save them before saving the test suite. To save a test
case/suite - in the ‘Test Suite’ pane, select the test case/suite and then right-click on
particular test case/suite to save. You cannot have any special characters except the
underscore “_” in the file name.
Note: Qualys Browser Recorder saves the test case or test suite files to a default location.
To enable the option to save the file to a different location, go to the Chrome browser and
then Settings > Advanced > Downloads. Enable the “Ask where to save each file before
downloading” option.
To open a test case/suite in the ‘Test Suite’ pane, click Open Test Suites on the toolbar,
which lets you browse your existing file and when you open an existing test suite, Qualys
Browser Recorder displays its commands in the command Pane.
20Step 4: Running test cases
Building Test Cases
Step 4: Running test cases
Qualys Browser Recorder allows many options for running your test case. You can execute
a test case all at once, stop and start it, run one line at a time, run a single command you
are currently developing, and you can do a batch run of an entire test suite. Execution of
test cases is very flexible.
Run a Test Case
Select the test case and click the play button to play the current test case
Run a Test Suite
Select the test suite and click the play button to execute all the test cases in the currently
loaded test suite.
Stop and Start
The Play button toggles between play and stop. When you execute the test case, you can
use the same button to stop the test case while it is being executed. When you stop the
test case, use the same stop button now to play the test case.
Stop in the Middle
You can set a breakpoint in the test case to cause it to stop on a particular command. This
is useful for debugging your test case. To set a breakpoint, select a command, right-click,
and select Toggle Breakpoint.
Run Any Single Command
Click any single command on command pane and then right-click and select ‘Execute this
command’. This is useful when you write a single command. It lets you immediately test a
command you are constructing. You can run single command to see if it runs correctly.
21Example
Building Test Cases
Example
Let us build a sample test case to understand the sequence better. For example, let us
record the steps needed to open Qualys website.
Step 1: Open Qualys Browser Recorder and click Record.
Step 2: Type the URL in the browser in the browser and perform few clicks. For every click,
Qualys Browser Recorder displays a prompt on the screen.
22Example
Building Test Cases
Step 3: After you complete the sequence of clicks, click Record button to stop the
recording. Qualys Browser Recorder automatically populates all the actions in the editor
pane.
Step 4: Save the test case and test suite.
23Example
Building Test Cases
Step 5: You can now replay the recorded steps. the background will change to light green
color if the script gets executed successfully and the log statement gets printed.
24Configure Input of Time-Based One-Time Password (TOTP)
Configure Input of Time-Based One-Time
Password (TOTP)
Qualys Browser Recorder has been enhanced to allow your WAS scans to support two-
factor authentication (2FA). This means you can use QBR to automate the input of a time-
based one-time password (TOTP) token used for 2FA. The "sendTotp" command is used to
provide the values that both QBR and the WAS scan engine need to generate the proper
TOTP for your web application
Use the sendTotp command for the form field that accepts input of the TOTP. You will
need to configure the sendTotp command in the QBR script to specify the hashing
algorithm, the number of digits, the time window in seconds, and the secret key. These
values are required to generate the correct TOTP for a given point in time.
With the sendTotp command, every time the script is run, either in QBR or by the WAS
engine during a scan, the correct TOTP for that moment in time will be generated and
entered into the field.
25Configure Input of Time-Based One-Time Password (TOTP)
Input Arguments
Parameter Description
locator (Required) An element locator.
settingsString (Required) Accepts these four arguments for token generation.
Specify these four arguments in the settingsString parameter
as a comma-separated values in the this order:
1) hashing_algorithm - Hashing algorithm to be used for
calculating HMAC hash. The valid values are: SHA-1,SHA-256,
and SHA-512.
2) number_of_digits - Number of digits in the token. The
standard token length is usually 6 to 8 digits long.
3) time_window - Number of seconds the token will remain
valid, which is usually 30 seconds.
4) secret_key_in_base32 - Base 32 encoded secret key that will
be hashed to generate the token.
An example of settingsString:
"SHA-1, 8, 60, GEZDGNBVGY3TQOJQGEZDGNBVGY3TQOJQ"
26Troubleshooting: General QBR usage
Troubleshooting
Troubleshooting
Troubleshooting: General QBR usage
1) Save the script with .xml extension or specify a location for saving the
script
By default, QBR will save the file with a .html extension (it's still valid XML data - XHTML
to be precise). If you enable "Ask where to save each file before downloading" in Chrome,
then you can change the extension to .xml if desired and also decide where to save the
file. It doesn't matter if you save the file with .xml or .html extension. Either will work for
playback in QBR as well as Qualys WAS.
2) Element not found when playing back the script
When you record a script, targets are selected automatically. Occasionally, the resulting
script will not find the target during playback. QBR allows you to choose a different
representation of the target by selecting from the drop-down. See the screenshot below for
an example.
3) Manually identifying targets for QBR commands
Identifying a target for your QBR commands can be challenging when manually editing a
script. The easiest way is to continue recording your script after you authenticate. While
still recording on a post-authentication page, click on an interactive element, such as a
button or text. Stop the recording and replace the post-authentication "click" command
you just recorded with the "waitForElementPresent" command.
You can also manually add the command. First, pick an element on your web page, such
as a button or text. Use your mouse to right click and select "Inspect". This will take you to
a DOM view of the page and from here you can find a way to reference this element
uniquely. Two common ways are by "id" or by css location.
27Troubleshooting: General QBR usage
Troubleshooting
In some applications, you will find buttons, labels, or form fields identified by id="name"
where "name" is unique for that element. This is very often the easiest solution when
available. For example:
Here you can clearly see there is an element in a span section called id=”ext-gen2095”. To
use this in your script, set it as the target for your command:
Command Target Value
waitForElementPresent id=”ext-gen2095”
If you are familiar with using your browser’s developer tools to access the console, you
can use the following command to pull out all the id="name" references:
document.querySelectorAll('[id]:not([id=""])')
If you cannot find an id="name" element or need to target an element that does not use id,
you can also use a css location and match against anything in quotes. This target will use
the following format: css=:contains(""). Using the same
screenshot as above, you can also reference the same target using
css=span:contains("section-panel-header-text") and leverage the class name.
In this example, our QBR script would look like this:
Command Target Value
waitForElementPresent css=span:contains(“section-panel-header-
text")
28Troubleshooting: General QBR usage
Troubleshooting
4) Activating fields that require user action
Sometimes a user action, such as clicking, is required before the fields in a form become
active. In this case, you need to use the mouse to click the field for it to get populated. In
that scenario, the "keyPress" command can be used to activate the field as part of the
script playback.
Below is an example script where the keyPress command is used.
5) Handling a popup window
Some application may use a popup window during the authentication process or other
activity. If so, you may need to add a "waitForPopUp" command with a target of title and
the popup window's title. Also add a "selectWindow" command to ensure the popup
window is selected. Then, use the sendKeys and click commands as you normally would
to submit the login form.
...
click
id=loginButton
waitForPopUp
title=Quick Login
50000
29Troubleshooting: Script playback in Qualys WAS scan
Troubleshooting
selectWindow
name=login
sendKeys
name=user
testuser
Troubleshooting: Script playback in Qualys WAS scan
1) Review QID 150100 (Selenium Diagnostics) in your scan report
Once your WAS scan has finished, view the scan report and look under Information
Gathered for QID 150100. This is where you will find diagnostic information for the script.
You should see each command in your script executing. If the scanner ran into a problem,
you will see it here and can take appropriate corrective action.
You may see an error, for example, that says an element could not be found. If that's the
case, try adding "waitForPageToLoad" command with a value 50000 milliseconds to your
script. Alternatively, it may help to add a "waitForElementPresent" command as explained
in the next section.
2) Verifying that authentication was successful during the scan
After uploading the authentication script into Qualys WAS, you must specify a regular
expression to verify that the authentication completed successfully. The regular
expression must match against the very first response received after the script executes.
For example, if the last command is to click on a submit button (generating a POST
request to the server), the server response must have a match for the regex you've
specified. This is how WAS verifies that authentication succeeded. It can match against
the displayed text of even against content found in the HTML source code itself.
In older web applications, a simple regex of "logout" was often sufficient as this was
usually part of this initial response back. However, many new applications, including most
dynamic/AJAX web apps, will often first respond back with a script that loads other
content. Remember, only the first response back is checked for the regular expression
match. In this case, your validation regular expression may fail even if you are
successfully authenticated.
A more versatile method to ensure you are authenticated and pass the validation regular
expression match is to leverage the QBR script itself to check for the presence of an
element only available on an authenticated page and use a "dummy" regular expression
(such as ".*") within WAS for the validation regex. In this scenario, the script will run to
completion only if it finds an element present on ANY post authentication page that is
loaded. You can check QID 150100 in the WAS scan report to see all script commands that
executed.
30Troubleshooting: Script playback in Qualys WAS scan
Troubleshooting
After this has occurred, the validation regular expression will match against ANYTHING
and QID 150094 will report you are successfully authenticated. If, however, the QBR script
fails to execute fully, and it cannot find the target element on the post-authentication
page, then QID 150100 will report that the script did not successfully execute fully and
QID 150095 will report the QBR script failed to authenticate to the application.
To implement this method, please see the section for "The WaitForElementPresent
Command" to adjust your QBR script, and use ".*" (without the quotes) for your validation
regex within WAS as shown in the screenshot below.
3) Leveraging "waitForElementPresent" for successful playback in WAS
The "waitForElementPresent" command in a QBR script can be used for a variety of
practical and useful operations. For example, if you need to add a delay to a command to
allow time for dynamic content on a web application to fully load, you can use the
“waitForElementPresent” command to pause execution until the target element is loaded
and available.
A good application of this is when attempting to use the “sendKeys” command to pass in
the username for a WAS authentication record. After the page is accessed, instead of
immediately going to the sendKeys command, you can first use the
“waitForElementPresent” command to slow the script playback down until the necessary
fields have loaded/rendered.
For example, if the form field for the username is identified by id=user, you could modify
your QBR script to add a "waitForElementPresent" command after the initial open
command. Another useful scenario is to use it at the end of your script to verify you have
successfully authenticated. This is shown in bold below.
Command Target Value
open https://www.myapp.com
waitForElementPresent Id=user
sendkeys Id=user John.Smith
sendkeys Id=password P@$$w0rd123
click Id=submit
waitForElementPresent Id=logout
31Troubleshooting: Script playback in Qualys WAS scan
Troubleshooting
The script itself gives you greater flexibility in confirming authentication compared to the
validation regex within WAS. You just need to find an element that only appears in the
post-authentication page. You can use text or elements from the DOM.
For example, you may have a button on the page labeled "Log Out". To use this for the
waitForElementPresent command, you have to identify this button by its element and not
by the text itself. So "Log Out" won't work, but id=logout will if this is how the button is
referenced.
In this example, you would add the waitForElementPresent as your final command in your
QBR authentication script. For example:
See the issue on “Manually identifying targets for QBR commands" to better understand
how to find elements for modifying your QBR scripts.
4) Prevent auto-login when recording an authentication script
When recording your authentication script using QBR, you may need to utilize Chrome's
Incognito Mode. This is sometimes necessary because applications will seamlessly
authenticate you due to existing cookies, local storage, Windows Integrated login, etc.
During a WAS scan, of course, the scanner does not have access to this data. It interacts
with the web application using a "clean" history, so it is important to record your script
from that perspective.
Simply open a Chrome Incognito window and record your script there. Note you may need
to activate QBR for use in Incognito Mode by enabling the "Allow in incognito" setting for
the extension in Chrome.
5) Using a single authentication script for different apps that use a
common SSO
If you need to scan a web application that uses single sign-on (SSO), you will most likely
need to use a Selenium script for Qualys WAS to successfully authenticate (more
information). If you have multiple web apps that use the same SSO mechanism, you may
find that your authentication scripts are identical except for the URL of the initial open
command. If that's the case, you can edit the script manually using a text editor and
replace the URL with "@@webappURL@@" (without the quotes). This is known as a WAS
parameter. When the script is played back during the WAS scan, the scanner will
recognize the WAS parameter and replace it with the web application's target URL.
This can greatly simplify management of your scripts because you can have a single
authentication script that works across many different web apps.
Below is a snippet of a Selenium script that uses a WAS parameter (highlighted).
...
open
@@webappURL@@
32Troubleshooting: Script playback in Qualys WAS scan
Troubleshooting
sendKeys
name=email
test@example.com
sendKeys
name=password
mypass
click
id=SignInButton
...
33Command Reference
Command Reference
This chapter lists all the commands available in the Qualys Browser Recorder.
A
addLocationStrategy
addLocationStrategyAndWait
addScript
addScriptAndWait
addSelection
addSelectionAndWait
allowNativeXpath
allowNativeXpathAndWait
altKeyDown
altKeyDownAndWait
altKeyUp
altKeyUpAndWait
answerOnNextPrompt
assertAlert
assertAlertAndWait
assertAlertNotPresent
assertAlertPresent
assertAllButtons
assertAllFields
assertAllLinks
assertAllWindowIds
assertAllWindowNames
assertAllWindowTitles
assertAttribute
assertAttributeFromAllWindows
assertBodyText
assertChecked
assertChildWindowName
34Command Reference
assertConfirmation
assertConfirmationAndWait
assertConfirmationNotPresent
assertConfirmationPresent
assertCookie
assertCookieByName
assertCookieNotPresent
assertCookiePresent
assertCssCount
assertCursorPosition
assertEditable
assertElementHeight
assertElementIndex
assertElementNotPresent
assertElementPositionLeft
assertElementPositionTop
assertElementPresent
assertElementWidth
assertEval
assertExpression
assertHtmlSource
assertLocation
assertMouseSpeed
assertNotAlert
assertNotAllButtons
assertNotAllFields
assertNotAllLinks
assertNotAllWindowIds
assertNotAllWindowNames
assertNotAllWindowTitles
assertNotAttribute
35Command Reference
assertNotAttributeFromAllWindows
assertNotBodyText
assertNotChecked
assertNotChildWindowName
assertNotConfirmation
assertNotCookie
assertNotCookieByName
assertNotCssCount
assertNotCursorPosition
assertNotEditable
assertNotElementHeight
assertNotElementIndex
assertNotElementPositionLeft
assertNotElementPositionTop
assertNotElementWidth
assertNotEval
assertNotExpression
assertNotHtmlSource
assertNotLocation
assertNotMouseSpeed
assertNotOrdered
assertNotPrompt
assertNotSelectOptions
assertNotSelectedId
assertNotSelectedIds
assertNotSelectedIndex
assertNotSelectedIndexes
assertNotSelectedLabel
assertNotSelectedLabels
assertNotSelectedValue
assertNotSelectedValues
36Command Reference
assertNotSomethingSelected
assertNotSpeed
assertNotTable
assertNotText
assertNotTitle
assertNotValue
assertNotVisible
assertNotWhetherThisFrameMatchFrameExpression
assertNotWhetherThisWindowMatchWindowExpression
assertNotXpathCount
assertOrdered
assertPrompt
assertPromptAndWait
assertPromptNotPresent
assertPromptPresent
assertSelectOptions
assertSelectedId
assertSelectedIds
assertSelectedIndex
assertSelectedIndexes
assertSelectedLabel
assertSelectedLabels
assertSelectedValue
assertSelectedValues
assertSomethingSelected
assertSpeed
assertTable
assertText
assertTextAndWait
assertTextNotPresent
assertTextPresent
37Command Reference
assertTitle
assertTitleAndWait
assertValue
assertVisible
assertWhetherThisFrameMatchFrameExpression
assertWhetherThisWindowMatchWindowExpression
assertXpathCount
assignId
assignIdAndWait
B
break
C
captureEntirePageScreenshot
captureEntirePageScreenshotAndWait
check
checkAndWait
chooseCancelOnNextConfirmation
chooseCancelOnNextPrompt
chooseCancelOnNextPromptAndWait
chooseOkOnNextConfirmation
chooseOkOnNextConfirmationAndWait
click
clickAndWait
clickAt
clickAtAndWait
close
contextMenu
contextMenuAndWait
contextMenuAt
contextMenuAtAndWait
controlKeyDown
38Command Reference
controlKeyDownAndWait
controlKeyUp
controlKeyUpAndWait
createCookie
createCookieAndWait
D
deleteAllVisibleCookies
deleteAllVisibleCookiesAndWait
deleteCookie
deleteCookieAndWait
deselectPopUp
deselectPopUpAndWait
doubleClick
doubleClickAndWait
doubleClickAt
doubleClickAtAndWait
dragAndDrop
dragAndDropAndWait
dragAndDropToObject
dragAndDropToObjectAndWait
E
echo
echoAndWait
editContent
editContentAndWait
F
fireEvent
fireEventAndWait
focus
focusAndWait
39Command Reference
G
goBack
goBackAndWait
H
highlight
highlightAndWait
I
ignoreAttributesWithoutValue
ignoreAttributesWithoutValueAndWait
K
keyDown
keyDownAndWait
keyPress
keyPressAndWait
keyUp
keyUpAndWait
M
metaKeyDown
metaKeyDownAndWait
metaKeyUp
metaKeyUpAndWait
mouseDown
mouseDownAndWait
mouseDownAt
mouseDownAtAndWait
mouseDownRight
mouseDownRightAndWait
mouseDownRightAt
mouseDownRightAtAndWait
mouseMove
mouseMoveAndWait
40Command Reference
mouseMoveAt
mouseMoveAtAndWait
mouseOut
mouseOutAndWait
mouseOver
mouseOverAndWait
mouseUp
mouseUpAndWait
mouseUpAt
mouseUpAtAndWait
mouseUpRight
mouseUpRightAndWait
mouseUpRightAt
mouseUpRightAtAndWait
O
open
openWindow
openWindowAndWait
P
pause
R
refresh
refreshAndWait
removeAllSelections
removeAllSelectionsAndWait
removeScript
removeScriptAndWait
removeSelection
removeSelectionAndWait
rollup
rollupAndWait
41Command Reference
runScript
runScriptAndWait
S
select
selectAndWait
selectFrame
selectPopUp
selectPopUpAndWait
selectWindow
sendKeys
sendKeysAndWait
sendTotp
setCursorPosition
setCursorPositionAndWait
setMouseSpeed
setMouseSpeedAndWait
setSpeed
setSpeedAndWait
setTimeout
shiftKeyDown
shiftKeyDownAndWait
shiftKeyUp
shiftKeyUpAndWait
showElement
showElementAndWait
store
storeAlert
storeAlertPresent
storeAllButtons
storeAllFields
storeAllLinks
42Command Reference
storeAllWindowIds
storeAllWindowNames
storeAllWindowTitles
storeAndWait
storeAttribute
storeAttributeFromAllWindows
storeBodyText
storeChecked
storeChildWindowName
storeConfirmation
storeConfirmationPresent
storeCookie
storeCookieByName
storeCookiePresent
storeCssCount
storeCursorPosition
storeEditable
storeElementHeight
storeElementIndex
storeElementPositionLeft
storeElementPositionTop
storeElementPresent
storeElementWidth
storeEval
storeExpression
storeHtmlSource
storeLocation
storeMouseSpeed
storeOrdered
storePrompt
storePromptPresent
43Command Reference
storeSelectOptions
storeSelectedId
storeSelectedIds
storeSelectedIndex
storeSelectedIndexes
storeSelectedLabel
storeSelectedLabels
storeSelectedValue
storeSelectedValues
storeSomethingSelected
storeSpeed
storeTable
storeText
storeTextAndWait
storeTextPresent
storeTitle
storeTitleAndWait
storeValue
storeVisible
storeWhetherThisFrameMatchFrameExpression
storeWhetherThisWindowMatchWindowExpression
storeXpathCount
submit
submitAndWait
T
type
typeAndWait
typeKeys
typeKeysAndWait
U
uncheck
44Command Reference
uncheckAndWait
useXpathLibrary
useXpathLibraryAndWait
V
verifyAlert
verifyAlertNotPresent
verifyAlertPresent
verifyAllButtons
verifyAllFields
verifyAllLinks
verifyAllWindowIds
verifyAllWindowNames
verifyAllWindowTitles
verifyAttribute
verifyAttributeFromAllWindows
verifyBodyText
verifyChecked
verifyChildWindowName
verifyConfirmation
verifyConfirmationNotPresent
verifyConfirmationPresent
verifyCookie
verifyCookieByName
verifyCookieNotPresent
verifyCookiePresent
verifyCssCount
verifyCursorPosition
verifyEditable
verifyElementHeight
verifyElementIndex
verifyElementNotPresent
45Command Reference
verifyElementPositionLeft
verifyElementPositionTop
verifyElementPresent
verifyElementWidth
verifyEval
verifyExpression
verifyHtmlSource
verifyLocation
verifyMouseSpeed
verifyNotAlert
verifyNotAllButtons
verifyNotAllFields
verifyNotAllLinks
verifyNotAllWindowIds
verifyNotAllWindowNames
verifyNotAllWindowTitles
verifyNotAttribute
verifyNotAttributeFromAllWindows
verifyNotBodyText
verifyNotChecked
verifyNotChildWindowName
verifyNotConfirmation
verifyNotCookie
verifyNotCookieByName
verifyNotCssCount
verifyNotCursorPosition
verifyNotEditable
verifyNotElementHeight
verifyNotElementIndex
verifyNotElementPositionLeft
verifyNotElementPositionTop
46Command Reference
verifyNotElementWidth
verifyNotEval
verifyNotExpression
verifyNotHtmlSource
verifyNotLocation
verifyNotMouseSpeed
verifyNotOrdered
verifyNotPrompt
verifyNotSelectOptions
verifyNotSelectedId
verifyNotSelectedIds
verifyNotSelectedIndex
verifyNotSelectedIndexes
verifyNotSelectedLabel
verifyNotSelectedLabels
verifyNotSelectedValue
verifyNotSelectedValues
verifyNotSomethingSelected
verifyNotSpeed
verifyNotTable
verifyNotText
verifyNotTitle
verifyNotValue
verifyNotVisible
verifyNotWhetherThisFrameMatchFrameExpression
verifyNotWhetherThisWindowMatchWindowExpression
verifyNotXpathCount
verifyOrdered
verifyPrompt
verifyPromptNotPresent
verifyPromptPresent
47Command Reference
verifySelectOptions
verifySelectedId
verifySelectedIds
verifySelectedIndex
verifySelectedIndexes
verifySelectedLabel
verifySelectedLabels
verifySelectedValue
verifySelectedValues
verifySomethingSelected
verifySpeed
verifyTable
verifyText
verifyTextAndWait
verifyTextNotPresent
verifyTextPresent
verifyTitle
verifyTitleAndWait
verifyValue
verifyVisible
verifyWhetherThisFrameMatchFrameExpression
verifyWhetherThisWindowMatchWindowExpression
verifyXpathCount
W
waitForAlert
waitForAlertNotPresent
waitForAlertPresent
waitForAllButtons
waitForAllFields
waitForAllLinks
waitForAllWindowIds
48Command Reference
waitForAllWindowNames
waitForAllWindowTitles
waitForAttribute
waitForAttributeFromAllWindows
waitForBodyText
waitForChecked
waitForChildWindowName
waitForCondition
waitForConfirmation
waitForConfirmationNotPresent
waitForConfirmationPresent
waitForCookie
waitForCookieByName
waitForCookieNotPresent
waitForCookiePresent
waitForCssCount
waitForCursorPosition
waitForEditable
waitForElementHeight
waitForElementIndex
waitForElementNotPresent
waitForElementPositionLeft
waitForElementPositionTop
waitForElementPresent
waitForElementWidth
waitForEval
waitForExpression
waitForFrameToLoad
waitForHtmlSource
waitForLocation
waitForMouseSpeed
49Command Reference
waitForNotAlert
waitForNotAllButtons
waitForNotAllFields
waitForNotAllLinks
waitForNotAllWindowIds
waitForNotAllWindowNames
waitForNotAllWindowTitles
waitForNotAttribute
waitForNotAttributeFromAllWindows
waitForNotBodyText
waitForNotChecked
waitForNotChildWindowName
waitForNotConfirmation
waitForNotCookie
waitForNotCookieByName
waitForNotCssCount
waitForNotCursorPosition
waitForNotEditable
waitForNotElementHeight
waitForNotElementIndex
waitForNotElementPositionLeft
waitForNotElementPositionTop
waitForNotElementWidth
waitForNotEval
waitForNotExpression
waitForNotHtmlSource
waitForNotLocation
waitForNotMouseSpeed
waitForNotOrdered
waitForNotPrompt
waitForNotSelectOptions
50Command Reference
waitForNotSelectedId
waitForNotSelectedIds
waitForNotSelectedIndex
waitForNotSelectedIndexes
waitForNotSelectedLabel
waitForNotSelectedLabels
waitForNotSelectedValue
waitForNotSelectedValues
waitForNotSomethingSelected
waitForNotSpeed
waitForNotTable
waitForNotText
waitForNotTitle
waitForNotValue
waitForNotVisible
waitForNotWhetherThisFrameMatchFrameExpression
waitForNotWhetherThisWindowMatchWindowExpression
waitForNotXpathCount
waitForOrdered
waitForPageToLoad
waitForPopUp
waitForPrompt
waitForPromptNotPresent
waitForPromptPresent
waitForSelectOptions
waitForSelectedId
waitForSelectedIds
waitForSelectedIndex
waitForSelectedIndexes
waitForSelectedLabel
waitForSelectedLabels
51Command Reference
waitForSelectedValue
waitForSelectedValues
waitForSomethingSelected
waitForSpeed
waitForTable
waitForText
waitForTextNotPresent
waitForTextPresent
waitForTitle
waitForValue
waitForVisible
waitForWhetherThisFrameMatchFrameExpression
waitForWhetherThisWindowMatchWindowExpression
waitForXpathCount
windowFocus
windowFocusAndWait
windowMaximize
windowMaximizeAndWait
52You can also read