NOSTRADAMUS AND THE SYNCHROTRON ENGINEER: KEY ASPECTS OF PREDICTING ACCELERATOR STRUCTURAL RESPONSE
←
→
Page content transcription
If your browser does not render page correctly, please read the page content below
NOSTRADAMUS AND THE SYNCHROTRON ENGINEER: KEY ASPECTS
     OF PREDICTING ACCELERATOR STRUCTURAL RESPONSE*
                                        C. Preissner†, H. Cease, J Collins, Z. Liu, J. Nudell,
                             Advanced Photon Source, Argonne National Laboratory, Argonne, IL, USA
                                B. N. Jensen, MAX IV Laboratory, Lund University, Lund, Sweden

Abstract
   Multibend Achromat (MBA) synchrotron designs are                   need to be made very early in the process. The combina-
placing stringent mechanical tolerances on the magnet                 tion of the physics and project planning constraints push
support systems. At the APS-U the magnet-to-magnet                    engineering designs in new directions for which limited
vibration tolerances are about 10 nm. [1]. Timelines,                 performance data are available. In the context of magnet
installation requirements, and budgets constrain the re-              support structures, predicting the modal and vibration
sources available for prototyping and physical testing.               response before construction are viewed by the APS-U
Reliance on FEA to predict dynamic response is para-                  engineering team as essential to completing the magnet
mount in insuring the tolerances are met. However, ob-                support structure designs [5-7] and meeting the machine
taining accurate results from a magnet support structure              requirements in and economical and timely manner.
FEA is not as simple as analysing the CAD model of the                   The goal is to have a validated process and set of mod-
structure.                                                            els, by which the important magnet support system struc-
   The 16th century author Nostradamus published a col-               tural response characteristics such as natural frequency,
lection of prophecies that since his time, have been held             vibration response, static deflection, and thermally-
up as predictions of various world events. While it is                induced distortion can be predicted for each of the magnet
attractive to think his collection of short poems can be              support systems. Ideally, the testing of physical proto-
used to foretell the future, in reality it is only the vague-         types is reduced to an exercise of design verification
ness and absence of any dates that make them easy to                  rather than one of discovery, as shown in the workflow in
apply in a posthoc basis. Arguably, a similar statement               Figure 1. This level of simulation is commonly referred to
can be made about the use of FEA in predicting accelera-              as virtual prototyping [8]. It is already being done in the
tor support response. In this paper the important contribu-           automotive sector [9].
tors to FEA dynamic modelling will be discussed along                    While the motivation for virtual prototyping in the au-
with techniques that can be used to generate necessary                tomotive or aerospace sectors may be primarily one of
data for models that can accurately predict response.                 reducing the cost of testing and of serial production prod-
                                                                      ucts, there is certainly significant desire to produce prod-
                                 INTRODUCTION                         ucts that have higher levels of out-of-the-box performance
                                                                      than ever before. This is the similarity to the synchrotron
Background                                                            world—to engineer and build magnet support structures
   Numerous multi-bend achromat (MBA) synchrotrons                    that have higher levels of mechanical stability than previ-
are either under construction or planned [2, 3]. At the               ous generations of synchrotrons.
Advanced Photon Source (APS) a major upgrade is in the                   Analytical and computational simulation have been
planning stages. The electron beam in this machine will               used extensively in the design of synchrotron compo-
have much smaller transverse dimensions, and conse-                   nents, primarily in the area of absorbers and optics.
quently more stringent beam stability requirements than               Thermal finite element analysis (FEA) models for syn-
the current APS. In addition, the X-ray beams will be                 chrotron radiation absorbers or optics depend on five
focused to ever smaller dimensions, placing more strin-               important aspects: component geometry, boundary condi-
gent stability requirements on the X-ray source point [4].            tion definition, material properties, thermal load profile
Both of these requirements result in magnet-to-magnet                 and cooling fluid conditions/properties. These have all
vibration tolerances on the order of 10 nm and magnet                 been characterized sufficiently such that performance can
group-to-magnet group (girder) requirements of a few                  be well predicted from computational models. In fact,
tens of nanometers.                                                   recent work has continued to refine the failure criteria
   Along with challenging physics requirements, facility,             through a better understanding of absorber failure mecha-
budget, and logistic constraints cause significant pressure           nisms. The same level of a priori computational confi-
on the design process. For example, the APS-Upgrade                   dence is not currently possible in the arena of synchrotron
(APS-U) project spans multiple years, though the installa-            structural dynamics.
tion and commissioning phase is to take place over a
single 12-month dark period. Critical engineering choices
____________________________________________

* Work supported by: Argonne is managed by UChicago Argonne, LLC,
for the U.S. Department of Energy under contract DE-AC02-06CH11357.
† email address: preissner@aps.anl.gov
Component
Testing
Preliminary Analysis & Prototype Testing
Final Design
Design Simulation Construction (Verification)
Revision
Figure 1: An example of the design workflow. If the loop can be reliably closed between simulation and design (solid
arrow), then reliance on feedback from testing to design (dashed arrow) can be reduced. The enabler for this to happen
is strategic component testing and correct use of the identified properties in the analysis and simulation step.
The use of analytical and computational simulation in way this could be done is that the Young’s modulus of the
the structural dynamics area for synchrotron components support mechanisms might be altered such that simulation
differs from the thermal area. While in a typical optic or and experiment modal results can be more closely
absorber thermal analysis the important area of the model matched. Drawbacks include difficulty in determining the
does not extend beyond the boundaries of a single part, in appropriate changes in modulus and material damping
a structural dynamics analysis, the model involves multi- and difficulty in incorporating directional and load de-
ple parts and interconnections. Component geometry, pendency. Most importantly, the results obtained with
mass, stiffness, and damping all play a role in the system model tuning are obtained only after testing a complete
behavior. structure, and are then only good for a specific case. Due
The Problem: Nostradamus We Are Not… to the posthoc nature of this method, it is difficult to gen-
eralize this process to other designs, much as it is difficult
Simply using a CAD model of a complete magnet sup- to generalize Nostrodamus’ predictions to future events.
port structure for the starting point of either a modal or Virtual design iteration as described in Figure 1 cannot be
vibration response analysis will result in over predictions done.
that are far from the measured result. For instance, a test
article for the APS-U magnet support structures is shown
in Figure 2. The geometry, mass, and material properties
are well known for the girder, magnets and plinth. In fact,
if a modal analysis were conducted using the CAD model
for the girder and magnet assembly (not including the
support and alignment mechanism), the results would be
quite reasonable.
In contrast, if the same type of modal analysis were run
for the whole test article, the results could over predict the Magnet support and
natural frequencies by as much as 100%. A random vibra- alignment mecha-
tion analysis would be even more erroneous. This is be- nism
cause the modal response of the assembly is highly de-
pendent upon the stiffness of the support mechanism and
the vibration response is highly dependent on both the
Figure 2: APS-U magnet support test article. The arrow
stiffness and damping of the support mechanism. Using a
points to one of the supports. Below the support and
CAD model of the support mechanism as the FE analysis
alignment mechanism is the plinth and above the support
model (just geometry, no accounting for interfaces) sig-
and alignment mechanism are the girder and magnets. A
nificantly over estimates the stiffness of the support and
thin epoxy grout layer couples the assembly to the floor.
has no true relation to the damping present in the support.
These properties are dependent not only on the compo- A general methodology is needed that can a) provide
nent geometry but friction, loads, and all the minute inter- stiffness and damping properties of any support mecha-
faces. nism, and b) incorporate those properties into an analysis
A modal FEA model based on the CAD data can be model of the complete magnet support system. This paper
tuned in a posthoc basis to match the experiment. One outlines a method by which the stiffness and damping of0 0 0 0
any support mechanism can be quantified in a phenome- 0 0 0 0 0
nological manner and these data subsequently incorpo- 0 0 0 0
(4)
0 0 0 0
rated into analysis models. Model validation is also dis- 0 0 0 0 0
cussed. 0 0 0 0
Three methods were considered for determining the
METHODS OF PROPERTY ESTIMATION stiffness and damping of the support mechanism, that is
In the most general sense the support system can be KJ and CJ. The methods, merits, and results for each are
considered as in Figure 3. The support and alignment discussed below.
mechanism can be represented by stiffness and damping “Constitutive” FE Modeling
matrices.
Virtual single-axis testing can be used in FE modeling
to estimate the support stiffness. This sub-modeling ap-
F proach is “constitutive” in the sense that all parts and
interfaces are modeled. allows all of the interfaces to be
captured, including the threads and the spherical washer
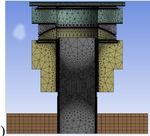
geometry. An example of a support post similar to those
Girder and used in the MAX IV design [10] and one of designs con-
Y, θY Magnets (M) sidered for the APS-U is shown is shown in Figure 4.
h
5 5
Kj, d 4 4
X, θX
Cj 3
Z, θZ 3 2
Figure 3: A generalized view of a magnet support mecha- 2
1 1
nism. The support alignment mechanism is represented by
the stiffness KJ and the damping CJ. F are the applied a) b)
forces. h is the height of the center of mass above the Figure 4: Views showing a) a cutaway of the MAX IV
support and d is the half-height of the support mechanism. support post, and b) the FEM of the same part. The parts
The equations of motion describing the system are: are: 1-post, 2-adjusting nut, 3-sperical washer set, 4-
spacer, and 5-sliding plate. The dark areas in view b) are
Mx Cx Kx. (1) the interfaces and have high mesh density.
Where the coordinates are described by:
. (2)
In the equations of motion, the mass matrix is diagonal
(mass centered coordinate system). The stiffness and
damping matrices are symmetric. The most general form
of the support stiffness and damping matrices (KJ and CJ)
are of the form:
⋮
(3)
⋮ ⋰ Figure 5: Chart showing the results from three different
virtual stiffness tests compared the stiffness value deter-
⋯ ⋯
mined from an experiment. Squares – solid model 1mm
elements, Triangles – friction only at slip plate, Diamonds
Notice the off-diagonal coupling terms, relating transla- – friction at all interfaces, No marker – experiment.
tion-translation, rotation-rotation, and translation-rotation.
Three of these posts are used to support and align the
It is reasonable in the case of the magnet support system
magnets. In order to estimate the stiffness of this support
to neglect the coupling terms, resulting in a diagonal
unidirectional virtual testing was carried out with the FE
stiffness matrix. In the case of a diagonal KJ, the stiffness
model shown in Figure 4b. The vertical and transverse
matrix K becomes:
stiffness (KXX, KYY, and KZZ) were to be determined by
first applying a vertical load equal to the magnet weight.
Then, a vertical or transverse load were applied and thedisplacement probed. Results for the lateral stiffness are the assembly and the response is measured at multiple
shown in Figure 5. The experimental measurement is points with a set of triaxial accelerometers.
considered to be the target stiffness. It can be seen that the Dynamic testing has a few advantages over the consti-
solid model, one where the interfaces are not modelled, tutive FE and static testing approaches. First, the whole
over predicts the stiffness (steeper slope). Whereas it can stiffness matrix can be determined if desired. Whereas the
be seen that in the frictional model the stiffness is de- FE and static approaches require distinct test for each
pendent on the number of frictional interfaces. Not shown stiffness value. The dynamic approach can use one set of
here are the dependence of the stiffness upon element size measurements to extract all of the stiffnessses. There are
for the solid model and upon friction coefficient and pre- two basic ways in doing dynamic testing, a modal ap-
load for the frictional model. In short, this result confirms proach and a frequency response function-based (FRF)
the over-prediction of a solid model (regardless of ele- approach [11].
ment size). The constitutive model presents the opposite
problem of under prediction. Other than a negative corre-
lation to the number of frictional interfaces and a positive 3
correlation to friction level, this under prediction is not
readily understood. The conclusion is that while conven-
ient to implement, it would not be possible to use this
method to estimate support stiffness without prior meas- 2
urement for calibration.
Static Testing 1
Conventional static stiffness testing was investigated.
Figure 6. Fixturing was designed to allow axial and lateral
stiffness measurements. For each type of measurement,
preload equal to the weight force from the magnet assem- Figure 7: Dynamic testing setup for wedge jack-type
bly was applied. Then, an Instron machine was used to support (Unisorb RK-IV is shown). 1-jack and base, 2-
apply the load and record the displacements. accelerometers (hammer on table), and 3-test mass.
The modal approach was used for this work. It is im-
portant to choose the test mass such that it is rigid in the
frequency range of interest. Another important considera-
tion is that the base of the isolator is “fixed”. Alternative-
ly, this test could be performed with free boundary condi-
tions. In the modal approach an experimental modal anal-
ysis (EMA) was conducted and the six rigid body modes
were identified. The natural frequencies, mode shapes,
and damping were then used along with the equations of
motions (1), with diagonal stiffness matrix (4), in a
Figure 6: A post-type support installed in an Instron test- Matlab script to solve for the support stiffnesses. As a
ing machine for lateral stiffness testing. check for self-consistency, a FE model of the test was
built using the identified stiffness data and a modal analy-
This type if testing is typically limited to linear meas- sis was run. The model was found to be in agreement with
urements. It was not possible to measure torsional stiff- the experiment.
nessses in this manner. The vertical and transverse stiff-
ness (KXX, KYY, and KZZ) obtained appeared reasonable in APPLICATION OF PROPERTY DATA
form. However, when used in a FE model and the result-
ing system dynamics did not match the experiment Property Usage
Regardless of how the support properties are obtained
Dynamic Testing these data need to be incorporated into models of the
The dynamic test method involves constructing a test complete support system to be useful. This overall model
setup similar to that shown in Figure 3. The practical could be analytical, or as in this paper, a FE model. In the
realization of this is shown in Figure 7. In the dynamic case of the FE model, each type of FE software typically
testing a single support is used and a test mass is installed has discrete stiffness elements. Through the use of dis-
on top of the support. Equation (1) describes the system crete stiffness elements, the stiffness matrix can be en-
and the stiffness matrix is as in equation (4). Both large tered directly. In this manner, a simple testing method can
(~2900 kg) and small (~120 kg) test masses were used. be used to generate data that can then be used in a variety
The test mass is symmetric and the support is known to of magnet support structures to investigate and predict
be centered under the mass because it was balanced. A performance. It is important to note that this same analy-
hammer with integral force transducer is used to impact sis mode cound notModel Validation CONCLUSION
The method and data were validated by comparing the We have developed a testing and modeling process that
results from a free boundary condition, experimental “closes the loop” on the design-analysis-testing workflow
modal analysis conducted on a prototype magnet support as shown in Figure 1. Establishing this process provides
system, shown in Figure 8. Free boundary conditions are confidence in simulation results and enables the explora-
the easiest to create. tion of many different designs using the same compo-
nents.
ACKNOWLEDGMENT
The authors would like to acknowledge the assistance
of Josh Abraham and the Argonne riggers and Bruce
Hoster and the APS machine shop In addition we thank
Dr. Sheldon Mustovoy at the Illinois Institute of Technol-
ogy for his assistance with static testing.
REFERENCES
[1] G. Decker, “Design Study of an MBA Lattice for the Ad-
vanced Photon Source,” Synchrotron Radiation News,
27(6), 13-17. doi:10.1080/08940886.2014.970932 (2014).
[2] E. S. Reich, “Ultimate upgrade for US synchrotron.” Na-
ture, 501(7466), pp.148-149 (2013).
[3] M. Borland, “Ultra-Low-Emittance Light Sources,” Syn-
chrotron Radiation News, 27(6), 2-2. doi:10.1080/
08940886.2014.970927 (2014).
[4] J. Maser et al., “A Next-Generation Hard X-Ray Nanoprobe
Figure 8: Setup for the free boundary condition, EMA Beamline for In Situ Studies of Energy Materials and De-
conducted on the ~10000 kg APS-U magnet support pro- vices,” Metallurgical and Materials Transactions A,
45A(1), 85-97, doi:10.1007/s11661-013-1901-x (2014).
totype. The whole assembly was hung from an overhead
crane. The support dynamics were sufficiently lower in [5]-J. Collins et al., “Preliminary Design of the Magnet Support
and Alignment Systems for the APS-U Storage Ring,” pre-
frequency than the structural dynamics such that they did
sented at MEDSI2016, 11-16 Sept. 2016, Barcelona Spain,
not confound the identification of these dynamics. paper MOPE34.
The test was conducted in a manner similar to the sin- [6] Z. Liu et al., “Optimization for the APS-U Magnet Support
gle-support test. A large instrumented hammer was used Structure,” presented at MEDSI2016, 11-16 Sept. 2016,
to excite the structure and the response was measured in Barcelona Spain, paper TUPE44.
multiple locations on the structure. Commercial modal [7] J. Nudell et al., “Preliminary Design and Analysis of the
analysis software was used to identify and visualize the FODO Module Support System for the APS-U Accelera-
natural frequencies and mode shapes. tor,” presented at MEDSI2016, 11-16 Sept. 2016, Barcelona
A FE model of the test setup was also constructed in Spain, paper MOPE32.
ANSYS. Discrete stiffness elements were used to incor- [8] D. LaCourse, “Virtual Prototyping Pays Off”, Retrieved
porate the support stiffness identified in the single-support from
test. A modal analysis was run with free boundary condi- http://www.cadalyst.com/manufacturing/virtual
tions. The resulting natural frequencies and modeshapes -prototyping-pays-9774 , (2003).
were then compared to the natural frequencies and [9] S. Birch and B. Visnic, “Jaguar, Exa say simulation to
modeshapes from the EMA as shown in Table 1. eliminate prototypes by 2020”, Automotive Engineering,
SAE International 3: 3 (2016).
Table 1: Comparison of EMA and FEA Obtained Natural [10] M. Johansson, B. Anderberg, and L.-J. Lindgren, “Magnet
Frequencies design for a low-emittance storage ring”, Journal of Syn-
chrotron Radiation, 21(5), 884-903. doi:10.1107/
Mode S160057751401666X (2014).
1 2 3 4
[11] P. J. Wyatt Becker, R. H. Wynn, Jr., E. J. Berger, and
EMA 64 Hz 91 Hz 130 Hz 137 Hz J. R. Blough, “Using Rigid-Body Dynamics to Measure
FEA 67 Hz 90 Hz 122 Hz 137 Hz Joint Stiffness,” Mechanical Systems and Signal Pro-
% diff. 5 1 6 0 cessing, 13(5), pp. 789-801, doi:10.1006/mssp.1999.1232
(1999).
It can be seen that the results from the experiment and
finite element model compare well. The jack stiffnesses
can also be incorporated in other support structure models
for which tests have not been done or are not planned.You can also read


