NanoTest integrated modelling modules - Advanced simulation - deeper understanding for improved coatings design - Micro Materials
←
→
Page content transcription
If your browser does not render page correctly, please read the page content below
NanoTest integrated modelling modules
Advanced simulation – deeper understanding for improved coatings design
Introduction Micro Materials have worked with SIO, an innovative modelling
Analytical modelling utilising the effective indenter company who have developed these models and the
concept for stress calculations is a powerful tool for getting accompanying intuitive software interface, to fully integrate
S
the most out of nanomechanical and nano-tribological this advanced modelling capability to the NanoTest system.
tests [1]. Key strengths of the NanoTest design (such as
high lateral rigidity for straight scratch tracks, ultra-low In this Technical Note we illustrate some of the possibilities
thermal drift at elevated temperature etc) enable from combining the advanced modelling with the NanoTest
production of high-quality artefact-free data to be used as data on hard PVD coatings and bulk metallic materials.
direct input to the physical-based models.
The detailed simulated stress distributions enable data to
be interpreted more effectively. They can provide
mechanistic information which can be the key to unlocking
exactly where and why coatings systems fail in scratch (see
also figs. 1-3, 6-8) [2-4] and fretting [5] tests, and then to
designing coatings with improved performance.
Figure 2 Simulated von Mises stress distribution at the Lc2 critical load
in scratch testing TIAlCrSiYN/TiAlCrN bi-layer coating on WC-Co.
Region where von Mises stress developing in the sliding contact
exceeds the yield stress is marked [see ref 4]. Probe radius = 25 m.
Figure 1 Different deformation mechanisms in nano-scratch
tests on (Ti,Fe)Nx coatings [2]
The effective indenter concept has also been applied to
determine the coating elastic modulus free of substrate
effects in a more reliable method than the standard
unloading approach. At high temperatures indentation
creep can make elastic modulus measurements less
reliable, as shown at room temperature in the ISO
standard, ISO14577-4, and to improve the accuracy of the
high temperature data analysis a time-dependent
Figure 3 Simulated von Mises and normal stress distributions at the Lc1
effective indenter approach can be used.
critical load for Si-doped DLC on hardened steel. Probe radius = 5 m.Case studies 2. Nanoindentation – accounting for time-
1. Nanoindentation on very thin coatings on dependent behaviour at high temperature
low yield stress substrates To accurately determine the nanomechanical properties of
Nanoindentation on very thin coatings (100 nm or less) is weld and parent material for P91, a high Cr content creep
more challenging when they are deposited on softer resistant steel used in steam pipes in power plants, at its
substrates. When coatings are very thin plastic flow can operating temperature requires (i) experimental capability to
occur in the substrate before the true coating hardness is perform measurements with minimal thermal drift (ii)
reached. Sensitivity to film properties is improved by improved analysis to take into account the influence of creep.
using a sharper indenter so that coating-only properties
could be measured. In tests of 40 nm and 80 nm ta-C films Tests to 100 mN on the weld material with a cubic boron nitride
deposited on glass a sharp cube corner diamond indenter indenter in argon purging atmosphere are shown below [6].
was used to ensure the measured hardness is due to the
coating hardness and not a lower value due to plastic flow
in the substrate.
Determining coating-only elastic properties is also
challenging. When the relative indentation depth is 10%
of the coating thickness there is some contribution from
the less stiff glass substrate and the measured elastic
modulus is lower than the real coating value. Two
methods were used to avoid this:- (i) an ISO 14577--4 type
approach - multi-cycle load-partial unload tests and
extrapolate the results to zero depth (ii) analytically
account for the substrate contribution to the measured
result. It can be seen below that both methods provide
improved accuracy, particularly for the 80 nm film, with
the modelling being experimentally more convenient.
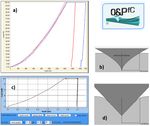
Figure 5 (a) 650 C tests on P91 weld material with 40s (red) or 300s
(blue) hold at peak load (b) effective indenter shape not accounting
for time-dependent c) O&PfC module fitting creep and unloading (d)
time-dependent effective indenter
The material appears stiffer due to the influence of creep on the
slope of the unloading data, especially for the shorter hold time
at peak load.
Conventional elastic unloading curve analysis does not account
for the time dependent depth changes occuring during
unloading resulting in the modulus being over-estimated.
Figure 4 Illustrative stress distributions on the point of
Using the technique from SIO developed to modify the effective
unloading for (a) 40 nm (b) 80 nm film. (c) NanoTest load-
partial unload data and ISO extrapolation method.
indenter geometry to compensate for time dependent depth
change (TDEI – time-dependent effective indenter) resulted in
improved results and agreement with literature data on bulk
samples (E 110 GPa [7]).3. Nano- and micro-scratch 4. High temperature micro-scratch
The von Mises, tensile and shear stresses during the micro- Experimentally it has been shown that on AlCrN and AlTiN
scratch test were evaluated using the Scratch Stress coatings deposited on WC-Co the critical load for coating
Analyzer, which uses a physical- based analytical failure can be higher at elevated temperature than at 25 C
methodology to determine simulated stress distributions. [3]. The modelling shows that this is not a result of improved
adhesion at 500 C. For AlTiN in particular the stress
The input parameters to the physical-based analytical
distributions were strongly temperature dependent. At 25 C
model are NanoTest data - the mechanical properties of the
the coating failure occurred by interface weakening from
coating and substrate i.e., H, E, H/Y, their Poisson ratios,
substrate yield in combination with high tensile stress at the
together with the applied load, scratch depth data, friction
surface. At 500 C the yield occurerd in the coating suggesting
coefficient and probe radius used in the nano- and micro-
the deformation proceeds by a different mechanism.
scratch tests.
Analytically determined maximum shear stresses at Lc2 were
lower at 500 C suggesting the coating-substrate bonding
strength is actually slightly reduced.
Figure 6 Von Mises stress distribution at the critical load for
plastic yield for DLC coatings on hardened tool steel. Over-
stressed regions are hashed.
Figure 6 shows that the different mechanical properties of
the DLC coatings alter the deformation position when using
a 5 µm probe.
For the harder a-C:H the interface is initially weakened by
Figure 8 temperature-dependence of the von Mises stress
substrate deformation but for the softer Si- and W-doped
distributions at Lc2 when scratching AlTiN coating with 25 m
DLC films the coating yields first. diamond. Over-stressed regions are hashed.
5. Nano-fretting
In nano-fretting tests on DLC coatings the modelling approach
provided closer simulation to the experimental data than
determined from the Archard wear equation [5].
Figure 7 normal stress distributions at Lc1 for Si-doped DLC tested
with R = 5 and 25 m probes
Figure 7 shows the tensile stresses developed at the Lc1
critical load.
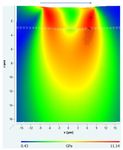
Figure 9 Evolution of the simulated stress distribution with number
of nano-fretting cycles for a-C:H on hardened steel. Within a few
cycles the contact pressure decreases due to the increasing size of
the fretting wear scar. R = 5 µm diamond probe6. Highly spatially resolved determination of Benefits of Modelling
residual stress by nanoindentation • Improved accuracy of high temperature elastic
Nanoindentation with modelling in Film Doctor was modulus data
performed to determine residual stresses on a metallic • Improved determination of coating-only properties of
steel sheet. Despite the highly rough surface the ultra-thin films
modelling was able to show good correspondence with • Maximum interfacial shear strength measurement for
scatter of residual stress determined hole-drilling true coating-substrate bonding information
methods [8]. • Simulated stress distributions to explain failure
behaviour in scratch tests
• Understand temperature-dependent scratch test data
• Predict wear performance more reliably than Archard
• Highly spatially resolved residual stress determination
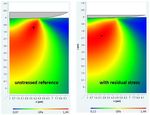
Figure 10 Von Mises stress distributions. The onset of yield
(marked with the black dot) changes with residual stress
NanoTest Specifications
The Saxonian Institute of Mechanics (SIO) provide a range
References and acknowledgements
of different analytical modelling modules including:- Film
[1] N Schwarzer, Ch22, pp513-560 in Applied
Doctor, Oliver and Pharr for Coatings, Scratch Stress
Nanoindentation in Advanced Materials, Wiley, Eds. Dr A
Analyzer, Test Optimizer, SIO Toolbox etc.
Tiwari and S. Natarajan, 2017.
[2] BD Beake et al, Surf Coat Technol, 309 (2017) 671.
The NanoTest software includes data export routines for [3] BD Beake et al, IJRMHM 69 (2017) 215-226.
SIO formats so that the SIO modelling capability is fully [4] S Chowdhury et al, Coatings 8 (2018) 59 (15pp).
integrated with the NanoTest indentation, scratch and [5] TW Liskiewicz et al, Surf Coat Technol 237 (2013) 212.
fretting modules in low load (0-500 mN) and 0-30 N high [6] MJ Davies PhD Thesis, University of Nottingham 2013.
load range, and across to the temperature range (to 850 [7] G Eggeler et al, Int. J. Pressure Vessels and Piping 60
C in the NanoTest Vantage). (1994) 237.
[8] S Vogt et al, Production Engineering 13 (2019) 133.
We would like to thank Norbert Schwarzer and Nick
Bierwisch at SIO and our collaborators, especially Vlad
Vishnyakov, Tomasz Liskiewicz, Simon Vogt and German
Fox-Rabinovich for their help with the studies described in
this Technical Note.
Micro Materials Ltd
At the forefront of nanomechanics since 1988:- Contact us:-
Micro Materials Ltd
• First commercial high-temperature nanoindentation stage Willow House, Yale Business Village,
• First commercial nano-impact stage Ellice Way, Wrexham, LL13 7YL, UK
• First commercial liquid cell
• First commercial instrument for high-vacuum, high- Tel: +44(0) 1978 261615
temperature nanomechanics E-mail: info@micromaterials.co.uk
www.micromaterials.co.ukYou can also read


