Model SDHmini-Ex Instruction Manual Dewpoint Meter - 3001 SDHmini-Ex User Manual - Iss 4.3 - Shaw Moisture Meters
←
→
Page content transcription
If your browser does not render page correctly, please read the page content below

Model SDHmini-Ex
Dewpoint Meter

Instruction Manual
3001 SDHmini-Ex User Manual - Iss 4.3
Contents

1   Introduction ................................................................................ 5
       1.1 Unpacking Your SHAW Moisture Meters SDHmini-Ex .......... 5
       1.2 General Description .............................................................. 5
2   Important Information ................................................................ 7
       2.1 Hazardous Area Use - Safety ................................................ 7
       2.2 Bluetooth Certifications ....................................................... 7
       2.3 Symbols Table ....................................................................... 7
       2.4 Lithium-ion Cell - Battery ...................................................... 7
       2.5 Pressure Exposure ................................................................ 8
       2.6 USB Communication Performance ....................................... 8
3   Installation .................................................................................. 9
       3.1 Gases to Avoid ...................................................................... 9
       3.2 Installing the Air/Gas Sampling System ................................ 9
       3.3 Piping Installation Schematic ............................................. 10
       3.4 Piping Schematic Component Index ................................... 11
       3.5 Purging the Sample Connection ......................................... 11
       3.6 Using the SDHmini-Ex to Take a Moisture Reading ............ 12
       3.7 Desiccant Dry-Down Technology ........................................ 13
       3.8 Sample Connections ........................................................... 14
       3.9 Pressure and Flow Control ................................................. 14
       3.10 Particulate Contamination ............................................... 15
       3.11 Liquid Contamination ....................................................... 15
4   Normal Operations ................................................................... 16
       4.1 Powering On/Off ................................................................ 16
       4.2 Graphical Viewing Options ................................................. 16
       4.3 Display Options .................................................................. 16
       4.4 Choice of Units ................................................................... 17
5   Calibration ................................................................................ 18
       5.1 Auto Calibration (AutoCal) ................................................. 18
       5.2 Calibration Setpoint (CalSet) .............................................. 19
       5.3 Calibration Procedure Error Messages ............................... 20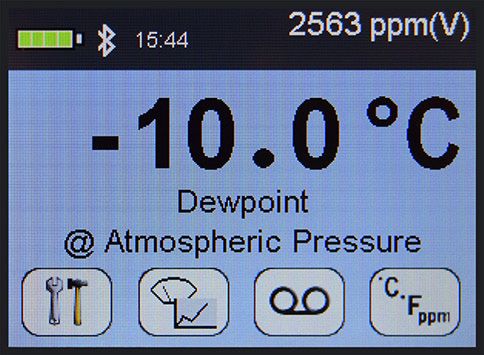
6    Sensor Related Settings ............................................................. 21
        6.1 Sensor Type ........................................................................ 21
        6.2 Selecting Gas Types ............................................................ 21
        6.3 Selecting Gas Molecular Weights ....................................... 21
        6.4 Pressure .............................................................................. 21
7    Non Measurement Related Configuration Functions ................. 22
        7.1 Changing the Date .............................................................. 22
        7.2 Changing the Time ............................................................. 23
        7.3 Changing International Settings ......................................... 23
        7.4 Hotkeys ............................................................................... 24
8    Bluetooth Printer Configuration ................................................ 24
9    Data Logging ............................................................................. 26
        9.1 Quicklog .............................................................................. 26
        9.2 Snapshot ............................................................................. 27
        9.3 Advanced Data Logging ....................................................... 27
        9.4 Logged Data Review ............................................................ 29
        9.5 Data Logging Storage ........................................................... 31
10   Additional Information ............................................................. 31
        10.1 Temperature ..................................................................... 31
        10.2 Response Time ................................................................. 31
        10.3 Guarantee ........................................................................ 32
        10.4 Basic Definitions ............................................................... 32
        10.5 Problem Guide ................................................................. 33
11   SDHmini-Ex Specifications ......................................................... 34
12   SDHmini-Ex General Assembly Diagram .................................... 35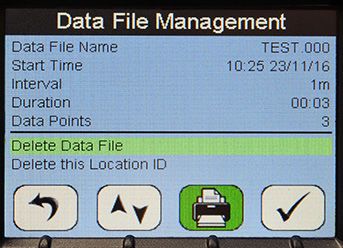
1 Introduction
1.1 Unpacking Your Shaw Moisture Meters SDHmini-Ex
Please examine the SDHmini-Ex package for any damage or mishandling. If
any damage is evident please notify the carrier and the Shaw Moisture Meters
representative from where this unit was purchased.
You should have received (if ordered):
   ● 1 model SDHmini-Ex instrument              ● 1 AC/DC adaptor
   ● 1 carry case                               ● 1 pressure dewpoint circular
   ● 1 Allen key                                  calculator
   ● 1 two metre length of PTFE tubing          ● 1 USB flash drive with Shaw
   ● 1 USB charging cable                         SDHmini User Tool software
   ● 1 Fir Tree fitting plus 1 x fittings as    ● 1 instruction manual
      ordered                                   ● 1 Shaw SDHmini User Tool Manual
If anything is missing please contact your distributor immediately.

1.2 General Description
The SDHmini-Ex is an intrinsically safe, micro-controller based battery operated
dewpoint hygrometer with state of the art features and enhancements with
support of USB and Bluetooth interfaces for communicating with PC and also
support for thermal printer over Bluetooth.

It is a fully self-contained unit incorporating the moisture sensor, signal
conditioning circuitry, memory management, graphics display, membrane
keyboard, real time clock, on-board battery and charger circuit.

The graphical user interface features three main viewing screens, digital,
graphical (historical readings in a scrolling strip chart) and a meter (a traditional
moving coil). There is also a secondary display in the top right which allows
display of readings in alternative units of measurement.

The unit operates with the following 10 language options: English, German,
French, Spanish, Portuguese, Russian, Italian, Chinese, Japanese and Korean.

A full colour graphics LCD display with 320 x 240 resolution landscape and a 6
key input including an on/off key.

The displayed units can be changed on both the primary and secondary displays for
the selectable moisture unit e.g. °C, °F, g/m3, ppm(v), ppm(w) and lbs/MMscf.

                                                                                        5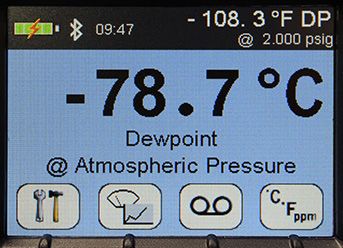
The SDHmini-Ex settings can be adjusted by a user-friendly software interface
    incorporating multiple menus, hot key combinations, information displays and
    control functions.

    Use the supplied USB cable, attach between the PC and the instrument, an
    automatic connection over USB is established.
    The USB port allows:
         ● Charging of the battery (Li-ion) when connected to PC or dedicated
            power supply (safe area only)
         ● Downloading of new firmware to the unit
         ● Downloading of setup data from dedicated PC software
         ● Downloading logged data files and real time data from the unit

    Alternatively, to connect the instrument using Bluetooth, first ensure that the
    instrument’s Bluetooth is switched on. There is no need to ask the instrument
    to search for devices as in this mode of communication it is the PC which
    initiates the pairing. Once connected over Bluetooth the connection status is
    shown in the bottom left of the view panel.

    The view panel allows access to many of the features, settings and information
    pages within the instrument.

    A micro SD card is fitted to the instrument, the contents of which can be
    explored by clicking the SD card icon in the bottom left of the view panel. The
    contents may include user manuals, service notes, calibration data sheets,
    firmware backups etc..

    The inbuilt memory, stores in excess of 300,000 readings including moisture
    and pressure compensated moisture readings with user selectable logging
    intervals from five seconds to one hour and real-time data logging graphical
    formats.

    Data is stored under customer generated file names and stored data files can
    be reviewed graphically on the unit. The rechargeable battery, when fully
    charged, has in excess of 150 hours logging capability on a minimum logging
    interval and is fully recharged in 12 hours.

6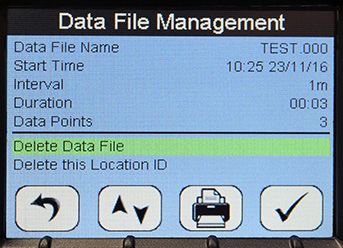
2 Important Information
2.1 Hazardous Area Use - Safety
The SDHmini-Ex is certified intrinsically safe to ATEX, IECEx and UL standards:
ATEX:       II 1 G Ex ia IIC T4 Ga                  (-20°C ≤ Ta ≤ +50°C)
            II 1 D Ex ia IIIB T60°C T5080°C Da
IECEx: Ex ia IIC T4 Ga
        Ex ia IIIB T60°C T5080°C Da
        (-20°C ≤ Ta ≤ +50°C)
UL: Class I Division 1 Groups A, B, C and D T4
The equipment complies with the requirements of:
           IEC 60079-0:2011 and IEC 60079-11:2011
           UL 913 and CSA 157
It is the responsibility of the user to ascertain the suitability of the SDHmini-
Ex for use in hazardous areas. Risk assessments should be carried out prior to
use, taking into account the SDHmini-Ex certifications, location and the gas
being monitored.

2.2 Bluetooth Certifications
This equipment complies with FCC radiation exposure limits set forth for an
uncontrolled environment - Contains FCC ID:QOQWT41/QOQWT41u.
This device complies with Industry Canada licence-exempt RSS standard(s) -
Contains IC:5123A-BGTWT41/5123A-BGTWT41u.
WT41 meets the requirements of the standards below and hence fulfils the
requirements of EMC Directive 89/336/EEC as amended by Directives 92/31/EEC
and 93/68/EEC within CE marking requirement.
WT41 has modular certification with certification number R 209-J00047/J00231.

2.3 Symbols Table
         2.4 Lithium-ion Cell - Battery
             The SDHmini-Ex is powered by a single lithium-ion cell. The cell
             is not field replaceable by the user as it is completely enclosed
             within the instrument. However, the cell may be exchanged by an
             authorised agent who has received the necessary training, support
             systems and accreditation. It is recommended to only use the USB
             power supply supplied with the instrument.
             Please note: Charging of the SDHmini-Ex should only be carried
             out in the SAFE AREA.
                                                                                    7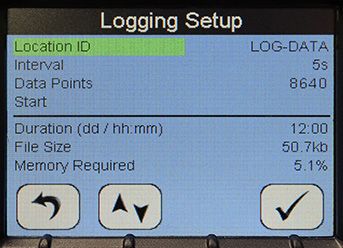
It is recommended that the SDHmini-Ex be put on charge overnight
        when the unit is first received.
        To attain maximum cell life the SDHmini-Ex should always be
        charged at room temperature. The discharging cell life (hours of use
        from a fully charged cell) will reduce when used in cold conditions.
        Switch on the instrument to check if fully charged.
        The symbol indicates that the device contains a battery which may
        be charged via the USB connector.
        Rating of instrument is less than 1 W in operation. Charging voltage
        is 5 V nominal. Charging input is however additionally protected to
        Um 250 Vrms.

        2.5 Pressure Exposure
    !
               The maximum pressure to which the telescopic
             measuring head is exposed should not be more than

                                 0.3 bar, 4 psi
            Exposing the measuring head to higher pressures may
              damage the instrument and result in injury to the
                  operator or other personnel in the area.

        2.6 USB Communication Performance
        Note: The USB communication channel and charging power port
        within the instrument is highly optimized by default for safety. It is
        particularly well protected electrically so that subsequent safe use
        in hazardous areas is not compromised by events in the safe areas.
        Its many safety components may result in not all connections to
        all USB ports on all PCs or laptops being entirely successful. Many
        USBs ports even within the same PC or laptop differ from each
        other in electrical hardware or firmware implementations whilst
        still broadly complying with the overall USB standards giving rise to
        a variety of situations which may manifest in a reduced connection
        experience. It is recommended that if a particular port is not
        connecting as expected then the user ought to try an alternative
        port within the PC or laptop or employ a USB Hub device which
        would effectively isolate the problematic PC or laptop USB port
        from the instrument.
8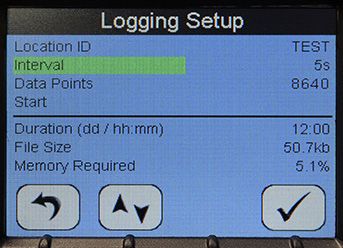
3 Installation
3.1 Gases to Avoid
The SHAW moisture sensors are suitable for many different industrial and research
applications. Most gases can be checked for their moisture content with no need
for the calibration to be altered when changing between different gases, as the
sensor operates only with reference to the water vapour content.

There are however, some gases that must be avoided as they are not compatible
with the material of construction of the sensor. Ammonia (NH3), Ozone (O3) and
Chlorine (Cl2) must be avoided at all times, even in small quantities. Hydrogen
Chloride (HCl) also attacks the sensors very quickly. Some, less aggressive acidic
gases such as Sulphur Dioxide (SO2) can be monitored as long as the moisture
content is low, generally less than 100ppm(v). If in doubt, please ask your supplier.

Sulphur Hexafluoride (SF6) has no effect on the sensor. If the gas has been exposed
to arcing, however, it is possible that various acidic species will have been formed
that will corrode the sensor. When testing SF6 that may have been arced, therefore,
an acidity test should be carried out first; if the gas proves to be acidic then the
moisture test should not be carried out.

3.2 Installing the Air/Gas Sampling System
The Piping Installation Schematic diagram (see section 3.3) shows all components,
which could be used in a dry gas measurement application. Although not all the
items shown will be required for every installation.

The main principle when considering the presentation of the gas sample to the
SDHmini-Ex dewpoint meter is to keep the sample system as simple as possible
and of minimum swept volume, so that it has the least possible influence on the
gas sample.

The SDHmini-Ex should be placed on a stable surface prior to connecting to the
sample pipework. Care should be taken to ensure that the sample presented
to the SDHmini-Ex is not contaminated with any component that will damage,
contaminate or affect in a way that will impair the unit’s accuracy.

The flow rate, although not critical to the sensor measurement, should be low
enough to avoid abrasion to the sensor surface without being so low as to extend

                                                                                        9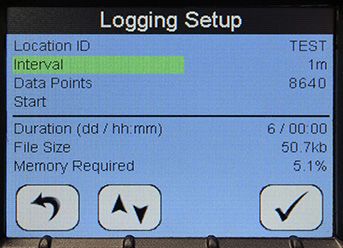
the SDHmini-Ex response time to an unacceptable level. In general, a flow rate
 of between 2 and 5 litres/min at normal temperature and pressure will give the
 right balance.

 The SDHmini-Ex is designed to operate at atmospheric pressure with a
 maximum of 0.3 bar.

 3.3 Piping Installation Schematic

                                       5            6
                      4                                              7

           3                                                                              9
                                                                              8

       2

       1

            MAIN
           PROCESS
             LINE

 Notes
   a. The sample point should be on the upper surface of the horizontal pipe or from a vertical
      section of pipe, wherever possible.
   b. The sample tube should run upwards from the sample point. If this is not possible, then an
      inspection port or drain tap should be installed at the lowest point in the sample system.

10
3.4 Piping Schematic Component Index
1. Sample Isolation Valve - This is a recommended item as it allows access
to the sample system without interrupting the main process line.
2. Filter Unit – A filter unit is recommended when the samples are likely
to contain particulate matter. If the air/gas sample contains heavy
hydrocarbon condensate, the filter must be of the coalescing type with
a drain. The filter unit should be positioned as close to the sample point
as practical.
3. Sample Tube – This should be stainless steel for dry air or gas
applications but copper or carbon steel can be used where wetter gases
are to be measured. If any section of the sample tube must be flexible
then PTFE should be used. In most cases, 3 mm OD (⅛”) is sufficient as
it provides good system response time with minimum flow. 6 mm OD
(¼”) tube can be used where pressure drops across the 3 mm tube are
too high.
4. Pressure Reduction Valve or Pressure Regulator – the sample is
measured at atmospheric pressure requiring that valve 4 is fitted to the
system.
5. Flow Control Valve.
6. Sample Connection.
7. SDHmini-Ex.
8. Flow Indicator – The recommended sample flow is 2 to 5 L/min.
9. Sample Exhaust – The exhaust is vented to atmosphere or returned to
an atmospheric pressure line.
3.5 Purging the Sample Connection
Refer to the Piping Installation Schematic in section 3.3.
It is advisable to carry out an initial purge of the sample loop without
connecting the instrument, in order to avoid the possibility of sensor damage
on start-up.
Open the sample isolation valve (1) slowly, until there is a small flow of air/gas
at atmospheric pressure from the pressure reduction valve (4). Allow the air/
gas to exhaust through the sample connection (9).
11Continue this for two minutes to remove any residual moisture from the sample pipe work and components. Check that no liquid or particulate contamination, which could damage the sensor, is passing through the sample pipe. Directing the sample onto a piece of white paper (such as a filter paper) will make it easier to see any dust or oil mist in the sample. Connect the SDHmini-Ex. The SDHmini-Ex is not flow sensitive, however, the sample flow needs to be enough to fill the sensor head with gas effectively, so anything less than 1 litre/min would mean that the instrument would take too long to settle to a stable reading. The flow should not be so high that the gas velocity could physically damage the sensor or cause back-pressure in the sensor head, so should not exceed approximately 10 litres/min. 3.6 Using the SDHmini-Ex to Take a Moisture Reading The first purpose of the SDHmini-Ex is to provide a rapid, easy and reliable means of carrying out moisture content measurement of gases. To ensure rapid response the sensor is kept dry by surrounding the sensor with desiccant in the head assembly when it is not in use. After purging the system to be monitored fit the SDHmini-Ex sample pipe to the sample connection (6). Allow the gas to purge for a further two minutes with the head down. Restrict the outlet of the SDHmni-Ex (7) by placing a finger over the sample exhaust (9), so that the pressure of the sample lifts the telescopic head. As soon as the head is fully extended remove the finger, to prevent pressure build up. Pull gently on the head to make sure it is fully extended. If there is not enough pressure to lift the head assembly, assist it by pulling it up, do this very slowly so that ambient air is not drawn in through the outlet. The sensor will respond to the moisture level present in the sampled gas. The displayed moisture value will continue to change until the sensor reaches equilibrium at which point the displayed value is representative of the moisture level in the sampled gas. When a reading has been taken and the test is finished, push down the telescopic head fully, carefully turn off the sample flow and disconnect the sample pipe. With the head in the down position the desiccant will dry the sensor, ready for the next test. 12
Note: It is important that the head assembly is either fully up or fully down to
keep the desiccant isolated from the ambient air so avoiding wetting it. When
the instrument is not in use it should be stored with the head in the down
position.

3.7 Desiccant Dry-Down Technology

The unique design        Sensor surrounded by                    The desiccant and
allows purging of        desiccant ensuring it is                sensor are always
the gas in the “Dry-     dry, ready for the next                 isolated from
Down Position”           measurement.                            atmospheric air to
which will bring all                                             ensure an accurate
surfaces and voids                                               reading.
to equilibrium.

                                                                     Sensor exposed
                                                                     to gas sample

                                                                     Sample exhaust

           Sample gas
            inlet pipe
                                  Sensor

               Dry-Down Position               Read Position

Keeping the sensor dry between tests ensures that the SDHmini-Ex is ready to
carry out rapid spot checks. The unique design of the desiccant head achieves
this by surrounding the sensor with desiccant, keeping the sensor dry. The head
is then lifted for sampling, exposing the sensor to the sample gas.

Between tests the sensor is not allowed to come into contact with ambient
air. The chamber is designed so that the void space and chamber wall surfaces
are purged with sample gas before exposure of the sensor, giving faster, more
accurate and reliable results.

                                                                                   13
3.8 Sample Connections The SDHmini-Ex is supplied with two connections: a Fir Tree on one side and a Swagelok compression fitting for ¼”, ⅛”, 6 mm OD pipe or another Fir Tree fitting (as specified on your order) on the other. Either can be used as the inlet connection (6). PTFE and stainless steel are recommended materials for sample pipes. Some specialist flexible tubing may be suitable as sample pipe but common flexible tubing such as PVC, nylon, polythene or rubber, should not be used, as they are permeable and water vapour from the atmosphere will diffuse through them into the sample gas. A 2 m PTFE sample pipe is supplied for use with the Fir Tree connection. The first time this is used it is advisable to warm the end that will go over the Fir Tree for a few seconds with a heat source to soften it slightly, which helps to get a gas tight seal. 3.9 Pressure and Flow Control In most cases the gas to be sampled will be at a positive pressure, which will need to be reduced to atmospheric pressure. At low pressures, up to around 8 barg, this can be done by including a simple needle valve (5) to control the flow and thereby the pressure dropping across it. Ideally this would be the isolation valve (1) on the sample point, thus keeping the number of joints and glands, which are points of potential moisture ingress to a minimum. At higher pressures it is advisable to reduce the pressure across a pressure regulator (4). Any regulator used should be stainless steel and of a low swept volume. Typical laboratory or welding type regulators are not suitable because they have elastomeric diaphragms which are permeable to water vapour and the high swept volume will be slow to purge. 14
3.10 Particulate Contamination

If the sample gas is likely to contain particulate material this should be kept away
from the sensor by including a small inline particle filter (2) in the sample system.

If the surface of the sensor becomes partly coated with particles it will not affect
the calibration of the sensor but will restrict the movement of water molecules
across the surface so increasing the time it takes for the sensor to come to
equilibrium with the water vapour concentration around it. If the solid material is
hygroscopic, such as desiccant dust, whenever there is a change in the moisture
concentration in the sample, this material must come to equilibrium with the
moisture content before the sensor can respond to the change, which will cause
delays in obtaining accurate results.

3.11 Liquid Contamination

If the sample gas may contain liquid contamination, such as oil mist, this should
be kept away from the sensor by including a coalescing filter or an appropriate
membrane filter (2) in the sample system.

If the surface of the sensor becomes partly coated with liquid, again, it will
not affect the calibration of the sensor. It will restrict the movement of water
molecules across the surface so increasing the time it takes for the sensor to
come to equilibrium with the water vapour concentration around it. If the liquid is
hygroscopic, such as glycol, the buffering effect described for desiccant dust may
be so great that the sensor becomes too slow to use.

                                                                                        15
4 Normal Operations
4.1 Powering On/Off
To switch on (and off), press the SDHmini-Ex
briefly displays a splash screen showing instrument status,
error information and firmware version number.
4.2 Graphical Viewing Options
The start up screen is soon replaced by the normal measurement mode screen
(see below) displaying the current moisture measurement in a variety of views.
The last used or last selected mode will be utilised automatically.
Top Bar Top Bar
Battery Status - Bluetooth Secondary Display or
Status - Time Measurement Value
Viewing Portal
Main display resides
here but can also show Button Icon Area
alternative Measurement These are soft keys which
Data, Information Screens, are always visible to assist
Configurations and Logged users in navigating through
Data in a variety of formats. the graphical screens.
4.3 Display Options
The display can be changed by pressing the following keys to cycle
through all of the graphical views and will take you to the home screen.
Here is a view starting as a digital number followed by simulated strip chart and
moving coil instruments.
The digital display mode has the benefit of showing the moisture measurement
in main choice of engineering units but also a secondary display with perhaps
alternative engineering units. This mode also allows application of pressure
dewpoint to evaluate the measurement in other samples pressures.
164.4 Choice of Units
In normal measurement mode. The secondary display is the measurement
displayed in the top bar on the right hand side (A). It allows alternative A
engineering units or concentrations to be displayed
alongside those chosen in the main display.
To choose the engineering units to be displayed, select
the units key from the main digital view.
You will be presented with the following screen to select engineering units for
the main and secondary displays. You may toggle between adjusting the main
and secondary displays by pressing the key 3.
Use the key to move to the
desired measurement type and
press to select it. Pressing
will exit the current screen without
making any further changes.
B
Here the secondary display
is being changed to ppm(v)
engineering units (B).
C
Please note: when you change the
display to either the moving coil
meter or the strip chart the secondary
engineering units display is replaced
with the primary units (C).
This continues to allow high precision measurement whilst having the benefit
of the graphical display.
175 Calibration Field calibrations of the SDHmini-Ex may be performed periodically, every two to three months, to ensure accuracy between laboratory calibrations by checking the span of the instrument and correcting for any deviation. These functions can be used to verify operation of the SDHmini-Ex if confirmation of an unexpected result is required. This may be accomplished by two similar in built calibration functions, namely AutoCal and CalSet. 5.1 Auto Calibration (AutoCal) The AutoCal facility uses the fact that each sensor is designed and manufactured to give no further increase in response when it reaches its maximum moisture level. For example a SDHmini-Ex with a full scale value of 0 °C dewpoint will read 0 °C dewpoint when exposed to a gas with this moisture concentration and will continue to read 0 °C dewpoint as the moisture concentration rises above 0 °C dewpoint. The SDHmini-Ex can therefore be adjusted to read 0 °C dewpoint on any gas with a moisture concentration wetter than 0 °C dewpoint, ambient air for instance, thus setting the span to match the original calibration. NOTE: For instruments with a dewpoint range above 0 °C, e.g. the Blue range, -80 to +20 °C, please refer to section 5.2 Calibration Setpoint (CalSet). Select AutoCal from the Configuration Menu. Please ensure that the inlet and outlet valves are open to atmosphere. Extend the desiccant head on the instrument (as illustrated on the instrument screen) noticing that the value of the full scale moisture level has already been automatically preselected as a target of 0 °C. You may need to lift the head two to three times to allow ambient air through to the chamber ensuring inlet and outlet are unrestricted. Press . 18
The SDHmini-Ex will display a moving bar until it assesses that the sensor has
stabilised (please allow up to ten minutes for this to occur).

The SDHmini-Ex will now display the full scale value of the
unit, either -20 °C or 0 °C depending on the sensor range.

Close the desiccant head when instructed and press           .

Pressing    during the AutoCal aborts the process.
Press    to accept.

The value present at the start of the aborted AutoCal process
is reinserted.

The SDHmini-Ex will return the instrument to normal measurement mode.
NOTE: Avoid carrying out the AutoCal procedure on a SDHmini-Ex with a full scale value of 0
°C dewpoint on days when the ambient may be below this value, for example a dry day when
the ambient temperature is below approximately 12 °C.

The entered AutoCal value must not be pressure compensated.

5.2 Calibration Setpoint (CalSet)
The function CalSet is suitable for sensors with an upper range
limit of +20 °C dewpoint, for example the Blue range -80 to
+20 °C dewpoint, where this upper range limit will exceed
typical ambient conditions.

The unit may be checked against a known moisture level,
for example from a moisture generator or other reference
standard, such as a chilled mirror hygrometer or a
psychrometer using the function CalSet.
Select CalSet from the Configuration Menu.
Extend the desiccant head and press          .
Whether the instrument is being checked against the
measured ambient level or against a known calibration
standard from a moisture generator,    and      are used
to set the value accordingly.
                                                                                         19
Selecting +10 °C for instance, involves changing the sign and
number by use of both keys.
The entered CalSet value must not be a pressure
compensated one and must be within the range of the
sensor.
Press when done.
The SDHmini-Ex will display a moving bar until it assesses
that the sensor has stabilised (up to 10 minutes).
The full scale value, 10 °C dewpoint, is now displayed.
Press when complete.
Close the desiccant head when instructed to do so and
press .
Pressing during CalSet aborts the
process and the value present at the
start of the aborted CalSet process is
reinserted.
Press to continue/accept changes.
The SDHmini-Ex will return to the normal operational mode.
5.3 Calibration Procedure Error Messages
If the instrument fails calibration, a message will be displayed on the screen until
acknowledged by the user, e.g.
AutoCal Failed
Sensor Open Circuit
or
AutoCal Failed
Sensor Short Circuit
This will mean replacing the sensor or its interconnecting cable in some cases.
206 Sensor Related Settings
On the configuration screens there exists a collection of measurement settings
associated with the sensors and its environment.
6.1 Sensor Type
Here you may view the type of sensor installed in the SDHmini-Ex and its range.
6.2 Selecting Gas Types
The SDHmini-Ex default setting is for ideal gas behaviour, however, there is an
option to change the setting to natural gas which uses the appropriate calculation.
6.3 Selecting Gas Molecular Weights
The SDHmini-Ex default setting is for air (molecular weight 28.99), however, this
function allows the molecular weight to be set appropriately for other sample gases,
for example 18.99.
6.4 Pressure
This sub-menu has, for both the primary and secondary displays, five options
allowing the user to select either atmospheric pressure or one of four pressure
engineering units and applied pressure.
When this function is selected, the main and secondary display screens will display
the pressure at which the dewpoint reading is calculated.
21The SDHmini-Ex requires that a numerical pressure value be entered in the
selected units at the bottom of the units selection section, for example
selecting pressure dewpoint of 2,000 psig on secondary display.
Warning: This function is purely an internal calculation and DOES NOT allow an
elevated pressure to be applied to the measuring head.
7 Non Measurement Related Configuration Functions
7.1 Changing the Date
In order to change the present date press the arrow
key to select the Date function from the Configuration
menu. Press .
Use and to change the date.
Here for example the date is changing from 06/03/15 to 06/04/15.
Press to enter new date or to abort changes.
227.2 Changing the Time
In order to change the present time
press to select the Time function
from the Configuration menu.
To change the time use and .
Here for example the time is changing from 10:48 to 11:48.
Press to enter new time or to abort changes.
7.3 Changing International Settings
Use the selection cursor to select options to change
the settings for Language, Date Format and Numerical
Delimiter.
Select International Settings from the Configuration menu.
To change the Language option select .
The language choice area is highlighted. A flag of a
country most associated with one of the pre-installed
languages indicates which language is currently selected.
The SDHmini-Ex operates with the following 10 language
options: English, German, French, Spanish, Portuguese,
Russian, Italian, Chinese, Japanese and Korean.
Use the to select the flag required.
And to accept the choice.
The Date Format i.e. DD/MM/YY or MM/DD/YY is also
chosen from within the International Settings menu.
And finally, numbers can be presented 123.45 or 123,45.
Note: These settings are carried through to any data files
and printer outputs where appropriate.
237.4 Hotkeys
To access the hotkeys from the main screen, press key 5 on the keypad.
The four soft keys are replaced by a new set of hotkeys for a short while. These
are available for rapid access to certain areas of the menu structures or functions.
Turns ON and OFF the inbuilt sounder.
Accesses the alternative moving coil graphical viewing screen
Takes the user to the Information screen
Takes the user to the Bluetooth Setup screen
If the SDHmini-Ex is connected to a PC then the second hotkey is
replaced by an SD card symbol
8 Bluetooth Printer Configuration
In the Configuration menu select Bluetooth Setup.
Press .
And again, to search for Bluetooth devices.
Ensure that the Bluetooth device is switched on. If not, go back and repeat until
the device is found using the key.
You may not find any devices and may have to restart the search.
If more than one device is found, (as per example image shown) select the
device you wish to pair with using and press to begin the pairing
process.
24Enter the pairing authorisation code for the device and press to connect.
The message will
say Connecting and
finally Connected.
If a problem exists then the message will turn red and say Connection Failed.
This maybe due to:
● An incorrect authorisation code
● The external device has powered down
● The external device is out of range
● The external device is not suitable to pair with
Repeat the Bluetooth Printer Configuration setup.
As confirmation, you may print a
test page of the instrument settings
to the printing device. You may also
Disconnect from a device. Leaving the
message status now empty.
259 Data Logging
Press on your data logging instrument to start the
data logging.
You will now see the following on the instrument screen
which is reminiscent of a traditional strip chart recorder.
Please note the default sample rate is shown on the right
hand side of the screen below the horizontal time axis.
Also note that the default file name is shown at the top.
9.1 Quicklog
Pressing will instigate a data logging event where
the data is captured every five seconds and saved in a
file named QUICKLOG *** ( *** is a sequential number
from 000 to 099). The file will contain 240 samples if
left to complete its log, making the default duration of
a Quicklog event 20 minutes long. The screen is being
updated three times per second so detail may be visible
on the strip chart that may not be recorded in the
logging event.
The printer icon on the right hand side may appear with
a white background to indicate that the printer is not
attached via Bluetooth. However, pressing the printer
icon key will take the user to the Bluetooth Setup screen
to connect. Once connected the Bluetooth icon will
appear in the notification area and the background will
appear green.
If the printer key is pressed again then the printer will
print the samples as they occur.
Note: When the printer icon has a RED background, this indicates to the user to
press the printer key to stop printing.
269.2 Snapshot
You may notice that when the strip chart has traversed
more than half of the way across the screen then another
icon appears, this time on the left hand side. It is called
the Snapshot function icon.
Pressing the Snapshot key will not stop the data logging
event but will show a snapshot of the current chart line.
Use the arrow keys to move along the trace and monitor
the measurement at any point on the displayed trace. The
instantaneous measurement and the time is displayed
along with the sequential file name for the snapshot.
The Snapshot image may also be
printed out at this stage using
the print icon - if connected as
before or escape to go back to the
main logging event, which may be
continuing in the background.
9.3 Advanced Data Logging
From the home screen press .
To run data logging events with different durations and
sample rates to the default setting and with the ability
to attach alternative names or Location IDs, press the
Configure Data Logging key to enter the Logging
Setup screen. The Location ID or file name may be
specified here as well as the sample interval and the number of data points.
27There is provision for 20 Location IDs to be held on the
SDHmini-Ex. Here is an example of how to create a new
Location ID called TEST.
Select Location ID and press .
Select an empty slot or
overtype an old one.
Use these keys to edit a new Location ID.
Press when done.
Setting up the sample interval requires a little thought as to how fast or slow
the sampling needs to be captured and what is important.
Here the sample rate/interval is
being adjusted from 5 seconds
to 1 minute.
In a similar way you can adjust the number of data points
also.
28The SDHmini-Ex automatically calculates the Duration
and displays it below the line along with the expected File
Size and Memory Required. For Location ID "TEST", the
number of data points potentially collected is set to be
8640, giving 6 days duration of the logging event.
When the Start command is accepted the logging will
proceed with the Logging Setup chosen.
9.4 Logged Data Review
On this screen the user can review not only the Logged
Data but also examine any instantaneous Snapshot
screens saved during data logging.
To examine data logging events press to instigate
logged data review.
In order to inspect the files select the appropriate type of
data by using and press .
Using , move the selection cursor to the data to
inspect and press to inspect file attributes and
perform other actions by starting Data File Management
function.
The Data File Management function allows the user
to inspect how the data was captured and other file
attributes. It also allows the possibility to delete the file
and also ALL files associated with the Location ID but
not the Location ID itself which will be saved ready for
another logging event.
29You may also print the data file
using the printer icon key, provided
as before, that the Bluetooth
connection has been maintained or
established.
Alternatively, press to return to
the Logged Data Review screen then
continue viewing the data log file on
the strip chart by selecting .
The value of the current measurement at the red cursor
line is shown on the right side of the top bar area.
The strip chart shows the data contained in the file
graphically in the centre of the viewing portal below the
top bar.
● The Location ID file name is shown with its sequence number (TEST 000)
on the top left.
● The current screen number and total number of screens within the file are
shown top right.
● The date and time of the measurement point is shown bottom left.
● The measurement or sample interval for the data logging file is shown
bottom right.
Press the and keys to scroll the vertical red line cursor through the data.
However, where more than one screen of logged data exists to review, the
and keys are replaced by an alternative set - and .
Pressing key 2 ( ) or 3 ( ) will move the screens left
and right, for instance screen 1 of 4 is replaced by screen
2 of 4 by pressing key 3 under the key icon.
30You will notice that the vertical red line cursor is missing
and the corresponding measurement value is also missing
from the top bar.
However, if in the selected screen of data is the one of
interest then pressing the key will switch on the
red cursor vertical line and the measurement value will
appear.
Pressing the and will move the cursor left and
right to select other data points.
9.5 Data Logging Storage
Number of Sample Total Sample
Data Points (n) per Maximum Number of Data Data Points
Data File Type Data File Files Storage
Logged Data 1 < n < 125,000 1,000 per Location ID = 286,000
20,000
Quicklog Data 1 < n < 240 100 24,000
Snapshot Data 120 < n < 240 50 12,000
322,000
10 Additional Information
10.1 Temperature
Typical ambient variations experienced throughout the world are quite
acceptable but avoid placing the instrument in direct sunlight or near a
source of radiant or convected heat. In countries that experience extremes of
temperature, always carry out the automatic calibration with the instrument at
its operating temperature.
10.2 Response Time
The response time of any water vapour pressure detector will naturally be very
much quicker from dry to wet, than from wet to dry. This is the reason that the
SHAW SDHmini-L is so successful. The sensor is kept in a dry condition when it
is not in use and therefore results are obtained in the quickest possible time.
31To check whether a particular instrument is within specification, carry out
the automatic calibration procedure, close the instrument head and note the
reading ten minutes later. If the unit has not dried down to -40 °C after this ten
minute period, the instrument should be returned to your supplier/authorised
distributor for examination.
10.3 Guarantee
All SHAW products are guaranteed for two years from the date of purchase,
some exclusions are as follows:
Removing protective guard from any sensor, subjecting sensor to shock or black
list gases e.g. caustic and acidic gases like ammonia and chlorine, tampering
with any internal electronics, subjecting to excessive flow rate, contaminants
and general misuse.
If you suspect a fault which you feel needs to be attended to under guarantee
please contact us for assistance hopefully to help fault find and effect a remedy
and if this is not successful, to give precise instructions for the return for
inspection.
No equipment will be replaced or repaired without having been returned for
inspection either to ourselves or an authorised distributor.
10.4 Basic Definitions
Water Vapour Pressure
The pressure exerted by the water vapour contained in any mixture of gases.
The total pressure exerted by the gas mixture is the sum of the pressures
exerted by its components – including the water vapour. Water Vapour Pressure
varies in direct proportion to the total gas.
Dewpoint Temperature
The temperature to which the gas must be cooled in order that it should be
saturated with water vapour (i.e. 100% relative humidity). For practical reasons
it is referred to dewpoint above 0 °C and frostpoint below 0 °C.
Parts Per Million by Volume
ppm(v) is the ratio of the water vapour pressure to the total gas pressure.
32Parts Per Million by Weight
ppm(w) is the ratio of the molecular weight of water vapour to the molecular
weight of the carrier gas mixture.
Relative Humidity
The ratio of the actual water vapour pressure in the gas to the saturation water
vapour pressure at the same temperature.
10.5 Problem Guide
Fault Explanation Required Action Notes
Unit does not turn Battery low level. Connect a battery
on. Screen remains charger unit for
blank and back light a minimum of 12
off. hours charging.
AutoCal failure. Sensor sensitivity Repeat AutoCal. If AutoCal fails,
too low. contact supplier
to replace sensor.
Unit always reads Sensor cable Repair cable.
lower limit. broken.
Unit will not dry Sieve wet. Perform service on Service Kit
down to lower limit. unit using Service available from
Kit. supplier.
‘O’ ring failure. Perform service on Service Kit
unit using Service available from
Kit. supplier.
Battery has short Battery reaching Return to supplier/ Order from
life between end of life. authorised supplier.
charges. distributor
for battery
replacement/
exchange.
Keypad damaged. Check function Contact supplier.
of keypad
electrically.
3311 SDHmini-Ex Specifications
Accuracy: ±2 °C (±3.6 °F)
Type: Battery powered hygrometer complete with carrying case. For use
with desiccant chamber for rapid readings. Certified intrinsically
safe to ATEX, IECEx and UL standards:
ATEX: II 1 G Ex ia IIC T4 Ga
(-20°C ≤ Ta ≤ +50°C)
II 1 D Ex ia IIIB T60°C T5080°C Da
IECEx: Ex ia IIC T4 Ga
Ex ia IIIB T60°C T5080°C Da
(-20°C ≤ Ta ≤ +50°C)
UL: Class I Div 1 Groups A, B, C and D T4
The equipment complies with the requirements of:
IEC 60079-0:2011 and IEC 60079-11:2011
UL 913 and CSA 157
FCC ID:QOQWT41/u IC:5123A-BGTWT41/u
EMC Directive 89/336/EEC as amended by Directives 92/31/EEC and
93/68/EEC within CE marking requirement
WT41 has modular certification with certification number R 209-
J00047/J00231
Dimensions: 97 mm (w) x 211 mm (h (259 mm head extended)) x 147 mm (d)
3.8 in (w) x 8.3 in (h (10.2 in head extended)) x 5.8 in (d)
Weight: 1.75 kg (3.8 lbs)
Display: Full colour graphics LCD. 320 x 240 resolution. Three main viewing
- digital, graphical and a traditional moving coil. Secondary display
in the top right for display of readings in alternative units of
measurement.
Sensor Connection: Internal
Power Supply: Single lithium-ion cell
Sampling: Pressure: Atmospheric with flow rate of 2 - 5 litres/minute
Operating Temperature: -20 °C to +50 °C (-4 °F to +122 °F)
Storage Temperature: -30 °C to +70 °C (-22 °F to +158 °F)
Operating Humidity: 95% RH non-condensing
Calibration: AutoCal on all (but Blue range)
Accessories/Options: Bluetooth Printer, Portable Sample System, Service Kit
Sensor Type (r): Sensor Range
Purple (P): -100 °C to 0 °C dewpoint, 0 - 6000 ppm(v)
Red (R): -80 °C to -20 °C dewpoint, 0 - 1000 ppm(v)
Grey (G): -80 °C to 0 °C dewpoint, 0 - 6000 ppm(v)
Blue (B): -80 °C to +20 °C dewpoint, 0 - 23000 ppm(v)
Silver (S): -100 °C to -20 °C dewpoint, 0 - 1000 ppm(v)
Gold (Gl): -110 °C to 0 °C dewpoint, 0 - 6000 ppm(v)
Sensor: Operating Principle: SHAW Ultra High Capacitance Aluminium
Oxides Sensor
3412 SDHmini-Ex General Assembly Diagram
FRONT VIEW REAR VIEW
259 mm with head extended
211 mm with head extended
SIDE VIEW
TOP VIEW
97 mm
147 mm
13 mm
353001 SDHmini-Ex User Manual - Iss 4.3 © SHAW MOISTURE METERS UK (LTD) 2021 Shaw Moisture Meters (UK) Ltd. | Len Shaw Building | Bolton Lane | Bradford | BD2 1AF | England t. +44 (0)1274 733582 | f. +44 (0)1274 370151 | e. mail@shawmeters.com | www.shawmeters.com
You can also read