IRISx460 - QUICK-START GUIDE 1 - Boat Cameras
←
→
Page content transcription
If your browser does not render page correctly, please read the page content below
Iris Innovations

IRISx460

QUICK-START GUIDE
IRISx460 User Guide v2.3 April 2021   1
Iris Innovations

Regulatory Information

Disposal of Waste Equipment by Users in Private Household in the European Union.

                   This symbol on the product or its packaging indicates that it must not be disposed of with
                   your other household waste. Instead, it is your responsibility to dispose of your waste
                   equipment by handing it over to a designated collection point for the recycling of waste
                   electrical and electronic equipment. The separate collection and recycling of your waste
                   equipment at the time of disposal will help to conserve natural resources and ensure that
                   it is recycled in a manner that protects human health and the environment. For more
!                  information about where you can drop off your waste equipment for recycling please
                   contact your local city office, your household waste disposal service or the shop where
                   you purchased the product.

                    This device has been tested and found to comply with the limits for a Class B digital
                    device, pursuant to Part 15 of the FCC rules. These limits are designed to provide
                    reasonable protection against harmful interference in a residential installation. This
                    equipment generates, uses and can radiate radio frequency energy and, if not installed
                    and used in accordance with the instructions, may cause harmful interference to radio or
!                   television reception. However, there is no guarantee that interference will not occur in a
                    particular installation. If this equipment does cause interference to radio and television
                    reception, which can be determined by turning the equipment off and on, the user is
                    encouraged to try to correct the interference by one or more of the following measures:
                    Reorientate or relocate the receiving antenna; Increase the separation between the
                    equipment and the receiver, connect the equipment to an outlet on a different circuit from
                    that to which the receiver is connected; consult the dealer or an experienced radio / TV
                    technician for help.

                   We hereby declare that the product is in compliance with the essential requirements
                   and other relevant provisions of EMC Directive 2014/30/EC, the RoHS Directive
!                  2011/65/EU.

IRISx460 User Guide v2.3 April 2021                                                                          2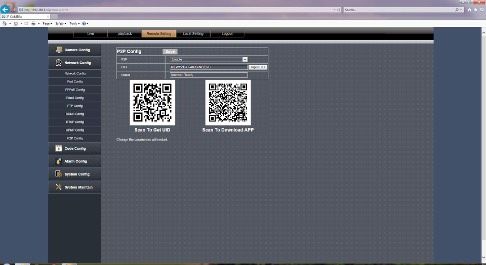
Iris Innovations

IRIS460 User Guide
(C) 2021 Iris Innovations Limited.

ALL RIGHTS RESERVED

Any and all information, including, among others, wordings, pictures, graphs are the properties of IRIS
INNOVATIONS., Ltd. or its subsidiaries (hereinafter referred to be “IRIS”). This user manual (hereinafter
referred to be “the Manual”) cannot be reproduced, changed, translated, or distributed, partially or wholly, by
any means, without the prior written permission of IRIS. Unless otherwise stipulated, IRIS does not make any
warranties, guarantees or representations, express or implied, regarding to the Manual.

LEGAL DISCLAIMER

TO THE MAXIMUM EXTENT PERMITTED BY APPLICABLE LAW, THE PRODUCT DESCRIBED, WITH ITS
HARDWARE, SOFTWARE AND FIRMWARE, IS PROVIDED “AS IS”, WITH ALL FAULTS AND ERRORS,
AND IRIS MAKES NO WARRANTIES, EXPRESS OR IMPLIED, INCLUDING WITHOUT LIMITATION,
MERCHANTABILITY, SATISFACTORY QUALITY, FITNESS FOR A PARTICULAR PURPOSE, AND NON-
INFRINGEMENT OF THIRD PARTY. IN NO EVENT WILL IRIS, ITS DIRECTORS, OFFICERS,
EMPLOYEES, OR AGENTS BE LIABLE TO YOU FOR ANY SPECIAL, CONSEQUENTIAL, INCIDENTAL,
OR INDIRECT DAMAGES, INCLUDING, AMONG OTHERS, DAMAGES FOR LOSS OF BUSINESS
PROFITS, BUSINESS INTERRUPTION, OR LOSS OF DATA OR DOCUMENTATION, IN CONNECTION
WITH THE USE OF THIS PRODUCT, EVEN IF IRIS HAS BEEN ADVISED OF THE POSSIBILITY OF SUCH
DAMAGES.
REGARDING TO THE PRODUCT WITH INTERNET ACCESS, THE USE OF PRODUCT SHALL BE
WHOLLY AT YOUR OWN RISKS. IRIS SHALL NOT TAKE ANY RESPONSIBILITIES FOR ABNORMAL
OPERATION, PRIVACY LEAKAGE OR OTHER DAMAGES RESULTING FROM CYBER ATTACK, HACKER
ATTACK, VIRUS INSPECTION, OR OTHER INTERNET SECURITY RISKS; HOWEVER, IRIS WILL
PROVIDE TIMELY TECHNICAL SUPPORT IF REQUIRED.
SURVEILLANCE LAWS VARY BY JURISDICTION. PLEASE CHECK ALL RELEVANT LAWS IN YOUR
JURISDICTION BEFORE USING THIS PRODUCT IN ORDER TO ENSURE THAT YOUR USE
CONFORMS THE APPLICABLE LAW. IRIS SHALL NOT BE LIABLE IN THE EVENT THAT THIS PRODUCT
IS USED WITH ILLEGITIMATE PURPOSES.
IN THE EVENT OF ANY CONFLICTS BETWEEN THIS MANUAL AND THE APPLICABLE LAW, THE LATER
PREVAILS.

IRISx460 User Guide v2.3 April 2021                                                                          3

Iris Innovations

Warnings & Important Product
Information

WARNING: Installation and Operation                                   CAUTION: Care and Cleaning
This product must be installed and operated in accordance with        This product is a sensitive piece of electronic, imaging
these instructions. Failure to do so may result in poor product       equipment and must be handled and treated accordingly. Do not
performance, damage to the product or vessel and or personal          drop or shake the unit during installation. Avoid exposure of the
injury. Installation should only be carried out be qualified          imager to direct sunlight where possible as this may degrade the
personnel or by persons competent in electrical systems.              cameras performance over time.

                                                                      When cleaning the device, ensure power is switched off. Clean
WARNING: Power Supply and Grounding                                   the camera housing with a soft cloth. Moisten the cloth and use
Ensure the boats power supply is switched off during installation.    a mild detergent if required. The lens window has a protective
Ensure suitably rated circuit breakers / fuses are used in the        coating which may suffer damage as a result of improper
installation of the product in accordance with the electrical         cleaning. To clean the lens window use a soft cotton cloth.
values shown in the technical specifications of the product.          Moisten with clean water if necessary. For further advise on
Never switch on power until the power connections are correctly       cleaning the lens window, contact Iris Innovations.
terminated in accordance with the information provided in this
document. Do not connect or disconnect the product with the
power supply switched on. Never disconnect the DC ground with         INFORMATION: Product Disposal and Recycling
the power supply on.                                                  Dispose of this product in accordance with the WEEE Directive.
                                                                      The Waste Electrical and Electronic Equipment (WEEE)
                                                                      Directive requires the recycling of waste electronic and electrical
WARNING: Wiring terminations                                          equipment. Iris Innovations supports the WEEE policy and
Where the products video, power and data terminations are             politely request you observe correct disposal methods. For
extended, ensure that suitable connectors are used and that the       further information on how to correctly dispose of this product
point of termination for each cable is adequately protected           please contact Iris Innovations.
against moisture ingress. Ensure correct polarity is strictly
observed. Do not cut or remove cable connectors without prior         Please recycle unwanted packaging and documentation. The
permission from Iris Innovations Limited.                             cardboard carton, all paper manuals and documents and the
                                                                      protective plastic bag in which the camera is shipped are widely
                                                                      recyclable. Please check with your local recycling plant for
WARNING: Do Not Open the Unit                                         confirmation.
There are no user serviceable parts within the product so there s
no need to open the device. The product has been certified to
IP66 standards, however, submersion or the product or                 EMC Guidelines
exposure to high pressure washing will invalidate the warranty.       This camera is designed to be used as a visual aid and is not
                                                                      part of the vessels navigational system - even if used in
                                                                      conjunction with other on board equipment or third party
                                                                      systems - and is compliant with the EMC directive 2014/30/EC.
WARNING: Disclaimer                                                   The original Declaration of Conformity (DoC) is available from
This product is intended to be used only as an aid to navigation      our website
and must never be used as an alternative to correct navigational
practices and judgements made on the basis of approved                The camera should not be installed on the ships helm or in close
navigation methods. It is the users responsibility to observe         proximity to radio receiver equipment. We recommend the
correct and proper navigational skill when using this product.        camera is installed no closer than 1m from any equipment
Only officially approved charts and notices to mariners contain       transmitting or cables carrying radio signals - particularly VHF
the current information required for safe navigation.                 radios and associated equipment.

Operating the camera or viewing the video input whilst the            The camera should be powered from a clean 12VDC supply. If
vessel is moving could cause a distraction and result in              when powered via a Power over Ethernet (PoE) connection any
accidental collision resulting in property damage, injury or death.   interference occurs on either the camera or nearby equipment,
Iris Innovations cannot be held liable for any incidental, special,   the effected equipment should be separated by a greater
indirect or consequential damages whether resulting from the          distance.
use, misuse or inability to use this product.
                                                                      Water Ingress: Disclaimer
                                                                      This product has been tested and complies with the
CAUTION: Switch Camera Off When Not in Use.                           requirements of the standard EN60529 to level IPx6, however,
To prolong the operation life of the the cameras sensor we            water intrusion and subsequent equipment failure may occur is
strongly advise that power to the camera is routed via a              subject to commercial high pressure washing or sustained
dedicated switch.                                                     exposure to water spray. This product is not designed to be
                                                                      submerged. Any damage caused as a result of these
                                                                      circumstances are not covered by the product warranty.
CAUTION: Service and Maintenance
This product contains no user serviceable parts. Please refer all
maintenance and repair issues to your authorised Iris                 NOTE:
Innovations dealer. Any unauthorised work to the product may          Due to manufacturing techniques there may be minor variations
affect the warranty.                                                  in the form of the stainless steel cowling. This is expected and
                                                                      does not detract from the performance and overall aesthetic of
                                                                      the product.

IRISx460 User Guide v2.3 April 2021                                                                                                   4
Iris Innovations

Introduction                                                       Overview of Key Features
Thanks for buying the IRISx460 Miniature IP Dome Camera            Here’s a brief list of some of the IRIS460’s key features:
from Iris Innovations.
                                                                   • Up to 3MP Resolution (2304 x 1296)
The IRISx460 is an IP version of our best selling IRIS06x range    • High Performance LED’s - 10 Meter Range
of dome cameras, made successful due to its stylish, miniature     • Mechanical IR Cutout filter for True Day / Night Operation
design and quality reliable performance.                           • Low Power 12VDC Operation
Iris Innovations

Camera Overview                                            Camera Installation Sequence
The diagram below details the various parts of your        The diagram below shows the sequence in which the
camera:                                                    camera parts are fit into place during installation...
                         Lens
   Infra Red LEDs
                                                           Warning!
                                Inner Dome
                                                           It is strongly advised that the camera is powered up
                                                           and connected to a monitor / computer to check the
                                                           desired field of view prior to fixing the camera in
                                                           place.
                                                           Iris do not accept any liability if the camera is
                                                           installed and does not cover desired field of view.

                                                           1. Fit Base

                                                           2. Slide camera cable through base

                                                           3. Set desired camera field of view
                                        Lock Screw
                                                           4. Slide Cowling over inner dome onto base
  Photo-Diode                           (in 2 positions)

  (Light Sensor)                 Base                      5. Tighten Grub Screws

                       Cowling

Warning!

TO AVOID DAMAGE TO THE CAMERAS PAINTWORK
WHICH COULD RESULT IN EROSION TO THE
HOUSING, ENSURE THE GRUB SCREWS ARE FULLY
LOOSENED BEFORE MAKING ANY POSITIONAL
ADJUSTMENTS TO THE INNER DOME.
FAILURE TO DO SO WILL INVALIDATE ANY
WARRANTY CLAIM IF THE PAINTWORK IS
SCRATCHED OR DAMAGED.

              FULLY LOOSEN PRIOR TO
          ADJUSTING INNER DOME POSITION
              (BOTH SIDES OF CAMERA)

IRISx460 User Guide v2.3 April 2021                                                                                 6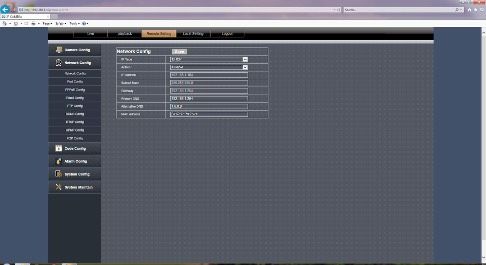
Iris Innovations

Installation                                                       Step 4:

WARNING!                                                           Fit the field installable water resistant RJ45 back-shell over
                                                                   the CAT5 cable and terminate the RJ45 connector in
Only trained electrical installers or competent persons
                                                                   accordance with T568B wiring specifications. Refer to
should install this product. Incorrect installation could lead
                                                                   Page 8 for further details.
to personal injury or death and/or damage to property.
Ensure the electrical regulations specific to your region are      Step 5:
observed, and observed wiring colour conventions.
                                                                   Plug your RJ45 jack into the cameras RJ45 socket. Make
Ensure the cameras power supply is connected via a                 sure the fit is good and you hear the connects ‘click’ into
suitably rated fuse or circuit breaker.                            place. Now ensure the water resistant back shell is
                                                                   tightened into place.
Switch off the power supply you are working on whilst
installing the camera, until the product is correctly installed.   Step 6:

Step 1:                                                            Slide the ‘slack’ cable from the camera back through the
                                                                   hole in your panel, ensuring connectors are still in tact and
Offer base into desired mounting position and mark off
                                                                   sit the inner dome onto the protective foam / rubber ring
screw hole positions and cable entry position through the
                                                                   on the base.
mounting surface. Alternatively, you can use the self
adhesive fixing template supplied to mark off the desired
fixing holes and cable entry hole.

TIP!

Power up camera and check to ensure you have the
desired field of view prior to drilling any holes and mounting
the camera in place.                                               Step 7:

Step 2:                                                            Place the cowling over the inner dome and move into
                                                                   position. The cowling will fit over the inner dome and push
Fit the camera base into position. Drill pilot holes
                                                                   up to the base. Once in position, carefully tighten the grub
appropriate for the fixings you are using, and then screw
                                                                   screws until they lightly hold the inner dome in position.
base into place, observing caution not to splinter or
                                                                   Now power up the camera and check you have achieved
damage the surface if fitting onto a GRP surface.
                                                                   the desired field of view. If any adjustments are required,
                                                                   loosen the grub screws to make the necessary
                                                                   adjustments, lightly tighten and then check again. Repeat
                                                                   until you have the desired field of view. Once you are
                                                                   happy with the cameras position, tighten the grub screws.

Step 3:

Present your cables to the camera through the cable entry
hole you’ve just drilled. If you have a PoE version of the
camera, this will just be a single CAT5 cable. If you have a
non PoE version, you will need a CAT5 cable and 2 cores
18AWG for the DC power. Ensure terminations are
sufficiently protected from any moisture ingress. Details on
how to fit the waterproof plug are on the next page.

IRISx460 User Guide v2.3 April 2021                                                                                            7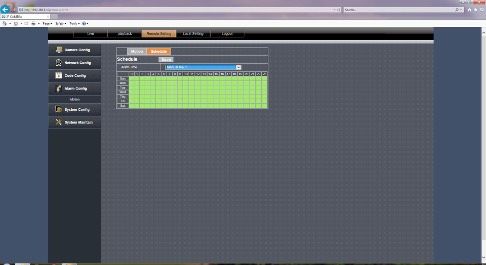
Iris Innovations

How to fit Field Installable                                    Method
Waterproof RJ45 Jacket                                          Step.1:
                                                                Feed the plug-less network cable (7) through the lock nut
When installing in an external location, or any position that
                                                                (6), waterproof rubber gasket (5) (ensuring the rubber
will be prone to moisture ingress or harsh weather, it is
                                                                gasket inset ridge faces the end-cap (4).
important the the waterproof RJ45 connector (supplied) is
used to protect the cameras connections.                        Step.2:
                                                                Crimp an RJ45 Network plug (3) onto the end of the cable
                                                                in accordance with the diagram below, taking care to
                                                                ensure the wires are terminated in the correct order and
                                                                are not crossed.

!

    Part No                   Description
       1      Cameras Network Interface Socket
       2      O Seal
       3      RJ45 Network Connector
                                                                 Pin No                     Wire Colour
       4      Waterproof Endcap
                                                                    1                      White / Orange
       5      Rubber Gasket
                                                                    2                          Orange
       6      Lock Nut
                                                                    3                       White / Green
       7      Network cable to Router / Switch / Hub / etc..
                                                                    4                            Blue
                                                                    5                        White / Blue
                                                                    6                           Green
                                                                    7                       White / Brown
                                                                    8                           Brown

                                                                Step.3:
                                                                Place the O Seal (2) onto the end of the cameras network
                                                                interface socket (1).

                                                                Step.4:
                                                                Insert the network plug (3) into the cameras network
                                                                interface socket (1).

                                                                Step.5:
                                                                Insert the waterproof rubber gasket (5) into the waterproof
                                                                end-cap (4) and secure lock nut (6) with the waterproof
                                                                end cap (4).

                                                                Step.6:
                                                                Align the snap on waterproof end-cap (4) with the notch on
                                                                the cameras network interface socket (1) and then secure
                                                                the waterproof end-cap (4) to the cameras network
                                                                interface socket (1).

IRISx460 User Guide v2.3 April 2021                                                                                      8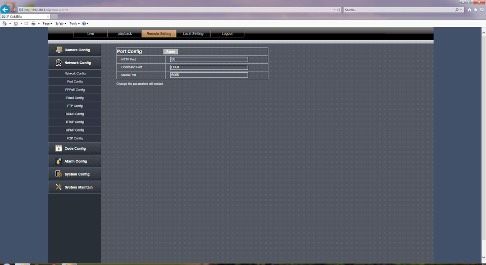
Iris Innovations

Configuring the Camera over the                               Once you’ve downloaded and installed the Device
                                                              Manager software, open the program and then click the
LAN                                                           REFRESH button at the bottom of the device list on the left
                                                              hand side. If everything is hooked up correctly, the details
WARNING: Stay Secure!
                                                              of your camera, including its IP address, will be displayed
When connecting any device to a network with access           in the list.
over the internet brings risks to the security of your
                                                              If the cameras IP address falls outside the range of the IP
network and your data. Your IRIS460 features built in User
                                                              address of your computers network adapter, you’ll have to
Name and Password authentication but it is also your
                                                              change the address on your adapter so it corresponds
responsibility to strengthen your network security where
                                                              with the address of the camera. Once this is done (and
ever possible. Please contact your IT expert for further
                                                              you’ll usually need to reboot your computer) you should
advise. Iris cannot provide support with any aspect of your
                                                              simply be able to open your web browser, type the IP
network security, other than the cameras built in security
                                                              address of the camera into the address bar and access the
settings.
                                                              camera. From here, if required, you can change the IP
Basic Setup: Single Camera / Computer                         address of the camera as desired - back to the original
The diagram below shows a very basic setup, with a single     address range of your computer for example. If you do
camera being viewed on a PC (or laptop).                      this, then you will also have to change the address of your
                                                              network adapter back to its previous range.

                                                              Basic Setup: Single Camera / Computer via Router
               Network               Network
                Cable      PoE        Cable                   using DHCP (default)
                          Injector                            The diagram below shows a simple one camera / one
                                                              computer device, but this time a router is used to manage
                                                              your network devices and address allocation.

                         IRISPoE1
                         6~36VDC

Use a standard 568B ethernet CAT5 cable to hook your
computer up to the PoE injector, and then another 568B
cable to hook the camera up to the injector.                                                                      Network
                                                                                                                   Cable
With this type of installation, you must ensure the IP                       Network               Network
address of the camera is in the same range as the network                     Cable      PoE        Cable
                                                                                                             Router
adapter in your computer used to communicate with the                                   Injector

camera. Consult documentation for your computer for
information on how to view (and edit) your network adapter
IP address.
                                                                                       IRISPoE1

The camera is set as default to DHCP, which means it has                               6~36VDC

no IP address set, and awaits for a router on your network
to assign the address.
                                                              As mentioned previously, the camera as default is set to
To find your camera on the network, use an IP camera          obtain its IP address automatically via DHCP. This means
discovery tool, or an ONVIF Device Manager.                   that once connected, your router will detect the device and
                                                              assign it an IP address within its designated range (refer to
A great Onvif Device Manager can be found here:https://
                                                              the documentation for your router for further details). You
sourceforge.net/projects/onvifdm/
                                                              must also ensure the network adapter for your computer is
                                                              set to obtain its address via DHCP.

IRISx460 User Guide v2.3 April 2021                                                                                         9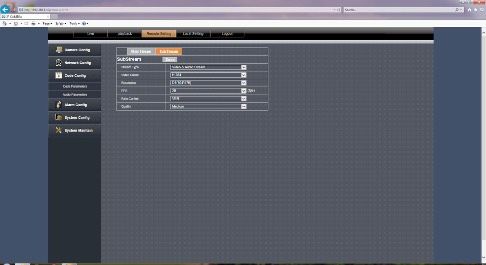
Iris Innovations

Operation                                                        Discovering your Camera

                                                                 To discover your camera on your network you can check
                                                                 your router for attached devices (if using DHCP) or use a
IP Addressing & DHCP (Dynamic Host Control
                                                                 software discovery tool, or an ONVIF device manager.
Protocol).
                                                                 A great Onvif Device Manager can be downloaded from
Devices on your network require their own, unique IP
                                                                 here:https://sourceforge.net/projects/onvifdm/
address. Your camera is factory set as DHCP (Dynamic
Host Control Protocol).                                          Remember, you’ll only be able to find a device on your
                                                                 network if it’s in the same IP address range. If you are
DHCP Addressing
                                                                 unsure how to do this, consult your IT specialist.
DHCP allows devices on the network to receive their IP
                                                                 Once you have found, or set your cameras address, you
address automatically from a server (or a device on the
                                                                 can log on to set up and view your camera.
network that acts as a server - such as a Raymarine MFD).

Nowadays, pretty much all routers have a DHCP server
feature, which usually just needs enabling and configuring.      Logging Into your Camera
Care should be taken on larger networks to ensure there
are no conflicts if multiple routers or devices are configured
as DHCP servers. Please refer to your IT specialist for
further details if you are unsure.

Raymarine MFD’s

For Raymarine MFD’s, including Axiom models, running
Lighthouse 2 or higher, all you need to do is connect the
camera to your Raymarine network and wait! Your
Raymarine device will take a few minutes to assign the
camera address at first, but once assigned, your camera
should appear within a short while after the MFD boots up
and initializes.

NOTE: The first time you hook your camera up to the
Raymarine it may take some time for the MFD to discover
the camera. This is normal.

                                                                 From your browser, type in your cameras IP address. The
Static (or Fixed) IP Addressing
                                                                 login page from the camera will be loaded up (see above).
If you are not using a DHCP server, you will need to log
                                                                 The default log in details are as follows:
onto the camera and assign an address to fit in with your
network address range. This sounds obvious, and like it          USER NAME: admin
should be a basic step, but can actually be a major
challenge, as you can only log into the camera if its            PASSWORD:
address is in the same range as your network. If you do
                                                                 No password is set as default.
not have experience in this field we recommend you
consult your IT specialist, as making undesirable changes        Once you’ve entered the correct user-name and password
to your settings could result in major network problems.         the main window will be displayed. You can change the
For further details, please contact your Iris dealer.            default user name and password from the cameras Set Up
                                                                 window.

IRISx460 User Guide v2.3 April 2021                                                                                     10
Iris Innovations
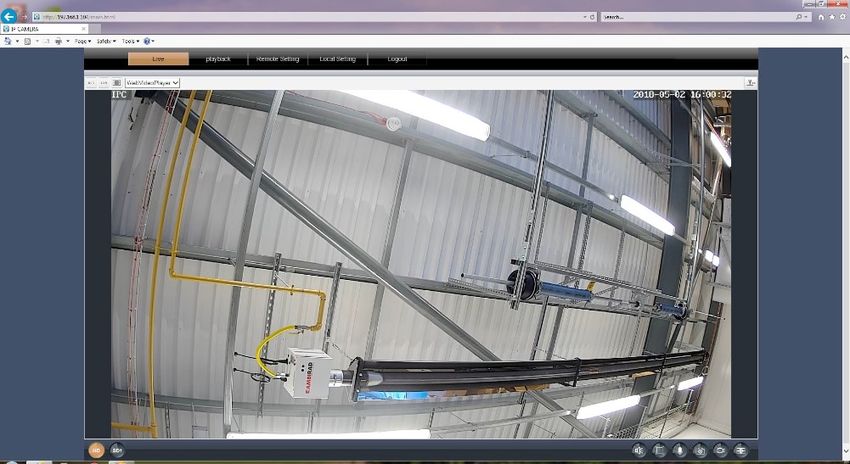
Main Window
Local Settings
Playback Defines path on local PC for storing
Used to search for stored snap-shots and snap-shots and video
videos as defined in Local Settings.
Live View Remote Settings Logout
Displays the live view from the camera Accesses Camera, Network and Logs out of the cameras interface.
System Setting pages.
Aspect Ratio
Camera Title
Can be toggled ON/OFF or re-labelled
in Settings Menu
Time & Date
Can be toggled ON/OFF or adjusted
in Settings Menu
Zoom
Once enabled, allows user to
draw ‘Region of Interest’
Video which will fill the screen
Video Definition Volume Stores video to path
Toggle between Standard Definition (1280x720) Not Enabled on IRIS460 defined in Local Settings
or High Definition (1920 x 1080) Full Screen Snapshot
Scales Live Video Panel to Stores snap shot to path
Full Screen defined in Local Settings
Microphone
Not Enabled on IRIS460
IRISx460 User Guide v2.3 April 2021 11Iris Innovations
Playback Window
Snap-Shots and Videos from the IRIS460 can be stored on
a local network device, such as a PC. To define the
storage path, format and duration, use the LOCAL
SETTINGS panel (see below).
Search Criteris
Playback Window
Query Button
Playback Controls Playback Time Line Playback Table
To search for files, set your desired start time (STime) and
end time (ETime) and hit QUERY.
The list of available events will be displayed in the playback
table.
To view and event, double click on the desired entry in the
playback table.
Local Settings Window
Defines paths for storing Snap-Shots and Videos as
detailed above.
IRISx460 User Guide v2.3 April 2021 12Iris Innovations
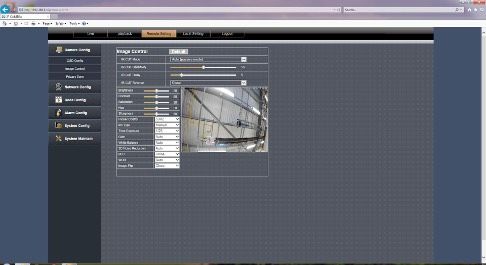
Remote Setting Window Network Config
The Remote Settings window contains the following sub- The Network Config tab contains the following sub menus:
menus:
Network Config: Set IP address details, including DHCP/
Camera Config Static (shown above).
OSD Config: Sets camera name and Time / Data display Port Config: Define network port settings (shown
(shown in image below). below).
Image Ctrl: Sets image values (Brightness, Colour,
Contrast etc, as well as IR settings (see below).
PPPoE Config: Enable / Disable PPPoE (default =
disabled).
Email Config: Define email address snap-shots are
Privacy Zone:Configure multiple ‘Privacy Zones’ to black
sent to when an alarm (motion) is
out areas that may either infringe privacy or you don’t want
triggered. This requires an email
other people with access to the camera to see.
account and the SMTP server details
to configure.
FTP Config: Configure FTP server details for
remote storage.
DDnS Config: Configure settings if you are
using a Dynamic Domain Name Server.
RTSP Config: Configure RTSP port details. RTSP
stream details are as follows:
MAIN Stream: rtsp://IP:Port/live/0/MAIN
SUB Stream: rtsp://IP:Port/live/0/SUB
Use mouse (or touch-screen) to ‘draw’ privacy zones.
IRISx460 User Guide v2.3 April 2021 13Iris Innovations
Network Config (continued...) Alarm Config
UPnP Config: Configure UPnP protocol settings. The IRIS460 supports motion recording and scheduled
recording.
P2P Config: Configures Peer to Peer connections. Also
displays QR Codes to download a generic F.O.C IP For Motion Detection, you define the areas of the screen
camera viewer App and the uniques configuration to you wish to become ‘alarmed’ by drawing boxes as
enable the camera to connect to a third party VPN host for desired in the Alarm/Motion window. Subsequently, when
remote viewing, which can be accessed from the App (see motion is detected within these boxes, the camera enters
below). alarm state and begins recording to the path defined in
LOCAL SETTINGS.
Code Config
Use mouse (or touch-screen) to ‘draw’ motion alarm
The code config window is where camera resolution,
zones.
refresh rate, bit rate control etc are set. Both streams can
be configured independently.
Scheduled Recording lets you define at which time and on
which days the camera records, as shown below.
IRISx460 User Guide v2.3 April 2021 14Iris Innovations System Config: The System Config window contains the following sub menus: TIME SETTINGS: Configure time zone settings and set Daylight Saving parameters USER MANAGEMENT Sets user accounts and privileges DEVICE INFO Displays camera serial number / software versions etc LOG QUERY Query camera error and activity log by time and date. AUTO REBOOT Specify a time you wish the camera to automatically reset PTZ SETTINGS Not Applicable System Maintenance: The System Maintenance menu has two sub menus: FIRMWARE UPDATE: Define the path new firmware is located lo perform a firmware upgrade RESTORE DEFAULT: Restores the camera to its default settings. IRISx460 User Guide v2.3 April 2021 15
Iris Innovations

Appendix:

Connectivity Issues: The IRIS460 camera is usually
viewed via an MFD using the RTSP feed and as the
camera is set to DHCP as default, usually (and depending
on the model of MFD used) connection should be plug and
play.

There will however be certain situations where you may
want to view on a PC (computer based navigation system
for example, during manual configuration or when viewing
the camera remotely).

In this scenario, please ensure you use a compatible
browser. Please check the up to date specifications on our
website (www.boat-cameras.com) to check compatible
browsers.

Please also ensure your PC’s firewalls and Active X settings
are configured correctly.

For Active X settings, navigate to the appropriate point in
your browser security settings and allow all Active X
connections. Failure to do so may result in the camera
video not displaying correctly, even though the interface
may load correctly.

The camera acts as a ‘web server’ and certain files may
need to be automatically installed by your computer from
the camera. Ensure your security settings allow files to be
downloaded and installed from the camera.

IRISx460 User Guide v2.3 April 2021                            16
Iris Innovations

IRISx460 User Guide v2.3 April 2021   17
Iris Innovations

IRISx460 User Guide v2.3 April 2021   18
Iris Innovations

IRISx460 User Guide v2.3 April 2021   19
Iris Innovations

                                             Iris Innovations Limited
                                         Unit 240 Ordnance Business Park
                                                 Aerodrome Road
                                                     Gosport
                                               Hampshire PO13 0FG
                                                 United Kingdom
                               Tel: +44(0)2392 556509 / email: info@boat-cameras.com

                                            www.boat-cameras.com

IRISx460 User Guide v2.3 April 2021                                                    20
You can also read