DIESEL PRESSURE WASHER HYW4000DE - User Manual - Tank Services
←
→
Page content transcription
If your browser does not render page correctly, please read the page content below

DIESEL PRESSURE WASHER
HYW4000DE
User Manual
CONTENTS

1. SAFETY                                   3-5
2. UNPACKNG & ASSEMBLY                      6
3. PRE-OPERATION CHECKS                     7-8
4. HOW TO START YOUR PRESSURE WASHER        9-12
5. HOW TO STOP YOUR PRESSURE WASHER         12 - 13
6. QUICK RELEASE NOZZLES                    13 - 14
7. USAGE TIPS                               14 - 15
8. TROUBLESHOOTING                          16-17
9. WINTER STORAGE                           18
10. MAINTENANCE                             19
11. SPECIFICATION                           20
12. CONTACT DETAILS                         20
13. DECLARATION of CONFORMITY               21

                                   Page 2
1. SAFETY.
   1.1. The operator of the machine;

        1.1.1. Is responsible for and has a duty of care in making sure that the machine is operated safely
             and in accordance with the instructions in this user manual.
        1.1.2. Should never leave it in a condition which would allow an untrained or unauthorised
             person/s to operate this machine.
            1.1.2.1. Should take care and show due diligence for the safety of and with regard to those
                   around whilst using the machine, to include but not limited to;
                1.1.2.1.1.     Elderly, children, pets, livestock and property.

   1.2. Some or all of the following PPE, Warning Signs and symbols may appear throughout this manual
        and you must adhere to their warning/s. Failure to do so may result in personal injury.
     Personal Protective clothing (PPE)

      Warning Signs and Symbols – FOLLOW safety messages to avoid or reduce risk of injury or death.

 DANGER - indicates a      WARNING - indicates a      CAUTION - indicates a    NOTE - indicates a
  hazard which if not        hazard which if not        hazard which if not   situation that could
avoided could result in    avoided could result in     avoided might result      easily result in
serious injury or death.   serious injury or death.   in minor or moderate    equipment damage.      READ MANUAL
                                                              injury.

                                                             Page 3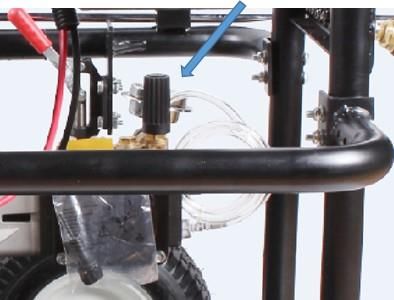
1.3. Carbon monoxide.

   1.3.1. Carbon monoxide is a colourless and odourless gas. Inhaling this gas can
           cause death as well as serious long term health problems such as brain damage.
   1.3.2. The symptoms of Carbon monoxide poisoning can include but not limited to the following;
       1.3.2.1. Headaches, Dizziness, Nausea, Breathlessness, Collapsing or Loss of consciousness.
       1.3.2.2. Carbon monoxide symptoms are similar to flu, food poisoning, viral infections and
              simply tiredness. It is quite common for people to mistake this very dangerous poisoning
              for something else.
   1.3.3. To avoid Carbon monoxide poisoning DO NOT Use Petrol/Diesel powered equipment inside
        a home, garage, tent, camper van, mobile home, caravan or boat. The list is not exhaustive if
        you are in any doubt contact your dealer.
   1.3.4. If you think you or someone around you has been affected by carbon monoxide poisoning;
       1.3.4.1. Get fresh air immediately, by opening doors and windows, turning off the machine
              and leaving the affected area.
       1.3.4.2. See your doctor immediately or go to hospital - let them know that you suspect
              carbon monoxide poisoning.
   1.3.5. DO NOT use in an enclosed area or a moving vehicle.

1.4. General fuel safety.

   1.4.1. Fuel Safety additional information can be obtained from the Health and Safety Executive.

   1.4.2.                      All fuels are flammable.

   1.4.3. Keep away from all ignition sources i.e. heaters, lamps, sparks from grinding or welding.
   1.4.4. Hot work on tanks that have contained fuel is extremely dangerous and should not be
        carried out.
   1.4.5. Keep work area clean and tidy.
   1.4.6. Clean up all spills promptly using correct methods i.e. absorbent granules and a lidded bin.
   1.4.7. Dispose of waste fuels correctly.

                                               Page 4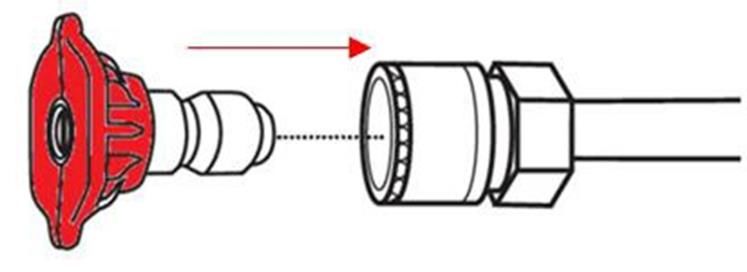
1.5. Diesel safety.
    1.5.1. Always fuel and defuel in well-ventilated area.
    1.5.2. Always wear correct, suitable and fit for purpose Personal Protective Equipment (PPE),
         suggested items are as follows, but are not limited too.

   1.5.3.       Hand protection.

   1.5.4.       Protective clothing.

   1.5.5.      Respiratory protective equipment should be used when in an unventilated area.
   1.5.6. When defueling always use a propriety fuel retriever.
   1.5.7. Always carry fuel in the correct and clearly marked container.

1.6. Battery safety
1.6.6. Batteries present a risk if they become damage by the possible leaking of electrolyte. This
       electrolyte is an acid and can cause serious injuries. Care should be taken when working on or
       near them.
        1.6.1.1. Should you come into contact with acid you should;
        1.6.1.2. Remove all clothing contaminated with acid.
        1.6.1.3. Get medical assistance as soon as possible.
        1.6.1.4. Use fresh running water to wash off excess acid, continue this until medical assistance
        arrives.
        1.6.1.5. If acid come into contact with Eyes the acid needs to be immediately washed away. Make
        sure that you do not wash the acid to another part of the face or body.
        1.6.1.6. Gasses from charging batteries are highly flammable and great care should be taken to
        charge in well ventilated areas.

                   Figure 2
                                                                           Figure 4

                                               Page 5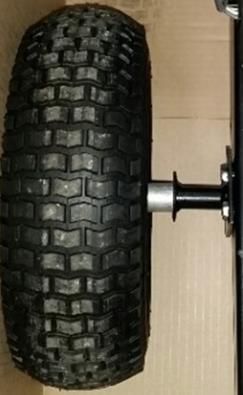
3. UNPACKING & ASSEMBLY

Unpack your pressure washer and make sure the following items are present:
• Hose.
• Gun/lance.
• Lance holder.
• Nozzles
• Detergent hose with filter.
• Wheels and fixings pack.
• Handles (x3) and fixings.
• Garden hose connector.

Contact your dealer immediately if any parts are missing or damaged.
Assembly. (Some models come pre-assembled).

Attaching the wheels .

1. Push the wheels over the axle, then secure in place using the provided
   flat washer and nyloc nut.
2. Repeat process for each of the four wheels.

NOTE: DO NOT overtighten the nuts as
the wheels must be free to rotate.

Attaching the handles.                                                       Figure 5

4. Bolt the two side and one end handles using suppled nuts
and bolts.
5. Locate side handles and line up bolts holes. Push bolts
through holes in frame then handle. Once the bolt is through
use the supplied washer, spring washer and nut to secure the
handle.
6. Locate end handle and follow similar procedure as 5
above.

                                                                             Figure 6

                                          Page 6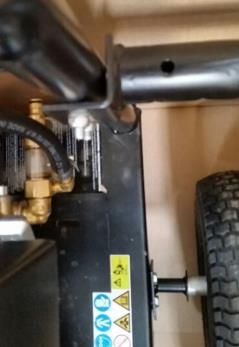
4. PRE-OPERATION CHECKS

Follow the checklist below before using the machine each time.
1. Check to ensure the engine oil is at the correct level. Use SAE 15W40 - API CH-4/CF/SJ/SL diesel
   engine oil or higher grade.
2. Make sure that all connection, nuts/bolts etc are tight and will not vibrate loose.
3. Add fuel to the diesel tank - regular diesel fuel.
4. Connect and tighten the garden hose to the garden hose connector.
5. Water must be turned on prior to starting the washer. Always pull the spray trigger to prevent
pressure build up and ensure water is moving through the hoses and out of the nozzle
without any leaks before starting the unit.
5. Review the safety guidelines in the manual prior to starting the unit.
6. If you have any issues operating the pressure washer, contact your dealer.

                             Always check the level of the engine and pump oil prior to starting
                             the washer.

         • Failure to do so could cause the engine and pump to seize if the oil is low or empty.

 Connect hose and water supply to pump before starting.

                              DO NOT start your pressure washer without the water
                              supply tumed on.

         • Failure to do so will result in damaging the pump from overheating
         and voiding the warranty.

Checking the engine oil level.
1. Turn the oil filler cap/dipstick anti-clockwise
and remove it from the oil filler tube, wipe the
dipstick with a clean cloth.
2. Insert the oil filler cap/dipstick back into the oil
filler tube and then remove it again. DO NOT
screw it in when doing this.
3. If the oil is low fill the engine oil sump to the edge
of the oil filler hole.                                                                        Figure 7
• We recommend the use of SAE30 - API CH-4/CF/SJ/SL
diesel engine oil or higher grade oil in this pressure
washer pump.
4. Replace the oil filler cap.
NOTE: Running the engine with
insufficient oil can cause engine damage.

                                                                                              Figure 8

                                                          Page 7
Checking the fuel level.
1. To check the fuel level open the fuel tank cap.
2. Just inside the fuel tank is a fuel strainer, check this
filter periodically and remove any contaminants which
may have accumulated.
3. Refuel in a well-ventilated area before starting the engine.
If the engine has been running, allow it to cool. Refuel carefully to
avoid spilling fuel. DO NOT fill above the fuel strainer shoulder.
4. After refueling, replace and tighten the fuel tank cap securely. Figure 9
Note: For any further information please use the engine manual for reference.
Always refuel in a well ventilated area away from any heat sources.
Allow the unit to cool down before refuelling.
DO NOT leave fuel within the reach of children.
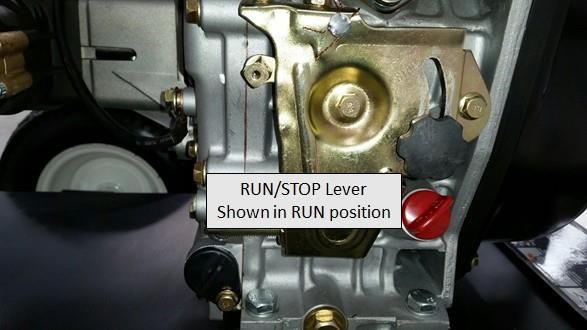
Pressure regulator.
When supplied the pressure regulator may be set to
minimum.
Turn the pressure regulator on the pump fully
clockwise to allow water pressure to build up when
the pressure washer is running.
You can reduce the pressure to the desired level to
suit the work application
Figure 10
Pump oil.
The pump is sealed and should not require attention except when unit is serviced.
Pressure washer terminology.
PSI = Pounds per square inch, the unit of measurement for water pressure.
GPM = Gallons per minute.
Bypass mode.
In bypass mode, the pump recirculates the water because the trigger of the spray gun is not being
pulled. If unit is left in bypass mode for more than two minutes, the water temperature will rise to a
dangerous level and could damage internal components of the pump.
NOTE: Any damage to pump due to these causes will not be covered under
warranty.
Thermal Relief Valve.
In an effort to prevent extreme damage, pumps are equipped with a thermal relief valve. This valve
will open when the temperature inside the pump rises too high. This valve will then release a gush
of water in an effort to lower the temperature inside the pump. Immediately after this occurs, the
valve will close.
Chemical Injection System.
Mixes cleaners or cleaning solvents with the pressurised water to improve cleaning effectiveness.
Page 85. HOW TO START YOUR PRESSURE WASHER
To start your pressure washer for the first time, follow these step-by-step instructions.
This starting information also applies if you have let the pressure washer sit idle for at
least a day.
1. Place the pressure washer near an outside water source capable of supplying water at a flow
rate greater than 14.4 litres per minute and no less than 20 PSI at pressure washer.
DO NOT siphon supply water.
2. Make sure unit is in a level position.
3. Connect garden hose to water inlet on pressure washer pump.
DO NOT run the pump without the water supply connected and turned on.
• Damage to the equipment resulting from failure to follow this instruction will void
the warranty.
4. Attach the wand extension to spray gun. Tighten by hand, DO NOT overtighten.
Figure 11
5. Choose desired nozzle, pull back the nozzle extension collar, insert nozzle and release collar.
Tug on the nozzle to make sure it is securely in place. See nozzle selection section.
Figure 126. Uncoil the high pressure hose and attach the quick connect end of hose to base of the
spray gun.
Pull down on the collar of quick connect, slide onto spray gun and let go of collar. Tug on
the hose to be sure of a tight connection. Some models may use a threaded hose
connector.
Figure 13
The high pressure stream of water that this equipment produces
can cut through skin and its underlying tissues, leading to
serious injury and possible amputation.
• NEVER connect a high pressure hose to the nozzle extension.
• Keep the high pressure hose connected to pump and spray gun while system is
pressurised.
• Always be certain the spray gun, nozzles and accessories are correctly attached.
7. Similarly, attach the other end of the high pressure hose to the high pressure outlet
(A) on the pump. Pull down on the collar of the quick connect, slide onto the pump
and let go of the collar. Pull on hose to be sure of tight connection.
*Some models may use a threaded hose connector.
8. Point the gun in a safe direction, turn the water supply on, then and squeeze the trigger to purge
the pump of air and debris. Do this for at least 30 seconds.
9. Do a visual check of all connections to make sure there are no leaks or loose connections.
IMPORTANT: If drawing water from a barrel, you should take the water from the
bottom of the barrel. Use ONLY cold water (less than 38°C/100°F).
10. Connect the garden hose to the water inlet tighten by
hand.
11. To start the machine by recoil, turn the ignition switch to the ON position. (Figure 1 item
17.)
Check to make sure fuel valve is in the ON position (Figure 2). Unscrew the knob, and
move the RUN/STOP (Figure 4) lever to the down position (Figure 3).
Gently pull recoil several times (Figure 1 item 16) until you cannot pull it anymore. With
both hands take a firm grip of recoil starter and pull the whole rope rapidly with both
hands.
12. Once the machine is running release water pressure by squeezing the trigger on the gun.
13. For electric start follow instructions from 1 to 10 & 12.
14. Unscrew the knob, and move the RUN/STOP lever to the down position. Turn the
key in a clockwise direction (against spring tension), once started release the key.
Page 10A running engine gives off carbon monoxide, an odourless,
colourless and poisonous gas.
Breathing carbon monoxide can cause headache, fatigue, dizziness,
vomiting, confusion, seizures, nausea, fainting and/or death.
• Operate the pressure washer ONLY outdoors.
• Keep exhaust gas from entering a confined area through windows, doors, ventilation
intakes, or other openings.
• DO NOT start or run the engine indoors or in an enclosed area, even if windows and
doors are open.
IMPORTANT: Before starting the pressure washer, make sure
you are wearing adequate and safe eye protection.
Risk of eye injury.
Spray can splash back or propel objects.
• Always wear safety goggles when using this equipment or in vicinity of
where equipment is in use.
• Before starting the pressure washer, be sure you are wearing appropiate eye
protection.
Starter cord kickback (rapid retraction) can result in bodily injury.
Kickback can pull hand and arm toward the engine faster than
you can let it go.
Broken bones, fractures, bruises, or sprains could result.
• NEVER pull the starter cord without first relieving spray gun pressure.
• When starting the engine, pull the cord slowly until resistance is felt and then pull
rapidly to avoid kickback.
• After each starting attempt, where the engine fails to run, always point the spray gun
in a safe direction and squeeze the spray gun trigger to release high pressure.
• Firmly grasp the spray gun with both hands when using high pressure
spray to avoid injury when the spray gun kicks back.
Page 11The high pressure stream of water that this equipment produces
can cut through skin and its underlying tissues, leading to serious
injury and possible amputation.
The spray gun traps high water pressure, even when engine is
stopped and water is disconnected, this high pressure if not
released correctly can cause injury.
• DO NOT allow children to operate pressure washer.
• NEVER repair high pressure hose. Replace it.
• NEVER repair leaking connections with sealant of any kind. Replace o-ring or seal.
• NEVER connect the high pressure hose to nozzle extension.
• Keep the high pressure hose connected to the pump and the spray gun while the
system is pressurised.
• ALWAYS point spray gun in a safe direction and squeeze the spray gun
trigger to release high pressure, every time you stop engine.
• NEVER aim spray gun at people, animals or plants.
• DO NOT secure the spray gun in open position.
• DO NOT leave spray gun unattended while the machine is running.
• NEVER use a spray gun which does not have a trigger guard in place and in working
order.
• ALWAYS be certain the spray gun, nozzles and accessories are correctly
attached.
Contact with the exhaust area can result in serious burns.
Exhaust heat/gases can ignite combustible structures or damage
fuel tank causing a fire.
• DO NOT touch hot parts and AVOID hot exhaust gases.
• Allow equipment to cool before touching.
• Keep at least 1.5m (5 feet) of clearance on all sides of pressure washer including
overhead.
6. HOW TO SHUT DOWN YOUR PRESSURE WASHER
1. Release the spray gun trigger and let the engine idle down.
2. Turn the ignition switch to the OFF position (Figure 1 item 16).
3. Release the locking knob on the RUN/STOP lever (Figure 4) and move it up
to the STOP position
3. ALWAYS point the spray gun in a safe direction, squeeze the trigger
to release retained high water pressure.
IMPORTANT: The spray gun traps high water pressure, even when
engine is stopped and water is disconnected. Couplings will not release
if under pressure.
Page 12The high pressure stream of water that this equipment produces
can cut through skin and its underlying tissues, leading to serious
injury and possible amputation.
The spray gun traps high water pressure, even when engine is
stopped and water is disconnected, which can cause injury.
Keep the high pressure hose connected to pump and spray gun while the system is
pressurised.
•ALWAYS point the spray gun in safe direction and squeeze the spray gun trigger
to release the high pressure, every time you stop engine.
7. QUICK RELEASE NOZZLES
Figure 14
The quick-release on the lance allows you to switch between five different quick-release
nozzles.
The nozzles can be changed while the pressure washer is running once spray the gun
trigger safety lock is engaged.
The different nozzles vary the spray pattern as shown above.
The high pressure stream of water that this equipment produces
can cut through skin and its underlying tissues, leading to serious
injury and possible amputation
• NEVER change nozzles without the trigger safety lock engaged on the spray gun.
• DO NOT twist nozzles whilst spraying.
Page 13Follow these instructions to change the nozzles:
1. Pull back the collar on the quick connect and pull current nozzle off. Store the nozzles in holder
provided on the handle. Storing nozzles in the designated holder will help prevent debris
clogging the tip.
2. Select desired nozzle:
• For a gentle rinse, select white 40° nozzle.
• To scour surface, select red 0° or yellow 15° nozzle.
• To apply detergent, select black nozzle.
3.Pull back on the collar, insert the new nozzle and release the collar. Tug on the nozzle to
make sure it is securely in place
8. USAGE TIPS
• For most effective cleaning, keep the nozzle away from cleaning surface at a ddistance of
between 8 & 24 inches (203mm & 610mm).
• If you let a high pressure nozzle get too close to the surface being cleaned it may be damaged.
To apply detergent, follow these steps:
1. Fit the black soap nozzle.
2. Prepare the detergent solution as required by job.
3. Place the small filter end of detergent siphoning tube into detergent container.
Make sure the filter is fully submerged in detergent while applying
detergent.
This washer will only draw soap with the black soaper nozzles. The the
white, red and yellow nozzle WILL NOT draw soap.
4. Make sure the black nozzle is installed.
5. Make sure the garden hose is connected to the water inlet. Check that the high pressure hose is
connected to the spray gun and pump. Turn on the water.
You must attach all hoses before you start the engine.
• Starting the engine without all the hoses connected and without the water turned ON
will damage the pump. Damage to the equipment resulting from failure to follow this
instruction will void the warranty.
6. Start the engine following instructions in the 'Starting Your Washer' section.
7. Apply detergent to surface, using long, even and overlapping strokes.
Page 148. Allow detergent to "soak in" for 5 minutes before washing and
rinsing. Re apply as needed to prevent the surface from drying.
DO NOT allow detergent to dry on.
IMPORTANT: You must flush the detergent siphoning system after each
use by placing the filter into a bucket of clean water, then run the
pressure washer in low pressure for 1-2 minutes.
Chemicals can cause bodily injury and/or property damage.
• NEVER use caustic liquid with pressure washer.
• Use ONLY pressure washer safe detergent/soaps. Follow all manufacturers
instructions.
Page 159. TROUBLESHOOTING
If you have checked all the possible cause listed and you are still experiencing the
problem, contact your dealer.
Problem Cause Correction
1. Replace with high pressure
1. Low pressure spray tip
spray tip.
Unit has installed.
2. Clear inlet.
following 2. Water inlet is blocked. 3. Provide adequate water
problems: 3. Inadequate water supply. flow.
Failure to 4. Inlet hose is kinked or leaking. 4. Straighten or repair inlet hose,
produce 5. Clogged inlet hose screen. patch
pressure, erratic 6. Water supply is over 1OO°F
5. Check and clean inlet hose
pressure, (38°C).
screen.
chattering, loss 7. High pressure hose is blocked
6. Provide cooler water supply.
of pressure, low or leaks.
7. Clear blocks in outlet hose.
water volume. 8. Spray gun leaks.
8. Replace spray gun.
9. Spray tip is obstructed.
9. Clean spray tip.
10. Pump is faulty.
10. Contact your dealer
1. Detergent siphoning tube is 1. Insert detergent siphoning
not submerged. tube into detergent.
Detergent fails to 2. Detergent siphoning tube/ 2. Clean or replace filter/
mix with spray. filter is clogged or cracked. detergent siphoning tube.
3. High pressure spray tip 3. Replace with low pressure
installed. spray tip.
Engine lacks 1. Dirty air filter. 1. Replace air filter.
power.
1. Turn throttle lever to ON
1. Throttle lever on/off switch position.
Engine will in OFF position. 2. Fill fuel tank or turn on fuel
not start. 2. No fuel in engine. supply.
3. Pressure build up in pump. 3. Squeeze trigger on spray
lance.
1. Engine not level or engine 1. Place engine on level surface
Units with oil
oil level too low. or fill with SAE 15W40 - API
alert.
CH-4/CF/SJ/SL diesel engine oil
or higher grade
Page 16Engine runs well
at no load but 1. Engine speed is too slow. 1. Adjust throttle lever back to
"bogs" down full throttle.
under full load.
Engine will not 1. Low oil level. 1. Fill to proper level.
start; or starts 2. Dirty air cleaner. 2. Clean or replace air cleaner.
and runs rough. 3. Out of fuel. 3. Fill fuel tank.
Engine shuts
1. Out of fuel. 1. Fill fuel tank.
down during
2. Low oil level. 2. Fill with oil, to proper level.
operation.
Engine lacks
1. Dirty air filter. 1. Replace air filter.
power.
Problem Cause Correction
No low pressure 1. Using wrong nozzle.
2. Siphon hose or filter is 1. Insert black soaper nozzle.
detergent
blocked. 2. Unblock siphon hose.
delivery
1. Check supply hose, tap and
inlet water filter. It must be
1. Restricted or insufficient connected to water source
Unit does not water supply. which provides 14.4 litres per
reach required 2. Unsuitable or worn out minute and no less than 20 PSI.
pressure nozzle. 2. Replace nozzle.
3. Regulator set too low. 3. Reset unloader by turning
knob (clockwise increases
pressure).
Thermal relief 1. Water temperature is too
valve is open and high. 1. Use cool water only.
discharging water 2. Pump has been operating for 2. Pull trigger at least 30
from side of seconds every 3 mins.
pump. 3 mins without pulling trigger.
1. Water leak in high pressure 1. Tighten hose fittings, replace
Leak in the
fittings, hose or gun. hose or gun. If problem
fittings.
continues, contact your dealer.
1. To gauge the oil level, look
directly into the sight glass. Oil
Pump oil is low. 1. Normal use consumes oil level should always be at the
over time. center dot. DO NOT overfill.
Replace with 30W non
detergent mineral oil.
1. Seals have worn from use 1. Return unit to local dealer to
Oil is milky color. have seals replaced.
and water has leaked in.
Page 1710. WINTER STORAGE
You must protect your unit from freezing temperatures.
• Failure to do so will permanently damage your pump and render it inoperable.
• Damage caused by the effect of freezing are covered under warranty.
To protect the unit from freezing temperatures:
1. Use a pump saver to treat the pump. This minimises freeze damage and lubricates pistons
and seals. Contact your dealer for a pump saver solution.
2. If pump saver is not available, connect a 1 metre section of garden hose
to water inlet adapter. Pour RV-antifreeze (antifreeze without alcohol) into the hose. Pull the
recoil handle twice. Disconnect the 1 metre hose.
3. Store the unit in a clean, dry area (heated area preferred).
Long term storage.
If you DO NOT plan to use the pressure washer for more than 30 days, you must
prepare the engine and pump for long term storage.
Other storage tips.
1. DO NOT store fuel from one season to another.
2. Replace fuel container if it starts to rust. Rust and/or dirt in fuel can cause problems if
it's used with this unit.
3. Cover the unit with a suitable protective cover that does not retain moisture.
4. Store the unit in a clean and dry area.
Storage covers can be flammable.
• DO NOT place a storage cover over a hot pressure washer.
• Let the equipment cool for a sufficient time before placing the cover on the equipment.
Page 1811. MAINTENANCE
NOTES
Only use parts supplied by the manufacturer in order to reduce the risk of
damage to the machine.
Before servicing make sure that the machine is completely switched off and
make sure that there is good ventilation in the area.
ENGINE OIL REPLACEMENT.
Draining the engine oil whilst the engine is still hot ensures that drainage is
quick and easy.
Remember to check the drain plug is securely fastened after draining.
When disposing of oil containers please do so at a recycling/amenity centre
for environmental reasons.
Page 1912. SPECIFICATION
Model HYW4000DE
Battery. 36ah
Engine. Hyundai D500E, Forced Air- cooled, OHV.
Displacement cc. 498
Power hp/kw. 12hp 9.6kW
Fuel type. Diesel.
Fuel tank capacity L. 5.5
Start method. Recoil & Electric.
Maximum engine speed rpm. 3600rpm
Lubrication oil. SAE 10W/30 or 15W/40 API CH-4/CF/SJ/
SL diesel engine oil or higher grade).
Lubrication oil capacity 1.75L
(Litres) Max flow rate 900L/hour, 15L/minute
Pump type. Annovi Reverberi RSV4G40 Triplex Pump
Max pressure 4000psi / 275bar
13. CONTACT DETAILS
Postal address.
Genpower Limited, Isaac Way, Pembroke Dock, Pembrokeshire,
SA72 4RW, UK.
Telephone/Fax conatct numbers.
Office +44 (0) 1646 687880
Fax +44 (0) 1646 686198
E-mail contacts.
aftersales@hyundaipowerproducts.co.uk
Web Site.
www.hyundaipowerproducts.co.uk
Page 2014. DECLARATION of CONFORMITY
Page 21Page 22
Page 23
Importer:
GENPOWER LTD
Isaac Way, London Road
Pembroke Dock, UNITED KINGDOM, SA72 4RW
T: +44 (0) 1646 687 880 F: +44 (0) 1646 686 198
E: info@hyundaipowerproducts.co.uk
www.hyundaipowerproducts.co.uk

Imported/Distributed by GENPOWER LTD for The United Kingdom & Ireland

                                                   Licensed by Hyundai Corporation, Korea
You can also read