Valentine's Day Science Experiment Guide
←
→
Page content transcription
If your browser does not render page correctly, please read the page content below

Valentine’s Day Science
     Experiment Guide

Valentine’s Day is all about love, hearts, friendship, love notes, candy, flowers… but there’s something missing.
That’s right… the science connection! Sure, there’s lots of research about the science of love, but that’s not what
this kit is about. We’re talking about the science of the love connection. Is there a way you can tell if someone likes
you? Do you have chemistry with a secret admirer? Is there a spark of electricity with that someone special? Are you
“hot” or not? Learn how to use some of the coolest science activities ever to turn this Valentine’s Day into the
biggest nerd fest this side of the Mississippi… or maybe just your side of the street.

Making Learning Fun
Great teachers (and parents) never miss the opportunity to create a learning experience out of something that kids
love. That’s exactly what this kit is all about… connecting some fun science with a fun holiday. The activities all
have a great “gee-whiz” factor while introducing children to some cool scientific principles in a sneaky way. It’s
important to read through the brief instructions that accompany each activity to get the “flavor” and story before you
begin.

A Word About Safety
Everything in this kit has been thoroughly tested and is not considered to be hazardous if used with adult
supervision. That’s right... the activities in this kit require adult supervision. This kit is not intended to be popped
open and tossed at a kid with the instruction, “Have fun.” Instead, you might want to use this opportunity to interact
with a few ankle-biters and learn a little science at the same time. We guarantee that your young scientists will get a
lot more from the experience if you’re there to guide them.

Remember that this is a science kit and science can be messy. There are liquids, so you will get wet. Stuff falls on
the floor... so you’ll need to clean it up so people don’t slip and fall. Don’t put chemicals in your eyes or ears and
don’t eat your experiment. Trust us, they don’t taste good and it’s a bad thing to do. The bottom line is that this
science kit requires adult supervision and common sense – simple concepts that help ensure a fun and safe
experience.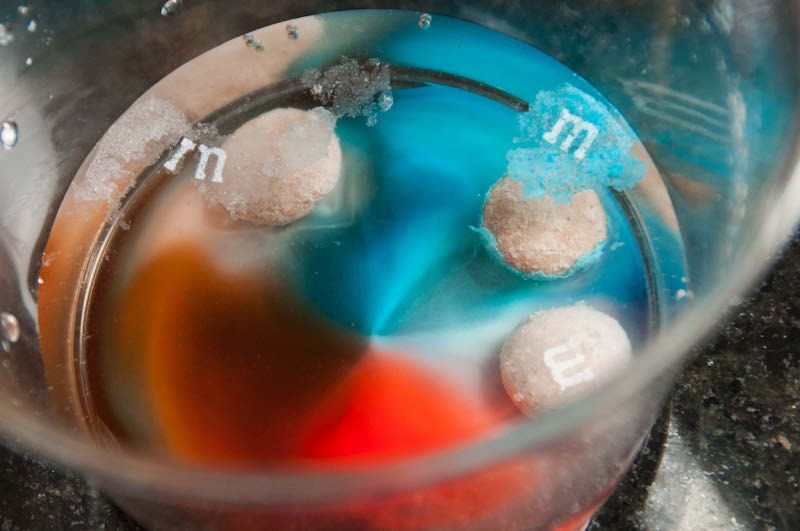
Love Meter 3000
You might have heard the phrase, “They’re hot!” but there is really no way to scientifically
prove if that person is actually hot or not. Now all of that has changed--introducing the Love
Meter 3000 (a.k.a. the Hand Boiler, but the name “Love Meter” sounds so much better).
This amazing piece of scientific-looking lab equipment will help you determine whether a
person really is hot or not.

When you place your hand around the large glass bulb on the bottom of the Love Meter
3000, you'll see the colorful liquid begin to shoot up the twisting, turning glass tube… if
you’re hot. Once the liquid reaches the top, it begins to boil. That’s right, you’re that hot.
What does it mean if you hand the Love Meter 3000 to someone and the liquid doesn’t shoot
to the top and boil? You guessed it… not hot.

Here’s What You’ll Need...
    •    Hand Boiler
    •    Someone with a good sense of humor

Let’s Try It!
    1.   Carefully remove the ornately twisted glass from the box. This is extremely
         delicate – handle it with care.
    2.   Gently wrap your hands around the bottom section that holds the liquid. In just a
         few seconds, you should see the liquid begin to move up the tube, ending up in the
         top bulb where it will “boil.”
    3.   Once all of the liquid is at the top, gently wrap your hand around the top bulb while
         taking your hand off of the bottom bulb. The liquid will flow back down to the
         bottom section. Hmmm… how does this work?

                              Professor Cupid’s Science Secret
                              The secret is nothing more than using your body temperature to raise the temperature
                              of the liquid in this closed container. The Love Meter 3000 (a.k.a. the Hand Boiler) is
                              made of thin glass that is very fragile. The liquid inside the glass container is typically
                              a substance like methylene chloride or another solvent with a boiling point that is at or
                              below body temperature – 98.6ºF. When the liquid and the surrounding gas in the
                              bottom bulb is heated by your hand, the increase in temperature creates an increase in
                              vapor pressure, which pushes the liquid up the tube to the top bulb. Scientifically
                              speaking... in a closed container, as the temperature goes up, so does the pressure. This
                              is called Charles's Law.

                              So the liquid at the top is heated to the point of boiling, right? Actually, the liquid isn’t
                              boiling at all! When the heated gas pushes all of the liquid out of the bottom chamber,
                              air bubbles are forced up the tube. The boiling effect is actually just bubbles of air
                              being forced up from the bottom chamber. Ahhh… love can be a tricky thing.

Once the liquid has moved to the top, wrap your “hot” hand around the top chamber while letting go of the bottom.
This repeats the process of heating the liquid and the gas, but this time in the top chamber. The liquid and gas get
pushed back down.

This doesn’t work on all people! That’s right, some people have cold hands (yes, it might be you) and the
temperature of their skin just isn’t warm enough to heat the gas in the bottom chamber. That’s why this activity is so
much fun on Valentine’s Day. You can find out who’s hot and who’s not... literally speaking.

                                    ©2021 Steve Spangler Inc | SteveSpangler.com | 855-228-8780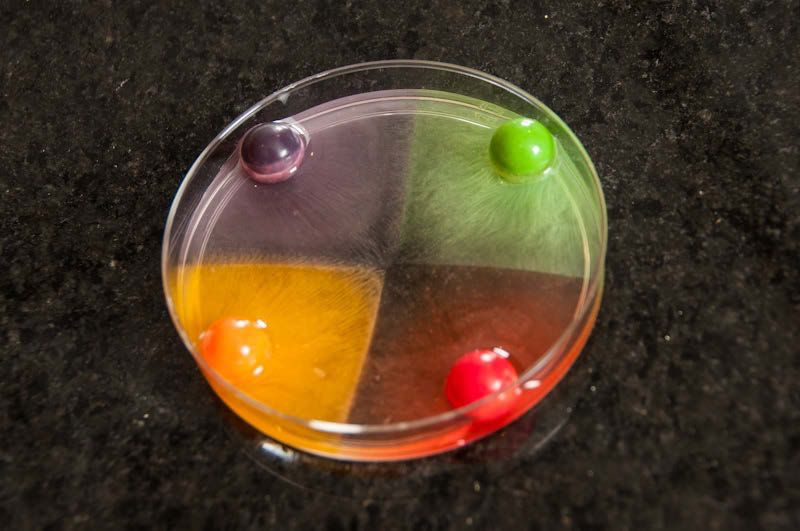
Ohhh! Ahhh! Paper
Let’s face it… most paper is boring. Sure, some papers have
some fun colors or textures, but that’s not very cool. Now
imagine what would happen if you went beyond a standard
Valentine’s card and wrote your special someone a note on a
piece of paper that magically changed color while they were
reading it. You can totally do that with this amazing Ohhh!
Ahhh! Paper.

Here’s What You’ll Need...
    •    Pink sheets of Ohhh! Ahhh! Paper
    •    Pens, markers, crayons, etc.

Let’s Try It!
    1.   Place one sheet of Ohhh! Ahhh! Paper on your hand,
         with the pink side up. Don’t take your eyes off of the
         paper or you’ll miss what makes it so special.
    2.   Within a few seconds you should start to notice
         something change. You can see the outline of your
         hand through the paper! Notice how the paper changes
         color wherever your hand touches it.
    3.   Now it’s up to you to write the best, most creative
         Valentine’s note ever on the coolest paper around. Get
         ready for a double-whammy!

Professor Cupid’s Science Secret
This paper is more commonly referred to as Heat Sensitive
Paper because it changes color as the temperature changes. The
secret comes from a special thermochromic ink that is used to
color the paper pink. The ink contains a pigment that goes from
pink to colorless at about 86ºF. That’s why the paper changes
color when you touch it (your body is 98.6ºF). There are many
uses for thermochromic inks, from color-changing labels on
food, to novelty items like coffee cups and soda cans, to
children’s toys. We like using it to make über-special Valentine’s
Day items.

                                                                                Take It Further! - Smooth Moves
                                                                                Have some fun with the thermochromic
                                                                                properties of Ohhh! Ahhh! Paper. Design your
                                                                                super-special love note... er... Valentine’s card,
                                                                                and give it to your crush. Tell them that you
                                                                                found a special paper that loses its pink color
                                                                                when the paper comes in contact with true
                                                                                love. Watch the look on their face as the
                                                                                thermochromic ink goes white, right before
                                                                                their eyes, just by touching it!

                                    ©2021 Steve Spangler Inc | SteveSpangler.com | 855-228-8780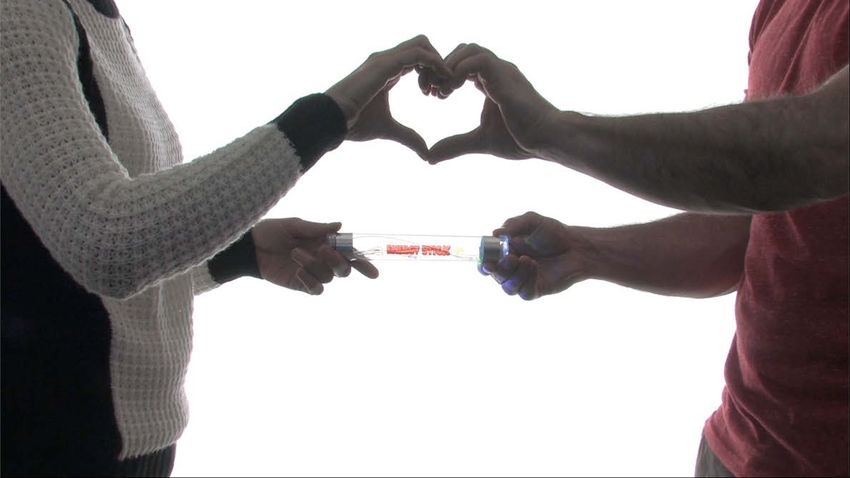
Borax Crystal Heart
Hearts are an amazing thing... especially when it comes to love. We can even prove it with science! It’s obviously a
little dangerous to let you mess around with an actual heart (not to mention all of the red tape), so we’ll teach you
how to make a heart that’s just as beautiful and unique as you using chemistry.

Here’s What You’ll Need...
    •    Pipe cleaners (red, if possible)
    •    String or yarn
    •    Wide-mouth jar or glass
    •    Borax (check the laundry section)
    •    A pencil
    •    Boiling water
    •    Red food coloring
    •    Scissors

Let’s Try It!
    1.   Create a heart out of a pipe cleaner. You can make your heart as unique as you want, just make sure that it
         will fit in the mouth of your jar or glass. Using a red pipe cleaner is going to be best, you know... because
         hearts are red and that means love. Stuff like that.
    2.   Cut a length of string or yarn and tie it to the pipe cleaner heart. Tie the other end of the string to the pencil.
         You want the heart to dangle into the jar, but not to touch the bottom. Adjust the length of your string
         accordingly and remove your apparatus from the jar.
    3.   Boil a pot of water and pour it into your jar. Add 3 tablespoons of borax per each cup of water you put in
         your jar and stir up the solution. It’s perfectly okay if some of the borax settles to the bottom of the jar.
    4.   Add a few drops of red food coloring (again... love, hearts, etc.) to your borax solution. The more drops you
         add, the more vivid your final product will be... just don’t go overboard.
    5.   Hand the pipe cleaner heart into the jar with the pencil resting on the mouth of the jar. Make sure that
         enough water has been added to completely submerge the heart.
    6.   Now the waiting begins. It’s just like Phil Collins (look him up) always said, “You can’t hurry love. No,
         you’ll just have to wait.” It’s not too long of a wait, though. Just let the heart sit in the borax solution
         overnight.
    7.   The next day, check out your gorgeous crystal heart. Gently, and carefully, pull the heart out of the jar. The
         result is a beautiful, one-of-a-kind heart... just like the one in your chest.

Professor Cupid’s Science Secret
So, you put a pipe cleaners that had been twisted into a heart shape into a solution of borax and water. How in the
world did it turn into this beautiful crystal heart? When you mixed the borax in with the water, you created a
suspension. A suspension is a mixture that contains solid particles large enough to settle out. By mixing the borax
into hot water, instead of room temperature or cold water, the borax stays suspended longer within the water.

As the borax begins to settle out, or sediment, it begins to crystallize. You'll see this crystallization on both the
bottom of the jar and, you got it, on your heart. The borax continues to sediment on top of the heart and on top of
other borax crystals until you pull it out of the water the next morning.

                                     ©2021 Steve Spangler Inc | SteveSpangler.com | 855-228-8780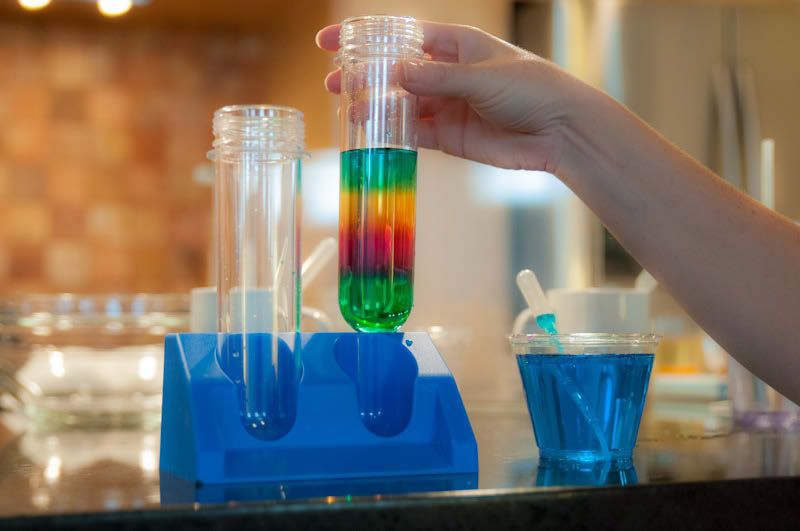
Color-Changing Carnations
Presenting your loved one with a beautiful bouquet of flowers is a must on Valentine’s Day, but the scientist in you
can’t help but wonder about the meaning of each of the colors. For example, a red rose can mean love and passion,
while a black rose can signify obsession. The practice of attaching meanings to the colors of flowers is also a long-
honored tradition in almost every culture. Here are just a few examples…

RED is most commonly associated with love, desire, and passion. Red
flowers when given in various numbers can mean anything from "I love
you," to "Will you marry me?" Yikes... you have to be careful with those!

                                                                     The PINK flower can signify a teasing interest, grace,
                                                                     gentility, and happiness.

A GREEN flower is great for someone who you think is very in
touch with nature, or it can be used to wish someone good fortune
and health.

ORANGE screams excitement and enthusiasm. An orange flower is a bold statement of color and vitality.

YELLOW flowers simply make people smile. It is the color of friendship, joy, and lightheartedness.

                                                          Other colors include PURPLE, a traditional color of royalty,
                                                          pride, or success. LAVENDER also means royalty, but with a
                                                          youthful exuberance and tenderness. BLUE flowers offer a
                                                          sense of calm, dignity, and serenity, while WHITE flowers
                                                          symbolize purity and innocence.

In the following activity, you’ll learn how to change the color of a real white carnation into any color you like. Once
you understand the anatomy of a carnation, you’ll be able to use the Jumbo Test Tubes in your kit to “split” a single
white carnation into two colors.

                                    ©2021 Steve Spangler Inc | SteveSpangler.com | 855-228-8780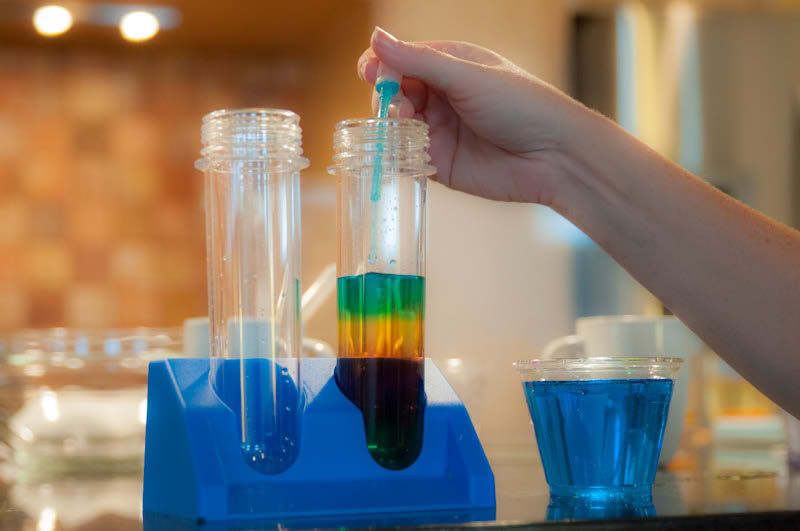
Here’s What You’ll Need...
                                                            •     Three real white carnations
                                                            •     Two vases or glasses
                                                            •     Scissors
                                                            •     Water
                                                            •     Food coloring

Let’s Try It!
    1.   Fill each of the Jumbo Test Tubes half-full with water and add 20-30 drops
         of food coloring to each container. It’s a good idea to select two different
         colors to observe the differences later.
    2.   Before placing a flower in the colored water, use scissors to trim the stem
         of the flower at an angle, creating a fresh cut. When cutting flowers, it is
         important for the stem tubes to be filled with water. If air gets in the tube,
         no water can move up the stem. Many gardeners and florists cut stems
         underwater to avoid the possibility of air bubbles breaking the tube’s water
         flow.
    3.   Place a freshly cut white carnation in each of the test tubes. What do you
         think will happen? Over time, the carnation’s white petals will turn…?
         Save the remaining carnation for the next step.
    4.   Another popular trick is called “Split Ends” and requires some fancy
         cutting of the stem. Have an adult use a sharp knife or a really good pair of
         scissors to slit the stem straight down the middle. The goal is to split just
         enough of the stem to allow one side to go into each of the test tubes. If all
         goes as planned, the white carnation will take on a “split personality.”

                           Professor Cupid’s Science Secret
                           Now it's time to get technical. There are two things that combine to move water through
                           plants -- transpiration and cohesion. Water evaporating from the leaves, buds and petals
                           (transpiration) pulls water up the stem of the plant. This works just like sucking on a
                           straw. Water that evaporates from the leaves "pulls" other water behind it up to fill the
                           space left by the evaporating water, but instead of your mouth providing the suction it is
                           due to evaporating water. This can happen because water sticks to itself very well (called
                           water cohesion) and because the tubes in the plant stem are very small (in a part of the
                           plant called the xylem). This process is called capillary action. Coloring the water with
                           food coloring does not harm the plant in any way, but it allows you to see the movement
                           of water through the roots to the shoots. Splitting the stem simply proves that the tiny
                           tubes in the stem run all the way from the stem to the petals of the flowers.

                                     ©2021 Steve Spangler Inc | SteveSpangler.com | 855-228-8780
The Love Connection
“There was an intense electric feeling the moment our eyes met!” Really?!? Sometimes love makes you say the
craziest things. Seriously though, how can a relationship last if there’s no “spark” of excitement? Luckily for you,
there’s a device to test your “love connection,” and it’s called the Energy Stick.

Here’s What You’ll Need...
    •    Energy Stick
    •    A friend... or two... or 20

Let’s Try It!
    1.   At first glance, this contraption looks
         like a bunch of wires surrounded by a plastic
         tube. In reality, it’s an example of an open electrical circuit, and
         the foil on each end of the tube is a conductor. The goal is to use your body to
         complete the circuit. Once that happens you’ll be rewarded with flashing lights and a buzzing alarm.
    2.   To find out if your body is a conductor of electricity, place each of your hands on opposite ends of the
         Energy Stick. Make sure that you make contact with the foil. Whoa! You immediately know that you’ve
         succeeded.
    3.   Obviously, you’re connected to yourself... now it’s time to test your love connection with someone else.
         Have a friend (or special someone) hold onto one end of the Energy Stick while you hold the other end.
         Complete the circuit by holding hands. If the lights and alarm goes off, there’s definitely a love connection.

Professor Cupid’s Science Secret
By now you’ve probably discovered that everyone makes the connection. Electricity is defined as the flow of
electrons through a circuit (and circuit is based upon the word circle). In order for the Energy Stick to become
activated, the two ends must be connected in a circle by something that allows electrons to flow through it. The
Energy Stick's sensing circuit is so sensitive that it can detect even the tiniest flow of electrons through the moisture
on your skin.

That's awesome, but did you know that you can do the same thing with an entire circle of people? It's true! Gather
up a few friends or a large group of people and have them hold hands in a circle. Have one participant hold one
electrode and the person next to him or her hold the other electrode. If everyone in the circle is holding hands, the
Energy Stick will do its magic. As soon as someone breaks the circle it will stop. How many people can you get to
complete the circuit? 20? 50? With a little creativity and a good story, you can use the Energy Stick to illustrate
almost anything… even a love connection!

                                       ©2021 Steve Spangler Inc | SteveSpangler.com | 855-228-8780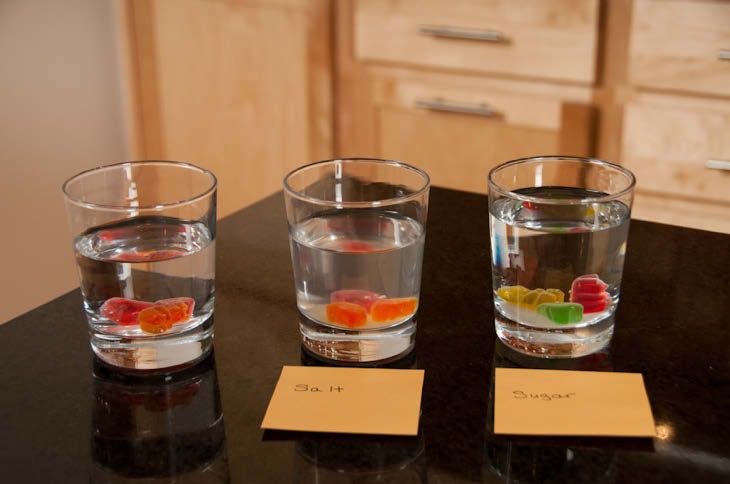
Dancing Conversation Hearts
Conversation Hearts are a staple of Valentine’s Day. Who doesn’t remember the first time a cute classmate passed
them a pastel yellow heart that read, “BE MINE.” These tasty little candies can do more than flirt... they can dance,
too! So go ahead - grab some conversation hearts, crank up the music, and get ready to break it down with hearts
that say, “YOU’RE CUTE,” and, “CALL ME.”

Here’s What You’ll Need...
    •    Candy Conversation Hearts
    •    Clear drinking glasses
    •    Clear carbonated beverages

Let’s Try It!
    8. Fill a clear drinking glass with a clear, carbonated beverage like Sprite, 7-Up, or Tonic Water.
    9. Drop 10-15 Conversation Hearts into the glass with the soda.
    10. Don’t take your eyes off of those hearts! Are the moving? You bet your sweethearts they are! In fact,
        they’re floating, sinking, bobbing, and bubbling.
    11. Want to go even further? You can test up a bunch of glasses with different types of clear carbonated
        beverages. Toss in some Conversation Hearts to test which beverage provides the best dancing atmosphere
        for those hearts.

Professor Cupid’s Science Secret
The Conversation Hearts will bob up and down for several minutes. This “heart dance” is captivating to watch.
Since the surface of the Conversation Hearts is rough, tiny bubbles of carbon dioxide gas are attracted to it. These
bubbles increase the volume of the heart substantially, but contribute very little to its mass. As a result, the overall
density of the heart is lowered, causing it to be carried upward by the more dense fluid surrounding it.

Once the Conversation Hearts reach the top, the bubbles pop upon exposure to the air. This makes the Conversation
Hearts more dense, causing them to sink. As more bubbles adhere to the Conversation Hearts, the density of the
hearts decreases and they rise to the surface again. This experiment very clearly shows that an increase in volume (as
long as the mass increase is negligible) will lead to a decrease in density. The bubbles that attach themselves to the
Conversation Hearts are like little life jackets that make the Conversation Hearts more buoyant by increasing their
volume.

                                     ©2021 Steve Spangler Inc | SteveSpangler.com | 855-228-8780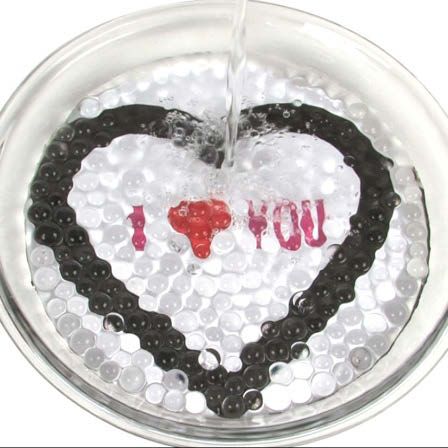
Fortune Telling Fish
When you’re searching for answers to your future, where do you turn? You might go for a fortune cookie, but there’s
no science behind it. You’re just breaking open a sugary treat and reading your lottery numbers... er... your fortune.
What if there were something similar that incorporated signals from your body to ultimately predict your fate?
Luckily, we found just the thing: Fortune Telling Fish. Place the fish in the palm of your hand and watch carefully as
it twists, turns, and curls up. The outcome of your life is resting in your hand!

Here’s What You’ll Need...
    •    Fortune Telling Fish

                                                                       Let’s Try It!
                                                                           1.    Unwrap a single Fortune Telling Fish from its
                                                                                 paper wrapping. You'll soon realize that
                                                                                 Fortune Telling Fish aren't actually live fish.
                                                                                 (How would they live in those paper wrappers,
                                                                                 anyway?)
                                                                           2.    Place the single Fortune Telling Fish on the
                                                                                 palm of your hand. Within a matter of seconds,
                                                                                 you'll see the fish start to curl, wiggle, and
                                                                                 writhe around on your hand.

On the wrapper, you'll notice that the Fortune Telling Fish come with a guide to help you understand what the fish's
movements mean. What is the Fortune Telling Fish saying about you?

Professor Cupid’s Science Secret
News flash! The Fortune Telling Fish isn't alive.
However, the little red fish wiggles and squirms once
it touches your hand. If you guessed that the fish is
made out of a heat sensitive material, you would be
wrong… but it was a great try. Instead, the fish is
made out of a super thin material called cellophane,
and it’s not heat that makes the fish move… it’s the
moisture in your skin.

Cellophane is a hygroscopic material. "Hygro" means water, and "scopic" means to find, making cellophane a
"water-finding" material. This water-finding property means that the cellophane fish seeks out and absorbs the
moisture from the surface of your palms. Since the palms of human hands have a lot of sweat glands, the cellophane
is immediately successful in finding moisture to absorb. As the cellophane absorbs the moisture, the material swells
which causes the fish to curl up and away from the palm of your hand. The wiggling effect comes from the light-
weight nature of cellophane that makes it very susceptible to even the slightest of air currents. What happens if the
person testing out the Fortune Telling Fish has very dry skin? That’s right… nothing happens at all. Without
moisture the fish remains flat... the classic “dead fish.”

Don’t overlook all of the cool science that you can test out using this simple little toy. If someone guesses that the
fish moves because of heat, it’s easy to set up a test between two surfaces – one hot and the other cold. Of course,
you know that the secret is moisture and not heat, but this is still a great way to make the discovery.

Try setting Fortune Telling Fish on different areas of your body like the tops of your hands, your arms, or even the
tops of your feet. The different amounts of sweat glands and moisture can have direct effects on how the fish react.

                                     ©2021 Steve Spangler Inc | SteveSpangler.com | 855-228-8780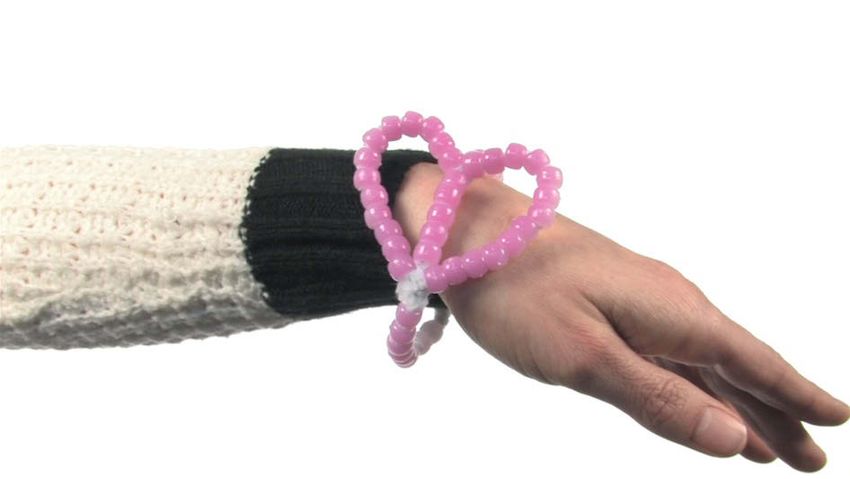
Science Jewelry - A Valentine’s Day Bracelet
Lovers stroll through the park, hand in hand, only to discover that their newly fashioned science jewelry is changing
color! Yes, love is in the air… or at least hidden in the energy of the sun! These are one-of-a-kind bracelets that will
have the love of your life gasping with joy and wonder. Truly, the only thing that would make this activity better is
to deliver your jewelry creation in one of those blue boxes (insert your favorite Tiffany’s reference here).

Here’s What You’ll Need...
    •     UV Color Changing Beads
    •     Pipe Cleaners

Try It!
    1.    It’s best to start this activity indoors, away from any sunlight.
          Thread a few beads onto a pipe cleaner (or you can use a piece of
          string or leather rawhide for a more permanent bracelet). If you are
          going to make all 30 bracelets, each bracelet will have 5 beads.
    2.    Twist the pipe cleaner into a bracelet that goes around your wrist.
    3.    It’s time to step outside and see if it’s really true that love is in the
          air. Don't take your eyes off the beads. Like magic, the beads
          change from white to red.
    4.    The final test is to see if the color vanishes from the beads when you
          go back inside. Don’t worry... they’ll change back and forth about
          50,000 times!

If you aren’t the bracelet type, it’s easy to thread the beads onto the pipe
cleaner and bend it into the shape of a heart or any other decoration. Then
you can attach your decoration to whatever you want!

Professor Cupid’s Science Secret
You may have guessed that the scientific secret is not actually love in the air, but instead it’s hidden energy in the
light of the sun. This magical energy is called ultraviolet light (or UV light). The beads contain a pigment that
changes color when exposed to ultraviolet light from any source, including the sun. When you’re indoors, the beads
are normally white (unless there’s some UV light sneaking in from outside or you have light bulbs that give off a
little UV light). In UV light, you will see the beads change color almost instantaneously.

Believe it or not, you can use these beads to test the effectiveness of your sunscreen. Try placing your bracelet (or
just a few loose beads) in a zipper-lock bag and smear sunscreen on the outside of the bag. Place some more beads
in a second zipper-lock bag without sunscreen and expose both bags to the sun. It’s easy to see that the beads
protected by the sunscreen were much more pale-colored than the unprotected beads.

                                      ©2021 Steve Spangler Inc | SteveSpangler.com | 855-228-8780
Secret Message Love Notes
When it comes to writing a love note for someone special, you should aim for being cutting edge, getting creative,
and making your Valentine smile. That’s why you should write them a love note with a secret message that requires
the heat from a candle to decode it... candles are so romantic! Your crush won’t believe their eyes, and it’s a great
way to pass messages in class without getting in trouble (just don’t tell anyone
that we taught you how).
Here’s What You’ll Need...
• Friction pens
(You can usually find them at office supply stores)
• Regular ink pens
• Lighter or matches
• Candle
The Cover-Up Message
This is the ultimate love note when you want to have a little fun with your
special someone.
1. Using a regular ink pen, write out your love note, exactly how you
want it to be read.
2. Now, you need to disguise the letters of your love note with the
friction pen. Turn the letters into shapes, symbols, or whatever you
want... just make sure that the note is indecipherable.
3. Make sure to provide the recipient of your note with directions on how
to decode it, otherwise they’re going to think your incredibly weird
(not that there’s anything wrong with that). Tell your crush to use a
lighter or candle (with adult supervision, of course) to heat the paper
without lighting it on fire. The heat from the flame will cause the
portion of your note written in friction pen to disappear and reveal
your true Valentine’s message.
Passing Notes in Secrecy
If you’re more of a daredevil, you might try passing one of these notes in class. Don’t worry, it’ll be our little secret.
1. To make this type of message work, you’ll need a bit more time. You’ll also need to be very precise with
both the regular ink pen and friction pen.
2. Decide what you want your message to be, then write a larger, different message around it. Use the note
below as an example. The underline parts would be written in regular ink, while the rest would be written
in friction ink.
“Mrs. Williams is youthful and
going to be, without a doubt
and without a question, my
most memorable teacher.”
3. If Mrs. Williams catches you passing notes, she just thinks your an admiring student, but when your crush
get’s the note, they know you want to go out with them. Pretty crafty, huh?
Professor Cupid’s Science Secret
Friction pens use ink that is sensitive to heat. When the ink is at temperatures between 15ºF and 140ºF, the ink will
appear in color (you can find them in pretty much every shade). But when the ink is heated beyond 140ºF, like when
someone holds a romantic candle near the ink, the ink vanishes. Actually, the ink doesn’t vanish... it’s still on the
paper, it’s just clear! This specially formulated ink is called thermochromic ink. If you remember the Ohhh! Ahhh!
Paper activity, this ink is just like the pigment used on the paper. It changes colors depending on the temperature.
©2021 Steve Spangler Inc | SteveSpangler.com | 855-228-8780Jelly Marble Magic
If you’re looking for the perfect Valentine’s Day gift, Jelly Marbles
just might trump even the biggest box of chocolates. There are so
many uses for these amazing, crystal-clear spheres. But first things
first… it’s time to set up your Jelly Marble growing lab.
Here’s What You’ll Need...
• Jumbo Test Tubes and Test Tube Rack
• Jelly Marbles
• Fizzers Coloring Tablets
• Water
Let’s Try It!
1. Remove the yellow caps and fill both of the Jumbo Test
Tubes ¾-full with warm water.
2. Find the bag of Jelly Marbles and place 10 of the tiny beads
into each of the test tubes.
3. Open the foil pouch containing the Fizzers and select one of the tablets (you have the choice of red, yellow
or blue). Drop the tablet into one of the test tubes but leave the water in the other test tube clear. Twist on
the yellow caps and gently shake the test tube with the coloring tablet to help mix the liquid.
4. The next step is difficult... you need to wait about 8 hours. What? Eight hours! That’s right... the Jelly
Marbles need time to absorb as much water as possible. Don't be afraid to pull a few out with a spoon every
so often to check on their progress. Make sure to notice the changes in shape and size. As they grow, the
spheres will take some very unique shapes along the way, but they'll eventually take on the shape of a clear
sphere. The Jelly Marbles should reach their maximum growth after roughly 8 hours, but leaving them
overnight is even better.
5. Don’t be surprised if you can’t see the Jelly Marbles after 8 hours or so. Look very carefully… the once
tiny little beads are now HUGE jelly-like spheres! Carefully pour off the water to reveal the clear spheres.
6. You’ll see that the Jelly Marbles that were in the colored water actually absorbed the color, while the water-
only spheres are crystal clear.
Vanishing Marbles
Fill a clear glass or bowl ¾-full with water. Reach into the test tube with
the clear Jelly Marbles and remove a few of the fully grown spheres.
Drop the Jelly Marbles into the water and watch it vanish! Drop in a
second one... and a third one. They vanish like magic. Reach into the
water and feel around for the spheres. You can feel them, but you can’t
see them!
If you want to make the Jelly Marbles reappear, drop a Fizzer tablet into
the water and watch what happens. As the water changes color, the
invisible Jelly Marbles become visible
Shatter and Shrink
Jelly Marbles will bounce, but they will also shatter! If this happens, just clean up the pieces and throw them away.
Also, if you let the Jelly Marbles sit out for a few days, the water inside the spheres will evaporate and the Jelly
Marbles will shrink down to their original size to be used again!
Jelly Marbles in a Flower Vase
Jelly Marbles are not just for people who like science. They seem to be popping up everywhere… and that includes
the flower shop. Florists are using Jelly Marbles of all sizes and colors as a decorative element to their vases. If
you’re giving someone flowers for Valentine’s Day, grow some Jelly Marbles and add them to the flower vase. Make
sure the bottom half of the vase is filled with water so the flowers won’t die. The visible Jelly Marbles on the top
half of the vase are certain to grab some well-deserved attention.
©2021 Steve Spangler Inc | SteveSpangler.com | 855-228-8780Secret Message
For this activity you’ll need to grow about 20-30 Jelly Marbles in a large container (at least a quart or 1 liter) of
water. Fill the container with warm water (the Jelly Marbles grow faster in warm water) and add 20-30 of the tiny,
dehydrated beads. Again, you’ll need to wait about 8 hours to maximize the water absorbed.
Search the kitchen to find a clear glass pie pan or a shallow, clear glass dish. Write the message that you want to
appear on a piece of white paper, and place the dish on top of the message. Fill the dish with a layer or two of the
large Jelly Marbles that you just grew. You will not be able to read the message because the Jelly Marbles refract
light. When you want the message to appear, pour water slowly into the dish to cover all of the spheres. As the Jelly
Marbles vanish, the message appears.
Professor Cupid’s Science Secret
Jelly Marbles start out as hard crystals, but when you drop them in water, they expand by absorbing 300 times their
weight in water. The secret is a special, water-absorbing polymer that expands to form the amazing clear sphere.
When these spheres are finished growing, they’re almost 99% water.
How do the marbles vanish in water? If you look closely, you can barely see the outline of the sphere in the test tube
of plain water, but colored water will reveal their outline. That’s because light passing through the sphere is only
barely refracted (or bent) by the edge of the sphere. Without this refraction along the edges, the Jelly Marbles would
seem to vanish altogether. This is all because the spheres are nearly 99% water, themselves. This high water content
makes the spheres share the same refraction properties as the water in the container!
SAFETY FIRST
Remember to never put the Jelly Marbles in your mouth. Make sure to keep the spheres away from small children
because they can be a choking hazard. When you’re finished playing with them, simply dispose of them in the trash.
©2021 Steve Spangler Inc | SteveSpangler.com | 855-228-8780That Loving “Spark”
It’s a popular cliché to say that love starts from an indescribable “spark” between two people. Since it’s Valentine’s
Day, and we love science, we figured out a way to incorporate some candy (a must during the holiday) and smashing
things (a must for one of our activities) to show you an awesome way to demonstrate that loving “spark.”
Here’s What You’ll Need...
• Package of fresh Wintergreen Lifesavers
• Pair of pliers
• Safety glasses
• Newspaper
• Dark room
Let’s Try It!
1. Arguably, the most important aspect of this experiment is to conduct it in the darkest room that you can
find. Even a slight amount of light can prevent you from seeing the spark of love.
2. You can use the newspaper for a couple of things... like reading. Here, however, you’ll want to lay it down
on the ground to catch bits and pieces of shattered Wintergreen Lifesavers. Trust us on this one. Your
parents are going to be pretty stoked, too.
3. Once you’ve got your work area all set up, turn off the lights. You may want to wait a little while for your
eyes to adjust to the darkness.
4. Place a Wintergreen Lifesaver inside of the pliers and crush the candy with a hard, quick squeeze. If
everything went well, you should see a blue flash. If you didn’t get the blue flash, don’t fret. Keep
experimenting with the candies until you figure out just how to do it. Pretty your science experiment will
look more like an indoor fireworks display.
Want to apply this and show it to that special someone at Valentine’s Day? Tell them that the candy only sparks if
it’s in the presence of true love, then perform the demonstration.
Professor Cupid’s Science Secret
That amazing blue spark that you see when you apply pressure to a Wintergreen Lifesaver is call piezoelectricity.
Piezoelectricity is an electrical charge that generates when pressure is applied to solid materials. The compressed,
hardened sugar crystals of a Wintergreen Lifesaver just so happens to be a material that is capable of
piezoelectricity. The sparks are too small to see in broad daylight, but you can see these flashes of light when in a
dark area.
©2021 Steve Spangler Inc | SteveSpangler.com | 855-228-8780Love Potion #9
There’s no guarantee that this potion will make you fall in love, but there’s a good chance that onlookers will
scream, “How did you do that?” when they see the clear liquid turn pink or the white carnation magically change
color. The secret is pure chemistry… but you probably knew that.
Here’s What You’ll Need...
• White carnations (the cloth carnations from the kit)
• Phenolphthalein indicator
• Ammonia water
• Jumbo Test Tubes and rack
• Safety glasses
Color-Changing Water
1. You’ll need both of the Jumbo Test Tubes and the safety glasses
for this activity. Nothing makes you look better on Valentine’s
Day than to wear a pair of very stylish-looking safety glasses.
Plus, 99% of people notice a person’s eyes first... so keep them
safe!
2. Fill one test tube ¾-full with plain water. Find the squirt bottle of
ammonia water and spray a single squirt into the test tube filled
with regular water.
3. Twist on the cap and gently swirl the mixture. Remove the cap
and place the test tube into the test tube rack.
4. Secretly place 5 drops of the phenolphthalein indicator solution
into the second, empty test tube. No one will even notice that
there is anything in this test tube. Now you’re ready to perform a
Valentine’s miracle…
5. Hold the test tube filled with “plain water” in one hand and the
empty test tube in the other hand. Show both test tubes, making
sure that everyone sees that there is NO food coloring hiding in
the bottom of the tube.
6. Pour the water from the first test tube into the second test tube
and watch what happens... the liquid magically turns pink!
Explain to your audience that you have discovered a magical
Valentine’s potion.
Take It Further! - Back & Forth & Back Again
Once you’ve figured out the magic behind the phenolphthalein, you can
have a little bit more fun with your audience. Remember how you mixed
up a bit of ammonia water to change the indicator to that vibrant pink
color? Well... what do you think will happen if, in another container next
to the ammonia water, you have an amount of vinegar? Since the vinegar
is acidic, it will neutralize the ammonia and change the indicator back to
its clear state. You could even pour two pink-colored liquids into a third
container containing vinegar and watch them change back to clear. You’ll
have to experiment with the amounts, but once you nail it, you’ll be a
master of all things chemistry!
©2021 Steve Spangler Inc | SteveSpangler.com | 855-228-8780Color-Changing Carnation
1. To further demonstrate your chemical genius, you’ll use the magical “love potion” to turn ordinary white
carnations into beautiful pink carnations.
2. Behind the scenes you’ll need to secretly prepare the white carnations. Cover each of the cloth carnations
with approximately 10-15 drops of phenolphthalein solution. It's best to do this over a sink. Hopefully
you’ll find a spare flower vase sitting around the house to hold the carnations once you’re finished coating
them with the special solution.
3. Find the squirt bottle of ammonia water, but don’t tell anyone what’s in it. Instead, make everyone believe
that this is your newly discovered “love potion.”
4. Again, it’s important for everyone to see that your “love potion” is a colorless liquid. Otherwise, they’ll just
think that you’re spraying the carnations with dye or colored water.
5. Make sure that you are wearing your safety glasses for this next step. Squirt each of the white carnations
with a few pumps of your “love potion” (ammonia water) and watch as the carnations turn bright pink.
Amazing!
6. That’s not all! Over the next few minutes, you’ll notice the pink carnations begin to lose their color. Wait a
few more minutes and the color will fade more and more until the carnations return to their original white
color.
7. Want to keep going? You guessed it… squirt the flowers with more of your “love potion” to magically turn
them pink all over again.
Professor Cupid’s Science Secret
Phenolphthalein is an indicator that is clear when exposed to an acid and turns pink or red when exposed to a base.
So, when you spray the clear colored ammonia or “love potion” onto the white flowers that have been coated with
phenolphthalein, the indicator reacts with the base (ammonia) and turns the flowers pink.
So how do the carnations return to their original white color? You didn’t add anything else to the carnations after
your “love potion,” but the flowers changed back to white. Whether you wanted it to or not, something else did
come in contact with the petals of the flowers... that’s right, air! The air that we breathe is slightly acidic, and since
phenolphthalein is clear in the presence of an acid, the indicator loses its vibrant pink hue.
©2021 Steve Spangler Inc | SteveSpangler.com | 855-228-8780Tasty and Colorful Candy Experiments
So you’ve got a ton of colorful Valentine’s Day candy and you just don’t know what to do with all of it. No way
you’re going to eat it, right? Worry not, young scientist. We’ve got experiments for all kinds of candy: the Skittles
that Tommy gave you, the M&Ms from Sheila, even the chocolate bars you got from Jamie.
Incredible Growing Gummy Bears
Here’s What You’ll Need...
• Gummy bears
• Drinking glasses
Let’s Try It!
1. Measure and weigh gummy bears before starting. Use a data table to record your changes.
2. Fill 3 glasses with water.
3. Leave one glass alone and add about a tablespoon of salt to one and a tablespoon of sugar to the third.
4. Add a few gummy bears to each glass.
5. Wait about 12 hours, measure and weigh the bears.
6. Check back after 24 hours, measure and weigh the bears.
7. Check back after 48 hours, measure and weigh the bears.
Professor Cupid’s Science Secret
Why do the gummy bears grow instead of dissolve in the water? Most sugary candies dissolve when added to water.
Even the candy bars in the above experiment began to dissolve after a few minutes in the water (not a pretty sight!)
Gelatin - one of the main ingredients in gummy bears - is the key. When gummy bears are made, gelatin and water
are heated, just like making Jell-O. As the mixture cools, the water is drawn out of the bears and they harden to a
chewy little bear. Gelatin is a long chain-like molecule that twists and forms a solid form. As the water is removed in
the cooling process, the gelatin solidifies. A solute is the dissolved material within another material. So the gummy
bear is the solute in the water. The water is the solvent.
When adding salt to water, the salt is the solute and the water is the solvent.When the gummy bears are added to
water, the water molecules will move into the bear by means of osmosis. Osmosis is the movement of solvent
molecules (water) through a partially permeable membrane into an area of higher solute (gummy bear/gelatin) to
equalize the solute concentration on both sides. So what does that mean? There is less water and more gelatin inside
the gummy bear. There is more water outside the gummy bear. The water doesn't want to be crowded, so some of the
water molecules will move inside the gummy bear where there are fewer water molecules and a lot of gelatin
molecules. The gummy bears started out with a lot of water but when they cooled and hardened, most of the water
was removed.
Why does salt dissolve in water and gelatin doesn't? Salt cannot form chains like gelatin. The gelatin molecules are
are much larger than the salt. The gelatin makes the gummy bear act more like a sponge, absorbing the water instead
of dissolving in it. What happens when you add salt to the water? The salt ions are much smaller than the gelatin
molecules in the water. The salt water has about 10-20 times the molecules that is in the gummy bear. Through
osmosis, the water molecules are going to move to the area with more solute or molecules in it to even out the
number of water molecules in both the salt water and inside the gummy bear. The water will leave the gummy bear
and move to where there are more salt molecules. The gummy bear won't shrink, so it looks like it stays the same
size
©2021 Steve Spangler Inc | SteveSpangler.com | 855-228-8780Skittles Chromatography
Here’s What You’ll Need...
• Skittles
• Plate
• Filter paper
• Pipette
• Glass or jar
Let’s Try It!
1. Take out a dinner plate and lay one of each color of Skittles,
leaving a little space around each one.
2. Fill a glass with water. Using a pipette or dropper, squeeze a little
water onto each piece of candy to start dissolving the shell.
3. While you wait for the candy to dissolve, cut your filter paper into
a square.
4. Draw a pencil line about 2 cm from the bottom edge of the paper.
Do not use pen, because the ink will run. This is your origin line.
5. When the water around the candy has changed color, squeeze the
colored water into the pipette bulb.
6. Drop a few drops of colored water on the origin line on your filter
paper. You may need to add several drops to ensure you have
enough dye.
7. Repeat this with each color, leaving about 2 cm between each
color. Let the filter paper dry completely.
8. Prepare a salt mixture of 0.1% for the solvent by adding 1/8 of a
teaspoon of salt to 3 cups of water (1g of salt to 1L of water).
9. Mix until the salt has completely dissolved.
10. Pour a small amount of the salt mixture into the bottom of a glass
or jar.
11. Place filter paper in the glass with salt water so that it is standing
up and the bottom is barely touching the surface of the salt
solution. You can tape the top of the filter paper to a pencil and
hang it down into the solution if you have a hard time getting it to
stay right at the surface.
12. Observe the salt water rising up the paper until it is almost at the
top.
13. Remove the paper from the glass and mark with a pencil where
the solvent stopped. Let the paper dry completely.
14. Repeat the experiment using M&M's, Gobstoppers or other dyed candy and compare like colors. Is the red
dye the same in all of the candies, or do the colors run differently? Do all of the colors move the same
distance? You can mark measurements on the filter paper and observe how and how far each color moves.
Professor Cupid’s Science Secret
Colorful candies like Skittles are made with FD&C dyes, sugar, and other substances. Chromatography is a
technique used to separate different parts of a solution. It is used to identify chemicals, used to identify crime scene
samples like blood or drugs and used to demonstrate the different dyes in your favorite candy.
If you spill a drop of water on a print out from an InkJet printer, the ink will run. The water will travel through the
paper by a process called capillary action. As the water travels, it will pick up particles of the ink and carry them
through the paper. This is called paper chromatography.
Chromatography works because different parts of a solution, like the water-dye solution you drop on the filter paper,
will move differently and at different rates. Some will "stick" to the paper fibers and not spend a lot of time traveling
with the water, while others will travel in the water for greater distances. Filter paper works well in this experiment,
because it allows water to flow through it easily.
©2021 Steve Spangler Inc | SteveSpangler.com | 855-228-8780Color Mixing Gobstoppers
Here’s What You’ll Need...
• Gobstoppers
• Petri dish or shallow bowl
Let’s Try It!
1. Fill a petri dish with enough water to
cover the bottom.
2. Drop a Gobstopper of a different color
along the edge of the petri dish. We would
tell you to put them all in the corners, but
the dish is round and doesn’t have corners.
So you need to place the Gobstoppers at
equal distances from from each other.
3. Now watch the colors!
Professor Cupid’s Science Secret
The surprise here is that the Gobstopper colors
don’t actually mix in the petri dish. Instead, they
run into each other and stop. In addition to the non-
mixing colors, you’ll notice that the colors change
during the dissolving process. This is because each
Gobstopper is comprised of four different colors.
Floating M’s
Here’s What You’ll Need...
• M&M’s
• Clear glass or bowl
Let’s Try It!
1. Fill a clear glass or bowl half-full with
water.
2. Drop a few M&M’s into the water.
3. Allow the M&M’s to soak in the water for
10-20 minutes.
Professor Cupid’s Science Secret
The “M” that is printed on the candy shell of M&M
candies is made of edible white ink. Although the
ink is edible, it is also insoluble in water. While the
candy coating of the candy dissolves, the letters will
remain and float to the top of the water.
©2021 Steve Spangler Inc | SteveSpangler.com | 855-228-8780Sugar Water Density Tower
Here’s What You’ll Need...
• Clear glass or Jumbo Test Tube
• Pipettes or droppers
• Sugar
• Measuring spoons
• Food coloring or Fizzers Coloring Tablets
• 4 small cups
Let’s Try It!
1. Fill your cups with 1 cup of warm water and add food coloring to the
water. You want a different color for each density. We used blue, green,
yellow and red.
2. Add 2 tablespoons of sugar to the 1st cup, 4 tablespoons to the 2nd cup,
6 tablespoons to the 3rd cup and 8 tablespoons to the last cup. You can
use these guidelines:
• Blue - 2 tablespoons
• Yellow - 4 tablespoons
• Red - 6 tablespoons
• Green - 8 tablespoons
3. Label each cup with the amount of sugar added.
4. Stir the water until the sugar is dissolved. It is crucial that all of the sugar
is dissolved in each cup. You may need to supersaturate the sugar water
solution to get all of the sugar to dissolve. Place the cup in the
microwave for 20-30 seconds to warm the water and dissolve more
sugar. Continue stirring until all of the sugar is gone.
5. Start with the cup with the most sugar. Using a pipette, dropper or back
of a spoon, begin adding the first layer of sugar water.
6. After the first layer, things get challenging. Carefully drip the next dense
layer onto the surface of the first. The best technique is to place the
pipette right above the surface of the first layer and against the glass.
Slowly drip the next color onto the first. This will take a lot of patience.
Go slow.
7. The colors will begin to mix at first and then your original color will
start to show.
8. Repeat with the next dense color and the least dense color until you have
stacked all of the colors.
Professor Cupid’s Science Secret
As you add sugar to the water, more and more sugar molecules will take over the
space, making the water more dense. The cup containing the 8 tablespoons of
sugar will be the most dense, the cup with 2 tablespoons will be least dense. With
this sugar water experiment, you put the most dense solution on the bottom. Why
do you think that is? What will happen if you try it with the least dense solution
on the bottom?
©2021 Steve Spangler Inc | SteveSpangler.com | 855-228-8780You can also read