Schluter-DITRA-HEAT Installation Handbook - Electric Floor Warming System with Integrated Uncoupling Technology
←
→
Page content transcription
If your browser does not render page correctly, please read the page content below

Schluter®-DITRA-HEAT Installation Handbook

                               5,5 mm

Electric Floor Warming System
with Integrated Uncoupling Technology

04/2023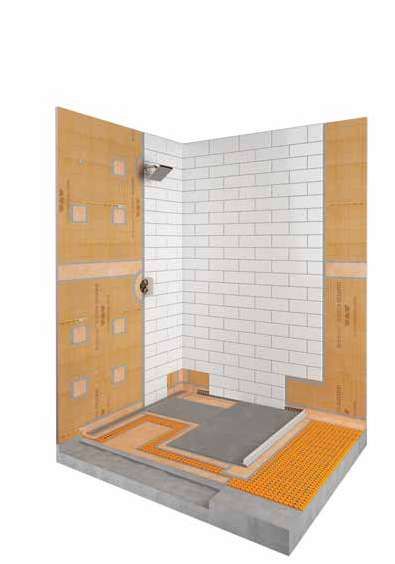
Schluter®-DITRA-HEAT
Electric Floor Warming System with Integrated Uncoupling Technology

Ceramic and stone tiles are the ideal surface coverings because they are durable, easy to maintain, and hygienic. However two
common barriers to the selection of tile as a floor covering are concerns about cracking and the perception that tiles are cold.
Floor warming systems are a growing trend in tile applications, but none address concerns about cracking. A viable installation
system must address the magnified fluctuations in temperature that contribute to increased shear stresses between the substrate
and the tile covering. Schluter®-DITRA-HEAT integrates customizable, comfortable electric floor warming with the functions
associated with DITRA: uncoupling, waterproofing, vapor management and support to ensure a long lasting installation. DITRA-
HEAT is primarily intended to warm tile floors and make them more comfortable underfoot, but can contribute to space heating.
DITRA-HEAT is also suitable for applications with alternate floor coverings such as engineered wood, luxury vinyl, wood and
stone plastic composite, and laminate flooring.
DITRA-HEAT combines the flexibility of loose heating cables with the ease of installation of mat systems. Cables can be
placed wherever heat is desired, without creating height differences in the floor. Self-leveling compounds are not required to
encapsulate the cables for ceramic, porcelain, and stone tiles, significantly reducing installation time and effort compared to
uncoupling membranes over other electric floor warming systems.

                          Uncoupling
                          Tile has been successfully installed for thousands of years by incorporating an uncoupling layer,
                          or forgiving shear interface, within the tile assembly. DITRA-HEAT provides uncoupling through
                          its geometric configuration, which allows for in-plane movement that effectively neutralizes the
                          differential movement stresses between the substrate and the tile, thus eliminating the major cause
                          of cracking and delaminating of the tiled surface.

                          Waterproofing
                          DITRA-HEAT provides reliable waterproofing. Its polypropylene composition protects the substrate
                          from moisture penetration, which is particularly important in today’s building environment where
                          most substrates are moisture sensitive.

                          Vapor Management
                          The free space on the underside of DITRA-HEAT provides a route for excess moisture and vapor
                          to escape from the substrate that could otherwise cause damage to the tile covering above.
                          Thus, DITRA-HEAT effectively manages moisture beneath the tile covering.

                          Support/Load Distribution
                          When placed on a solid foundation, columns or pillars can support tremendous loads. The
                          same physical principle applies to DITRA-HEAT installations. Column-like mortar structures are
                          formed in and between the studs on the surface of the matting. Loads are transferred from the
                          tile covering through these column-like mortar structures to the substrate. Since DITRA-HEAT is
                          virtually incompressible within the tile assembly, the advantages of uncoupling are achieved without
                          sacrificing point load distribution capabilities.

 Legend                                           Schluter®-Systems’ written installation instructions shall have
             Essential                            precedence over referenced industry standard guidelines and
             Significant                          installation procedures insofar as referenced information may contain
             Helpful                              overlapping or conflicting requirements. Type, thickness, and format
                                                  of the ceramic or stone tile surface covering must be suitable for the
                                                  intended application.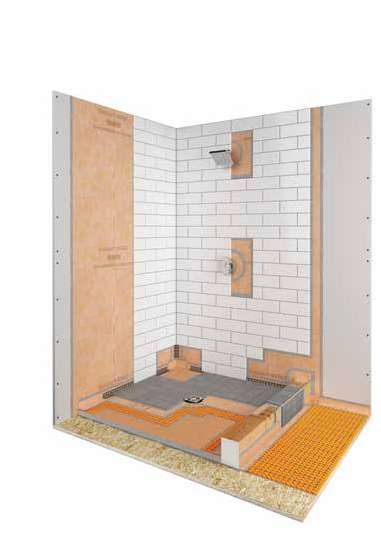
CONTENTS
                      WOOD      4   Floors,   Interior   –   16, 19.2, & 24-inch o.c. joist spacing
                                6   Floors,   Interior   –   Natural Stone Tile
                                7   Floors,   Interior   –   Existing Vinyl
                                7   Floors,   Interior   –   Structural Plank Subfloor

                  CONCRETE      8 Floors, Interior – Ceramic or Stone Tile
                                9 Floors, Interior - Gauged Porcelain Tiles and Tile Panels

                    GYPSUM     10 Floors, Interior – Ceramic or Stone Tile

    WATERPROOFING - FLOORS     11 Floors, Interior – Ceramic or Stone Tile

          SHOWER ASSEMBLY      12 Shower application

           MOVEMENT JOINTS     14 Placement guidelines and descriptions

        WOOD UNDERLAYMENT      17 Installation guidelines

ALTERNATIVE FLOOR COVERINGS    18 Floors, Interior - Engineered Wood, Vinyl, WPC, LVT/LVP, SPC,
                                    and Laminate

     WARNINGS AND PLANNING     20		 Warnings and planning information

               INSTALLATION    22		 Installation instructions

              THIN-SET FACTS   27 Discussion of thin-set mortar types to be used with Schluter®-
                                    DITRA-HEAT

 HEATING CABLE SPECIFICATION   28 Schluter®-DITRA-HEAT-E-HK specification

    TESTING & CERTIFICATIONS   29 Products evaluation

             SOUND CONTROL     31 Discussion of sound control in conjunction with ceramic &
                                    stone tile

             DITRA-HEAT-DUO    33 Solution to improve floor warming response time

       CONCRETE SUBFLOORS      34 Discussion on Schluter®-DITRA-HEAT installations over
                                    concrete subfloors

          208 V APPLICATIONS   35 Discussion of heating cables in 208 V applications

              SPACE HEATING    36 Discussion on use of Schluter®-DITRA-HEAT for space heating

             NATURAL STONE     37 Discussion of natural stone and single-layer wood subfloors

        HEATING CABLE TESTS    38             Heating cables must be installed by a qualified person in accordance
                                              with this handbook and with the National Electrical Code (USA) or
                                              Canadian Electrical Code Part I (CAN) as applicable. All electrical
    HEATING CABLE TESTS LOG    39			          connections must be made by a qualified person, according to the
                                              electrical and building codes effective in your region.
                  WARRANTY     40          This installation handbook is subject to change without notice.
                                           Please visit www.schluter.com for the latest version.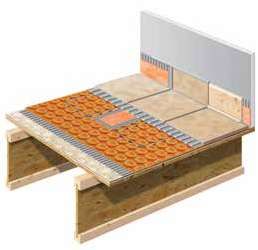
WOOD
Every substrate presents unique challenges
All wood materials, including OSB, plywood, and framing members, are subject to expansion, contraction, bending, and deflection as a
result of changes in moisture content and loading. Further, these deformations fluctuate over the life of the building structure.

             The uncoupling function of Schluter®-DITRA-HEAT protects the ceramic or stone tile covering from the aforementioned deformations
             by neutralizing the differential movement stresses between the wood structure and the tile, thus eliminating the major cause of cracking
             and delaminating of the tiled surface. Therefore, DITRA-HEAT can replace a second layer of plywood in most applications.

             Since wood structures are sensitive to moisture, the DITRA-HEAT membrane's waterproofing function adds an essential
             element to the flooring assembly by providing simple, effective, and permanent moisture protection.

             Wood continually absorbs and releases moisture. The free space beneath the DITRA-HEAT membrane allows the wood to
             breathe and provides a route for any residual moisture in the wood substrate to escape.

             Since DITRA-HEAT is virtually incompressible within the tile assembly, the advantages of uncoupling are achieved without
             sacrificing point load distribution capabilities.

By addressing all of the challenges associated with today’s fast, lightweight construction methods, DITRA-HEAT provides a durable
installation system for ceramic and stone tile over wood substrates.

DITRA-HEAT combines the flexibility of loose heating cables with the ease of installation of mat systems. Cables can be placed wherever
heat is desired, without creating height differences in the floor. Self-leveling compounds are not required to encapsulate the cables,
significantly reducing installation time and effort compared to uncoupling membranes over other electric floor warming systems.

DH-W16-T and DHPS-W16-T
                                                                          Floors, Interior - Ceramic or Porcelain Tile
 1   Ceramic or porcelain tile
 2   SET, ALL-SET, FAST-SET,
     or unmodified thin-set mortar
                                                                         16" (406 mm) o.c. joist spacing, single layer OSB
 3   DITRA-HEAT/-PS or DITRA-HEAT-DUO/-PS
                                                                         or plywood subfloor
     uncoupling membrane and heating cables
                                                                         Areas of Application                              Movement Joints
 4   ALL-SET, FAST-SET,                                                  • over any even and structurally sound OSB or     • DITRA-HEAT and DITRA-HEAT-DUO do
     or modified thin-set mortar                                           plywood subfloor with 16" (406 mm) o.c. joist     not eliminate the need for movement joints,
                                                                           spacing                                           including perimeter joints, within the tiled
 5   PRIMER-U
                                                                         • interior dry or wet areas                         surface. Movement joints must be installed
 6   Single layer of plywood or OSB                                                                                          in accordance with industry standards and
                                                                         Limitations                                         norms; see page 14 of this Handbook, TCNA
 7   Joists, I-joists, or trusses                                        • minimum 2" x 2" (50 mm x 50 mm) tile              EJ171, and TTMAC 301 MJ
                                                                         • for natural stone, see detail DH-W-S (page 6)
                                                                           and natural stone discussion (page 37)          Setting and Grouting Materials
                                      1                                                                                    • modified thin-set mortar - ANSI A118.11
              3              2                                           Requirements                                      • unmodified thin-set mortar – ANSI A118.1
                                                                         • maximum spacing of joists, I-joists, or floor   • grout – ANSI A118.3, A118.6, A118.7, A118.8
                                                                           trusses is 16" (406 mm) o.c.
         6         4                                                     • minimum subfloor thickness – 19/32", 5/8"       Setting and Grouting Specifications
                                                                           nom. (16 mm) tongue-and-groove with 1/8"        • tile – ANSI A108.5
                                                                           (3 mm) gap between sheets                       • grout – ANSI A108.6, A108.9, A108.10

                                                                         Substrate Preparation                             Other Considerations
               7                                                         • verify that subfloor panels are properly        • tightly butted and/or tented plywood or OSB
                                                 EL & STICK
                                               PE                          fastened to framing members                       seams must be addressed prior to installing
                             5                                           • any leveling of the subfloor must be done
                                                                •

                                                                                                                             DITRA-HEAT and DITRA-HEAT-DUO
                                       •

                                                                PEEL &
                                        TICK

                                                                           prior to installing DITRA-HEAT and DITRA-       • vapor barrier on crawl space floors according
                                      &S

                                                                           HEAT-DUO                                          to regional building codes
                                                                S

                                                         TI
                                             EL            CK
                                                                         • for optimal performance with difficult-
                                           PE
                                                                                                                           • where a waterproof floor is required, all
                                                     •

                                                                           to-bond-to substrates, use Schluter®-             DITRA-HEAT and DITRA-HEAT-DUO seams
                                                                           PRIMER-U or other primer suitable for the         and floor/wall transitions must be sealed with
                                                                           application. Contact Schluter Systems to          KERDI-BAND using SET, ALL-SET, FAST-SET,
                                                                           determine if PRIMER-U, or suitable primer, is     or unmodified thin-set mortar; see page 11
                                                                           required for the specific installation

4    WOOD — Floors, Interior - Ceramic or Porcelain Tile
DH-W19-T and DHPS-W19-T 19.2" (488 mm) o.c. joist spacing, single layer OSB
1 Ceramic or porcelain tile or plywood subfloor
2 SET, ALL-SET, FAST-SET,
or unmodified thin-set mortar Areas of Application Movement Joints
• over any even and structurally sound OSB or • DITRA-HEAT and DITRA-HEAT-DUO do not
3 DITRA-HEAT/-PS or DITRA-HEAT-DUO/-PS plywood subfloor with 19.2" (488 mm) o.c. eliminate the need for movement joints,
uncoupling membrane and heating cables joist spacing including perimeter joints, within the tiled
• interior dry or wet areas surface. Movement joints must be installed
4 ALL-SET, FAST-SET,
or modified thin-set mortar in accordance with industry standards and
Limitations norms; see page 14 of this Handbook, TCNA
5 PRIMER-U • minimum 2" x 2" (50 mm x 50 mm) tile EJ171, and TTMAC 301 MJ
• for natural stone, see detail DH-W-S (page 6)
6 Single layer of plywood or OSB and natural stone discussion (page 37) Setting and Grouting Materials
• modified thin-set mortar - ANSI A118.11
7 Joists, I-joists, or trusses Requirements • unmodified thin-set mortar – ANSI A118.1
• maximum spacing of joists, I-joists, or floor • grout – ANSI A118.3, A118.6, A118.7, A118.8
trusses is 19.2" (488 mm) o.c.
1 • minimum subfloor thickness – 23/32", Setting and Grouting Specifications
3 2 3/4" nom. (19 mm) tongue-and-groove with • tile – ANSI A108.5
1/8" (3 mm) gap between sheets • grout – ANSI A108.6, A108.9, A108.10
6 4 Substrate Preparation Other Considerations
• verify that subfloor panels are properly • tightly butted and/or tented plywood or OSB
fastened to framing members seams must be addressed prior to installing
• any leveling of the subfloor must be done DITRA-HEAT and DITRA-HEAT-DUO
prior to installing Schluter®-DITRA-HEAT and • vapor barrier on crawl space floors according
7 EL & STICK DITRA-HEAT-DUO to regional building codes
PE
5 • for optimal performance with difficult- • where a waterproof floor is required, all
•
•
to-bond-to substrates, use Schluter®- DITRA-HEAT and DITRA-HEAT-DUO seams
PEEL &
TICK
PRIMER-U or other primer suitable for the and floor/wall transitions must be sealed with
&S
S
application. Contact Schluter Systems to
TI
KERDI-BAND using SET, ALL-SET, FAST-SET,
EL CK
PE •
determine if PRIMER-U, or suitable primer, is or unmodified thin-set mortar; see page 11
required for the specific installation
DH-W24-T and DHPS-W24-T 24" (610 mm) o.c. joist spacing, double layer OSB
1 Ceramic or porcelain tile or plywood subfloor
2 SET, ALL-SET, FAST-SET,
or unmodified thin-set mortar Areas of Application Movement Joints
• over any even and structurally sound double • DITRA-HEAT and DITRA-HEAT-DUO do
3 DITRA-HEAT/-PS or DITRA-HEAT-DUO/-PS layer OSB or plywood floor not eliminate the need for movement joints,
uncoupling membrane and heating cables • interior dry or wet areas including perimeter joints, within the tiled
ALL-SET, FAST-SET, surface. Movement joints must be installed
4
or modified thin-set mortar Limitations in accordance with industry standards and
• minimum 2" x 2" (50 mm x 50 mm) tile norms; see page 14 of this Handbook, TCNA
5 PRIMER-U EJ171, and TTMAC 301 MJ
Requirements
6 Double layer of plywood or OSB • maximum spacing of joists, I-joists, or floor Setting and Grouting Materials
trusses is 24" (610 mm) o.c. • modified thin-set mortar - ANSI A118.11
7 Joists, I-joists, or trusses
• double layer wood floor consisting of: • unmodified thin-set mortar – ANSI A118.1
• minimum subfloor thickness – 23/32", • grout – ANSI A118.3, A118.6, A118.7, A118.8
1 3/4" nom. (19 mm) tongue-and-groove
• minimum underlayment thickness – Setting and Grouting Specifications
3 2
11/32", 3/8" nom. (10 mm) • tile – ANSI A108.5
• grout – ANSI A108.6, A108.9, A108.10
6 Substrate preparation
4
• verify that subfloor panels are properly Other Considerations
fastened to framing members • tightly butted and/or tented plywood or OSB
• underlayment – minimum 11/32", 3/8" seams must be addressed prior to installing
nom. (10 mm)-thick Exposure 1, plugged- DITRA-HEAT and DITRA-HEAT-DUO
7 face plywood or OSB with 1/8" (3 mm) • vapor barrier on crawl space floors according
EL & STICK
PE gap between sheets; see page 17 for to regional building codes
5 underlayment installation guidelines • where a waterproof floor is required, all
•
•
PEEL &
TICK
• any leveling of the subfloor must be done DITRA-HEAT and DITRA-HEAT-DUO seams
prior to installing Schluter®-DITRA-HEAT and and floor/wall transitions must be sealed with
&S
S
TI
EL CK
DITRA-HEAT-DUO KERDI-BAND using SET, ALL-SET, FAST-SET,
PE •
• for optimal performance with difficult- or unmodified thin-set mortar; see page 11
to-bond-to substrates, use Schluter®-
PRIMER-U or other primer suitable for the
application. Contact Schluter Systems to
determine if PRIMER-U, or suitable primer, is
required for the specific installation
WOOD — Floors, Interior - Ceramic or Porcelain Tile 5DH-W-S and DHPS-W-S Floors, Interior - Natural Stone Tile
1 Natural stone tile
2 SET, ALL-SET, FAST-SET, Double layer of OSB or Plywood subfloor
or unmodified thin-set mortar
Areas of Application Movement Joints
3 DITRA-HEAT/-PS or DITRA-HEAT-DUO/-PS • over any even and structurally sound double • DITRA-HEAT and DITRA-HEAT-DUO do
uncoupling membrane and heating cables
layer OSB or plywood floor not eliminate the need for movement joints,
4 ALL-SET, FAST-SET, • interior dry or wet areas including perimeter joints, within the tiled
or modified thin-set mortar surface. Movement joints must be installed
Limitations in accordance with industry standards and
5 PRIMER-U • requires double layer wood floor regardless norms; see page 14 of this Handbook, TCNA
of joist spacing EJ171, and TTMAC 301 MJ
6 Double layer of plywood or OSB
• minimum 2" x 2" (50 mm x 50 mm) tile
7 Joists, I-joists, or trusses Setting and Grouting Materials
Requirements • modified thin-set mortar - ANSI A118.11
• maximum spacing of joists, I-joists, or floor • unmodified thin-set mortar – ANSI A118.1
1 trusses is 24" (610 mm) o.c. • grout – ANSI A118.3, A118.6, A118.7, A118.8
3 2 • double layer wood floor consisting of:
• minimum subfloor thickness – 23/32", Setting and Grouting Specifications
3/4" nom. (19 mm) tongue-and-groove • tile – ANSI A108.5
6 4 • minimum underlayment thickness – • grout – ANSI A108.6, A108.9, A108.10
11/32", 3/8" nom. (10 mm)
Other Considerations
Substrate Preparation • certain moisture-sensitive stones, e.g., green
• verify that subfloor panels are properly marble, or resin-backed tiles may require
7 EL & STICK fastened to framing members special setting materials. Consult stone
PE
5 • underlayment – minimum 11/32", 3/8" supplier and Schluter-Systems for more
•
•
nom. (10 mm)-thick Exposure 1, plugged- information
PEEL &
TICK
face plywood or OSB with 1/8" (3 mm) • tightly butted and/or tented plywood or OSB
&S
S
TI
gap between sheets; see page 17 for
EL
seams must be addressed prior to installing
CK
PE •
underlayment installation guidelines DITRA-HEAT and DITRA-HEAT-DUO
• any leveling of the subfloor must be done • vapor barrier on crawl space floors according
prior to installing Schluter®-DITRA-HEAT and to regional building codes
DITRA-HEAT-DUO • where a waterproof floor is required, all
• for optimal performance with difficult- DITRA-HEAT and DITRA-HEAT-DUO seams
to-bond-to substrates, use Schluter®- and floor/wall transitions must be sealed with
PRIMER-U or other primer suitable for the KERDI-BAND using SET, ALL-SET, FAST-SET,
application. Contact Schluter Systems to or unmodified thin-set mortar; see page 11
determine if PRIMER-U, or suitable primer, is
required for the specific installation
6 WOOD — Floors, InteriorDH-V-T and DHPS-V-T
1 Tile or wood base
Floors, Interior - Existing Vinyl Floors
2 Ceramic, porcelain, or stone tile Areas of Application of this Handbook, TCNA EJ171, and TTMAC
• over any even and structurally sound substrate 301 MJ
3 RONDEC
with existing vinyl flooring
Setting and Grouting Materials
4 DILEX-EKE • interior dry or wet areas
• Fast-setting modified thin-set mortar - ANSI
Limitations A118.4F or ANSI A118.15F
5 SET, ALL-SET, FAST-SET,
or unmodified thin-set mortar • minimum 2" x 2" (50 mm x 50 mm) tile • unmodified thin-set mortar – ANSI A118.1
• cushioned vinyl unacceptable • grout – ANSI A118.3, A118.6, A118.7, A118.8
6 KERDI-BAND • perimeter bonded vinyl flooring unacceptable
• multiple layers of vinyl unacceptable Setting and Grouting Specifications
7 DITRA-HEAT/-PS or DITRA-HEAT-DUO/-PS • lauan plywood and particle board underlayments • tile – ANSI A108.5
uncoupling membrane and heating cables are unacceptable substrates directly beneath • grout – ANSI A108.6, A108.9, A108.10
DITRA-HEAT/-PS or DITRA-HEAT-DUO/-PS and
8 FAST-SET or fast-setting modified
thin-set mortar must be removed and/or replaced with plywood Other Considerations
or OSB prior to membrane installation. However, • DITRA-HEAT and DITRA-HEAT-DUO are adhered
9 PRIMER-U lauan and particle board are acceptable directly to the vinyl flooring using FAST-SET or fast-setting
beneath the existing vinyl modified thin-set mortar suitable for bonding to
10 Existing vinyl vinyl. As an alternative, a suitable cement-based
Requirements
• for wood substrates, subfloor/underlayment embossing leveler or ALL-SET or an appropriate
11 Plywood or OSB
configuration according to detail DH-W16-T, modified thin-set mortar can be used to skim
6 coat the vinyl to provide a bonding surface. When
12 Joists, I-joists, or 3 DH-W19-T, DH-W24-T, or DH-W-S
trusses skim coat is cured, DITRA-HEAT and DITRA-
4 1 Substrate Preparation HEAT-DUO are adhered to the skim coat using
• ensure that the structure beneath the vinyl is SET or unmodified thin-set mortar. See page 27
6 sound and adequate
5 for discussion on latex-modified thin-set mortars
2
• ensure that vinyl is well adhered sandwiched between two impervious layers
11 10 • remove any wax and clean vinyl
7 • seaming DITRA-HEAT and DITRA-HEAT-DUO,
8 • for wood substrates, nail off floor with ring shank including floor/wall connections, with KERDI-
flooring nails every 4" (102 mm) o.c. – fasteners BAND may be appropriate in cases where a break
must pass through entire thickness of assembly in the water line of an ice maker or dishwasher can
with minimal penetration into joists damage pre-existing moisture-sensitive substrates
12 EL & STICK • any leveling of the subfloor must be done prior and underlayments. KERDI-BAND floor/wall
PE
to installing Schluter®-DITRA-HEAT and DITRA- connections are just as easily concealed with
•
•
9 HEAT-DUO wood base as with tile. KERDI-BAND floor/wall
PEEL &
TICK
• for optimal performance with difficult-to-bond- connections in dishwasher alcoves are parged
&S
S
TI
to substrates, use Schluter®-PRIMER-U or other
EL
with thin-set mortar; see page 11
CK
PE •
primer suitable for the application • vapor barrier on crawl space floors according to
Movement Joints regional building codes
• DITRA-HEAT and DITRA-HEAT-DUO do • certain moisture-sensitive stones, e.g., green
not eliminate the need for movement joints, marble, or resin-backed tiles may require special
including perimeter joints, within the tiled surface. setting materials. Consult stone supplier and
Movement joints must be installed in accordance Schluter-Systems for more information
with industry standards and norms; see page 14
DH-SP-TS and DHPS-SP-TS
1 Ceramic, porcelain, or stone tile
Floors, Interior - Structural Plank Subfloor
2 SET, ALL-SET, FAST-SET, Areas of Application Movement Joints
or unmodified thin-set mortar • over structural plank subfloors • DITRA-HEAT and DITRA-HEAT-DUO do
• interior dry or wet areas not eliminate the need for movement joints,
3 DITRA-HEAT/-PS or DITRA-HEAT-DUO/-PS
uncoupling membrane and heating cables including perimeter joints, within the tiled surface.
Limitations Movement joints must be installed in accordance
4 ALL-SET, FAST-SET, • minimum 2" x 2" (50 mm x 50 mm) tile with industry standards and norms; see page 14
or modified thin-set mortar of this Handbook, TCNA EJ171, and TTMAC 301
MJ
Requirements
5 PRIMER-U
• maximum spacing of joists is 24" (610 mm) o.c.
Setting and Grouting Materials
6 Plywood or OSB underlayment • double layer wood floor consisting of: • modified thin-set mortar - ANSI A118.11
• minimum structural plank subfloor • unmodified thin-set mortar – ANSI A118.1
7 Structural plank subfloor thickness – 3/4" (19 mm) • grout – ANSI A118.3, A118.6, A118.7, A118.8
• minimum underlayment thickness –
8 Joists 15/32", 1/2" nom. (13 mm)
1 Setting and Grouting Specifications
2 • tile – ANSI A108.5
Substrate Preparation • grout – ANSI A108.6, A108.9, A108.10
6 • verify that subfloor planks are properly fastened
3 to framing members Other Considerations
4 • underlayment – minimum 15/32", 1/2" nom. (13 • vapor barrier on crawl space floors according to
7 mm)-thick Exposure 1, plugged-face plywood regional building codes
or OSB with 1/8" (3 mm) gap between sheets; • where a waterproof floor is required, all
DITRA-HEAT and DITRA-HEAT-DUO seams
see page 17 for underlayment installation
8 and floor/wall transitions must be sealed with
EL & STICK guidelines
PE KERDI-BAND using SET, ALL-SET, FAST-SET, or
• any leveling of the subfloor must be done prior unmodified thin-set mortar; see page 11
5
•
•
to installing DITRA-HEAT and DITRA-HEAT-DUO
PEEL &
• certain moisture-sensitive stones, e.g., green
TICK
• for optimal performance with difficult-to-bond- marble, or resin-backed tiles may require special
&S
S
to substrates, use Schluter®-PRIMER-U or other
TI
EL
setting materials. Consult stone supplier and
CK
PE •
primer suitable for the application. Contact Schluter-Systems for more information
Schluter Systems to determine if PRIMER-U,
or suitable primer, is required for the specific
installation
WOOD — Floors, Interior 7CONCRETE
Every substrate presents unique challenges
There are various challenges associated with the installation of hard surface coverings on concrete substrates.To begin, the coefficient of thermal
expansion of concrete is close to twice that of ceramic tile. Additionally, tile contractors are often expected to install tile over young concrete
(concrete cured less than 28 days). However, rigid surface coverings installed over young concrete are susceptible to damage as a result of
shrinkage during curing. Pre-stressed/post-tensioned concrete slabs are also commonplace in today’s construction environment. Although pre-
stressing is used to help control deflections in concrete structures, these slabs are still subject to deformations caused by changes in moisture,
temperature, and loading. Many concrete slabs on or below grade are subject to moisture migration, which can be problematic. Furthermore,
these structures experience the same deformations as stated above.
The uncoupling function of Schluter®-DITRA-HEAT protects the ceramic or stone tile covering by neutralizing the differential
movement stresses between the concrete substrate and the tile, thus eliminating the major cause of cracking and delaminating
of the tiled surface.
The DITRA-HEAT membrane’s waterproofing ability not only protects the substrate from harmful substances, it also slows the drying
of fresh concrete, which reduces the chances of cracking and curling of the slab.
The configuration of the DITRA-HEAT matting provides free space to accommodate vapor emissions from the concrete slab. This
allows the installation of DITRA-HEAT and the tile covering as soon as the slab can be walked upon. Vapor management is also
essential for slabs subject to moisture migration.
Since DITRA-HEAT is virtually incompressible within the tile assembly, the advantages of uncoupling are achieved without sacrificing
point load distribution capabilities.
By addressing all of the challenges associated with today’s fast construction methods, DITRA-HEAT provides a durable installation system for
ceramic and stone tile over concrete substrates.
DITRA-HEAT combines the flexibility of loose heating cables with the ease of installation of mat systems. Cables can be placed wherever heat is
desired, without creating height differences in the floor. Self-leveling compounds are not required to encapsulate the cables, significantly reducing
installation time and effort compared to uncoupling membranes over other electric floor warming systems. Concrete substrates can absorb heat
energy increasing the time it takes for floors to warm up, particularly when there is no insulation layer below the concrete. In some cases, floors
may never reach the desired temperature. DITRA-HEAT-DUO features an integrated thermal break to reduce sound transmission through floor-
ceiling assemblies, reduce heat loss to concrete substrates, and improve floor warming response times.
DH-C-TS and DHPS-C-TS Floors, Interior - Ceramic or Stone Tile
1 Ceramic, porcelain, or stone tile Concrete subfloor
Areas of Application • sound control floors - Schluter perimeter
2 SET, ALL-SET, FAST-SET, • over any structurally sound and even concrete movement joints recommended to help limit
or unmodified thin-set mortar subfloor sound energy transfer
• young concrete (concrete cured less than 28 Substrate Preparation
3 DITRA-HEAT/-PS or DITRA-HEAT-DUO/-PS days). Note: when installing the peel-and-stick • any leveling of the subfloor must be done prior to
uncoupling membrane and heating cables membranes over young concrete, the maximum installing DITRA-HEAT and DITRA-HEAT-DUO
allowable surface moisture is 75% RH • for optimal performance with difficult-to-bond-to
4 SET, ALL-SET, FAST-SET, substrates, use Schluter®-PRIMER-U or other
• on or below grade concrete subject to moisture
or unmodified thin-set mortar primer suitable for the application
migration
5 Concrete • post-tensioned or pre-stressed concrete Movement Joints
• cracked concrete • DITRA-HEAT and DITRA-HEAT-DUO do
not eliminate the need for movement joints,
Limitations including perimeter joints, within the tiled surface.
1 • minimum 2" x 2" (50 mm x 50 mm) tile Movement joints must be installed in accordance
• concrete slabs subject to moisture migration with industry standards and norms; see page 14
2 must have all seams in DITRA-HEAT/-PS and of this Handbook, TCNA EJ171, and TTMAC
DITRA-HEAT-DUO/-PS sealed with KERDI- 301 MJ
4 BAND using Schluter SET®, Schluter ALL-SET®,
3 Schluter FAST-SET®, or unmodified thin-set Setting and Grouting Materials
mortar • unmodified thin-set mortar – ANSI A118.1
5 • any cracks in concrete subfloor must exhibit • grout – ANSI A118.3, A118.6, A118.7, A118.8
in-plane movement only; thin-set tile assemblies, Setting and Grouting Specifications
including those incorporating DITRA-HEAT or • tile – ANSI A108.5
EL & STICK
PE DITRA-HEAT-DUO, cannot accommodate
differential vertical displacement • grout – ANSI A108.6, A108.9, A108.10
•
•
PEEL &
Other Considerations
TICK
Requirements
• where a waterproof floor is required, all
&S
• slab to be structurally sound
S
TI
EL
DITRA-HEAT and DITRA-HEAT-DUO seams and
CK
PE •
• slab to be free of waxy or oily films and curing floor/wall transitions must be sealed with KERDI-
compounds (when present, mechanical scarifying BAND using unmodified thin-set mortar; see
is necessary) page 11
• the installation of DITRA-HEAT or DITRA-HEAT- • certain moisture-sensitive stones, e.g., green
DUO and tile can begin as soon as the slab can marble, or resin-backed tiles may require special
be walked upon setting materials. Consult stone supplier and
• slab to be free of standing water Schluter-Systems for more information
• consider the use of DITRA-HEAT-DUO to improve
the response time of DITRA-HEAT in applications
over concrete. See page 34 for more information
8 CONCRETE — Floors, Interior - Ceramic or Stone TileFloors, Interior - Gauged Porcelain Tiles and Tile Panels
DH-C-GP and DHPS-C-GP Areas of Application •
residual moisture in gypsum screed,
2.0% (percentage by volume) or less
• over any structurally sound and even
1 Gauged porcelain tiles or tile panels before installing DITRA-HEAT
(7/32" [5.5 mm] and thicker) concrete subfloor
• installation must conform to this
•
over gypsum concrete underlayment
2 ALL-SET handbook and ANSI A108.19,
placed over structurally sound concrete
including, but not limited to,
3 DITRA-HEAT/-PS uncoupling membrane subfloors
and heating cables requirements for mortar coverage,
•
young concrete (concrete cured less movement joints, grout joint size, and
4 ALL-SET than 28 days). Note: when installing lippage
the peel-and-stick membranes
5 Concrete or gypsum concrete over concrete over young concrete, the maximum Substrate Preparation
allowable surface moisture is 75% RH •
any leveling or sloping of the slab
• on or below grade concrete subject to or assembly must be done prior to
moisture migration installing DITRA-HEAT
• post-tensioned or pre-stressed • gypsum – follow manufacturer’s
2 1 concrete directions
4 • cracked concrete • for optimal performance with difficult-
3 to-bond-to substrates, use Schluter®-
• interior dry or wet areas PRIMER-U or other primer suitable for
5 the application.
Limitations
Movement Joints
EL & STICK
• minimum thickness of gauged porcelain
PE
tiles and tile panels 7/32" (5.5 mm) • DITRA-HEAT does not eliminate the
need for movement joints, including
•
•
•
DITRA-HEAT membrane only (no
PEEL &
TICK
perimeter movement joints, within the
DITRA-HEAT-DUO)
&S
tile surface. Movement joints must be
S
TI
EL CK
PE •
•
recommended installations in normal installed in accordance with industry
commercial and light institutional areas standards and norms; see page 14
such as public spaces of restaurants of this Handbook, TCNA EJ171, and
and hospitals. Commercial kitchen TTMAC 301 MJ
applications are not approved. •
concrete floors may incorporate
•
DITRA-HEAT membrane and gauged various movement joints; see page
porcelain tile panels must be installed 15 of this Handbook, for guidelines on
with Schluter ALL-SET® how to treat the different types of joints
(control/contraction joints, expansion
•
concrete subfloors and gypsum
joints, etc.)
concrete underlayment over concrete
subfloors only; no wood subfloors Materials Specifications
•
concrete slabs subject to moisture • gauged porcelain tiles and tile panels –
migration must have all seams in ANSI A137.3
DITRA-HEAT sealed with Schluter®-
KERDI-BAND • grout – ANSI A118.3, A118.7
• any cracks in concrete subfloor must Setting and Grouting Specifications
exhibit in-plane movement only; thin-
set tile assemblies, including those • tile – ANSI A108.19
incorporating DITRA-HEAT, cannot • grout – ANSI A108.6, A108.10
accommodate differential vertical
displacement Other Considerations
Requirements • since DITRA-HEAT must bond to the
gypsum concrete, follow gypsum
• slab to be structurally sound manufacturer’s recommendations
•
slab to be free of waxy or oily films regarding primers and/or special
and curing compounds (when present, surface preparation before installing
mechanical scarifying is necessary) DITRA-HEAT
• the installation of DITRA-HEAT and tile •
where a waterproof floor is required,
can begin as soon as the slab can be all DITRA-HEAT seams and floor/wall
walked upon transitions must be sealed with KERDI-
BAND; see waterproofing details (DH-
• slab to be free of standing water WP) on page 11 of this Handbook for
• gypsum – where radiant heat tubes are more information
laid over the subfloor, gypsum poured
to a height that is 3/4" (19 mm) above
the tops of the tubes is required before
DITRA-HEAT
CONCRETE — Floors, Interior - Gauged Porcelain Tiles and Tile Panels 9GYPSUM
Every substrate presents unique challenges
Bonding ceramic or stone tiles directly to gypsum underlayment substrates is generally considered questionable or not recommended.
The challenges associated with gypsum-based underlayments include the requirement of an extended drying period before installing tile
and continued sensitivity to the reintroduction of moisture throughout the life of the installation. In addition, since the coefficient of thermal
expansion of gypsum underlayment is substantially greater than that of ceramic tile, shear stresses caused by temperature fluctuations
can result in delamination or cracking of the tile covering. This is particularly important when gypsum underlayment is used as a thermal
mass for hydronic radiant heated floors. With the increasing popularity of hydronic radiant heated floors, which typically utiliize gypsum
underlayment, tile installers need a reliable installation system to address these issues.
The uncoupling function of Schluter®-DITRA-HEAT protects the ceramic or stone tile covering by neutralizing the differential
movement stresses between the gypsum underlayment substrate and the tile, thus eliminating the major cause of cracking and
delaminating of the tiled surface.
The DITRA-HEAT membrane’s waterproofing function prevents the reintroduction of moisture to gypsum underlayment, which,
if not prevented, could significantly compromise performance of the underlayment and lead to damage of the tiled surface.
The configuration of the DITRA-HEAT matting provides free space to accommodate vapor emissions from the gypsum.
Since DITRA-HEAT is virtually incompressible within the tile assembly, the advantages of uncoupling are achieved without
sacrificing point load distribution capabilities.
By addressing all of the challenges associated with today’s fast, lightweight construction methods, DITRA-HEAT provides a durable
installation system for ceramic and stone tile over gypsum substrates.
DITRA-HEAT combines the flexibility of loose heating cables with the ease of installation of mat systems. Cables can be placed
wherever heat is desired, without creating height differences in the floor. Self-leveling compounds are not required to encapsulate the
cables, significantly reducing installation time and effort compared to uncoupling membranes over other electric floor warming systems.
DITRA-HEAT is useful even in applications where hydronic radiant-heating tubes are incorporated in gypsum underlayment, as there may
be times when floor warming is desirable while radiant heating is not necessary.
DH-G-TS and DHPS-G-TS
Floors, Interior - Ceramic or Stone Tile
1 Ceramic, porcelain, or stone tile
2 SET, ALL-SET, FAST-SET,
Gypsum underlayment
or unmodified thin-set mortar Areas of Application Movement joints must be installed in accordance
• over gypsum underlayment placed over with industry standards and norms; see page 14
3 DITRA-HEAT/-PS or DITRA-HEAT-DUO/-PS structurally sound wood or concrete subfloors of this Handbook, TCNA EJ171, and TTMAC
uncoupling membrane and heating cables • interior dry or wet areas 301 MJ.
4 SET, ALL-SET, FAST-SET, Limitations Setting and Grouting Materials
or unmodified thin-set mortar • minimum 2" x 2" (50 mm x 50 mm) tile • unmodified thin-set mortar – ANSI A118.1
• DITRA-HEAT-DUO not recommended over • grout – ANSI A118.3, A118.6, A118.7, A118.8
5 PRIMER-U heated floors
Requirements Installation Specifications
6 Gypsum underlayment
• for wood substrates, subfloor/underlayment • gypsum – follow manufacturer’s directions
configuration according to detail DH-W16-T, • tile – ANSI A108.5
DH-W19-T, or DH-W24-T. • grout – ANSI A108.6, A108.9, A108.10
1 • where radiant heat tubes are laid over the
2 subfloor, gypsum poured to a height that is 3/4" Other Considerations
(19 mm) above the tops of the tubes is required • since DITRA-HEAT and DITRA-HEAT-DUO
before installing DITRA-HEAT. must bond to the gypsum underlayment, follow
6
4 3 • residual moisture in gypsum screed, 2.0% gypsum manufacturer’s directions regarding
(percentage by volume) or less before installing primers and/or special surface preparation before
DITRA-HEAT and DITRA-HEAT-DUO. installing DITRA-HEAT and DITRA-HEAT-DUO.
• Schluter®-PRIMER-U suitable for use over
Substrate preparation gypsum underlayment. Refer to the Schluter®-
EL & STICK
PE • gypsum – follow manufacturer’s directions PRIMER-U data sheet for more information.
5
•
• for optimal performance with difficult-to-bond-to
•
• where a waterproof floor is required, all
PEEL &
TICK
substrates, use Schluter®-PRIMER-U or other DITRA-HEAT and DITRA-HEAT-DUO seams
&S
primer suitable for the application. Contact and floor/wall transitions must be sealed with
S
TI
EL CK
PE
Schluter Systems to determine if PRIMER-U,
•
KERDI-BAND using SET, ALL-SET, FAST-SET, or
or suitable primer, is required for the specific unmodified thin-set mortar; see page 11.
installation • certain moisture-sensitive stones, e.g., green
Movement Joints marble, or resin-backed tiles may require special
• DITRA-HEAT and DITRA-HEAT-DUO do setting materials. Consult stone supplier and
not eliminate the need for movement joints, Schluter-Systems for more information.
including perimeter joints, within the tiled surface. • vapor barrier on crawl space floors according to
regional building codes.
10 GYPSUM — Floors, Interior - Ceramic or Stone TileWATERPROOFING - FLOORS
Every substrate presents unique challenges
Today’s construction methods, which include the use of lightweight, moisture-sensitive materials, such as plywood, OSB, and gypsum
underlayment, have made the installation of hard surface coverings particularly challenging. If wood or gypsum underlayment substrates
are exposed to moisture, the tile covering above can be damaged as a result.
Typical areas that require waterproofing include tub surrounds and showers. However, there are other commonly tiled areas that may,
through unexpected circumstances, become exposed to significant amounts of water; for example, an overflowed toilet, or ruptured
dishwasher, icemaker, or washing machine lines, which can result in flooding.
Waterproofing these floors can save an owner from replacing the tile assembly and substructure in the event of a leak.
Schluter®-DITRA-HEAT and DITRA-HEAT-DUO installations can be made waterproof with minimal effort. Since the matting is made
of waterproof polypropylene, the only extra step necessary is to seal the seams and floor/wall connections. This is easily accomplished
by applying KERDI-BAND to these areas using SET, ALL-SET, FAST-SET, or an unmodified thin-set mortar. The result is a waterproof
installation that will not suffer damage in the event of an unexpected water leak. KERDI-DRAIN or KERDI-LINE may be used to provide
drainage in DITRA-HEAT and DITRA-HEAT-DUO installations.
DH-WP and DHPS-WP
Floors, Interior - Ceramic or Stone Tile
1 Tile or wood base
Areas of Application Other Considerations
2 Ceramic, porcelain or stone tile
• over any even and structurally sound • seaming DITRA-HEAT and DITRA-HEAT-DUO,
3 RONDEC substrate where waterproofing is desired including floor/wall connections, with KERDI-
BAND may be appropriate in cases where
4 DILEX-EKE Limitations
a break in the water line of an ice maker or
• minimum 2" x 2" (50 mm x 50 mm) tile
dishwasher can damage pre-existing moisture-
5 SET, ALL-SET, FAST-SET, • all DITRA-HEAT installations can be made
or unmodified thin-set mortar sensitive substrates and underlayments.
waterproof by sealing the joints with
KERDI-BAND floor/wall connections are just
6 KERDI-BAND Schluter®-KERDI-BAND. For applications
as easily concealed with wood base as with
requiring membrane compliance with or
tile. KERDI-BAND floor/wall connections in
7 DITRA-HEAT/-PS or DITRA-HEAT-DUO/-PS certification to the ANSI A118.10 American
uncoupling membrane and heating cables dishwasher alcoves are parged with thin-set
National Standard Specifications for Load
mortar.
8 Thin-set mortar per appropriate detail Bearing, Bonded, Waterproof Membranes
• DITRA-HEAT-PS and DITRA-HEAT-DUO-PS
for Thin-Set Ceramic Tile and Dimension
membranes are waterproof when joints are
9 PRIMER-U per appropriate detail Stone Installation, select the DITRA-HEAT
properly sealed with KERDI-BAND, therefore
or DITRA-HEAT-DUO membranes that are
peel-and-stick membranes are suitable for
installed with thin-set mortar. Alternatively,
use in a bathroom/wet room if meeting
the DITRA-HEAT-PS or DITRA-HEAT-DUO-
specifications ANSI A118.10 is not required.
PS membranes may be covered with the
• in some applications, the vertical section of
Schluter®-KERDI membrane, which is
the floor/wall transition will not accept a bond
certified to meet ANSI A118.10.
6 3 to unmodified thin-set mortar. Connections
Requirements to such elements can be achieved using
4 1 • all seams in DITRA-HEAT and DITRA-HEAT- KERDI-FIX or suitable trowel-applied
7 DUO matting and floor/wall transitions must waterproofing materials, such as those that
be sealed with KERDI-BAND using SET, require atmospheric moisture to cure (e.g.,
5 2
ALL-SET, FAST-SET, or unmodified thin-set urethane sealant).
8 mortar. Note: KERDI-BAND must lap DITRA- • KERDI-DRAIN-F may be used to provide
HEAT at seams and at floor/wall transitions drainage in DITRA-HEAT and DITRA-
by a minimum of 2" (50 mm) in order to HEAT-DUO applications. DITRA-HEAT
EL & STICK
PE maintain waterproof integrity and DITRA-HEAT-DUO are sealed to the
•
•
KERDI waterproofing collar on KERDI-
PEEL &
TICK
DRAIN-F using SET, ALL-SET, FAST-SET, or
9
&S
unmodified thin-set mortar.
S
TI
EL CK
PE •
WATERPROOFING — Floors, Interior 11SHOWER ASSEMBLY
Showers – Ceramic or stone tile
Schluter®-DITRA-HEAT Shower Application
DH-SH
5
8 8
4
2 1 1
2
3
6
8 8
9
7
7 7
15
16
6 10a
10b
3
11a 11b 13
12 3
14
15 14
15
1 Ceramic or stone tile 11 Base: 15 Wood or concrete subfloor
SET®, ALL-SET®, FAST-SET®, a. KERDI-SHOWER-T/-TS/-TT 16 DILEX profile (optional)
2
or unmodified thin-set mortar b. KERDI-SHOWER-LT/-LTS
Bench (not shown, optional):
3 KERDI waterproofing membrane Alternative (not shown):
• KERDI-BOARD-SB
• Mortar bed
4 KERDI-BOARD waterproof building panel • KERDI-BOARD
12 KERDI-BOARD-SC curb
5 KERDI-BOARD-ZT/-ZS washers and screws Niche (not shown, optional):
Alternatives (not shown): • KERDI-BOARD-SN
6 KERDI-BAND • KERDI-BOARD
waterproofing strips waterproof building panel
7 KERDI-KERECK-F waterproofing corners • Built-up curb DITRA-HEAT system installation in a
shower requires KERDI be installed on
top. The Schluter-Shower System and
8 KERDI-SEAL-PS/-MV 13 SHOWERPROFILE-WSK/-WSL
KERDI family of products have been
seals or KERDI-FIX Shower profile tested and are listed and approved as
sealant and bonding compound a fully waterproof system. Installation of
Alternative (not shown): KERDI over DITRA-HEAT in a shower
9 Solid backing • SHOWERPROFILE-WS/-WSC ensures a dry environment for the heating
cable. The KERDI membrane was
14 DITRA-HEAT/-PS and DITRA-HEAT-DUO/-PS evaluated and is certified waterproof by
10 Drain: ICC-ES (Report ESR-2467). The Schluter-
Electric floor warming and uncoupling membrane Shower System was evaluated and is
a. KERDI-DRAIN EL & STICK
certified waterproof by ICC-ES (Report
PE
b. KERDI-LINE PMG-1204).
•
•
PEEL &
TICK
&S
S
TI
EL CK
PE •
12 SHOWER ASSEMBLYShowers – Ceramic or stone tile
Schluter®-DITRA-HEAT Shower Application Note: Please refer to the Schluter-Shower System
Installation Handbook for installation instructions and
DH-SH warranty criteria for the Schluter-Shower System.
Areas of Application Safety
• Interior showers with or without curbless applications. • Extra care must be taken for repairs to the DITRA-HEAT heating cable in wet areas.
• Interior intermittent use steam showers (e.g., residential applications). See detail After repairs and waterproofing connections are completed, Schluter-Systems
K-SSH in the Schluter-Shower System Installation Handbook for more information. recommends flood testing the shower before re-tiling.
• Over wood or concrete subfloors. • Heating cable factory cold lead splice must not be installed in the shower area.
• For product certification information see Testing and Certification section on pages
Limitations 29-30.
• Certain glass tiles may not be compatible with bonded waterproof membranes and/or
may require special setting materials. Consult glass tile manufacturer and Schluter®- Substrate Preparation
Systems for more information. • Verify that subfloor panels and solid backing are properly fastened to framing
• Certain moisture sensitive stones, e.g., green marble, or resin-backed tiles may not members.
be appropriate for use in wet areas such as showers or may require special setting • Any leveling of the subfloor must be done prior to installing
materials. Consult stone supplier and Schluter-Systems for more information. KERDI-SHOWER-T/-TS/-TT/-LT/-LTS/-R, KERDI-BOARD-SC/-SB, DITRA-HEAT/-PS
• Do not use sawn lumber curbs on concrete subfloors subject to moisture migration. and DITRA-HEAT-DUO/-PS membranes.
• For optimal performance with difficult-to-bond-to substrates, use Schluter®-PRIMER-U
Requirements or other primer suitable for the application. Contact Schluter Systems to determine if
• Plywood, OSB, or concrete subfloor must be clean, even, and load bearing. PRIMER-U, or suitable primer, is required for the specific installation.
• For wood substrates, subfloor/underlayment configuration according to detail
DH-W16-T, DH-W19-T, DH-W24-T, or DH-W-S. Solid Backing Materials
• For curbless applications: Recessing the floor of a bathroom must be done in a way • Gypsum wallboard – ASTM C1396/C1396M
that preserves the structural integrity and safety of the construction. This may require • Cementitious backer unit – ANSI A118.9 or ASTM C1325
the services of a qualified design professional (e.g., architect, engineer, etc.). • Fiber-cement backerboard – ASTM C1288
• Solid backing – gypsum wallboard, cementitious backer unit, • Fiber-reinforced water-resistant gypsum
fiber-cement backerboard, fiber-reinforced water-resistant gypsum backerboard, backerboard – ASTM C1278
coated glass mat water-resistant gypsum backerboard, Portland cement mortar, • Coated glass mat water-resistant gypsum backerboard – ASTM C1178
concrete, or masonry. • Portland cement mortar – ANSI A108.1B
• Minimum KERDI-BOARD thickness – 1/2" (12.5 mm) for studs spaced at • Concrete
16" (40.6 cm) o.c. and 3/4" (19 mm) for studs spaced at 24" (61.0 cm) o.c. • Masonry
• KERDI-BOARD shall be fastened to wood or metal framing with appropriate screws
(i.e., KERDI-BOARD-ZS or coarse thread wood screw for wood studs and self-tapping Setting and Grouting Materials
for metal studs) and corresponding KERDI-BOARD-ZT washers. Screws must reach • Unmodified thin-set mortar – ANSI A118.1
a depth of at least 3/4" (20 mm) in wood studs and 3/8" (10 mm) in metal studs. • Grout – ANSI A118.3, A118.6, A118.7
Maximum allowable on-center fastener spacing is 12" (30 cm) for walls and 6" (15 cm)
for ceilings.
Installation Specifications
• KERDI or KERDI-BOARD shall be installed up to the height of the showerhead at
• Solid backing panels – follow manufacturer’s instructions
minimum.
• Portland cement mortar bed – ANSI A108.1B
• Any protrusions through the KERDI or KERDI-BOARD (e.g., showerhead, mixing valve,
etc.) must be treated with KERDI-SEAL-PS/-MV seals, KERDI-FIX or suitable sealant. • Tile – ANSI A108.5
• Base – KERDI-SHOWER-T/-TS/-TT/-LT/-LTS or Portland cement mortar bed. • Grout – ANSI A108.6, A108.10
• Ramp – KERDI-SHOWER-R or Portland cement mortar bed.
• Curb – KERDI-BOARD-SC, KERDI-BOARD, concrete, masonry block, or sawn lumber Other Considerations
sheathed with solid backing (see above). • Acceptance of electric floor warming in a shower and this detail must be
• Bench – KERDI-BOARD-SB, KERDI-BOARD, concrete, masonry block, or sawn verified by the local inspector or authority having jurisdiction (AHJ).
lumber sheathed with solid backing (see above). • KERDI is required on top of DITRA-HEAT installations in the shower. Schluter-Systems
• All horizontal surfaces (e.g., benches, curbs, window sills, shelves, etc.) must be chooses to be conservative and to ensure everything is protected. Note: DITRA-HEAT-
sloped toward the shower drain. E-HK heating cables are rated for wet applications per CAN/CSA-C22.2 No.130-
16. DITRA-HEAT and DITRA-HEAT-DUO membranes have been found to meet or
• KERDI-DRAIN/-LINE shall be properly supported. Additional thin-set mortar may be
exceed requirements of ANSI A118.10. DITRA-HEAT-PS and DITRA-HEAT-DUO-PS
needed to bed the KERDI-DRAIN for this detail.
do not meet or exceed requirements of ANSI A118.10. If meeting ANSI A118.10
• KERDI-DRAIN/-LINE shall be connected to the waste line; use ABS cement for ABS
specifications is required and peel-and-stick membranes are to be used, the entire
drains, PVC cement for PVC drains, a no-hub coupling for stainless steel drains with
area must be covered with KERDI membrane in conjunction with appropriate KERDI
no-hub outlets, and thread sealing compound or tape for stainless steel drains with
components.
threaded outlets.
• Curbless tiled showers rely on the slope of the floor to effectively contain water in the
• When using the stainless steel KERDI-DRAIN bonding flange, use
immediate shower area and direct water to the drain. Given the wide range of potential
KERDI-FIX to bond KERDI to the drain.
configurations, it isn’t possible to address them all in this Handbook.
• DITRA-HEAT heating cables must be installed in the DITRA-HEAT/-PS or DITRA-
• For curbless applications: waterproofing must be installed in all areas subject to water
HEAT-DUO/-PS membrane. KERDI must be installed over the heating cables and
exposure.
DITRA-HEAT/-PS or DITRA-HEAT-DUO/-PS in the shower.
• SHOWERPROFILE-WS/-WSK system profiles can be used to form a splashguard at
• Due to the installation of the DITRA-HEAT membrane on top of the shower tray, it is
the entrance of curbless showers.
necessary to raise the height of the KERDI-DRAIN/LINE. Installation of DITRA-HEAT
• Various building codes and other sources, such as the Americans with Disabilities
membrane on the substrate under the detachable center section for KERDI-DRAIN
Act, include specific requirements for disabled access in public buildings and must be
or under the KERDI-LINE channel body support will provide the proper height
consulted when applicable. Areas of interest may include degree of slope, clearance,
adjustment.
and supporting structures such as grab bars.
• When a curb is used, the heating cables must be installed over the curb in a 3/4"
• Shower grab bars must be anchored in the structure or solid blocking behind KERDI-
wide x 1/4" deep routed section and encased in thin-set mortar. DO NOT install
BOARD.
the heating cable under the curb or go through the curb, as this could cause
damage to the heating cable and curb. After the heating cable is installed, • When KERDI-SHOWER-T/-TS/-TT/-LT/-LTS tray dimensions do not match the
apply KERDI over the routed section of the KERDI-BOARD-SC curb or over dimensions of the shower compartment, the tray may be cut or extended with dry
the entire built-up curb. pack mortar.
• A dedicated heating cable is recommended in the shower area to allow for simple • When KERDI or KERDI-BOARD and tile are installed on the ceiling, the solid backing
disconnection without an impact on the bathroom floor heating in the event that the and fasteners must be able to support the load of the tile and setting and grouting
shower heating cable is damaged and unable to be repaired. Multiple heating cables materials.
may be installed on a single thermostat, up to the 15 amp limit. However, for ease of • A water test is recommended before setting tile to verify a successful installation. Wait
installation, a maximum of two heating cables per thermostat and a deep junction box 24 hours minimum after the membrane installation is complete to allow for final set of
is recommended. Refer to electrical codes for proper junction box selection for your thin-set mortar and ensure waterproof performance at seams and connections. For
installation. curbless showers a temporary dam (e.g., a 2x4 and silicone sealant, plastic sheeting
• The minimum spacing from the edge of any drain pipe must be 4" (100 mm). With a and sand, etc.) must be provided at the threshold to perform the water test.
linear drain, the cable must be 4" (100 mm) from the actual drain pipe and a minimum • Schluter-Systems profiles may be used to finish and protect outside corners and
of 1" (25 mm) from the channel body edges. eliminate the use of sealant at inside corners.
• Heating cables must be spaced a minimum of 8" (200 mm) from steam inlets in • SHOWERPROFILE-S/-R profiles eliminate the need for cutting wedges of tile by
intermittent use steam showers and continuous use steam rooms. covering the exposed wall area where the floor slopes to KERDI-LINE.
SHOWER ASSEMBLY 13You can also read