Pygame Zero Documentation - Release 1.2 Daniel Pope - Read the Docs
←
→
Page content transcription
If your browser does not render page correctly, please read the page content below
Pygame Zero Documentation
                  Release 1.2

                 Daniel Pope

                    Jan 03, 2022
Contents

1   Courses                                                                                                                                                                      3
    1.1 Introduction to Pygame Zero . . . . . . . . . . . . . . . . . . . . . . . . . . . . . . . . . . . . . . .                                                                3
    1.2 Migrating from Scratch . . . . . . . . . . . . . . . . . . . . . . . . . . . . . . . . . . . . . . . . .                                                                 7

2   Reference                                                                                                                                                                   15
    2.1 Event Hooks . . . . . . . . . . . . . . . . . . . . . . . . . . . . . . . . . . . . . . . . . . . . . . .                                                               15
    2.2 Built-in Objects . . . . . . . . . . . . . . . . . . . . . . . . . . . . . . . . . . . . . . . . . . . . .                                                              22

3   User Guide                                                                                                                                                                  43
    3.1 Installing Pygame Zero . . . . . . . . . . . . .    .   .   .   .   .   .   .   .   .   .   .   .   .   .   .   .   .   .   .   .   .   .   .   .   .   .   .   .   .   43
    3.2 Running Pygame Zero in IDLE and other IDEs          .   .   .   .   .   .   .   .   .   .   .   .   .   .   .   .   .   .   .   .   .   .   .   .   .   .   .   .   .   44
    3.3 Examples . . . . . . . . . . . . . . . . . . . .    .   .   .   .   .   .   .   .   .   .   .   .   .   .   .   .   .   .   .   .   .   .   .   .   .   .   .   .   .   45
    3.4 Tutorials and Resources . . . . . . . . . . . .     .   .   .   .   .   .   .   .   .   .   .   .   .   .   .   .   .   .   .   .   .   .   .   .   .   .   .   .   .   54
    3.5 Other libraries like Pygame Zero . . . . . . . .    .   .   .   .   .   .   .   .   .   .   .   .   .   .   .   .   .   .   .   .   .   .   .   .   .   .   .   .   .   55
    3.6 Changelog . . . . . . . . . . . . . . . . . . .     .   .   .   .   .   .   .   .   .   .   .   .   .   .   .   .   .   .   .   .   .   .   .   .   .   .   .   .   .   57

4   Stickers by                                                                                                                                                                 59
    4.1 Laptop Stickers . . . . . . . . . . . . . . . . . . . . . . . . . . . . . . . . . . . . . . . . . . . . . .                                                             59

5   Improving Pygame Zero                                                                                                                                                       61
    5.1 Roadmap . . . . . . . . . . . . . . . . . . . . . . . . . . . . . . . . . . . . . . . . . . . . . . . . .                                                               61
    5.2 Principles of Pygame Zero . . . . . . . . . . . . . . . . . . . . . . . . . . . . . . . . . . . . . . . .                                                               62
    5.3 Contributing to Pygame Zero . . . . . . . . . . . . . . . . . . . . . . . . . . . . . . . . . . . . . .                                                                 63

Index                                                                                                                                                                           67

                                                                                                                                                                                 i
ii
Pygame Zero Documentation, Release 1.2

Pygame Zero is for creating games without boilerplate.
It is intended for use in education, so that teachers can teach basic programming without needing to explain the Pygame
API or write an event loop.

Contents                                                                                                             1
Pygame Zero Documentation, Release 1.2

2                                        Contents
CHAPTER           1

                                                                                                        Courses

    1.1 Introduction to Pygame Zero

    1.1.1 Creating a window

    First, create an empty file called intro.py.
    Verify that this runs and creates a blank window by running
    pgzrun intro.py

    Everything in Pygame Zero is optional; a blank file is a valid Pygame Zero script!
    You can quit the game by clicking on the window’s close button or by pressing Ctrl-Q (-Q on Mac). If the game
    stops responding for any reason, you may need to terminate it by pressing Ctrl-C in your Terminal window.

    1.1.2 Drawing a background

    Next, let’s add a draw() function and set window dimensions. Pygame Zero will call this function whenever it needs
    to paint the screen.
    In intro.py, add the following:
1   WIDTH = 300
2   HEIGHT = 300
3

4   def draw():
5       screen.fill((128, 0, 0))

    Re-run pgzrun intro.py and the screen should now be a reddish square!
    What is this code doing?
    WIDTH and HEIGHT control the width and height of your window. The code sets the window size to be 300 pixels in
    each dimension.

                                                                                                                    3
Pygame Zero Documentation, Release 1.2
screen is a built-in that represents the window display. It has a range of methods for drawing sprites and shapes.
The screen.fill() method call is filling the screen with a solid colour, specified as a (red, green, blue)
colour tuple. (128, 0, 0) will be a medium-dark red. Try changing these values with numbers between 0 and 255
and see what colors you can create. You can also use a string to name a built-in colour name.
Let’s set up a sprite that we can animate.
1.1.3 Draw a sprite
Before we can draw anything, we’ll need to save an alien sprite to use. You can right click on this one and save it
(“Save Image As. . . ” or similar).
(This sprite has a transparency (or “alpha”) channel, which is great for games! But it’s designed for a dark background,
so you may not be able to see the alien’s space helmet until it is shown in the game).
Tip: You can find lots of free sprites, including this one, on kenney.nl. This one comes from the Platformer Art
Deluxe pack.
You need to save the file in the right place so that Pygame Zero can find it. Create a directory called images and save
the image into it as alien.png. Both of those must be lower case. Pygame Zero will complain otherwise, to alert
you to a potential cross-platform compatibility pitfall.
If you’ve done that, your project should look like this:
.
images/
alien.png
intro.py
images/ is the standard directory that Pygame Zero will look in to find your images.
There’s a built-in class called Actor that you can use to represent a graphic to be drawn to the screen.
Let’s define one now. Change the intro.py file to read:
1 alien = Actor('alien')
2 alien.pos = 100, 56
3
4 WIDTH = 500
5 HEIGHT = alien.height + 20
6
7 def draw():
8 screen.clear()
9 alien.draw()
Your alien should now be appearing on screen! By passing the string 'alien' to the Actor class, it automatically
loads the sprite, and has attributes like positioning and dimensions. This allows us to set the HEIGHT of the window
based on the height of the alien.
The alien.draw() method draws the sprite to the screen at its current position.
4 Chapter 1. CoursesPygame Zero Documentation, Release 1.2
1.1.4 Moving the alien
Let’s set the alien off-screen; change the alien.pos line to read:
alien.topright = 0, 10
Note how you can assign to topright to move the alien actor by its top-right corner. If the right-hand edge of the
alien is at 0, the alien is just offscreen to the left. Now let’s make it move. Add the following code to the bottom of
the file:
def update():
alien.left += 2
if alien.left > WIDTH:
alien.right = 0
Pygame Zero will call your update() function once every frame. Moving the alien a small number of pixels every
frame will cause it to slide across the screen. Once it slides off the right-hand side of the screen, we reset it back to the
left.
Your functions draw() and update() work in similar ways but are designed for two different purposes. The
draw() function draws the current position of the alien while the update() function is used to show the alien
moving on the screen.
1.1.5 Handling clicks
Let’s make the game do something when you click on the alien. To do this we need to define a function called
on_mouse_down(). Add this to the source code:
1 def on_mouse_down(pos):
2 if alien.collidepoint(pos):
3 print("Eek!")
4 else:
5 print("You missed me!")
You should run the game and try clicking on and off the alien.
Pygame Zero is smart about how it calls your functions. If you don’t define your function to take a pos parameter,
Pygame Zero will call it without a position. There’s also a button parameter for on_mouse_down. So we could
have written:
def on_mouse_down():
print("You clicked!")
or:
def on_mouse_down(pos, button):
if button == mouse.LEFT and alien.collidepoint(pos):
print("Eek!")
1.1.6 Sounds and images
Now let’s make the alien appear hurt. Save these files:
• alien_hurt.png - save this as alien_hurt.png in the images directory.
• eep.wav - create a directory called sounds and save this as eep.wav in that directory.
1.1. Introduction to Pygame Zero 5Pygame Zero Documentation, Release 1.2
Your project should now look like this:
.
images/
alien.png
alien_hurt.png
sounds/
eep.wav
intro.py
sounds/ is the standard directory that Pygame Zero will look in to find your sound files.
Now let’s change the on_mouse_down function to use these new resources:
def on_mouse_down(pos):
if alien.collidepoint(pos):
alien.image = 'alien_hurt'
sounds.eep.play()
Now when you click on the alien, you should hear a sound, and the sprite will change to an unhappy alien.
There’s a bug in this game though; the alien doesn’t ever change back to a happy alien (but the sound will play on each
click). Let’s fix this next.
1.1.7 Clock
If you’re familiar with Python outside of games programming, you might know the time.sleep() method that
inserts a delay. You might be tempted to write code like this:
1 def on_mouse_down(pos):
2 if alien.collidepoint(pos):
3 alien.image = 'alien_hurt'
4 sounds.eep.play()
5 time.sleep(1)
6 alien.image = 'alien'
Unfortunately, this is not at all suitable for use in a game. time.sleep() blocks all activity; we want the game to
go on running and animating. In fact we need to return from on_mouse_down, and let the game work out when to
reset the alien as part of its normal processing, all the while running your draw() and update() methods.
This is not difficult with Pygame Zero, because it has a built-in Clock that can schedule functions to be called later.
First, let’s “refactor” (ie. re-organise the code). We can create functions to set the alien as hurt and also to change it
back to normal:
1 def on_mouse_down(pos):
2 if alien.collidepoint(pos):
3 set_alien_hurt()
4
5
6 def set_alien_hurt():
7 alien.image = 'alien_hurt'
8 sounds.eep.play()
9
10
11 def set_alien_normal():
12 alien.image = 'alien'
6 Chapter 1. CoursesPygame Zero Documentation, Release 1.2
This is not going to do anything different yet. set_alien_normal() won’t be called. But let’s change
set_alien_hurt() to use the clock, so that the set_alien_normal() will be called a little while after.
def set_alien_hurt():
alien.image = 'alien_hurt'
sounds.eep.play()
clock.schedule_unique(set_alien_normal, 0.5)
clock.schedule_unique() will cause set_alien_normal() to be called after 0.5 second.
schedule_unique() also prevents the same function being scheduled more than once, such as if you click very
rapidly.
Try it, and you’ll see the alien revert to normal after 0.5 second. Try clicking rapidly and verify that the alien doesn’t
revert until 0.5 second after the last click.
clock.schedule_unique() accepts both integers and float numbers for the time interval. In the tutorial we are
using a float number to show this but feel free to use both to see the difference and effects the different values have.
1.1.8 Summary
We’ve seen how to load and draw sprites, play sounds, handle input events, and use the built-in clock.
You might like to expand the game to keep score, or make the alien move more erratically.
There are lots more features built in to make Pygame Zero easy to use. Check out the built in objects to learn how to
use the rest of the API.
1.2 Migrating from Scratch
This tutorial will compare an implementation of Flappy Bird written in Scratch with one written in Pygame Zero. The
Scratch and Pygame Zero programs are similar to a remarkable extent.
The Pygame Zero version can be found in Pygame Zero repository.
You can also download the Scratch 1.4 version and Scratch 3 version from the repository.
The Pygame Zero version includes scoring logic, which is omitted in the code examples on this page to make it a
closer comparison.
The Python code shown below is re-arranged for clarity within the examples.
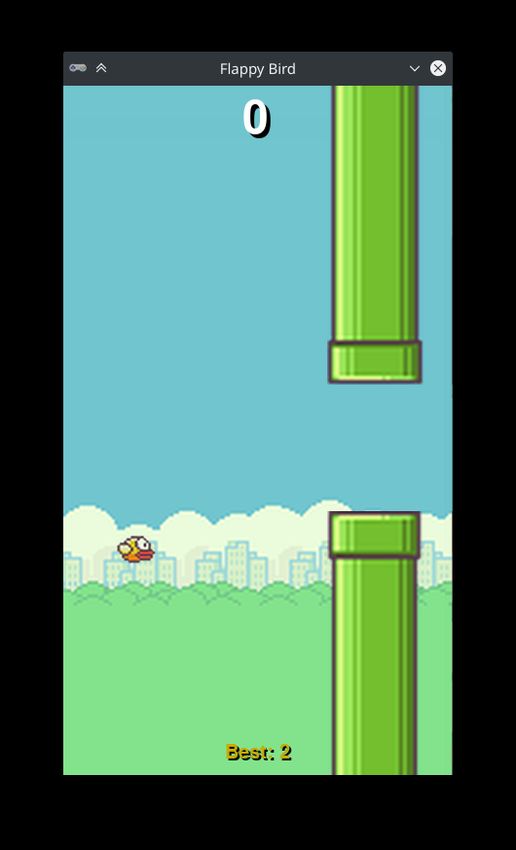
1.2.1 The stage
Here’s how the stage is laid out in our Scratch program:
1.2. Migrating from Scratch 7Pygame Zero Documentation, Release 1.2
There are just three objects, aside from the background: the bird, and the top and bottom pipes.
This corresponds to the Pygame Zero code setting these objects up as Actors:
bird = Actor('bird1', (75, 200))
pipe_top = Actor('top', anchor=('left', 'bottom'))
pipe_bottom = Actor('bottom', anchor=('left', 'top'))
In Pygame Zero we also have to ensure we draw these objects. In principle this gives a little more flexibility about
how to draw the scene:
8 Chapter 1. CoursesPygame Zero Documentation, Release 1.2
def draw():
screen.blit('background', (0, 0))
pipe_top.draw()
pipe_bottom.draw()
bird.draw()
1.2.2 Pipe movement
The pipes move at a constant rate irrespective of the bird. When they move off the left-hand side of the screen, they
loop around to the right, and their vertical position moves at random.
In Scratch this can be achieved by creating two different scripts for the top and bottom pipe.
To summarise what’s happening here:
• The condition x position < -240 is true when a pipe is off the left-hand side of the screen, and this is the
trigger to reset the pipes.
1.2. Migrating from Scratch 9Pygame Zero Documentation, Release 1.2
• The pipe_height variable is used to coordinate the two pipes. Because the gap between them should remain
the same, we can’t pick both heights randomly. Therefore one of the scripts has this logic and the other doesn’t.
• The set y position to pipe height +/- 230 sets one pipe to be above pipe_height and the
other pipe below pipe_height.
This code becomes much simpler in Pygame Zero. We could write a single function that updates both pipes. In fact I
split it a different way to make it clear that the reset actions go together:
import random
WIDTH = 400
HEIGHT = 708
GAP = 130
SPEED = 3
def reset_pipes():
pipe_gap_y = random.randint(200, HEIGHT - 200)
pipe_top.pos = (WIDTH, pipe_gap_y - GAP // 2)
pipe_bottom.pos = (WIDTH, pipe_gap_y + GAP // 2)
def update_pipes():
pipe_top.left -= SPEED
pipe_bottom.left -= SPEED
if pipe_top.right < 0:
reset_pipes()
A small difference here is that I can extract values that I want to re-use as “constants”, spelled in UPPERCASE. This
lets me change them in one place when I want to tune the game. For example, in the code above, I could widen or
narrow the gap between the two pipes simply by changing GAP.
The biggest thing that differs is that there is no forever loop in Python code. This is the big difference between
Scratch and most text-based programming languages: you must update the game by one animation step and then return.
Returning gives Pygame Zero a chance to do things like processing input or redrawing the screen. Loop forever and
the game would just sit there, so any loops need to finish quickly.
Pygame Zero calls an update() function when it wants you to update the animation by one step, so we just need to
a call to update_walls():
def update():
update_walls()
1.2.3 The Bird
The patterns described above for how Scratch logic translates to Python code also apply for the bird logic. Let’s look
at the Python code first this time.
The code to update the bird is organised into a function called update_bird(). The first thing this function contains
is some code to move the bird according to gravity:
GRAVITY = 0.3
# Initial state of the bird
bird.dead = False
bird.vy = 0
def update_bird():
(continues on next page)
10 Chapter 1. CoursesPygame Zero Documentation, Release 1.2
(continued from previous page)
uy = bird.vy
bird.vy += GRAVITY
bird.y += bird.vy
bird.x = 75
This is a simple gravity formula:
• Gravity means constant acceleration downwards.
• Acceleration is change in velocity.
• Velocity is change in position.
To represent this we need to track a variable bird.vy, which is the bird’s velocity in the y direction. This is a new
variable that we are defining, not something that Pygame Zero provides for us.
• Gravity means constant acceleration downwards: GRAVITY is greater than 0.
• Acceleration is change in velocity: GRAVITY gets added to bird.vy
• Velocity is change in position: bird.vy gets added to bird.y
Note that the bird does not move horizontally! Its x position stays at 75 through the whole game. We simulate
movement by moving the pipes towards it. This looks as though it’s a moving camera following the bird. So there’s
no need for a vx variable in this game.
The next section makes the bird flap its wings:
if not bird.dead:
if bird.vy < -3:
bird.image = 'bird2'
else:
bird.image = 'bird1'
This checks if the bird is moving upwards or downwards. We show the bird2 image if it is moving upwards fast and
the bird1 image otherwise. (-3 was picked by trial and error to make this look convincing).
The next section checks if the bird has collided with a wall:
if bird.colliderect(pipe_top) or bird.colliderect(pipe_bottom):
bird.dead = True
bird.image = 'birddead'
If so we set bird.dead to True. This is a boolean value meaning it is either True or False. We can use this to
easily check if the bird is alive. If it isn’t alive it won’t respond to player input.
And the final section checks if the bird has fallen off the bottom (or the top) of the game screen. If so it resets the bird:
if not 0 < bird.y < 720:
bird.y = 200
bird.dead = False
bird.vy = 0
reset_pipes()
What’s reset_pipes() doing there? Because I’d organised my pipes code to be a separate function, I can just call
it whenever I want to reset my walls. In this case it makes it a better game because it gives the player a chance to react
when the bird moves back to its start position.
Again, this needs to be called every frame, so we add it to update():
1.2. Migrating from Scratch 11Pygame Zero Documentation, Release 1.2
def update():
update_walls()
update_bird()
The final part of the bird logic is that it has to respond to player control. When we press a key, the bird flaps upwards.
Pygame Zero will call an on_key_down() function - if you’ve defined one - whenever a key is pressed:
FLAP_VELOCITY = -6.5
def on_key_down():
if not bird.dead:
bird.vy = FLAP_VELOCITY
Here, if the bird is not dead, we set its vy to a negative number: in Pygame Zero this means it starts moving upwards.
You should be able to find a lot of parallels between the Python code and this Scratch code:
12 Chapter 1. CoursesPygame Zero Documentation, Release 1.2 1.2. Migrating from Scratch 13
Pygame Zero Documentation, Release 1.2

The biggest differences between Scratch and Pygame Zero are these:
     • You cannot loop forever in Pygame Zero - just update for one frame and then return.
     • The coordinates are different. In Pygame Zero, the top left of the screen is x = 0, y = 0. The x direction
       goes from left to right as before, but y goes down the screen! This is why GRAVITY is a positive number and
       FLAP_VELOCITY is a negative number in Python.
     • bird.dead is a bool, so I can write code like if not bird.dead instead of dead = 0 as in Scratch.

1.2.4 Summary

Many of the concepts available in Scratch can be translated directly into Pygame Zero.
Here are some comparisons:

 In Scratch                             In Pygame Zero
 change y by 1 (up)                     bird.y -= 1
 change y by -1 (down)                  bird.y += 1
 set costume to                   bird.image = 'name'
 if dead = 0                            if not bird.dead:
 set dead to 0                          bird.dead = False
 if touching Top?                       if bird.colliderect(pipe_top)
 When Flag clicked. . .                 Put code into the update() function.
 forever
 When [any] key pressed                 def on_key_down():
 pick random a to b                     import random to load the random module, then random.
                                        randint(a, b)
 (0, 0) is the centre of the stage      (0, 0) is the top-left of the window

In some cases, the code is simpler in Python because it can be organised in a way that helps it make sense when you
read it.
The power of Pygame Zero’s actors also makes the coordinate manipulation easier. We used the anchor position to
position the pipes, and we were able to see if a pipe was off-screen by checking pipe_top.right < 0 rather than
if x position < -240.

14                                                                                           Chapter 1. Courses
CHAPTER 2
Reference
2.1 Event Hooks
Pygame Zero will automatically pick up and call event hooks that you define. This approach saves you from having to
implement the event loop machinery yourself.
2.1.1 Game Loop Hooks
A typical game loop looks a bit like this:
while game_has_not_ended():
process_input()
update()
draw()
Input processing is a bit more complicated, but Pygame Zero allows you to easily define the update() and draw()
functions within your game module.
draw()
Called by Pygame Zero when it needs to redraw your game window.
draw() must take no arguments.
Pygame Zero attempts to work out when the game screen needs to be redrawn to avoid redrawing if nothing has
changed. On each step of the game loop it will draw the screen in the following situations:
• If you have defined an update() function (see below).
• If a clock event fires.
• If an input event has been triggered.
One way this can catch you out is if you attempt to modify or animate something within the draw function. For
example, this code is wrong: the alien is not guaranteed to continue moving across the screen:
15Pygame Zero Documentation, Release 1.2
def draw():
alien.left += 1
alien.draw()
The correct code uses update() to modify or animate things and draw simply to paint the screen:
def draw():
alien.draw()
def update():
alien.left += 1
update() or update(dt)
Called by Pygame Zero to step your game logic. This will be called repeatedly, 60 times a second.
There are two different approaches to writing an update function.
In simple games you can assume a small time step (a fraction of a second) has elapsed between each call to
update(). Perhaps you don’t even care how big that time step is: you can just move objects by a fixed
number of pixels per frame (or accelerate them by a fixed constant, etc.)
A more advanced approach is to base your movement and physics calculations on the actual amount of time that
has elapsed between calls. This can give smoother animation, but the calculations involved can be harder and
you must take more care to avoid unpredictable behaviour when the time steps grow larger.
To use a time-based approach, you can change the update function to take a single parameter. If your update
function takes an argument, Pygame Zero will pass it the elapsed time in seconds. You can use this to scale your
movement calculations.
2.1.2 Event Handling Hooks
Similar to the game loop hooks, your Pygame Zero program can respond to input events by defining functions with
specific names.
Somewhat like in the case of update(), Pygame Zero will inspect your event handler functions to determine how
to call them. So you don’t need to make your handler functions take arguments. For example, Pygame Zero will be
happy to call any of these variations of an on_mouse_down function:
def on_mouse_down():
print("Mouse button clicked")
def on_mouse_down(pos):
print("Mouse button clicked at", pos)
def on_mouse_down(button):
print("Mouse button", button, "clicked")
def on_mouse_down(pos, button):
print("Mouse button", button, "clicked at", pos)
It does this by looking at the names of the parameters, so they must be spelled exactly as above. Each event hook has
a different set of parameters that you can use, as described below.
on_mouse_down([pos ][, button ])
Called when a mouse button is depressed.
Parameters
16 Chapter 2. ReferencePygame Zero Documentation, Release 1.2
• pos – A tuple (x, y) that gives the location of the mouse pointer when the button was
pressed.
• button – A mouse enum value indicating the button that was pressed.
on_mouse_up([pos ][, button ])
Called when a mouse button is released.
Parameters
• pos – A tuple (x, y) that gives the location of the mouse pointer when the button was
released.
• button – A mouse enum value indicating the button that was released.
on_mouse_move([pos ][, rel ][, buttons ])
Called when the mouse is moved.
Parameters
• pos – A tuple (x, y) that gives the location that the mouse pointer moved to.
• rel – A tuple (delta_x, delta_y) that represent the change in the mouse pointer’s position.
• buttons – A set of mouse enum values indicating the buttons that were depressed during
the move.
To handle mouse drags, use code such as the following:
def on_mouse_move(rel, buttons):
if mouse.LEFT in buttons:
# the mouse was dragged, do something with `rel`
...
on_key_down([key ][, mod ][, unicode ])
Called when a key is depressed.
Parameters
• key – An integer indicating the key that was pressed (see below).
• unicode – Where relevant, the character that was typed. Not all keys will result in print-
able characters - many may be control characters. In the event that a key doesn’t correspond
to a Unicode character, this will be the empty string.
• mod – A bitmask of modifier keys that were depressed.
on_key_up([key ][, mod ])
Called when a key is released.
Parameters
• key – An integer indicating the key that was released (see below).
• mod – A bitmask of modifier keys that were depressed.
on_music_end()
Called when a music track finishes.
Note that this will not be called if the track is configured to loop.
2.1. Event Hooks 17Pygame Zero Documentation, Release 1.2
Buttons and Keys
Built-in objects mouse and keys can be used to determine which buttons or keys were pressed in the above events.
Note that mouse scrollwheel events appear as button presses with the below WHEEL_UP/WHEEL_DOWN button con-
stants.
class mouse
A built-in enumeration of buttons that can be received by the on_mouse_* handlers.
LEFT
MIDDLE
RIGHT
WHEEL_UP
WHEEL_DOWN
class keys
A built-in enumeration of keys that can be received by the on_key_* handlers.
BACKSPACE
TAB
CLEAR
RETURN
PAUSE
ESCAPE
SPACE
EXCLAIM
QUOTEDBL
HASH
DOLLAR
AMPERSAND
QUOTE
LEFTPAREN
RIGHTPAREN
ASTERISK
PLUS
COMMA
MINUS
PERIOD
SLASH
K_0
K_1
K_2
18 Chapter 2. ReferencePygame Zero Documentation, Release 1.2
K_3
K_4
K_5
K_6
K_7
K_8
K_9
COLON
SEMICOLON
LESS
EQUALS
GREATER
QUESTION
AT
LEFTBRACKET
BACKSLASH
RIGHTBRACKET
CARET
UNDERSCORE
BACKQUOTE
A
B
C
D
E
F
G
H
I
J
K
L
M
N
O
P
2.1. Event Hooks 19Pygame Zero Documentation, Release 1.2
Q
R
S
T
U
V
W
X
Y
Z
DELETE
KP0
KP1
KP2
KP3
KP4
KP5
KP6
KP7
KP8
KP9
KP_PERIOD
KP_DIVIDE
KP_MULTIPLY
KP_MINUS
KP_PLUS
KP_ENTER
KP_EQUALS
UP
DOWN
RIGHT
LEFT
INSERT
HOME
END
PAGEUP
20 Chapter 2. ReferencePygame Zero Documentation, Release 1.2
PAGEDOWN
F1
F2
F3
F4
F5
F6
F7
F8
F9
F10
F11
F12
F13
F14
F15
NUMLOCK
CAPSLOCK
SCROLLOCK
RSHIFT
LSHIFT
RCTRL
LCTRL
RALT
LALT
RMETA
LMETA
LSUPER
RSUPER
MODE
HELP
PRINT
SYSREQ
BREAK
MENU
POWER
2.1. Event Hooks 21Pygame Zero Documentation, Release 1.2
EURO
LAST
Additionally you can access a set of constants that represent modifier keys:
class keymods
Constants representing modifier keys that may have been depressed during an on_key_up/on_key_down
event.
LSHIFT
RSHIFT
SHIFT
LCTRL
RCTRL
CTRL
LALT
RALT
ALT
LMETA
RMETA
META
NUM
CAPS
MODE
2.2 Built-in Objects
Pygame Zero provides useful built-in objects to help you make games easily.
2.2.1 Screen
Text Formatting
The Screen’s draw.text() method has a very rich set of methods for position and formatting of text. Some
examples:
screen.draw.text("Text color", (50, 30), color="orange")
screen.draw.text("Font name and size", (20, 100), fontname="boogaloo", fontsize=60)
screen.draw.text("Positioned text", topright=(840, 20))
screen.draw.text("Allow me to demonstrate wrapped text.", (90, 210), width=180,
˓→lineheight=1.5)
screen.draw.text("Outlined text", (400, 70), owidth=1.5, ocolor=(255,255,0), color=(0,
˓→0,0))
screen.draw.text("Drop shadow", (640, 110), shadow=(2,2), scolor="#202020")
screen.draw.text("Color gradient", (540, 170), color="red", gcolor="purple")
(continues on next page)
22 Chapter 2. ReferencePygame Zero Documentation, Release 1.2
(continued from previous page)
screen.draw.text("Transparency", (700, 240), alpha=0.1)
screen.draw.text("Vertical text", midleft=(40, 440), angle=90)
screen.draw.text("All together now:\nCombining the above options",
midbottom=(427,460), width=360, fontname="boogaloo", fontsize=48,
color="#AAFF00", gcolor="#66AA00", owidth=1.5, ocolor="black", alpha=0.8)
In its simplest usage, screen.draw.text requires the string you want to draw, and the position. You can either
do this by passing coordinates as the second argument (which is the top left of where the text will appear), or use the
positioning keyword arguments (described later):
screen.draw.text("hello world", (20, 100))
screen.draw.text takes many optional keyword arguments, described below.
Font name and size
Fonts are loaded from a directory named fonts, in a similar way to the handling of images and sounds. Fonts must
be in .ttf format. For example:
screen.draw.text("hello world", (100, 100), fontname="Viga", fontsize=32)
Keyword arguments:
• fontname: filename of the font to draw. By default, use the system font.
• fontsize: size of the font to use, in pixels. Defaults to 24.
• antialias: whether to render with antialiasing. Defaults to True.
Color and background color
screen.draw.text("hello world", (100, 100), color=(200, 200, 200), background="gray")
Keyword arguments:
• color: foreground color to use. Defaults to white.
• background: background color to use. Defaults to None.
color (as well as background, ocolor, scolor, and gcolor) can be an (r, g, b) sequence such as (255,
127,0), a pygame.Color object, a color name such as "orange", an HTML hex color string such as
"#FF7F00", or a string representing a hex color number such as "0xFF7F00".
background can also be None, in which case the background is transparent. Unlike pygame.font.Font.
render, it’s generally not more efficient to set a background color when calling screen.draw.text. So only
specify a background color if you actually want one.
Colors with alpha transparency are not supported (except for the special case of invisible text with outlines or drop
shadows - see below). See the alpha keyword argument for transparency.
Positioning
screen.draw.text("hello world", centery=50, right=300)
screen.draw.text("hello world", midtop=(400, 0))
2.2. Built-in Objects 23Pygame Zero Documentation, Release 1.2
Keyword arguments:
top left bottom right
topleft bottomleft topright bottomright
midtop midleft midbottom midright
center centerx centery
Positioning keyword arguments behave like the corresponding properties of pygame.Rect. Either specify two
arguments, corresponding to the horizontal and vertical positions of the box, or a single argument that specifies both.
If the position is overspecified (e.g. both left and right are given), then extra specifications will be (arbitrarily but
deterministically) discarded. For constrained text, see the section on screen.draw.textbox below.
Word wrap
screen.draw.text("splitting\nlines", (100, 100))
screen.draw.text("splitting lines", (100, 100), width=60)
Keyword arguments:
• width: maximum width of the text to draw, in pixels. Defaults to None.
• widthem: maximum width of the text to draw, in font-based em units. Defaults to None.
• lineheight: vertical spacing between lines, in units of the font’s default line height. Defaults to 1.0.
screen.draw.text will always wrap lines at newline (\n) characters. If width or widthem is set, it will also
try to wrap lines in order to keep each line shorter than the given width. The text is not guaranteed to be within the
given width, because wrapping only occurs at space characters, so if a single word is too long to fit on a line, it will
not be broken up. Outline and drop shadow are also not accounted for, so they may extend beyond the given width.
You can prevent wrapping on a particular space with non-breaking space characters (\u00A0).
Text alignment
screen.draw.text("hello\nworld", bottomright=(500, 400), align="left")
Keyword argument:
• align: horizontal positioning of lines with respect to each other. Defaults to None.
align determines how lines are positioned horizontally with respect to each other, when more than one line is drawn.
Valid values for align are the strings "left", "center", or "right", a numerical value between 0.0 (for left
alignment) and 1.0 (for right alignment), or None.
If align is None, the alignment is determined based on other arguments, in a way that should be what you want
most of the time. It depends on any positioning arguments (topleft, centerx, etc.), anchor, and finally defaults
to "left". I suggest you generally trust the default alignment, and only specify align if something doesn’t look
right.
Outline
screen.draw.text("hello world", (100, 100), owidth=1, ocolor="blue")
Keyword arguments:
24 Chapter 2. ReferencePygame Zero Documentation, Release 1.2
• owidth: outline thickness, in outline units. Defaults to None.
• ocolor: outline color. Defaults to "black".
The text will be outlined if owidth is specified. The outlining is a crude manual method, and will probably look bad
at large sizes. The units of owidth are chosen so that 1.0 is a good typical value for outlines. Specifically, they’re
the font size divided by 24.
As a special case, setting color to a transparent value (e.g. (0,0,0,0)) while using outilnes will cause the text to
be invisible, giving a hollow outline. (This feature is not compatible with gcolor.)
Valid values for ocolor are the same as for color.
Drop shadow
screen.draw.text("hello world", (100, 100), shadow=(1.0,1.0), scolor="blue")
Keyword arguments:
• shadow: (x,y) values representing the drop shadow offset, in shadow units. Defaults to None.
• scolor: drop shadow color. Defaults to "black".
The text will have a drop shadow if shadow is specified. It must be set to a 2-element sequence representing the x and
y offsets of the drop shadow, which can be positive, negative, or 0. For example, shadow=(1.0,1.0) corresponds
to a shadow down and to the right of the text. shadow=(0,-1.2) corresponds to a shadow higher than the text.
The units of shadow are chosen so that 1.0 is a good typical value for the offset. Specifically, they’re the font size
divided by 18.
As a special case, setting color to a transparent value (e.g. (0,0,0,0)) while using drop shadow will cause the
text to be invisible, giving a hollow shadow. (This feature is not compatible with gcolor.)
Valid values for scolor are the same as for color.
Gradient color
screen.draw.text("hello world", (100, 100), color="black", gcolor="green")
Keyword argument:
• gcolor: Lower gradient stop color. Defaults to None.
Specify gcolor to color the text with a vertical color gradient. The text’s color will be color at the top and gcolor
at the bottom. Positioning of the gradient stops and orientation of the gradient are hard coded and cannot be specified.
Alpha transparency
screen.draw.text("hello world", (100, 100), alpha=0.5)
Keyword argument:
• alpha: alpha transparency value, between 0 and 1. Defaults to 1.0.
In order to maximize reuse of cached transparent surfaces, the value of alpha is rounded.
2.2. Built-in Objects 25Pygame Zero Documentation, Release 1.2
Anchored positioning
screen.draw.text("hello world", (100, 100), anchor=(0.3,0.7))
Keyword argument:
• anchor: a length-2 sequence of horizontal and vertical anchor fractions. Defaults to (0.0, 0.0).
anchor specifies how the text is anchored to the given position, when no positioning keyword arguments are passed.
The two values in anchor can take arbitrary values between 0.0 and 1.0. An anchor value of (0,0), the default,
means that the given position is the top left of the text. A value of (1,1) means the given position is the bottom right
of the text.
Rotation
screen.draw.text("hello world", (100, 100), angle=10)
Keyword argument:
• angle: counterclockwise rotation angle in degrees. Defaults to 0.
Positioning of rotated surfaces is tricky. When drawing rotated text, the anchor point, the position you actually specify,
remains fixed, and the text rotates around it. For instance, if you specify the top left of the text to be at (100, 100)
with an angle of 90, then the Surface will actually be drawn so that its bottom left is at (100, 100).
If you find that confusing, try specifying the center. If you anchor the text at the center, then the center will remain
fixed, no matter how you rotate it.
In order to maximize reuse of cached rotated surfaces, the value of angle is rounded to the nearest multiple of 3
degrees.
Constrained text
screen.draw.textbox("hello world", (100, 100, 200, 50))
screen.draw.textbox requires two arguments: the text to be drawn, and a pygame.Rect or a Rect-like
object to stay within. The font size will be chosen to be as large as possible while staying within the box. Other than
fontsize and positional arguments, you can pass all the same keyword arguments to screen.draw.textbox
as to screen.draw.text.
The screen object represents your game screen.
It is a thin wrapper around a Pygame surface that allows you to easily draw images to the screen (“blit” them).
class Screen
surface
The raw Pygame surface that represents the screen buffer. You can use this for advanced graphics opera-
tions.
bounds()
New in version 1.3.
Return a ZRect representing the bounds of the screen.
clear()
Reset the screen to black.
26 Chapter 2. ReferencePygame Zero Documentation, Release 1.2
fill((red, green, blue)[, gcolor=(r, g, b) ])
Fill the screen with a solid color.
New in version 1.3: If gcolor is given then fill with a gradient, from color at the top of the screen to
gcolor at the bottom.
blit(image, (left, top))
Draw the image to the screen at the given position.
blit() accepts either a Surface or a string as its image parameter. If image is a str then the named
image will be loaded from the images/ directory.
draw.line(start, end, (r, g, b), width=1)
Draw a line from start to end with a certain line width.
draw.circle(pos, radius, (r, g, b), width=1)
Draw the outline of a circle with a certain line width.
draw.filled_circle(pos, radius, (r, g, b))
Draw a filled circle.
draw.rect(rect, (r, g, b), width=1)
Draw the outline of a rectangle with a certain line width.
Takes a Rect.
draw.filled_rect(rect, (r, g, b))
Draw a filled rectangle.
draw.text(text[, pos ], **kwargs)
Draw text.
There’s an extremely rich API for positioning and formatting text; see Text Formatting for full details.
draw.textbox(text, rect, **kwargs)
Draw text, sized to fill the given Rect.
There’s an extremely rich API for formatting text; see Text Formatting for full details.
Tip: All of the colours can be specified as (r, g, b) tuples, or by name, using one of Pygame’s colour names
2.2.2 Rect
The Pygame Rect class is available as a built in. This can be used in a variety of ways, from detecting clicks within a
region to drawing a box onto the screen:
For example, you can draw a box with:
RED = 200, 0, 0
BOX = Rect((20, 20), (100, 100))
def draw():
screen.draw.rect(BOX, RED)
2.2.3 Resource Loading
The images and sounds objects can be used to load images and sounds from files stored in the images and
sounds subdirectories respectively. Pygame Zero will handle loading of these resources on demand and will cache
2.2. Built-in Objects 27Pygame Zero Documentation, Release 1.2
them to avoid reloading them.
You generally need to ensure that your images are named with lowercase letters, numbers and underscores only. They
also have to start with a letter.
File names like these will work well with the resource loader:
alien.png
alien_hurt.png
alien_run_7.png
These will not work:
3.png
3degrees.png
my-cat.png
sam's dog.png
The resource loader caches loaded images and sounds. To clear the cache (for instance, if you are running into memory
issues), use the unload() and unload_all() functions.
Example:
cow = Actor('cow')
loader.images.unload('cow') # clears the cache of cow.png
loader.images.unload_all() # clears all cached image files
Images
Pygame Zero can load images in .png, .gif, and .jpg formats. PNG is recommended: it will allow high quality
images with transparency.
We need to ensure an images directory is set up. If your project contains the following files:
space_game.py
images/alien.png
Then space_game.py could draw the ‘alien’ sprite to the screen with this code:
def draw():
screen.clear()
screen.blit('alien', (10, 10))
The name passed to blit() is the name of the image file within the images directory, without the file extension.
Or using the Actors API,
alien = Actor('alien')
def draw():
alien.draw()
There are some restrictions on the file names in both cases: they may only contain lowercase latin letters, numbers and
underscores. This is to prevent compatibility problems when your game is played on a different operating system that
has different case sensitivity.
28 Chapter 2. ReferencePygame Zero Documentation, Release 1.2
Image Surfaces
You can also load images from the images directory using the images object. This allows you to work with the
image data itself, query its dimensions and so on:
forest = []
for i in range(5):
forest.append(
Actor('tree', topleft=(images.tree.get_width() * i, 0))
)
Each loaded image is a Pygame Surface. You will typically use screen.blit(...) to draw this to the screen.
It also provides handy methods to query the size of the image in pixels:
class Surface
get_width()
Returns the width of the image in pixels.
get_height()
Returns the height of the image in pixels.
get_size()
Returns a tuple (width, height) indicating the size in pixels of the surface.
get_rect()
Get a Rect that is pre-populated with the bounds of the image if the image was located at the origin.
Effectively this is equivalent to:
Rect((0, 0), image.get_size())
Sounds
Pygame Zero can load sounds in .wav and .ogg formats. WAV is great for small sound effects, while OGG is a
compressed format that is more suited to music. You can find free .ogg and .wav files online that can be used in your
game.
We need to ensure a sounds directory is set up. If your project contains the following files:
drum_kit.py
sounds/drum.wav
Then drum_kit.py could play the drum sound whenever the mouse is clicked with this code:
def on_mouse_down():
sounds.drum.play()
Each loaded sound is a Pygame Sound, and has various methods to play and stop the sound as well as query its length
in seconds:
class Sound
play()
Play the sound.
2.2. Built-in Objects 29Pygame Zero Documentation, Release 1.2
play(loops)
Play the sound, but loop it a number of times.
Parameters loops – The number of times to loop. If you pass -1 as the number of times to
loop, the sound will loop forever (or until you call Sound.stop()
stop()
Stop playing the sound.
get_length()
Get the duration of the sound in seconds.
You should avoid using the sounds object to play longer pieces of music. Because the sounds sytem will fully load
the music into memory before playing it, this can use a lot of memory, as well as introducing a delay while the music
is loaded.
2.2.4 Music
New in version 1.1.
Warning: The music API is experimental and may be subject to cross-platform portability issues.
In particular:
• MP3 may not be available on some Linux distributions.
• Some OGG Vorbis files seem to hang Pygame with 100% CPU.
In the case of the latter issue, the problem may be fixed by re-encoding (possibly with a different encoder).
A built-in object called music provides access to play music from within a music/ directory (alongside your
images/ and sounds/ directories, if you have them). The music system will load the track a little bit at a time
while the music plays, avoiding the problems with using sounds to play longer tracks.
Another difference to the sounds system is that only one music track can be playing at a time. If you play a different
track, the previously playing track will be stopped.
music.play(name)
Play a music track from the given file. The track will loop indefinitely.
This replaces the currently playing track and cancels any tracks previously queued with queue().
You do not need to include the extension in the track name; for example, to play the file handel.mp3 on a
loop:
music.play('handel')
music.play_once(name)
Similar to play(), but the music will stop after playing through once.
music.queue(name)
Similar to play_once(), but instead of stopping the current music, the track will be queued to play after the
current track finishes (or after any other previously queued tracks).
music.stop()
Stop the music.
music.pause()
Pause the music temporarily. It can be resumed by calling unpause().
30 Chapter 2. ReferencePygame Zero Documentation, Release 1.2
music.unpause()
Unpause the music.
music.is_playing()
Returns True if the music is playing (and is not paused), False otherwise.
music.fadeout(duration)
Fade out and eventually stop the current music playback.
Parameters duration – The duration in seconds over which the sound will be faded out. For
example, to fade out over half a second, call music.fadeout(0.5).
music.set_volume(volume)
Set the volume of the music system.
This takes a number between 0 (meaning silent) and 1 (meaning full volume).
music.get_volume()
Get the current volume of the music system.
If you have started a music track playing using music.play_once(), you can use the on_music_end() hook
to do something when the music ends - for example, to pick another track at random.
2.2.5 Clock
Often when writing a game, you will want to schedule some game event to occur at a later time. For example, we may
want a big boss alien to appear after 60 seconds. Or perhaps a power-up will appear every 20 seconds.
More subtle are the situations when you want to delay some action for a shorter period. For example you might have
a laser weapon that takes 1 second to charge up.
We can use the clock object to schedule a function to happen in the future.
Let’s start by defining a function fire_laser that we want to run in the future:
def fire_laser():
lasers.append(player.pos)
Then when the fire button is pressed, we will ask the clock to call it for us after exactly 1 second:
def on_mouse_down():
clock.schedule(fire_laser, 1.0)
Note that fire_laser is the function itself; without parentheses, it is not being called here! The clock will call it
for us.
(It is a good habit to write out times in seconds with a decimal point, like 1.0. This makes it more obvious when you
are reading it back, that you are referring to a time value and not a count of things.)
clock provides the following useful methods:
class Clock
schedule(callback, delay)
Schedule callback to be called after the given delay.
Repeated calls will schedule the callback repeatedly.
Parameters
• callback – A callable that takes no arguments.
2.2. Built-in Objects 31Pygame Zero Documentation, Release 1.2
• delay – The delay, in seconds, before the function should be called.
schedule_unique(callback, delay)
Schedule callback to be called once after the given delay.
If callback was already scheduled, cancel and reschedule it. This applies also if it was scheduled multiple
times: after calling schedule_unique, it will be scheduled exactly once.
Parameters
• callback – A callable that takes no arguments.
• delay – The delay, in seconds, before the function should be called.
schedule_interval(callback, interval)
Schedule callback to be called repeatedly.
Parameters
• callback – A callable that takes no arguments.
• interval – The interval in seconds between calls to callback.
unschedule(callback)
Unschedule callback if it has been previously scheduled (either because it has been scheduled
with schedule() and has not yet been called, or because it has been scheduled to repeat with
schedule_interval().
Note that the Pygame Zero clock only holds weak references to each callback you give it. It will not fire scheduled
events if the objects and methods are not referenced elsewhere. This can help prevent the clock keeping objects alive
and continuing to fire unexpectedly after they are otherwise dead.
The downside to the weak references is that you won’t be able to schedule lambdas or any other object that has been
created purely to be scheduled. You will have to keep a reference to the object.
2.2.6 Actors
Once you have many images moving around in a game it can be convenient to have something that holds in one place
the image and where it is on screen. We’ll call each moving image on screen an Actor. You can create an actor by
supplying at least an image name (from the images folder above). To draw the alien talked about above:
alien = Actor('alien', (50, 50))
def draw():
screen.clear()
alien.draw()
You can move the actor around by setting its pos attribute in an update:
def update():
if keyboard.left:
alien.x -= 1
elif keyboard.right:
alien.x += 1
And you may change the image used to draw the actor by setting its image attribute to some new image name:
alien.image = 'alien_hurt'
Actors have all the same attributes and methods as Rect, including methods like .colliderect() which can be used to
test whether two actors have collided.
32 Chapter 2. ReferencePygame Zero Documentation, Release 1.2
Positioning Actors
If you assign a new value to one of the position attributes then the actor will be moved. For example:
alien.right = WIDTH
will position the alien so its right-hand side is set to WIDTH.
Similarly, you can also set the initial position of the actor in the constructor, by passing one of these as a key-
word argument: pos, topleft, topright, bottomleft, bottomright, midtop, midleft, midright,
midbottom or center:
This can be done during creation or by assigning a pair of x, y co-ordinates. For example:
WIDTH = 200
HEIGHT = 200
alien = Actor('alien', center=(100,100))
def draw():
screen.clear()
alien.draw()
2.2. Built-in Objects 33Pygame Zero Documentation, Release 1.2
Changing center=(100, 100) to midbottom=(100, 200) gives you:
If you don’t specify an initial position, the actor will initially be positioned in the top-left corner (equivalent to
topleft=(0, 0)).
Anchor point
Actors have an “anchor position”, which is a convenient way to position the actor in the scene. By default, the anchor
position is the center, so the .pos attribute refers to the center of the actor (and so do the x and y coordinates). It’s
common to want to set the anchor point to another part of the sprite (perhaps the feet - so that you can easily set the
Actor to be “standing on” something):
alien = Actor('alien', anchor=('center', 'bottom'))
spaceship = Actor('spaceship', anchor=(10, 50))
anchor is specified as a tuple (xanchor, yanchor), where the values can be floats or the strings left,
center/middle, right, top or bottom as appropriate.
Rotation
New in version 1.2.
The .angle attribute of an Actor controls the rotation of the sprite, in degrees, anticlockwise (counterclockwise).
The centre of rotation is the Actor’s anchor point.
34 Chapter 2. ReferencePygame Zero Documentation, Release 1.2
Note that this will change the width and height of the Actor.
For example, to make an asteroid sprite spinning slowly anticlockwise in space:
asteroid = Actor('asteroid', center=(300, 300))
def update():
asteroid.angle += 1
To have it spin clockwise, we’d change update() to:
def update():
asteroid.angle -= 1
As a different example, we could make an actor ship always face the mouse pointer. Because angle_to() returns
0 for “right”, the sprite we use for “ship” should face right:
ship = Actor('ship')
def on_mouse_move(pos):
ship.angle = ship.angle_to(pos)
Remember that angles loop round, so 0 degrees == 360 degrees == 720 degrees. Likewise -180 degrees == 180
degrees.
Distance and angle to
New in version 1.2.
Actors have convenient methods for calculating their distance or angle to other Actors or (x, y) coordinate pairs.
Actor.distance_to(target)
Return the distance from this actor’s position to target, in pixels.
Actor.angle_to(target)
Return the angle from this actor’s position to target, in degrees.
This will return a number between -180 and 180 degrees. Right is 0 degrees and the angles increase going
anticlockwise.
Therefore:
• Left is 180 degrees.
• Up is 90 degrees.
• Down is -90 degrees.
Transparency
New in version 1.3.
In some cases it is useful to make an Actor object partially transparent. This can be used to fade it in or out, or to
indicate that it is “disabled”.
The .opacity attribute of an Actor controls how transparent or opaque it is.
• When an actor is not at all transparent, we say it is “opaque” and it has opacity of 1.0, and you can’t see
through it at all.
2.2. Built-in Objects 35Pygame Zero Documentation, Release 1.2
• When an actor is completely transparent, it has an opacity of 0.0. This will make it completely invisible.
To make an actor that is half-transparent (like a ghost), you could write:
ghost = Actor('ghost')
ghost.opacity = 0.5
This diagram shows the scale; the grey checkerboard is used to give the sense of transparency:
Tip: The order in which you draw overlapping transparent objects still matters. A ghost seen through a window looks
slightly different to a window seen through a ghost.
2.2.7 The Keyboard
You probably noticed that we used the keyboard in the above code. If you’d like to know what keys are pressed
on the keyboard, you can query the attributes of the keyboard builtin. If, say, the left arrow is held down, then
keyboard.left will be True, otherwise it will be False.
There are attributes for every key; some examples:
keyboard.a # The 'A' key
keyboard.left # The left arrow key
keyboard.rshift # The right shift key
keyboard.kp0 # The '0' key on the keypad
keyboard.k_0 # The main '0' key
The full set of key constants is given in the Buttons and Keys documentation, but the attributes are lowercase, because
these are variables not constants.
Deprecated since version 1.1: Uppercase and prefixed attribute names (eg. keyboard.LEFT or keyboard.K_a)
are now deprecated; use lowercase attribute names instead.
New in version 1.1: You can now also query the state of the keys using the keyboard constants themselves:
keyboard[keys.A] # True if the 'A' key is pressed
keyboard[keys.SPACE] # True if the space bar is pressed
2.2.8 Animations
You can animate most things in pygame using the builtin animate(). For example, to move an Actor from its
current position on the screen to the position (100, 100):
animate(alien, pos=(100, 100))
animate(object, tween=’linear’, duration=1, on_finished=None, **targets)
Animate the attributes on object from their current value to that specified in the targets keywords.
Parameters
• tween – The type of tweening to use.
• duration – The duration of the animation, in seconds.
• on_finished – Function called when the animation finishes.
36 Chapter 2. ReferencePygame Zero Documentation, Release 1.2
• targets – The target values for the attributes to animate.
The tween argument can be one of the following:
2.2. Built-in Objects 37Pygame Zero Documentation, Release 1.2
‘linear’ Animate at a constant speed from start to
finish
‘accelerate’ Start slower and accelerate to finish
‘decelerate’ Start fast and decelerate to finish
‘accel_decel’ Accelerate to mid point and decelerate to
finish
‘in_elastic’ Give a little wobble at the end
‘out_elastic’ Have a little wobble at the start
38 Chapter 2. ReferencePygame Zero Documentation, Release 1.2
The animate() function returns an Animation instance:
class Animation
stop(complete=False)
Stop the animation, optionally completing the transition to the final property values.
Parameters complete – Set the animated attribute to the target value.
running
This will be True if the animation is running. It will be False when the duration has run or the stop()
method was called before then.
on_finished
You may set this attribute to a function which will be called when the animation duration runs out. The
on_finished argument to animate() also sets this attribute. It is not called when stop() is called.
This function takes no arguments.
2.2.9 Tone Generator
New in version 1.2.
Pygame Zero can play tones using a built-in synthesizer.
tone.play(pitch, duration)
Play a note at the given pitch for the given duration.
Duration is in seconds.
The pitch can be specified as a number in which case it is the frequency of the note in hertz.
Alternatively, the pitch can be specified as a string representing a note name and octave. For example:
• 'E4' would be E in octave 4.
• 'A#5' would be A-sharp in octave 5.
• 'Bb3' would be B-flat in octave 3.
Creating notes, particularly long notes, takes time - up to several milliseconds. You can create your notes ahead of
time so that this doesn’t slow your game down while it is running:
tone.create(pitch, duration)
Create and return a Sound object.
The arguments are as for play(), above.
This could be used in a Pygame Zero program like this:
beep = tone.create('A3', 0.5)
def on_mouse_down():
beep.play()
2.2.10 Data Storage
The storage object behaves just like a Python dictionary but its contents are preserved across game sessions. The
values you assign to storage will be saved as JSON, which means you can only store certain types of objects in it:
list/tuple, dict, str, float/int, bool, and None.
2.2. Built-in Objects 39You can also read