EDITED BY M. E. SCHAUFF SYSTEMATIC ENTOMOLOGY LABORATORY, USDA NATIONAL MUSEUM OF NATURAL HISTORY, NHB-168, WASHINGTON, DC 20560
←
→
Page content transcription
If your browser does not render page correctly, please read the page content below

EDITED BY M. E. SCHAUFF • SYSTEMATIC ENTOMOLOGY LABORATORY, USDA
NATIONAL MUSEUM OF NATURAL HISTORY, NHB-168, WASHINGTON, DC 20560

Techniques and Tools

  COLLECTING AND PRESERVING
      INSECTS AND MITES:
    TECHNIQUES AND TOOLS

                                                  EDITED BY M. E. SCHAUFF*
                                             Systematic Entomology Laboratory, USDA
                                            National Museum of Natural History, NHB 168
                                                      Washington, D.C. 20560

                                                              Contents
Introduction .......................................................................................................................................... 3
What to Collect ..................................................................................................................................... 4
Part 1. Equipment and Collecting Methods .......................................................................................... 4
         1.1 Basic Equipment .............................................................................................................. 4
         1.2 Collecting Nets .............................................................................................................. 5
         1.3 Killing Jars or Bottles ........................................................................................................ 7
         1.4 Liquid Killing Agents ........................................................................................................ 8
         1.5 Solid Killing Agents........................................................................................................... 9
         1.6 Aspirators and Suction Devices ....................................................................................... 10
         1.7 Beating Sheets              ............................................................................................................ 11
         1.8 Sifters                     ............................................................................................................ 11
         1.9 Separators and Extractors ................................................................................................ 11
         1.10 Traps                      ............................................................................................................ 13
                  1.10.1 Effects of Elevation ........................................................................................ 13
                  1.10.2 Windowpane Traps ......................................................................................... 13
                  1.10.3 Interceptions Nets and Barriers ...................................................................... 13
                  1.10.4 Malaise Traps ................................................................................................. 14
                  1.10.5 Pitfall and Dish Traps ..................................................................................... 14
                  1.10.6 Moericke Traps and Other Color Traps......................................................... 15
                  1.10.7 Emergence and Rearing Traps ....................................................................... 15
                  1.10.8 Lobster or Eel Trap ....................................................................................... 16
                  1.10.9 Light Traps ..................................................................................................... 16
                  1.10.10 Light Sheets.................................................................................................. 17
                  1.10.11 Sticky Traps .................................................................................................. 18
                  1.10.12 Snap Traps .................................................................................................... 18
                  1.10.13 Artificial Refuges ......................................................................................... 19
                  1.10.14 Electrical Grid Traps .................................................................................... 19
         1.11 Baits, Lures, and Other Attractants ................................................................................ 19
                                                                                                                                           1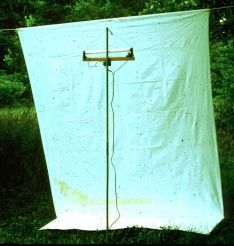
1.11.1 Baiting With Feces. ........................................................................................ 20
                  1.11.2 The Oatmeal Trail........................................................................................... 20
                  1.11.3 Pheromones and Other Attractants ................................................................. 20
                  1.11.4 - Sounds, etc. .................................................................................................. 20
         1.12 - Collecting Aquatic and Soil Insects and Ectoparasites................................................ 21
         1.13 - Rearing           ............................................................................................................ 21
                  1.13.1- Containers for Rearing ................................................................................. 21
                  1.13.2 - Rearing Conditions and Problems .............................................................. 22
                          1.13.2.1 - Moisture ........................................................................................ 22
                          1.13.2.2 - Temperature ................................................................................... 23
                          1.13.2.3 - Dormancy and Diapause................................................................ 23
                          1.13.2.4 - Light .............................................................................................. 23
                          1.13.2.5 - Food ............................................................................................... 23
                          1.13.2.6 - Artificial Diets ............................................................................... 24
                  1.13.3 - Special Problems and Precautions in Rearing. ............................................ 24
Part 2. - Specimen Preservation .......................................................................................................... 24
         2.1 - Liquid Agents for Killing and Preserving .................................................................... 24
         2.2 - Temporary Storage of Specimens .................................................................................. 25
                  2.2.1 - Refrigeration and Freezing ............................................................................ 25
                  2.2.2 - Dry preservation ............................................................................................ 26
                  2.2.3 - Papering ......................................................................................................... 26
                  2.2.4 - Liquid Preservation ........................................................................................ 26
         2.3- Preservation for Molecular Studies ................................................................................ 27
Part 3. Mounting Specimens ............................................................................................................ 27
         3.1 - Preparing Dry Specimens for Mounting........................................................................ 28
         3.2 - Preparing Liquid-Preserved Specimens ........................................................................ 30
         3.3 - Direct Pinning ............................................................................................................ 31
         3.4 - Double Mounts ............................................................................................................ 32
         3.5 - Spreading Boards and Blocks ........................................................................................ 35
                  3.5.1 - Construction of Spreading Boards. ................................................................ 35
                  3.5.2 - Using the Spreading Boards .......................................................................... 36
                  3.5.3 - Construction of Spreading Blocks. ................................................................ 37
         3.6 - Riker Mounts ............................................................................................................ 38
         3.7 - Inflation of Larvae ......................................................................................................... 38
         3.8 - Artificial Drying ............................................................................................................ 38
         3.9 - Embedding          ............................................................................................................ 39
         3.10 - Mounting Specimens for Microscopic Examination ................................................... 39
Part 4. - Sample Procedures 43
         4.1 - Preparation and Storage of Genitalia. ............................................................................ 43
         4.2 - Mounting Wings ............................................................................................................ 44
         4.3 - Mounting Larvae of Diptera, Coleoptera, Lepidoptera, and Other Groups. ................. 45
Part 5 - Labeling                 ............................................................................................................ 46
         5.1 - Paper              ............................................................................................................ 46
         5.2 - Ink                ............................................................................................................ 46
         5.3 - Lettered and Printed Labels ........................................................................................... 46
         5.4 - Size of Labels ............................................................................................................ 46
         5.5 - Label Data         ............................................................................................................ 47
5.6 - Placing the Labels.......................................................................................................... 47
         5.7 - Bar Coding        ............................................................................................................ 48
         5.8 - Labeling Vials ............................................................................................................ 48
         5.9 - Labeling Microscope Slides .......................................................................................... 48
         5.10 - Identification Labels .................................................................................................... 48
Part 6 - Care of the Collection ........................................................................................................... 48
         6.1 - Housing the Collection .................................................................................................. 48
         6.2 - Protecting Specimens From Pests and Mold ................................................................. 49
Part 7 - Packing and Shipping Specimens .......................................................................................... 50
         7.1 - Packing Materials. ......................................................................................................... 50
         7.2 - Pinned Specimens. ......................................................................................................... 50
         7.3 - Specimens in Vials......................................................................................................... 51
         7.4 - Loading Cartons. ........................................................................................................... 51
         7.5 - Shipping Microscope Slides .......................................................................................... 52
         7.6 - Shipping Live Specimens. ............................................................................................. 52

                                                               Introduction

       The Class Arthropoda, which includes insects, spiders, mites, and their relatives, is without question the most
successful group of organisms on the planet. Insects alone account for nearly 55% of all species known to science
(Barrowclough 1992). Spiders, mites and insects inhabit every terrestrial habitat on the planet and play a major role in
the evolution and maintenance of biotic communities. They are the primary pollinators of flowering plants; they are
important consumers and recyclers of decaying organic matter; and they are integral components in the foodwebs of
vertebrates and other invertebrates. For these reasons, and many others, the study of insects and their relatives is of
increasing importance as society faces increased challenges to preserve and enhance environmental quality, reduce
pesticide usage, increase crop productivity, control food costs, and increase trade in the global community. Pest species
are responsible for enormous economic losses annually, attacking crops and ornamental plants, causing damage to our
food and clothing, and vectoring diseases that effect cultivated plants, our pets and livestock, and ourselves. The damage
cause by pests species is far outweighed by the positive effects of beneficial species. Pollinators ensure the production of
fruit, parasitoids and predators help control pest species, some species contain chemicals of pharmaceutical value, and a
large number of species contribute to the decomposition and recycling of dead and decaying matter.

       Because of the damage inflicted by pest species, increased knowledge of these organisms has the potential to save
lives and money. Correct identification of a newly detected pest or disease vector is of utmost importance because the
scientific name of an organism is the key to all known information about its morphology, its behavior and life history,
and its potential threat to human welfare.

      The behavior of insects and mites can be observed most easily in their natural environments. However, many
species, especially the smaller ones, must be collected and properly preserved before they can be identified. Because
correct identification seldom is easy, it is important that specimens be preserved in the best condition possible. The
identification of a particular insect or mite usually requires examination of minute details of its anatomy with the aid of a
hand lens or microscope. Some specimens may require dissection or even study with the electron microscope. If these
details on a specimen are concealed, missing, or destroyed because of improper handling or preservation, identification is
made difficult or impossible, and information about the species to which it belongs cannot be made available. Therefore,
adequate preservation and proper labeling of specimens are essential to their identification.

      The methods used to collect insects and mites are dictated by the ultimate goal of the samples collected. Insects
may be collected as a hobby for personal enjoyment of their diversity and beauty. They may be collected in conjunction
with school courses on biology or entomology. Specific insects groups may be sampled to assess or measure biodiversity

      * This manual is an updated and modified version of the USDA Misc. Publication no. 1443 published by the Agricultural
Research service in 1986 and Edited by George C. Steyskal, William L. Murphy, and Edna M. Hoover.
Collecting and Preserving Insects and Mites
to help identify appropriate areas to be included in           the specimens they photograph if positive identification is
reserves. Aquatic species may be used to detect changes in     desired; minute, critical diagnostic characters often are not
water quality. Pest species may be sampled to assess           depicted in photographs. If specimens are destined for
presence/absence or abundance in order to determine            display cases that portray them in their natural habitats, it
whether control measures are necessary. Specific groups        may be important to collect a sample of the host plant for
or species may be collected to acquire material for            the display.
biological, physiological, ecological, molecular, and
systematic studies.                                                  Many persons starting a collection attempt to collect
                                                               every specimen they find. Biology students in high school
      This manual provides a summary of the methods and        and college are often required to collect specimens from as
techniques used by professionals and amateurs alike to         many orders or groups as possible. The experience and
collect and preserve specimens for study. While many of        knowledge gained in making a general collection are of
the methods covered here, such as pinning, have changed        value in helping the collector decide on a specialty.
very little in the last hundred years, other techniques have   However, with so many different kinds of insects from
become available only in the last few years or decades         which to choose—over 100,000 described species in North
with advancing technologies. Older manuals such as             America alone—most persons find that as their skills and
Steyskal et al. (1986), Martin (1977) and Upton (1991)         interests increase, concentrating eventually on 1 or 2 of the
while still useful will not cover such these as preservation   major insect or mite groups is desirable. Specimens other
for molecular studies. In addition, most of these older        than those in a chosen group may still be collected for
publications are now out of print and may be difficult to      exchange with other collectors.
find.

                    What to Collect                                 References: Lewis & Taylor 1965; Seber 1973;
                                                               Barrowclough 1992.
      Because of their incredible diversity, insects, mites,
and other related groups vary widely as to their proper
collecting requirements and methods. In the following            Part 1. Equipment and Collecting Methods
sections, we will explore some of the many recommended
techniques and look at the varied equipment used by                              1.1 Basic Equipment
collectors. The emphasis will be on insects and mites, but           Collecting methods may be divided into two broad
much of what is included here will also pertain to other       categories. In the first the collector actively searches out
related groups such as spiders.

        Which species and how many
specimens to collect depends on the
purpose for which the material is
intended. For hobbyists and students,
small samples are usually adequate.
However, when important pest insects
and mites need to be identified, they
should be collected in series if at all
feasible. A sample of 20 specimens
should be considered the minimum,
and even larger numbers may be
desirable. If adults and immatures are
present, specimens should be col-
lected of all life stages. Excess
specimens can be discarded or
exchanged, but it is not always
possible to collect additional speci-
mens when needed. Frequently insects
and mites cannot be identified
accurately from immature stages, and
it is then necessary to rear them to the
adult stage to obtain a precise identifi-
cation. Photographers should collect
                                                                   Fig. 1. A field collecting kit.
                                                                                                                      4
Techniques and Tools
the insects, using nets, aspirators, beating sheets, or virtually impossible to extricate without damage.
whatever apparatus suits his or her particular needs. In the
second, the collector participates passively and permits (5) Small envelopes for temporary storage of delicate
traps to do the work. Both approaches may be used specimens and/or gelcaps for tiny specimens.
simultaneously, and both are discussed in the following
pages. Using a variety of collecting methods will help to (6) One or more aspirators (see p. 7-8).
maximize the number of specimens taken, especially when
briefly visiting an interesting area. (7) Absorbent tissue for use in killing bottles and aspira-
tors.
While picking up insects by hand is simple and
sometimes effective, their size, mobility, and the possibil- (8) Notebook and writing equipment for jotting down
ity of being bitten or stung usually dictates that various notes and label data.
kinds of equipment and special methods are needed. Those
described here have general application; it is expected that (9) A strong knife for opening galls, seed pods, twigs, etc
the collector will make some adaptations to fit his or her and a pair of scissors for cutting labels.
own purposes and resources. In fact, as experience
collecing increases, or the target group becomes more (10) A small, fine brush (camel’s hair is best) for picking
focussed, the use of specialized techniques increases. For up minute specimens. Moisten the tip; tiny specimens
additional information, especially concerning the use of will adhere to it and may be transferred to a killing
specialized techniques, consult the list of references. bottle or vial.
References (general): Arnett, 1985; Balogh 1958; (11) Bags for storing plant material, rearing material, or
Banks 1909; Banks et al. 1981; Bland & Jacques 1978; Berlese samples. For collecting much plant material, a
Borror et al.; British Museum 1974; Cantrall 1939-40; botanist’s vasculum or tin box is advisable.
Cantrall 1941; Chu 1949; Edmunds & McCafferty 1978;
Foote 1948; Klots 1932; Knudsen 1966; Knudsen 1972; (12) A hand lens.
Kogan & Herzog 1980; Lehker & Deay 1969; Lincoln &
Sheals 1979; McNutt 1976; Martin 1977; Nicholls 1970; This list may be modified according to the special
Norris 1966; Oldroyd 1958; Peterson 1964; Service 1976; kinds of insects or mites to be collected. A small digging
Southwood 1979; Stein 1976; Upton, 1991; USDA 1970; tool or trowel may be useful for collecting insects from
USDA 1966-70; Urquhart 1965; Wagstaffe & Fidler 1955. soil or for gathering Berlese samples and a heavy knife or
small hatchet for searching under bark or in decaying logs.
The equipment used to assemble a general insect or A plant press should be available to prepare plant speci-
mite collection need not be elaborate or expensive. In mens for determination or as voucher specimens, espe-
many instances, a collecting net (see below) and several cially when leaf-mining insects are being studied. When
killing bottles (see p. 5) will suffice; however, additional collecting at night, have a flashlight or headlamp; the latter
items will permit more effective sampling of a particular is especially useful because it leaves the hands free.
fauna. Many collectors carry a bag (fig. 1) or wear a vest
in which they store equipment. The following items Much of the equipment listed above may be obtained
usually are included in the general collector’s bag: from around the home or from ordinary sources like a drug
store, but equipment especially designed for insect
(1) Forceps. Fine, lightweight forceps are recommended; if collecting often must be bought from special supply
sharp-pointed forceps are used, care must be taken not houses. If there is a local company, their address may
to puncture specimens. If possible, grasp specimens usually be found in the yellow pages of telephone directo-
with the part of the forceps slightly behind the points. ries under “Biological Laboratory Supplies” or “Labora-
tory Equipment and Supplies.” The faculty members of a
(2) Vials containing alcohol or other preservatives (see p. local university’s biology or entomology department or
21). curators at a nearby museum are usually willing to help
and in the best position to recommend a supplier in the
(3) Killing bottles of various sizes. area. Professional journals also sometimes carry advertise-
ments for equipment suppliers.
(4) Small boxes or containers for storing specimens after
their removal from killing bottles. These may be made 1.2 Collecting Nets
of cardboard, plastic, or metal and should be partly
filled with soft tissue or cloth to keep specimens from Collecting nets come in three basic forms: Aerial,
rolling about. Do not use cotton because specimens sweeping, and aquatic. The first is designed especially for
become entangled in the fibers and may become
5Collecting and Preserving Insects and Mites
is that the size and shape can be
adapted to the needs of the
user, to the kind of collecting
intended, and to the material
available, which need not be
expensive. These materials
include—
(1) Piece of heavy (8-
gage) steel wire for the rim,
bent to form a ring 30-38 cm in
diameter (fig. 2, A). Small nets
15 cm or so in diameter
sometimes are useful, but nets
larger than 38 cm are too
cumbersome for most collect-
ing.
(2) Dacron or other
strong, light fabric through
which air can flow freely.
Brussels netting is best but may
be difficult to obtain; otherwise
nylon netting, marquisette,
organdy, or good quality
cheesecloth can be used, but
the last snags easily and is not
durable. The material should be
folded double and should be
1.5-1.75 times the rim diameter
in length (fig. 2, B). The edges
should be double-stitched
(French seams).
(3) Strip of muslin, light
canvas, or other tightly woven
cloth long enough to encircle
the rim. The open top of the net
bag is sewn between the folded
edges of this band to form a tube through which the wire
Fig. 2. Collecting Net
rim is inserted (fig. 2, C).
collecting butterflies and other flying insects. Both the bag (4) Straight hardwood dowel about 19 mm in
and handle are relatively lightweight. The sweeping net is diameter and 105-140 cm long (to suit the collector). For
similar to the aerial net but is stronger and has a more attachment of the rim to the handle, a pair of holes of the
durable bag to withstand being dragged through dense same diam-
vegetation. Aquatic nets are used for gathering insects eter as the
from water and are usually made of metal screening or wire are
heavy scrim with a canvas band affixed to a metal rim. A drilled
metal handle is advisable because wooden ones may opposite each
deteriorate after repeated wetting. The net you choose other to
depends on the kind of insects or mites you wish to collect. receive the
bent tips of
Several kinds of nets, including collapsible models the wire, and
with interchangeable bags, are available from biological a pair of
supply houses, but anyone with a little mechanical ability
can make a useful net. The advantage of a homemade net Fig. 3. A truck equipped with a large net.
6Techniques and Tools
grooves as deep and as wide as the wire are cut from each through the netting when the butterfly’s wings are closed.
hole to the end of the dowel to receive the straight part of Experience will teach you how much pressure to exert;
the wire (fig. 2, D). obviously, pinching small specimens of any kind is not
recommended. When numerous specimens are in the net
(5) Tape or wire to lash the ends of the rims tightly after prolonged sweeping, it may be desirable to put the
into the grooves in the end of the handle. This may be entire tip of the bag into a large killing jar for a few
electrician’s plastic tape or fiber strapping tape commonly minutes to stun the insects. They may then be removed and
used for packaging. If wire is used, the ends should be desired specimens placed separately into a killing jar, or
bound with tape to secure them and to keep them from the entire mass may be dumped into a killing jar for later
snagging. A close-fitting metal sleeve (ferrule) may be sorting. These methods of mass collecting are especially
slipped over the rim ends and held in place with a small adapted to obtaining small insects not readily recognizable
roundheaded screw instead of tape or wire lashing. until the catch is sorted under a microscope.
Removal of stinging insects from a net may be a
After the net has been placed on the rim, the ends of problem. They will often crawl toward the rim of the bag
the band should be sewn together and the rim ends and may be made to enter a killing jar held at the point
fastened to the handle. The other end of the handle should where they crawl over the rim. However, many insects will
be filed to remove sharp edges. The net is then ready for fly as soon as they reach the rim, and a desired specimen
use (fig. 2, E). may be lost. A useful method is to trap the insect in a fold
of the net, carefully keeping a sufficient amount of netting
Efficient use of a net is gained only with experience. between fingers and insect to avoid being stung. This fold
Collection of specimens in flight calls for the basic of the net can then be inserted into the killing jar to stun
stroke—swing the net rapidly to capture the specimen, the insect. After a few moments, it should be safe to
then follow through to force the insect into the very remove the insect from the net and transfer it to a killing
bottom of the bag. Twist the wrist as you follow through so jar. If the stunned insect clings to the net and does not fall
the bottom of the bag hangs over the rim; this will entrap readily into the jar, use forceps or pry the insect loose with
the specimen. If the insect alights on the ground or other the jar lid or a small stick—not with your fingers.
surface, it may be easier to use a downward stroke, quickly
swinging down on top of the insect. With the rim of the net Aerial nets made of dacron or nylon may be used to
in contact with the ground to prevent the specimen from sweep insects from water if an aquatic net is not at hand.
escaping, hold the tip of the bag up with one hand. Most The netting will dry quickly if swept strongly through the
insects will fly or crawl upward into the tip of the bag, air a few times; however, it should not be used again until
which can then be flipped over the rim to entrap the thoroughly dry, or other specimens, especially butterflies,
specimen. may be ruined. A number of special modifications are
necessary to adapt a net for aquatic collecting.
Sweeping the net through vegetation, along the sand
and seaweed on beaches, or up and down tree trunks will For specialized collecting, nets can be attached to the
catch many kinds of insects and mites. The aerial net may ends of beams that are rotated about their midlength by a
be used in this way, but the more durable sweeping net is motor drive. Nets also can be adapted to be towed by or
recommended for such rough usage. After sweeping with mounted on vehicles (fig. 3) (Peck and Cook, 1992).
the net, a strong swing will bring anything in the bag to the
bottom, and then by immediately grasping the middle of References: Dresner 1970; Johnson 1950; Rogers &
the net with the free hand, the catch will be confined to a Smith 1977; Rudd & Jensen 1977; Takeda et al. 1962;
small part of the bag. Only the most rugged sweeping net Williams & Miine 1935; vehicle-mounted net: Almand et
may be used through thistles or brambles. Even some al. 1974; Barnard 1979; Grigarick 1959; Harwood 1961;
kinds of grasses, such as sawgrass, can quickly ruin a net. Hill 1971; Holzapfel et al. 1978; Kronblad & Lundberg
Burs and sticky seeds are also a serious problem. 1978; Landin 1976; McNutt 1976; Noyes, 1982; Rudd &
Jensen 1977; Torre-Bueno 1937; Traver 1940.
The catch may be transferred from the bag to a
killing jar in one of several ways. Single specimens are 1.3 Killing Jars or Bottles
transferred most easily by lightly holding them in a fold of
the net with one hand while inserting the open killing jar Effective collecting of insects and related groups
into the net with the other. While the jar is still in the net, usually requires that the specimens be killed so that they
cover the opening until the specimen is stupefied; other- may be properly mounted and studied. The most widely
wise, it may escape before the jar can be removed from the
net and closed. To prevent a butterfly from damaging its
wings by fluttering in the net, squeeze the thorax gently
7Collecting and Preserving Insects and Mites
opening jars to insert or remove specimens, is not believed
to reault in any permanent harm. Never deliberately inhale
the fumes, even momentarily. All killing agents are to
some extent hazardous to human health. All killing jars or
bottles should be clearly labeled “POISON” and should
be kept away from children or persons who may be
unaware of their potential danger.
When not in use, killing jars should be stored in a
safe place away from children and pets where they are not
liable to accidental breakage. Cyanide jars should not be
stored in an area such as a bedroom where any accidental
leakage could expose someone to fumes. Remember that
killing agents can be as effective against humans as they
are against insects and that care and caution in their
construction and use are essential.
1.4 Liquid Killing Agents
Jars for use with liquid killing agents are prepared in
one of two ways. One way (fig. 4, A) is to pour about 2.5
cm of plaster of paris mixed with water into the bottom of
the jar and allow the plaster to dry. Enough of the killing
agent is then added to saturate the plaster; any excess
should be poured off. This kind of jar can be recharged
merely by adding more killing agent. The second method
is to place a wad of cotton or other absorbent material in
the bottom of a jar, pour enough liquid killing agent into
the jar to nearly saturate the absorbent material, and then
press a piece of stiff paper on it or a cardboard cut to fit
the inside of the jar tightly. The paper or cardboard acts as
a barrier between the insect and the killing agent, keeping
the latter from evaporating too rapidly and also preventing
the specimen from becoming entangled in loose fibers.
Among the liquid killing agents are ethyl acetate
(CH3CO2 • C2H5), ether (diethyl ether, C2H5 • O •
C2H5), chloroform (CHCI3), and ammonia water
(NH4OH solution). Ethyl acetate is most widely used. All
of these chemicals are extremely volatile and flammable
and should never be used near fire. Children should only
use them under adult supervision.
Fig. 4. Killing jars
Ethyl acetate is regarded by many as the most
satisfactory liquid killing agent. Its fumes are less toxic to
employed method for killing collected specimens is the
humans than those of the other substances. Although it
killing jar (bottle). Any heavy, wide-mouthed glass jar or
usually stuns insects quickly, it kills them slowly. Speci-
bottle with a tight-fitting stopper or metal screw top may
mens that appear dead may revive if removed from the
be used. Tops that may be removed with only a quarter
killing jar too soon, but a compensating advantage is that
turn often are preferred but may not be obtained readily.
most specimens may be left in an ethyl acetate killing jar
The killing agent used may be any of various liquids or
for several days and still be limp. If the ethyl acetate is
solids. Liquid killing agents generally are considered to be
allowed to evaporate from the specimens, they will harden.
slower acting but safer to use than solids such as cyanide,
Killing jars with ethyl acetate are preferred by many
but some of them are known to accumulate in human
entomologists, especially for infrequent use.
tissue after repeated or prolonged exposure. Despite its
extreme toxicity, cyanide is a noncumulative poison, and
Ether and chloroform are both extremely volatile and
brief exposure to the fumes, as inevitably occurs when
8Techniques and Tools
flammable and should not be used near an open flame or water condensation on the inside glass surface. Instead of
lighted cigarette. Their high volatility makes them service- the plaster of paris, a plug of paper or cardboard may be
able in a killing jar for only a short time. Perhaps the pressed on top of the sawdust. Be sure that it fits tightly.
greatest hazard with chloroform is that even when stored When ready to use after a few hours, place several drops
in a dark-colored jar, it eventually forms the extremely of water on the plaster or paper plug. In an hour or so,
toxic gas phosgene (carbonyl chloride, COCI2). Chloro- enough fumes of hydrocyanic acid will have been pro-
form, however, is useful when other substances cannot be duced to make the jar operative. Do not test this by
obtained. It stuns and kills quickly but has the disadvan- sniffing the open jar.
tage of stiffening specimens.
Ethyl Alcohol (ethanol or ETOH) is widely used to Every killing jar or bottle should be clearly and
kill small Coleoptera adults, small Hymenoptera, and prominently labeled “POISON”. The bottom must be
many immature insects and soft-bodied insects. It is most covered with tape, preferably cloth, plastic, or clinical
commonly used at 70-80% concentration and many adhesive tape, to cushion the glass against breakage and to
workers add 5% glacial acetic acid ("acetic alcohol") keep its dangerous contents from being scattered if the
which helps penetration of the alcohol into the specimen container breaks.
and leaves specimens more relaxed. Isopropyl alcohol
(rubbing alcohol) may also be used, and may be easier to Killing jars or bottles will last longer and give better
find and purchase than Ethanol. However, Ethanol is results if the following simple rules are observed:
preferred for most applications. Ethanol is used com-
monly in Berlese funnels and similar traps. (1) Place a few narrow strips of absorbent paper in
each jar or bottle to keep it dry and to prevent specimens
Liquid ammonia is irritating to humans, and in from mutilating or soiling each other. Replace the strips
general is not a particularly effective killing agent for most when they become moist or dirty. This method is useful for
insects. However, it is highly recommended for use in most insects except Lepidoptera, which are too difficult to
small vials for dispatching microlepidoptera, and it has disentangle without damage.
been used with variable success in blacklight traps, again
for Lepidoptera. Specimens killed in ammonia tend to (2) Do not leave killing jars in direct sunlight as they
stay in a relaxed condition much longer than those killed will sweat and rapidly lose their killing power.
by cyanide, allowing greater ease of spreading. Ammonia
is readily available from many sources. Ammonium (3) If moisture condenses in a jar, wipe it dry with
carbonate, a solid but volatile substance, also can be used. absorbent tissue.
1.5 Solid Killing Agents (4) Keep delicate specimens in separate jars so that
larger specimens will not damage them.
The solid killing agents most often used in killing
jars are the cyanides—potassium cyanide (KCN), sodium (5) Do not allow a large number of specimens to
cyanide (NaCN), or calcium cyanide [Ca(CN)2]. Handle accumulate in a jar unless it is to be used specifically for
all cyanides with extreme care. They are dangerous, rapid- temporary storage.
acting poisons with no known antidote. If even a single
grain touches the skin, wash immediately with water. To (6) Do not leave insects in cyanide jars for more than
avoid handling the cyanide and having to find a safe place a few hours. The fumes will change the colors of some
to store or dispose of surplus crystals, you may be able to insects, especially yellows to red, and specimens will
find a chemist, pharmacist, or professional entomologist to generally become brittle and difficult to handle.
make the killing jar for you. If this is not feasible, use
utmost care in following the instructions given here. (7) If it is necessary to keep insects in killing jars for
more than several hours, place the specimens in another
To make a cyanide killing jar or bottle, place a layer container and store them in a refrigerator.
(about 15 mm) of cyanide crystals in the bottom (fig. 4,
B). Potassium cyanide is best; sodium cyanide is as (8) Keep butterflies and moths in jars by themselves
effective but is hygroscopic, that is, it absorbs water and so that their hairs and scales will not ruin other kinds of
makes the jar wet; and calcium cyanide is seldom avail- insects.
able. Cover the crystals with about 10 mm of sawdust and
then add about 7 mm of plaster of paris mixed with water (9) Never test a killing jar by smelling its contents.
to form a thick paste, working quickly before the plaster
solidifies. Then add crumpled absorbent paper to prevent (10) Old jars that no longer kill quickly should be
recharged or disposed of by burning or burying. A cyanide
9Collecting and Preserving Insects and Mites
jar that has become dry may be reactivated by adding a To make an aspirator, bend the glass or copper tubes
few drops of water. as in figure 5, A. In bending or cutting glass tubes, always
protect your fingers by holding the glass between several
Spray-dispensed insecticides may be used, if not to layers of cloth. Obtain the advice of a chemist or labora-
kill specimens, to at least ‘knock them down’ into a tory technician for cutting and bending glass. Moisten one
container from which they may be picked up. If they are end of the longer tube and insert it through one of the
directed into a container topped with a funnel, they may be holes in the rubber stopper. Moisten one end of the shorter
allowed to revive and treated further as desired (see Clark tube, insert it through the other hole in the stopper, and
& Blom 1979). using a rubberband fasten the cloth mesh over the end that
was inserted through the stopper; this will prevent speci-
References: Banks et al. 1981; Clark & Blom 1979; mens from being sucked into the collector’s mouth when
Frost 1958; Lindroth 1957; Pennington 1967; Preiss et al.; the aspirator is used. Attach one end of the flexible tubing
White 1964. to the free end of this tube. The length, size, and amount of
bend in the tubing will vary according to the user’s needs.
To complete the assembly, insert the rubber stopper into
1.6 Aspirators and Suction Devices the vial. To use the aspirator, place the free end of the
flexible tubing in the mouth, move the end of the longer
The aspirator (fig. 5, A), known in England as a glass tube close to a small specimen, and suck sharply. The
‘pooter,’ is a convenient and effective device for collecting specimen will be pulled into the vial.
small insects and mites. The following materials are
needed to construct an aspirator: Instead of using a vial, some workers prefer a tube
(fig. 5, B). In either method, it is well to keep small pieces
(1) Vial 2.5-5 cm in diameter and about 12 cm long. of absorbent tissue in the vial or tube at all times to
prevent moisture from accumulating. Be cautioned that
(2) Two pieces of glass or copper tubing about 7 mm there is some danger of inhaling harmful substances or
in diameter, one piece about 8 cm long and the other about organisms when using a suction-type aspirator (see Hurd
13 cm long. 1954).
(3) Rubber stopper with two holes in which the Either the vial- or tubing-type aspirator (fig. 5, B)
tubing will fit snugly. may be converted into a blow-type aspirator by removing
the 13-cm glass tube (see fig. 5, A) and substituting a T—
(4) Piece of flexible rubber or plastic tubing about 1 shaped attachment (fig. 5, B). The flexible tubing is
meter long, with diameter just large enough to fit snugly attached to one arm of the ‘T,’ the opposite arm is left
over one end of shorter piece of stiff tubing. open, and the stem of the ‘T’ is inserted into the vial and
covered with mesh. Upon blowing through the flexible
(5) Small piece of cloth mesh, such as cheesecloth, tubing, a current of air passes across the ‘T’ and creates a
and rubberband. partial vacuum in the vial, which produces the suction
needed to draw specimens into the vial. This kind of
aspirator eliminates the danger of inhaling small particles,
fungus spores, or noxious fumes.
Aspirators with a squeeze bulb may sometimes be
purchased, or if a valved bulb can be obtained, they may
be constructed for use with either pressure or suction.
Collection traps also have been devised with the suction
feature applied on a much larger scale than with the usual
aspirator. Suction produced by a fan has been employed in
traps in conjunction with light or other attractants. Some of
these traps are described in the following references and in
the section on Traps. Suction is created by a piston in a
‘slurp-gun’ described for aquatic collecting. This principle
could be adapted for use in air to gather insects and to
deposit them in a vial attached to the side of the piston.
References: Azrang 1976; Barnard & Mulla 1977;
Fig. 5. Aspirators
10Techniques and Tools
Bradbury & Morrison 1975; Clifford et al. 1977; Evans et dislodge the mites, which will fall through the screen and
al. 1964; Galtsoff et al. 1937; Hurd 1954; Johnson 1950; into the vial below.
Johnson & Taylor 1955; Johnson et al. 1957; Lumsden
1958; Minter 1961; Mulhern 1942; Scholdt & Neri 1974; Another type of sifter employs two hoops of heavy
Taylor 1962a; Turnbull & Nicholls 1966; White 1964; metal, each with a handle. A long (3-4 ft.) canvas bag is
Weins & Burgess 1972; Williams 1973; Woke 1955. sewn to the top hoop. The bag is left open at the end and
secured with a cord or twist-tie. About 1 foot down in the
1.7 Beating Sheets bag, the second hoop is sewn to the canvas and to this is
attached a metal screen. Coarse debris is loaded into the
A beating sheet should be made of durable cloth, top and sifted down to the end of the canvas bag. Sifted
preferably white, attached to a frame about 1 meter square, debris is then ready to be processed by one of the follow-
with two pieces of doweling or other light wood crossing ing separators or extractors.
each other and fitted into pockets at each corner of the
cloth. An ordinary light-colored umbrella also may be used References: Martin 1977.
as a beating sheet. Place the beating sheet or umbrella
under a tree or shrub and sharply beat the branches or 1.9 Separators and Extractors
foliage with a club or stick. Specimens will fall onto the
sheet and may be removed from the light-colored material Somewhat similar to the sifter are various devices
by hand or with forceps, a moistened brush, or an aspira- designed to separate or extract live specimens from
tor. Locating specimens on the sheet is sometimes a substances in which they may be found, such as leaf mold
problem because of leaves or other unwanted material and other kinds of vegetable matter, shore detritus, dung,
dropping onto the sheet. Watching for movement will help even net sweepings that include so much foreign matter
locate specimens, as well as tilting the sheet so that the that it is difficult to pick out the insects. These devices
debris is displaced or even allowed to fall off, with the usually depend on some physical aid such as light, heat, or
insects and mites left clinging to the cloth. dryness to impel the insects to leave the foreign matter.
Beating sheets are especially useful in collecting One of the simplest such devices is the sweeping
beetles, true bugs, and larval Lepidoptera. Beating may be separator (fig. 7). This is simply a carton or wooden box
the best collecting technique when the weather has turned with a tight-fitting lid. Near the top of the box on one side
cold, or early and late in the day, when normally active is inserted a glass jar. If the jar is made with a screw top, a
insects seek shelter in vegetation and are otherwise hole of proper diameter cut in the side of the carton will
difficult to detect. permit the jar to be screwed onto it. The cover ring,
A ‘ground cloth’ also is used in sampling crop fields
(see Rudd & Jensen 1977).
1.8 Sifters
Sifters are used to collect insects and mites that live
in ground litter, leaf mold, rotting wood, mammal and bird
nests, fungi, shore detritus, lichens, mosses, and similar
material. Sifters are especially useful for winter collecting
to pick up hibernating specimens. Almost any container
with a wire-mesh screen bottom will serve as a sifter. The
size of the mesh depends on the size of the specimens
sought. For general purposes, screening with 2.5-3 meshes
per centimeter is satisfactory. To use the sifter, place the
material to be sifted into the container and shake it gently
over a white pan or piece of white cloth. As the insects and
mites fall onto the cloth, they may be collected with
forceps, a brush, or an aspirator.
A similar method is used chiefly to collect mites
from foliage. Using a sifter of 20-mesh screen (about 8 per
centimeter) with a funnel underneath that leads to a small
vial, beat pieces of vegetation against the screen to
Fig. 6. Separation bag
11Collecting and Preserving Insects and Mites
A more sophisiticated version of this separtor is
made of alumnium with a clear plastic top and cloth
collecting bag (fig. 6). Sitting on three legs, this separator
allow the collector to dump the catch into the bag, place
the lid, which is lined with a magnet, on top and insert an
aspirator through a small hole in the side of the bag. As
insects are attracted to the top and collect on the plastic,
the aspirator can be moved about to suck up the insects of
interest.
Nets can also be modified to help keep plant
material contacted during sweeping away from the insects.
In most cases, hardware cloth or some other screening
material with fairly large holes (ca. 1cm in diameter) is
Fig. 7. Sweeping separator placed across the net opening and fastened to the net ring.
This works well to keep out larger pieces of plant debris
but will not be effective in excluding seeds and other small
without the lid, from a home-canning jar may be nailed to plant parts (Noyes 1988; Zolnerowich et al. 1990).
the periphery of a hole in a wooden box and the jar then
screwed onto the ring. Insects collected into alcohol can also be separated
from plant debris by the use of screens. In this method, a
The sweepings are dumped into the box and the screen of 1/4 inch diameter galvanized hardware cloth is
cover is quickly closed. The insects in the darkened box fastened over a frame. Below this is another screen made
soon will be attracted to the lighted glass jar. When all the from a very fine mesh material such as organdy or a small
insects appear to have entered the jar, it can be removed section of panty hose. The insect/plant material collection
and its contents put into a killing jar. Alternatively, a jar is poured over the coarser screen and alcohol is added.
cover containing a piece of blotting paper soaked with When agitated, the insect will sink through the larger
xylene may be placed over the jar for awhile to stun the screen while plant material will float or be stopped by the
insects, which may then be sorted. screen mesh. A similar method uses a set of three stacked
screens of decreasing diameter and specimens are washed
from one layer to another using a gentle spray of water.
Care must be taken so that the washing does not damage
the specimens.
The Berlese or Tullgren funnel (Upton 1991) (fig. 8)
and its modifications are cleaner and more efficient than
sifting to separate insects and mites from leaf mold and
similar materials. The sample (usually presifted to remove
large debris) is placed on a screen near the top of a funnel.
A light bulb can be placed above the sample to produce
heat and light, which drive the insects downward into the
funnel, or heated coils or a jacket around the funnel can be
used to dry the sample and make it inhospitable. The
insects and mites are directed by the funnel into a con-
tainer, sometimes containing alcohol at the bottom of the
funnel. Care should be taken not to dry the sample so
rapidly that slow-moving specimens are immobilized
before they can leave the sample. To prevent large
amounts of debris from falling into the container, place the
sample on the screen before the container is put in place.
A similar separator is the photoeclector or
Winkler/Moczarski Elector. This device is similar to the
Berlese funnel except that no light bulb or other heat
source is used to drive the insect to the bottom. Instead, an
open jar, with a most cloth or tissue inside, is attached to
Fig. 8. Berlese funnel the bottom of the funnel or canvas bag and insects are
12Techniques and Tools
attracted to the light and humidity. An added advantage of Stewart & Lam 1968.
this device is that it requires no electricity and so may be
more readily used in the field. 1.10.2 Windowpane Traps
References: Besuchet et al. 1987; Brown 1973; One of the simplest and cheapest traps is a barrier
Everett & Lancaster 1968; Finch & Skinner 1974; Gui et consisting of a windowpane held upright by stakes in the
al. 1942; Kempson et al. 1962; Kevan 1955; Kevan 1962; ground or suspended by a line from a tree or from a
Lane & Anderson 1976; Martin 1977; Masner & Gibson horizontal line. A trough filled with a liquid killing agent is
1979; Murphy 1962; Newell 1955; Norton and Kethley so placed that insects flying into the pane drop into the
1988; Salmon 1946. trough and drown. They are removed from the liquid,
washed with alcohol or other solvent, then preserved in
1.10 Traps alcohol or dried and pinned. The trap is not recommended
for adult Lepidoptera or other insects that may be ruined if
Since a trap is defined as anything that impedes or collected in fluid.
stops the progress of an organism, this subject is extensive, A modification of this trap uses the central "pane"
including devices used with or without baits, lures, or of a malaise trap instead of a pane of glass. The malaise
other attractants. Besides its construction, the performance trap pane covers more space than glass, is easier to
of a trap depends on such factors as its location, time of transport, and, of course, is not breakable. Various mesh
year or day, weather, temperature, and kind of attractant sizes if cloth can also be used depending on the insects
used, if any. A little ingenuity coupled with knowledge of targeted. These traps may also be referred to as flight
the habits of the insects or mites sought will suggest intercept traps.
modifications or improvements in nearly any trap or may
even suggest new traps. References: Chapman & Kinghorn 1955; Corbet
1965; Kato et al. 1966; Lehker & Deay 1969; Masner and
Only a few of the most useful traps are discussed Goulet 1981; Nijholt & Chapman 1968; Peck and Davies
here, but the following references describe many more, 1980; Roling & Kearby 1975; Wilson 1969.
especially Martin 1977; Peterson 1964; Southwood 1979.
1.10.3 Interceptions Nets and Barriers
References: A'Brook 1973; Banks 1959; Banks et al.
1981; Barber 1931; Bidlingmayer 1967; Broadbent 1949; A piece of netting, 1.8 meters or more in height, can
Broadbent et al. 1948; Dunn & Reeves 1980; Evans 1975; be stretched between three trees or poles to form a V-
Flaschka & Floyd 1969; Ford 1973; Glasgow & Duffy shaped trap with the wide end of the V open. A triangular
1961; Golmeric & Davenport 1971; Granger 1970; roof should be adjusted to slope gently downward to the
Hafraoui et al. 1980; Hanec & Bracken 1964; Hansens et broad open side of the V. A device of this type will
al. 1971; Hargrove 1977; Hartstack et al. 1968; Hathaway intercept many kinds of flying insects, particularly if the
1981; Heathcote et al. 1969; Hienton 1974; Hollingsworth trap is situated with the point of the V toward the side of
et al. 1963; Howell 1980; Kimerle & Anderson 1967; maximum light and in the direction of air movement. A
Klein et al. 1973; Martin 1977; Meyerdirk et al. 1979; pair of such nets set in opposite directions, or a single net
Morris 1961; Peterson 1964; Pickens et al. 1972; in a zigzag shape, will intercept specimens from two
Southwood 1979; Sparks et al. 1980; Taylor 1962b; directions. Since insects flying into such a net tend to
Thorsteinson et al. 1965; Weseloh 1974; Whittaker 1952; gather at the pyramidal apex, they are easy to collect. In
Williams 1951; Woke 1955. one variant of this trap the cloth is sprayed with a sythetic
pyrethroid insecticide and the insects which are killed by
1.10.1 Effects of Elevation contact with the cloth then fall into a long pan trap at the
bottom. The so-called ‘funnel’ or ‘ramp’ traps are inter-
One of the external factors affecting the performance ception devices that direct insects to a central point, where
of traps, especially light traps, has been specially studied, a retaining device or killing jar may be placed. More
namely the effect of the elevation (above sea or ground complex arrangements have been described in the litera-
level) at which the trap is placed when in use. The subject ture, primarily for migrating butterflies.
is complex, with many variables related to kinds of insects,
locality, and so forth, which are discussed in the following References: Gillies 1969; Graham et al. 1961;
references. Hocking & Hudson 1974; Jonasson 1954; Leech 1955;
Masner and Goulet 1981; Merrill & Skelly 1968; Nielsen
References: Blakeslee et al. 1959; Callahan et al. 1960; Parman 1931, 1932; Steyskal 1981; Walker and
1972; Cooke 1969; Frost 1957; Glick 1939; Glick 1957; Lenczewski 1989; Walker and Whitesell 1993, 1994.
Goma 1965; Meyers 1959; Roling & Kearby 1975;
13Collecting and Preserving Insects and Mites
insects and mites to enter. A piece of bark, wood, or flat
stone will serve this purpose. Pitfall traps may be baited
with various substances, depending on the kind of insects
or mites the collector hopes to capture. Although most that
fall into the trap will remain there, it should be inspected
daily, if possible, and desired specimens removed and
placed in alcohol or in a killing bottle while they are in
their best condition.
Also in the pitfall category is the cereal dish trap,
which is a simple but effective device for obtaining insects
attracted to dung. It consists of a small dish, preferably
Fig. 9. Malaise trap.
1.10.4 Malaise Traps
One of the most widely used insect traps was
developed by the Swedish entomologist René Malaise and
that now bears his name. Several modifications of his
original design have been published, and at least one is
available commercially. The trap, as originally designed,
consists of a vertical net serving as a baffle, end nets, and a
sloping canopy leading up to a collecting device (fig. 9).
The collecting device may be a jar with either a solid or
evaporating killing agent or a liquid in which the insects
drown. The original design is unidirectional or bidirec-
tional with the baffle in the middle, but more recent types
include a nondirectional type with cross baffles and with
the collecting device in the center. Malaise traps have been
phenomenally successful, sometimes collecting large
numbers of species that could not be obtained otherwise.
Attractants may be used to increase the efficiency of the
traps for special purposes.
References: Butler 1966; Townes 1972; Steyskal
1981 (bibliography).
1.10.5 Pitfall and Dish Traps
Another simple but very effective and useful type of
interception trap consists of a jar, can, or dish sunk in the
earth (fig. 10). A cover must be placed over the open top of Figs. 10-11. 10, Pitfall Trap (Top). 11, Cereal
the jar to exclude rain and small vertebrates while allowing Dish Trap (Bottom).
14You can also read