Community Home Medical Equipment Toll Free: www.eCommunity.com/HME - Fishers, IN 46037 Local: 317.6214800
←
→
Page content transcription
If your browser does not render page correctly, please read the page content below

Community Home Medical Equipment
         9894 East 121st Street
          Fishers, IN 46037
          Local: 317.6214800
        Toll Free: 800.404.4852
      www.eCommunity.com/HME
Last Revised 6/4/2021

                        2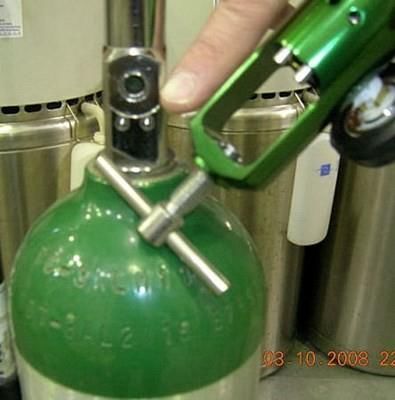
Community Home Medical Equipment
We are honored that you and your family have entrusted us with your care. Our team works to develop a strong relationship
with the individuals we serve, empowering them to become our partners. This book contains important information about
your rights, your safety and your right to decide about your health care. If you have any questions, please speak with your
caregiver or call the number listed below. Thank you for allowing Community Home Medical Equipment to provide care for
you and your family.

                              Community Home Medical Equipment is a wholly owned subsidiary of
                                              Community Health Network.

               Table of Contents                                                                      Page
               Patient and Family Partnership Philosophy                                                  4

               Home Medical Equipment Patient Bill of Rights                                              5

               Home Medical Equipment Services                                                            6

               Medicare Supplier Standards                                                                7

               Oxygen at Home                                                                           8-16

               CPAP/ AutoPAP/Bi-level PAP Equipment                                                    17-21

               Patient Lifting Devices                                                                 22-23

               Suction Unit                                                                            24-25

               Hospital Bed                                                                            26-27

               Wheelchairs, Walkers, Canes and Shower Benches                                          28-29

               Advocacy Resources                                                                        30

               Community Mission, Vision and Values and Concern Processes                              31-32

               Notice of Privacy Practices                                                             33-36

               Release of Information                                                                    37

               Preventing Fraud and Abuse in Healthcare                                                  38

               Weather Safety and Emergency Preparedness                                                 39

               Fire Safety                                                                               39

               Fall Prevention                                                                           40

               Vaccines/ Infection Prevention                                                            40

               Indiana State Department of Health: Advanced Directives                                 41-49

               Indiana Living Will Declaration                                                           50

               Indiana Out of Hospital Do Not Resuscitate Declaration and Order                          51

               Indiana Physician Orders for Scope of Treatment                                         52-54

               Indiana Appointment of Healthcare Representative                                        55-56

                                                              3
Patient and Family Partnership Philosophy
Our staff at CHME want to develop a partnership with those we serve, to empower them to help us provide the highest
quality services.
Your Community Home Medical Equipment team is available 24/7. You may reach us by calling (317) 621-4800 or toll free at 1-
800-404-4852.
Office hours are 8 a.m. to 5 p.m., Monday through Friday. Outside of these hours, and on holidays and weekends, our on-call
staff will return your call as soon as possible.
Community Home Health Services, doing business as Community Home Medical Equipment, is a wholly owned subsidiary of
Community Health Network. Community Health Network assigns care for all patients in a non-discriminatory manner and
cannot guarantee that care preferences will be honored. You have the right to refuse treatment at any time and our staff will
provide a list of other healthcare organizations where you may seek treatment.

Terms you may see in this booklet:
CMS                         Centers for Medicare/Medicaid Services
DME                         Durable Medical Equipment
HME                         Home Medical Equipment
CHME                        Community Home Medical Equipment
DMEPOS                      Durable Medical Equipment Prosthetic Orthotic Supplier
DME MAC                     Durable Medical Equipment Medicare Approved Contractor
Break-in need               Change in medical condition that affects use of medical equipment
Break-in service            Break in monthly billing for medical equipment
RUL                         Reasonable Useful Life (of a piece of medical equipment); generally 5 years

Medicare payment for home medical equipment other than oxygen
“Capped Rental Services”:
Medicare will pay a monthly fee for a period not to exceed 13 months, after which ownership of the equipment is transferred
to the Medicare beneficiary.
After ownership of the equipment is transferred to the Medicare beneficiary, it is the beneficiary’s responsibility to arrange
for any required equipment service or repair.
Examples of this type of equipment may include: Hospital beds, wheelchairs, alternating pressure pads, nebulizers, suction
pumps, CPAP devices , patient lifts, and trapeze bars.
“Inexpensive or Routinely Purchased Items”:
Examples of this type of equipment may include: canes, crutches, commode chairs, low pressure and positioning equalization
pads, home blood glucose monitors, seat lift mechanisms, pneumatic compressors, bed side rails and traction equipment.

                                                               4
HOME MEDICAL EQUIPMENT PATIENT BILL OF RIGHTS
Dignity and Respect
Patients have the right to:
Have their property and person treated with respect
Be free from verbal, mental, sexual, and physical abuse, including injuries of unknown source, neglect and misappropriation
of property
Have his or her personal values, beliefs and preferences respected.
Complaints
Patients have the right to file complaints with CHME:
Regarding their treatment and/or care that is provided
Regarding treatment and/or care that the agency fails to provide
Regarding the lack of respect for property and/or person by anyone who is providing services on behalf of the home health
agency.
Decision Making, Consent, and Services Provided
Patients have the right to:
Participate in, and be informed about, and consent or refuse care in advance of and during treatment.
Protection of rights during research, investigation and clinical trials
When requested, CHME will make available a listing of all individuals or other legal entities who have an ownership or
control of interest in CHME.
Privacy, and Access to Medical Records
Patients have the right to a confidential clinical record.
Patients have the right to access and to the release of patient information and clinical records.
Patients have the rights to give or withhold informed consent to produce or use recordings, films, or other images of the
patient for purposes other than his/her care.
Financial Information
Patients will be advised of:
The extent to which payment for home medical equipment services may be expected from Medicare, Medicaid, or any other
federally-funded or federal aid program known to CHME
The charges for services that may not be covered by Medicare, Medicaid, or any other federally-funded or federal aid pro-
gram known to CHME
The charges the individual may have to pay before care is initiated
Any changes in payment responsibility orally and in writing as soon as possible but no later than 30 calendar days from the
date CHME becomes aware.
5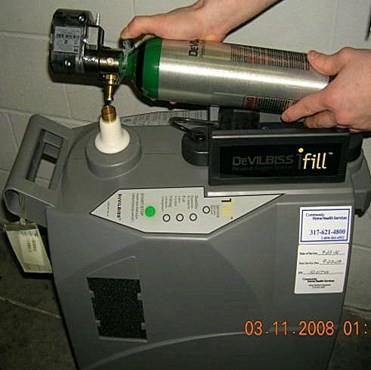
Home medical equipment services
CHME provides durable medical equipment such as:
respiratory care equipment including oxygen, nebulizers, CPAP and Bi-level PAP, and suction machines
orthopedic braces, splints
wheelchairs, walkers, crutches, canes, and knee-walkers
hospital beds, transfer and lift aids
bath safety items such as bedside commodes, tub transfer benches, grab bars, elevated toilet seats
pediatric equipment such as photo therapy (bili lights), apnea monitors and pulse oximeters.
Delivery
Normal delivery service is Monday through Friday from 8 a.m. to 5 p.m. but can be extended to after-hours and weekends for
special needs.
Some equipment will be delivered to your home, while other products may be picked up or shipped. We will provide
instructions regarding proper use, storage, and safety for your equipment. For in home deliveries, our staff will set up the
equipment and make recommendations to prepare your home for safe operation and use, but cannot move furniture. Always
follow instructions and use your equipment according to your doctor’s orders and manufacturer’s recommendations.
Maintenance, repair and warranty
Some rental equipment needs to have routine servicing. CHME will follow the manufacturer’s recommended service schedule.
You will not be charged for routine maintenance. Never try to repair equipment yourself. Contact our office to arrange a time
to have your equipment serviced or replaced, if required. Manufacturer equipment warranty information is attached to all
purchased equipment. Warranties only apply to the original purchaser.
Travel assistance
We will assist you in locating a provider to service your oxygen or medical equipment needs during travel. You are required to
provide at least two weeks’ notice for assistance in finding a provider and four weeks’ notice if you need to reserve equipment
to take with you.
Billing
Medicare, Medicaid, and most third party insurance carriers are accepted. If you have any questions regarding your bill, contact our
billing staff directly at (317) 621-4800.
Discontinuing service
Please call (317) 621-4800 to coordinate the discontinuation of services. Do not return rental equipment to physician’s offices
or hospitals. We do not purchase, buy back or accept as a donation any patient-owned home equipment.
Resuscitation
Our delivery technicians are not trained to provide cardiopulmonary resuscitation (CPR), and will not attempt to resuscitate a
patient in the event of cardiopulmonary arrest. We will call 911 in an emergency.
6
Medicare supplier standards
This is an abbreviated version of the Supplier Standards every Medicare DMEPOS supplier must meet in order to obtain and re-
tain billing privileges. These standards are listed in their entirety in 42 C.F.R. pt 424, Sec 424.57(c).

  1.    A supplier must be in compliance with all applicable Federal and State licensure and regulatory requirements.

  2.    A supplier must provide complete and accurate information on the DMEPOS supplier application. Any changes to this information must be reported to
        the National Supplier Clearinghouse within 30 days.

  3.    An authorized individual must sign the application for billing privileges.

  4.    A supplier must fill orders from its own inventory, or must contract with other companies for the purchase of items necessary to fill the order. A supplier
        may not contract with any entity that is currently excluded from the Medicare program, any State health care programs, or from any other Federal pro-
        curement or non-procurement programs.

  5.    A supplier must advise beneficiaries that they may rent or purchase inexpensive or routinely purchased durable medical equipment and of the purchase
        option for capped rental equipment
  6.    A supplier must notify beneficiaries of warranty coverage and honor all warranties under applicable State law and repair or replace free of charge Medi-
        care covered items that are under warranty.
  7.    A supplier must maintain a physical facility on an appropriate site. This standard requires that the location is accessible to the public and staffed during
        posted hours of business. The location must be at least 200 square feet and contain space for storing records.
  8.    A supplier must permit CMS or its agents to conduct on-site inspections to ascertain the supplier’s compliance with these standards. The supplier loca-
        tion must be accessible to beneficiaries during reasonable business hours, and must maintain a visible sign and posted hours of operation.
  9.    A supplier must maintain a primary business telephone listed under the name of the business in a local directory or a toll free number available through
        directory assistance. The exclusive use of a beeper, answering machine or cell phone is prohibited.

  10.   A supplier must have comprehensive liability insurance in the amount of at least $300,000.00 that covers both the supplier’s place of business and all
        customers and employees of the supplier. If the supplier manufactures its own items, this insurance must also cover product liability and completed
        operations.
  11.   A supplier must agree not to initiate telephone contact with beneficiaries with a few exceptions allowed. This standard prohibits suppliers from calling
        beneficiaries based on a physician’s oral order unless an exception applies.
  12.   A supplier is responsible for delivery and must instruct beneficiaries on use of Medicare covered items, and maintain proof of delivery.

  13.   A supplier must answer questions and respond to complaints of beneficiaries, and maintain documentation of such contacts.

  14.   A supplier must maintain and replace at no cost or repair directly, or through a service contract with another company, Medicare covered items it has
        rented to beneficiaries.

  15.   A supplier must accept returns of substandard (less than full quality for the particular item) or suitable items (inappropriate for the beneficiary at the
        time it was fitted and rented or sold) from beneficiaries.

  16.   A supplier must disclose these supplier standards to each beneficiary to whom it supplies a Medicare covered item.

  17.   A supplier must disclose to the government any person having ownership, financial or control interest in the supplier.

  18.   A supplier must not convey or reassign a supplier number; i.e. the supplier may not sell or allow another entity to use its Medicare Supplier Billing Num-
        ber.

  19.   A supplier must have a complaint resolution protocol established to address beneficiary complaints that relate to these standards. A record of these
        complaints must be maintained at the physical facility.
  20.   Complaint records must include: the name, address, telephone number and health insurance claim number of the beneficiary, a summary of the com-
        plaint and any actions taken to resolve it.

  21.   A supplier must agree to furnish CMS any information required by the Medicare statute and implementing regulations.

  22.   All suppliers must be accredited by the CMS approved accreditation organization in order to receive and retain a supplier billing number. The accredita-
        tion must indicate the specific products and services, for which the supplier is accredited in order for the supplier to receive payment of those specific
        products and services (except for certain exempt pharmaceuticals).

  23.   All suppliers must notify their accreditation organization when a new DMEPOS location is opened.

  24.   All supplier locations, whether owned or subcontracted, must meet the DMEPOS quality standards and be separately accredited in order to bill Medi-
        care.

  25.   All suppliers must disclose upon enrollment all products and services, including the addition of new product lines for which they are seeking accredita-
        tion.

  26.   Must meet the surety bond requirements specified in 42 C.F.R. 424.57(c).

  27.   A supplier must obtain oxygen from a state licensed oxygen supplier.
  28.   A supplier must maintain ordering and referring documentation consistent with provisions found in 42 CFR 424.516(f).

  29.   DMEPOS suppliers are prohibited from sharing a practice location with certain other Medicare providers and suppliers.

  30.   DMEPOS suppliers must remain open to the public for a minimum of 30 hours per week with certain exceptions.

                                                                                 7
Oxygen at home
Oxygen must be prescribed by your physician. An exact flow rate given in liters per minute will be ordered by your physician, and
should never be changed unless your doctor tells you to do so. Too much or too little oxygen can cause complications. Oxygen
concentrators require the same care, storage, cleaning and safety precautions, but they may look different.
Oxygen equipment
Reimbursement for the Initial 36 months
Reimbursement for oxygen equipment is limited to 36 monthly rental payments. Payment for accessories (e.g., cannula, tubing,
etc.), delivery, back-up equipment, maintenance, and repairs is included in the rental allowance. Payment for oxygen contents
(stationary and/or portable) is included in the allowance for stationary equipment (billing codes E0424, E0439, E1390, E1391).
Payment for stationary equipment is increased for beneficiaries requiring greater than 4 liters per minute (LPM) of oxygen flow
and decreased for beneficiaries requiring less than 1 LPM. If a beneficiary qualifies for additional payment for greater than 4 LPM
of oxygen and also meets the requirements for portable oxygen, payment will be made for the stationary system at the higher
allowance, but not for the portable system. In this situation, if both a stationary system and a portable system are billed for the
same rental month, the portable oxygen system will be denied as not separately payable.
The supplier who provides oxygen equipment for the first month must continue to provide any necessary oxygen equipment and
all related items and services through the 36-month rental period, unless one of the following exceptions is met:
Beneficiary relocates temporarily or permanently outside of the supplier’s service area
Beneficiary elects to obtain oxygen from a different supplier
Individual case exceptions made by CMS or DME MAC
Item becomes subject to competitive bidding
Providing different oxygen equipment/modalities (e.g., concentrator [stationary or portable], gaseous, liquid, transfilling equipment)
is not permitted unless one of the following requirements is met:
Supplier replaces the equipment with the same or equivalent item
Physician orders different equipment
Beneficiary chooses to receive an upgrade and signs an Advance Beneficiary Notice of Noncoverage (ABN)
CMS or the DME MAC determines that a change in equipment is warranted
A new 36-month rental period can begin only in the following situations:
Specific incident of damage beyond repair (e.g., dropped and broken, fire, flood, etc.) or the item is stolen or lost
Break-in-need for at least 60 days plus the days remaining in the month of discontinuation and new medical necessity is
established.
A new 36-month rental period does not start in the following situations:
Replacing equipment due to malfunction, wear and tear, routine maintenance, repair
Providing different equipment based on a physician order or beneficiary request for an upgrade
Break-in-need less than 60 days plus the days remaining in the month of discontinuation
Break-in-billing
Changing suppliers.
8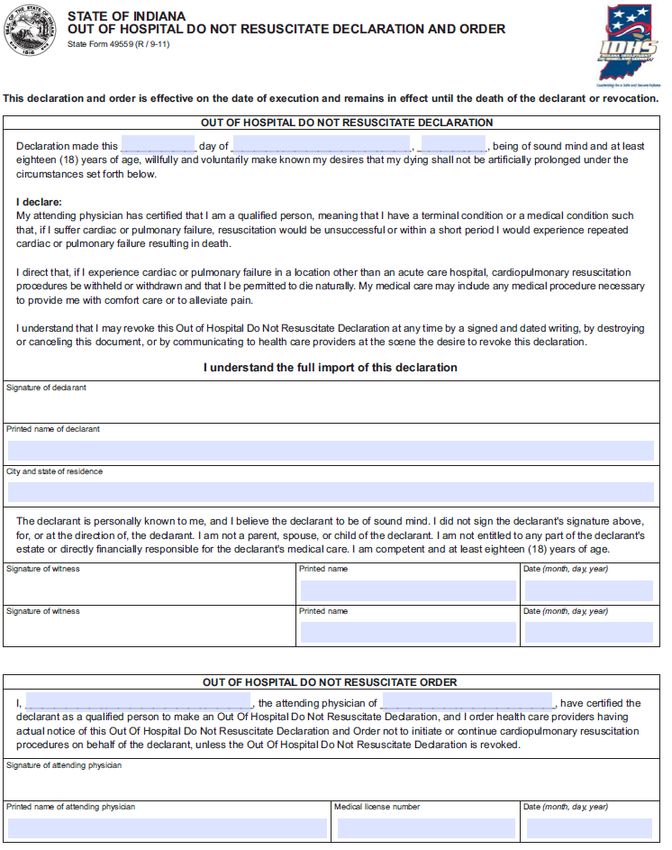
Months 37-60
There is no further payment for oxygen equipment during the 5-year reasonable useful lifetime (RUL) of the equipment after
36 rental payments have been made. If use of portable equipment (billing codes E0431, E0433, E0434, E1392, K0738) begins
after the use of stationary equipment begins, payment for the portable equipment can continue after payment for the
stationary equipment ends until 36 rental payments have been made for the portable equipment.
The supplier who provided the equipment during the 36th rental month is required to continue to provide the equipment,
accessories, contents (if applicable), maintenance, and repair of the oxygen equipment during the 5 year reasonable useful
lifetime of the equipment.
Rules for providing different equipment/modalities are the same in months 37-60 as they are in the initial 36 months (see
above). A new 36-month rental period can begin only in the following situation:
There is a specific incident of damage beyond repair (e.g., dropped and broken, fire, flood, etc.) or the item is stolen or lost
A new 36-month rental period does not start in the following situations:
Replacing equipment due to malfunction, wear and tear, routine maintenance, repair
Providing different equipment based on a physician order or beneficiary request for an upgrade
Break-in-need
Break-in-billing
Changing suppliers.
Months 61 and after
At any time after the end of the 5-year reasonable useful lifetime for oxygen equipment, the beneficiary may elect to receive
new equipment, thus beginning a new 36-month rental period.
If the beneficiary elects not to receive new equipment after the end of the 5-year reasonable useful lifetime and if the supplier
retains title to the equipment, all elements of the payment policy for months 37-60 remain in effect. There is no separate
payment for accessories or repairs. If the beneficiary was using gaseous or liquid oxygen equipment during the 36th rental
month, payment can continue to be made for oxygen contents.
If the beneficiary elects not to receive new equipment after the end of the 5-year reasonable useful lifetime and if the supplier
transfers title of the equipment to the beneficiary, accessories, maintenance, and repairs are statutorily non-covered by
Medicare. Contents are separately payable for beneficiary-owned gaseous or liquid systems.
If a beneficiary enters Medicare with beneficiary-owned equipment, then accessories, maintenance, and repairs are statutorily
non-covered by Medicare. Contents are separately payable for beneficiary-owned gaseous or liquid systems.
9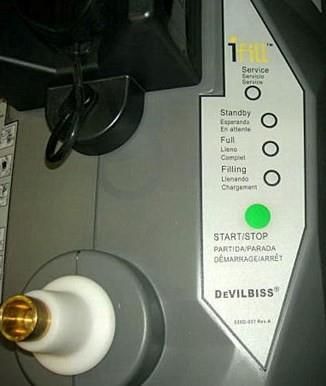
Oxygen equipment replacement and cleaning recommendations
Nasal Cannula: Replace monthly or more frequently after having a cold or illness.
Extension tubing: Replace every 90 days and wipe with a damp cloth.
Humidifier: Add fresh, distilled water daily. Wash with warm, soapy water twice weekly.
Concentrator: Should have a clean filter weekly and should be rinsed under water and thoroughly dried before replacing.
Wash the oxygen concentrator cabinet with clean, warm, soapy water. Rinse with a clean cloth, damp with clean clear water.
Safety/hazard rules for oxygen
Oxygen does not explode and will not burn by itself. Three elements are needed for a fire to ignite: flammable material (fuel),
heat (such as a match, open flame or heat source), and an oxidizing agent (oxygen). When additional oxygen is present it can
cause a small spark to ignite much more quickly and to burn hotter than usual.
Follow the rules below to prevent fire-related injuries.
DO NOT
Do NOT permit the use of open flames where oxygen is being used or stored.
Do NOT smoke near oxygen.
Do NOT use any household electric equipment near oxygen (electric razors, heaters, blankets, etc.). Keep these items at
least five feet away from your oxygen or your oxygen concentrator.
Do NOT use oily lotions, face creams, oil or hair dressings.
Do NOT use petroleum-based products (such as Vaseline) in your nose or near your oxygen.
Do NOT use aerosol sprays around your oxygen equipment.
Do NOT allow oxygen tubing to be covered by any objects.
Do NOT leave oxygen on when equipment is not in use.
Do NOT abuse or handle oxygen containers roughly.
Do NOT store oxygen in a confined area (i.e., closet, under a bed with a bed
skirt).
Do NOT allow untrained persons to use or adjust equipment.
DO
Keep all oxygen at least 15 feet away from any open flame, heat sources, hot surfaces, lubricants or flammable products.
Secure oxygen in the back seat of a car.
Open your window about one inch when you have oxygen equipment in your car.
Secure oxygen cylinders in a stand, appropriate storage box, by a chain or cord. If unable to do so, lay cylinders flat on
floor and contact CHHS for a storage device.
Post NO SMOKING signs on your doors.
Place a smoke detector/alarm on each floor of your home.
Check the batteries in your smoke detectors monthly, or as recommended by the manufacturer.
Develop a fire safety escape plan now. Choose a meeting place for everyone in your home. Never go back into a burning
building.
Have a fire extinguisher in your home in case of a fire.
10Oxygen concentrator safety
Your oxygen concentrator separates oxygen from room air. It provides a high concentration of oxygen directly to you through a
nasal cannula. Your concentrator can be easily rolled from room to room in your home.
Take the following precautions:
Never smoke within 15 feet of an oxygen concentrator and post NO SMOKING signs on your doors.
Keep your concentrator and all related items away from open flame, heat sources, hot surfaces, lubricants or flammable
products.
Keep your concentrator three to six inches from any wall, furniture, draperies or similar surfaces.
Never insert anything into an opening on your concentrator and do not block the air openings.
Do not place the concentrator on a bed or near a couch where the soft surface could block an air opening.
Avoid using the concentrator while you are bathing. If you must keep your oxygen in place while you bathe, place it at
least seven feet away from the tub or shower.
Never touch the concentrator while you are wet.
Never use extension cords to plug your concentrator into an outlet.
Never take the ground prong off the cord plug to make it usable.
Use in a smoke free and soot free environment.
Do not keep the concentrator in a confined space such as a closet.
Do not put your concentrator near heat ducts, radiators, heaters, hot water heater, or hot air registers.
Using your concentrator
1. Plug concentrator power cord into house electrical outlet.
2. When you turn the concentrator on, all the panel lights and audible alarm will come on for one second, indicating that
the unit is functioning properly.
3. After one second, the green system OK/power light will stay on.
4. Adjust the prescribed liter-per-minute (lpm) flow rate on the front of the concentrator. Locate the prescribed flow rate line
on the flow meter.
5. Turn the flow knob until the ball rises to the line. DO NOT change the setting from the prescribed flow rate.
6. If the flow rate drops below 0.5L/min the alarm will sound.
7. To discontinue use, push or turn power switch to off.
Purity Indicator Lights
Adjustment knob
Flow Meter
Power switch
Oxygen
outlet
11Oxygen purity indicator lights
Yellow light: Call CHME immediately. You may continue to use the concentrator unless instructed otherwise by your sup-
plier. Be sure your backup oxygen supply is nearby.
Red light: Total unit shutdown. Switch to your backup oxygen supply and call CHME immediately.
Green light with yellow light flashing: Call CHME immediately. Oxygen sensor malfunctioning, but you may continue to
use the concentrator.
Using the humidifier
1. Fill and maintain humidifier bottle (if prescribed) with sterile or distilled water to the full mark on the bottle and attach to
the concentrator oxygen outlet fitting.
2. Attach supply tube, with cannula, to the humidifier bottle oxygen outlet fitting.
3. If humidifier is not prescribed, attach the oxygen outlet fitting directly to the concentrator fitting. Attach supply tubing to
this fitting.
Cleaning the cabinet filters
There are two filters, one on each side of the cabinet. Filter
Remove each filter to clean once each week with a vacuum
cleaner or wash them in warm, soapy water and rinse thoroughly.
Dry the filters before replacing in the concentrator.
Troubleshooting guide
Problem You should
Concentrator is turned on but is not Check wall electrical receptacle to make sure power cord is plugged in and try a
working and the alarm does not sound. different receptacle
Check household circuit breaker/fuse box
If equipped with battery-powered alarm, batteries may need replaced
Concentrator is turned on but the alarm Call 317-621-4800
does not stop beeping
Concentrator not operating and the alarm Check wall electrical receptacle to make sure power cord is plugged in and try a
is an intermittent short beep/long pause. different receptacle
Check household circuit breaker/fuse box
If concentrator equipped with battery-powered alarm, batteries may need re-
placing
If electricity to the house is out, turn the concentrator off and switch to back
up cylinder until power is restored
Power switch is on and the fan is operating, There is not enough power in the plug you are using. Plug power cord into
but the compressor is not operating and different wall receptacle
the alarm is sounding
Check the oxygen liters per minute (LPM) setting
Remove tubing and humidifier bottle (if equipped) from unit. Replace with new
humidifier bottle; make sure tubing is not kinked and nothing is sitting on it.
Straighten old tubing or replace with new tubing by reattaching to
concentrator or humidifier bottle
To check if concentrator is working, turn it Place the end of the nasal cannula in a glass or cup of water.
on and place the end of the nasal cannula
in a glass of water. Water should bubble.
12Managing your oxygen cylinders-Your oxygen cylinder (tank) is for use as a backup for your concentrator or as a portable oxy-
gen supply.
How long will your oxygen tank last?
Full Oxygen Cylinders Hours of Oxygen Use
E Cylinder 29 inches tall
Liters per min 1 2 3 4 5
D Cylinder 21 inches tall D Cylinder 5hrs 2.5hrs 1.75hrs 1.25hrs 1hr
E Cylinder 10hrs 5hrs 3.5hrs 2.5hrs 2hrs
M6 cylinder
M6 cylinder 2.5hrs 1.5hr ------ ------ ----
Oxygen cylinder safety
Store oxygen cylinders in an oxygen holder, an approved oxygen box, strapped in place or you can lay
them flat on the floor.
Do not store oxygen cylinders near heat sources or enclosed areas such as closets.
You can store your oxygen cylinders under your bed as long as the air flow is not obstructed.
If you travel with oxygen cylinders in your vehicle you must make sure they are secured or tied down.
Keeping your oxygen cylinder in an approved holder is important for safety!
Placing a regulator (or “gauge”) on your cylinder
1. Match up the two prongs on the gauge with the two holes in the top of the oxygen cylinder.
2. Slide the gauge over the top of the cylinder . Turn the “T” shaped
handle until it is tight.
Adjust the liter
flow
Oxygen
outlet
13Using a conserving pulse regulator (or “gauge”) with your oxygen cylinder
The conserving device for your oxygen cylinder is called a pulse regulator. It helps conserves your oxygen so your cylinder will last
longer by only delivering oxygen when you take a breath. The amount of time you can expect your cylinder to last is listed in the
table below, but will vary based on how fast you are breathing.
How long will your oxygen tank last?
Full Oxygen Cylinders Hours of Oxygen Use
Conserving
LPM 1 2 3 4 6 pulse
regulator
D Cylinder 20hrs 13hrs 6.5hrs 5hrs 3hr
E Cylinder 34hrs 17hrs 11hrs 8hrs 5hrs
M6 cylinder 7hrs 3hrs 2hrs ---- ---- Liter Flow
Oxygen outlet
Place the regulator over the top of the cylin-
der and turn the black handle to tighten the
regulator.
Attach your oxygen hose to the oxygen out-
let and turn the wrench clockwise to turn on
your oxygen. Set the liter flow as ordered by
your doctor.
TROUBLESHOOTING: If your oxygen tank is not working be sure to check and make sure the
main valve is open. Make sure the flow meter is turned on and that your oxygen tubing is se-
cure on the outlet and is not crimped.
14Managing Your Oxygen Cylinder Filling Station
Your oxygen cylinder filling station should be placed at least 3 to 6 inches away from walls, curtains or furniture to ensure
sufficient airflow.
Avoid placing next to heaters, radiators or hot air registers.
Keep it at least 5 feet away from hot objects or sources of flame.
Never move it with a cylinder connected to it, or stored on it, to prevent injuries.
Always inspect your cylinder for dents or dings and oil or grease before you place them on the self-filling system. If you
have dents or other damage on your cylinder, you should call CHHS and ask to have your cylinder replaced.
Never lubricate or grease any part of the oxygen equipment.
Never use ANY kind of tools to connect or disconnect the cylinder and the oxygen station. Severe injury or damage
could occur.
Do not drop oxygen cylinders. Use two hands when handling oxygen cylinders to prevent injury.
Infection control/ cleaning:
1. Unplug the oxygen station and remove filters
2. Clean filters with a vacuum cleaner or wash in warm soapy water and rinse thoroughly.
3. Dry the filters thoroughly before you re-installation.
4. Clean the exterior cabinet with a damp cloth or sponge and a mild household cleaner wipe it dry.
INDICATOR LIGHTS ON YOUR OXYGEN CYLINDER FILLING STATION AND WHAT THEY MEAN
Oxygen Station Status
Indicator Light Color What it means
Service Red with audible
Internal failure Contact CHHS
alert
Cylinder is ready to being Cylinder filling
Standby Green
filling has not started
Filling green
Cylinder is filling Cylinder is filling
You may remove
Full green Cylinder is full cylinder
Not turned on.
Check & make
No light is on Oxygen station unplugged
sure it is plugged
in.
CONNECTING YOUR OXYGEN CYLINDER TO THE PERSONAL OXYGEN
FILLING STATION
1. Unplug your oxygen self-filling system from the wall outlet.
2. Remove the oxygen fill cover.
3. Position the cylinder over the cradle while aligning the nipple connect-
or on the oxygen cylinder with the fill connector.
4. Press down until the cylinder “clicks” into place.
5. Plug your oxygen fill station into the wall outlet.
6. Push the green start/stop button on the control panel.
7. The FILLING green light will illuminate.
8. Check the rotary Selector and turn it to “OFF”.
15Oxygen Filling Station
Infection control
Unplug the oxygen station and remove filters
Clean filters with a vacuum cleaner or wash in warm soapy water and rinse thoroughly.
Dry the filters thoroughly before you re-installation.
Clean the exterior cabinet with a damp cloth or sponge and a mild household cleaner wipe it dry.
Trouble Shooting
Problem Solution
No indicator light is on Make sure the unit is plugged in. Call CHME if it is
plugged in a not working
Red Light is on Ensure the oxygen cylinder is connected correctly
Press the start/stop switch and if the red light remains
on call CHME.
Excessive fill times or the green filling light stays on Ensure the oxygen cylinder rotary selector is set to off
Check and make sure the cylinder is connected proper-
ly. Press the start/stop switch to return to standby.
Remove the cylinder and re-install. Press the start/
stop button to begin filling the cylinder. If the light
turns red again, call CHH
Hissing sound from the oxygen cylinder Turn rotary selector off
If hissing sound continues call CHME.
Oxygen cylinder is on, but oxygen is not being delivered Refill the cylinder
Make sure the cannula is straight and is not pinched.
Call CHME if the problem persists.
16CPAP/ AutoPAP / Bi-level PAP Equipment
Rental equipment
Most insurance providers require that CPAP/ Autopap/ Bi-level PAP are “capped”
rental items. This means that the equipment rents for a certain rental period
determined by the insurance provider. At the end of the rental period the equip-
ment belongs to the patient. Depending on your insurance this rental can be up
to 15 months. Be aware that if your insurance has a deductible you will have to
meet your deductible again at the beginning of next year before the insurance
makes any payment on your equipment.
Mask Returns and Exchanges
CHME cannot exchange masks that a patient receives from the sleep lab or any other provider. Masks sold to the patient by
CHME may not be returned for a refund. You may exchange a mask purchased from CHME, if you call within 14 days from date
of purchase. This program is offered through the mask manufacturers and has a strict time limit from the date of purchase.
Most insurance providers allow a new mask only every 90 days. If you need a different mask after the exchange period has
passed, you can choose to privately pay for a new mask or wait until you are eligible. CHME cannot exchange masks that you
have received from the sleep lab or another provider.
Insurance Compliance Requirements for most insurance providers
Patients must demonstrate that they are using the equipment enough in order for the insurance company to continue to make
payment on the equipment. When CHHS is required to obtain this data, we will retrieve it from a modem on your equipment,
or send you an SD card. Most insurances require that patients use the equipment for a minimum of 4 hours per night, 70% of
the nights in a 30 day consecutive period (21 out of 30 consecutive days), within the 90 most recent day usage.
Patients who are not compliant have the choice to return any equipment that is still under rental or pay privately until the time
when the patient demonstrates compliance. Purchased equipment and supplies cannot be returned.
If at any time you find that you are not able to use your equipment for more than a few nights or are
hospitalized or admitted to a skilled nursing facility, you must contact CHME to notify us. Insurance will
not make payment for both outpatient equipment (from a home care provider) and inpatient care/
equipment (for example, a skilled nursing facility or hospital) at the same time.
17Sleep Coaching - you may opt out of these contacts at any time.
Phone number for your Respironics machine sleep coach: 1-800-644-3324
We will attempt to reach you on a regular basis to ask a few questions about the use of your equipment and how you are doing,
and will assist with any questions or troubleshooting needs you may have. Our goal is to ensure you are able to use your equip-
ment and to assist you in becoming not only compliant with insurance usage requirements, but that you are comfortable with
your equipment, answer any questions you may have, and ultimately to improve the quality of your sleep!
Our sleep coaches can assist you in troubleshooting and may enlist the help of a respiratory therapist as needed.
Supply reminder contacts- you may opt out of these contacts at any time.
Phone number for your supplies: (317) 218-7004
Many patients say it is hard to remember when they last ordered their supplies. Regular cleaning and replacement of supplies is
important to prevent infection, to ensure the best mask seal and function of your machine. CHME will attempt to reach you on a
regular basis to remind you that you when you are eligible for replacement supplies. You can choose to order all supplies that
your insurance allows, you can choose which ones you need, or you may decline to receive any at that time.
If your insurance requires prior authorization, we may need to obtain data about your equipment usage before we can ship sup-
plies. If you are not compliant with the usage guidelines, you may choose to pay privately.
Once CHME has everything we need for prior authorization, your order will be processed and should arrive in 5-7 business days.
You will be responsible for any deductible or co-pay amounts that your insurance plan requires.
Once you receive your shipment, please open it immediately to ensure you have received the supplies requested, and contact us
immediately for any issue resolution.
NOTES OR QUESTIONS:
18How to use your machine
Before you go to bed
Wash the part of your mask that comes into contact with your face daily. Make sure your mask and face are clean and dry for the
best seal.
Pull out your humidifier water chamber. Empty it if there is still water inside.
Put fresh distilled water into the water chamber and DO NOT fill past the MAX line.
Put water chamber back into machine.
Put your mask on.
Press the Start/Stop or On/Off button once to turn on your machine.
Lie down in your sleeping position and then make adjustments to your head gear to fix any leaks. Don’t do this while sitting up or
you will likely over-tighten your headgear.
If the pressure feels too strong, press the Ramp (triangle button) on the Respironics machine. If you have a ResMed machine, the
Ramp will start automatically when turned on.
When you wake up
Turn off your machine by tapping the Start/ Stop or On/Off button once.
Take off your mask.
Remove the water chamber and empty out any remaining water.
Weekly
Wash your mask, headgear, water chamber, non-disposable filter (Respironics machines only) and tubing in mild dish detergent
and warm water. Rinse in clear water and allow to air dry.
Infection Control/ Cleaning Guidelines
Wash your hands frequently when working with your equipment. All parts should be washed in a mild dish detergent and
water. Rinse all parts well with clear water, and allow to air dry. Do not use chemicals such as bleach or alcohol, or place in a
dish- washer, washing machine or dryer unless specified by the manufacturer that is it is safe to do so. These recommendations
are minimum frequencies for cleaning your supplies. Clean more frequently, as needed.
Mask: wash the parts of the mask that come into contact with your face daily. Wash the entire mask at least once per week.
Tubing: wash weekly. Rinse well under running water, and hang up to drip dry.
Headgear: wash weekly.
Humidifier chamber: fill with fresh distilled water every night before using, and empty in the morning when you wake up.
Wash once a week.
Re-usable filter: rinse in tap water (no soap) weekly.
Disposable filter: Never wash these filters. They are disposable and must be replaced when they look dirty. Allowing your filters
to remain dirty can affect the performance of your machine, including reducing the pressure output.
“Cleaning machines” that you may have seen advertised are not covered by insurance, which means you would need to pay if you
choose to purchase one. If you are interested in information, call Wellspring Medical at Home (317) 621-9358.
19Replacing CPAP/ Bi-level PAP supplies and accessories
Most insurance companies follow the Medicare guidelines for replacement supplies, as follows:
Full face mask cushion 1 monthly Phone number for supplies: (317) 218-7004
Nasal mask cushion 2 monthly You must call in the first month to establish contact.
Nasal pillows 2 monthly Our resupply program provides you with the option to
receive email, phone, text messages or using an App for
Disposable filters 2 monthly
ordering, after your initial contact. You may change
Any style mask frame 1 every 3 months your choice at any time by simply asking to have it
completed.
Tubing 1 every 3 months
Headgear 1 every 6 months It is important to replace your supplies to prevent infection,
mold and bacteria growth. Contact your insurance company to
Chinstrap 1 every 6 months
make sure how often you can order supplies. CHHS cannot
Water chamber 1 every 6 months guarantee insurance payment. Often, patients have deductibles
that must be met before the insurance will pay anything, and
Non-disposable filter (reusable) 1 every 6 months you may have co-insurance or co-pays for
each item as well.
Mask fitting
Headgear straps need to be even. Uneven straps can cause your mask to put unequal pressure on your face and create air
leaks.
Your mask doesn’t have to be completely tight to work properly. Your machine has the ability to compensate for small
leaks. It’s better to allow a small leak rather than cause pain. The only place a leak should be completely stopped is when it
blows into your eyes.
If the bridge of your nose is sore, then your mask is probably too tight. If you are using the nasal pillows and the skin be-
tween your nostrils is sore, then your headgear is probably too tight. You can try the next larger size pillows instead of
making your headgear so tight.
When adjusting your straps, make very small (tiny) adjustments to both sides at the same time and see if that corrects the
problem. If not, make another tiny adjustment.
Clean masks seal better. Make sure to clean off the part of your mask that contacts your face every day. Make sure your
face is clean as well. Any natural facial oil, added lotions and/ or creams will prevent a good seal.
Replace your mask cushion when you are allowed, which is generally every month. Seals do wear out with time. If you no-
tice you must make your straps tighter in order to seal, then it may be time for a new cushion.
Pressure
Ramp feature– this will decrease the pressure so that it’s more comfortable when you are first going to sleep. Ramp will
automatically build the pressure back up to the prescription setting that was ordered by your doctor while you sleep.
If you cannot tolerate your prescription pressure even after using the ramp, please contact your doctor. CHME is not able
to change your pressure setting unless we have a prescription from your doctor.
20Humidity
The type of humidifiers that CHME provides have a sensor that detects the humidity and temperature of the room where you
are sleeping and will only heat up when the machine senses the need to do so. Therefore, your humidifier may use different
amounts of water from night to night, or may not feel warm to the touch. This doesn’t mean your humidifier isn’t working. Make
adjustments based upon the following:
If your mouth or throat is dry:
Turn up your humidifier setting by one number per night until the desired level of moisture is achieved.
Make sure you are drinking an adequate amount of water during the day.
If you are using a nasal mask or pillows and your mouth comes open, this will create a very dry mouth/throat. You may need
a chinstrap to keep your jaw closed, or you may need a full face mask that covers both your mouth and nose.
You can use a non-prescription saline spray. Spray several times in each nostril before and after using your machine.
Do not place your machine too close to a heating or cooling vent.
If you feel like you are getting too much moisture in your mask or nose:
Turn down the humidifier setting one number per night until you reach a comfortable humidity level.
Make sure you do not have a buildup of water condensation in your tubing. Carefully detach the tubing from the machine,
carry to a sink and empty any water out of the tubing, then reconnect to your machine.
You can increase the tubing temperature setting to prevent condensation in the tubing.
If you feel that the temperature of the air is too warm or cold:
Adjust the tubing temperature up or down until it is comfortable for you.
Tips for success with your CPAP or Bi-level PAP
Be positive: Have a positive attitude and realize this is a learning process. You have been sleeping with nothing on your face for
years. Your brain will adjust if you keep using every night and make it a new, healthy habit. Also remember that this is a very sim-
ple, low-risk treatment in comparison to surgery or medication.
Be patient: Your body must adjust to sleeping with something new on your face. Practice wearing your mask while you are
relaxing, watching TV or just resting.
Be persistent: Keep on trying and don’t give up easily! Anything worth having is worth working for. Feeling better and being
healthier is worth the work it may take up front. Don’t skip any nights. You’re developing a new sleeping habit, and skipped
nights interfere with this process and your ability to establish compliance (required by many insurance providers).
Other important tips
Don’t move, tilt, pack or relocate your machine with water inside the water chamber. Always remove the chamber
and empty it first. This will prevent water from entering the electrical components of your CPAP/Bi-level PAP ma-
chine, causing equipment failure.
Don’t send your CPAP/Bi-level PAP equipment to the baggage compartment of an airplane or public transportation
system. Carry it on board with you to prevent damage.
Schedule a follow up appointment with your doctor so they can evaluate and determine the effectiveness of your
CPAP/Bi-level PAP treatment. Any necessary adjustments to your machine can be ordered at this time. Some
insurance companies require that you have this face-to-face follow up visit with your doctor in order for continued
payment for the equipment.
21Patient Lifting Device
This lifting device is for transferring the patient, not for transporting the patient!
Before you try to lift anyone with this lifting device you should practice.
Be sure you have the correct size sling before you try to use this lift device.
Always explain the procedure to the patient before you begin.
To raise the lifter you should pump the pumping handle.
To lower the lifter open the pressure release knob by turning it counter clockwise, not more than one full turn.
The knob is located near the pump handle.
Boom
Steering Bar Cradle
Caster brake
Base
Using the lifting device to get a patient from the bed to a chair
1. Roll the patient on his side and place the sling behind the back.
2. Roll the person onto his back.
3. Pull the leg loops forward and put them under each thigh, pulling the loops up between the legs, then cross the loops.
4. Roll the base of the lifting device as far under the bed as possible.
5. Make sure the cradle is over the patient you want to lift. Be Careful: Do not use the caster brake when you are lifting the
patient.
6. Attach each side of the sling to the corresponding sides of the lifter cradle.
7. When both sides of the sling are attached you should lift the patient slowly until the buttocks are just above the mattress.
8. Grasp the patient’s legs and swing them around slowly until they dangle off the side of the bed. DO NOT slide the patient
away from the mattress until you are sure the sling is secure.
9. Grasp the steering handle and slowly move the lifter away from the bed.
10. Make sure the chair is secure before lowering the patient.
22Using the lifting device to get a patient from the chair to the bed
1. Move the lifter base around the base of the chair and under the leg rests if the patient is in a wheelchair.
2. Be sure you lock the wheelchair brakes.
3. Attach the sling appropriately to the cradle on the lifting device and raise the patient above the seat.
4. Make sure the sling is secure before you move the patient.
5. Use the steering bar to move the patient to the bed.
6. Push the lifter base as far under the bed as possible.
7. Make sure the patient’s buttocks are above the mattress.
8. Gently swing the patient’s legs onto the mattress and lower the patient onto the bed.
Safety/hazard guide
Patient lifts should be used only by order of the physician.
If the patient is wearing slippery clothing it may cause them to slide out of the sling.
Do not move the lifting device over shag or deep pile carpeting, thresholds, rough or surfaces or over other obstructions
that can cause wheel stoppage and a tip over.
Use care if a patient lift is used to lift a severely spastic or handicapped person.
Base legs on lifter should be spread to widest position when lifting patient.
Keep patient centered between the legs of base and facing toward the person who is operating the lift.
Check position of sling to be sure seat is close to bend of knees.
Adjust links of chains or slides on web straps to ensure the most comfortable position.
Make sure wheels are locked when putting the patient into and out of the patient lift.
Visually inspect the nut and bolt that attaches the boom to the top of the mast; verify that the nut and bolt are securely
fastened.
Troubleshooting
Call CHME if your lift is not working properly.
Cleaning and infection control
Clean lift with warm soapy wash cloth or sponge; wipe with a damp non-soapy cloth.
Soak the lifting sling in the one part vinegar to one part water, then hand wash with laundry soap and air dry.
For infection control, the complete lift should be wiped with a clean cloth and a solution of one part vinegar to one part
water.
The entire lift can then be sprayed with disinfectant and allowed to air dry.
23Suction unit instructions and care
Vacuum
Collection
Gauge/ display
Jar
Vacuum
Control
Knob
Should Tubing
be set
between
80-120
mm Hg.
Your particular unit may look different that this.
This equipment must be grounded. You must use a three prong plug. Never remove the prong to make this plug fit into a two
prong socket. Improper grounding can result in electrical shock. If you must use an extension cord make sure it is at least 18
gauge and no longer than 25 feet.
Do not operate this suction equipment unless you have been properly trained. Improper use of a suction unit can cause
physical harm or tissue damage!
Operating instructions
1. Read the instruction sheet and familiarize yourself with the unit.
2. Make sure the on/off switch is in the off position.
3. Attach the tubing to the suction outlet.
4. Turn the control knob counterclockwise as far as it will go.
5. Plug the unit into a properly grounded electrical outlet.
6. Turn the on/off switch to the on position.
7. Turn the control know clockwise, to adjust the amount of suction pressure. Typically, the range is a minimum of 80 mmHg
and no greater than 120 mm Hg. Do not exceed 120 unless specifically instructed to do so by CHHS.
8. Your suction unit will operate on battery in case of a power failure, and it has an adapter to connect it to your car’s adapter
if needed. Keep the unit plugged in at all times, in order to ensure the best charge on the battery.
24Changing the filter
If the unit loses suction you may need to replace the filter. Never use a different type of filter in this suction unit. Please
call Community Home Health if you have questions.
Remove the elbow connector end of the filter tubing from the top of the collection jar.
Unthread the tubing assembly from the vacuum gauge and throw it away.
Put the new filer assembly in place by threading it to the vacuum gauge and attaching the connector to the top of the
collection jar.
Collection jar
The collection jar should be emptied and cleaned after every use.
Turn the unit off and remove the elbow connector from the top of the collection jar.
Lift the jar out of the bracket, remove the lid and empty the jar.
Infection control/cleaning the collection jar
The collection jar and lid is safe to put in the upper rack of a dishwasher. The water temperature maximum is 65 to 150
degrees.
Wash the collection jar in soap and water or soak the jar for 20 minutes in a solution of 2% vinegar and water. (mix 4
teaspoons of white vinegar in 1 quart of water).
Air dry the collection jar and lid on a towel or paper towel.
Infection Control for the Suction Unit:
You may wipe the outside of the unit with a clean dry cloth.
Troubleshooting
If the suction on your unit has decreased or stopped you should:
Turn the unit off and unplug it from the electrical outlet
Remove the collection jar and clean or replace, if needed.
Resume the operation of the unit according to the instructions provided in the “Operation” section on the previous
page.
If the suction continues to be decreased or stopped you should change the filter as instructed above. If the suction still
does not work properly call CHME at (317) 621-4800.
25Hospital bed
Hospital beds permit body positioning that is not easily performed in a regular home bed and allow for attachment of other
pieces of equipment that cannot be used on a regular home bed.
Hospital beds may provide several other advantages such as:
Making it easier and safer for the person to get in and out of the bed and to reach a standing position for ambulation
with crutches, walker or cane.
Making transfers to and from wheelchairs or bedside commodes easier and safer.
Making care giving easier by placing the bed at a more convenient height when providing assistance with position
changes, turning, bathing, eating or other care.
Operating instructions
Manual, multi-height bed models
When facing the foot of the beds:
The left crank raises and lowers the head section of the spring.
The right crank raises and lowers the foot section of the spring. Bed crank
at the foot
The center crank raises and lowers the height of the bed of the bed
Turning any of these three cranks clockwise raises, and counter-
clockwise lowers.
Semi-electric bed models
The pendant has four buttons:
Raises the head section of the spring. Bed Control
Lowers the head section of the spring.
Raises the foot section of the spring. The semi-electric models
have a manual crank system
Lowers the foot section of the spring. to raise and lower bed
height.
Full electric bed models
The control pendant has six buttons:
Four of the buttons are the same as those described above for the semi-electric models
The two additional buttons operate the bed height. One button raises the bed; the other lowers the bed. The function of
each button is indicated on the control
On both electric models an emergency crank is furnished. This crank can be inserted into the appropriate sockets at the
foot of the bed to allow manual adjustment of all bed functions. This provides emergency back-up operation in the event of
power failure or the failure of one of the motors.
Troubleshooting
You and your caregivers should be familiar with all the basic operations of the bed in order to use it to meet your needs. Be
alert to any unusual noise when you are using the bed or any changes such as cranks becoming stiffer or more difficult to
turn. It could be a mechanical problem and you should call CHHS if this occurs.
26Bed side rails
A side rail is a safety device to prevent the person from rolling out of the bed.
There will be a gap between the side rail & the mattress when the head is elevated. The mattress you received with your bed is
the standard size mattress that is recommended by the manufacturer. Do not change mattresses because a smaller mattress
would increase the gap between the mattress and side rail and a person could become trapped in the gap.
Bed rail safety
There have been reports of people being trapped between the mattress and side rails on hospital beds. Being trapped has
caused injury and even death, making it important to take precautions when using side rails on any bed.
Some of the risks include: Strangling, suffocation or bodily injury, including death if you become caught between rails or be-
tween the rails and the mattress.
Serious injuries can occur from climbing over rails or skin cuts and scrapes. Most people are safe in bed without using rails.
To prevent injuries:
Keep the bed locked and in the lowest position.
Keep some of the bed rails down so you can get in and out of bed as needed.
Use the proper size mattress to prevent being trapped between the mattress and the side rails.
Reduce spaces between the mattress and side rails by using rolled blankets or pillows.
If bed rails are used you should have your family members check on your frequently.
If you are afraid of falling out of bed you could put padding on the floor near the bed.
Make sure you have something to drink within easy reach of your bed.
Make sure you use the bathroom prior to going to bed.
Operating instructions
The rails are lowered by pulling out on the pull buttons or plungers. Be careful not to catch hands or feet in the rails as they
are lowered. It is wise to hold the rail with one hand while releasing the pull button with the other.
To raise the rail, slightly lift up in the center until the plungers snap into the holes in the rail. Look at the rails to check and
make sure the plungers are in place
On the universal telescoping rails, the head-end can be raised independently of the foot-end to provide a half-rail
When assisting a person to turn onto their side, the rails should be in the up and locked position. The caregiver should stand
on the side toward which the person is to be turned, then reach over the rail and pull to provide the needed assistance.
27You can also read