CAMP TV Episodes in Week 3 - KERA Learn!
←
→
Page content transcription
If your browser does not render page correctly, please read the page content below
CAMP TV
                                 Episodes in Week 3

CAMP TV 211 Mismatched Shoe (or Sock!) Day
Wear shoes or socks that don’t match; read a Sock Story!
Join head counselor Zach wearing shoes that don’t match! Ride the rounding roller coaster,
make a treasure chest, meet tortoises & squirrels. Content partners include Carnegie Hall, Koo
Koo Kangaroo, Liberty Science Center, Memphis Zoo, NJ DOE, New Victory Theater, NY Public
Library, San Antonio Zoo Sketch with Jeff at the Guggenheim Museum, Story Pirates, The
Metropolitan Museum of Art.

CAMP TV 212 Favorite Animal Day
Have an animal dance party, make a hungry bunny, meet otters, llamas, and red pandas!
Join head counselor Zach and have an animal dance party! Make a hungry bunny & and a
nature journal; meet otters, llamas, and red pandas. Content partners include: Children’s
Museum of the Arts, Koo Koo Kanga Roo, Impossible Science, Monterey Bay Aquarium,
National Dance Institute, NYS Office of General Services, Seneca Park Zoo, Memphis Zoo,
Playworks.

CAMP TV 213 Ocean Day
Learn about sharks, sketch in the sand, make jellyfish, play a sea animal guessing game!

Join head counselor Zach to learn about sharks, sketch in the sand, make jellyfish, play guess
the sea animal! Learn a card trick, dance samba. Content partners include One Voice Children’s
Choir, Impossible Science, Liberty Science Center, Lincoln Center, Monterey Bay Aquarium,
National Dance Institute, NY Philharmonic, Sketch with Jeff at the Guggenheim Museum, They
Might Be Giants.

CAMP TV 214 – Career Day
Meet a firefighter and a conservation biologist, make a balloon rocket!

Join head counselor Zach to meet a meet a firefighter and a conservation biologist! Make a
balloon rocket and a flip book, do a freeze dance, write hero stories, learn about meerkats and
pikas. Content partners include Denver Museum of Nature and Science, Intrepid Sea, Air &
Space Museum, NYS Office of General Services, OK Go, Playworks, San Diego Zoo, S’More
Ideas, Story Pirates, WFSU.

CAMP TV 215 – Poem in My Pocket Day
Hear a poem, write a poem, make a pocket!

Join head counselor Zach to hear a poem, write a poem, make a pocket! Meet zoo animals, do
an emotions dance, create strong shapes out of paper, read The Land of Nod. Content partners
include Carnegie Hall, Liberty Science Center, Minnesota Zoo, Move-to-Improve, National
Dance Institute, One Voice Children’s Choir, Sketch with Jeff at the Guggenheim Museum,
S’More Ideas, They Might Be Giants.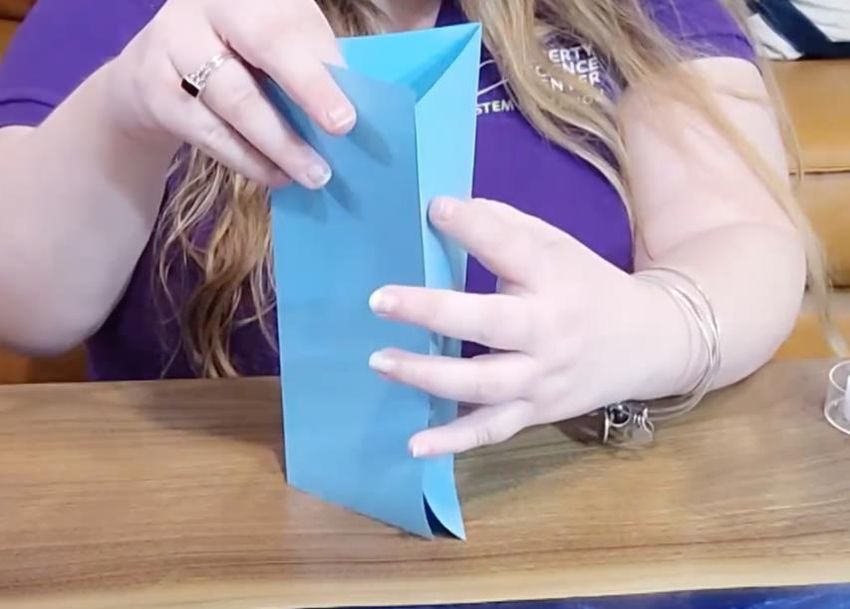
Season 2, Episode 11: Mismatched Shoe (or Sock!) Day

                                         Join head counselor Zach wearing shoes that
                                         don’t match! Ride the rounding roller coaster,
                                         make a treasure chest, meet tortoises &
                                         squirrels. Content partners include Carnegie
                                         Hall, Koo Koo Kangaroo, Liberty Science Center,
                                         Memphis Zoo, NJ DOE, New Victory Theater, NY
                                         Public Library, San Antonio Zoo, Sketch with Jeff
                                         at the Guggenheim Museum, Story Pirates, The
                                         Metropolitan Museum of Art.

                                            Activity Guide
        Treasure Chest ……………………………………………… 1-2
        Moving Molecules ………………………………………….. 3
        Origami Samurai Hat ………………..….…...……..……. 4-6

                    PARTICIPATE!
         How many pairs of shoes do you have? Count them all
         then mix them up and see how many different
         mismatched pairs you can make!

Camp TV is a production of The WNET Group.
Major funding for Camp TV is provided by the Corporation for Public Broadcasting. Additional funding is provided by The
Peter G. Peterson and Joan Ganz Cooney Fund and the Pine Tree Foundation of New York.

                                  © The WNET Group https://www.camptv.org
Treasure Chest
 Materials List:
   • shoebox with an attached lid
   • paper fasteners
   • black paint
   • paintbrush
   • foil paper
   • glue
   • scissors

     *This activity should be done with the help of a trusted adult*
Instructions:

1. First, pain the outside of the
shoe box black. Let dry.

2. Cut strips of foil and glue
them onto the box.

                             https://www.camptv.org
3. With the help of an adult,
use scissors to poke holes
along the sides of the box and
put some of the fasteners in.

4. Add whatever else you
would like to decorate your
box. Now your treasure chest
is ready to hold all of your
valuables!

                           https://www.camptv.org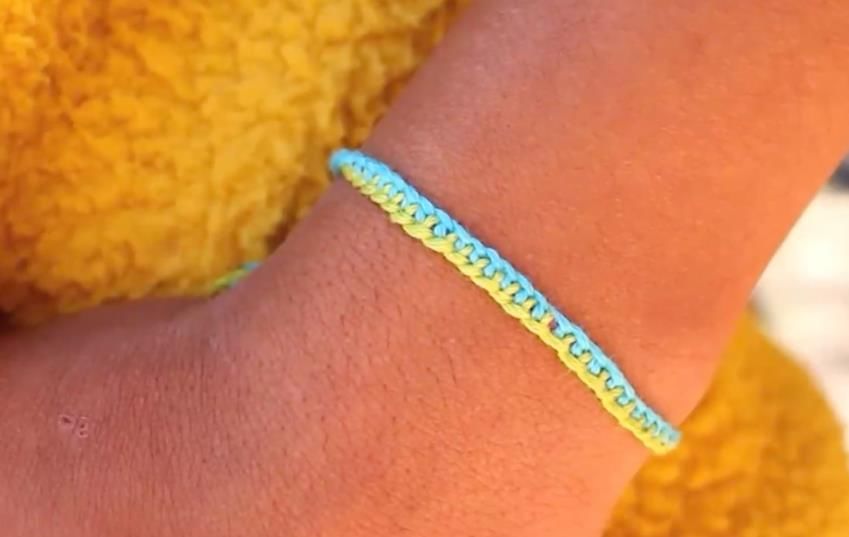
Moving Molecules
 Materials List:
   • 2 different colors of food coloring
   • 2 clear cups
   • water – hot and cold

     *This activity should be done with the help of a trusted adult*
Instructions:
1. Fill one cup with cold water
and the other with hot water.
Be sure that both cups are
filled with an equal amount of
water. *Ask an adult for help
when working with hot water.
Do not pour hot water into
plastic cups or drink it.*
2. Add a few drops of food
coloring to each of the cups.
You may want to put a white
sheet of paper behind the
cups so that you can better
observe what happens
3. Observe how the colors
move in each cup. Is there any
difference in the way the food
coloring moves in the hot
water verses the cold water?

                     Activity courtesy of Liberty Science Center
                               https://www.camptv.org
Origami Samurai Hat
 Materials List:
    •   Large sheet of paper - try newspaper or wrapping paper

Preparing the Paper:

1. Tear a large piece of paper into a
square.

2. Lay paper flat, folding one corner
up against the opposite edge to
form a double-layered triangle and
a remaining rectangle.

3. Fold the remaining rectangle
over the triangle.

4. Repeat this fold over the triangle
a few times to create a crease.

5. Lay paper flat and tear along the
crease to remove the remaining
rectangle.

6. Open the triangle to a square
with equal sides about 20 inches
(50.8 cm) long.

                               https://www.camptv.org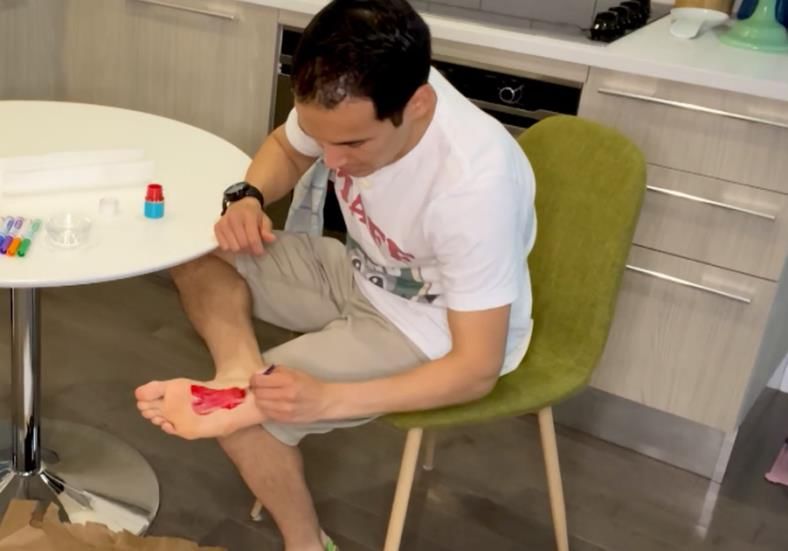
Origami Folding Technique:
1. Rotate the paper so you're
working with a diamond shape.
2. Fold the diamond in half, top to
bottom, into a triangle.
3. Then fold the triangle in half to
create a crease.

4. Fold in half, side to side, and
open.

5. Fold the outer corners down to
meet the center crease.

6. Now fold the top layer corners
upwards in half.

7. Fold flaps outwards.

                             https://www.camptv.org
8. Now fold the top layer below
upwards into a small triangle
covering the bottom of the horns.

9. Then fold the triangle again to
make the bottom band of the
helmet.

10. Fold the remaining single-
layered triangle below up to the top
to create a crease, and then open.

11. Tuck that triangle inside the
helmet. Puff it up and try it on!

                Activity courtesy of The Metropolitan Museum of Art - #MetKids
https://www.metmuseum.org/art/online-features/metkids/videos/Fold-an-Origami-Samurai-Helmet
                                    https://www.camptv.org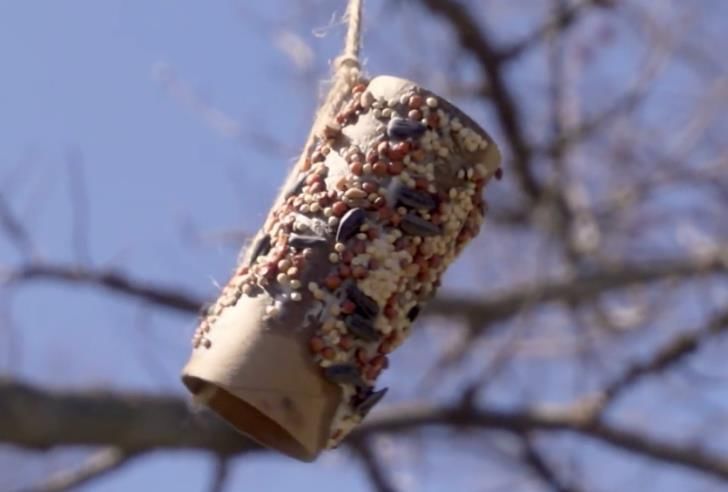
Season 2, Episode 12: Favorite Animal Day

                                         Join head counselor Zach and have an animal
                                         dance party! Make a hungry bunny & and a nature
                                         journal; meet otters, llamas, and red pandas.
                                         Content partners include: Children’s Museum of
                                         the Arts, Koo Koo Kanga Roo, Impossible
                                         Science, Monterey Bay Aquarium, National
                                         Dance Institute, NYS Office of General Services,
                                         Seneca Park Zoo, Memphis Zoo, Playworks.

                                            Activity Guide
        My Favorite Animal ………………..….…….……..…………1
        Penguin Holiday …………………..….……..……..………….2
        Test the Scientific Method Against This Card Trick … 3
        Hungry Bunny Craft ….………….………………..………… 4-5
        Nature Journal …………………………………………..……. 6-7
        Fruit Art ………………………………………………………..… 8-9

                   PARTICIPATE!
       What’s your favorite animal? Draw a picture and share
       what you know about this animal on the next page!

Camp TV is a production of The WNET Group.
Major funding for Camp TV is provided by the Corporation for Public Broadcasting. Additional funding is provided by The
Peter G. Peterson and Joan Ganz Cooney Fund and the Pine Tree Foundation of New York.

                                  © The WNET Group https://www.camptv.org
My Favorite Animal
Draw a picture of your favorite animal in the space below.

My favorite animal is __________________
It can   ____________________________
It eats ____________________________
I like it because ______________________

                              https://www.camptv.org
Penguin Holiday
Materials List:
• blank paper
• safety scissors
• pencil
• crayons, colored pencils, or washable markers for coloring
Instructions:
1. First, select the animal that you want
to use as the main figures in your
artwork. Draw your animals on a piece
of paper and cut them out.
2. Then, decide what your animals are
going to be doing in your artwork. Take a
moment to imagine yourself doing your
favorite activity. Then, imagine your
animal there instead! Use a pencil,
coloring utensils, and piece of blank
paper to draw the background of your
scene.
3. Now take your characters and place
them into your setting. You can also
create props of costume pieces to add
to your scene!
Activity courtesy of Children’s Museum of the Arts
https://www.camptv.orgTest the Scientific Method Against This Card Trick
Instructions:
1. Put your finger on any of the
numbered cards.
2. Move your finger to the left or
to the right to the first face card.
Tip: you can move your finger
across more than one card at a
time.
3. Move your finger up or down to
the first number card.
4. Move your finger diagonally to
the first red card.
5. Move down or to the left to the
first numbered card. Keep your
finger there.
WAS YOUR CARD THE 2 OF CLUBS?
In science there is a method to figure things out. It’s called the scientific
method. It involves:
1. Observation – Observe something you want to learn more about.
2. Question - In this case, how did the trick work?
3. Form a Hypothesis – Take a guess at how you think it works.
Ex: Does the value of the card matter? What happens if you start
somewhere else? Is there a pattern to the cards?
4. Experiment – Test the hypothesis by experimenting.
5. Conclusion – If your hypothesis matches your test, you can make a
conclusion. If it doesn’t, you have to make a new hypothesis.
6. Share Results – If you figure out the trick, try it on your friends!
Use the scientific method to see if you can figure out how the card trick
was done!
https://www.camptv.orgHungry Bunny Craft
Materials List:
• paper plate
• markers
• glue
• tape
• orange, green and white paper
• craft stick
• craft knife or scissors – only use a craft knife with the permission and
help of a trusted adult
*This activity should be done with the help of a trusted adult*
Instructions:
1. Draw a simple bunny face
on a paper plate.
2. Cut out the shape of a
carrot on orange paper.
https://www.camptv.org3. Cut the top of the carrot
out of green paper and glue
it on.
4. Draw bunny paws on
white paper. Cut them out.
glue them onto the carrot.
5. Flip the carrot over and
tape or glue a craft stick to
the back.
6. With the help of an adult,
cut a slit toward the bottom
of the plate, about one inch
long. Slide the craft stick
into the hole and now you
have your very own hungry
bunny!
https://www.camptv.orgNature Journal
Materials List:
• journal or notebook
• writing utensil
• string
• toilet paper tube or pinecone
• shortening or peanut butter
• bird seed
Instructions:
1. If you don’t have a spare
notebook or journal, fold a few
sheets of paper down the
middle and staple along the
crease to make your own.
2. Using string or some sticks,
mark a space about the size of
a basketball. Draw and take
notes on every living or non-
living thing inside of the space.
3. Be sure to title your
observations and include
information like date, weather
and time. Then start drawing!
https://www.camptv.org4. You can also use your journal
to record changes over time.
Find an interesting tree or bush
and observes its buds or leaves
over time. Keep making
observations over the next few
weeks to see how the buds
progress.
5. Create a birdfeeder by
covering a toilet paper tube (or
pinecone) with shortening (or
peanut butter) and bird seed.
6. Choose a spot that’s close
enough to see, but not too close
to scare away the birds. Use
your journal to record the types
of animals that visit the feeder,
and the number of times they
visit, in a 30-minute period. You
can repeat this observation at
different times of day, or
different times of the year!
Activity courtesy of Seneca Park Zoo
https://www.camptv.orgFruit Art
Materials List:
• mandarin orange or clementine
• chocolate chip
• lettuce
• blueberries
• knife
*This activity should be done with the help of a trusted adult*
Instructions:
1. Peel the orange, then pull it
in half. Put one of the halves of
down on the plate. Use 2 slices
from the other half to make fins
and 3 slices to make the tail.
2. Put some lettuce on the
bottom of the plate to make sea
grass.
https://www.camptv.org3. With the help if an adult, cut
a small piece of the orange peel
to make the fish’s mouth.
4. Place a chocolate chip for
the eye and use blueberries to
make bubbles.
https://www.camptv.orgSeason 2, Episode 13: Oceans Day
Join head counselor Zach to learn about sharks,
sketch in the sand, make jellyfish, play guess the
sea animal! Learn a card trick, dance samba.
Content partners include One Voice Children’s
Choir, Impossible Science, Liberty Science
Center, Lincoln Center, Monterey Bay Aquarium,
National Dance Institute, NY Philharmonic,
Sketch with Jeff at the Guggenheim Museum,
They Might Be Giants.
Activity Guide
Will It Float? ………….…………………………………..1
Predict the Future Card Trick ………………………. 2-3
Jellyfish Craft ……………………………………………. 4
PARTICIPATE!
What would you wear to swim in the ocean? Put on
your swimsuit, grab your goggles (or any other
equipment you might need) and pretend you’re off on
an ocean adventure while you watch “Oceans Day”
on Camp TV!
Camp TV is a production of The WNET Group.
Major funding for Camp TV is provided by the Corporation for Public Broadcasting. Additional funding is provided by The
Peter G. Peterson and Joan Ganz Cooney Fund and the Pine Tree Foundation of New York.
© The WNET Group https://www.camptv.orgFloating Paperclip
Materials List:
• large bowl
• water
• paperclip
• tissue paper squares – slightly bigger than the paperclip
• pencil with an eraser
• dishwashing liquid
Instructions:
1. Place a square of tissue paper
into a bowl of water so that it
floats. Then, gently place a dry
paperclip on top of the tissue
paper.
2. Use the eraser of your pencil to
press the edges of the tissue
paper down until it comes away
from the paperclip and remove it.
3. To make your paperclip sink
again, pour a few drops of
dishwashing liquid into the bowl.
Activity courtesy of Liberty Science Center
https://www.camptv.orgPredict the Future Card Trick
Instructions:
2. Set up the following piles of
cards:
Pile 1: 4, 3, 2 and Ace of
Diamonds (So that the 4 is on
top when you flip the deck
over)
Pile 2: A, 2, 3 and 4 of hearts
(so that the Ace is on top when
the deck is flipped over)
3. Spell the magic words
“Math or Magic” and make one
“move” for each letter you say.
For each “move”, move one
card from the top to the
bottom of the pile for each
letter you say.
4. Take the top card from each
pile and set them aside. Then,
spell the magic words again,
moving one card from the top
to the bottom for each letter
you say.
https://www.camptv.org5. Again, remove the top card
from each pile and set aside.
Repeat spelling the magic
words, and moving cards, one
more time.
6. Flip over the pairs of
discarded cards and reveal
matching pairs!
Activity courtesy of Impossible Science
https://www.camptv.orgJellyfish Craft
Materials List:
• paper bowl
• paint or markers
• tape
• ribbon or string
• safety scissors
• googly eyes – optional
Instructions:
1. Start by coloring the outside of your
bowl
3. Cut long pieces of ribbon or string
for the tentacles.
4. Tape the ribbon “tentacles” to the
inside of the bowl.
5. Draw eyes, or glue on googly eyes,
and draw a mouth for your jellyfish
friend.
https://www.camptv.orgSeason 2, Episode 14: Career Day
Join head counselor Zach to meet a meet a
firefighter and a conservation biologist! Make a
balloon rocket and a flip book, do a freeze dance,
write hero stories, learn about meerkats and
pikas. Content partners include Denver Museum
of Nature and Science, Intrepid Sea, Air & Space
Museum, NYS Office of General Services, OK Go,
Playworks, San Diego Zoo, S’More Ideas, Story
Pirates, WFSU.
Activity Guide
Balloon Rocket ………….…………………………………..1
Flip Book ………………………………………….…....……. 2
Footprint Vehicles.…………………………….....………. 3-4
PB&J Archeology …………………………………………… 5-6
PARTICIPATE!
What do you want to be when you grow up? Draw a
picture of your dream job and get ready to watch
“Career Day” on Camp TV!
Camp TV is a production of The WNET Group.
Major funding for Camp TV is provided by the Corporation for Public Broadcasting. Additional funding is provided by The
Peter G. Peterson and Joan Ganz Cooney Fund and the Pine Tree Foundation of New York.
© The WNET Group https://www.camptv.orgBalloon Rocket
Materials List:
• balloon
• long piece of string
• tape
• scissors
• straw – cut in half
Instructions:
1. Attach one end of the sting to a high
surface or a chair. Or, have someone hold
the string.
2. Thread the straw onto the string. Then,
add a piece of tape on top of the straw.
3. Blow up a balloon. While holding the end
balloon, attach it to the straw with the tape.
4. Release the balloon and watch it blast off!
Activity courtesy of Intrepid
https://www.camptv.orgFlip Book
Materials List:
• pack of post-it notes
• pencil
• note cards
• binder clip
Part 1:
1. Flip to the last page on a pack of
post-its. Draw a line on the right side
of the page.
2. Flip to the next page. On the new
page draw a line a little further
toward the center.
3. Continue moving the line further
across the page on every new page.
Once you are done, flip the book
from back to front and it will look
like your line is moving!
https://www.camptv.orgPart 2:
1. Make a stronger flip book using a
binder clip and a stack of note cards.
2. Draw a stick figure at the bottom
of the first note card.
3. On the next card, draw another
stick man, but make the arms and
legs move slightly.
4. Continue making cards, slightly
adjusting the arms and legs. When
you are done, flip through the pages
of the book to make your stick man
run.
Activity courtesy of OK GO
https://www.camptv.orgFootprint Vehicles
Materials List:
• paper
• washable markers
• paint brush
• non-toxic washable paint
• paper bag – or something an adult says is ok to use to protect the floor
Instructions:
1. Put a piece of paper on
top of the paper bag on the
floor.
2. While sitting on a chair,
paint the bottom of one of
your feet the color of your
vehicle. Make sure not to
use too much paint so that it
doesn’t drip.
https://www.camptv.org3. Carefully, making sure the
bottom of your painted foot
doesn’t touch the ground,
stand up and place your foot
horizontally on the paper
and make a footprint. Gently
lift your foot off the page to
prevent smearing. Have a
wet towel close by to wipe
your foot when you are
done.
4. After the paint dries, draw
the wheels and other details
to make your vehicle!
https://www.camptv.orgPB&J Archaeology
Materials List:
• butter knife
• bread
• peanut butter
• jelly
• colored candies
• chocolate chips
• sprinkles
• clear straw
Instructions:
1. Imagine that a long, long time
ago there was a field that was
next to a river (Place the first
slice of bread onto a plate). The
river floods and leaves a layer of
mud. (Use peanut butter to
represent the mud)
3. Along come a group of people
who want fish on the river and
spend the night. They need to
make a campfire to stay warm.
(Use chocolate chips and yellow
sprinkles to represent the
campfire)
https://www.camptv.org4. After these people are done
camping, the go on their way.
Over time a layer of dirt is
deposited on the site. (Add
another piece of bread)
5.Years later, a new group of
people come a long and they
decide they want to build houses
there. (Pinch out 4 post holes for
the houses in the bread)
6. Since these people will be
staying there for a while, they
will be making a lot of garbage.
So, they dig a hole for their trash.
(Make a hole and fill with
sprinkles and candy)
7. Over time, the river starts
rising, so the people move on
their way. The river does indeed
flood. (Add a layer of jelly)
https://www.camptv.org8. Over time, more dirt is
deposited on top the site. (Add
another piece of bread)
9. Now it’s time to excavate the
site to see what’s there! First,
use a straw to poke holes
through the layers. Examine what
comes out through the straw.
10. Decide where you want to dig
a larger hole, maybe were you
felt something hard with the
straw. Excavate layer by layer to
gather information about what
happened at the site.
Activity courtesy of WFSU
https://www.camptv.orgSeason 2, Episode 15: Poem in My Pocket Day
Join head counselor Zach to hear a poem, write a
poem, make a pocket! Meet zoo animals, do an
emotions dance, create strong shapes out of
paper, read The Land of Nod. Content partners
include Carnegie Hall, Liberty Science Center,
Minnesota Zoo, Move-to-Improve, National
Dance Institute, One Voice Children’s Choir,
Sketch with Jeff at the Guggenheim Museum,
S’More Ideas, They Might Be Giants.
Activity Guide
Color Poems …………………………………………. 1
Friendship Bracelet ………….………….…………..2-3
Paper Pocket .,……………………….………………. 4-5
Super Strong Shapes ………………………………. 6-7
PARTICIPATE!
Have you ever written a poem? Write your very own
color poem on the next page and get ready to watch
“Poem in My Pocket Day” on Camp TV !
Camp TV is a production of The WNET Group.
Major funding for Camp TV is provided by the Corporation for Public Broadcasting. Additional funding is provided by The
Peter G. Peterson and Joan Ganz Cooney Fund and the Pine Tree Foundation of New York.
© The WNET Group https://www.camptv.orgColor Poems
Use your 5 senses to write a color poem. Check out the example below then
write your own color poems!
Yellow looks like sunshine
Yellow sounds like birds chirping
Yellow tastes like lemons
Yellow smells like flowers
Yellow feels like happiness
Blue looks like ___________________
Blue sounds like ___________________
Blue tastes like ___________________
Blue smells like ___________________
Blue feels like ___________________
Green looks like ___________________
Green sounds like ___________________
Green tastes like ___________________
Green smells like ___________________
Green feels like ___________________
https://www.camptv.orgFriendship Bracelet
Materials List:
• 3 different colors of string
• safety scissors
• tape
Instructions:
1. Cut 24 inches of each
color string. Tie them
together with a knot that is
a couple of inches from
the top. Tape the string
down on a hard surface.
2. Start by taking your left
string and making a
number 4 shape.
3. Loop the left string
under and through the
middle string, pulling it
tight to make a knot.
https://www.camptv.org4. Do the same thing on
the right side, but this time
making a backwards 4.
Loop the right string under
and through the middle
string and pull tight to
make a knot.
5. Keep going through this
same process, going back
and forth between the left
and right string. Do this
until the bracelet is long
enough to fit around your
wrist.
Activity courtesy of S’more Ideas
https://www.camptv.orgPaper Pocket
Materials List:
• paper
• safety scissors
• glue
Instructions:
1. Start by folding your paper in
half, about ¾ of the way from the
top.
2. Then, fold the sides and the
top about an inch deep
4. Unfold the paper and cut the
sides off the bottom half.
https://www.camptv.org5. Snip off the corners on the top
half.
6. Fold in the sides, add some
glue, and smooth. Be sure to
leave an opening at the top. Let
the glue dry and now you have a
perfect portable pocket.
https://www.camptv.orgSuper Strong Shapes
Materials List:
• 3 pieces of construction paper
• tape
• books
Instructions:
1. Place a piece of paper
flat on a table. Roll until
on side meets the other.
Tape the edges together to
form a cylinder. Set aside.
2. Place a new piece of
paper flat on a table. Fold
the paper 2 times, first
taking one side and folding
it toward to the middle.
Then fold the other side,
this time all the way to the
end. Tape the edges to
form a triangular prism.
Set aside.
https://www.camptv.org2. Place a new piece of
paper flat on a table. To
make a rectangular prism
you will need to make 3
folds. Take the first side
and fold it right before the
middle. Fold it again, this
time make sure to leave
some space before the
end. Then, fold it all the
way over to the end. Tape
the edges.
5. Which shape do you
think will be the
strongest? Place books on
top of each shape to see
which can hold the most
books!
Activity courtesy of Liberty Science Center
https://www.camptv.orgYou can also read