Aqua-Aire Sit-Bath System 6900
←
→
Page content transcription
If your browser does not render page correctly, please read the page content below
Operation Video

                         Aqua-Aire
                     Sit-Bath System 6900
                 Safe Operation & Daily Maintenance
                              Instructions

                      PENNER PATIENT CARE, INC
                        Box 523 / 101 Grant St.
                           Aurora, NE 68818
                      360750 Revision G - 12/18/18

1-866-PENNERS               1-866-736-6377          1-800-732-0717
             E-mail Address: pennersales@hamilton.net
              Web Site: www.pennerbathingspas.com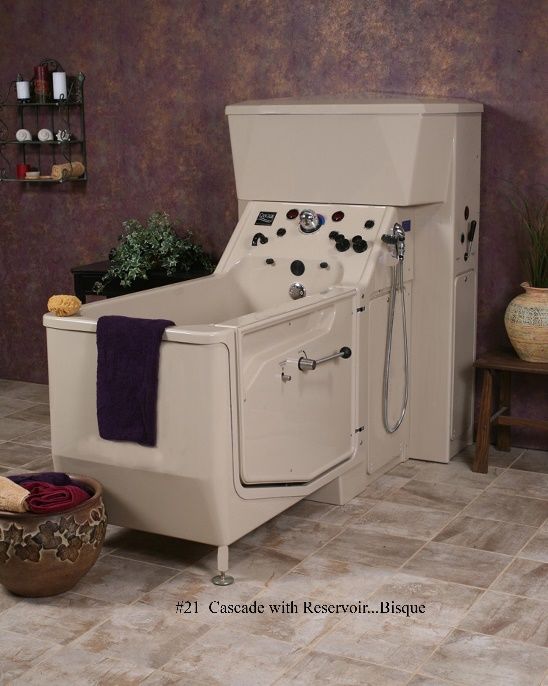
Table of Contents
TABLE OF CONTENTS .................................................................................. 2
INTRODUCTION ............................................................................................. 3
SYMBOLS AND TERMS ................................................................................. 3
TECHNICAL DESCRIPTION ........................................................................... 3
BASIC COMPONENTS ................................................................................... 5
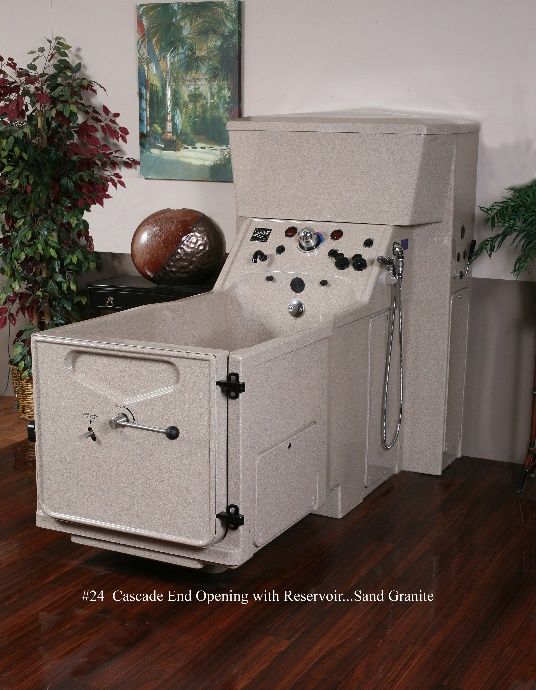
CASCADE TUB ............................................................................................... 5
CASCADE DOOR ........................................................................................... 6
LOCKING CASCADE DOOR .......................................................................... 6
UNLOCKING CASCADE DOOR ..................................................................... 6
CASCADE RESERVOIR ................................................................................. 7
SYSTEM PREPARATION (BEFORE BATH)................................................... 7
BELTING TECHNIQUE ................................................................................... 9
TRANSFER INTO BATH USING SIT-TO-STAND LIFT .................................. 9
TRANSFERRING WITH PENNER PATIENT TRANSFERS.......................... 10
BATHING PROCEDURE WITHOUT A RESERVOIR.................................... 10
USING CASCADE WITH RESERVOIR......................................................... 10
BATHING PROCEDURE ............................................................................... 12
TRANSFER OUT OF BATH .......................................................................... 14
SYSTEM CLEANING (AFTER EVERY BATH) .............................................. 14
RESERVOIR CLEANING .............................................................................. 16
DAILY MAINTENANCE ................................................................................. 17
DAILY SAFETY CHECKLIST ........................................................................ 18
CASCADE TUB ............................................................................................. 18
CASCADE RESERVOIR ............................................................................... 19
2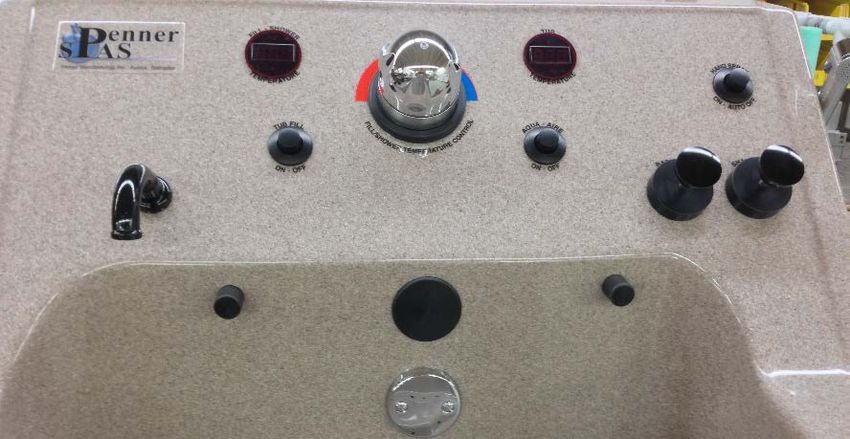
Introduction

The Cascade Sit-Bath System 6900 is designed to significantly improve the
efficiency and environmental safety of your nursing care operation. However,
the benefits designed into the Sit-Bath System will be realized only if the
system is operated and cared for properly. The purpose of this manual is to
provide you with a recommended procedure to help you obtain the maximum
efficiency and safety from your Sit-Bath System.

Symbols and Terms

    WARNING
      The warning symbol identifies important safety messages. Failure to
      obey a safety warning may result in injury to you or to others.

CAUTION
      The caution heading identifies important maintenance and operation
      information. Failure to obey a caution warning may result in damage to
      the Sit-Bath equipment and may void the warranty.

Left or Right
      When the terms “left” or “right” are used with reference to the tub, this
      means left or right as you look at the control panel from the seat end of
      the tub

Technical Description

The Cascade Bath is an “Aqua-Aire” bathing system intended for use in
nursing homes, hospitals, and assisted living facilities to bath residents
under the direct supervision of trained staff. There is an optional reservoir
system that allows the tub to be filled quickly. Both items are mainly
constructed of gel-coated fiberglass laminate on a steel frame. The tub has
an Aqua-Aire system for bubbling the water with air. It has a dispensing
system to dispense shampoo/body wash and bath oil, and a disinfecting
system to aid in cleaning the tub. The tub has a locking door on one side for
access to the tub by the resident. A thermostatic mixing valve controls
incoming water temperature. Digital temperature read-outs indicate all
incoming and tub water temperatures. A hand shower sprayer is also
provided.

                                                                              3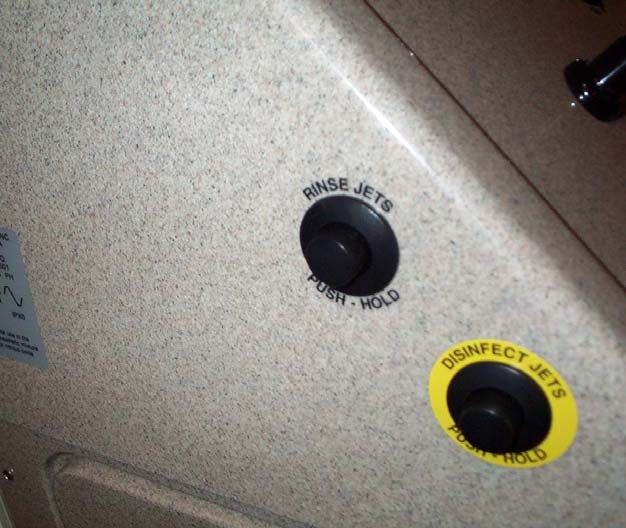
Manufacturer:           Penner Manufacturing Inc
                         102 Grant St   / PO Box 503
                         Aurora, NE     68818
                         (402) 694-5003

                         Models:          Cascade - 6900 Sit Bath

Model   360010-1 (Aqua-Aire - Low seat - White)             Model 361910-1 (Aqua-Aire - High seat - White)
Model   360010-1L (Aqua-Aire - Low seat - White             Model 361910-X (Aqua-Aire - High seat - Color)
Model   360010-1W (Aqua-Aire - Low Bariatric - White)       Model 362010-1 (Aqua-Aire –End Open - White)
Model   360010-XW (Aqua-Aire - Low Bariatric - Color)       Model 362010-1L (Aqua-Aire –End Open - White)
Model   360010-X (Aqua-Aire - Low seat - Color)             Model 362010-X (Aqua-Aire – End Open - Color)
Model   360010-XL (Aqua-Aire - Low seat - Color)            Model 362010-XL (Aqua-Aire – End Open - Color)

              Models:              Cascade Reservoir

Model 370000-1W (White Wide Right Hand)                      Model 370000-1WL (White Wide Left Hand)
Model 370000-XW (Color Wide Right Hand)                      Model 370000-XWL (Color Wide Left Hand)

 Aqua-Aire Ratings:     120 Volts AC                               Reservoir Ratings:        120 Volts
 AC
                        7.25 Amps (includes reservoir’s .75 amps)                            60 Hz
                        60 Hz                                                                1 Phase
                        1 Phase

 UL Classification:     Class I; Type B; Ordinary EQUIPMENT

 Equipment not suitable for use in the presence of a flammable anesthetic mixture with air or with
 oxygen or nitrous oxide.

                      MEDICAL EQUIPMENT
                      WITH RESPECT TO ELECTRIC SHOCK
                      FIRE AND MECHANICAL HAZARDS ONLY
   61LN
                      IN ACCORDANCE WITH UL2601-1, AND
                      CAN/CSA C22.2 NO. 601.1

         All temperature read-out values are accurate to +/- 2ºF (per NSF C-2). The read-out range is
         -40/199ºF. The resolution is 1º.
         An electrical circuit diagram can be found on the inside of the lid of the electrical box located
         inside the larger service access door on the left side of the tub.
         Service parts and technical information are available by contacting your distributor or by
         calling one of the telephone numbers located on the front or back cover of this manual.
         Environmental conditions for transport and storage for up to 15 weeks (as packaged from
         the manufacturer) are as follows:

          Temperature range               -40º F (-40º C) to 120º F (49º C)
          Relative Humidity               10% to 90%
          Atmospheric Pressure            7.5 PSI to 15.5 PSI

                                                                                                         4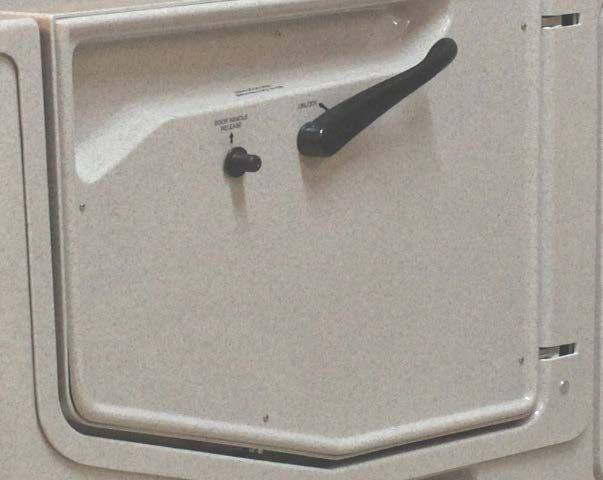
Basic Components
The Cascade Sit-Bath System 6900 is composed of the following
components:
• Cascade Tub
• Cascade Door
• Cascade Reservoir
Cascade Tub
350535M-SER – Thermometer (two each)
350495 - Air Transmitter – Black Five Each
350200 - Dispenser Complete
350201- "O" Ring For Disp. (Included In
350200)
350204 - Spring-Dispenser Pump
Replacement (Included In 350200)
350210 - Nut, Pump Mount (White)
(Included In 350200)
350215 - Cap, Dispenser Pump (Included In
350200)
350151 – Replacement Cartridge-(Not
shown)
350172 – Escutcheon, Chrome
350220 - Dispenser Spout - Oil & Soap (two)
360340 - Spigot – Black
Tub Identification Markings And Ratings
5
Cascade Door

The Cascade Door is a specially designed reinforced door with locking lever
to open and close the door.

         DOOR LOCK LEVER

     DOOR HANDLE RELEASE

Locking Cascade Door
1.    With lever in the upright position, close the door tight against the tub.
2.    When the door is against the tub push the lever over to the right so the
      lever is the LOCK position. (Label at base of lever indicates “UNLOCK” or
      “LOCK” positions)
3.    The door is now locked in place.
      (Note) To extend the life of the Water Door Seal, leave the door open
      when not in use.

Unlocking Cascade Door

      WARNING
        NEVER ATTEMPT TO UNLOCK THE DOOR WHILE THERE IS
      ANY WATER IN THE TUB. FAILURE TO HEED THIS WARNING MAY
      RESULT IN INJURY TO A RESIDENT AND OR OPERATOR.

1.    To unlock, first pull up on the door handle release and hold it.
2.    Then move the lever to the “unlock” position.
3.    The door is now unlocked and able to be opened.

                                                                                  6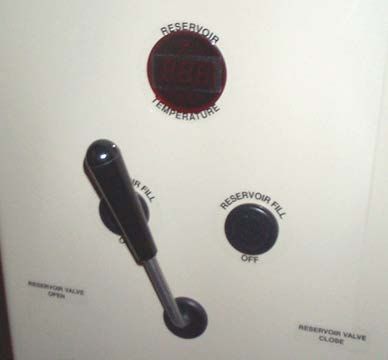
Cascade Reservoir

     The Cascade Reservoir is a specially designed water holding tank that you
     fill with water first, and then once the resident has been transferred into the
     tub you release the water into the tub. By filling the reservoir first, it allows
     you to fill the tub in 70 seconds or less and keeps the time the resident is
     unclothed and out of water to a minimum.

                                                                  RESERVOIR TEMPERATURE READ-OUT

                                                                  RESERVOIR FILL ON BUTTON

                                                                  RESERVOIR FILL OFF BUTTON

                                                                RESERVOIR RELEASE VALVE HANDLE

     System Preparation (Before Bath)

       WARNING
       ONLY PERSONNEL WHO HAVE BEEN THOROUGHLY TRAINED IN
       THE OPERATION OF THE CASCADE SIT-BATH SYSTEM 6900
       SHOULD OPERATE THIS EQUIPMENT. OPERATION OF THIS
       EQUIPMENT BY UNTRAINED PERSONNEL COULD RESULT IN
       INJURY TO THE OPERATOR OR PATIENT. YOUR PENNER PATIENT
       CARE DISTRIBUTOR IS AVAILABLE AT YOUR REQUEST TO
       PROVIDE COMPLETE IN-SERVICE TRAINING ON THE
       EQUIPMENT’S PROPER OPERATION.

       Prior to the bath, perform the following preparation steps.
1.    Make sure you have all of your bathing aids ready such as a washcloth and
      towels.
2.    Check that the seat belt is in place and ready to strap in the resident after
      they are in the tub. (The belt should be run through the seat belt brackets

                                                                                         7
at the rear of the seat area. The belt can be run through the brackets in
either direction. Use the safest Belting technique for the resident.) See
Belting Technique on page (9).
Note. Check the level of Penner Bath Oil, Penner Shampoo, and Penner
Disinfectant concentrate in the supply bottles daily to ensure that
adequate amounts are available for the day’s bathing requirements.
These bottles are located behind the small access door on the left side
of the tub. Replace a bottle before it runs out to avoid re-priming the
system. Transfer into Bath – Ambulatory Resident
You are now ready to transfer the resident into the bath. To do so:
1. Make sure bathing area is clear of all unneeded equipment.
2. Open door to widest position.
3. Help transfer the resident into the bath by using acceptable nursing
techniques. Resident should sit on seat first then swing his/her legs into
the bath.
WARNING
WHEN USING THE TRANSFER, DO NOT LIFT THE PATIENT INTO
THE TUB BY GOING OVER THE TOP OF THE TUB. GOING OVER THE
TOP OF THE TUB WITH THE PATIENT TRANSFER MAY RESULT IN
INJURY TO A RESIDENT OR OPERATOR.
WARNING
STEPPING INTO THE TUB FIRST AND THEN SITTING ON THE SEAT
MAY PUT THE RESIDENT IN DANGER OF SLIPPING AND CAUSE
HARM TO THE RESIDENT AND/OR STAFF.
8Belting Technique
Transfer Procedure with the Penner Transfer System
1. Attach seat belt around the resident using the D-rings on the seat
belt.
2. Route the belt through the belt loops inside tub prior to placing the
resident into the tub.
4. Connect the belt to the D-ring as shown at the right.
5. Close the door and lock. Ensure that the belt does not get caught in
the door the door when it is closed.
6. The tub is now sealed and you are ready to fill the tub with water.
CAUTION
Failure to keep the belt from getting pinched in the door can
result in damage to the tub seal.
Transfer into Bath Using Sit-to-Stand Lift
1. Make sure the bathing area is clear of all unneeded equipment.
2. Open door to widest position.
3. The Cascade was designed with an opening under the tub to allow the
use of sit-to-stand lifts.
4. Using your sit-to-stand lift according to manufacturers instructions, transfer
the resident onto the Cascade Seat.
5. Remove the sit-to-stand lift.
6. Swing resident’s legs into tub.
7. Attach seat belt around the resident using the D-rings on the seat belt.
8. Close and lock the door. Ensure that the belt does not get caught in the
door the door when it is closed.
CAUTION
FAILURE TO KEEP THE BELT FROM GETTING PINCHED IN THE
DOOR CAN RESULT IN DAMAGE TO THE TUB SEAL.
9. The tub is now sealed and you are ready to fill the tub with water.
9Transferring with Penner Patient Transfers.
1. Refer to the appropriate Transfer Safe operation & Maintenance Manual.
Bathing Procedure without a Reservoir
1. Place the drain plug in the drain.
2. Press the Tub Fill Button to begin filling the tub. (Reference Figure 1).
3. Monitor the water temperature by watching the Fill /Shower Water
Temperature Readout. Adjust the water temperature by turning the
Temperature Control Knob to a normal bathing temperature, 95 to 105
degrees Fahrenheit.
WARNING
IN ADDITION TO MONITORING THE TEMPERATURE READOUT,
ALWAYS CHECK THE WATER TEMPERATURE BY ALLOWING IT
TO RUN OVER YOUR WRIST. FAILURE TO DO THIS COULD
RESULT IN A HOT-WATER BURN TO THE RESIDENT.
4. When filled, press the Fill Button again to stop the water flow.
Using Cascade with Reservoir
Reference Figure 3 for locations of the controls listed in this section.
1. Press the reservoir fill ON button to begin filling the reservoir.
2. Monitor the reservoir water temperature by watching the temperature
readout located on the reservoir. To adjust the temperature of water
flowing into the reservoir, turn the mixing valve handle to a normal
bathing temperature, 95-105 degrees Fahrenheit as shown on the
fill/shower temperature read-out.
3. The reservoir can hold up to 48 gallons of water and can be stopped at
anytime during the filling process if you desire. To stop the filling of the
reservoir, simply push the reservoir fill OFF button located on the
reservoir.
4. If you do not stop the filling of the reservoir by using the reservoir fill OFF
button, the filling of the reservoir will stop filling AUTOMATICALLY once it
is full.
5. The reservoir is now full and the water ready to be checked for safety.
To make sure the temperature of the water in the reservoir is suitable for
10bathing, first close and lock the tub door, then open the reservoir release
valve slightly to release some water from the reservoir and manually
check the water temperature by letting the water run over you wrist.
Close the reservoir release valve if the temperature is suitable and
continue on getting prepared for you resident. If water is too hot or too
cold, open the reservoir release valve and let the water run out of the
reservoir into the empty tub and start over at step number one, above.
WARNING
FAILURE TO MANUALLY CHECK THE WATER TEMPERATURE
BEFORE PUTTING A RESIDENT IN THE TUB MAY RESULT IN BURN
INJURIES TO THE RESIDENT AND/OR OPERATOR.
6. Unlock and open the door.
7. Once all of the above steps have been followed and the water in the
reservoir is suitable for bathing, you are ready to transfer the resident
into the tub, release the water from the reservoir, and give a bath. Refer
to pages 8-10 on proper transfers into Cascade.
8. Place drain plug in the drain.
9. Once the resident is transferred into the Cascade and secured with the
safety belt, close and lock the door. You may now release the water
from the reservoir.
10. Open the reservoir release valve on the reservoir to release the water,
checking again for the second time with your wrist to make sure the
water is not too hot or not too cold. If the temperature is suitable for
bathing (95 to 105 degrees Fahrenheit) continue to let the reservoir
empty. If the temperature is not correct after double- checking, remove
the resident from the Cascade and empty the reservoir into the vacant
tub. Fill reservoir again with the correct temperature of water. Repeat
steps 7 and 8.
A unique feature of the Cascade is that you are able to fill the tub
with the water from the reservoir and fill with the spigot at the same
time. This cuts down your filling time and limits the time your
resident sits in the tub unclothed.
11. After transferring your resident into the Cascade, close and locked the
door, and put the drain plug in the drain, open the reservoir release
valve.
12. Once the reservoir release valve has been opened, push the Tub Fill
button located on the Cascade Control Panel and adjust the water
temperature by turning the Temperature Control knob to normal bathing
temperature, 95 to105 degrees Fahrenheit.
1113. When desired level of water is achieved push Tub Fill button again to
shut water off coming from the spigot.
Bathing Procedure
You are now ready to begin washing the resident. The suggested
bathing time is 5 to 10 minutes. Bathing a patient more than 10 minutes
is not required.
To bathe the resident, use the following procedures:
1. Start the air blower by pressing the Aqua-Aire ON/OFF button.
2. Push the Bath Oil Dispensing Pump Plunger to add Penner Bath Oil to
the water. The amount of Penner Bath Oil will vary according to the
resident’s skin condition.
Note. Penner Bath Oil is a non-aqueous, liquid bathing oil containing refined
lanolin similar to natural skin oil. When combined with water, Penner
Bath Oil can penetrate the skin. This combination of water and oil
restores moisture to the patient’s skin and benefits the nursing attendant,
whose hands are frequently in water. Additionally, the use of Penner
Shampoo & Body Wash eliminates the risk of cross-contamination,
which can result from sharing a single bar of soap.
WARNING
IN THE FOLLOWING BATHING INSTRUCTIONS YOU ARE
REQUIRED TO RINSE THE RESIDENT WITH THE SHOWER
SPRAYER. BEFORE DOING SO EACH TIME, MAKE SURE THE
TEMPERATURE IS BETWEEN 95 AND 105 DEGREES FAHRENHEIT
BY VIEWING THE TEMPERATURE READOUT. AS A FURTHER
PRECAUTION, ALWAYS TEST THE WATER ON THE INSIDE OF
YOUR WRIST BEFORE TURNING THE SHOWER SPRAYER
TOWARD THE RESIDENT. FAILURE TO FOLLOW THE
PRECAUTIONS IN THIS WARNING COULD RESULT IN A BURN
INJURY TO THE OPERATOR OR THE RESIDENT.
3. Bathe the resident’s upper body as follows:
a. Position one hand or hand with washcloth under the Shampoo
dispensing spout and push the Shampoo Dispensing Pump
Plunger to dispense Penner Body Wash and Shampoo. Apply it
directly to the resident’s body.
12b. Begin gently washing the resident’s upper body. Pay special
attention to folds or creases in the skin and under the arms. If the
scalp is flaky, apply a small amount of Penner Bath Oil to the
problem area and let it soak in until time for shampoo.
4. Rinse the upper body with the shower sprayer as follows.
a. Pick up the Hand-Held Shower Sprayer located off to the side of
the control panel.
b. Press the Shower Button to activate the Shower Sprayer.
Note. Once the shower sprayer is activated, it will stay activated for a period
of time and then automatically shut off. This time period (up to 10
minutes) is adjustable by maintenance personnel only.
a. While pointing the sprayer into the tub, not onto the resident,
press the Shower Trigger, located on the sprayer.
b. Adjust the water temperature by turning the Temperature Control
Knob to the normal bathing range of 95 to 105 degrees
Fahrenheit as shown below. Monitor the temperature by viewing
the Fill/Shower Temperature Readout. As a further precaution,
always test the water on the inside of your wrist before turning the
sprayer toward the resident.
c. Repeat the washing and rinsing steps for the upper body a
second time.
5. Bathe the resident’s perineal area as follows:
a. Lift the resident’s right leg and let the Aqua-Aire bubbling action
wash the perineal area. This technique protects the resident’s
dignity and removes any residual waste or fecal matter.
b. The Aqua-Aire bubbling action, at the bottom of the tub, will clean
the resident’s feet.
6. To shampoo the resident’s hair, use the following procedure:
a. Wet the resident’s hair with the shower sprayer.
b. Push the Shampoo Pump Plunger and apply a small amount of
Penner Body Wash and Shampoo to the wet hair.
Note. Penner Body Wash and Shampoo is a special formula with lanolin for
use with residents who have dry scalp and/or skin conditions. Penner
Body Wash and Shampoo’s special conditioning formula assures that
all residues will be removed quickly and easily, leaving hair clean,
conditioned, and shining..
c. Massage the resident’s head to create lather. Continue the
massage to fully clean the hair and scalp.
d. Rinse with the shower sprayer.
13e. Shampoo and rinse a second time if required.
Transfer Out Of Bath
After the bath has been given, you are now ready to transfer the
resident out of the tub.
1. Drain the tub by pulling the drain plug from the drain. Allow the tub to
be drained completely.
WARNING
FAILURE TO HAVE THE TUB COMPLETELY DRAINED BEFORE
UNLOCKING THE DOOR COULD CAUSE INJURY TO THE
OPERATOR AND RESIDENT.
2. Unlock door by pulling up on the door handle release and pulling up on
the lever at the same time.
3. Open door to widest position.
4. Dry off resident.
5. Swing residents legs around and place on the floor.
6. If transferring manually, use proper nursing techniques to transfer to a
wheelchair or other chair to finish hair, nail, shaving, etc.
7. If using a sit-to-stand lift or total lift, follow the manufacturers
instructions on the use of that particular lift.
8. After finishing your post bath routine, take the resident out of the
bathing room.
9. You are now ready to disinfect the Cascade tub.
System Cleaning (After Every Bath)
Clean and disinfect the tub after every bath with Penner Cleaner/Disinfectant as
follows:
Note. Penner Cleaner/Disinfectant is a special non-abrasive cleaning and
disinfecting solution that will not harm the tub’s fiberglass surface. Penner
Cleaner/Disinfectant is the only cleaning solution designed and
recommended for use with your Cascade Tub.
14CAUTION
SOME CLEANERS, DISINFECTANTS, AND FLOOR STRIPPERS
CONTAIN INGREDIENTS THAT ARE CORROSIVE OR ABRASIVE.
THESE SOLUTIONS OR COMPOUNDS MAY CONTAIN CHLORINE,
ACID, BASIC INGREDIENTS OR ABRASIVES. DO NOT ALLOW SUCH
SOLUTIONS OR COMPOUNDS TO COME IN CONTACT WITH YOUR
PENNER EQUIPMENT. FAILURE TO HEED THIS CAUTION COULD
RESULT IN DAMAGE TO THE EQUIPMENT AND VOID THE
WARRANTY.
1. Close and lock the door.
2. Press the Tub Fill Button and turn the Temperature Control Knob all the
way to the left to its warmest level to heat the disinfectant solution and
maximize its effectiveness.
3. Remove any visible tissue, residue, or fluids from the tub by pressing
the Shower Button and rinsing the inside tub surfaces with the shower
sprayer.
4. Press the Fill Button again to turn off the water. Allow the tub to drain,
and place the drain plug over the drain.
5. On the Aqua-Aire Tubs, press and hold the Disinfect Button located on
the left side of the tub. As the button is held down, the properly mixed
cleaning solution is running through the air injection system and out all
of the air jets. Release the button after you see solution coming out of
all the air jets and you have 1 to 1 1/2 gallons of disinfectant solution in
the foot well of the tub.
WARNING
HOUSEKEEPING PERSONNEL SHOULD WEAR PROTECTIVE
GLASSES AND GLOVES TO PREVENT DISINFECTANT FROM
DAMAGING THEIR EYES OR SKIN. IF DISINFECTANT GETS ON
THE SKIN OR IN THE EYES, RINSE THOROUGHLY WITH PLENTY
OF WATER. SEEK MEDICAL ADVICE IF IRRITATION OCCURS.
6. Using the long-handled brush, available from your Penner distributor,
thoroughly scrub all interior surfaces of the tub with the solution that
remains in the foot well of the tub. Let disinfectant stay on surface for 10
minutes or, as recommended by the instructions on the disinfectant
concentrate container.
7. Remove the plug from the drain.
8. Rinse the tub’s interior surfaces thoroughly with the shower sprayer.
159. Press and hold the Rinse button located on the left side of the control
panel until clear water runs from all the air jets. Then release the Rinse
button.
10. Finish rinsing the interior surfaces of the tub with the shower sprayer.
11. Start the air blower by pushing the Aqua-Aire Button. Allow it to run for
30 seconds. This pushes the rinse water out of the air injection system.
If this was the last bath of the day, allow the blower to run for 2 minutes
to dry out the system.
12. Stop the Aqua-Aire blower by again pushing the Aqua-Aire button.
13. Visibly check that the tub and the reservoir (if applicable) was effectively
cleaned during the disinfecting procedure. If not, repeat the procedure.
14. If there is a delay of one or more hours before the next bath, we
recommend using a towel to wipe off all excess water. This will keep
your Cascade tub looking great for years to come.
Reservoir Cleaning
The lid of the reservoir (if applicable) can be removed to allow access
for cleaning and disinfecting when necessary.
How often should the Reservoir tank be cleaned? Since only fresh
water goes through the reservoir tank, the time between cleanings
depends on the local water quality. As a general rule, we suggest at
least once per month or more often if needed.
WARNING
HOUSEKEEPING PERSONNEL SHOULD WEAR PROTECTIVE
GLASSES AND GLOVES TO PREVENT DISINFECTANT
CONCENTRATE FROM DAMAGING THEIR EYES OR SKIN. IF
DISINFECTANT GETS ON THE SKIN OR IN THE EYES, RINSE
THOROUGHLY WITH PLENTY OF WATER. SEEK MEDICAL ADVICE
IF IRRITATION OCCURS.
Supplies needed:
• Step ladder to comfortably reach into the reservoir tank.
• Penner Disinfectant concentrate. We recommend using the Penner
disinfectant concentrate that is used in the tub. However, you can use
a cleaner or disinfectant of your choice.
• The long handle nylon brush that is used for tub cleaning.
16Procedure:
1. Close the water door of the tub and ensure that the drain is open.
2. Ensure that the reservoir drain valve is in the open position.
3. Remove the lid of the reservoir and set it aside.
4. Press the reservoir fill ON button and turn the mixing valve to the
warmest positon. Allow the incoming water temperature to warm up.
5. Press the reservoir fill OFF button to stop the water flow.
6. Use the hand sprayer of the tub to rinse the reservoir tank.
7. When done rinsing, allow the water to drain from the reservoir tank and
close the reservoir drain valve.
8. If you are using Penner disinfectant concentrate, pour 2-3 ounces of
concentrate directly into the reservoir tank and add approximately one
gallon of warm water from either the hand sprayer or the reservoir fill
spout.
9. With the long handle nylon brush, dipped into the water in the bottom of
the reservoir tank, brush the entire inner surface of the tank until it is
clean.
10. Let disinfectant stay on surface for 10 minutes. (Or, as recommended by
the instructions on the disinfectant concentrate container.)
11. Open the reservoir drain valve and rinse the inside surfaces of the
reservoir tank using the hand sprayer.
12. Rinse the disinfectant solution from the inside surface of the tub.
13. Replace the reservoir lid.
14. Unlock the tub’s water door and open slightly.
15. Put away all cleaning supplies.
If you have any questions, please contact Penner Mfg Inc. at 1-800-732-0717.
Daily Maintenance
To properly maintain the Cascade Sit Bath System, perform the following
daily maintenance procedures.
1. Check that there is an adequate supply of system liquids such as
shampoo, bath oil, and disinfectant concentrate in the supply bottles
located behind the small access door on the left side of the tub. Replace
the bottles before they are empty to avoid re-priming the system. Be
sure each bottle label matches the label found on the hose to which the
bottle is attached.
17WARNING
WHILE REPLACING SYSTEM LIQUIDS, HOUSEKEEPING
PERSONNEL SHOULD WEAR PROTECTIVE GLASSES AND
GLOVES TO PREVENT DISINFECTANT CONCENTRATE FROM
DAMAGING THEIR EYES OR SKIN. IF DISINFECTANT GETS ON
THE SKIN OR IN THE EYES, RINSE THOROUGHLY WITH PLENTY
OF WATER. SEEK MEDICAL ADVICE IF IRRITATION OCCURS.
2. Perform the Daily Safety Checklist described in the following section
before using the system.
Daily Safety Checklist
WARNING
FAILURE TO PERFORM THE DAILY SAFETY CHECKS AND TAKE
CORRECTIVE ACTION, WHEN REQUIRED, PRIOR TO THE
OPERATION OF THE EQUIPMENT EACH DAY COULD RESULT IN
INJURY TO THE RESIDENT OR OPERATOR.
WARNING
IF ANY PART OF THE SYSTEM IS NOT FUNCTIONING PROPERLY,
CEASE ALL BATHING ACTIVITIES UNTIL THE PROBLEM IS
CORRECTED BY MAINTENANCE. THE SYSTEM MUST BE
MAINTAINED ON A SCHEDULED BASIS TO ENSURE IT IS
FUNCTIONING PROPERLY. FAILURE TO HEED THESE
PRECAUTIONS COULD RESULT IN INJURY TO THE OPERATOR
OR RESIDENT.
CHECK THE FOLLOWING ITEMS EACH DAY BEFORE.
Cascade Tub
Perform the following safety checks for the Cascade Tub:
1. High temperature limit – Press the Fill Button and turn the Temperature
Control Knob all the way to the left to the highest setting. Test the fill and
shower water temperature to ensure that it reaches no more than 115
degrees Fahrenheit (lower if required by local regulations).
182. Seal Damage - Open the door and check to see that the seal is not torn,
cracked, or peeling away from the door.
3. Self - Draining Trap - If water is draining regularly from the self-draining
trap, the 1-1/2” check valve may need to be cleaned or replaced.
WARNING
IF DURING THE SAFETY CHECKS YOU FIND PARTS ARE MISSING,
ARE EXCESSIVELY WORN, DO NOT FUNCTION PROPERLY, OR
DO NOT MEET THE RECOMMENDED SAFE OPERATING LEVELS,
DO NOT OPERATE THE EQUIPMENT UNTIL THE MAINTENANCE
DEPARTMENT HAS TAKEN THE APPROPRIATE CORRECTIVE
ACTION.
Cascade Reservoir
1. Temperature Read-Out Accuracy - Close the reservoir release valve and
partially fill the reservoir with 95 to 105 degrees Fahrenheit water. Open
the reservoir release valve and test the temperature of the water with a
thermometer and by letting the water flow over your wrist. The water
temperature should be consistent with the thermometer reading and
should not feel too hot or too cold.
19Your Penner Distributor and his personnel are trained to provide in-service
instruction and maintenance on your Cascade Aqua-Aire Spa. If you have any
questions about the operation or maintenance of your Cascade Spa, please
contact Penner Patient Care Inc.
PENNER PATIENT CARE, INC.
Box 523 / 101 Grant St.
Aurora, NE 68818
1-866-PENNERS 1-866-736-6377 1-800-732-0717
E-mail Address: pennersales@hamilton.net
Web Site: http://pennerpatientcare.comYou can also read