2021 WRANGLER RUBICON 392 - PERFORMANCE FEATURES GUIDE
←
→
Page content transcription
If your browser does not render page correctly, please read the page content below

2 02 1 WRA N GLER RU BICON 392
            Whether it’s providing information about specific product features, taking a tour through your vehicle’s heritage, knowing what
            steps to take following an accident or scheduling your next appointment, we know you’ll find the app an important extension of
            your Jeep® brand vehicle.
                                                                                                                                                             PERFORM A N CE FEAT URES GUIDE
Simply download the app, select your make and model and enjoy the ride. To get this app, go directly to the App Store® or Google Play®
Store and enter the search keyword “JEEP” (U.S. residents only).

           U. S.                                                                                                          Canada

                                      DOWNLOAD A FREE ELECTRONIC COPY OF THE MOST UP-TO-DATE
                                        OWNER’S MANUAL, UCONNECT AND WARRANTY BOOKLETS

     mopar.com/om                                                                                                   owners.mopar.ca

©2020 FCA US LLC. All Rights Reserved. Tous droits réservés.
Jeep is a registered trademark of FCA US LLC. Jeep est une marque déposée de FCA US LLC.                                          First Edition
App Store is a registered trademark of Apple Inc. Google Play Store is a registered trademark of Google.                21_JL_RUB_SU_EN_USC

20_JL_OM_EN_US_t.book Page 1

  TABLE OF CONTENTS
     1       INTRODUCTION ............................................................................................................................. 3                1

    2        GETTING TO KNOW YOUR INSTRUMENT PANEL ..........................................................4                                                           2

    3        STARTING AND OPERATING ................................................................................................... 6                                3

    4        SERVICING AND MAINTENANCE ..........................................................................................18                                      4

    5        TECHNICAL SPECIFICATIONS ...............................................................................................37                                  5

    6        INDEX ................................................................................................................................................ 41   6
20_JL_OM_EN_US_t.book Page 2

   2

   INTRODUCTION                                                              TORQUE RESERVE................................................ 13      VEHICLE MAINTENANCE .....................................25
                                                                             DUAL MODE EXHAUST......................................... 13             Engine Oil ................................................... 25
   GETTING TO KNOW YOUR                                                      FOUR–WHEEL DRIVE OPERATION .................... 14                        Engine Air Cleaner .................................... 26
   INSTRUMENT PANEL                                                             Four-Position Transfer Case ....................... 14                 Fuses ............................................................ 28
                                                                             FUEL SAVER TECHNOLOGY 6.4L........................ 16
   INSTRUMENT CLUSTER ......................................... 4                                                                                   TECHNICAL SPECIFICATIONS
                                                                             TRAILER TOWING ................................................ 16
       Instrument Cluster Descriptions................... 5
                                                                                Trailer Towing Weights (Maximum                                     FUEL REQUIREMENTS — GASOLINE ENGINE ..37
   STARTING AND OPERATING                                                       Trailer Weight Ratings) ............................ 17                6.4L Engine.................................................. 37
                                                                                                                                                    FLUID CAPACITIES ...............................................37
   ENGINE BREAK-IN RECOMMENDATIONS............ 6                             SERVICING AND MAINTENANCE                                              ENGINE FLUIDS AND LUBRICANTS ...................38
   AUTOMATIC TRANSMISSION ............................... 6
                                                                             SCHEDULED SERVICING .................................... 18            CHASSIS FLUIDS AND LUBRICANTS .................40
      Ignition Park Interlock ................................... 7
                                                                                Maintenance Plan ....................................... 19
      Brake/Transmission Shift Interlock
                                                                             ENGINE COMPARTMENT ................................... 24
      System ........................................................... 8
      Eight–Speed Automatic Transmission ......... 8                            6.4L Engine .................................................. 24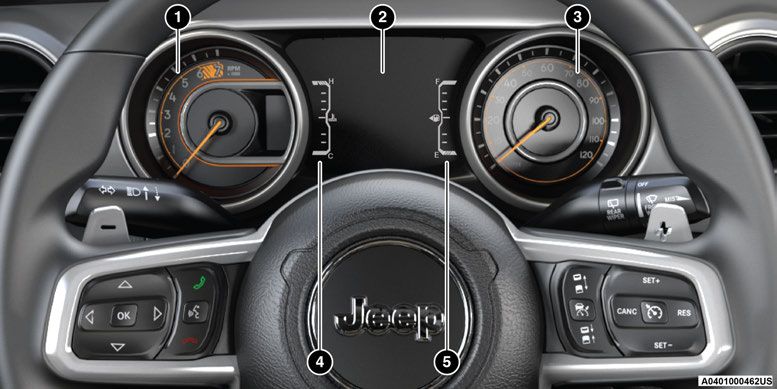
20_JL_OM_EN_US_t.book Page 3

                                                                                                                                                                 3

                                                            INTRODUCTION
                                                                                                                                                                     1
   Dear Customer, congratulations on selecting your new Jeep®. Be assured that it represents precision workmanship, distinctive styling, and high quality.
   This is a specialized utility vehicle. It can go places and perform tasks that are not intended for conventional passenger vehicles. It handles and
   maneuvers differently from many passenger vehicles both on-road and off-road, so take time to become familiar with your vehicle. It is not intended for
   off-road driving or use in other severe conditions suited for a four-wheel drive vehicle. Before you start to drive this vehicle, read this Owner’s Manual.
   Be sure you are familiar with all vehicle controls, particularly those used for braking, steering, transmission, and transfer case shifting. Learn how your
   vehicle handles on different road surfaces. Your driving skills will improve with experience. When driving off-road, or working the vehicle, don’t overload
   the vehicle or expect the vehicle to overcome the natural laws of physics. Always observe federal, state, provincial and local laws wherever you drive.
   As with other vehicles of this type, failure to operate this vehicle correctly may result in loss of control or a collision.
   This Owner's Manual has been prepared with the assistance of service and engineering specialists to acquaint you with the operation and maintenance
   of your vehicle. It is supplemented by customer-oriented documents. Within this information, you will find a description of the services that FCA US LLC
   offers to its customers as well as the details of the terms and conditions for maintaining its validity. Please take the time to read all of these publications
   carefully before driving your vehicle for the first time. Following the instructions, recommendations, tips, and important warnings in this manual will help
   ensure safe and enjoyable operation of your vehicle.
   When it comes to service, remember that authorized dealers know your Jeep® best, have factory-trained technicians and genuine Mopar® parts, and
   care about your satisfaction.
20_JL_OM_EN_US_t.book Page 4
4
GETTING TO KNOW YOUR INSTRUMENT PANEL
INSTRUMENT CLUSTER
Instrument Cluster20_JL_OM_EN_US_t.book Page 5
GETTING TO KNOW YOUR INSTRUMENT PANEL 5
I NSTRUMENT CLUSTER D ESCRIPTIONS The pointer will likely indicate a higher 5. Fuel Gauge
temperature when driving in hot weather, The pointer shows the level of fuel in the
1. Tachometer up mountain grades, or when towing a fuel tank when the ignition switch is in
Indicates the engine speed in revolutions trailer. It should not be allowed to exceed the ON/RUN position.
per minute (RPM x 1000). the upper limits of the normal operating
range. The fuel pump symbol points 2
CAUTION! to the side of the vehicle where
WARNING! the fuel filler door is located.
Do not operate the engine with the
tachometer pointer in the red area. Engine A hot engine cooling system is dangerous.
damage will occur. You or others could be badly burned by steam
or boiling coolant. You may want to call an
2. Instrument Cluster Display authorized dealer for service if your vehicle
overheats.
The instrument cluster display features a
driver interactive display.
3. Speedometer CAUTION!
Indicates vehicle speed. Driving with a hot engine cooling system
could damage your vehicle. If the
4. Temperature Gauge temperature gauge reads “H” pull over and
The temperature gauge shows engine stop the vehicle. Idle the vehicle with the air
coolant temperature. Any reading within conditioner turned off until the pointer drops
the normal range indicates that the back into the normal range. If the pointer
engine cooling system is operating satis- remains on the “H”, turn the engine off
factorily. immediately and call an authorized dealer for
service.20_JL_OM_EN_US_t.book Page 6
6
STARTING AND OPERATING
ENGINE BREAK-IN RECOMMENDATIONS 100 to 300 miles (161 to 483 km): NOTE:
Check engine oil with every refueling and add if
Press the accelerator pedal slowly and not
Engine break in occurs mainly during the first necessary. Oil and fuel consumption may be
more than halfway to avoid rapid accelera-
500 miles (805 km) and continues through the higher through the first oil change interval.
tion in lower gears (FIRST to THIRD gears).
first oil change interval. Running the engine with an oil level below the
It is recommended for the operator to observe Avoid aggressive braking. add mark can cause severe engine damage.
the following driving behaviors during the new Drive with the engine speed below
vehicle break-in period:
5,000 RPM. AUTOMATIC TRANSMISSION
0 to 100 miles (0 to 161 km): You must press and hold the brake pedal while
Maintain vehicle speed below 70 mph
shifting out of PARK.
Do not allow the engine to operate at idle for (112 km/h) and observe local speed limits.
an extended period of time.
300 to 500 miles (483 to 805 km): WARNING!
Press the accelerator pedal slowly and not Exercise the full engine RPM range, shifting Never use the PARK position as a substi-
more than halfway to avoid rapid manually (paddles or gear shift) at higher tute for the parking brake. Always apply the
acceleration. RPM when possible. parking brake fully when exiting the vehicle
Avoid aggressive braking. to guard against vehicle movement and
Do not perform sustained operation with the
possible injury or damage.
Drive with the engine speed below accelerator pedal at wide open throttle.
3,500 RPM. Your vehicle could move and injure you and
Maintain vehicle speed below 85 mph others if it is not in PARK. Check by trying to
Maintain vehicle speed below 55 mph (136 km/h) and observe local speed limits. move the transmission gear selector out of
(88 km/h) and observe local speed limits. For the first 1,500 miles (2,414 km): PARK with the brake pedal released. Make
sure the transmission is in PARK before
Avoid high engine and driveline loading. exiting the vehicle.
(Continued)20_JL_OM_EN_US_t.book Page 7
STARTING AND OPERATING 7
WARNING! (Continued) WARNING! (Continued) WARNING! (Continued)
The transmission may not engage PARK if Unintended movement of a vehicle could Do not leave the key fob in or near the
the vehicle is moving. Always bring the injure those in or near the vehicle. As with vehicle (or in a location accessible to chil-
vehicle to a complete stop before shifting to all vehicles, you should never exit a vehicle dren), and do not leave the ignition in the
PARK, and verify that the transmission gear while the engine is running. Before exiting a ACC or ON/RUN mode. A child could
position indicator solidly indicates PARK (P) vehicle, always come to a complete stop, operate power windows, other controls, or
without blinking. Ensure that the vehicle is then apply the parking brake, shift the move the vehicle. 3
completely stopped, and the PARK position transmission into PARK, and turn the igni-
is properly indicated, before exiting the tion OFF. When the ignition is in the OFF
vehicle. mode, the transmission is locked in PARK, CAUTION!
It is dangerous to shift out of PARK or securing the vehicle against unwanted Shift into or out of PARK or REVERSE only
NEUTRAL if the engine speed is higher than movement. after the vehicle has come to a complete
idle speed. If your foot is not firmly pressing When exiting the vehicle, always make sure stop.
the brake pedal, the vehicle could accel- the ignition is in the OFF mode, remove the Do not shift between PARK, REVERSE,
erate quickly forward or in reverse. You key fob from the vehicle, and lock the NEUTRAL, or DRIVE when the engine is
could lose control of the vehicle and hit vehicle. above idle speed.
someone or something. Only shift into gear Never leave children alone in a vehicle, or
when the engine is idling normally and your Before shifting into any gear, make sure
with access to an unlocked vehicle. your foot is firmly pressing the brake pedal.
foot is firmly pressing the brake pedal. Allowing children to be in a vehicle unat-
(Continued) tended is dangerous for a number of
reasons. A child or others could be seriously I GNITION PARK INTERLOCK
or fatally injured. Children should be This vehicle is equipped with an Ignition Park
warned not to touch the parking brake, Interlock which requires the transmission to be
brake pedal or the transmission gear in PARK before the ignition can be turned to the
selector. OFF mode. This helps the driver avoid
(Continued) inadvertently leaving the vehicle without placing
the transmission in PARK. This system also20_JL_OM_EN_US_t.book Page 8
8 STARTING AND OPERATING
locks the transmission in PARK whenever the move the selector rearward or forward. To shift Only shift from DRIVE to PARK or REVERSE
ignition is in the OFF mode. the transmission out of PARK, the engine must when the accelerator pedal is released and the
be running and the brake pedal must be vehicle is stopped. Be sure to keep your foot on
NOTE:
pressed. You must also press the brake pedal to the brake pedal when shifting between these
The transmission is NOT locked in PARK when
shift from NEUTRAL into DRIVE or REVERSE gears.
the ignition is in the ACC mode (even though the
when the vehicle is stopped or moving at low The transmission gear selector provides PARK,
engine will be off). Ensure that the transmission
speeds. Select the DRIVE range for normal REVERSE, NEUTRAL, and MANUAL (M)
is in PARK, and the ignition is OFF (not in ACC
driving. (AutoStick) shift positions. Manual shifts can be
mode) before exiting the vehicle.
NOTE: made using the AutoStick shift control. Toggling
BRAKE/TRANSMISSION SHIFT In the event of a mismatch between the gear the gear selector forward (-) or rearward (+)
I NTERLOCK SYSTEM selector position and the actual transmission while in the MANUAL (AutoStick) position
gear (for example, driver selects PARK while (beside the DRIVE position), or tapping the shift
This vehicle is equipped with a Brake paddles (+/-), (if equipped) will manually select
driving), the position indicator will blink continu-
Transmission Shift Interlock system (BTSI) that the transmission gear, and will display the
ously until the selector is returned to the proper
holds the transmission gear selector in PARK current gear in the instrument cluster
position, or the requested shift can be
unless the brakes are applied. To shift the Ú page 12.
completed.
transmission out of PARK, the engine must be
running and the brake pedal must be pressed. The electronically controlled transmission
The brake pedal must also be pressed to shift adapts its shift schedule based on driver inputs,
from NEUTRAL into DRIVE or REVERSE when the along with environmental and road conditions.
vehicle is stopped or moving at low speeds. The transmission electronics are
EIGHT–S PEED AUTOMATIC self-calibrating; therefore, the first few shifts on
a new vehicle may be somewhat abrupt. This is
TRANSMISSION a normal condition, and precision shifts will
The transmission gear range (PRNDM) is develop within a few hundred miles
displayed both beside the gear selector and in (kilometers).
the instrument cluster. To select a gear range, Transmission Gear Selector
press the lock button on the gear selector and20_JL_OM_EN_US_t.book Page 9
STARTING AND OPERATING 9
NOTE: When parking on a hill, apply the parking brake
If the gear selector cannot be moved to the before shifting the transmission to PARK. As an WARNING! (Continued)
PARK, REVERSE, or NEUTRAL position (when added precaution, turn the front wheels toward Your vehicle could move and injure you and
pushed forward), it is probably in the AutoStick the curb on a downhill grade and away from the others if it is not in PARK. Check by trying to
(+/-) position (beside the DRIVE position). In curb on an uphill grade. move the transmission gear selector out of
AutoStick mode, the transmission gear (1, 2, 3, When exiting the vehicle, always: PARK with the brake pedal released. Make
etc.) is displayed in the instrument cluster. sure the transmission is in PARK before
Move the gear selector to the right (into the Apply the parking brake. exiting the vehicle. 3
DRIVE [D] position) for access to PARK, Shift the transmission into PARK. The transmission may not engage PARK if
REVERSE, and NEUTRAL. the vehicle is moving. Always bring the
Turn the ignition OFF.
Gear Ranges vehicle to a complete stop before shifting to
Remove the key fob from the vehicle. PARK, and verify that the transmission gear
Do not press the accelerator pedal when position indicator solidly indicates PARK (P)
shifting out of PARK or NEUTRAL. NOTE: without blinking. Ensure that the vehicle is
On four-wheel drive vehicles, be sure that the completely stopped, and the PARK position
NOTE:
transfer case is in a drive position. is properly indicated, before exiting the
After selecting any gear range, wait a moment
to allow the selected gear to engage before vehicle.
accelerating. This is especially important when
WARNING! It is dangerous to shift out of PARK or
the engine is cold. Never use the PARK position as a substi- NEUTRAL if the engine speed is higher than
tute for the parking brake. Always apply the idle speed. If your foot is not firmly pressing
PARK (P) parking brake fully when exiting the vehicle the brake pedal, the vehicle could accel-
This range supplements the parking brake by to guard against vehicle movement and erate quickly forward or in reverse. You
locking the transmission. The engine can be possible injury or damage. could lose control of the vehicle and hit
started in this range. Never attempt to use (Continued) someone or something. Only shift into gear
PARK while the vehicle is in motion. Apply the when the engine is idling normally and your
parking brake when exiting the vehicle in this foot is firmly pressing the brake pedal.
range. (Continued)20_JL_OM_EN_US_t.book Page 10
10 STARTING AND OPERATING
the gear selector all the way forward until it
WARNING! (Continued) WARNING! (Continued) stops and is fully seated.
Unintended movement of a vehicle could Do not leave the key fob in or near the
Look at the transmission gear position
injure those in or near the vehicle. As with vehicle (or in a location accessible to chil-
display and verify that it indicates the PARK
all vehicles, you should never exit a vehicle dren), and do not leave the ignition in the
position (P), and is not blinking.
while the engine is running. Before exiting a ACC or ON/RUN mode. A child could
vehicle, always come to a complete stop, operate power windows, other controls, or With brake pedal released, verify that the
then apply the parking brake, shift the move the vehicle. gear selector will not move out of PARK.
transmission into PARK, and turn the igni-
tion OFF. When the ignition is in the OFF REVERSE (R)
mode, the transmission is locked in PARK, CAUTION! This range is for moving the vehicle backward.
securing the vehicle against unwanted Before moving the transmission gear Shift into REVERSE only after the vehicle has
movement. selector out of PARK, you must start the come to a complete stop.
When exiting the vehicle, always make sure engine, and also press the brake pedal. NEUTRAL (N)
the ignition is in the OFF mode, remove the Otherwise, damage to the gear selector
could result. Use this range when the vehicle is standing for
key fob from the vehicle, and lock the
prolonged periods with the engine running.
vehicle. DO NOT race the engine when shifting from Apply the parking brake and shift the
Never leave children alone in a vehicle, or PARK or NEUTRAL into another gear range, transmission into PARK if you must exit the
with access to an unlocked vehicle. as this can damage the drivetrain. vehicle.
Allowing children to be in a vehicle unat-
tended is dangerous for a number of The following indicators should be used to WARNING!
reasons. A child or others could be seriously ensure that you have properly engaged the
or fatally injured. Children should be Do not coast in NEUTRAL and never turn off
transmission into the PARK position:
warned not to touch the parking brake, the ignition to coast down a hill. These are
When shifting into PARK, push the lock unsafe practices that limit your response to
brake pedal or the transmission gear
button on the gear selector and firmly move changing traffic or road conditions. You might
selector.
(Continued)
lose control of the vehicle and have a
collision.20_JL_OM_EN_US_t.book Page 11
STARTING AND OPERATING 11
performance and extend transmission life by be severely degraded and the engine may stall.
CAUTION! reducing excessive shifting and heat build-up. In some situations, the transmission may not
Towing the vehicle, coasting, or driving for During extremely cold temperatures (-22°F re-engage if the engine is turned off and
any other reason with the transmission in [-30°C] or below), transmission operation may restarted. The Malfunction Indicator Light (MIL)
NEUTRAL can cause severe transmission may be illuminated. A message in the
be modified depending on engine and
damage. instrument cluster will inform the driver of the
transmission temperature as well as vehicle
Refer to “Recreational Towing” in “Starting speed. Normal operation will resume once the more serious conditions, and indicate what
And Operating” or “Towing A Disabled transmission temperature has risen to a actions may be necessary. 3
Vehicle” in “In Case Of Emergency” in the suitable level. In the event of a momentary problem, the
Owner’s Manual for further information. transmission can be reset to regain all forward
MANUAL (M)
gears by performing the following steps:
DRIVE (D) The MANUAL (M, +/-) position (beside the DRIVE
position) enables full manual control of NOTE:
This range should be used for most city and transmission shifting also known as AutoStick
highway driving. It provides the smoothest In cases where the instrument cluster
mode. Toggling the gear selector forward (-) or message indicates the transmission may not
upshifts and downshifts, and the best fuel rearward (+) while in the MANUAL (AutoStick)
economy. The transmission automatically re-engage after engine shutdown, perform
position will manually select the transmission this procedure only in a desired location
upshifts through all forward gears. The DRIVE gear, and will display the current gear in the (preferably, at an authorized dealer).
position should be used for all normal operating instrument cluster Ú page 12.
conditions. Even if the transmission can be reset, we
Transmission Limp Home Mode recommend that you visit an authorized
When frequent transmission shifting occurs
(such as when operating the vehicle under Transmission function is monitored dealer at your earliest possible convenience.
heavy loading conditions, in hilly terrain, electronically for abnormal conditions. If a Authorized dealers have diagnostic
traveling into strong head winds, or while towing condition is detected that could result in equipment to assess the condition of your
a heavy trailer), use the AutoStick shift control transmission damage, Transmission Limp transmission.
to select a lower gear Ú page 12. Under these Home Mode is activated. In this mode, the
conditions, using a lower gear will improve transmission may operate only in certain gears,
or may not shift at all. Vehicle performance may20_JL_OM_EN_US_t.book Page 12
12 STARTING AND OPERATING
If the transmission cannot be reset, autho- conditions, mountain driving, trailer towing, and will retain the current gear. The current
rized dealer service is required. many other situations. transmission gear will be displayed in the
instrument cluster.
1. Stop the vehicle.
AutoStick mode has the following operational
2. Shift the transmission into PARK, if benefits:
possible. If not, shift the transmission to
NEUTRAL. The transmission will automatically down-
shift as the vehicle slows (to prevent engine
3. Push and hold the ignition switch until the lugging) and will display the current gear.
engine turns off.
The transmission will automatically down-
4. Wait approximately 30 seconds. shift to FIRST gear when coming to a stop.
After a stop, the driver should manually
5. Restart the engine. Steering Wheel Mounted Paddle Shifters upshift (+) the transmission as the vehicle is
6. Shift into the desired gear range. If the accelerated.
1 — (-) Shift Paddle
problem is no longer detected, the 2 — (+) Shift Paddle You can start out, from a stop, in FIRST or
transmission will return to normal SECOND gear (or THIRD gear, in 4WD Low
operation. range). Tapping (+) (at a stop) will allow
Operation
starting in SECOND gear. Starting out in
AutoStick In AutoStick mode, you can use the gear SECOND or THIRD gear can be helpful in
AutoStick is a driver-interactive transmission selector (in the MANUAL position), or the shift snowy or icy conditions.
feature providing manual shift control, giving paddles, to manually shift the transmission. To
you more control of the vehicle. AutoStick activate AutoStick mode, move the gear If a requested downshift would cause the
allows you to maximize engine braking, selector into the MANUAL (M) position (beside engine to over-speed, that shift will not occur.
eliminate undesirable upshifts and downshifts, the DRIVE position), or tap one of the shift The system will ignore attempts to upshift at
and improve overall vehicle performance. This paddles on the steering wheel. Tapping the (-) too low of a vehicle speed.
system can also provide you with more control shift paddle to enter AutoStick mode will
during passing, city driving, cold slippery downshift the transmission to the next lower
gear, while tapping (+) to enter AutoStick mode20_JL_OM_EN_US_t.book Page 13
STARTING AND OPERATING 13
Holding the (-) paddle pressed (if equipped),
or holding the gear selector in the (-) position,
TORQUE RESERVE illuminates when “Performance Exhaust ON”
mode is active. In this mode, the exhaust valves
will downshift the transmission to the lowest Torque Reserve is automatically enabled while are commanded fully open to deliver a deep,
gear possible at the current speed. staging a Brake Torque Launch, to reduce the sporty sound. A message appears momentarily
time required for the intake system to fill with in the instrument cluster whenever the exhaust
Transmission shifting will be more noticeable air. Torque Reserve provides greater engine mode changes. When the “Performance
when AutoStick is enabled. airflow than is otherwise required, stops fuel Exhaust OFF” setting is active, the exhaust
The system may revert to automatic shift flow to multiple cylinders and retards spark as valves are closed except at high engine speeds 3
mode if a fault or overheat condition is necessary to hold the torque from the extra and loads, when they are commanded open
detected. airflow “in reserve”. As soon as the driver without notification.
launches the car, fuel flow is restored and spark
NOTE: is advanced to instantaneously deliver the
When Selec-Speed Control is enabled, AutoS- reserve torque. For a given launch engine
tick is not active. speed, additional torque is delivered more
To disengage AutoStick, return the gear selector quickly than is possible without Torque Reserve.
to the DRIVE position, or press and hold the (+) NOTE:
shift paddle (and the gear selector is already in Due to the way the engine is controlled during
DRIVE) until “D” is once again indicated in the Torque Reserve, a distinct exhaust note is
instrument cluster. You can shift in or out of produced and engine vibration increases.
AutoStick at any time without taking your foot
off the accelerator pedal. DUAL MODE EXHAUST Dual Mode Exhaust Button
WARNING! This vehicle is equipped with a dual-mode The exhaust system has a default setting for
exhaust, designed to provide both quiet cruising each vehicle drive mode. In 4H AUTO, 4H PT, 4L,
Do not downshift for additional engine and sporty sound. The system has two modes, and ROCK mode, Performance Exhaust is OFF
braking on a slippery surface. The drive Performance Exhaust ON and Performance by default; however, if Performance Exhaust ON
wheels could lose their grip and the vehicle Exhaust OFF. A button on the dashboard can be is activated by pressing the exhaust button, this
could skid, causing a collision or personal used to toggle between settings, and the light setting will be saved after changing drive modes
injury. and after restarting the engine.20_JL_OM_EN_US_t.book Page 14
14 STARTING AND OPERATING
FOUR–WHEEL DRIVE OPERATION 4H PT (4WD High PT) — Four-Wheel Drive Part
Time High Range
N (Neutral)
WARNING! WARNING!
N (Neutral)
Failure to engage a transfer case position You or others could be injured or killed if you
4L (4WD Low) — Four-Wheel Drive Low Range leave the vehicle unattended with the transfer
completely can cause transfer case damage
or loss of power and vehicle control. You For additional information on the appropriate case in the (N) Neutral position without first
could have a collision. Do not drive the use of each transfer case mode position, see fully engaging the parking brake. The transfer
vehicle unless the transfer case is fully the information below: case (N) Neutral position disengages both the
engaged. front and rear driveshafts from the
4WD High AUTO powertrain, and will allow the vehicle to roll,
Four-Wheel Drive Auto High Range — This range even if the automatic transmission is in PARK.
FOUR-P OSITION T RANSFER CASE is for normal street and highway driving on dry, The parking brake should always be applied
hard surfaced roads. This range sends power to when the driver is not in the vehicle.
the front wheels. The four-wheel drive system
will be automatically engaged when the vehicle Neutral — This range disengages both the front
senses a loss of traction to optimize traction for and rear driveshafts from the powertrain. To be
varying road conditions. used for flat towing behind another vehicle.
4WD High PT Refer to “Recreational Towing” in “Starting And
Operating” in the Owner’s Manual for further
Four-Wheel Drive Part Time High Range — This
information.
range maximizes torque to the front driveshaft,
forcing the front and rear wheels to rotate at the 4WD Low
Four-Wheel Drive Gear Selector same speed. This range provides additional Four-Wheel Drive Low Range — This range
traction for loose, slippery road surfaces only. provides low speed four-wheel drive. It
The transfer case provides four mode positions:
maximizes torque to the front driveshaft, forcing
4H AUTO (4WD High AUTO) — Four-Wheel the front and rear wheels to rotate at the same
Drive Auto High Range speed. This range provides additional traction
and maximum pulling power for loose, slippery20_JL_OM_EN_US_t.book Page 15
STARTING AND OPERATING 15
road surfaces only. Do not exceed 25 mph The instrument cluster alerts the driver that the disengage faster if you momentarily release the
(40 km/h). vehicle is in four-wheel drive, and the front and accelerator pedal after completing the shift. Do
This transfer case is designed to be driven in rear driveshafts are locked together. The light not accelerate while shifting the transfer case.
the four-wheel drive position (4WD AUTO) for will illuminate when the transfer case is shifted Apply a constant force when shifting the
normal street and highway conditions on dry into the 4WD High position. transfer case lever.
hard surfaced roads. When operating your vehicle in 4WD Low, the NOTE:
For variable driving conditions, the 4WD AUTO engine speed will be approximately four times
that of the 4WD High position at a given road Do not attempt to make a shift while only the 3
mode can be used. In this mode, the front axle front or rear wheels are spinning. The front
is engaged, but the majority of the vehicle's speed. Take care not to overspeed the engine.
and rear driveshaft speeds must be equal for
power is sent to the rear wheels. Four-wheel Proper operation of four-wheel drive vehicles the shift to take place. Shifting while only the
drive is automatically engaged when the vehicle depends on tires of equal size, type, and front or rear wheels are spinning can cause
senses a loss of traction and more torque is circumference on each wheel. Any difference damage to the transfer case.
transferred to the front axle. will adversely affect shifting and cause damage
to the transfer case. Delayed shifts out of four-wheel drive may be
In the event that additional traction is required,
experienced due to uneven tire wear, low or
the transfer case 4WD High and 4WD Low Because four-wheel drive provides improved uneven tire pressures, excessive vehicle
positions can be used to lock the front and rear traction, there is a tendency to exceed safe loading, or cold temperatures.
driveshafts together, forcing the front and rear turning and stopping speeds. Do not go faster
wheels to rotate at the same speed. The 4WD than road conditions permit. Shifting effort will increase with speed, this is
High and 4WD Low positions are intended for normal.
Shifting Procedures
loose, slippery road surfaces only and not
During cold weather, you may experience
intended for normal driving. Driving in the 4WD 4WD High AUTO To 4WD High PT Or 4WD High increased effort in shifting until the transfer
High and 4WD Low positions on hard-surfaced PT To 4WD High AUTO case fluid warms up. This is normal.
roads will cause increased tire wear and
Shifting between 4WD High AUTO to 4WD High
damage to the driveline components. Refer to
PT can be made with the vehicle stopped or in
“Shifting Procedures” in this section for further
motion. The preferred shifting speed would be 0
information on shifting into 4WD High or 4WD
to 45 mph (72 km/h). With the vehicle in
Low.
motion, the transfer case will engage/20_JL_OM_EN_US_t.book Page 16
16 STARTING AND OPERATING
4WD High PT/4WD High AUTO To 4WD Low Or
4WD Low To 4WD High PT/4WD High AUTO
WARNING! TRAILER TOWING
Failure to engage a transfer case position In this section you will find safety tips and
With the vehicle rolling at 2 to 3 mph (3 to
completely can cause transfer case damage information on limits to the type of towing you
5 km/h), shift the transmission into NEUTRAL
or loss of power and vehicle control. You can reasonably do with your vehicle. Before
(N). While the vehicle is coasting at 2 to 3 mph
could have a collision. Do not drive the towing a trailer, carefully review this information
(3 to 5 km/h), shift the transfer case lever firmly
vehicle unless the transfer case is fully to tow your load as efficiently and safely as
to the desired position. Do not pause with the
engaged. possible.
transfer case in N (Neutral). Once the shift is
completed, place the transmission into DRIVE. To maintain the New Vehicle Limited Warranty
NOTE: FUEL SAVER TECHNOLOGY 6.4L coverage, follow the requirements and
recommendations in this manual concerning
Shifting into or out of 4WD Low is possible with This feature offers improved fuel economy by vehicles used for trailer towing.
the vehicle completely stopped; however, diffi- shutting off four of the engine's eight cylinders
culty may occur due to the mating teeth not during light load and operation. The system is
being properly aligned. Several attempts may automatic with no driver inputs. It is not
be required for clutch teeth alignment and shift available in 4WD Low. There is also a four
completion to occur. The preferred method is cylinder indicator in the instrument cluster to
with the vehicle rolling at 2 to 3 mph indicate when this feature is active.
(3 to 5 km/h). Avoid attempting to engage or
disengage 4WD Low with the vehicle moving NOTE:
faster than 2 to 3 mph (3 to 5 km/h). This system may take some time to return to full
functionality after a battery disconnect.20_JL_OM_EN_US_t.book Page 17
STARTING AND OPERATING 17
TRAILER TOWING WEIGHTS (M AXIMUM T RAILER W EIGHT RATINGS)
Max. GTW
Engine/ GCWR (Gross Combined Max. Trailer Tongue Wt.
Model Frontal Area (Gross
Transmission Wt. Rating) (See Note)
Trailer Wt.)
3,500 lb (1,587
6.4L Four–Door 8,117 lb (3,682 kg) 30 ft2 (2.79 m2) 350 lb (158 kg)
kg) 3
Refer to local laws for maximum trailer towing speeds.20_JL_OM_EN_US_t.book Page 18
18
SERVICING AND MAINTENANCE
SCHEDULED SERVICING NOTE: Instrument Panel” in the Owner’s Manual for
further information.
The Scheduled Maintenance services listed in The oil change indicator message will not
monitor the time since the last oil change. At Each Stop For Fuel
this manual must be done at the times or
mileages specified to protect the vehicle Change your vehicle's oil if it has been six Check the engine oil level.
warranty and ensure the best vehicle months since your last oil change, even if the
oil change indicator message is NOT illumi- Check the windshield washer solvent and
performance and reliability. More frequent
nated. add if required.
maintenance may be needed for vehicles in
severe operating conditions, such as dusty Change your engine oil more often if you drive Once A Month
areas and very short trip driving. Inspection and your vehicle off-road for an extended period Check tire pressure and look for unusual
service should also be done anytime a of time. wear or damage.
malfunction is suspected.
Under no circumstances should oil change Inspect the battery, and clean and tighten the
The oil change indicator system will remind you intervals exceed 6,000 miles (10,000 km) or terminals as required.
that it is time to take your vehicle in for 6 months, whichever comes first.
scheduled maintenance. Check the fluid levels of the coolant reservoir,
An authorized dealer will reset the oil change engine oil, brake master cylinder, and add as
The instrument cluster display will display an
indicator message after completing the needed.
“Oil Change Required” message and a single
scheduled oil change. If a scheduled oil change
chime will sound, indicating that an oil change Check all lights and other electrical items for
is performed by someone other than an
is necessary. correct operation.
authorized dealer, the message can be reset by
Based on engine operation conditions, the oil referring to the steps described under
change indicator message will illuminate. This instrument cluster display. Refer to “Instrument
means that service is required for your vehicle. Cluster Display” in “Getting To Know Your
Have your vehicle serviced as soon as possible,
within the next 500 miles (805 km).20_JL_OM_EN_US_t.book Page 19
SERVICING AND MAINTENANCE 19
At Each Oil Change
CAUTION!
Change the engine oil filter.
Failure to perform the required maintenance
Inspect the brake hoses and lines. items may result in damage to the vehicle.
Inspect the CV/Universal joints.
MAINTENANCE P LAN
102,000
108,000
114,000
120,000
126,000
132,000
138,000
144,000
150,000
4
12,000
18,000
24,000
30,000
36,000
42,000
48,000
54,000
60,000
66,000
72,000
78,000
84,000
90,000
96,000
6,000
Miles:
Or Months: 6 12 18 24 30 36 42 48 54 60 66 72 78 84 90 96 102 108 114 120 126 132 138 144 150
100,000
110,000
120,000
130,000
140,000
150,000
160,000
170,000
180,000
190,000
200,000
210,000
220,000
230,000
240,000
250,000
10,000
20,000
30,000
40,000
50,000
60,000
70,000
80,000
90,000
Or Kilometers:
Change the engine oil
X X X X X X X X X X X X X X X X X X X X X X X X X
and engine oil filter.
Rotate the tires, rotate
at the first sign of
irregular wear, even if
X X X X X X X X X X X X X X X X X X X X X X X X X
it occurs before
scheduled
maintenance.20_JL_OM_EN_US_t.book Page 20
20 SERVICING AND MAINTENANCE
102,000
108,000
114,000
120,000
126,000
132,000
138,000
144,000
150,000
12,000
18,000
24,000
30,000
36,000
42,000
48,000
54,000
60,000
66,000
72,000
78,000
84,000
90,000
96,000
6,000
Miles:
Or Months: 6 12 18 24 30 36 42 48 54 60 66 72 78 84 90 96 102 108 114 120 126 132 138 144 150
100,000
110,000
120,000
130,000
140,000
150,000
160,000
170,000
180,000
190,000
200,000
210,000
220,000
230,000
240,000
250,000
10,000
20,000
30,000
40,000
50,000
60,000
70,000
80,000
90,000
Or Kilometers:
If using your vehicle
for any of the
following: dusty or X
off-road conditions. X X X X X X X X X X X
Inspect the engine air
cleaner filter; replace
if necessary.
Inspect the brake
linings; replace if X X X X X X X X X X X X
necessary.
Inspect the CV/
X X X X X X X X X X X X X X X X X X X X X X X X X
Universal joints.
Inspect the exhaust
X X X X X X X X X X X X
system.
Adjust the parking
brake on vehicles
X X X X X
equipped with four
wheel disc brakes.20_JL_OM_EN_US_t.book Page 21
SERVICING AND MAINTENANCE 21
102,000
108,000
114,000
120,000
126,000
132,000
138,000
144,000
150,000
12,000
18,000
24,000
30,000
36,000
42,000
48,000
54,000
60,000
66,000
72,000
78,000
84,000
90,000
96,000
6,000
Miles:
Or Months: 6 12 18 24 30 36 42 48 54 60 66 72 78 84 90 96 102 108 114 120 126 132 138 144 150
100,000
110,000
120,000
130,000
140,000
150,000
160,000
170,000
180,000
190,000
200,000
210,000
220,000
230,000
240,000
250,000
10,000
20,000
30,000
40,000
50,000
60,000
70,000
80,000
90,000
Or Kilometers:
Drain the transfer 4
X X X X X
case and refill.
Inspect the accessory
drive belts replace if X X
necessary.
Inspect the front and
rear axle fluid. Change
if using your vehicle
for any of the
following: police, taxi, X X X X X
X
fleet, sustained high
speed driving, off-road
or frequent trailer
towing.20_JL_OM_EN_US_t.book Page 22
22 SERVICING AND MAINTENANCE
102,000
108,000
114,000
120,000
126,000
132,000
138,000
144,000
150,000
12,000
18,000
24,000
30,000
36,000
42,000
48,000
54,000
60,000
66,000
72,000
78,000
84,000
90,000
96,000
6,000
Miles:
Or Months: 6 12 18 24 30 36 42 48 54 60 66 72 78 84 90 96 102 108 114 120 126 132 138 144 150
100,000
110,000
120,000
130,000
140,000
150,000
160,000
170,000
180,000
190,000
200,000
210,000
220,000
230,000
240,000
250,000
10,000
20,000
30,000
40,000
50,000
60,000
70,000
80,000
90,000
Or Kilometers:
Inspect front
suspension, tie rod
ends, and boot seals,
for cracks or leaks and
X X X X X X X X X X X X
all parts for damage,
wear, improper
looseness or end play;
replace if necessary.
Replace the engine air
X X X X X
cleaner filter.
Replace the air
X X X X X X
conditioning filter.
Inspect and replace
the PCV Valve if X
necessary.
Replace the spark
X
plugs – 6.4L Engine. 120_JL_OM_EN_US_t.book Page 23
SERVICING AND MAINTENANCE 23
102,000
108,000
114,000
120,000
126,000
132,000
138,000
144,000
150,000
12,000
18,000
24,000
30,000
36,000
42,000
48,000
54,000
60,000
66,000
72,000
78,000
84,000
90,000
96,000
6,000
Miles:
Or Months: 6 12 18 24 30 36 42 48 54 60 66 72 78 84 90 96 102 108 114 120 126 132 138 144 150
100,000
110,000
120,000
130,000
140,000
150,000
160,000
170,000
180,000
190,000
200,000
210,000
220,000
230,000
240,000
250,000
10,000
20,000
30,000
40,000
50,000
60,000
70,000
80,000
90,000
Or Kilometers:
Flush and replace the 4
engine coolant at
120 months if not
X X
done at 150,
000 miles (240,
000 km).
1. The spark plug change interval is mileage based only, monthly intervals do not apply.
WARNING! WARNING! (Continued)
You can be badly injured working on or Failure to properly inspect and maintain
around a motor vehicle. Do only service your vehicle could result in a component
work for which you have the knowledge and malfunction and effect vehicle handling
the right equipment. If you have any doubt and performance. This could cause an acci-
about your ability to perform a service job, dent.
take your vehicle to a competent mechanic.
(Continued)20_JL_OM_EN_US_t.book Page 24 24 SERVICING AND MAINTENANCE ENGINE COMPARTMENT 6.4L E NGINE 1 — Battery 6 — Power Steering Fluid Reservoir 2 — Engine Coolant Reservoir 7 — Engine Oil Fill 3 — Brake Fluid Reservoir Cap 8 — Engine Oil Dipstick 4 — Washer Fluid Reservoir Cap 9 — Engine Air Cleaner Filter 5 — Power Distribution Center (Fuses)
20_JL_OM_EN_US_t.book Page 25

                                                                                                                    SERVICING AND MAINTENANCE          25

   VEHICLE MAINTENANCE                                ENGINE OIL                                                           CAUTION!
   An authorized dealer has the qualified service     Engine Oil Selection                                Do not use chemical flushes in your engine oil
   personnel, special tools, and equipment to         For best performance and maximum protection         as the chemicals can damage your engine.
   perform all service operations in an expert        under all types of operating conditions, the        Such damage is not covered by the New
   manner. Service Manuals are available which        manufacturer recommends engine oils that            Vehicle Limited Warranty.
   include detailed service information for your      meet the requirements of FCA Material
   vehicle. Refer to these Service Manuals before     Standard. For the proper engine oil selection       American Petroleum Institute (API) Engine
   attempting any procedure yourself.                 Ú page 38.                                          Oil Identification Symbol
   NOTE:                                              NOTE:                                                        his symbol means that the oil has     4
   Intentional tampering with emissions control       Hemi engines (6.4L) at times can tick right after            been certified by the American
   systems may void your warranty and could           startup and then quiet down after approxi-                   Petroleum Institute (API). FCA only
   result in civil penalties being assessed against   mately 30 seconds. This is normal and will not               recommends API Certified engine oils.
   you.                                               harm the engine. This characteristic can be
                                                                                                          This symbol certifies 0W-20, 5W-20, 0W-30,
                                                      caused by short drive cycles. For example, if the
                                                                                                          5W-30 and 10W-30 engine oils.
                    WARNING!                          vehicle is started then shut off after driving a
    You can be badly injured working on or            short distance. Upon restarting, you may experi-
                                                                                                                           CAUTION!
    around a motor vehicle. Only do service work      ence a ticking sound. Other causes could be if
                                                      the vehicle is unused for an extended period of     Do not use chemical flushes in your engine oil
    for which you have the knowledge and the
                                                      time, incorrect oil, extended oil changes or        as the chemicals can damage your engine.
    proper equipment. If you have any doubt
                                                      extended idling. If the engine continues to tick    Such damage is not covered by the New
    about your ability to perform a service job,
                                                      or if the Malfunction Indicator Light (MIL) comes   Vehicle Limited Warranty.
    take your vehicle to a competent mechanic.
                                                      on, see the nearest authorized dealer.
20_JL_OM_EN_US_t.book Page 26
26 SERVICING AND MAINTENANCE
Synthetic Engine Oils ENGINE AIR CLEANER First Water Separation Chamber Removal
You may use synthetic engine oils provided the For the proper maintenance intervals The vehicle is equipped with a hood duct system
recommended oil quality requirements are met, Ú page 19. for filtering out water, dirt and debris to keep
and the recommended maintenance intervals them out of the engine air cleaner filter. The first
for oil and filter changes are followed. WARNING! water separation chamber can be removed for
Synthetic engine oils which do not have both the cleaning if necessary.
The air induction system (air cleaner, hoses,
engine oil certification mark and the correct SAE etc.) can provide a measure of protection in Removal
viscosity grade number should not be used. the case of engine backfire. Do not remove 1. Loosen the six captured fasteners from the
Materials Added To Engine Oil the air induction system (air cleaner, hoses, first water separation chamber using a
etc.) unless such removal is necessary for suitable tool.
FCA strongly recommends against the addition
repair or maintenance. Make sure that no
of any additives (other than leak detection dyes)
one is near the engine compartment before
to the engine oil. Engine oil is an engineered
starting the vehicle with the air induction
product and its performance may be impaired
system (air cleaner, hoses, etc.) removed.
by supplemental additives.
Failure to do so can result in serious personal
Disposing Of Used Engine Oil And Oil injury.
Filters
Care should be taken in disposing of used Engine Air Cleaner Selection
engine oil and oil filters from your vehicle. Used The quality of replacement engine air cleaners
oil and oil filters, indiscriminately discarded, can varies considerably. Only high quality Mopar®
present a problem to the environment. Contact filters should be used. First Water Separation Chamber
an authorized dealer, service station or
governmental agency for advice on how and 1 — Captured Fasteners
where used oil and oil filters can be safely
discarded in your area.20_JL_OM_EN_US_t.book Page 27
SERVICING AND MAINTENANCE 27
NOTE: Installation NOTE:
The captured fasteners are made to stay with Both components should click in. The cone
NOTE:
the first water separation chamber and must shaped to the second chamber can aid in
Inspect and clean the housing if dirt or debris is
NOT be removed. locating parts.
present before replacing.
2. Pull on the hood duct at the top to 2. Hand start the six captured fasteners.
1. Locate the first water separation chamber
disengage the push pin clip along with the
to hood/second chamber then engage the 3. Tighten the captured fasteners, do not
rubber grommet and remove from vehicle.
push pin clip and grommet. over-tighten.
4
First Water Chamber Removal
First Water Separation Chamber
1 — Push Pin
2 — Grommet (On The Backside)20_JL_OM_EN_US_t.book Page 28
28 SERVICING AND MAINTENANCE
Engine Air Cleaner Inspection and 2. Lift the engine air cleaner cover to access FUSES
Replacement the engine air cleaner.
General Information
Follow the recommended maintenance 3. Remove the engine air cleaner from the
intervals as shown in the Maintenance housing assembly. WARNING!
Schedule in this section.
When replacing a blown fuse, always use
Engine Air Cleaner Installation
Engine Air Cleaner Removal an appropriate replacement fuse with the
NOTE: same amp rating as the original fuse. Never
1. Loosen the fasteners from the air cleaner
Inspect and clean the housing if dirt or debris is replace a fuse with another fuse of higher
cover using a suitable tool. amp rating. Never replace a blown fuse with
present before replacing the engine air cleaner.
metal wires or any other material. Failure to
1. Install the engine air cleaner into the use proper fuses may result in serious
housing assembly with the engine air personal injury, fire and/or property
cleaner inspection surface facing damage.
downward.
Before replacing a fuse, make sure that the
2. Tighten engine air cleaner cover fasteners ignition is off and that all the other services
using a suitable tool. are switched off and/or disengaged.
If the replaced fuse blows again, contact an
authorized dealer.
Engine Air Cleaner Cover If a general protection fuse for safety
1 — Engine Air Cleaner Cover
systems (air bag system, braking system),
power unit systems (engine system,
2 — Fasteners
gearbox system) or steering system blows,
contact an authorized dealer.20_JL_OM_EN_US_t.book Page 29
SERVICING AND MAINTENANCE 29
The fuses protect electrical systems against Power Distribution Center (PDC)
excessive current. The Power Distribution Center is located in the
When a device does not work, you must check engine compartment near the battery. This
the fuse element inside the blade fuse for a center contains cartridge fuses, mini fuses, and
break/melt. relays. The PDC top cover is labeled with each
Also, please be aware that when using power serviceable fuse/relay location, function, and
outlets for extended period of time with the size.
engine off, may result in vehicle battery
discharge.
Power Distribution Center 420_JL_OM_EN_US_t.book Page 30
30 SERVICING AND MAINTENANCE
Cavity Cartridge Fuse Micro Fuse Description
F01 – – Spare
F02 40 Amp Green – Starter
F03 – 5 Amp Tan Intelligent Battery Sensor (IBS)
F04 – 25 Amp Clear Fuel Pump MTR/FPCM
F05 – 5 Amp Tan Security Gateway
F06 – Spare
–
F07 – 15 Amp Blue Low Temp Radiator Cooling Pump (LTR) — If Equipped
F08 – 15 Amp Blue Trans Control Module TCM-8HP CYGNUS
F09 – – Spare
Key Ignition Node (KIN)/Radio Frequency Hub (RF HUB)/
F10 – 15 Amp Blue
Electric Steering Column Lock (ESCL)
F11 – 10 Amp Red UCI Port (USB & AUX)
F12 – 25 Amp Clear HIFI Amplifier
F13 – – Spare
F14 – – Spare
Instrument Panel Cluster (IPC)/Switch Bank-Heavy Duty
F15 – 15 Amp Blue
Electrical Pkg (SWITCH BANK-HD ELEC)
F16 – – Spare
F17 – – Spare
F18 – 10 Amp Red Air Conditioning Clutch (AC CLUTCH)20_JL_OM_EN_US_t.book Page 31
SERVICING AND MAINTENANCE 31
Cavity Cartridge Fuse Micro Fuse Description
F19 – – Spare
F20 30 Amp Pink – Central Body Controller (CBC) 1-INTERIOR LIGHTS
F21 – 20 Amp Yellow REAR WIPER
Engine Control Module (ECM)/Powertrain Control Module
F22 – 10 Amp Red (PCM)/Motor Generator Unit (MGU) WAKE UP/Power Pack
Unit (PPU) WAKE UP
Powertrain Control Module (PCM)/Engine Control Module 4
F23 – 10 Amp Red
(ECM)
F24 – – Spare
F25 – 10 Amp Red Module Shift By Wire (MOD_SBW)
F26 40 Amp Green – Central Body Controller (CBC) 2-EXTERIOR LIGHTS #1
F27 30 Amp Pink – Front Wipers
F28 40 Amp Green – Central Body Controller (CBC) 3-POWER LOCKS
F29 40 Amp Green – Central Body Controller (CBC) 4-EXTERIOR LIGHTS #2
F30 – – Spare
F31 – 10 Amp Red DIAGNOSTIC PORT
Heating Ventilation Air Conditioning Mod (HVAC CTRL
MOD)/Steering Column Lock (SCL)/Occupant
F32 – 10 Amp Red
Classification Module (OCM)/Driver Presence Detection
Module (DPDM)
ParkTronics System (PTS)/Infrared Camera Module
F33 – 10 Amp Red
(IRCM)/Airbag Disable Lamps (AIRBAG DISABLE LMPS)20_JL_OM_EN_US_t.book Page 32
32 SERVICING AND MAINTENANCE
Cavity Cartridge Fuse Micro Fuse Description
Electronic Stability Control (ESC)/Electric Hydraulic Power
F34 – 10 Amp Red Steering (EHPS)/Smart Bar Control Module (SBCM) WAKE
UP
F35 30 Amp Pink – BRAKE VAC PMP — If Equipped
F36 30 Amp Pink – TRAILER TOW MOD — If Equipped
F37 30 Amp Pink – TRAILER TOW CONN 7W — If Equipped
F38 20 Amp Blue – Engine Control Module (ECM)
F39 – 15 Amp Blue MGU Coolant Pump (3.6) — If Equipped
DriveTrain Control Module (DTCM)/Axle Lock (AXLE LOC)
F40 – 15 Amp Blue
FT_RR
F41 – 15 Amp Blue Instrument Cluster (IC)/Security GateWay (SGW) WAKE UP
F42 – 10 Amp Red Power Control Relay Control Feed (Electric Stop/Start)/
Spare (Belt Starter Generator) -- If Equipped
F43 – 20 Amp Yellow PWR OUTLET (CARGO) BATT
F44 – 10 Amp Red InfraRed Camera (IRCAM) HEATERS
F45 – 20 Amp Yellow PWR OUTLET (CARGO) IGN
F46 – 10 Amp Red AUTO HDLP LVL MOD/LVL MTR/HDLP SW
F47 – – Spare
F48 – – Spare
F49 – 10 Amp Red Occupant Restraint Controller (ORC)20_JL_OM_EN_US_t.book Page 33
SERVICING AND MAINTENANCE 33
Cavity Cartridge Fuse Micro Fuse Description
F50 – 10 Amp Red HD ACC — If Equipped
Digital TV (DSRC)/USB/InSide RearView Mirror (ISRVM)/
F51 – 10 Amp Red
Compass Module (CSGM)
F52 – 20 Amp Yellow CIGAR LTR
F53 – – Spare
F54 – – Spare
F55 – 10 Amp Red Central Vision Processing Module (CVPM) 4
F56 – 10 Amp Red IN-CAR TEMP SENSOR
F57 – 20 Amp Yellow Front Driver Heated Seat
F58 – 20 Amp Yellow Front Pass Heated Seat
F59 – – Spare
Comfort Steering Wheel Module (CSWM) (HTD STR
F60 – 15 Amp Blue
WHEEL)
Left Blind Spot Sensor (LBSS)/Right Blind Spot Sensor
F61 10 Amp Red
– (RBSS)
F62 – – Spare
F63 – 10 Amp Red Occupant Restraint Controller (ORC)
F64 – – Spare
F65 – – Spare
F66 40 Amp Green – HVAC BLOWER MTR Front
F67 – – Spare20_JL_OM_EN_US_t.book Page 34
34 SERVICING AND MAINTENANCE
Cavity Cartridge Fuse Micro Fuse Description
F68 – – Spare
Motor Generator Unit MGU Belt Starter Generator (BSG) —
F69 – 5 Amp Tan
If Equipped
F70 – 25 Amp Clear INJ/IGN COIL (GAS)/GLO PLUG MOD (DSL)
F71 – – Spare
F72 – 10 Amp Red HD ELEC ACC PKG — If Equipped
F73 20 Amp Blue – PWR TOP LT
F74 20 Amp Blue – PWR TOP RT
Power Pack Unit - Battery Pack Control Module & Auxiliary
F75 – 10 Amp Red Power Module (PPU-BPCM & APM) Belt Starter Generator
(BSG) — If Equipped
F76 – 20 Amp Yellow ECM (GAS)/PCM (DSL)
F77 – 10 Amp Red HEATED MIRRORS
F78 – 10 Amp Red COMP/INTRUSION/SIREN/INTRUSION SENSORS
F79 – 20 Amp Yellow SMART BAR CTRL MOD
F80 – 15 Amp Blue Powertrain Control Module (PCM)
F81 30 Amp Pink – REAR DEFROSTER (EBL)
F82 30 Amp Pink – FUEL HTR — If Equipped
F83 60 Amp Yellow – GLOW PLUG — If Equipped
F84 30 Amp Pink – UREA HTR CTRL UNIT — If Equipped
F85 – 10 Amp Red PM SENSOR — If Equipped20_JL_OM_EN_US_t.book Page 35
SERVICING AND MAINTENANCE 35
Cavity Cartridge Fuse Micro Fuse Description
F86 30 Amp Pink – BRAKE VAC PMP 2 — If Equipped
F87 – 10 Amp Red SUPPLY/PURGING PMP — If Equipped
F88 20 Amp Blue – NOx SENSOR #1/ #2 — IF Equipped
– Steering Column Control Module (SCCM)/ Cruise Control
F89 10 Amp Red
(CRUISE CTL)/Digital TV (DTV)
F90 20 Amp Blue – TRAILER TOW PARK LMP — If Equipped
F91 – 20 Amp Yellow HORN 4
F92 40 Amp Green – HD ACCY #2 — If Equipped
F93 40 Amp Green – HD ACCY #1 — If Equipped
F94 – 10 Amp Red Tire Pressure Monitor (TPM)/RF Hub system (CORAX)
F95 – – Spare
F96 – 10 Amp Red PWR MIRROR SW
F97 – 20 Amp Yellow RADIO/TBM
F98 – 10 Amp Red
SW BANK-HD ELEC/OFF ROAD
F99 – – Spare
F100 30 Amp Pink – ESC-ECU & VALVES
F101 30 Amp Pink – DriveTrain Control Module (DTCM)
F102 – 15 Amp Blue DUAL USB PORT
F103 – 15 Amp Blue HD ACCY #3 — If Equipped
F104 – 15 Amp Blue PPU COOL PUMP — If EquippedYou can also read