User Guide BIMWIZARD for Graphisoft ArchiCAD - USG ...
←
→
Page content transcription
If your browser does not render page correctly, please read the page content below
User Guide
    BIMWIZARD® for Graphisoft® ArchiCAD®
                                                                           Australia

                                                                             April 2021

                                                                           Version 2.00

USG Boral Building Products Pty Limited
Level 3, 40 Mount Street, North Sydney 2060

 For assistance contact TecAssist® 1800 811 222   TecAssist@usgboral.com    Apr 2021   1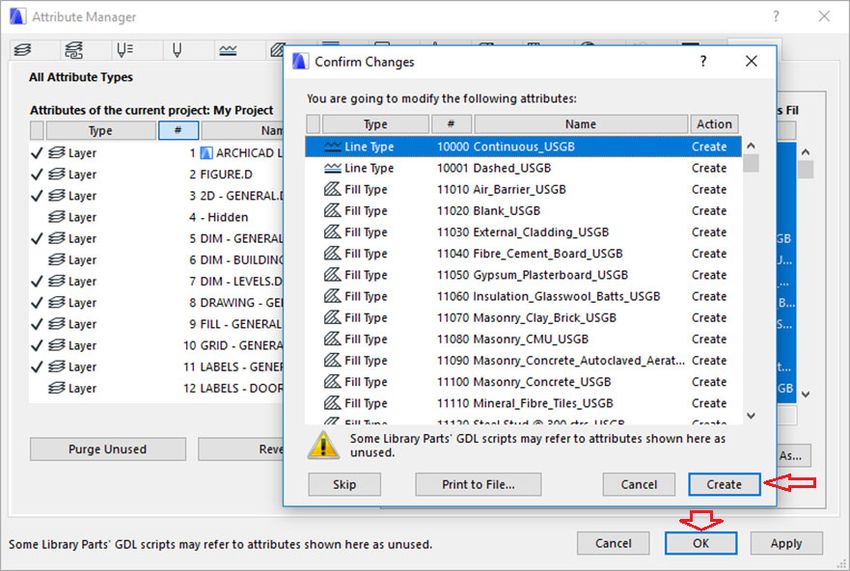
©2021 USG BORAL. All rights reserved. The trademarks USG BORAL, INNOVATION INSPIRED BY
YOU, BIMWIZARD, TecASSIST, Unispan, Soundstop, Echostop, Firestop, Wetstop, FireWetstop,
Multistop, Flexiboard, Shaftliner, Partiwall, IntRwall, Multiframe, OutRwall, Shaftwall,
Ventshaft, Fire Tunnel, Linerstrip, Wet Area Sealant are trademarks of USG Boral Building
Products or one or more of its affiliates. SHEETROCK & FIBEROCK are trademarks owned by
United States Gypsum Company and used under license; DONN, Mars, ClimaPlus, Clean Room,
Eclipse, Impressions, Micro, Radar, Rock Face and Pixels are trademarks of USG Interiors, LLC
and used under license.
X‐Block is a registered trademark owned by Fletcher Building Holdings Ltd. NZ and used under
license.
Pink® Partition, Pink Ceiling Batts and Pink Wall Batts® Sisalation® and Permastop® are
registered trademarks of Owens Corning used under license by Fletcher Insulation Pty Limited.
Villaboard is a trademark of James Hardie Australia.
TSB™ is a trademark owned by Tontine Insulation – a division of Pacific Nonwovens Pty Ltd.
Firesound is a trademark of H.B. Fuller.
Promaseal, Fyre Seal Mastic and IBS are trademarks of Promat International (Asia Pacific) Ltd.
Graphisoft® and ArchiCAD® are registered trademarks of Graphisoft SE.

    For assistance contact TecAssist® 1800 811 222   TecAssist@usgboral.com      Apr 2021    2
What’s New In This Revision?

Update Window                      All updates and installs are now accompanied by an
                                   information window that details what has been added or
                                   changed in BIMWIZARD.

Draw In ArchiCAD                   Users can now use the Draw In ArchiCAD button to load our
                                   systems directly into the wall or ceiling tool in ArchiCAD
                                   without having to save and import external files.

Custom Index Numbers               BIMWIZARD assigns index numbers to our composites
                                   automatically but there is now a special field where a custom
                                   number can be nominated instead.

Stud Width Filter                  Users can now select the width of stud to be used in their
                                   wall or spanning ceiling.

Framing Configuration Filter In systems with varied framing configurations, users may
                             specify the combination of stud, furring channel and direct
                             fixed linings.

Flooring Type Filter               Users can now sort ceilings under timber or concrete by the
                                   type of flooring they want over top.

New Systems                        New walls and ceilings have been added included Cinema
                                   Walls, acoustic plasterboard ceilings and metal ceiling tiles
                                   (in acoustic suspended ceiling tiles).

Watch for the below symbol throughout the User Guide to easily spot new features:

 For assistance contact TecAssist® 1800 811 222   TecAssist@usgboral.com            Apr 2021    3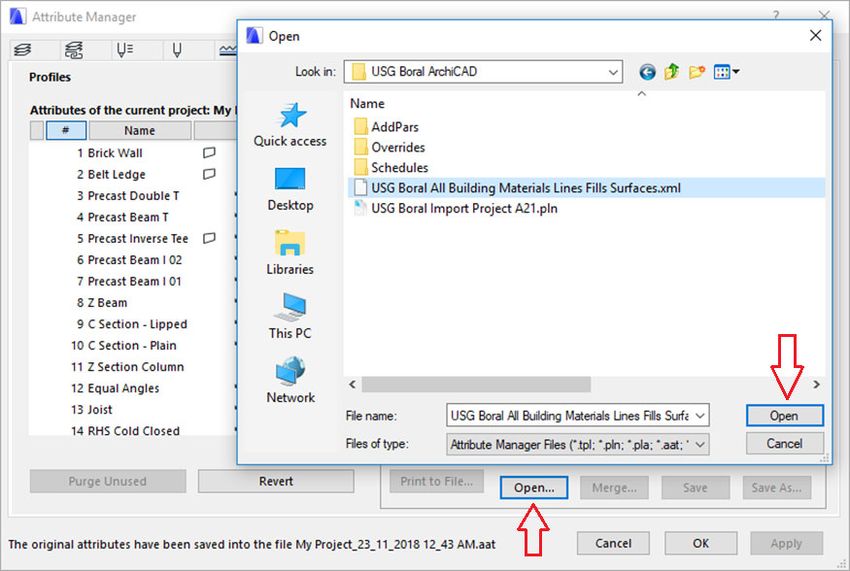
Document Revisions

                      Version
     Date                                                    Document Changes
                      Number

21/11/2018        0.01              Initial Draft
24/11/2018        0.10              Final Draft
26/11/2018        1.00              Publication
30/04/2021        2.00              Addition of new features

For assistance contact TecAssist® 1800 811 222    TecAssist@usgboral.com        Apr 2021   4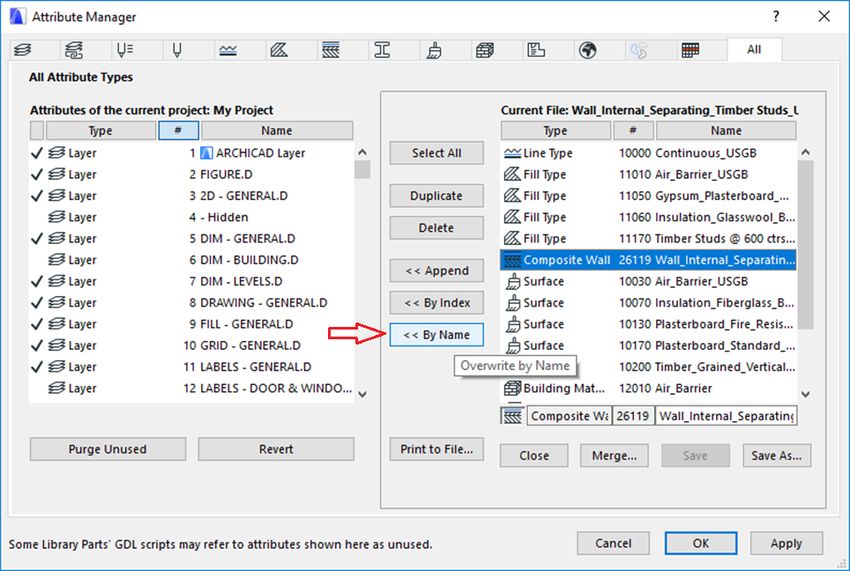
Table of Contents
1                Introduction .................................................................................................................................................................... 6
     1.1 ..... Scope and Purpose ............................................................................................................................................................ 6
     1.2 ..... Other BIMWIZARD® Versions....................................................................................................................................... 6
     1.3 ..... Installation............................................................................................................................................................................ 6
     1.4 ..... Interface Layout ................................................................................................................................................................. 7
2                System Selection Work Flow ................................................................................................................................... 8
     2.1 ..... Select Wall/Ceiling Type ................................................................................................................................................ 8
     2.2 ..... Filtering .................................................................................................................................................................................. 9
          2.2.1 Performance Criteria ................................................................................................................................................................. 9
          2.2.2 Attributes ...................................................................................................................................................................................... 12
          2.2.3 Ancillary ........................................................................................................................................................................................ 12
          2.2.4 Acoustic Ceiling Tiles ............................................................................................................................................................... 13
          2.2.5 General Filter Area – Buttons and Features ................................................................................................................... 13

     2.3 ..... Browse Results and Select Desired System ........................................................................................................... 14
     2.4 ..... Saving to ArchiCAD ......................................................................................................................................................... 15
          2.4.1 Draw In ArchiCAD – NEW!..................................................................................................................................................... 15
          2.4.2 Export Files .................................................................................................................................................................................. 15
          2.4.3 Index Number Field – NEW! ................................................................................................................................................. 16

     2.5 ..... Importing Saved Files .................................................................................................................................................... 17
          2.5.1 Standard Import Method (aka Bring In Everything) .................................................................................................. 17
          2.5.2 Bring in all USG Boral Attributes ........................................................................................................................................ 27
          2.5.3 Bring in Composites only (without importing all attributes first) ....................................................................... 29
          2.5.4 Attribute Manager Overwrite Method .............................................................................................................................. 32

     2.6 ..... Tabs ........................................................................................................................................................................................ 33
          2.6.1 Folders Tab .................................................................................................................................................................................. 33
          2.6.2 Solutions Tab ............................................................................................................................................................................... 34

3                Options ........................................................................................................................................................................... 36
     3.1 ..... General Options ................................................................................................................................................................ 36
          3.1.1 Show Export Button ................................................................................................................................................................. 36

     3.2 ..... Advanced Features .......................................................................................................................................................... 37
          3.2.1 Wall/Ceiling System Naming Tools ................................................................................................................................... 37
          3.2.2 Folder Utilities ............................................................................................................................................................................ 40
          3.2.3 Feedback Tab .............................................................................................................................................................................. 41

4                Customisation.............................................................................................................................................................. 42
5                Schedules and Overrides ........................................................................................................................................ 43

    For assistance contact TecAssist® 1800 811 222                                               TecAssist@usgboral.com                                                              Apr 2021               5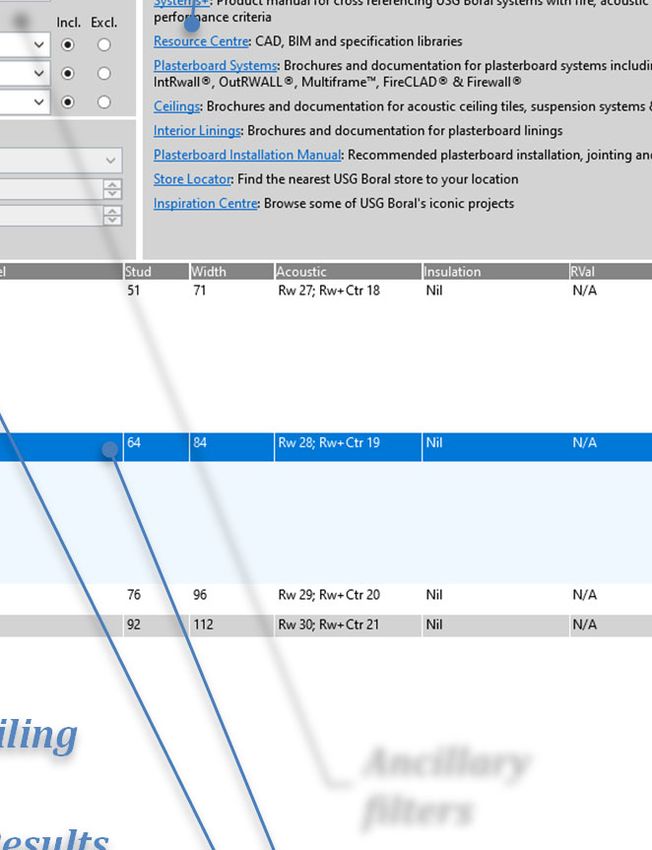
1 Introduction
1.1 Scope and Purpose
Welcome to the User Guide for USG Boral’s Graphisoft® ArchiCAD® tool, BIMWIZARD®! This
guide will help you navigate the multiple areas and functions of this application as well as
understand the ways it may save you time and reduce design risk.
The BIMWIZARD® application is a new tool that streamlines the process of selecting,
designing and creating the correct USG Boral wall or ceiling system for your project
requirements. BIMWIZARD® will recommend USG Boral solutions based on your
specifications and seamlessly add your selection to your project without having to leave the
ArchiCAD environment.
Key benefits of incorporating BIMWIZARD® into your workflow include:
An easy to use, intuitive interface
Access to 100,000+ USG Boral data-rich models representing our full product
catalogue
Ability to sort by system performance, product attributes and physical dimensions
Save hours of design time and anxiety by using our pre-qualified design solutions
Automatically self-updates to ensure you have our latest database
All content compliant with Australian Building Code and Standards
This guide assumes that the user has access to and a base knowledge of ArchiCAD software.
1.2 Other BIMWIZARD® Versions
BIMWIZARD® is now available in multiple countries for various BIM platforms. This
manual is specifically for the Australian ArchiCAD® version. Please use the alternate links
on the download page for other BIM platforms. If you are outside Australia, navigate to
your country via USG Boral’s international web page www.usgboral.com.
1.3 Installation
Download and open the installer file named ‘BoralBimWizardArchicad.msi’ and follow the
steps on the installation wizard. Upon completion, the BIMWIZARD® application will be
installed and available in the windows start menu.
NOTE: Upon download you may receive a warning message since the installer
is an executable file type. These warnings can safely be dismissed.
For assistance contact TecAssist® 1800 811 222 TecAssist@usgboral.com Apr 2021 6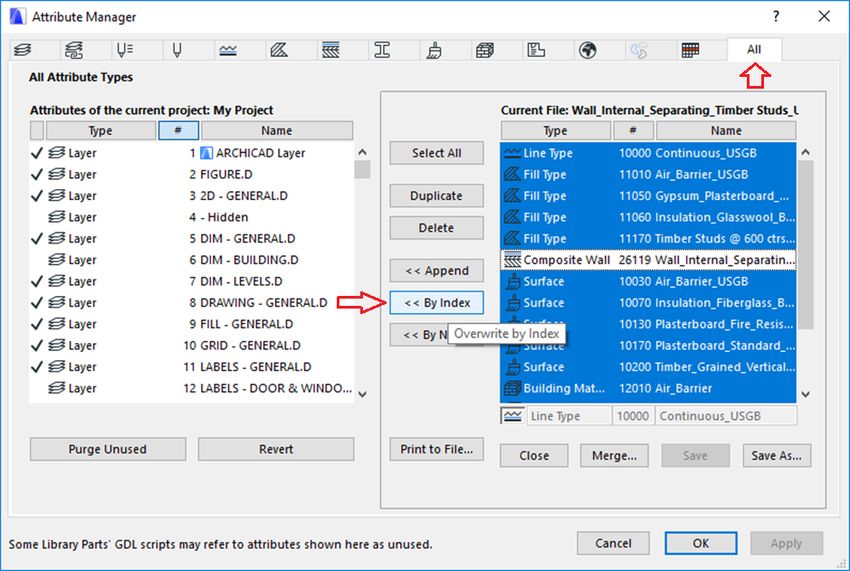
1.4 Interface Layout
The below image is a typical screen shot from the BIMWIZARD® home page with labels of
commonly referenced areas and features.

             Wall Selector                  Solutions tab
                                                                           Filter Minimisation Button
             Performance
                                            Ceiling Selector               Reset All Fields button
             Criteria

                  Folders tab               Attributes                     Helpful Links

                                              Acoustic Ceiling
                                                                              Ancillary              Options
     Export         Draw In                   Tile Filters
                                                                              filters                Button
     Files          ArchiCAD                  Expanded Results
     Button         Button                                                    Design solution (Active)
     (optional)                               Index Number Field
                                                                              Design solution (Inactive)

 For assistance contact TecAssist® 1800 811 222   TecAssist@usgboral.com                  Apr 2021   7
2 System Selection Work Flow
The general work flow for finding the wall or ceiling system best suited to your needs and
importing it into your ArchiCAD library is as follows:
Step 1: Select wall/ceiling type
Step 2: Filtering (select performance criteria, lining attributes and miscellaneous options)
Step 3: Browse results and select desired system
Step 4: Export system information to ArchiCAD project or hard drive
Step 5: Import system information to ArchiCAD project (if Export Files used)
2.1 Select Wall/Ceiling Type
When BIMWIZARD® first opens, only the wall and ceiling selectors are visible and active.
Selecting from one of these menus starts the filtering process.
Tips:
Only one wall or one ceiling type can be selected at a time and all results will belong
to the current system type.
Some systems that aren’t technically walls are found in the wall type menu, such as:
o Fireclad® external cladding
o Column protection systems.
Some systems with both vertical and horizontal elements appear in both menus,
such as:
o Beam protection systems
o Firetunnel™
For assistance contact TecAssist® 1800 811 222 TecAssist@usgboral.com Apr 2021 8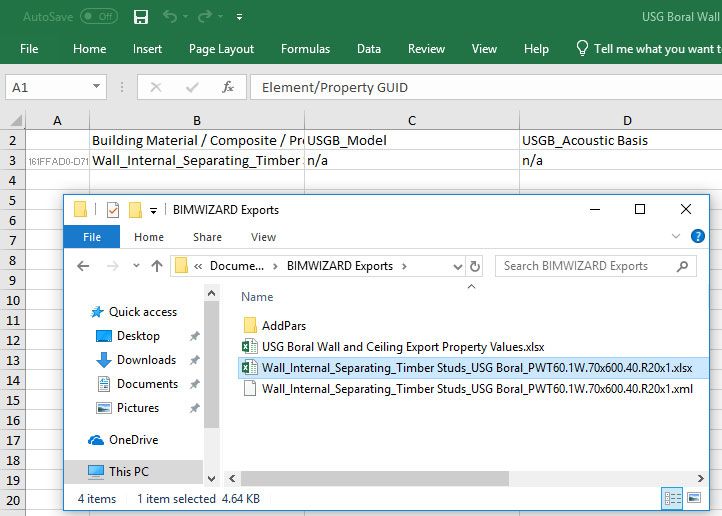
2.2 Filtering
To find the system best suited to your project’s requirements, utilise the various filter
options available below the system selectors. Please note some of the filters will be grey
and inactive depending on which system type was selected. This is because those filters are
not applicable or not needed for the current system type.
Tips:
None of the filters need to be used to get basic results, but some systems won’t show unless
certain filters have been activated. For example:
Most systems with special attributes, like mould resistance, won’t show until the
corresponding attribute box has been ticked
Systems with insulation generally won’t show until an acoustic rating has been set
Stud arrangements show maximum spacing and minimum BMT until a wall height
or ceiling span has been set
The filters are grouped into four areas; Performance Criteria, Attributes, Ancillary and
Acoustic Ceiling Tiles.
2.2.1 Performance Criteria
Filters in this group define a characteristic of the overall system such as fire rating,
acoustic rating or physical dimensions.
Filter (Active)
Filter (Inactive)
For assistance contact TecAssist® 1800 811 222 TecAssist@usgboral.com Apr 2021 9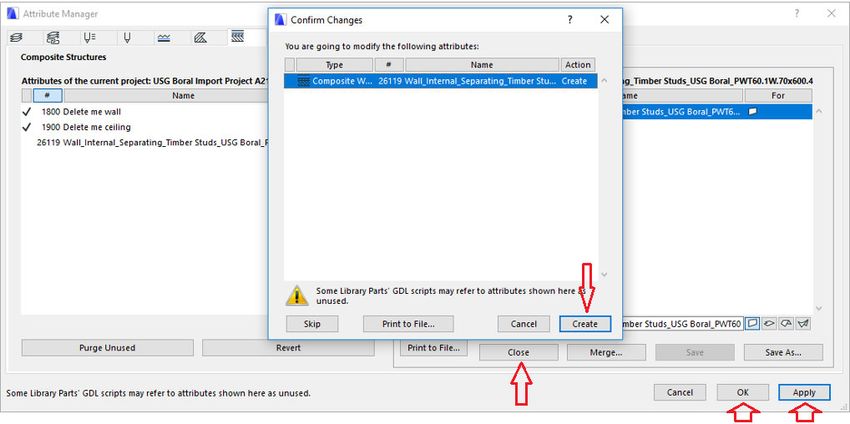
2.2.1.1    Fire Resistance Level
          This filter has options for load bearing (XX/XX/XX) or non-load bearing (-/XX/XX)
          fire ratings. Selecting a non-load bearing option will return all fire ratings of equal
          or greater duration but selecting a load bearing option will return only load bearing
          fire ratings of equal or greater value (e.g. selecting -/60/60 will return 60/60/60
          results but selecting 60/60/60 will not return -/60/60 results)

2.2.1.2    Acoustic Rating
          This filter gives the option to search by either Rw or Rw+Ctr values. For some
          ceiling systems Ln,w and Ln,w+Cl are also searchable. Only systems with the least
          insulation (usually none) will show until the Acoustic Rating filter has been
          activated.

2.2.1.3    Max System Width/Tile Width & Max Tile Length
          For acoustic ceiling tiles, these two fields set the maximum dimensions of an
          individual tile (e.g. 600 x 1200). For all other applicable systems, the left field sets
          the maximum thickness of the wall or ceiling.

2.2.1.4    Wall/Ceiling Pressure
          This is for setting the pressure on a wall or spanning ceiling. Changing this filter
          only has an effect on search results if the Wall Height/Ceiling Span filter is also used.

2.2.1.5    Wall Height/Ceiling Span
          Entering a value into this field will adjust the spacing and/or base metal thickness
          (BMT) of framing members in the search results to make them structurally
          appropriate. Maximum heights/spans for each result can be seen in the expanded
          result.

2.2.1.6    Show Max Stud Spacing Only & Show Min Stud BMT Only
          Once a wall height/ceiling span value has been entered, BIMWIZARD® makes a
          decision for you on the most efficient framing arrangement. Should you want to see
          only solutions with the maximum stud spacing, you can tick the Show Max Stud
          Spacing Only box and if you only want solutions with the minimum BMT, you can
          tick the Show Min Stud BMT Only box. Refer to the example below.

 For assistance contact TecAssist® 1800 811 222   TecAssist@usgboral.com             Apr 2021   10
Example:
For the system, pressure and
wall height specified above,
BIMWIZARD® has suggested
64mm wide studs at 400mm
centres with a 0.50mm BMT.
Ticking the Show Max Stud
Spacing Only box changes the
stud spacing to 600mm centres
and compensates with a
0.75mm BMT.
Ticking the Show Min Stud BMT
Only box simultaneously
changes the BMT to 0.55mm
and compensates with a 76mm
wide stud.
For assistance contact TecAssist® 1800 811 222 TecAssist@usgboral.com Apr 2021 112.2.1.7 Stud Width & Framing Configuration – NEW!
These two menus allow for selection of systems with framing that utilises specific
stud widths or layouts. Available layouts consist of combinations of independent
studs, furring channels and direct fixed linings.
2.2.1.8 Masonry Type, Column Type, Ceiling Fixing Type & Flooring Type – NEW!
These three menus allow for selection of a specific element in particular systems,
namely:
The thickness/type of masonry in masonry upgrade systems
The type of column in column protection systems
The type of ceiling fixing in some ceiling systems.
The type of flooring used over some ceiling systems.
2.2.2 Attributes
Filters in this group define a characteristic of the system lining such as impact,
moisture or mould resistance attributes.
The Not Required box removes all systems with special attributes from the search
results (some show by default). Some systems with impact boards provide superior
acoustic performance, so it’s good practice to not use this box when trying to meet
acoustic criteria.
2.2.3 Ancillary
Filters in this group are used for refining search results based on USG Boral system
and material naming conventions.
For assistance contact TecAssist® 1800 811 222 TecAssist@usgboral.com Apr 2021 122.2.3.1 System No.
This filter is used when searching for a specific USG Boral system. A minimum of 3
characters is required to activate the filter which will return any systems that
contain an exact match of the input text in their system reference (first column of
the results).
2.2.3.2 Material filters
These filters are used when specific lining products either need to be used (select
Include) or must not be used (select Exclude). Engaging multiple filters works with
an AND logic (e.g. in the image below, the filter would only return systems with
Firestop®/FireWetstop™ AND at least one 13mm lining AND don’t have 13mm
Multistop™.
2.2.4 Acoustic Ceiling Tiles
Filters in this group apply specifically to acoustic ceiling tile systems.
2.2.5 General Filter Area – Buttons and Features
Besides the filters in the three main areas there are a few other features worth
mentioning in the general filter area.
2.2.5.1 Filter Minimisation Button
Located beside the Ceiling Type selector, this button hides the entire filtering area to
display more results at one time.
2.2.5.2 Reset All Fields Button
Quickly clears all inputs and sets filters back to default.
2.2.5.3 Helpful Links
These are web links that give quick access to various locations on the USG Boral
website.
For assistance contact TecAssist® 1800 811 222 TecAssist@usgboral.com Apr 2021 132.3 Browse Results and Select Desired System
Once a wall or ceiling type has been selected, you will see this area populated with design
solutions where each row represents a specific system arrangement.
The results will update dynamically as you engage various filters
Results at the top of the list are the most recommended solutions for your set of
design requirements
The more detail you input, the better your solutions will be.
Left click anywhere within a row to see additional information including:
Full system number
System description
Maximum wall height/ceiling span
Height limiting factors.
Right click anywhere within a row to bring up the context menu and save the selected
system to a favourites folder.
Tips:
Multiple rows may be expanded simultaneously, but only the highlighted row is currently
selected for saving to ArchiCAD or a folder.
For assistance contact TecAssist® 1800 811 222 TecAssist@usgboral.com Apr 2021 142.4 Saving to ArchiCAD
Once you’ve found the solution you want, you’re ready to generate the system and add it to
your ArchiCAD library. There are two options for this, Draw in ArchiCAD or Export Files.
2.4.1 Draw In ArchiCAD – NEW!
The Draw In ArchiCAD button will minimise BIMWIZARD® and activate the
ArchiCAD wall or ceiling sketch tool with the selected system so that you can place it
in your project immediately.
This is the recommended generation option for most users. Should you want
to exercise more control over what properties and information are added to
your project, try the Save Files option.
2.4.2 Export Files
A Save As dialogue box will appear. Navigate to your desired folder and click Save.
BIMWIZARD® will save 3 items in the destination folder: an XML file and an XLSX file of the
same name and a folder named “AddPars” that is required for importing the XML file. The
XML file contains information about the system’s composite and included attributes. The
XLSX file contains the system’s property values. If multiple systems are exported to the
same location, their XML files will share the AddPars folder.
For assistance contact TecAssist® 1800 811 222 TecAssist@usgboral.com Apr 2021 15Tips: There is no harm in renaming the file in the Save As dialogue, however this will not update the composite name within the files, which is what determines its name in ArchiCAD. To change both, use the custom naming feature. 2.4.3 Index Number Field – NEW! Next to the Draw In ArchiCAD button is a number field that accepts any positive integer or can be left blank. If left blank, any composites generated via either button will be assigned the default USG Boral value. Otherwise, the number entered will be used instead. If a composite with the same number already exists in the active project the system will fail to generate and produce a reminder message. Tips: In ArchiCAD 22 the index number must be less than 32,768. For assistance contact TecAssist® 1800 811 222 TecAssist@usgboral.com Apr 2021 16
2.5 Importing Saved Files
The Export Files feature doesn’t interface directly with ArchiCAD so several steps are
required to fully import USG Boral systems in this way. There are many different methods
you can use, but the most common and efficient are described here. The ArchiCAD menu
and command descriptions in this manual are based on ArchiCAD 21 and may vary in
different versions, but the methodology is the same unless noted otherwise. For most
import methods you’ll want to download the USG Boral ArchiCAD Import Files from the
miscellaneous materials area of the BIMWIZARD® download page of the USG Boral website.

2.5.1     Standard Import Method (aka Bring In Everything)
          The standard import method is recommended by USG Boral as the best way to
          utilise its content in ArchiCAD. It is also the method depicted in BIMWIZARD®’s
          quick tutorial available in the options menu. This set of instructions assumes you
          only want to bring in attributes (building materials, fills, surfaces, etc.) required for
          your imported systems. If you first import the ‘USG Boral All Building Materials
          Lines Fills Surfaces.xml’ file to your project, you can skip any steps in this section
          about importing attributes.

2.5.1.1     Importing Composites
          Open the preconfigured ‘USG Boral Import Project A21.pln’ file. Once open, navigate
          to Options > Element Attributes > Attribute Manager…

 For assistance contact TecAssist® 1800 811 222   TecAssist@usgboral.com             Apr 2021   17
Click the “Open…” button, then navigate to your save location. Select the desired
system and click the “Open” button.
Select the Composites tab, then select the composite in the right pane and click
“Click the “Apply” button, then click the “Create” or “Modify” button as appropriate.
To bring in additional composites, click the “Close” button and repeat the previous
steps. To exit, click the “OK” button.
2.5.1.2 Importing Element Properties
To bring in the element’s properties, first place an appropriate element in the
project (place a wall for a wall type composite, slab for ceiling) and assign the
desired composite to the element. If you’re bringing in multiple elements, it’s best
to import all the composites before this step then place exactly 1 element for each
composite. Navigate to File > Interoperability > Classifications and Properties >
Export Property Values from Schedule…
For assistance contact TecAssist® 1800 811 222 TecAssist@usgboral.com Apr 2021 19Navigate to the desired save location, ensure the element scheme is set to ‘USG Boral
Wall and Ceiling Export’, the ‘Open file after save’ box is checked (optional) and click
the “Save” button. We’ll call this the Property Exports file. You can rename this
XLSX file if you wish.
In windows explorer, navigate to the folder where you saved the files exported from
BIMWIZARD® and open the XLSX file in Excel (Hint: it will have the same name as
the XML file). We’ll generically call files of this type the BIMWIZARD® Property
File.
Select all the cells in row 2 of the BIMWIZARD® Property File (NOT the entire row,
as this won’t paste correctly) and press Ctrl+C. Open the Property Exports file,
select cell B3 and press Ctrl+V. If you’ve exported multiple elements, open all of
their respective BIMWIZARD® Property Files and copy/paste in a similar manner.
For assistance contact TecAssist® 1800 811 222 TecAssist@usgboral.com Apr 2021 20Make sure to paste into the appropriate cell of column B in the Property Exports file,
the name of the composite copied must match the name of the composite in the
paste location! Save and close the spreadsheet when finished.
Return to ArchiCAD then navigate to File > Interoperability > Classifications and
Properties > Import Property Values into Elements…
For assistance contact TecAssist® 1800 811 222 TecAssist@usgboral.com Apr 2021 21Navigate to the Property Exports file location, select it and click the “Open” button.
Click the “Import” button. Afterwards you should receive an alert that the import
was successful.
You should now be able to see all the USG Boral properties within our elements(s).
Select all placed elements in the Import Project, press Ctrl+C, open your working
project (aka your project) and press Ctrl+V in a plan view to place the elements,
complete with all associated attributes and properties.
For assistance contact TecAssist® 1800 811 222 TecAssist@usgboral.com Apr 2021 222.5.1.3 Importing Schedules and/or Material Take Off
To use USG Boral pre-made schedules (Wall, Plasterboard Ceiling, Acoustic Ceiling,
Material Takeoff ) in your project, navigate to Document > Schedules > Scheme
Settings…
For assistance contact TecAssist® 1800 811 222 TecAssist@usgboral.com Apr 2021 23Click the “Import” button, navigate to the ‘Schedules’ folder included in the BIMWIZARD® download materials, select any combination of desired schedules and click the “Open” button. The automatically populated schedule can now be found in the project navigator. You may customise and change these schedules any way you prefer. These schedules are linked to several pre-defined USG Boral element properties, so renaming or altering the values of those properties may cause the schedules to not behave as intended. For assistance contact TecAssist® 1800 811 222 TecAssist@usgboral.com Apr 2021 24
2.5.1.4     Importing Override Combination
          To use the USG Boral override combination for simplified element view in your
          project, open the Attribute Manager, click the “Open…” button, navigate to the
          ‘Overrides’ folder included in the BIMWIZARD® download materials, select the ‘USG
          Boral Override Hatching & Lines.xml’ file and click the “Open” button.

          Click the ‘All’ tab, select all attributes in the right pane then click the “
Navigate to Document > Graphic Overrides > Graphic Override Combinations…
Navigate to the ‘Overrides’ folder included in the BIMWIZARD® download
materials, select the ‘USG Boral Override Combination.xml’ file and click the “Open”
button.
For assistance contact TecAssist® 1800 811 222 TecAssist@usgboral.com Apr 2021 26You can now activate the USG Boral override combination for simplified element
views from the Override menu.
Elements will be hatched according to their
Function property
Discontinuous walls will show a dashed
border
Fire Rated elements will show a red border
Elements with impact resistant linings will
have a purple fill
Elements with moisture resistant linings will
have a blue fill
Elements with impact and moisture resistant
linings will have a violet fill
Elements with mould resistant linings will
have a green fill
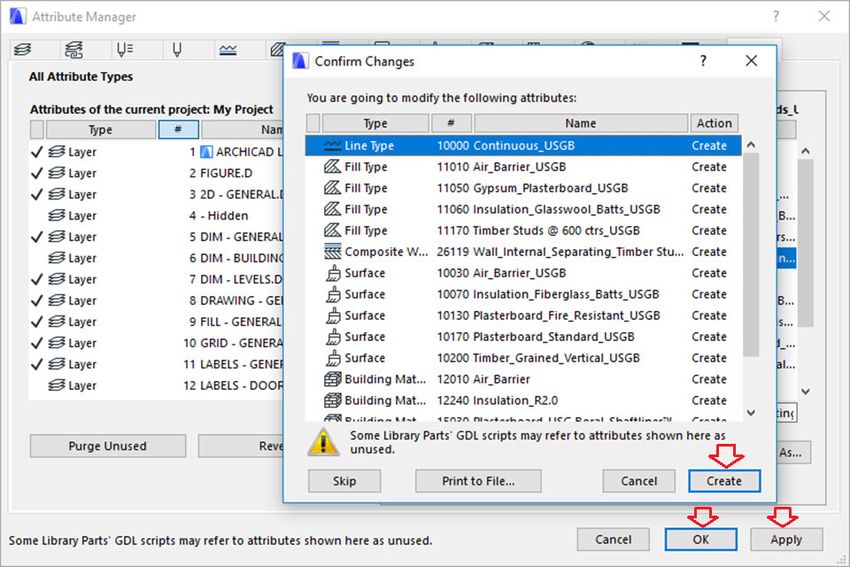
2.5.2 Bring in all USG Boral Attributes
All USG Boral attributes exist in the Import Project file. When using USG Boral
ArchiCAD content you can either choose to bring in only the attributes needed for
your project or to bring in all USG Boral attributes. The first option has the
advantage of keeping your project Building Materials library from growing too large,
but comes with the risk of you forgetting to import the appropriate attributes before
another bit of USG Boral material that depends on those attributes, in which case the
attributes will be incorrectly assigned or left as ‘Missing’. The second option has the
advantage of not needing to worry about any steps in any process that involve
importing USG Boral attributes via the Attribute Manager.
To import all USG Boral attributes, open your project and navigate to Options >
Element Attributes > Attribute Manager…
For assistance contact TecAssist® 1800 811 222 TecAssist@usgboral.com Apr 2021 27Click the “Open..” button, then navigate to the USG Boral download materials, select
the ‘USG Boral All Building Materials Lines Fills Surfaces.xml’ file and click the
“Open” button.
Select the ‘All’ tab, then select all attributes in the right pane and click “Click the “OK” button, then click the “Create” or “Proceed” button as appropriate.
2.5.3 Bring in Composites only (without importing all attributes first)
If you only need to import composites and don’t plan to use USG Boral properties,
schedules or overrides, you can bring them directly into your project rather than
using the Importer Project file first. If you have imported all USG Boral attributes
then you can follow the composite import procedure in the standard import
method, otherwise use these instructions.
In your project, navigate to Options > Element Attributes > Attribute Manger…
For assistance contact TecAssist® 1800 811 222 TecAssist@usgboral.com Apr 2021 29Click the “Open…” button, then navigate to your save location. Select the desired
system and click the “Open” button.
Select the ‘All’ tab, then select all the attributes in the right pane except for the
composite and click “Next, select only the composite in the right pane and click “
2.5.4     Attribute Manager Overwrite Method
        In the ArchiCAD attribute manager, there are 3x buttons that allow the user
        to save imported attributes from the right (temporary) pane to the left
        (project) pane: “Append”, “By Index” and ‘By Name”. All USG Boral
        attributes are assigned specific index numbers to assure their import is
        consistent in varied project environments. All non-composite attributes will
        have the same index number even in future updates and must be imported
        ‘By Index’ because this is how parent attributes like Building Materials and
        Composites know to find them.

        Composites however, have semi-unique index numbers that may change with each
        new database update. This is due to ArchiCAD’s limit of 32,766 index numbers.
        Because of this, USG Boral composites must be imported ‘By Name’.

        It is never good practice to import USG Boral material using the ‘Append’ overwrite
        method as this will create duplicate copies of some materials and cause others to be
        assigned incorrectly.

 For assistance contact TecAssist® 1800 811 222   TecAssist@usgboral.com        Apr 2021   32
2.6 Tabs
In addition to the standard page, BIMWIZARD® has 2x other pages provided to make the
design process as convenient as possible: the Folders page and the Solutions page.
2.6.1 Folders Tab
The Folders page can be accessed anytime by clicking the Folders Tab at the top of
the BIMWIZARD® window. This page is used for storing and organising systems for
later use. It will initially be unpopulated but systems can be added to it from the
BIMWIZARD® main page or the Solutions page. The below image is an example
folder structure in the folders page.
Folder tree Saved walls Subfolder View Box
Saved ceilings
Saved acoustic ceiling tiles
2.6.1.1 Folder tree
Initially, there will be a single, empty folder here, but folders and subfolders can be
easily added, renamed, copied or deleted using the context menu (right mouse
click).
2.6.1.2 Saved Wall, Ceiling and Acoustic Ceiling Tiles Areas
These areas are where the saved systems of the active folder appear. The columns
and rows here behave the same as in the results area of the main BIMWIZARD®
page, allowing each system to be expanded and saved to ArchiCAD with the Draw In
ArchiCAD and Export Files buttons.
For assistance contact TecAssist® 1800 811 222 TecAssist@usgboral.com Apr 2021 332.6.1.3 Subfolder View Box
If this box is unticked, only systems within the selected folder will be visible in the
Saved Systems areas. If the box is ticked, all systems in any subfolders (including
nested subfolders) will appear as well.
2.6.2 Solutions Tab
The Solutions page can be accessed anytime by clicking the Solutions Tab at the top
of the BIMWIZARD® window. The Solutions page is specifically for the early stages
of design where not all the details required for detailed wall and ceiling specification
might be known. The Solutions Wizard has 3 steps where minimum requirements
for satisfying Building Code of Australia (BCA), Australian Standards and industry
best practice are determined.
2.6.2.1 Step 1
In Step 1, the project’s building class is selected. Consult the BCA for determining the
appropriate building class.
2.6.2.2 Step 2
In Step 2, the project’s construction type is determined based on the number of
stories selected and/or the building class selected in Step 1. Do not include any
stories located fully below ground. For stories located partially below ground or at
the top of the building and used only for utility and lift plant purposes, consult the
BCA.
For assistance contact TecAssist® 1800 811 222 TecAssist@usgboral.com Apr 2021 342.6.2.3 Step 3
In Step 3, the project’s primary framing system is identified as Steel or Timber.
2.6.2.4 Solutions
Once all 3 steps are completed, a set of results will be displayed. Each type of
system (i.e. external wall, shaft wall, spanning ceiling, etc) is given their own field of
results which are further categorised by their unique advantage (i.e. most
economical, high performance, etc). The columns and rows here behave the same as
in the results area of the main BIMWIZARD® page, allowing each system to be
expanded, saved to ArchiCAD with the Save To ArchiCAD button and/or saved to a
folder with the context menu (right mouse click).
For assistance contact TecAssist® 1800 811 222 TecAssist@usgboral.com Apr 2021 353 Options
The Options window is for setting user preferences and advanced features.
Wall system
naming tool
Ceiling system
naming tool
General options
Folder import/export tool
Feedback tab
3.1 General Options
3.1.1 Show Export Button
Under general options there is a check box to toggle the Export Files Button. There
is a help link below that launches a quick tutorial for importing these files.
For assistance contact TecAssist® 1800 811 222 TecAssist@usgboral.com Apr 2021 363.2 Advanced Features
BIMWIZARD® has several auxiliary tools available to help further streamline the design and
documentation process.
3.2.1 Wall/Ceiling System Naming Tools
BIMWIZARD® now includes a way to automatically rename all systems it generates
according to the user’s preferences. There are separate tools for walls and ceilings so that
they can follow different standards if required. There is also the ability to export and
import the standards so they can be stored or shared. Below is an image of the wall naming
tool at its default setting.
Custom Text Field with Add Button
(green arrow)
Add Button (green arrow)
Remove Button (red arrow)
Name Fields (currently selected)
Available Fields (available for selection)
Up/Down Buttons
Preview Selector
Reset Button
Import/Export Buttons
3.2.1.1 Name Fields
The values (name fields) found in this area determine how BIMWIZARD® will name
generated ArchiCAD composites. The default values are ‘Default Name’ and ‘Model
Number’. These 2 values, in this order, give the standard USG Boral naming
convention. The ‘Default Name’ value can be removed, but the ‘Model Number’
value cannot. This is to ensure every generated name is unique. Add name fields to
this area from the available and custom field areas with their respective Add
buttons and remove name fields from this area with the Remove button.
Tips:
You can identify the Default Name part of the standard USG Boral naming
convention by its ending text, “_USG Boral_”, everything after this is the
system model number
Items at the top of the Name Fields area appear first in the family type name
Check how the current set of naming values will look in the preview text just
below the preview selector
For assistance contact TecAssist® 1800 811 222 TecAssist@usgboral.com Apr 2021 373.2.1.2 Available Fields
This area contains all the standard name values that are available to be added to the
Name Fields area.
Name Field Description Example Value
Beginning of standard USG Wall_Internal_Separating_
Default Name
Boral family type name Timber Studs_USG Boral_
End of standard USG Boral
Model Number ST90.2A.FxF.64x50Bx600.50
family type name
System Type Brief description of system Timber Staggered Studs
Manufacturer Name of manufacturer USG Boral
Function The basic purpose of a wall Interior
Load bearing and non-load
90/90/90 (LB), -/120/120
Full Fire Rating bearing fire rating with
(NLB) From Both Sides
direction and RISF
Abbreviated Fire Single number to represent
120
Rating the fire rating in minutes
Full Acoustic Rw 64; Rw+Ctr 57; Ln,w 54;
All applicable acoustic ratings
Rating Ln,w+CI 49
Acoustic – Single number, either Rw or
64
Rw/NRC NRC (if acoustic ceiling tile)
Acoustic – Rw+Ctr Single number, Rw+Ctr 57
Acoustic – Single number, either Lnw or
54
Lnw/CAC CAC (if acoustic ceiling tile)
Side 1/External: Thickness in mm of third
3rd Layer layer of lining on the first or 10
Thickness external side of the wall
Side 1/External: Thickness in mm of second
2nd Layer layer of lining on the first or 10
Thickness external side of the wall
Side 1/External: Thickness in mm of first layer
1st Layer of lining on the first or 10
Thickness external side of the wall
Thickness in mm of first layer
Side 2/Internal: 1st
of lining on the second or 10
Layer Thickness
internal side of the wall
Side 2/Internal: Thickness in mm of second
2nd Layer layer of lining on the second 10
Thickness or internal side of the wall
Side 2/Internal: Thickness in mm of third
3rd Layer layer of lining on the second 10
Thickness or internal side of the wall
Thickness in mm of all
Top Layer
plasterboard layers on top of 1616
Thicknesses – All
a ceiling, concatenated
Thickness in mm of all
Bottom Layer plasterboard layers on
131313
Thicknesses – All bottom of a ceiling,
concatenated
For assistance contact TecAssist® 1800 811 222 TecAssist@usgboral.com Apr 2021 38Name Field Description Example Value
Masonry Thickness in mm of system’s
150
Thickness masonry component
Width in mm of entire system
(except OutRwall® where it’s
System Width/Tile the system less cladding and
134
Width acoustic ceiling tiles where
it’s the shorter side of the
tile)
The longer side of a ceiling
Tile Length 1200
tile in mm
The width of a system’s stud
Stud Width 92
in mm
The width of a system’s
2nd Stud Width 92
second stud in mm
Track Width The width of a system’s track
(Staggered Stud in mm, if different than the 150
Only) stud width
Base Metal Thickness of a
Stud BMT (x100) steel stud in mm, multiplied 75
by 100
Spacing of primary framing
Structural Spacing 600
members in mm
3.2.1.3 Custom Field
This area is used for adding text, numbers or symbols to the naming convention.
This is useful for adding separators, like dashes (-) and underscores (_), or labels for
values, like adding “FRL ” before the Abbreviated Fire Rating field, or giving all USG
Boral systems a prefix such as, “Manufacturer-“.
Tips:
Any text added from the Custom Field area will appear in all systems of the
same element type (wall/ceiling)
Some available fields are not populated all the time (e.g. the 2nd & 3rd layer
fields, Masonry Thickness, Track Width, etc) so take caution adding custom
text before and after these fields
o If all 3x Side 1 Layer Thickness fields are applied and separated with
dashes (-) then a system with 3x layers of 13mm board will appear
as “13-13-13”. However, under that same naming convention a
system with only 1x layer of 13mm board will appear as “--13”.
Some special characters cannot be used in the Custom Field area, these
characters simply won’t appear if typed or pasted into the field.
3.2.1.4 Preview Selector
Just below this drop down menu is a text string which gives a basic preview of what
the current naming convention (determined by the contents and order of the Name
Fields area) will look like for the selected system. Choosing a different system will
update the preview below. Please note this menu does not change the naming
convention in any way.
For assistance contact TecAssist® 1800 811 222 TecAssist@usgboral.com Apr 2021 393.2.1.5 Reset Button
This button will reset the current naming tab to its default settings. This means
BIMWIZARD® will resume using the standard USG Boral naming convention. The
Reset button only affects one tab at a time, so resetting the Wall Type Name tab will
not affect any custom Ceiling Type convention and vice versa.
3.2.1.6 Import/Export Buttons
These buttons can be used to export the current custom naming convention as a
.BIM file. This file can be imported again later by any BIMWIZARD® user.
Tips:
This can be a handy method of establishing an organisation naming standard
for all utilised USG Boral systems
Multiple naming standards can be exported and archived
Wall and Ceiling standards import/export separately
3.2.2 Folder Utilities
The buttons in this area can be used to export the current Folders page folder tree and
included systems to an .XML file. This file can be imported again later by any BIMWIZARD®
user. Also, there is the Delete All button which clears the Folders page back to its empty,
default state.
Tips:
Easy to relocate folders if working on multiple devices
Send project folders to colleagues
Archive folders when a project is finished
Set a folder standard for an organization
For assistance contact TecAssist® 1800 811 222 TecAssist@usgboral.com Apr 2021 403.2.3 Feedback Tab This area is for sending feedback to the BIMWIZARD® developers. All feedback is carefully considered and incorporated into future development plans wherever possible. The form can be sent without filling out all fields, but the more information we receive, the more valuable the feedback is. If you wish to be contacted by the development team via email, you can include your contact details in field 5 along with your question/concern. Your details will be handled in accordance with USG Boral’s privacy policy https://www.usgboral.com/en_au/legal.html. Response times will vary, but we endeavour to answer all enquiries in a reasonable time frame. If you require more timely assistance, please contact TecAssist at 1800 811 822, TecAssist@usgboral.com or our new LiveChat option at www.usgboral.com/au/tecassist. For assistance contact TecAssist® 1800 811 222 TecAssist@usgboral.com Apr 2021 41
4 Customisation
Once placed within an ArchiCAD® project, changes to USG Boral systems are not
recommended. Changes to the wall structure may void the fire rating, acoustic rating and/or
a handful of other parameters associated with the system and changes to some properties
or property names may affect how the system interacts with USG Boral schedules and
overrides. It is always safer to return to the BIMWIZARD® interface, find the correct system
and replace the incorrect one.
NOTE: there are element aspects that can be changed after system generation without
voiding the system information. Some of these elements are listed below:
Composite name – This is only a suggested naming convention and can be replaced
by your own without losing any information.
Lining location on asymmetric systems – Some wall types have internal structures
that are asymmetrical and different linings on either side. With these systems, it
may occur that you want to switch the side of the wall that the linings are on (e.g. a
masonry upgrade system might have studs and Regular Board on one side but
furring channels and Wetstop® on the other, but you want the Wetstop® on the stud
side instead). You may swap the linings but take care not to alter the number of
layers or thickness of either lining. It’s easier to keep the material layers intact and
drag them into place rather than delete, replace or modify the layers.
Material aesthetics – You may change the graphics and appearance of materials to
suit your project style. This includes pens, colours, line types, fills and surfaces.
Keep in mind that if you import additional USG Boral material, it may overwrite any
changes made if the index numbers haven’t been changed. It is not recommended to
change the surface grid pattern on acoustic ceiling tile materials.
Generic materials – Many of our systems contain generic materials that we do not
manufacture such as cladding or flooring. You may swap these out for your own
materials so long as they match the description given and meet or exceed any
specified requirements.
The Priorities of USG Boral building materials are set for optimised intersection
display, however there is no requirement to use our priority settings.
The composite skin type of USG Boral composites may be changed as needed.
Index numbers of USG Boral composites may be changed (and in fact may change
between BIMWIZARD® updates). Index numbers of all other USG Boral attributes
should be left unchanged (for the benefit of future imports) unless you are altering
said attribute in which case resetting the index number is advised.
For assistance contact TecAssist® 1800 811 222 TecAssist@usgboral.com Apr 2021 425 Schedules and Overrides
Included in the USG Boral download materials are several schedules and an override
combination that are provided to make USG Boral ArchiCAD elements more easily
documented.
Wall and Ceiling element schedules come in 3 varieties: Wall, Plasterboard Ceiling,
Acoustic Ceiling Tiles. These schedules are tied to custom USG Boral properties
which must be imported to the project before the schedule, otherwise the scheme
rules won’t be applied correctly. Renaming or deleting USG Boral element
properties may affect the behaviour of these schedules.
The Material Take Off component schedule is set to pick up wall and slab elements
and lists their comprising materials by building material ID, not building material
name. This is because some materials have a different name to serve a different
purpose (different fill, different priority, etc.) but are actually the same real-world
construction material and should be combined in a material take off.
The Wall and Ceiling Export element schedule is used for the exporting, updating
and importing of USG Boral element properties. This schedule is meant to be used in
the ‘USG Boral Import Project A21.pln’ file where the property manager is populated
with all and only USG Boral element properties. The schedule can be used in other
project files, however if not all USG Boral element properties are imported or if any
have been renamed or if any other properties exist, the exported property file will
not match the format of the property files exported from BIMWIZARD® and will
require careful copy/pasting.
For assistance contact TecAssist® 1800 811 222 TecAssist@usgboral.com Apr 2021 43You can also read