Preparing requestors to use the GEMS* online portal for the submission and ongoing management of Grant requests - Global Governance Office - Novartis
←
→
Page content transcription
If your browser does not render page correctly, please read the page content below

Global Governance Office
GEMS

                     Preparing requestors to use the GEMS* online portal for
                     the submission and ongoing management of Grant
                     requests

                      * Grants, External Studies and Managed Access System

                      Version 3.0
                      Effective Date : March 1st 2021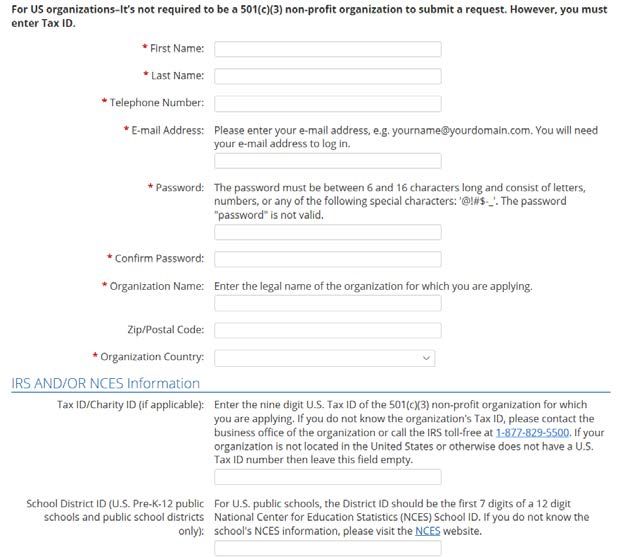
Introduction Novartis will introduce GEMS, a new global cloud-based system for the submission and ongoing management of all Grant requests. From the date of launch, all requests must be submitted via the GEMS online portal accessed from www.novartis.com. The introduction of GEMS will make it easier for applicants to submit and manage their requests and for Novartis to review and potentially approve them more quickly. This deck provides external requestors with the information they need to submit their requests in GEMS. 2 Public
Benefits of GEMS

                       Ability to     Quicker
                                                    Application
        Easier       manage the     review and
                                                   can be made
     submission of   application    approval of
                                                     from any
      applications   process in     applications
                                                       device
                      one place     by Novartis

3   Public
Contents
    Section no.   Section name                     Page

    1             Registering on the GEMS portal   5

    2             Submitting a new request         10

    3             Managing a request               21

    4             Additional information           42

4       Public
Global Governance Office
    GEMS

                         Section 1
                         Registering on the GEMS portal

5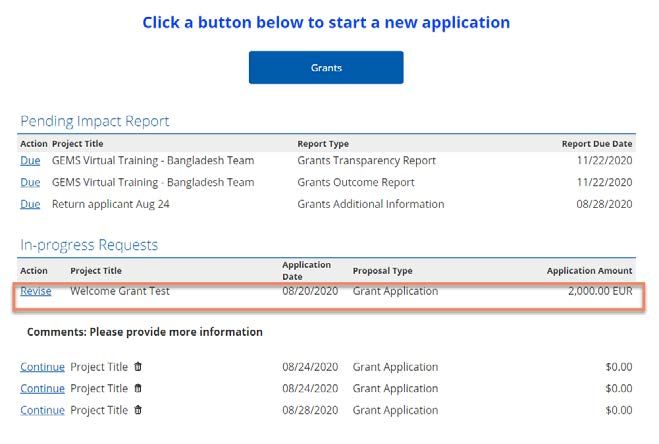
Registering on the portal
                     Step 1
                     • Click on Create a Password at the top of the
                       screen

6   Public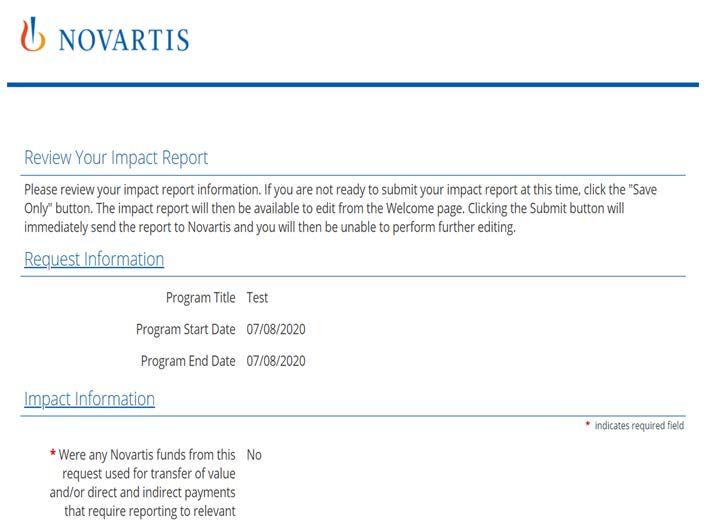
Registering on the portal
Step 2
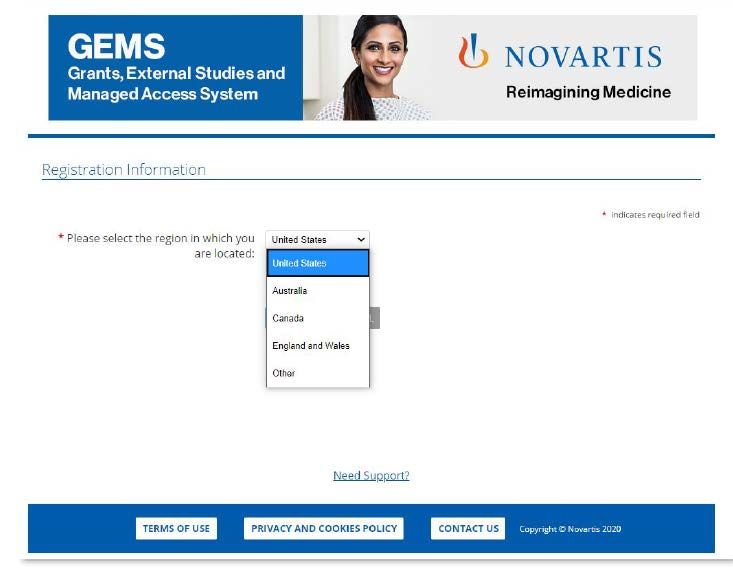
• Select your Region (ie country) from the drop-down box
• Organizations located outside of Australia, Canada,
England and Wales, United States, please select Other
to proceed with the account registration.
7 Public
Registering on the portal
PLEASE NOTE: Any field marked with a ∗ (red asterisk) is mandatory for completion

                                                  Step 3
                                                  • Please include your local country code with your telephone
                                                    number
                                                  • Complete the remaining Registration Information
                                                  • Click Submit
                                                  • An activation email will be sent to the email address you have
                                                    given. This can be either your organization email address or a
                                                    personal email address. Click on the link contained in the email
                                                    to proceed and confirm your registration details
                                                  • If you do not see an activation email in your inbox, please check
                                                    your Junk / Spam or Trash folder for a message from
                                                    donotreply@cybergrants.com
                                                  • If you still cannot locate the activation email, please click on the
                                                    link given on the registration page: Click here to send a new
                                                    activation email

8   Public
Registering on the portal
                     Step 4
                     • Once registered, you have access to your own
                       Welcome Page.
                     • If you have made requests in the past, these will show
                       on the dashboard on your Welcome Page. If you have
                       not submitted any past requests, the dashboard will
                       be blank.
                     • You can use the dashboard to manage all ongoing
                       requests and submit new ones.

9   Public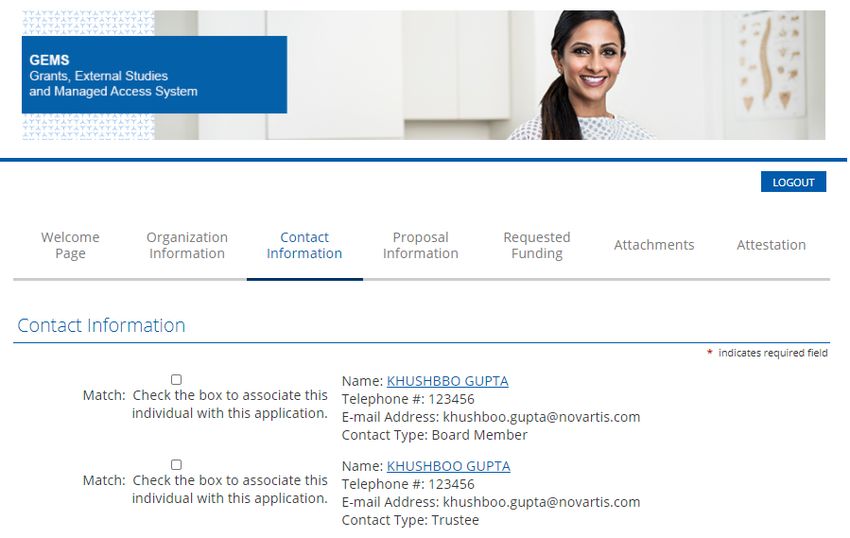
Global Governance Office
     GEMS

                          Section 2
                          Submitting a new request

10
Submitting a new request
Step 1
• If you work with multiple organizations and you are
making the first application for a new organization,
please use the link “click here to add a new
organization to your account.” You will be asked to
select the organization’s region and complete basic
registration information (refer to slide 7 & 8) .
11 PublicSubmitting a new request
Step 2
• Click on the Grants button at the bottom of your
Welcome Page.
Grants
Unsolicited, independently requested monetary
contribution for a specified purpose to support medical /
scientific research, education, policy initiatives, and
patient advocacy activities where Novartis will receive
no benefit. Grants will not be provided to political parties
12 PublicSubmitting a new request
Step 3
• Review the auto-completed information (taken from the
Registration Information) and edit or update any further
information as required.
• Once complete, select Save and Proceed to move to the
next tab. This will also ensure the content is saved
should you need to return to the request.
• You will be able to see your progress on the dashboard
shown at the top of each page. You can use the headings
on the dashboard to move around within the application
by clicking on them and you do not have to complete one
section before moving to another. However, to avoid
losing any information you have inserted on a page, you
must click Save and Proceed before leaving any page.
• IMPORTANT NOTE: GEMS does not automatically save
data, so it is important to click Save and Proceed when
you complete any page.
13 PublicSubmitting a new request
Step 4
• To create a new contact, click on Create New
button.
• Provide contact information and save. Once
saved, contact information will be displayed.
• Check/ Tick the box that relates to your Contact
Details. There may be more than one box; in this
case, ensure you select the correct box as these
will become your primary contact details.
• Select Save and Proceed to move to the next
tab.
Note: The contact information provided here can be
used by Novartis to communicate with you if
required. Therefore provide the updated information
for every request you submit.
14 PublicSubmitting a new request
Step 5
• Complete all required information on the Proposal Information
tab, including Program Details and Event Details (if
appropriate).
• A (?) to the right of any field title indicates that further
explanation of the field requirement is available by clicking on the
(?) icon.
• Geographical Outreach of the Program: select single country
and corresponding country of request.
• Program start date* (US date format: MM/DD/YYYY): this is the
planned “Day One” date when the activity for your program will
start.
• Program end date (US date format: MM/DD/YYYY): this is the
planned date you expect to close your program following
completion.
* Countries may require different lead time after request
submission; the exact requirement is noted in the application when
a country is selected.
15 PublicSubmitting a new request
Step 5 (Continued)
• In “Currency of Request,” select the local currency
code and then enter “Amount of Request.”
• Enter Total Cost of the Program. Do not use any
special character (for eg “,” “.”) when entering cost
in this field.
• Select Save and Proceed to move to the next tab.
16 PublicSubmitting a new request
Step 5 (Continued)
• If the Grant Request is for a medical education
program, Select “Yes” for “Is this Request for an
Independent Medical Education Program”.
• When “Yes” is selected, an additional Fields
related to educational activity details will be
displayed that needs to be completed
Independent Medical Education Program: An
Independent Medical Education Program is generally
defined as an educational program for health care
professionals (HCPs) provided by an independent
educational provider, such as a community hospital,
academic center, society/association, or medical
education and communication company.
17 PublicSubmitting a new request
Step 5 (Continued)
• If the Grant program includes any Live Events, ie face-
to-face meetings, summits, conferences, etc. select
“Yes” for Does this program include any Live
Events?
• When “Yes” is selected, an additional field will be
displayed to provide additional information about the
live event. Select the number of events and provide
details such as Venue, Address, City, and Country for
each event.
18 PublicSubmitting a new request
Step 6
• The next screen for completion will ask you for further detail
around the breakdown of the total program cost.
• For every category of the spend all fields need to be completed.
• Select from the drop-down list appropriate category of spend.
• Depending on which category is selected, a selection of sub-
categories will be provided in a drop-down list.
• An open field box is provided for Description / Details of
Spend.
• Fill in the Estimated Cost for each category. Grant total for
estimated cost must be equal to the Total Program Cost under
Program Details in the Proposal Information section. Do not
use any special character (for eg “,”, “.”) when entering cost in this
field.
• Should you wish to add a further line item, click Add Line Item.
• Click Save and Proceed.
19 PublicSubmitting a new request
Step 7
• For Grant application, mandatory upload of a
Formal Letter of Request (LOR) as well as a Full
Program Proposal is required.
• To upload a document, click the blue Upload File
button. A pop-up window will appear with
instructions on locating the correct file.
• Once located, click the Upload File instruction in
the pop-up window to upload the selected file.
• Following upload, click Close Window.
• Any additional documents can be uploaded under
Other Supporting Documents. If you would like to
provide any additional information, use Additional
Comments.
20 PublicSubmitting a new request
Step 8
• The final page is for the Attestation.
• An open field dialogue box is available for the
declaration of any conflicts of interest.
• Click Save and Proceed.
21 PublicSubmitting a new request
Step 9
• The final page requests a review of the application
information
• If there are no changes to be made, click Submit. Please
note that once submitted, no further changes can be
made to the request.
• The information submitted can be viewed by selecting
View for the relevant request on the Welcome Page.
• Once the request is submitted, you will see a confirmation
message on screen.
• Your funding request is successfully submitted to
Novartis. You will be notified in due course about Novartis
decision on your request.
• To print a copy of this request, press Ctrl + P on the
keyboard and select the appropriate printer.
22 PublicGlobal Governance Office
GEMS
Section 3
Managing a request
23Introduction This section covers: – Reviewing and approving your request – Providing further information – Reconciling your request 24 Public
Reviewing and approving your request
After the request is submitted, it will appear in the Submitted
Requests section on your Welcome Page while it undergoes a
formal review process.
The status will show in the Status column with and include one of
the following:
– Submitted meaning it has been received by Novartis but has not yet been
assigned to a Novartis Request Owner
– Under review meaning it has been assigned to a Novartis Request Owner
and the internal review is ongoing
– Approved meaning it has been approved
– Declined meaning it has been rejected
– System will share auto notification at the time of request
submission as well as once request is Approved and/ or
Declined.
25 PublicProviding further information During the review process, the Novartis Request Owner may require further information from you. There are two ways in which this might happen: – By using the Return to Applicant functionality and requesting further information. – By triggering a Grants Additional Information Impact Report. We explain the process for both in the following slides. 26 Public
Return to Applicant
If the Novartis Request Owner uses the Return to Applicant
functionality, you will receive an automated email and the
request will move to the In-progress Requests section. It will
also include a comment explaining why it has been returned to
you.
To provide the information, click on the blue Revise link and
follow the on-screen instructions.
27 PublicGrants Additional Information Impact Report
If the Request Owner triggers a Grants Additional
Information Impact Report, it will appear in this section
along with the date by which it needs to be completed.
To access the report, click on the relevant blue Due link.
Once completed, the Impact Report will no longer appear on
this list.
28 PublicGrants Additional Information Impact Report
When you click on the blue Due link, you will be taken to the
Request Information tab, which includes the program title,
and start and end dates per your original request.
Click Save and Proceed to continue.
29 PublicGrants Additional Information Impact Report
This takes you to the Impact Information tab.
Provide information as requested by Novartis.
Additional supporting documents can be uploaded by
selecting Upload File.
Select Save and Proceed to continue.
30 PublicGrants Additional Information Impact Report
• This takes you to the Review Your Impact Report tab.
• Review the information you have submitted carefully
before submitting.
• If any changes are to be made, click on Impact
Information link and update as necessary.
• Once you are ready to submit, click Submit. After
submitting, no further changes can be made.
31 PublicReconciling your request When your program is completed, you will need to reconcile your request by completing further Impact Reports. There are three in total and these are explained on the next slide. Your Welcome Page includes a section for Pending Impact Reports (see slide 28). When an Impact Report becomes due, it will appear in this section along with the date by which it needs to be completed. To access the report, click on the relevant blue Due link. You have 90 days from the date of notification to complete any Impact Report. Once completed, the Impact Report will no longer appear on this list. 32 Public
Impact Reports for Reconciliation

 Name of report         Required for            Purpose                              When triggered

                                                To confirm how the funds were        Sent automatically by GEMS
 Transparency Report    All Grants requests     used and if funding was given to     once the Program End Date
                                                other individuals or organisations   is reached

                                                To confirm how much money has        Sent automatically by GEMS
 Outcomes Report        All Grants requests     been spent and if any refund may     once the Program End Date
                                                be due                               is reached

                                                                                     If applicable, sent
 Program and            Grants requests         To confirm whether the
                                                                                     automatically by GEMS once
 Educational Outcomes   involving educational   educational outcomes for the
                                                                                     the Program End Date is
 Report                 activities              project were achieved
                                                                                     reached

33 Public
Transparency Report
When you click on the blue Due link, you will be
taken to the Request Information tab, which
includes the Program title, and start and end
dates per your original request.
Click Save and Proceed to continue.
34 PublicTransparency Report
This takes you to the Impact Information tab.
Answer the question by selecting either No or Yes from the
drop-down list.
If the answer is Yes, you are required to provide further
information.
To do this, select Create New.
This brings up the Spend Detail Information Window.
Complete all details and click Save.
This returns you to the Impact Information tab, where you
click Save and Proceed to continue.
35 PublicTransparency Report
• This takes you to the Review Your Impact Report
tab.
• Review the information you have submitted carefully
before submitting.
• If any changes are to be made, click on Impact
Information link and update as necessary.
• Once you are ready to submit, click Submit. After
submitting, no further changes can be made.
36 PublicOutcome Report
When you click on the blue Due link, you will be taken to
the Request Information tab, which includes the project
title, and start and end dates per your original request.
Click Save and Proceed to continue.
37 PublicOutcome Report
This takes you to the Impact Information tab.
Complete all fields marked with a red asterisk.
Depending on the answers given, additional details may
be required. Complete these as necessary.
While not mandatory, you can upload additional
supporting documents by selecting Upload File.
Click Save and Proceed to continue.
38 PublicOutcome Report
This takes you to the Spend Details tab.
Enter the Actual Cost of the spend category in the
field to the right-hand side.
Once completed, select Save and Proceed to
continue.
39 PublicOutcome Report
This takes you to the Review Your Impact Report
tab.
Review the information you have submitted carefully
before submitting.
If any changes are to be made, click on Impact
Information link and update as necessary.
Once you are ready to submit, click Submit. After
submitting, no further changes can be made.
40 PublicProgram and Educational Outcomes Report
When you click on the blue Due link, you will be
taken to the Request Information tab, which
includes the project title, and start and end dates per
your original request.
Click Save and Proceed to continue.
41 PublicProgram and Educational Outcomes Report
This takes you to the Impact Information tab.
Complete all fields marked with a red asterisk.
Depending on the answers given, additional details may
be required. Complete as necessary.
While not mandatory, you can upload additional
supporting documents by selecting Upload File.
Click Save and Proceed to continue.
42 PublicProgram and Educational Outcomes Report
This takes you to the Review Your Impact Report
tab.
Review the information you have submitted carefully
before submitting.
If any changes are to be made, click on Impact
Information link and update as necessary.
Once you are ready to submit, click Submit. After
submitting, no further changes can be made.
43 PublicGlobal Governance Office
GEMS
Section 4
Additional information
44Approval workflow
1 2 3 4
Applicant submits request and Request Owner assesses
Request received and
Applicant registers on portal uploads supporting information request and submits for review
assigned to a Request Owner
where relevant with three possible outcomes
Status: Pending Status: Pending
Approved Further information required Rejected
Request Owner informs Request Owner requests Request Owner notifies
Applicant information from Applicant Applicant
Status: Approved Status: Pending Status: Declined
Applicant signs Agreement Applicant provides information
and submits Impact Reports as and Request Owner submits
required for review
Status: Approved Status: Pending
45 PublicThank you
You can also read


