APHIS eFile Guidance for Submitting a VS 16-3 Permit Application Application for 16-6A permit to import or transport animal products, organisms ...
←
→
Page content transcription
If your browser does not render page correctly, please read the page content below
APHIS eFile
Guidance for Submitting a VS 16-3 Permit Application
Application for 16-6A permit to import or transport animal products,
organisms and vectors

Version 1.0
January 2021
WELCOME!
USDA APHIS Veterinary Services has a new online website to request Animal Products

                         and Organisms and Vectors permits.

 This user guide will take you through the process of creating and submitting a request

                                     for a permit.

                 For more APHIS eFile VS 16-3 support materials:

           Check out our "How to" playlist on the APHIS YouTube Channel

     Review this and other User Guides online on the APHIS eFile Training Page
I AM AN APPLICANT

Before you apply for your Animal Products, Organisms and Vectors permits it is important to note that if your application results in a
permit, you will see two different numbers associated with the permit.
Permit Numbers:
    1. Ref # - System Generated Permit Record Number (P-00001234)
         •   This number is the Record ID number that is autogenerated when a permit has been created. This is not a smart
             number, and does not represent the year, permit type, or any additional information.
    2. Permit # - APHIS Permit Number (610-20-201-00015)
         • This is the number on your permit and the number that CBP will reference when needed.
         • The format of this number is: Program Prefix-Calendar Year-Ordinal Day-Sequential Number
              • The Program Prefix indicated the type of permit.

                                                                                                                                         3
TABLE OF CONTENTS

Use the VS Permitting Assistant (VSPA) to create your request
    Page 6

Complete and submit your application(s)
   Page 16

Amend or Renew eFile Permits
   Page 44

Renew ePermit Permits in eFile (When applicable)
   Page 48

Respond to Required Lab Inspection (When applicable)
   Page 54

Withdraw an Application (When applicable)
    Page 55

                                                                4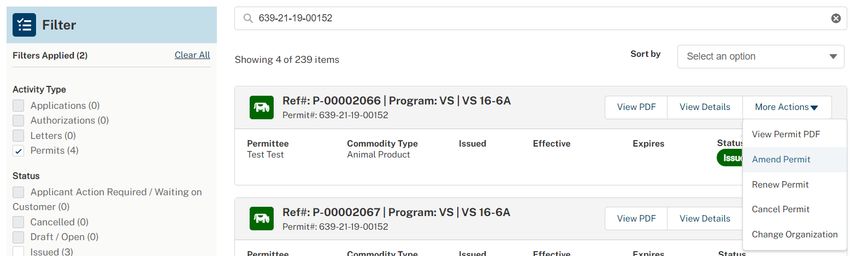
I AM AN APPLICANT

      I want to Submit a VS 16-3 Permit Application

Step 1: Sign into APHIS eFile                        Step 6: Enter Transportation Information
    Page 6                                               Page 26

Step 2: Create your request with the VS Permitting   Step 7: Enter Material Information
Assistant (VSPA)                                         Page 29
    Page 7
                                                     Step 8: Upload Additional Documentation
Step 3: Proceed to Application(s) from VSPA              Page 36
    Page 16
                                                     Step 9: Review, Certify, and Proceed to Payment
Step 4: Identify the Responsible Parties                 Page 38
    Page 18
                                                     Step 10: Payment
Step 5: Enter Supply Chain/Exporter(s) Information       Page 39
    Page 23

                                                                                                       5
Step 1: Sign in to eFile
Navigate to https://efile.aphis.usda.gov/s/ in Google A
Chrome (eFile is not supported by Internet Explorer).
A• Log in to eFile using your eAuthentication credentials.
• If you are not eAuthenticated, select Create an Account
and follow the steps to become eAuthenticated. You must
be eAuthenticated to apply in APHIS eFile.
• If your eAuthentication is not Verified, you will be
prompted with various questions to upgrade your eAuth
(Example question: What is your Social Security number?).
Complete these questions in order to proceed.
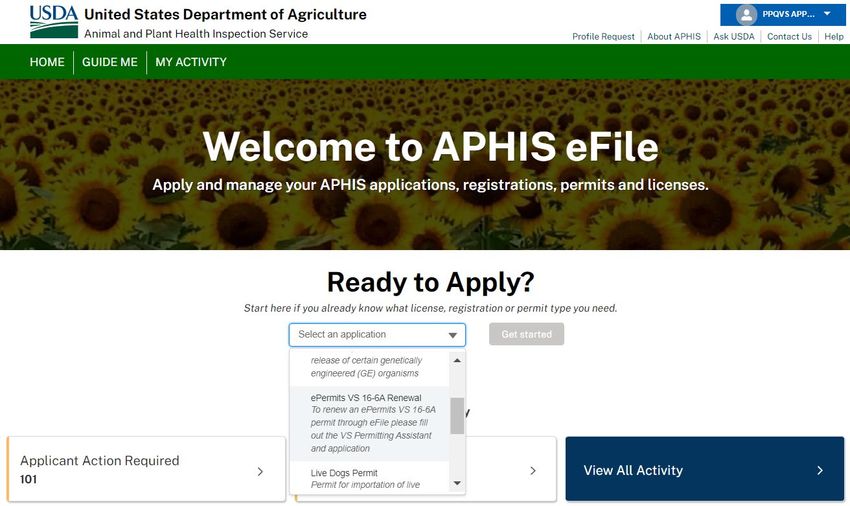
B• Under the Ready to Apply section, choose the VS 16-3 B
application and then select Get Started.
• The VS 16-3: Application for 16-6A permit to import
or transport animal products, organisms and
vectors.
6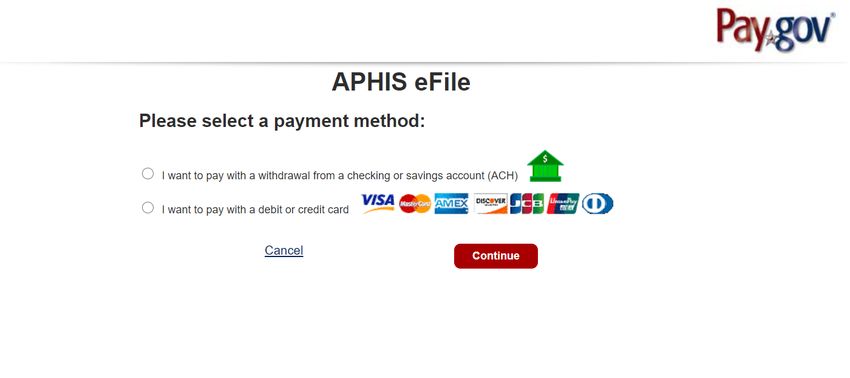
Step 2: Complete the Permitting Assistant                                                                                    SEARCH PAGE

Complete the Permitting Assistant to begin the application process.

A• Select the tab associated with the material you would like to add to your application summary.
B• Enter your material’s details into the appropriate search fields.
     • If you are searching for an Organism and Vector and are unable to find it on the list, select the Not Found on the Organism or
        Vector List checkbox. This will reveal an “Organism or Vector Name” field where you can free-text enter the name of your
        Organism or Vector. Please note, if your movement type is interstate, this will not be an option.
C• Select the Search button to search for your material.

   A                                                                                                        Note: Add all the materials on
                                                    Select the “i” icons                                    the application and the VSPA
                                                    to reveal tool tips
       B                                                                                                    will split them for you. Once
                                                                                                            your materials have been
                                                                                                            added, they will be
                                                                                                            automatically organized into

                                                                                            C               the appropriate applications.

                          Use the “See List” hyperlinks to view
                                                                                                                                             7
                          lists of your options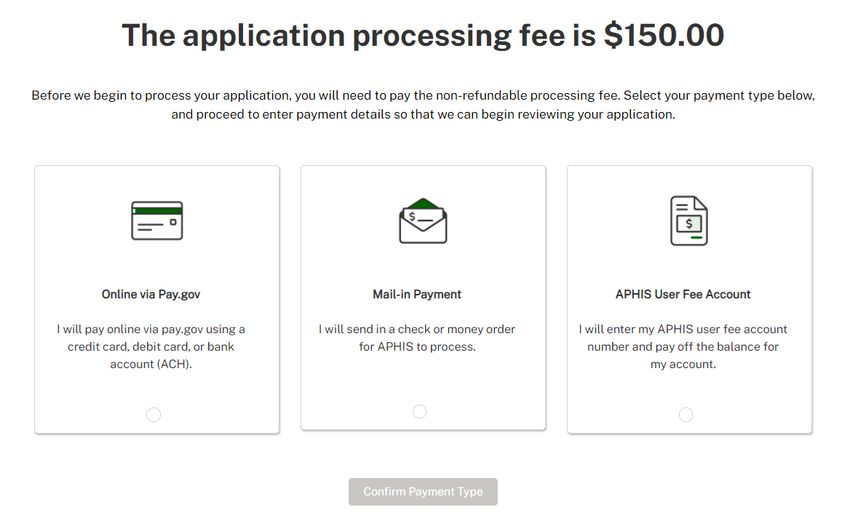
Step 2: Complete the Permitting Assistant                                                         SEARCH PAGE

                                                                                 Use the “X” to remove an
 A• Select the Attribute Filters to refine your material search results.         individual filter and “Clear All”
                                                                                 to remove all selected filters.

    Note: For best results complete ALL
    attribute filters from top to bottom order until
    there is only ONE result.

    Some of the filters are selection-order
    dependent, meaning that your first selection                   A

    may limit which filters you may select next.

                                                                           Select the “i” icons
                                                                           to reveal tool tips

                                                                                                                     8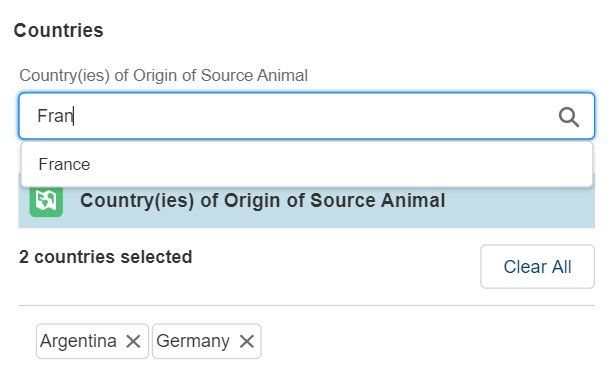
Step 2: Complete the Permitting Assistant                                                                                    SEARCH PAGE

 Note: You will likely not need to adjust your view of the Result Cards, as you should use all attribute filters until one result remains.

 Use the following tools to adjust your view of
 the Result Cards.
                                                                                          A                                                  C
A• Use the drop-down to change the number
    of Result Cards per page.
                                                                                     C
B• Use the arrows to view more pages of
    Result Cards.

C• Use the drop-down to sort by
    Prescreening Result number (PR #) or
    Outcome.

      • Each Result Card has a unique PR #.
         If you need to communicate with VS
         about a specific result card, you can                                                        B
         use the PR #.
                                                                                                                                             9
Step 2: Complete the Permitting Assistant                                                                               SEARCH PAGE

 You can add a material to your request as a single material (ex: single-species bulk material, tissue samples) or as an ingredient of
 a product made up of multiple animal-origin materials (ex: food products, pet food, test kits, nutraceuticals).

A• To add a material as a single material, select Add Material.

                                                                                            A

                                                                                                                                         10
Step 2: Complete the Permitting Assistant SEARCH PAGE
B• To add a material as an ingredient of a multi-ingredient product, select Add to Product Ingredient List.
•1 Select the checkbox associated with each product ingredient list you would like to add the material to.
•2 If you have not yet created a product ingredient list, or would like to create a new one, select Create a Product Ingredient
List, enter the Name of your product and select Create Product & Add Ingredient.
Note: Multi-ingredient is only available for animal products.
Select View My Product
Ingredient Lists to
manage all ingredient lists. Use the pencil or
trash can icons to
edit an ingredient
list name or delete
1 an ingredient list.
B
2
Note: Make sure to add all ingredients within that product, even if you don't need a permit. The outcome for the
whole product is based on the individual requirements for each animal-origin ingredient. 11Step 2: Complete the Permitting Assistant SEARCH PAGE
To remove a single material, select the Remove
Material button.
To remove an ingredient, uncheck the checkbox
associated with the Product Ingredient List.
Note: You must use one of these two options to
remove a material. Once you have added a material,
refreshing the VSPA will not remove them.
To add additional materials, edit any of the search
fields and repeat the process.
A• Once you’ve added all your materials proceed to
your Application Summary by selecting the
Shopping Cart icon or the View Summary
A
button.
12Step 2: Complete the Permitting Assistant SUMMARY PAGE
The materials you have added have been sorted into categories:
VS 16-3 Permit Application – Materials listed in this
section require 16-3 Permit applications. The materials
have been sorted onto the appropriate number of
applications.
No Permit Required but Conditions Apply –
Materials listed in this section do not require a permit
application but may have additional conditions (i.e. a
required certificate).
Inadmissible – Materials listed in this section are not
allowed for import, transport, or transit.
Select each category tab to view the results in that
category.
13Step 2: Complete the Permitting Assistant SUMMARY PAGE
B
A• To delete a material from your summary
request, select the trashcan icon.
E
B• To add more materials, select Go Back
and Add More Materials.
C• When applicable, download all letters by A
selecting the View Letter button
associated with each material.
C
D• To send yourself a copy of this request
summary, enter your email into the field
and select Send.
• Please note your summary will expire in 5
standard days.
E• If you are renewing an ePermits permit, D
enter the Permit number and Save.
14Step 3: Proceed to Application(s) from VSPA SUMMARY PAGE
A• Once you have reviewed all your results, select the Proceed to Applications button to continue to complete and submit your
applications in eFile.
A
Note: If you are not already logged in, you will be prompted to log in with your eAuthentication credentials.
15Step 3: Proceed to Application(s) from VSPA
If your Application Summary resulted in more than one application, you will see the Split Application Notice that lists each resulting
application and its associated materials.
A• Select I Understand & Continue to proceed to application
A
16Step 3: Proceed to Application(s) from VSPA
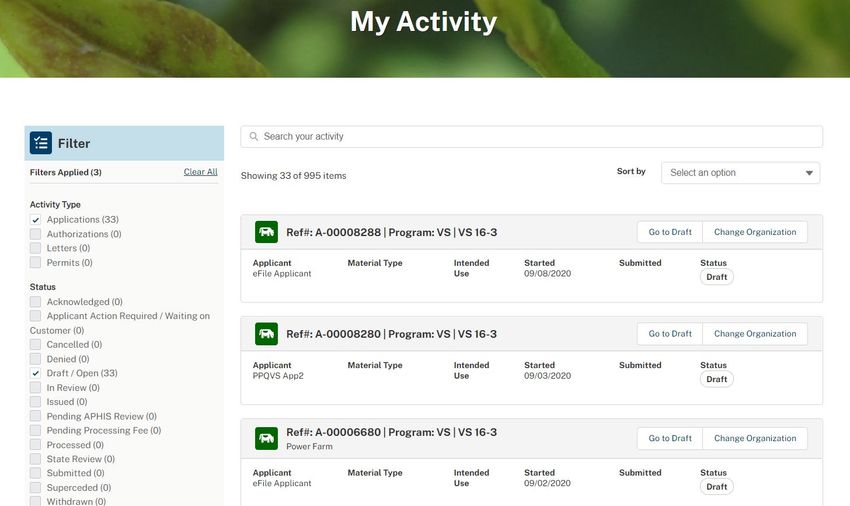
After you click “I Understand & Continue”, you will be sent to the My Activity page that lists all applications associated with your
account, the applications are sorted by Newest to Oldest. Your most recent application(s) will be at the top of the list.
B• To navigate to your application select one of the three options:
1• Reference #
2• Go to Draft
3• Draft
1 2
3
17Step 4: Identify Responsible Parties Responsible Party
In the Responsible Party section of your application, you will identify the responsible parties involved in the movement of
your material.
The types of Responsible Parties include:
• Permittee – The individual who is the permit holder, whose name will appear on the permit. The Permittee must be a
person who resides in the United States or operates a business establishment within the United States.
• Applicant –The individual filling out and submitting the application (such as importers or brokers). The Applicant must
be a person who resides in the United States or operates a business establishment within the United States.
• In a situation where the applicant and permittee are different people, the applicant is the individual authorized by the permittee
to submit the application on their behalf.
• Delivery Recipient – The individual who will be receiving your material (such as quarantine or testing facility).
18Step 4: Identify Responsible Parties Responsible Party
Applicant Details
A• You have the option to enter an Application Reference Name. This is a “friendly name” you can use later to identify this
application.
A
B• Confirm that your information on the Contact Card is correct. If you are a first-time user, you will need to provide
additional contact information such as your business and/or mailing address and phone number.
• To update your contact information, select Edit and update accordingly.
C• Answer the required question, “Will you be the permittee?” to indicate whether you will be the permit holder or not.
• If you select no, you will need to provide the permittee’s contact information in an additional section of the page.
B C
19Step 4: Identify Responsible Parties
Using the Contact Cards - The contact cards displaying on the application are your associated contacts. Please note, if you do not
have any associated contacts, no cards will display. The Contact Cards are saved into eFile for repeated, future use. The cards are
sorted in alphabetical order by last name from left to right. A B
A• To find a contact you have previously used, enter the
contact’s name, company, or email into the search bar
or use the page arrows to manually search.
B• To create a new contact select Create New Contact,
enter the information and save. C
C• To edit or update a contact’s information, select Edit
Please note that editing a contact will update that
contact’s information for all future uses.
A
Note: If you edit the contact information before selection the contact will update for all future uses. However, if you
update after selection the contact will not update for all future uses. 20Step 4: Identify Responsible Parties Responsible Party
Permittee Details
Note: This section will only appear if you’ve indicated that you will not be the permit holder.
A Use the Contact Cards to select the Permittee.
B Answer the required question, What is your relationship to the permittee? If this is a new
• If you select Other, use the Relationship Explanation field to explain contact or if
you’re unable to
your relationship.
find the contact,
select Create
C You have the option to add attachments such as a Power of Attorney A New Contact.
document. To include a file, select Add New File and upload your file.
B
C
21Step 4: Identify Responsible Parties Responsible Party
Delivery Recipient
A• If your material must undergo quarantine/testing or is for non-commercial uses, use the Contact Cards to select
your delivery/quarantine address(es).
• If you are unable to provide your delivery/quarantine address(es) when needed, please note that the
application may be returned to you for more information, which may delay processing.
To add an additional delivery
recipient, select Add Another
Delivery Recipient. This is optional.
A
22Step 5: Enter in Supply Chain/Exporter(s) Information Supply Chain/Exporter
Knowledge of Exporters
In this section of the application you will provide the contact information of the exporter(s) of your material(s).
Answer the required question, “Do you know the
A
name(s) and address(es) of your exporter(s)?”
B
Exporter Details
A If you selected Yes, use the contact cards to
select your exporter(s).
To add an additional Exporter, select Add Another
Exporter. This is optional.
A
Please note option B is displayed on the following page 23Step 5: Enter in Supply Chain/Exporter(s) Information Supply Chain/Exporter
Countries of Export
B• If you selected No:
1.
1 Read the Warning.
2.
2 Answer the required question, “Do you know your country(ies) of export?”
a
b
a If you select Yes, the Country of Export section will appear. Use the section to select the countries from
where your material is being shipped.
a
Please note option b is displayed on the following page 24Step 5: Enter in Supply Chain/Exporter(s) Information Supply Chain/Exporter
Countries of Export
B• If you selected No:
1.
1 Read the Warning.
2.
2 Answer the required question, “Do you know your country(ies) of export?”
a
b
b If you select No, complete the required field by explaining why you do not know the specific country(ies)
from which your material is being exported.
b
25Step 6: Enter Transportation Information Transportation
Ports and Transportation
In this section of the application you will identify the Port of Arrival, Port of Exit (Transit applications only), and
Mode of Transportation for your material(s).
In the Ports section of the page, answer the required
question. Please note, this question will not appear on A
Transit applications. B
A If you answered Yes, use the Port of Arrival section to search for and select your ports.
B If you answered No, proceed to the Transportation section of the page.
26Step 6: Enter Transportation Information Transportation
Ports & Transportation
In the Ports section of the page, use the Port of Exit section to search and select the specific ports. Please note, this
field will only appear if you indicated Transit as your movement type.
Select Clear All to remove
all ports chosen
To Remove ports, select the
"X" to the right of chosen port
27Step 6: Enter Transportation Information Transportation
Ports & Transportation
In the Transportation section of the page:
A• Select your mode(s) of transportation by selecting them from the Available Mode(s) drop down.
You can choose more than one option
from the drop-down. A checkmark
indicates an option is selected. Use
the “X”s to remove selections.
B Answer the required question, “Do you wish to request an exception to hand-carry (on your person or baggage)
the material(s)?”
• If you answered Yes, read the message.
• If you answered No, proceed to the next page of the application.
28Step 7: Enter Material Information Material
Material Details
In this section of the application, you will provide all the details about each of your materials based on your selections
from the VS Permitting Assistant.
• Use the Save & Next Material button to navigate between each of the materials on your application. Please Note,
selecting the tabs on the left side of the page to navigate between materials will not save your data.
Note: The “cards” you selected in the VS Permitting Assistant may contain additional information required for
your application. Be sure to review your VS Permitting Assistant selections while entering your material details.
Select the VS Permitting Assistant
arrow to reveal the “card” you
A check mark next selected in the Assistant. This card
to a material name may contain additional information
will indicate all of required for your application.
Use the Remove Material
that material’s
button to delete materials
required fields are
from your application.
completed.
29Step 7: Enter Material Information Material
Material Details
Products have two tabs within them:
A
• Product Details – Information about the overall product as a whole
• Ingredient Details – Information about each individual ingredient within the product
B
Select each of the tabs to navigate between the two.
A B
This number indicates
the number of
ingredients within this
product.
30Step 7: Enter Material Information Material
Material Details
In this section of the application you will provide all the details about each of your materials.
• Complete all the required fields for each of your materials.
Required fields are marked with a red asterisk.
Note: Several fields will pre-populate with the information you entered into the VS Permitting Assistant.
• There are several fields, such as the Tissue field, that are multi-select drop-downs. To use these fields, select the drop-
down and then choose all your applicable options. A check-mark next to a tissue denotes that it is selected.
Use the “X” to remove an individual selection.
31Step 7: Enter Material Information Material
Material Details
Complete all the required fields for each of the applicant’s materials.
• To use the Countries fields, search for and select Countries one at a time.
Use the “X” to remove an individual
country and “Cleat All” to remove all
selected countries .
32Step 7: Enter Material Information Material
Material Details
A C
If your material is a cell culture product, you will also
need to complete a VS 16-7.
A• Complete all required fields in the VS 16-7 section.
B
B• To add a cell line, select the Add a Cell Line
button.
C• In the modal enter your data and then save.
Your cell line will be added to the table.
• Repeat steps B-C for all Cell Lines.
D
D• To add Nutritive Factors/Enzymes, select the Add
Nutritive Factors/Enzymes button.
E
E• In the modal, enter your data and then save.
Your nutritive factor/enzyme will be added to the
table.
• Repeat steps D-E for all Nutritive
Factors/Enzymes. 33Step 7: Enter Material Information Material
Material Details
In the Attachments section of the page, you have the option to attach additional documentation that is specific to this
material. There will be an additional section later in the application where you can attach general files that are not specific to a
material. This section is not required.
A• If you would like to upload files, select Add New File.
B• In the popup window, select Upload Files and select your file or drag and drop your file on the “drop files” button.
C• Once your file has uploaded, select Done.
C
B
34Step 7: Enter Material Information Material
Material Details
You have the option to add additional materials to your application. To do this:
A• Select Add Another Material.
A
B
B• Read the Redirecting You modal. In order to add more materials to your
application, you will be taken back to the VS Permitting Assistant. Please
note, you will only be able to add additional materials that are allowed to be C
permitted with the materials already on your application.
C• Select I Understand & Continue to proceed to the VS Permitting Assistant.
35Step 8: Upload Additional Documentation Upload Files
Supporting Documentation
In this section of the application you have the option to add any additional documentation that you feel would be beneficial for
your application. The documentation in this section is not specific to a material.
A• If you do not have any files to upload, select the checkbox and proceed to the next
A
section of the application.
B• Use the File Description text field to enter in information about the file(s) being uploaded.
C• If you would like to upload files, select Add New File.
• In the popup window, select Upload Files and select your file or drag and drop your file on the “drop files” button.
D• Once your file has uploaded, select Done
B D
C
36Step 8: Upload Additional Documentation Upload Files
Supporting Documentation
Once your files have been uploaded, they will appear in a table view.
A Select Save and Next to proceed to the next section of the application.
Use the trashcan icon to delete
a file or the pencil icon to edit
the description of the file.
A
37Step 9: Review, Certify, and Submit Review and Submit
Review and Submit
In this section of the application you will review your complete application, certify that the information you have entered is
correct, and submit. Please note, once you submit your application you are not able to change any of the information.
A • Review your data in each of the sections.
• To edit your data in a specific section of the application, select the Edit button
associated with that section. You will be taken back to that page of the application to edit
your data.
B • Once you are ready to submit your application, read the certification statement, select the
“I certify…” checkbox and select Proceed to Payment.
B
B
38Step 10: Payment
After you've completed the application, in order to submit you will need to pay the application fee. Review your application
processing fee and then select your method of payment.
Payment Methods:
A• Online via Pay.gov
A B C
B• Mail-in Payment
C• APHIS User Fee Account
39Step 10: Payment – Online via Pay.gov
Online via Pay.gov as your payment method.
• Please note, when selecting this as your payment method you will be redirected to pay.gov, once you have completed
the payment process you will, you will be returned to the APHIS eFile site.
A• Select whether you want to pay with a withdrawal
from a checking or savings account (ACH) or if
you want to pay with a debit or credit card.
A
B• Select Continue to finish completing your payment.
B
40Step 10: Payment – Mail-in Payment
Mail-in Payment method:
• Please note, you will need to write your application number on your check or money order to ensure the VS Staff can
associate the payment with your application upon receipt. Cash payments will not be accepted.
A• Enter your Check or Money Order Number
B• Select Confirm Payment Details
A
B
41Step 10: Payment – APHIS User Fee Account
APHIS User Fee Account payment method:
• Please note, VS Staff will associate the cost of the application with your account and will begin to review it after
payment processing is complete.
A• Enter APHIS User Fee Account Number
B• Select Confirm Payment Detail
A
B
42Step 10: Payment
Congratulations!
• To ensure you have successfully completed your payment, you will see the confirmation message below.
• You will receive a confirmation email once your application has been processed.
43I AM AN APPLICANT
I want to amend or renew an eFile permit
Step 1: Sign into APHIS eFile and find your permit on the My Activity page
Page 45
Step 2: Amend or renew your Permit
Page 46
44Step 1: Sign into APHIS eFile and find your permit on the My Activity page
Navigate to https://efile.aphis.usda.gov/ in Google Chrome (eFile is not supported by Internet Explorer).
A• Log in to eFile using your eAuthentication credentials.
B• Select the My Activity tab and use the search bar or filters to find the permit you want to amend or renew.
C• Select the More Actions drop-down and choose Amend Permit or Renew Permit.
• All issued and active permits are eligible to be amended.
• All issued permits that are within 90 days of expiration or expired are eligible to be renewed.
• You can only complete one of these actions at a time. For example, if you’ve applied to amend your permit, you are not able
to renew until the amendment is processed.
B
C
B
45Step 2: Amend Your Permit
A• If you selected Amend Permit, read the pop-up window and select I understand & Continue.
• You will be taken to a new, amendment application. All data from your previous application will be copied into
the amendment application.
• Edit your information as needed and then on the Review and Submit page, certify and proceed to payment.
• Pay to complete and submit your application.
A
Note: If approved, your amended permit will keep the same APHIS permit number (610-20-205-1234). 46Step 2: Renew your Permit
A• If you selected Renew Permit, read the pop-up window and select one of the radio options:
1• Renew with no changes when you do not need to edit any of the permit information and only wish to renew the
effective and expiration dates.
• Select I Understand & Continue. You will be taken to a new, renewal application. All data from your previous
application will be copied into the renewal application.
• On the Review and Submit page, certify and proceed to payment.
• Pay to complete and submit your application.
2• Renew with changes when you need to edit information and
renew the effective and expiration dates.
• Select I Understand & Continue. You will be taken to a
new, renewal application. All data from your previous
application will be copied into the renewal application.
A
• Edit your information as needed and then on the Review
and Submit page, certify and proceed to payment.
• Pay to complete and submit your application.
Note: If approved, your renewed permit will keep the same APHIS permit number (610-20-205-1234).
47I AM AN APPLICANT
I want to renew an ePermits permit in eFile
Step 1: Sign into APHIS eFile
Page 49
Step 2: Complete the VSPA based on the ePermits permit you are renewing
Page 51
Step 3: Proceed to, complete, and submit your Application
Page 53
48Renewing ePermits Permits in eFile SUMMARY PAGE
Users can renew permits issued from ePermits in eFile. To do this, you will need to complete the VS Permitting Assistant,
complete and submit your application in eFile. Your application fee will be adjusted to the appropriate renewal amount.
Make sure to add all the materials on your ePermits permit to your Application Summary.
The following slides will explain the step-by-step process to renew ePermits permits in eFile.
49Step 1: Sign in to eFile
Navigate to https://efile.aphis.usda.gov/
in Google Chrome (eFile is not supported by Internet
Explorer).
A• Log in to eFile using your eAuthentication
credentials.
• If you are not eAuthenticated, select Create an
Account and follow the steps to become
eAuthenticated. You must be eAuthenticated to
apply in APHIS eFile.
• If your eAuthentication is not Verified, you will be B
prompted with various questions to upgrade your
eAuth (Example question: What is your Social Security
number?). Complete these questions in order to
proceed.
B• Under the Ready to Apply section, select the
ePermits VS 16-6A Renewal link.
50Step 2: Complete the VSPA based on the ePermits permit you are renewing SEARCH PAGE
Complete the VS Permitting Assistant to begin the application process. For assistance using the VS Permitting Assistant,
please see the VS Permitting Assistant section of this guide.
Note: Make sure to add all the materials on your ePermits Permit to your Application Summary.
Once you’ve added all your materials proceed to your Application Summary by selecting the
Shopping Cart icon or the View Summary button.
51Step 2: Complete the VSPA based on the ePermits permit you are renewing SUMMARY PAGE
A• To indicate that this application is
renewal enter your ePermits Permit
A
Number on the Application Summary
page and select Save.
B• Please note, your Estimated Processing
Fee will be updated accordingly.
If the materials on your ePermits Permit
result in more than one permit application in
the eFile VSPA Application Summary, these B
applications will be independent of one
another for processing and issuance.
52Step 3: Proceed to Application(s) from VSPA SUMMARY PAGE
Once you have reviewed all your results, select Proceed to Applications. Refer to the VS 16-3 Application section of this guide
for directions on how complete the eFile application.
Note: If you are not already
logged in, you will be
prompted to log in with
your eAuthentication
credentials.
When completing your application, make sure to include an attached copy of your ePermit permit.
53I AM AN APPLICANT
My application requires a Lab Facility Inspection
If your application requires a facility inspection, you
will receive an email alerting you. This email will
contain a Preliminary Questionnaire you must
complete before the inspection can take place.
If you have questions or need assistance, please
contact the VS staff member who emailed you. If
you need further assistance, see the Appendix for
additional contact information.
54I AM AN APPLICANT
I want to Withdraw my Application
A
A• To withdraw an application, navigate to your My
Activity page and select the View Details associat
with the application you would like to withdraw.
B• On the Application Details page, select the More B
drop-down and choose Withdraw Application.
C• In the pop-up window, select the Reason for
Withdrawal drop-down and choose your reason
for withdrawing.
D• When you are done, select Submit.
E• Once you submit, your withdrawal will be pending C
APHIS approval. Once APHIS approves your
request, your application will be withdrawn.
D
55APPENDIX
System Setup Contact
• Compatible browser – For the best user experience, please use
Google Chrome. Other available browsers include Firefox, Safari, and If you require assistance with your applications, please contact:
Veterinary Services
Edge. eFile is NOT supported by Internet Explorer.
(301) 851 3300
• Emails – Add the APHIS eFile email at aphis.efile@usda.gov and APIE@usda.gov
support@salesforce.com to your address book so that any automatic
emails are not sent to junk If you require technical assistance, please contact:
Help Desk
• Zoom –100%
help@usda.gov
56You can also read


