SM24DP4XA Managed Gigabit Ethernet Fiber Switch - Transition Networks
←
→
Page content transcription
If your browser does not render page correctly, please read the page content below

Transition Networks                                               SM24DP4XA Install Guide

SM24DP4XA
Managed Gigabit Ethernet Fiber Switch
(20) 100/1000Base-X SFP Slots + (4) 100/1000Base SFP/RJ-45 Combo Ports + (4)
1G/10GBase-X SFP+ Slots

Install Guide
33769 Rev. D

33769 Rev. D                    https://www.transition.com                Page 1 of 50
Transition Networks                                                                                         SM24DP4XA Install Guide

Safety Warnings and Cautions
These products are not intended for use in life support products where failure of a product could reasonably be expected to
result in death or personal injury. Anyone using this product in such an application without express written consent of an
officer of Transition Networks does so at their own risk and agrees to fully indemnify Transition Networks for any damages
that may result from such use or sale.

        Attention: this product, like all electronic products, uses semiconductors that can be damaged by ESD (electrostatic discharge).
Always observe appropriate precautions when handling.

         NOTE:    Emphasizes important information or calls your attention to related features or instructions.

          WARNING: Alerts you to a potential hazard that could cause personal injury.

          CAUTION: Alerts you to a potential hazard that could cause loss of data or damage the system or equipment.

SM24DP4XA Managed Fiber Switch Install Guide, 33769 Rev. D

Record of Revisions

    Rev        Date                                                Description of Changes
     A       1/21/20      Initial release at FW v7.10. 2341, HW v1.01.1, and Mechanical v1.01.
     B       6/15/20      Update features, specs, and install information.
     C      10/16/20      Update weight specs and add UL certification.
     D       3/4/21       Update specs and change Power Supply from 25079 (EoL) to 25175.

Trademark notice: All trademarks and registered trademarks are the property of their respective owners. All other products
or service names used in this publication are for identification purposes only and may be trademarks or registered
trademarks of their respective companies. All other trademarks or registered trademarks mentioned herein are the property
of their respective holders.

Copyright restrictions: © 2020-2021 Transition Networks, Inc. All rights reserved. No part of this work may be reproduced or
used in any form or by any means (graphic, electronic, or mechanical) without written permission from Transition Networks.

Address comments on this product or manual to:
Transition Networks Inc.
10900 Red Circle Drive, Minnetonka, MN 55343
tel: +1.952.941.7600 | toll free: 1.800.526.9267 | fax: 952.941.2322
sales@transition.com | techsupport@transition.com | customerservice@transition.com

33769 Rev. D                                        https://www.transition.com                                        Page 2 of 50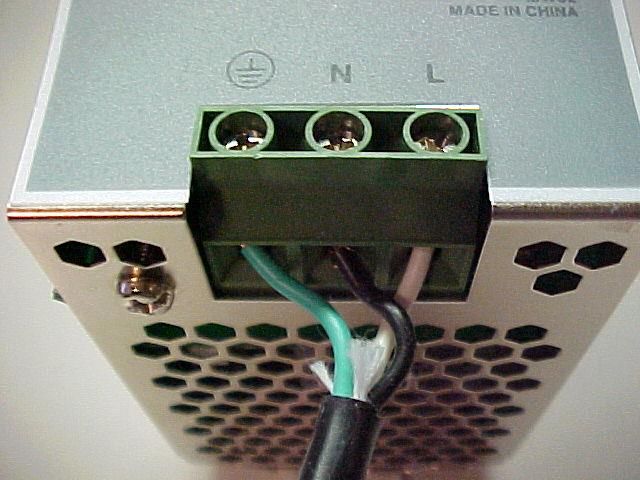
Transition Networks                                                                                                                    SM24DP4XA Install Guide

Contents
Safety Warnings and Cautions .........................................................................................................................2
Chapter 1 - Overview .......................................................................................................................................5
  Key Features .............................................................................................................................................................5
  Benefits ....................................................................................................................................................................5
  Ordering Information ...............................................................................................................................................6
  Specifications ...........................................................................................................................................................6
  Software Features ....................................................................................................................................................7
  Front Panel .............................................................................................................................................................16
  LEDs ........................................................................................................................................................................17
  RST (Reset) button .................................................................................................................................................19
  Back Panel ..............................................................................................................................................................19
  Side Panel ...............................................................................................................................................................19
  Manual Overview ...................................................................................................................................................20
  For More Information ............................................................................................................................................20
Chapter 2 – Installing the Switch .................................................................................................................... 21
  Package Contents ...................................................................................................................................................21
  Regional Versions of Power Cords .........................................................................................................................21
  Safety Instructions for Rack Mount Installations ...................................................................................................21
  Mounting the Switch in a 19-inch Rack..................................................................................................................22
  Mounting the Switch on Desk or Shelf...................................................................................................................22
  Grounding the Switch ............................................................................................................................................23
  Installing SFP Modules ...........................................................................................................................................23
  Connecting Network Devices .................................................................................................................................24
     Twisted-Pair Devices ..........................................................................................................................................24
     Cabling Guidelines ..............................................................................................................................................24
     Connecting to PCs, Servers, Hubs, and Switches ...............................................................................................24
  AC/DC/DC Redundant Power .................................................................................................................................26
  Connecting the AC Power Cord ..............................................................................................................................26
  Connecting to DC Power ........................................................................................................................................27
  Power Supply Specifications ..................................................................................................................................29
     25131 for 48VDC ................................................................................................................................................29
     25079 for 24VDC ................................................................................................................................................31
     Optional Power Supply 25175............................................................................................................................32
  25175 Features ......................................................................................................................................................32
  25175 Specifications ..............................................................................................................................................32
  25175 Installation ..................................................................................................................................................34
Chapter 3 - Initial Switch Configuration .......................................................................................................... 38
  Initial Switch Configuration via Web Browser .......................................................................................................38
  Initial Switch Configuration via CLI.........................................................................................................................39
Chapter 4 - Troubleshooting .......................................................................................................................... 40
  Basic Troubleshooting ............................................................................................................................................40
  Troubleshooting Table ...........................................................................................................................................40
  LED Troubleshooting ..............................................................................................................................................41
  Device Label and Packaging Label Information .....................................................................................................41
  Record Device and System Information.................................................................................................................42

33769 Rev. D                                                     https://www.transition.com                                                           Page 3 of 50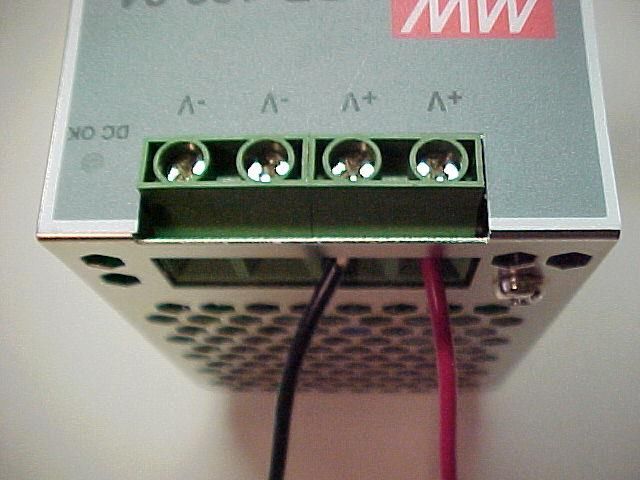
Transition Networks                                                                                                                 SM24DP4XA Install Guide

Chapter 5 - Regulatory and Safety Information ............................................................................................... 43
  SM24DP4XA Certifications .....................................................................................................................................43
  SM24DP4XA Compliance and Safety Statements ..................................................................................................43
  SM24DP4XA EMC and EMI Report .........................................................................................................................44
  CE EMC Test ...........................................................................................................................................................44
  FCC EMI Test ..........................................................................................................................................................44
  Declaration of Conformity .....................................................................................................................................45
  Class I, Division 2 / classe I, division 2 ....................................................................................................................45
  High Risk Activities Disclaimer ...............................................................................................................................46
  Cautions and Warnings ..........................................................................................................................................46
  Electrical Safety Warnings......................................................................................................................................47
Chapter 6 - Service, Warranty & Tech Support ................................................................................................ 48
  Warranty ................................................................................................................................................................48
  Contact Us ..............................................................................................................................................................49

33769 Rev. D                                                    https://www.transition.com                                                        Page 4 of 50
Transition Networks                                                                       SM24DP4XA Install Guide

Chapter 1 - Overview
The SM24DP4XA is a next generation Layer 2 managed switch with 128Gbps switching capacity. It provides up to
(24) dual speed fiber slots and (4) 10Gig aggregation ports, it’s an ideal switch for fiber aggregation applications.
The SM24DP4XA delivers 20 GbE SFP ports, 4 Combo GbE RJ45/SFP ports, 4 GbE/10G SFP+ ports, RJ45 Console
port and OOB Management port with built-in AC and dual DC power support. The SM24DP4XA provides front
panel access to all power, data, and management ports to facilitate desktop or rack-mount installations.
The SM24DP4XA is ideal for environments that require advanced features for granular control which is a must for
easy network configuration and management where you need a successful installation for high-bandwidth VoIP,
Gigabit-to-the-Desktop deployments, and converged voice and data networks.

Key Features
  •   DMS (Device Management System) provides Graphical Monitoring (Topology, Floor, & Map views, Traffic
      Monitoring, & Troubleshooting (network diagnostic, protection, performance & link management)
  •   L2+ features provide better manageability, security, QoS, and performance
  •   Guest VLAN, Voice VLAN, Port based, tag-based and Protocol based VLANs
  •   802.3az Energy Efficient Ethernet
  •   IPv6/ IPv4 Dual stack
  •   IEEE 802.3ah OAM and IEEE 802.1ag and Y.1731 CFM
  •   IEEE 1588v2 PTP
  •   L2/L3/L4 ACLs support MAC ACL, IP standard/extended ACL, 802.1p, Ethernet type
  •   ITU-T G.8031 Ethernet Linear Protection Switching (EPS)
  •   ITU-T G.8032 Ethernet Ring Protection Switching (ERPS)
  •   Ethernet Virtual Circuits (EVC) for EPL and EVPL services
  •   Spanning Tree protocol (STP, RSTP,MSTP) and Rapid Ring support

Benefits
Exceptional Precision with IEEE 1588v2 (TC) : The switch performs IEEE1588v2 with transparent clock capability,
implementations in hardware, so there is no performance penalty on packet processing. The hardware
architecture ensures low latency and high time accuracy – which is critical for delay-sensitive financial and mobile
applications.
Superior reliability through OAM and CFM for Service Assurance : Service assurance is provided through a rich
feature set of operations, administration, and maintenance (OAM) functionalities. It can simplify and facilitate
the management of Ethernet networks, resulting in diminishing operational costs. The Ethernet access device
also offers standards-based fault and performance management in adherence with Y.1731 PM and 802.1ag
connectivity fault management (CFM) standards. These features contribute to significant reduction in operational
expenditures and allows for troubleshooting without expensive truck rolls.

33769 Rev. D                               https://www.transition.com                               Page 5 of 50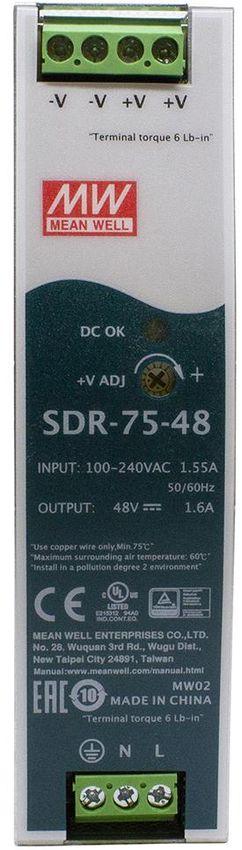
Transition Networks                                                                        SM24DP4XA Install Guide

Ordering Information
          SKU                                                   Description
                        Managed fiber switch, (20) 100/1000BASE-X + (4) 100/1000 SFP/RJ-45 Combo + (4)
  SM24DP4XA
                        1G/10G SFP+ with 19” Rack Mount ears included
  25131                 Industrial DIN rail mounted power supply, 48VDC, 76.8Watts (option; order separately)
  25079                 Industrial DIN Rail Mounted Power Supply (option; order separately) (EoL March 2021)
                        Industrial DIN rail mounted power supply. Input: 90 – 264VAC, 127 - 370VDC;
  25175
                        Output: 24 - 48VDC, 5.0A, 120 Watts. Operating Temp: -20°C to +70°C.
  SFPs                  See Transition Networks SFP webpage (option; order separately)

Specifications

Port Configuration
                                                      Uplinks
      Total Ports          SFP (100M/1G)                                       Console                  MGMT
                                                  (100M/1G/10G)
                                                       4 SFP+
            28                    20                                             RJ45                        RJ45
                                                 4 RJ45/SFP Combo

Hardware Performance

    Forwarding Capacity            Switching Capacity                Mac Table                     Jumbo Frames

          95.232 Mpps                   128 Gbps                        32 K                       up to 10K bytes

Environmental Range

         Operating Temperature                   Storage Temperature                              Altitude
     Fahrenheit          Centigrade         Fahrenheit          Centigrade               Feet                 Meters
    -4 to +140⁰          -20 to +60⁰       -13 to +158⁰         -25 to +70⁰             < 10000               < 3000

Dimension, Weight, Humidity

                 Dimension (WxHxD)                         Weight (no packaging)
                                                                                                   Operating Humidity
         Millimeters             Inches               Kilograms                Pounds
                                                                                                   10% to 90% non-
     442 x 44 x 211         17.4 x 1.73 x 8.31            3.0                    6.50
                                                                                                      condensing

33769 Rev. D                               https://www.transition.com                                Page 6 of 50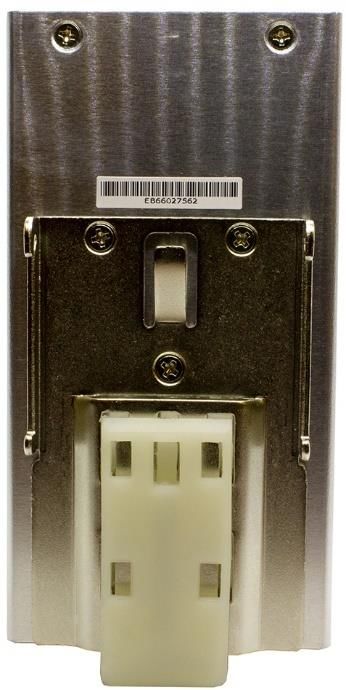
Transition Networks                                                                    SM24DP4XA Install Guide

Voltage and Frequency

  Input Voltage and Frequency
  AC Voltage               100-240 VAC
  AC Frequency             50-60 Hz
  DC Voltage               Dual +24/+48 VDC or -24V/-48V VDC

Industry Standards

                   IEEE 802.3™, IEEE 802.3u, IEEE 802.3z, IEEE802.3ae, IEEE 802.3x, IEEE 802.3ad, IEEE 802.1D,
  Standard         IEEE 802.1w, IEEE802.1s IEEE 802.1Q, IEEE 802.1p, IEEE 802.1ad,IEEE 1588v2, IEEE802.3ah,
                   IEEE802.1ag, ITU-T Y.1731, ITU-T G.8031, ITU-T G.8032

MTBF
                                MTBF at 25.00 deg.                             MTBF at 75.00 deg.
         Model          Environment GB, GC - Ground Benign,            Environment GB, GC - Ground Benign,
                                    Controlled                                     Controlled
 SM24DP4XA                            120,914 Hrs.                                 27,500 Hrs.

Software Features
  Layer 2 Switching
                           • Standard Spanning Tree 802.1d
  Spanning Tree
                           • Rapid Spanning Tree (RSTP) 802.1w
  Protocol (STP)
                           • Multiple Spanning Tree (MSTP) 802.1s
                           Link Aggregation Control Protocol (LACP) IEEE 802.3ad
  Trunking                 • Up to 14 groups
                           • Up to 4 ports per group
                           Supports up to 4K VLANs simultaneously (out of 4096 VLAN IDs)
                           • Port-based VLAN
                           • 802.1Q tag-based VLAN
                           • MAC-based VLAN
  VLAN                     • Management VLAN
                           • Private VLAN Edge (PVE)
                           • Q-in-Q (double tag) VLAN
                           • Voice VLAN
                           • GARP VLAN Registration Protocol (GVRP)
                           • Relay of DHCP traffic to DHCP server in different VLAN.
  DHCP Relay
                           • Works with DHCP Option 82
  IGMP v1/v2/v3            Limits bandwidth-intensive multicast traffic to only the requesters. Supports 1024
  Snooping                 multicast groups

33769 Rev. D                              https://www.transition.com                             Page 7 of 50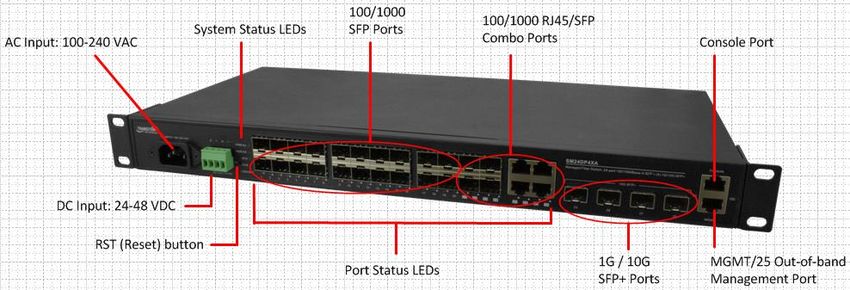
Transition Networks                                                                   SM24DP4XA Install Guide

                         Used to support a Layer 2 multicast domain of snooping switches in the absence of a
  IGMP Querier
                         multicast router
                         IGMP snooping with proxy reporting or report suppression actively filters IGMP
  IGMP Proxy
                         packets in order to reduce load on the multicast router

  MLD v1/v2 Snooping     Delivers IPv6 multicast packets only to the required receivers

  Layer 3 Switching

  IPv4 Static Routing    IPv4 Unicast: Static routing

  IPv6 Static Routing    IPv6 Unicast: Static routing
  Security
  Secure Shell (SSH)     SSH secures Telnet traffic in or out of the switch; SSH v1 and v2 are supported
  Secure Sockets Layer   SSL encrypts HTTP traffic, allowing secure access to browser-based management GUI

                         • IEEE802.1X: RADIUS authentication, authorization and accounting, MD5 hash,
                           guest VLAN, single/multiple host mode and single/multiple sessions
  IEEE 802.1X
                         • Supports IGMP-RADIUS based 802.1X
                         • Dynamic VLAN assignment

  Layer 2 Isolation      PVE (protected ports) provides L2 isolation between clients in the same VLAN.
  Private VLAN Edge      Supports multiple uplinks
  Port Security          Locks MAC addresses to ports, and limits the number of learned MAC address

  IP Source Guard        Prevents illegal IP address from accessing to specific port in the switch

  RADIUS/ TACACS+        Supports RADIUS and TACACS+ authentication. Switch as a client
                         Prevents traffic on a LAN from being disrupted by a broadcast, multicast, or unicast
  Storm Control
                         storm on a port
  DHCP Snooping          Acts as a firewall between untrusted hosts and trusted DHCP servers
                         Supports up to 512 entries. Drop or rate limitation based on:
                         • Source and destination MAC, VLAN ID or IP address, protocol, port,
                         • Differentiated services code point (DSCP) / IP precedence
                         • TCP/ UDP source and destination ports
  ACLs
                         • 802.1p priority
                         • Ethernet type
                         • Internet Control Message Protocol (ICMP) packets
                         • TCP flag

33769 Rev. D                           https://www.transition.com                               Page 8 of 50
Transition Networks                                                                      SM24DP4XA Install Guide

  Quality of Service (QoS)
  Hardware Queue             Supports 8 hardware queues
                             •   Strict priority and weighted round-robin (WRR)
  Scheduling
                             •   Queue assignment based on DSCP and class of service
                             •   Port based
                             •   802.1p VLAN priority based
  Classification             •   IPv4/IPv6 precedence / DSCP based
                             •   Differentiated Services (DiffServ)
                             •   Classification and re-marking ACLs
                             •   Ingress policer
  Rate Limiting              •   Egress shaping and rate control
                             •   Per port

  Management
  DHCP Server                Support DHCP server to assign IP to DHCP clients
  Remote Monitoring          Embedded RMON agent supports RMON groups 1,2,3,9 (history, statistics, alarms,
  (RMON)                     and events) for enhanced traffic management, monitoring and analysis
                             Traffic on a port can be mirrored to another port for analysis with a network analyzer
  Port Mirroring             or RMON probe. Up to N-1 (where N is number of Switch ports) ports can be mirrored
                             to single destination port. A single session is supported.
                             The Universal Plug and Play Forum, an industry group of companies working to enable
  UPnP
                             device-to-device interoperability by promoting Universal Plug and Play

  Management
                             • Used by network devices for advertising their identities, capabilities, and
  IEEE 802.1ab (LLDP)          neighbors on an IEEE 802ab local area network.
                             • Support LLDP-MED extensions
  Web GUI Interface          Built-in switch configuration utility for browser-based device configuration
  CLI                        For users to configure/manage switches in command line modes
  Dual Image                 Independent primary and secondary images for backup while upgrading
                             SNMP version1, 2c and 3 with support for traps, and SNMP version 3 user-based
  SNMP
                             security model (USM)

                             • Web browser upgrade (HTTP/ HTTPs) and TFTP
  Firmware Upgrade
                             • Upgrade through console port as well

                             Network Time Protocol (NTP) for clock synchronization between computer systems
  NTP
                             over packet-switched

                             HTTP/HTTPs; SSH; DHCP Client/ DHCPv6 Client; Cable Diagnostics; Ping; Syslog; Telnet
  Other Management
                             Client; IPv6 Management

33769 Rev. D                               https://www.transition.com                             Page 9 of 50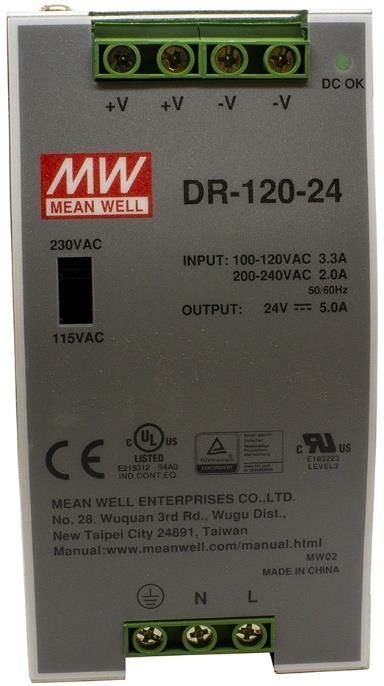
Transition Networks                                                                  SM24DP4XA Install Guide

  Ethernet OAM
  IEEE 802.3ah Link
                          Supports IEEE 802.3ah Ethernet OAM (Operations, Administration & Management)
  OAM
  IEEE 802.1ag & ITU-T    Supports IEEE 802.1ag Ethernet CFM (Connectivity Fault Management)
  Y.1731 Flow OAM         Supports ITU-T Y.1731 Performance Monitoring

  Loop Protection
  ITU-T G.8031            Supports ITU-T G.8031 Ethernet Linear Protection
  ITU-T G.8032            Supports ITU-T G.8032 Ethernet Ring Protection Switching

Power Consumption
DC Power Consumption
* Measure the DC power consumption after 60 minutes under full loading with wire speed forwarding.
DC Input: 24V

                                                       DC Current                             DC Power
             Status           Operating Interface                       DC Voltage (V)
                                                     Consumption (A)                       Consumption (W)

 Non-loading                None                           0.79               24                18.96

                            20-Port 1G SFP
 Full-load
                            4-Port 1G RJ45                 1.65               24                39.60
 5 minutes
                            4-Port 10G SFP
                            20-Port 1G SFP
 Full-loading
                            4-Port 1G RJ45                 1.80               24                43.20
 60 minutes later
                            4-Port 10G SFP

                                                       DC Current                             DC Power
             Status           Operating Interface                       DC Voltage (V)
                                                     Consumption (A)                       Consumption (W)
                            22-Port 1G SFP
 Full-load
                            2-Port 1G RJ45                 1.66               24                39.84
 5 minutes
                            4-Port 10G SFP
                            22-Port 1G SFP
 Full-loading
                            2-Port 1G RJ45                 1.81               24                43.44
 60 minutes later
                            4-Port 10G SFP

                                                       DC Current                             DC Power
             Status           Operating Interface                       DC Voltage (V)
                                                     Consumption (A)                       Consumption (W)
 Full-load                  24-Port 1G SFP
                                                           1.57               24                37.68
 5 minutes                  4-Port 10G SFP
 Full-loading               24-Port 1G SFP
                                                           1.70               24                40.80
 60 minutes later           4-Port 10G SFP

33769 Rev. D                            https://www.transition.com                          Page 10 of 50
Transition Networks SM24DP4XA Install Guide
DC Input: 48V
DC Current DC Power
Status Operation Interface DC Voltage (V)
Consumption (A) Consumption (W)
Non-loading None 0.37 48 17.76
20-Port 1G SFP
Full-load
4-Port 1G RJ45 0.82 48 39.36
5 minutes
4-Port 10G SFP
20-Port 1G SFP
Full-loading
4-Port 1G RJ45 0.89 48 42.72
60 minutes later
4-Port 10G SFP
DC Current DC Power
Status Operation Interface DC Voltage (V)
Consumption (A) Consumption (W)
22-Port 1G SFP
Full-load
2-Port 1G RJ45 0.75 48 36.00
5 minutes
4-Port 10G SFP
22-Port 1G SFP
Full-loading
2-Port 1G RJ45 0.82 48 38.88
60 minutes later
4-Port 10G SFP
DC Current DC Power
Status Operation Interface DC Voltage (V)
Consumption (A) Consumption (W)
Full-load 24-Port 1G SFP
0.81 48 38.88
5 minutes 4-Port 10G SFP
Full-loading 24-Port 1G SFP
0.87 48 41.76
60 minutes later 4-Port 10G SFP
33769 Rev. D https://www.transition.com Page 11 of 50Transition Networks SM24DP4XA Install Guide
AC Power Consumption
* Measure the AC power consumption after 30 minutes under full loading with wire speed forwarding.
1. AC 100V Input
AC Current
AC Voltage Power Apparent Real Power
Status Test Status Consumption
(V) Factor Power (VA) (W)
(A)
No Loading None 100 0.37 0.54 37.00 19.98
20-Port 1G SFP
Full-load 5 minutes 4-Port 1G RJ45 100 0.69 0.56 69.00 38.64
4-Port 10G SFP
20-Port 1G SFP
Full-loading
4-Port 1G RJ45 100 0.74 0.56 74.00 41.44
60 minutes later
4-Port 10G SFP
AC Current
AC Voltage Power Apparent Real Power
Status Test Status Consumption
(V) Factor Power (VA) (W)
(A)
22-Port 1G SFP
Full-load 5 minutes 2-Port 1G RJ45 100 0.69 0.56 69.00 38.64
4-Port 10G SFP
22-Port 1G SFP
Full-loading
2-Port 1G RJ45 100 0.74 0.56 74.00 41.44
60 minutes later
4-Port 10G SFP
AC Current
AC Voltage Power Apparent Real Power
Status Test Status Consumption
(V) Factor Power (VA) (W)
(A)
24-Port 1G SFP
Full-load 5 minutes 100 0.68 0.56 68.00 38.08
4-Port 10G SFP
Full-loading 24-Port 1G SFP
100 0.73 0.56 73.00 40.88
60 minutes later 4-Port 10G SFP
Note: Apparent Power (VA) = AC Voltage x AC Current Consumption.
Real Power (W) = Apparent Power (VA) x Power Factor.
33769 Rev. D https://www.transition.com Page 12 of 50Transition Networks SM24DP4XA Install Guide
2. AC 110V Input
AC Current
AC Voltage Power Apparent Real Power
Status Test Status Consumption
(V) Factor Power (VA) (W)
(A)
No Loading None 110 0.34 0.53 37.40 19.82
20-Port 1G SFP
Full-load 5 minutes 4-Port 1G RJ45 110 0.63 0.54 69.30 37.42
4-Port 10G SFP
20-Port 1G SFP
Full-loading
4-Port 1G RJ45 110 0.68 0.55 74.80 41.14
60 minutes later
4-Port 10G SFP
AC Current
AC Voltage Power Apparent Real Power
Status Test Status Consumption
(V) Factor Power (VA) (W)
(A)
22-Port 1G SFP
Full-load 5 minutes 2-Port 1G RJ45 110 0.65 0.55 71.50 39.33
4-Port 10G SFP
22-Port 1G SFP
Full-loading
2-Port 1G RJ45 110 0.69 0.55 75.90 41.75
60 minutes later
4-Port 10G SFP
AC Current
AC Voltage Power Apparent Real Power
Status Test Status Consumption
(V) Factor Power (VA) (W)
(A)
24-Port 1G SFP
Full-load 5 minutes 110 0.63 0.55 69.30 38.12
4-Port 10G SFP
Full-loading 24-Port 1G SFP
110 0.68 0.55 74.80 41.14
60 minutes later 4-Port 10G SFP
Note: Apparent Power (VA) = AC Voltage x AC Current Consumption.
Real Power (W) = Apparent Power (VA) x Power Factor.
33769 Rev. D https://www.transition.com Page 13 of 50Transition Networks SM24DP4XA Install Guide
3. AC 220V Input
AC Current
AC Voltage Power Apparent Real Power
Status Test Status Consumption
(V) Factor Power (VA) (W)
(A)
No Loading None 220 0.20 0.45 44.00 19.80
20-Port 1G SFP
Full-load 5 minutes 4-Port 1G RJ45 220 0.37 0.46 81.40 37.44
4-Port 10G SFP
20-Port 1G SFP
Full-loading
4-Port 1G RJ45 220 0.41 0.46 90.20 41.49
60 minutes later
4-Port 10G SFP
AC Current
AC Voltage Power Apparent Real Power
Status Test Status Consumption
(V) Factor Power (VA) (W)
(A)
22-Port 1G SFP
Full-load 5 minutes 2-Port 1G RJ45 220 0.38 0.46 83.60 38.46
4-Port 10G SFP
22-Port 1G SFP
Full-loading
2-Port 1G RJ45 220 0.41 0.46 90.20 41.49
60 minutes later
4-Port 10G SFP
AC Current
AC Voltage Power Apparent Real Power
Status Test Status Consumption
(V) Factor Power (VA) (W)
(A)
24-Port 1G SFP
Full-load 5 minutes 220 0.38 0.46 83.60 38.46
4-Port 10G SFP
Full-loading 24-Port 1G SFP
220 0.41 0.46 90.20 41.49
60 minutes later 4-Port 10G SFP
Note: Apparent Power (VA) = AC Voltage x AC Current Consumption
Real Power (W) = Apparent Power (VA) x Power Factor
33769 Rev. D https://www.transition.com Page 14 of 50Transition Networks SM24DP4XA Install Guide
4. AC 240V Input
AC Current
AC Voltage Power Apparent Real Power
Status Test Status Consumption
(V) Factor Power (VA) (W)
(A)
No Loading None 240 0.19 0.44 45.60 20.06
20-Port 1G SFP
Full-load 5 minutes 4-Port 1G RJ45 240 0.36 0.45 86.40 38.88
4-Port 10G SFP
20-Port 1G SFP
Full-loading
4-Port 1G RJ45 240 0.39 0.45 93.60 42.12
60 minutes later
4-Port 10G SFP
AC Current
AC Voltage Power Apparent Real Power
Status Test Status Consumption
(V) Factor Power (VA) (W)
(A)
22-Port 1G SFP
Full-load 5 minutes 2-Port 1G RJ45 240 0.36 0.45 86.40 38.88
4-Port 10G SFP
22-Port 1G SFP
Full-loading
2-Port 1G RJ45 240 0.39 0.45 93.60 42.12
60 minutes later
4-Port 10G SFP
AC Current
AC Voltage Power Apparent Real Power
Status Test Status Consumption
(V) Factor Power (VA) (W)
(A)
24-Port 1G SFP
Full-load 5 minutes 240 0.35 0.45 84.00 37.80
4-Port 10G SFP
Full-loading 24-Port 1G SFP
240 0.38 0.45 91.20 41.04
60 minutes later 4-Port 10G SFP
Note: Apparent Power (VA) = AC Voltage x AC Current Consumption.
Real Power (W) = Apparent Power (VA) x Power Factor.
33769 Rev. D https://www.transition.com Page 15 of 50Transition Networks SM24DP4XA Install Guide Front Panel The SM24DP4XA front panel provides the ports, LEDs, buttons, and power inputs as shown and described below. Connectors: Provides 1 Console Port, 1 Management port, 20 100/1000 SFP slots, 4 100/1000 SFP/RJ-45 Combo, and 4 1G/10G SFP+ slots. Console port: 1 RJ-45 Console port to connect to a PC or terminal for Command Line Interface (CLI) command entry (e.g., a PC running Hyper Terminal, Tera Term, etc.). See Initial Switch Configuration via CLI on page 39. MGMT/25 port: Dedicated out-of-band Management Port. Provides 1 RJ-45 Console port to connect to a PC’s Ethernet port to run the Web UI. See Initial Switch Configuration via Web Browser on page 38. AC Input: 100-240 VAC: Connects the Power Cord. See Regional Versions of Power Cords on page 21. See Connecting the AC Power Cord on page 26. DC Input 24-48 V: Connects to DC Power. See Connecting to DC on page 27. RST (Reset) button: see RST (Reset) button on page 19. 33769 Rev. D https://www.transition.com Page 16 of 50
Transition Networks                                                                     SM24DP4XA Install Guide

LEDs
The front panel LEDs provide with switch status checking and monitoring as shown and described below.

AC/DC Power LED: Indicates if the switch is powered up correctly.
SYS (System) Status LED : Indicates if the system is ready.
Port Status LEDs : Indicate the current status of each port.
ALM LED : Indicates if the system is operating normally.
LINK/ACT LED : Port Status LEDs indicate if copper port is enabled, linked to a connected device, and connection
speed.

Table 1: Power LED

         LED           Color      State                                  Description

                                On           The switch is powered ON correctly.
 AC Power             Green
                                Off          The switch is not receiving power from power1.

                                On           The switch is powered ON correctly.
 DC Power             Green
                                Off          The switch is not receiving power from power2.

Table 2: System LED

         LED           Color      State                                  Description

                                On           The switch is ready and running ok.

 System               Green     Off          The switch is not ready or failed.

                                Blinking     The switch is booting.

Table 3: Alarm LED

 LED                  Color     State      Description

                                           An abnormal state, such as temperature, voltage or fan speed, has
                                On
 Alarm                Red                  been detected in the switch.

                                Off        The system is normal

33769 Rev. D                                https://www.transition.com                          Page 17 of 50
Transition Networks SM24DP4XA Install Guide
Table 4: Port Status LEDs
LED Color State Description
The port is enabled and established a link to connected device, and the
Green On
connection speed is 1000Mbps.
The port is transmitting/receiving packets, and connection speed is
Green Blinking
1000Mbps.
The port is enabled and established a link to connected device, and the
Amber On
RJ45 Ports connection speed is 10/100Mbps.
The port is transmitting/receiving packets, and the connection speed is
Amber Blinking
10/100Mbps.
The port has no active network cable connected, or it is not established a
-- Off link to connected device. Otherwise, the port may have been disabled
through the switch user interface.
The port is enabled and established a link to connected device, and the
Green On
connection speed is 1000Mbps.
The port is transmitting/receiving packets, and connection speed is
Green Blinking
1000Mbps.
The port is enabled and established a link to connected device, and the
Amber On
SFP Ports connection speed is 100Mbps.
The port is transmitting/receiving packets, and the connection speed is
Amber Blinking
100Mbps.
The port has no active network cable connected, or it is not established a
-- Off link to connected device. Otherwise, the port may have been disabled
through the switch user interface.
The port is enabled and established a link to connected device, and the
Blue On
connection speed is 10Gbps.
The port is transmitting/receiving packets, and the connection speed is
Blue Blinking
10Gbps.
The port is enabled and established a link to connected device, and the
SFP+ Ports Green On
connection speed is 1Gbps.
Green Blinking The port is transmitting/receiving packets, and connection speed is 1Gbps.
The port has no active network cable connected, or it is not established a
-- Off link to connected device. Otherwise, the port may have been disabled
through the switch user interface.
33769 Rev. D https://www.transition.com Page 18 of 50Transition Networks SM24DP4XA Install Guide
RST (Reset) button
By pressing the front panel RST (Reset) button for certain period of time, you can:
Reset the Switch : To reboot and get the switch back to the previous configuration
settings saved.
Restore the Switch to Factory Defaults : To restore the original factory default settings back to the switch.
Note: Based on the table below, you can determine which task is being performed by reading the LED behaviors
while pressing the Reset button. Once the LED behaviors are correctly displayed, just release the button.
Table 5: RST (Reset) Button Descriptions
SYS LED Port Status LED
Task to perform Press the RST button for
Behavior Behavior
Blinking
Reset the Switch 2 ~ 7 seconds ALL LEDs OFF
Green
Blinking
Restore to Defaults 7 ~ 12 seconds ALL LEDs stay ON
Green
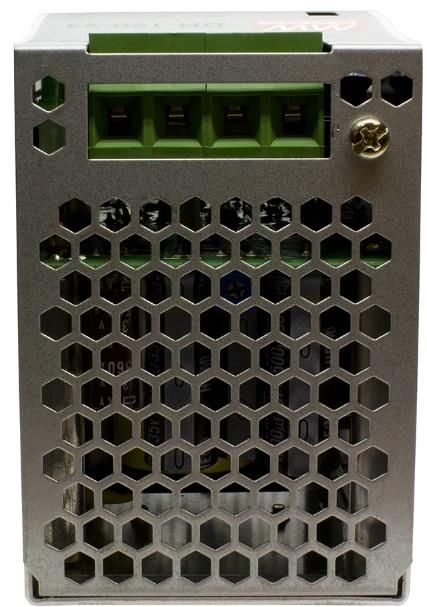
Back Panel
The SM24DP4XA back panel provides the Ground Screw as shown below.
Side Panel
The SM24DP4XA left side panel has two fans. Make sure that the left side panel fan vents are not blocked after
installation.
33769 Rev. D https://www.transition.com Page 19 of 50Transition Networks SM24DP4XA Install Guide
Manual Overview
This manual describes how to install, initially configure, and troubleshoot the switch, including how to:
• Check switch status by reading the LED behavior,
• Reset the switch or restore the switch to factory defaults,
• Install the switch,
• Use a Web browser or the Command Line to initially configure the switch, and
• Troubleshoot the switch.
Note that this manual provides links to third party web sites for which Transition Networks is not responsible.
For More Information
A printed Quick Start Guide is shipped with each device.
For Transition Networks Drivers, Firmware, etc. go to the Product Support webpage (logon required).
For Transition Networks Manuals, Brochures, Data Sheets, etc. go to the Support Library (no logon required).
For SFP manuals see Transition Networks SFP webpage.
Related manuals include:
• SM24DP4XA Quick Start Guide, 33768
• SM24DP4XA Install Guide, 33769 (this manual)
• SM24DP4XA Web User Guide, 33770
• SM24DP4XA CLI Reference, 33771
• Release Notes (version specific)
33769 Rev. D https://www.transition.com Page 20 of 50Transition Networks SM24DP4XA Install Guide
Chapter 2 – Installing the Switch
Package Contents
Check the package contents to make sure you have received the following items. Contact your sales
representative if any item is damaged or missing. Please save the packaging for possible future use.
• One SM24DP4XA switch
• One DB-9 to RJ45 Cable
• Four adhesive-backed rubber feet
• One printed Quick Start Guide
• One documentation postcard
• Rack Mount Brackets
• AC Power cord (option)
Regional Versions of Power Cords
Power Cord Included: to order the corresponding country-specific power cord, add the extension from the list
below to the end of the SKU: -NA = North America, -LA = Latin America, -EU = Europe, -UK = United Kingdom,
-SA = South Africa, -JP = Japan, -OZ = Australia.
Safety Instructions for Rack Mount Installations
The instructions below (or similar) are intended for rackmount installation environments:
1. Elevated Operating Ambient: if installed in a closed or multi-unit rack assembly, the operating ambient
temperature of the rack environment may exceed room ambient. Install the equipment in an environment
compatible with the maximum ambient temperature (Tma) specified.
2. Reduced Air Flow: install the equipment in a rack so that the amount of air flow required for safe operation is
not compromised.
3. Mechanical Loading: Mount the equipment in the rack so that a hazardous condition does not occur due to
uneven mechanical loading (weight distribution/rack balance).
4. Circuit Overloading: give consideration to the connection of the equipment to the supply circuit and the
effect that overloading of the circuits might have on overcurrent protection and supply wiring. Consider all
equipment nameplate ratings when addressing this concern.
5. Reliable Earthing: maintain reliable earthing of rack-mounted equipment; pay particular attention to supply
connections other than direct connections to the branch circuit (e.g., use of power strips).
Note: The SM24DP4XA left side panel has two fans. Do not block the left side panel fan vents during installation.
33769 Rev. D https://www.transition.com Page 21 of 50Transition Networks SM24DP4XA Install Guide Mounting the Switch in a 19-inch Rack 1. Attach the mounting brackets to both sides of the chassis. Insert screws and tighten with a screwdriver to secure the brackets. 2. Place the switch on a rack shelf in the rack. Push it in until the oval holes in the brackets align with the mounting holes in the rack posts. 3. Attach the brackets to the posts. Insert screws and tighten them. Mounting the Switch on Desk or Shelf 1. Verify that the workbench is sturdy and reliably grounded. 2. Attach the four adhesive rubber feet to the bottom of the switch. 33769 Rev. D https://www.transition.com Page 22 of 50
Transition Networks                                                                     SM24DP4XA Install Guide

Grounding the Switch

The SM24DP4XA back panel provides the Ground Screw as shown below.
ATTENTION: This case must be earth grounded. No DC input may be earth grounded.
Use Isolated Power Supply.

Installing SFP Modules
You can install or remove a mini-GBIC SFP/SFP+ module from an SFP/SFP+ port without having to power off the
switch.
Note: The SFP ports should use UL Listed Optional Transceiver product, Rated 3.3Vdc, Laser Class 1. See the SFP
manual for important cautions, warnings, and instructions. See the Transition Networks SFP page for our full
range of Optical Devices.
1. Verify the SFP orientation (label up or down) and insert the SFP module into the SFP port. The SFP is inserted
   with the label up on the four 10G SFP+ ports. For the 24 1G SFP ports, the SFP is inserted with the label up on
   the top row of ports and with the label down on the bottom row of ports.

2. Press firmly to ensure that the module seats into the connector.

Note: Use an attenuator if the lengths will be less than half the maximum range of your particular optics.

33769 Rev. D                              https://www.transition.com                            Page 23 of 50
Transition Networks                                                                      SM24DP4XA Install Guide

Connecting Network Devices
The switch is designed to be connected to 10, 100 or 1000Mbps network cards in PCs and servers, as well as to
other switches and hubs. It may also be connected to remote devices using optional SFP transceivers.
Twisted-Pair Devices
Each device requires an unshielded twisted-pair (UTP) cable with RJ-45 connectors at both ends. Use Category 5,
5e, or 6 cable for 1000BASE-T connections, Category 5 or better for 100BASE-TX connections.
Cabling Guidelines
The RJ-45 ports on the switch that support automatic MDI/MDI-X pin-out configuration, so you can use standard
straight-through twisted-pair cables to connect to any other network device (PCs, servers, switches, routers, or
hubs).
CAUTION: Do not plug a phone jack connector into an RJ-45 port. This will damage the switch. Use only twisted-
pair cables with RJ-45 connectors that conform to FCC standards.
Connecting to PCs, Servers, Hubs, and Switches
1. Attach one end of a twisted-pair cable segment to the device’s RJ-45 connector.

2. If the device is a network card and the switch is in the wiring closet, attach the other end of the cable segment
    to a modular wall outlet that is connected to the wiring closet. See the section “Network Wiring Connections”.
    Otherwise, attach the other end to an available port on the switch.
3. Make sure each twisted pair cable does not exceed 100 meters (328 ft.) in length.
4. As each connection is made, the Link LED corresponding to each port will light green (1000 Mbps) or amber
   (100 Mbps) to indicate that the connection is valid.

33769 Rev. D                               https://www.transition.com                            Page 24 of 50
Transition Networks SM24DP4XA Install Guide
Network Wiring Connections
The punch-down block is an integral part of many of the newer equipment racks. It is a part of the patch panel.
Instructions for making connections in the wiring closet with this type of equipment follows.
1. Attach one end of a patch cable to an available port on the switch, and the other end to the patch panel.
2. If not already in place, attach one end of a cable segment to the back of the patch panel where the punch-
down block is located, and the other end to a modular wall outlet.
3. Label the cables to simplify future troubleshooting.
33769 Rev. D https://www.transition.com Page 25 of 50Transition Networks SM24DP4XA Install Guide AC/DC/DC Redundant Power The three power inputs (AC/DC/DC) are redundant but in active/standby mode. There is failover between the three inputs but selecting primary and secondary is not supported. To select the primary and secondary inputs: 1. Between AC and DC : Both AC and DC will convert the input power to 12VDC output to the PCB; the design will compare the voltage of 12VDC output and select the higher voltage as the primary power. If the primary power fails, the secondary will take over. 2. Between two DC inputs: The DC input with higher voltage is the primary input, the other is the secondary input. Selecting the priority between AC and DC is not supported, but you can select between two DC inputs by adjusting the DC output. See Power Supply Specifications on page 29. Connecting the AC Power Cord Power Connection: Warning: Connect the power supply to the switch first, and then connect the power supply to power. Otherwise catastrophic product failure may occur. 1. Verify that power is off to the DC circuit that you are going to attach to the switch DC-input connector. This can be either of the two power supplies (AC-input or DC-input) or site source DC. 2. As an added precaution, place an appropriate safety flag and lockout device at the source power circuit breaker, or place a piece of adhesive tape over the circuit breaker handle to prevent accidental power restoration while you are working on the circuit. Power Disconnection: To disconnect power from the switch after a successfully boot: 1. Turn off power to the switch. 2. Disconnect the cables. You can order one AC Power cord as a separate option. 1. Connect the AC power cord to the AC power receptacle of switch. 2. Connect the other end of the AC power cord to the AC power outlet. 3. Check the SYS LED. If it is lit, the power connection is correct. 33769 Rev. D https://www.transition.com Page 26 of 50
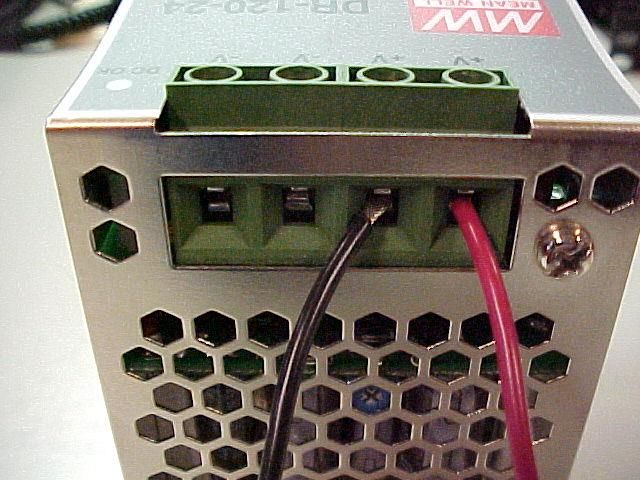
Transition Networks                                                                   SM24DP4XA Install Guide

Connecting to DC Power
The SM24DP4XA supports dual 24/48 VDC or -24/-48 VDC inputs. The power source must be powered off when
connecting and disconnecting this product.
1. Insert the negative or positive voltage DC power source wires into the DC INPUT terminals, respectively as
   shown below:

2. To keep the DC wires from pulling loose, use a small flat-blade screwdriver to tighten the wire-clamp screws
   on the front of the terminal block connector.

33769 Rev. D                             https://www.transition.com                           Page 27 of 50
Transition Networks                                                               SM24DP4XA Install Guide

3. Insert the terminal block connector prongs into the terminal block receptor.
4. Check the SYS LED. If it is ON, the power connection is correct.

                                           Connecting DC Power Input

33769 Rev. D                              https://www.transition.com                     Page 28 of 50
Transition Networks SM24DP4XA Install Guide Power Supply Specifications Two DC Power Supply options are available which must be ordered separately. 25131 for 48VDC 25131 Industrial DIN rail mounted power supply, 48VDC, 76.8 Watts See https://www.transition.com/products/accessory/25131a/ 25131 Features Auto-Negotiation Variable AC input range Protected against Overload, Over Voltage, and Over Temperature Convection air cooling DIN Rail mountable UL 508 approved RoHS compliant MTBF 481.9Khrs Adjust output voltage with the front panel +V ADJ adjustment screw Verify the DC Out by observing the DC OK front panel LED 25131 Output Output Voltage 48VDC Current Rating 1.6A Power Rating 76.8 Watts Ripple & Noise Max 120mVp-p Voltage Range 48~55VDC Voltage Tolerance ±1.0% Line Regulation ±0.5% Load Regulation ±1.0% Setup, Rise Time 3000ms, 60ms Hold Up Time 20ms/115VAC 25131 Input Voltage Range Switch Selectable:88~264VAC, 124~370VDC Frequency Range 47~63Hz Efficiency 90% AC Current (Typical) 1.4A@115VAC, .85A@230VAC Inrush Current (Cold) 30A@115VAC, 50A@230VAC Leakage Current
Transition Networks                                SM24DP4XA Install Guide

25131 Product Views

33769 Rev. D          https://www.transition.com          Page 30 of 50
Transition Networks                                                                SM24DP4XA Install Guide

25079 for 24VDC
25079 Industrial DIN Rail Mounted Power Supply. Note that 25079 is a last
time buy opportunity (limited quantities, while supplies last) as of March 2021.
See https://www.transition.com/products/accessory/25079a/#
Features
    • Variable AC input range
    • Power Output:
           o Output Voltage 24VDC
           o Current Rating 5.0A
           o Power Rating 120 Watts
           o Ripple & Noise Max 80mVp-p
           o Voltage Range 24~28VDC
    • Protected against: Short Circuit, Overload, Over Voltage, and
       Overheating
    • Convection air cooling
    • DIN rail mountable
    • UL 508 approved
    • Full load burn in test
    • Lifetime warranty
    • RoHS compliant
    • MTBF 136.8Khrs
    • Dimensions (mm) : 65.5W, 125.2H, 100D
    • Weight 0.79Kg.
Product Views

33769 Rev. D                              https://www.transition.com                      Page 31 of 50
Transition Networks SM24DP4XA Install Guide Optional Power Supply 25175 25175 Features • Variable AC input range • Protected against Short Circuit, Overload, Over Voltage, Overheating • Convection air cooling • DIN rail mountable - can be mounted on a TS35 Standard DIN rail (TS35/7.5 or 15) • Full load burn in test • RoHS compliant 25175 Specifications Output Output Voltage 24VDC Current Rating 5A Power Rating 120 Watts Ripple & Noise Max 120mVp-p Voltage Range 24~28VDC Voltage Tolerance ±1.0% Line Regulation ±0.5% Load Regulation ±1.0% Setup, Rise Time 2500ms, 60ms Hold Up Time 10ms Input Voltage Range 90 - 264VAC; 127 - 370VDC Frequency Range 47~63Hz Efficiency 88% AC Current (Typical) 2.25A@115VAC; 1.3A@230VAC Inrush Current (Cold) 20A@115VAC; 35A@230VAC Leakage Current
Transition Networks                                                          SM24DP4XA Install Guide

Certifications
Safety: UL508, TUV 62368-1; IEC60068-2-6 (Vibration);
EMC Emission: EN55032(CISPR32), EN61204-3 Class B, EN61000-3-2, EN61000-3-
3;
EMC Immunity: EN61000-4-2, EN61000-4-3, EN61000-4-4, EN61000-4-5,
EN61000-4-6, EN61000-4-8, EN61000-4-11, EN55024, EN61000-6-2, EN50082-2,
EN61204-3, EAC TP TC 020
Warranty         5 Years
Packaging        typical:

Product Views with Dimensions
Dimensions are in mm.

33769 Rev. D                          https://www.transition.com                    Page 33 of 50
Transition Networks                                                                     SM24DP4XA Install Guide

25175 Installation
1. Always allow good ventilation clearances, 5mm left and right, 40mm above and 20mm below, around the
   unit in use to prevent it from overheating. Also, a 10-15 cm clearance must be kept when the adjacent device
   is a heat source.
2. The appropriate mounting orientation for the unit is vertical, the input terminals at the bottom and output
   on the top. Mounting orientations other than that, such as upside down, horizontal, or table-top mounting, is
   not allowed.

3. Use copper wire only, and recommended wires are shown as below.
                      AWG                           18          16           14           12
     Rated Current of Equipment (Amps)             7A           10A         15A          20A
     Cross-section of Lead (mm2)                   0.8          1.3          2.1          3.3

     Note: Current each wire carries should be de-rated to 80% of the current suggested above
     when using 5 or more wires connected to the unit.

Make sure that all strands of each stranded wire enter the terminal connection and the screw terminals are
securely fixed to prevent poor contact. If the power supply possesses multi-output terminals, make sure each
contact is connected to wires to prevent too much current stress on a single contact.
4. Use wires that can withstand temperatures of at least 80°C, such as UL1007.
5. Recommended wire strapping length is 5mm (0.197”).
6. Recommended screwdriver is 3mm, slotted type.
7. The recommended torque setting for terminals is: I/P = 7.5 kgf-cm (6.5 Lb-in) and O/P = 7.5 kgf-cm (6.5 Lb-in).
8. Suggested fuse and maximum number of the PSUs that can be connected to a circuit breaker at 230V:
Fuse: T4A/L250V, Circuit breaker C16 = 5, D16 = 10.
9. Mounting Instructions: Mount as shown in figure only, with input terminals down, or else sufficient cooling will
not be possible. Admissible DIN rail:TS35/7.5 or TS35/15.

33769 Rev. D                              https://www.transition.com                            Page 34 of 50
Transition Networks SM24DP4XA Install Guide For rail fastening: (a)Tilt the unit slightly rearwards. (b)Fit the unit over top hat rail. (c)Slide it downward until it hits the stop. (d)Press against the bottom for locking. (e)Shake the unit slightly to ensure the locking action. 10. For other information about the products, please refer to www.meanwell.com for more details. 25175 Warnings / Cautions !! 1)Risk of electrical shock and energy hazard. All failure should be examined by a qualified technician. Please do not remove the case of the power supply by yourself! 2)Risk of electric arcs and electric shock (danger to life). Connecting both the primary and the secondary sides together is not allowed. 3)Risk of burn hazard. Do not touch the unit in operation and shortly after disconnection! 4)Risk of fire and short circuit. The openings should be protected from foreign objects or dripping liquids. 5)Only install the unit in a pollution degree 2 environment (see Note 1 below). 6)Please do not install the unit in places with high moisture or near the water. 7)The maximum operating temperature is 45°C; do not install the unit in places with high ambient temperature or near fire source. 8)The FG ( ) must be connected to PE (Protective Earth). 9)Output current and output wattage must not exceed the rated value on its specification. 10)Disconnect system from supply voltage. Before commencing any installation, maintenance or modification work: Disconnect your system from supply voltage. Make sure that inadvertent connection in circuit will be impossible! 11)For continued protection against risk of fire, replace only with same type and rating of fuse. Pour ne pas compromettre la protection contre les risqué d’incendie, remplacer par un fusible de même type et de memes caractéristiques nominales. Note 1: Pollution Degree 2 applies where there is only non-conductive pollution that might temporarily become conductive due to occasional condensation. Generally refers to dry, well-ventilated locations, such as control cabinets. 33769 Rev. D https://www.transition.com Page 35 of 50
Transition Networks                                     SM24DP4XA Install Guide

Terminal Pin Assignments

25175 Install Views

33769 Rev. D               https://www.transition.com          Page 36 of 50
Transition Networks                                                                      SM24DP4XA Install Guide

+V ADJ Screw
A small front panel hole provides access to a small Phillips screw; turn clockwise to increase or
decrease voltage. Adjustable from 24V to 28VDC. No adjustment is usually needed. The 25175
power supply ships from the factory set to 24 VDC.

DC OK LED
Lights to indicate a DC OK condition (output 24 - 28VDC, 5.0A, 120 Watts).

33769 Rev. D                               https://www.transition.com                               Page 37 of 50
Transition Networks                                                                       SM24DP4XA Install Guide

Chapter 3 - Initial Switch Configuration
Initial Switch Configuration via Web Browser

After powering up the switch for the first time, you can perform the initial switch configuration using a web
browser. For managing other switch features, see the Web User Guide for details.
To begin the initial configuration stage, you must reconfigure your PC’s IP address and subnet mask so as to make
sure the PC can communicate with the switch. After changing PC’s IP address (for example, 192.168.1.250), then
you can access the Web interface of the switch using the switch’s default IP address as shown below.
Note: The switch factory default IP address is 192.168.1.77. The switch factory default Subnet Mask is
255.255.255.0.
1. Power up the PC that you will use for the initial configuration. Please make sure the PC has the Ethernet RJ45
   connector to be connected to the switch via standard Ethernet LAN cable.
2. Reconfigure the PC’s IP address and Subnet Mask as below, so that it can communicate with the switch. The
   method to change the PC’s IP address (e.g., for a PC running Windows® 7/8.x/10) is as follows:
    2a: Type “network and sharing“ into the Search box in the Start Menu.
    2b: Select Network and Sharing Center.
    2c: Click on Change adapter settings on the left of PC screen.
    Note: You can skip step 2a to 2c, by pressing WinKey+R and type ”ncpa.cpl” command to get to step 2d
    directly.
    2d: Right-click on your local adapter and select Properties
    2e: In the Local Area Connection Properties window highlight Internet Protocol Version 4 (TCP/IPv4) then
    click the Properties button.
    Note: Be sure to record all your PC’s current IP settings to be able to restore them later.
    2f: Select the radio button. Use the following IP address and enter in the IP for the PC (e.g. any IP address
    not in use, and in between 192.168.1.2 and 192.168.1.254), Subnet mask (e.g. 255.255.255.0), and Default
    gateway that corresponds with your network setup. Then enter your Preferred and Alternate DNS server
    addresses.
    2g: Click OK to change the PC’s IP address.
3. Power up the switch to be initially configured and wait until it has finished its start-up processes.
4. Connect the PC to any port on the switch using a standard Ethernet cable, and check the port LED on the
   switch to make sure the link status of the PC is OK.
5. Run your Web browser on the PC; enter the factory default IP address to access the switch’s Web interface.

33769 Rev. D                               https://www.transition.com                             Page 38 of 50
Transition Networks SM24DP4XA Install Guide
If your PC is configured correctly, the Login page displays as shown below.
If you do not see the above login page, try these steps:
Refresh the web page.
Check to see if there is an IP address conflict issue.
Clear browser cookies and temporary internet files.
Check your PC settings again and repeat step 2.
6. Enter the factory default username (admin) and password (admin) on Login page.
7. Click “Login” to log into the switch. See the Web User Guide for additional information.
Initial Switch Configuration via CLI
1. Use an RJ-45 cable to connect a terminal or PC/terminal emulator to the switch port to access the CLI.
2. Attach the RJ-45 serial port on the switch front panel to the cable for Telnet/CLI configuration.
3. Attach the other end of the DB-9 cable to a PC running Telnet or a terminal emulation program such as
HyperTerminal or TeraTerm.
4. After powering up the switch for the first time, you can perform the initial switch configuration using the CLI
(Command Line Interface). For managing other switch features, see the CLI Reference for details.
33769 Rev. D https://www.transition.com Page 39 of 50You can also read