IP Office Embedded Voicemail Installation - Release 11.1 FP1 Issue 9 July 2022
←
→
Page content transcription
If your browser does not render page correctly, please read the page content below
IP Office
Embedded Voicemail Installation

                                  Release 11.1 FP1
                                            Issue 9
                                         July 2022
© 2020-2022, Avaya Inc. YOU DO NOT WISH TO ACCEPT THESE TERMS OF USE, YOU
All Rights Reserved. MUST NOT ACCESS OR USE THE HOSTED SERVICE OR
AUTHORIZE ANYONE TO ACCESS OR USE THE HOSTED
Notice SERVICE.
While reasonable efforts have been made to ensure that the Licenses
information in this document is complete and accurate at the time of
printing, Avaya assumes no liability for any errors. Avaya reserves THE SOFTWARE LICENSE TERMS AVAILABLE ON THE AVAYA
the right to make changes and corrections to the information in this WEBSITE, HTTPS://SUPPORT.AVAYA.COM/LICENSEINFO,
document without the obligation to notify any person or organization UNDER THE LINK “AVAYA SOFTWARE LICENSE TERMS (Avaya
of such changes. Products)” OR SUCH SUCCESSOR SITE AS DESIGNATED BY
AVAYA, ARE APPLICABLE TO ANYONE WHO DOWNLOADS,
Documentation disclaimer USES AND/OR INSTALLS AVAYA SOFTWARE, PURCHASED
“Documentation” means information published in varying mediums FROM AVAYA INC., ANY AVAYA AFFILIATE, OR AN AVAYA
which may include product information, operating instructions and CHANNEL PARTNER (AS APPLICABLE) UNDER A COMMERCIAL
performance specifications that are generally made available to users AGREEMENT WITH AVAYA OR AN AVAYA CHANNEL PARTNER.
of products. Documentation does not include marketing materials. UNLESS OTHERWISE AGREED TO BY AVAYA IN WRITING,
Avaya shall not be responsible for any modifications, additions, or AVAYA DOES NOT EXTEND THIS LICENSE IF THE SOFTWARE
deletions to the original published version of Documentation unless WAS OBTAINED FROM ANYONE OTHER THAN AVAYA, AN AVAYA
such modifications, additions, or deletions were performed by or on AFFILIATE OR AN AVAYA CHANNEL PARTNER; AVAYA
the express behalf of Avaya. End User agrees to indemnify and hold RESERVES THE RIGHT TO TAKE LEGAL ACTION AGAINST YOU
harmless Avaya, Avaya's agents, servants and employees against all AND ANYONE ELSE USING OR SELLING THE SOFTWARE
claims, lawsuits, demands and judgments arising out of, or in WITHOUT A LICENSE. BY INSTALLING, DOWNLOADING OR
connection with, subsequent modifications, additions or deletions to USING THE SOFTWARE, OR AUTHORIZING OTHERS TO DO SO,
this documentation, to the extent made by End User. YOU, ON BEHALF OF YOURSELF AND THE ENTITY FOR WHOM
YOU ARE INSTALLING, DOWNLOADING OR USING THE
Link disclaimer SOFTWARE (HEREINAFTER REFERRED TO
Avaya is not responsible for the contents or reliability of any linked INTERCHANGEABLY AS “YOU” AND “END USER”), AGREE TO
websites referenced within this site or Documentation provided by THESE TERMS AND CONDITIONS AND CREATE A BINDING
Avaya. Avaya is not responsible for the accuracy of any information, CONTRACT BETWEEN YOU AND AVAYA INC. OR THE
statement or content provided on these sites and does not APPLICABLE AVAYA AFFILIATE (“AVAYA”).
necessarily endorse the products, services, or information described Avaya grants You a license within the scope of the license types
or offered within them. Avaya does not guarantee that these links will described below, with the exception of Heritage Nortel Software, for
work all the time and has no control over the availability of the linked which the scope of the license is detailed below. Where the order
pages. documentation does not expressly identify a license type, the
Warranty applicable license will be a Designated System License as set forth
below in the Designated System(s) License (DS) section as
Avaya provides a limited warranty on Avaya hardware and software. applicable. The applicable number of licenses and units of capacity
Refer to your sales agreement to establish the terms of the limited for which the license is granted will be one (1), unless a different
warranty. In addition, Avaya’s standard warranty language, as well as number of licenses or units of capacity is specified in the
information regarding support for this product while under warranty is documentation or other materials available to You. “Software” means
available to Avaya customers and other parties through the Avaya computer programs in object code, provided by Avaya or an Avaya
Support website: https://support.avaya.com/helpcenter/ Channel Partner, whether as stand-alone products, pre-installed on
getGenericDetails?detailId=C20091120112456651010 under the link hardware products, and any upgrades, updates, patches, bug fixes,
“Warranty & Product Lifecycle” or such successor site as designated or modified versions thereto. “Designated Processor” means a single
by Avaya. Please note that if You acquired the product(s) from an stand-alone computing device. “Server” means a set of Designated
authorized Avaya Channel Partner outside of the United States and Processors that hosts (physically or virtually) a software application
Canada, the warranty is provided to You by said Avaya Channel to be accessed by multiple users. “Instance” means a single copy of
Partner and not by Avaya. the Software executing at a particular time: (i) on one physical
“Hosted Service” means an Avaya hosted service subscription that machine; or (ii) on one deployed software virtual machine (“VM”) or
similar deployment.
You acquire from either Avaya or an authorized Avaya Channel
Partner (as applicable) and which is described further in Hosted SAS License type(s)
or other service description documentation regarding the applicable
hosted service. If You purchase a Hosted Service subscription, the Designated System(s) License (DS). End User may install and use
foregoing limited warranty may not apply but You may be entitled to each copy or an Instance of the Software only: 1) on a number of
support services in connection with the Hosted Service as described Designated Processors up to the number indicated in the order; or 2)
further in your service description documents for the applicable up to the number of Instances of the Software as indicated in the
Hosted Service. Contact Avaya or Avaya Channel Partner (as order, Documentation, or as authorized by Avaya in writing. Avaya
applicable) for more information. may require the Designated Processor(s) to be identified in the order
by type, serial number, feature key, Instance, location or other
Hosted Service specific designation, or to be provided by End User to Avaya through
THE FOLLOWING APPLIES ONLY IF YOU PURCHASE AN AVAYA electronic means established by Avaya specifically for this purpose.
HOSTED SERVICE SUBSCRIPTION FROM AVAYA OR AN AVAYA Concurrent User License (CU). End User may install and use the
CHANNEL PARTNER (AS APPLICABLE), THE TERMS OF USE Software on multiple Designated Processors or one or more Servers,
FOR HOSTED SERVICES ARE AVAILABLE ON THE AVAYA so long as only the licensed number of Units are accessing and using
WEBSITE, HTTPS://SUPPORT.AVAYA.COM/LICENSEINFO UNDER the Software at any given time as indicated in the order,
THE LINK “Avaya Terms of Use for Hosted Services” OR SUCH Documentation, or as authorized by Avaya in writing. A “Unit” means
SUCCESSOR SITE AS DESIGNATED BY AVAYA, AND ARE the unit on which Avaya, at its sole discretion, bases the pricing of its
APPLICABLE TO ANYONE WHO ACCESSES OR USES THE licenses and can be, without limitation, an agent, port or user, an e-
HOSTED SERVICE. BY ACCESSING OR USING THE HOSTED mail or voice mail account in the name of a person or corporate
SERVICE, OR AUTHORIZING OTHERS TO DO SO, YOU, ON function (e.g., webmaster or helpdesk), or a directory entry in the
BEHALF OF YOURSELF AND THE ENTITY FOR WHOM YOU ARE administrative database utilized by the Software that permits one
DOING SO (HEREINAFTER REFERRED TO INTERCHANGEABLY user to interface with the Software. Units may be linked to a specific,
AS “YOU” AND “END USER”), AGREE TO THE TERMS OF USE. IF identified Server or an Instance of the Software.
YOU ARE ACCEPTING THE TERMS OF USE ON BEHALF A
COMPANY OR OTHER LEGAL ENTITY, YOU REPRESENT THAT Cluster License (CL). End User may install and use each copy or an
YOU HAVE THE AUTHORITY TO BIND SUCH ENTITY TO THESE Instance of the Software only up to the number of Clusters as
TERMS OF USE. IF YOU DO NOT HAVE SUCH AUTHORITY, OR IF indicated on the order, Documentation, or as authorized by Avaya in
writing with a default of one (1) Cluster if not stated.Enterprise License (EN). End User may install and use each copy or same type of products, then two products of that type must be
an Instance of the Software only for enterprise-wide use of an ordered.
unlimited number of Instances of the Software as indicated on the
Third Party Components
order, Documentation, or as authorized by Avaya in writing.
“Third Party Components” mean certain software programs or
Named User License (NU). End User may: (i) install and use each
portions thereof included in the Software or Hosted Service may
copy or Instance of the Software on a single Designated Processor or
contain software (including open source software) distributed under
Server per authorized Named User (defined below); or (ii) install and
third party agreements (“Third Party Components”), which contain
use each copy or Instance of the Software on a Server so long as
terms regarding the rights to use certain portions of the Software
only authorized Named Users access and use the Software as
(“Third Party Terms”). As required, information regarding distributed
indicated in the order, Documentation, or as authorized by Avaya in
Linux OS source code (for those products that have distributed Linux
writing. “Named User”, means a user or device that has been
OS source code) and identifying the copyright holders of the Third
expressly authorized by Avaya to access and use the Software. At
Party Components and the Third Party Terms that apply is available
Avaya’s sole discretion, a “Named User” may be, without limitation,
in the products, Documentation or on Avaya’s website at: https://
designated by name, corporate function (e.g., webmaster or
helpdesk), an e-mail or voice mail account in the name of a person or support.avaya.com/Copyright or such successor site as designated
corporate function, or a directory entry in the administrative database by Avaya. The open source software license terms provided as Third
utilized by the Software that permits one user to interface with the Party Terms are consistent with the license rights granted in these
Software. Software License Terms, and may contain additional rights benefiting
You, such as modification and distribution of the open source
Shrinkwrap License (SR). End User may install and use the Software software. The Third Party Terms shall take precedence over these
in accordance with the terms and conditions of the applicable license Software License Terms, solely with respect to the applicable Third
agreements, such as “shrinkwrap” or “clickthrough” license Party Components to the extent that these Software License Terms
accompanying or applicable to the Software (“Shrinkwrap License”) impose greater restrictions on You than the applicable Third Party
as indicated in the order, Documentation, or as authorized by Avaya Terms.
in writing.
The following applies only if the H.264 (AVC) codec is distributed with
Transaction License (TR). End User may use the Software up to the the product. THIS PRODUCT IS LICENSED UNDER THE AVC
number of Transactions as specified during a specified time period PATENT PORTFOLIO LICENSE FOR THE PERSONAL USE OF A
and as indicated in the order, Documentation, or as authorized by CONSUMER OR OTHER USES IN WHICH IT DOES NOT RECEIVE
Avaya in writing. A “Transaction” means the unit by which Avaya, at REMUNERATION TO (i) ENCODE VIDEO IN COMPLIANCE WITH
its sole discretion, bases the pricing of its licensing and can be, THE AVC STANDARD (“AVC VIDEO”) AND/OR (ii) DECODE AVC
without limitation, measured by the usage, access, interaction VIDEO THAT WAS ENCODED BY A CONSUMER ENGAGED IN A
(between client/server or customer/organization), or operation of the PERSONAL ACTIVITY AND/OR WAS OBTAINED FROM A VIDEO
Software within a specified time period (e.g. per hour, per day, per PROVIDER LICENSED TO PROVIDE AVC VIDEO. NO LICENSE IS
month). Some examples of Transactions include but are not limited to GRANTED OR SHALL BE IMPLIED FOR ANY OTHER USE.
each greeting played/message waiting enabled, each personalized ADDITIONAL INFORMATION MAY BE OBTAINED FROM MPEG LA,
promotion (in any channel), each callback operation, each live agent L.L.C. SEE HTTP://WWW.MPEGLA.COM.
or web chat session, each call routed or redirected (in any channel).
Service Provider
End User may not exceed the number of Transactions without
Avaya’s prior consent and payment of an additional fee. THE FOLLOWING APPLIES TO AVAYA CHANNEL PARTNER’S
HOSTING OF AVAYA PRODUCTS OR SERVICES. THE PRODUCT
Heritage Nortel Software
OR HOSTED SERVICE MAY USE THIRD PARTY COMPONENTS
“Heritage Nortel Software” means the software that was acquired by SUBJECT TO THIRD PARTY TERMS AND REQUIRE A SERVICE
Avaya as part of its purchase of the Nortel Enterprise Solutions PROVIDER TO BE INDEPENDENTLY LICENSED DIRECTLY FROM
Business in December 2009. The Heritage Nortel Software is the THE THIRD PARTY SUPPLIER. AN AVAYA CHANNEL PARTNER’S
software contained within the list of Heritage Nortel Products located HOSTING OF AVAYA PRODUCTS MUST BE AUTHORIZED IN
at https://support.avaya.com/LicenseInfo under the link “Heritage WRITING BY AVAYA AND IF THOSE HOSTED PRODUCTS USE
Nortel Products” or such successor site as designated by Avaya. For OR EMBED CERTAIN THIRD PARTY SOFTWARE, INCLUDING
Heritage Nortel Software, Avaya grants Customer a license to use BUT NOT LIMITED TO MICROSOFT SOFTWARE OR CODECS,
Heritage Nortel Software provided hereunder solely to the extent of THE AVAYA CHANNEL PARTNER IS REQUIRED TO
the authorized activation or authorized usage level, solely for the INDEPENDENTLY OBTAIN ANY APPLICABLE LICENSE
purpose specified in the Documentation, and solely as embedded in, AGREEMENTS, AT THE AVAYA CHANNEL PARTNER’S EXPENSE,
for execution on, or for communication with Avaya equipment. DIRECTLY FROM THE APPLICABLE THIRD PARTY SUPPLIER.
Charges for Heritage Nortel Software may be based on extent of
WITH RESPECT TO CODECS, IF THE AVAYA CHANNEL
activation or use authorized as specified in an order or invoice.
PARTNER IS HOSTING ANY PRODUCTS THAT USE OR EMBED
Copyright THE H.264 CODEC OR H.265 CODEC, THE AVAYA CHANNEL
PARTNER ACKNOWLEDGES AND AGREES THE AVAYA
Except where expressly stated otherwise, no use should be made of
CHANNEL PARTNER IS RESPONSIBLE FOR ANY AND ALL
materials on this site, the Documentation, Software, Hosted Service,
RELATED FEES AND/OR ROYALTIES. THE H.264 (AVC) CODEC
or hardware provided by Avaya. All content on this site, the
IS LICENSED UNDER THE AVC PATENT PORTFOLIO LICENSE
documentation, Hosted Service, and the product provided by Avaya
FOR THE PERSONAL USE OF A CONSUMER OR OTHER USES
including the selection, arrangement and design of the content is
IN WHICH IT DOES NOT RECEIVE REMUNERATION TO: (I)
owned either by Avaya or its licensors and is protected by copyright
ENCODE VIDEO IN COMPLIANCE WITH THE AVC STANDARD
and other intellectual property laws including the sui generis rights
(“AVC VIDEO”) AND/OR (II) DECODE AVC VIDEO THAT WAS
relating to the protection of databases. You may not modify, copy,
ENCODED BY A CONSUMER ENGAGED IN A PERSONAL
reproduce, republish, upload, post, transmit or distribute in any way
ACTIVITY AND/OR WAS OBTAINED FROM A VIDEO PROVIDER
any content, in whole or in part, including any code and software
LICENSED TO PROVIDE AVC VIDEO. NO LICENSE IS GRANTED
unless expressly authorized by Avaya. Unauthorized reproduction,
OR SHALL BE IMPLIED FOR ANY OTHER USE. ADDITIONAL
transmission, dissemination, storage, and or use without the express
INFORMATION FOR H.264 (AVC) AND H.265 (HEVC) CODECS
written consent of Avaya can be a criminal, as well as a civil offense
MAY BE OBTAINED FROM MPEG LA, L.L.C. SEE HTTP://
under the applicable law.
WWW.MPEGLA.COM.
Virtualization
Compliance with Laws
The following applies if the product is deployed on a virtual machine.
You acknowledge and agree that it is Your responsibility for
Each product has its own ordering code and license types. Unless
complying with any applicable laws and regulations, including, but not
otherwise stated, each Instance of a product must be separately
limited to laws and regulations related to call recording, data privacy,
licensed and ordered. For example, if the end user customer or
intellectual property, trade secret, fraud, and music performance
Avaya Channel Partner would like to install two Instances of the
rights, in the country or territory where the Avaya product is used.Preventing Toll Fraud “Toll Fraud” is the unauthorized use of your telecommunications system by an unauthorized party (for example, a person who is not a corporate employee, agent, subcontractor, or is not working on your company's behalf). Be aware that there can be a risk of Toll Fraud associated with your system and that, if Toll Fraud occurs, it can result in substantial additional charges for your telecommunications services. Avaya Toll Fraud intervention If You suspect that You are being victimized by Toll Fraud and You need technical assistance or support, call Technical Service Center Toll Fraud Intervention Hotline at +1-800-643-2353 for the United States and Canada. For additional support telephone numbers, see the Avaya Support website: https://support.avaya.com or such successor site as designated by Avaya. Security Vulnerabilities Information about Avaya’s security support policies can be found in the Security Policies and Support section of https:// support.avaya.com/security. Suspected Avaya product security vulnerabilities are handled per the Avaya Product Security Support Flow (https:// support.avaya.com/css/P8/documents/100161515). Downloading Documentation For the most current versions of Documentation, see the Avaya Support website: https://support.avaya.com, or such successor site as designated by Avaya. Contact Avaya Support See the Avaya Support website: https://support.avaya.com for product or Hosted Service notices and articles, or to report a problem with your Avaya product or Hosted Service. For a list of support telephone numbers and contact addresses, go to the Avaya Support website: https://support.avaya.com (or such successor site as designated by Avaya), scroll to the bottom of the page, and select Contact Avaya Support. Trademarks The trademarks, logos and service marks (“Marks”) displayed in this site, the Documentation, Hosted Service(s), and product(s) provided by Avaya are the registered or unregistered Marks of Avaya, its affiliates, its licensors, its suppliers, or other third parties. Users are not permitted to use such Marks without prior written consent from Avaya or such third party which may own the Mark. Nothing contained in this site, the Documentation, Hosted Service(s) and product(s) should be construed as granting, by implication, estoppel, or otherwise, any license or right in and to the Marks without the express written permission of Avaya or the applicable third party. Avaya is a registered trademark of Avaya Inc. All non-Avaya trademarks are the property of their respective owners. Linux® is the registered trademark of Linus Torvalds in the U.S. and other countries.
Contents

Chapter 1: IP Office Embedded Voicemail.............................................................................. 8
   What's New............................................................................................................................ 8
   Mailbox features...................................................................................................................... 9
   Embedded Voicemail Summary................................................................................................ 9
   Languages supported............................................................................................................ 10
   Default/Fallback Language Operation...................................................................................... 11
Chapter 2: Installing Embedded Voicemail.......................................................................... 14
   Embedded Voicemail task worksheet...................................................................................... 14
   Checking and Uploading Prompts........................................................................................... 15
       Checking the prompt sets................................................................................................. 15
       Uploading additional language prompts............................................................................. 16
       Reloading language prompts............................................................................................ 16
       Transferring the prompt files using IP Office Manager......................................................... 16
   Configuring Embedded Voicemail........................................................................................... 17
   Memory card removal............................................................................................................ 18
       Shutting down a memory card using Manager................................................................... 19
       Shutting down a memory card using System Status........................................................... 19
   Memory card startup.............................................................................................................. 19
       Starting up a memory card using Manager........................................................................ 20
       Starting up a memory card using System Status................................................................ 20
Chapter 3: User mailbox configuration................................................................................. 21
   Changing a user's voicemail configuration............................................................................... 22
   User Voicemail Settings......................................................................................................... 23
   Configuring voicemail email integration................................................................................... 25
       Configuring System SMTP Support................................................................................... 25
       SMTP tab field descriptions.............................................................................................. 25
       Configuring User Voicemail Email..................................................................................... 26
   Announcements.................................................................................................................... 27
       Configuring announcements............................................................................................. 27
       User Announcement settings............................................................................................ 28
       Recording announcements using short codes.................................................................... 28
   Using pre-recorded names, greetings and announcements....................................................... 29
       Converting pre-recorded files........................................................................................... 29
       Transferring Recordings to Embedded Voicemail............................................................... 30
   Other Mailbox Message Waiting Indication.............................................................................. 31
       Configuring Other User Message Waiting Indication........................................................... 31
       Configuring Hunt Group Mailbox Message Waiting Indication.............................................. 32
   Editing a User's Trusted Locations.......................................................................................... 32
   Visual Voice.......................................................................................................................... 33

July 2022                                                Embedded Voicemail Installation                                                  5
                                                   Comments on this document? infodev@avaya.com
Contents
Configuring a Visual Voice button..................................................................................... 33
Configuring the MESSAGES button.................................................................................. 34
Chapter 4: Hunt group mailbox configuration..................................................................... 35
Configuring a group mailbox................................................................................................... 36
Hunt Group Fallback Settings........................................................................................... 36
Hunt Group Voicemail Settings......................................................................................... 37
Hunt Group Message Waiting Indication.................................................................................. 38
Configuring Hunt Group Mailbox Message Waiting Indication.............................................. 39
Hunt group mailbox access.................................................................................................... 39
Message Waiting Indication access methods..................................................................... 40
Short code and button access.......................................................................................... 40
Remote access............................................................................................................... 41
Announcements.................................................................................................................... 41
Configuring announcements............................................................................................. 41
Group Announcement settings......................................................................................... 42
Recording announcements using short codes.................................................................... 43
Chapter 5: Auto attendant configuration.............................................................................. 44
Creating an auto attendant..................................................................................................... 44
Auto Attendant General Settings....................................................................................... 45
Auto-Attendant Action Settings......................................................................................... 46
Recording Prompts................................................................................................................ 49
Routing incoming calls to an auto attendant............................................................................. 50
Transferring calls to an auto attendant.................................................................................... 51
Programmed buttons....................................................................................................... 51
SoftConsole.................................................................................................................... 52
Short codes.................................................................................................................... 52
Using an auto attendant to access voicemail........................................................................... 53
Dial By Name........................................................................................................................ 54
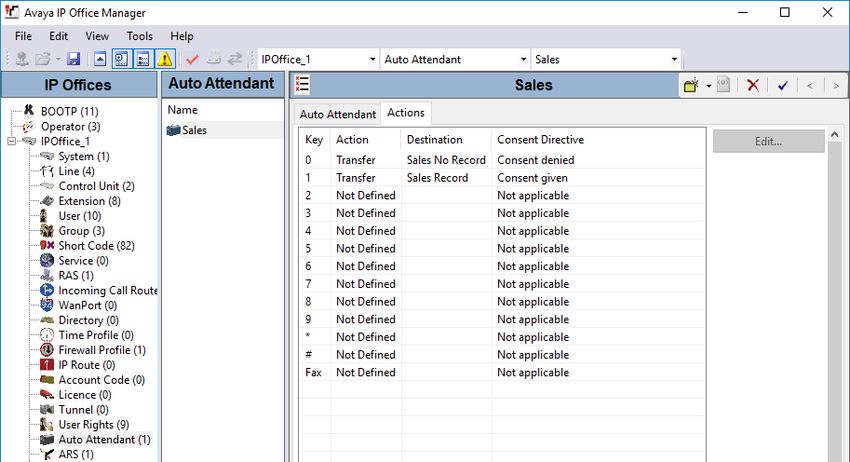
Recording Caller Consent...................................................................................................... 55
Using pre-recorded names, greetings and announcements....................................................... 57
Converting pre-recorded files........................................................................................... 57
Transferring Recordings to Embedded Voicemail............................................................... 58
Configuring an Auto Attendant to use a greeting file........................................................... 58
Chapter 6: Miscellaneous....................................................................................................... 60
Remote mailbox access......................................................................................................... 60
Mailbox Password Rules........................................................................................................ 61
Configuring buttons............................................................................................................... 62
Button Programming Actions............................................................................................ 63
Short Codes.......................................................................................................................... 63
Default short codes.......................................................................................................... 63
Short code features......................................................................................................... 65
Chapter 7: Mailbox Maintenance........................................................................................... 67
Viewing Mailboxes................................................................................................................. 67
July 2022 Embedded Voicemail Installation 6
Comments on this document? infodev@avaya.comContents
Viewing the Embedded Voicemail Files................................................................................... 67
Monitoring Embedded Voicemail............................................................................................. 68
Monitoring Embedded Voicemail housekeeping....................................................................... 69
DTE Port Maintenance........................................................................................................... 70
Chapter 8: Additional Help and Documentation.................................................................. 71
Additional Manuals and User Guides...................................................................................... 71
Getting Help.......................................................................................................................... 71
Finding an Avaya Business Partner........................................................................................ 72
Additional IP Office resources................................................................................................. 72
Training................................................................................................................................ 73
July 2022 Embedded Voicemail Installation 7
Comments on this document? infodev@avaya.comChapter 1: IP Office Embedded Voicemail
The IP Office IP500 V2 and IP500 V2A control units support Embedded Voicemail by default.
Embedded Voicemail provides basic voicemail and automated attendant operation without requiring
a separate voicemail server.
Embedded Voicemail uses the following components:
• IP500 V2/V2A Control Unit – The control unit uses the system's mandatory System SD card
for storage of the Embedded Voicemail prompts and messages.
• Licenses (Optional) – For non-subscription systems, by default the system provides 15 hours
of storage and 2 simultaneous connections without requiring any licenses. Using licenses, that
can be increased up to 25 hours of storage and 6 simultaneous connections.
Embedded Voicemail cannot be used in conjunction with another voice mail server. For example, IP
Office Embedded Voicemail cannot be used with Voicemail Pro server. Similarly, it cannot be used
by a network of servers, The presence of another voice mail server on the same network might
cause Embedded Voicemail to fail to operate correctly and vice versa.
Related links
What's New on page 8
Mailbox features on page 9
Embedded Voicemail Summary on page 9
Languages supported on page 10
Default/Fallback Language Operation on page 11
What's New
The following new features apply to IP Office R11.1 FP1.
• Hunt Group Voicemail Operation - Previously unanswered calls to a hunt group went to
voicemail when they reached the group's no answer time. They now go to the group's
fallback destination, which can be configured to an extension number, system short code or
voicemail. This operation is configured through the Group > Fallback tab.
Related links
IP Office Embedded Voicemail on page 8
July 2022 Embedded Voicemail Installation 8
Comments on this document? infodev@avaya.comMailbox features
Mailbox features
The system automatically creates a mailbox for every user and hunt group in the system’s
configuration.
• For users, the mailbox is automatically used to answer calls direct to the user that ring
unanswered for the user's configured No Answer Time. The mailbox is also used in other
situations where the system would have otherwise returned a busy tone, for example when
the user is set to Do Not Disturb.
• For hunt groups, the mailbox is used when a call has rung for the group's Group No Answer
Time and the Group No Answer Destination is set to Voicemail.
• For security, a voicemail access code can be assigned to any mailbox. This can be changed
by the mailbox user or the system administrator.
• For user mailboxes, message waiting indication is provided to the user's phone extension
and to their user application.
• For hunt group mailboxes, message waiting indication can be assigned to specified users.
• Various dialing short codes can be used to control voicemail features and for actions such as
collecting messages, leaving messages, and turning voicemail on and off. See Default short
codes on page 63 for more information.
Related links
IP Office Embedded Voicemail on page 8
Embedded Voicemail Summary
Feature Details
Control Unit IP500 V2 and IP500 V2A
Memory type Uses the System SD Card
Compression method Uses G711. No VCM channels required.
Storage 25 hours maximum
For systems not running in subscription mode, 15 hours by default. An
additional 5 hours is added for each 2 additional channels licensed
(see below).
Maximum simultaneous 6 channels maximum
connections
For systems not running in subscription mode, 2 channels by default.
Additional channels require licenses.
Maximum individual message Default 120 seconds.
length
Adjustable between 3 and 180 seconds
Auto attendants Yes. Up to 40.
July 2022 Embedded Voicemail Installation 9
Comments on this document? infodev@avaya.comIP Office Embedded Voicemail
Related links
IP Office Embedded Voicemail on page 8
Languages supported
Embedded Voicemail supports the following language prompt sets:
Locale WAV folder
Arabic[1] ara
Chinese – Cantonese zhh
Chinese – Mandarin chs
Danish dan
Dutch nld
English UK eng
English US enu
Finnish fin
French fra
French–Canadian frc
German deu
Italian ita
Japan jpn
Korean kor
Mediterranean heb
Norwegian nor
Polish plk
Portuguese ptg
Portuguese-Brazil ptb
Russian rus
Spanish esp
Spanish-Argentina ess
Spanish-Mexico esm
Swedish sve
Turkish trk
Note:
• The Arabic prompt set is only supported on systems running in Basic Edition modes.
July 2022 Embedded Voicemail Installation 10
Comments on this document? infodev@avaya.comDefault/Fallback Language Operation
Related links
IP Office Embedded Voicemail on page 8
Default/Fallback Language Operation
The system Locale setting sets the default language used for voicemail prompts. However, this
can be overridden as follows:
• The user locale, if set, is used if the caller is internal.
• The incoming call route locale, if set, is used if the caller is external.
• If no user or incoming call route locale is set, the system locale is used.
• A short code locale, if set, is used and overrides the options above if the call is routed to
voicemail using the short code.
• For all the above, if the particular prompt set is not available, the fallback language is used if
available.
Locale Default Language Fallback Languages
Argentina Latin Spanish Spanish > UK English > US English
Australia UK English US English
Bahrain Arabic[1] UK English > US English
Belgium (Dutch) Dutch Dutch > UK English > US English
Belgium (French) French French > Canadian French> UK English
Brazil Brazilian Portuguese Portuguese > UK English > US English
Canadian Canadian French French > US English > UK English
Chile Latin Spanish Spanish > US English
China Mandarin UK English > US English
Colombia Latin Spanish Spanish > US English
Czech Republic UK English US English
Denmark Danish UK English > US English
Egypt Arabic[1] UK English > US English
Finland Finnish UK English > US English
France French Canadian French > UK English > US English
France 2 French Canadian French > UK English > US English
Germany German UK English > US English
Greece UK English US English
Hong Kong Cantonese UK English > US English
Hungary UK English US English
Table continues…
July 2022 Embedded Voicemail Installation 11
Comments on this document? infodev@avaya.comIP Office Embedded Voicemail
Locale Default Language Fallback Languages
Iceland UK English US English
India UK English US English
Italy Italian UK English > US English
Japan (Japanese) Japanese US English > UK English
Japan US English UK English > US English
Korea UK English UK English > US English
Kuwait Arabic[1] UK English > US English
Malaysia UK English US English
Mediterranean Hebrew UK English > US English
Mexico Latin Spanish Spanish > UK English > US English
Morocco French French > UK English > US English
Netherlands Dutch UK English > US English
New Zealand (UK UK English UK English > US English
English)
Norway Norwegian UK English > US English
Oman Arabic[1] UK English > US English
Pakistan UK English UK English > US English
Peru Latin Spanish Spanish > UK English
Philippines US English UK English
Poland Polish UK English > US English
Portugal Portuguese UK English > US English
Qatar Arabic[1] UK English > US English
Russia Russian UK English > US English
Saudi Arabia UK English US English
Singapore UK English US English
South Africa UK English US English
Spain Spanish Latin Spanish > UK English > US English
Sweden Swedish UK English > US English
Switzerland French UK English
Switzerland German UK English > US English
Switzerland Italian UK English > US English
Taiwan Mandarin UK English > US English
Turkey Turkish UK English > US English
United Arab Emirates UK English US English
United Kingdom UK English US English
Table continues…
July 2022 Embedded Voicemail Installation 12
Comments on this document? infodev@avaya.comDefault/Fallback Language Operation
Locale Default Language Fallback Languages
United States US English UK English
Venezuela Latin Spanish Spanish > US English
Note:
• The Arabic prompt set is only supported on systems running in Basic Edition modes.
Related links
IP Office Embedded Voicemail on page 8
July 2022 Embedded Voicemail Installation 13
Comments on this document? infodev@avaya.comChapter 2: Installing Embedded Voicemail
Embedded voicemail is the default voicemail used by new or defaulted IP500 V2 and IP500 V2A
systems. It uses the System SD card installed in the control unit for prompts and for voicemail
storage. However, additional configuration may be required for specific features and for systems that
are upgraded to a new release of IP Office software.
Related links
Embedded Voicemail task worksheet on page 14
Checking and Uploading Prompts on page 15
Configuring Embedded Voicemail on page 17
Memory card removal on page 18
Memory card startup on page 19
Embedded Voicemail task worksheet
# Section Description
1. Upgrade prompts on A set of prompts are provided on Embedded Voicemail
page 15 memory cards supplied by Avaya. However these may not
match the full set of prompts required for new features in your
systems installed version of IP Office.
2. Configuring Embedded Set the IP Office to use Embedded Voicemail and set the
Voicemail on page 17 maximum record time for messages, greetings and prompts.
3. User mailbox configuration on Configure the personal settings for individual users.
page 21
4. Hunt group mailbox Configure the settings for any hunt groups where voicemail is
configuration on page 35 required. This includes configuring message waiting indication
and mailbox access which are not enabled by default.
5. Auto attendant Setup any required auto attendant services and associate
configuration on page 44 them with incoming call routes.
Related links
Installing Embedded Voicemail on page 14
July 2022 Embedded Voicemail Installation 14
Comments on this document? infodev@avaya.comChecking and Uploading Prompts
Checking and Uploading Prompts
When you install a new System SD card in an IP500 V2 or IP500 V2A system, a default set of
languages is loaded on the card. You can upload additional language prompt sets if required. For
example, when you upgrade to a new release of software, it is possible that new features require
additional prompts. See Uploading additional language prompts on page 16 for more information.
You can also reload languages that are already installed on the System SD card. For example,
you can reload languages if new prompts have been added in a maintenance release. See
Reloading language prompts on page 16 for more information.
All the prompts for Embedded Voicemail are found in the C:\Program Files (x86)\Avaya
\IP Office\Manager\MemoryCards\Common\system\lvmail folder after the IP Office
Administrator Applications are installed.
Related links
Installing Embedded Voicemail on page 14
Checking the prompt sets on page 15
Uploading additional language prompts on page 16
Reloading language prompts on page 16
Transferring the prompt files using IP Office Manager on page 16
Checking the prompt sets
About this task
Additional Embedded Voicemail features added in new IP Office releases may require new
prompts. The system can be checked to see if it is reporting that any expected prompts are
missing.
Procedure
1. From the Start menu, select IP Office > Monitor.
2. Select File > Select Unit.
3. Enter details for connection to the system.
4. Select Filters > Trace Options > System > Error.
5. Click OK.
Error messages like the following example are output at regular intervals:
158267586mS ERR: EVM 7p0 upgrade file clips missing
158267587mS ERR: EVM 7p2 upgrade file clips missing
Related links
Checking and Uploading Prompts on page 15
July 2022 Embedded Voicemail Installation 15
Comments on this document? infodev@avaya.comInstalling Embedded Voicemail
Uploading additional language prompts
About this task
You can perform this task on active systems only. The Add/Display VM Locales button is not
available for offline configurations.
Procedure
1. Using IP Office Manager, receive the configuration from the system.
2. In the navigation pane, click System.
3. Select Voicemail.
4. Click the Add/Display VM Locales button.
5. Select the prompt set you want to upload.
6. Click OK.
7. Save the configuration back to the system (File > Save Configuration).
Related links
Checking and Uploading Prompts on page 15
Reloading language prompts
About this task
Use this task to reload language prompts that are already installed on the System SD card.
Procedure
1. Open IP Office Manager.
2. Select File > Advanced > Upgrade.
3. Click the check box for the appropriate system.
4. Click Upgrade.
5. Click the Upload System Files check box to select this option.
6. Click OK.
7. Save the configuration back to the system (File > Save Configuration).
Related links
Checking and Uploading Prompts on page 15
Transferring the prompt files using IP Office Manager
About this task
For systems being centrally managed through System Manager, this task cannot be performed
using IP Office Manager launched from System Manager. You must first disable Under SMGR
Administration in Security Settings before you perform this task.
July 2022 Embedded Voicemail Installation 16
Comments on this document? infodev@avaya.comConfiguring Embedded Voicemail
Caution:
• Do not transfer prompt files if the level of IP Office Manager software is not appropriate
for the IP Office system.
Procedure
1. Using IP Office Manager, receive the configuration from the system.
2. Select File > Advanced > Embedded File Management.
3. Click the check box for the appropriate system.
4. Click OK.
5. Enter the same user name and password as used for normal system configuration..
6. Click OK.
7. Select File > Upload System Files. The prompt files installed with IP Office Manager and
the IP Office firmware files are transferred.
Related links
Checking and Uploading Prompts on page 15
Configuring Embedded Voicemail
About this task
This task requires a system reboot. A system reboot ends all current calls and operation for a
period of up to 5 minutes.
Procedure
1. Using IP Office Manager, receive the configuration from the system.
2. In the left navigation pane, select System.
3. Click the Voicemail tab.
4. In the Voicemail Type drop-down box, select Embedded Voicemail.
5. The system’s mailboxes can operate in one of two modes, In the Voicemail Mode drop-
down box, select either:
• IP Office – This is the default for new and defaulted A-law systems.
• Intuity – This is the default for new and defaulted U-law systems.
6. If Enforcement is enabled, you can select various password enforcement options:
• Minimum length – Sets the minimum mailbox password length allowed. The default is 6
digits.
July 2022 Embedded Voicemail Installation 17
Comments on this document? infodev@avaya.comInstalling Embedded Voicemail
• Complexity – When enabled, the following complexity rules are enforced for new
mailbox passwords:
- No forward or reverse sequence of numbers. For example, 1234 or 4321.
- No repeated digits. For example, 1111 or 2222.
- No match to the extension number.
7. In the Maximum Record Time field, set the value required by the customer. The allowable
range is 30 to 180 seconds. The default setting is 110 seconds.
8. If Enable Outcalling is selected, users are able to use and configure mailbox outcalling
options.
9. Click the System tab.
10. Make sure the Locale setting matches the language for spoken prompts required from the
Embedded Voicemail. If it is not correct, consult with the customer first. This Locale setting
controls many default aspects of IP Office operation and is normally already set to match
the customer's locale.
If the configuration a set of locale language prompts that is not present on the System SD
card, IP Office Manager displays a warning message. Click the warning to open a window
and follow the prompts to add the locales. Alternatively, click Add/Display VM Locales
and select the language to upload.
11. Click OK.
12. Select File > Save Configuration to send the changes back to the system and restart it.
Embedded voicemail is not started immediately after the system restarts. There is a delay
while the system performs housekeeping operations on the existing set of messages and
prompts. On a new system the delay is less than a minute. However, as the number of
messages increases the delay increases
13. Once the IP Office system has restarted, from an extension on the system, dial *17. The
Embedded Voicemail answers and starts to give you prompts.
Related links
Installing Embedded Voicemail on page 14
Memory card removal
The memory card should never be simply removed from a system during normal operation. Doing
so can cause the corruption of files in use. Either the memory card or the whole system must be
shutdown before removing a memory card.
While the card is shutdown, voicemail is not available to the system. Any other services that use
the memory card are also disabled. Features licensed by the System SD card continue for up to 2
hours while the card is not present.
Once a memory card has been removed, reinserting the memory card automatically restarts it.
July 2022 Embedded Voicemail Installation 18
Comments on this document? infodev@avaya.comMemory card startup
Related links
Installing Embedded Voicemail on page 14
Shutting down a memory card using Manager on page 19
Shutting down a memory card using System Status on page 19
Shutting down a memory card using Manager
Procedure
1. In IP Office Manager, select File > Advanced > Memory Card Command > Shutdown.
2. When prompted to continue, click Yes.
3. Select the system and enter an administrator name and password.
4. Select System.
5. At the back of the control unit, confirm that the appropriate memory card LED is off.
6. Remove the card.
Related links
Memory card removal on page 18
Shutting down a memory card using System Status
Procedure
1. Open System Status and access the status output.
2. In the navigation pane, select System > Memory cards.
3. If prompted, select System SD.
4. At the bottom of the window, click Shutdown.
5. At the back of the control unit, confirm that the appropriate memory card LED is off.
6. Remove the card.
Related links
Memory card removal on page 18
Memory card startup
Reinserting a memory card into a system that is already switched on will automatically restart card
operation. However, if the card has been shutdown but not removed, it can be restarted without
requiring a reboot.
Related links
Installing Embedded Voicemail on page 14
Starting up a memory card using Manager on page 20
July 2022 Embedded Voicemail Installation 19
Comments on this document? infodev@avaya.comInstalling Embedded Voicemail
Starting up a memory card using System Status on page 20
Starting up a memory card using Manager
About this task
Use this task to restart a memory card without removing and reinserting it.
Procedure
1. In IP Office Manager, select File > Advanced > Memory Card Command > Startup.
2. Select the system and enter an administrator name and password.
3. Select System.
4. Click OK.
Related links
Memory card startup on page 19
Starting up a memory card using System Status
About this task
Use this task to restart a memory card without removing and reinserting it.
Procedure
1. Open System Status and access the status output.
2. In the navigation pane, select System > Memory cards.
3. Click System SD or Optional SD.
4. At the bottom of the window, click Startup.
Related links
Memory card startup on page 19
July 2022 Embedded Voicemail Installation 20
Comments on this document? infodev@avaya.comChapter 3: User mailbox configuration
Embedded voicemail creates a mailbox for each user on the system. Direct calls to a user are
routed to their mailbox whenever the user's extension is busy or does not answer within the user's
No Answer Time. This includes calls that are forwarded to another internal destination. This
chapter describes how to configure an individual user's mailbox by configuring the user settings in
IP Office Manager. An individual user's mailbox can also be configured through the mailbox and
system short codes (see the IP Office Embedded Voicemail User Guide for more information).
User mailbox features include:
• Message Waiting Indication – If supported by the user's current telephone, the user will
receive message waiting indication whenever their mailbox contains new messages. The type
of message waiting indication will depend on the telephone.
• Mailbox access – The standard default short code (*17) can be used to access an extension's
associated user mailbox. Other methods of mailbox access can be configured.
• Visual Voicemail — The MESSAGES button on phones is configured by default to access
visual voicemail.
• Ringback – Embedded voicemail can be set to ring the user whenever they have new
messages in their mailbox. This ringback is triggered after the completion of a call at the user's
extension. Ringback from a hunt group mailbox containing new messages may also occur if the
user is configured to receive hunt group message waiting indication.
• Voicemail on or off – Sending calls to the user's mailbox can be switched off. Note however
that this does not stop other methods of leaving messages directly in the user's mailbox.
• Access code – An access code can be assigned to the mailbox. Anyone accessing the
mailbox must first enter this code before they can collect messages. The access code can be
reset by the user once they are in their mailbox.
• Reception/DTMF breakout numbers – Options can be configured that allows callers to dial 0,
2 or 3 when they hear the mailbox greeting to be transferred to another number rather than
leave a message. For example, dial 0 to be transferred to the receptionist. When used, these
features should be announced in the mailbox greeting. The breakout numbers can be defined
at the system level for application to all mailboxes or separately at the individual user level.
• Announcements – Embedded voicemail allows announcements to calls waiting to be
answered by users. This is similar to the announcements provided for hunt groups, with
announcements being played to callers waiting to be answered. Due to the overlap of various
timeouts, the use of user announcements is not recommended in conjunction with forwarding
and voicemail.
July 2022 Embedded Voicemail Installation 21
Comments on this document? infodev@avaya.comUser mailbox configuration
• Voicemail Email – A user can have notification of new messages sent to their email address.
The notification can be a simple alert to tell them they have a new message or the voicemail
message can be sent if required. See Configuring voicemail email integration on page 25 for
more information.
Related links
Changing a user's voicemail configuration on page 22
User Voicemail Settings on page 23
Configuring voicemail email integration on page 25
Announcements on page 27
Using pre-recorded names, greetings and announcements on page 29
Other Mailbox Message Waiting Indication on page 31
Editing a User's Trusted Locations on page 32
Changing a user's voicemail configuration
About this task
Mailboxes are created based on each user's unique user name within the IP Office configuration.
Changing a user name associates that user with a new mailbox. If it is necessary to change a user
name, ensure that they have played and deleted all their messages first. If a user name is
changed without clearing the original mailbox, you must create a short code based on the old user
name in order to access the old mailbox.
Use this task to change the voicemail configuration for an individual. A lock symbol indicates that
the setting can also be set and locked through user rights. See the IP Office Manager on-line help
or user documentation for more information.
For systems being centrally managed through System Manager, this task cannot be performed
using IP Office Manager launched from System Manager. You must first disable Under SMGR
Administration in Security Settings before you perform this task.
Procedure
1. Using IP Office Manager, receive the configuration from the system.
2. In the navigation pane, click User and select the required user.
3. Select Voicemail.
4. Change the fields as appropriate. See User Voicemail Settings on page 23 for more
information.
5. Click OK.
6. Repeat steps 3 through 6 for each user as appropriate.
7. Save the configuration back to the system (File > Save Configuration).
Related links
User mailbox configuration on page 21
July 2022 Embedded Voicemail Installation 22
Comments on this document? infodev@avaya.comYou can also read