Design of a robot for the automatic charging of an electric car
←
→
Page content transcription
If your browser does not render page correctly, please read the page content below
Design of a robot for the automatic charging
               of an electric car

    Damien Chablat†‡ and Riccardo Mattacchione‡ and Erika Ottaviano‡
    †
        DICeM, University of Cassino G. Di Biasio 43, 03043 Cassino (Fr), Italy
          ‡
            LS2N, UMR CNRS 6004, 1 rue de la Noë, 44321 Nantes, France

         Abstract In this paper, a robot with parallel architecture is pro-
         posed for charging an electric vehicle having the charging socket on
         its front side. Kinematic models are developed to design the robot
         for a given workspace that corresponds to the car’s plug placements.
         A demonstrator composed by commercial components is shown.

1       Introduction
Nowadays, the automotive industry develops electric vehicles with associ-
ated tools for a broad range of customers and users. To charge the batteries,
most users still have to manually connect the car to a charging station or
home outlet. In addition, to enhance the range of electric cars, the batteries
are equipped with a larger capacity and require a high charging intensity,
which must be performed by large cables. Approximately one meter of ca-
ble consisting of four wires with a section of 25mm2 each has a mass of
approximately 0.9 Kg. Therefore, some pioneering studies have been devel-
oped to explore the possibility of using a robot that could relieve the user
from the task of log in and out the plug. However, among the other pos-
sible industrial applications in the automotive industry, only a few robots
are designed exclusively for recharging electric cars. In August 2015, the
car manufacturer Tesla presented a snake robot for charging Tesla Model S
cars. This robot has the morphology of a snake and can detect the vehicle’s
charging port and connect to it autonomously. The charging cover opens
automatically when the parked vehicle is ready to be charged. Once the
connection between the robot and the vehicle is established, the charging
process can be started. The idea behind this concept is that the driver does
not need to get out of the car to charge the vehicle (Walzel et al. (2016)).
    In July 2017, Wolkswagen company unveiled discreetly the prototype of
the future Gen.E. A robotic articulated arm equipped with a combo plug is
installed on the side of the vehicle. The robot is designed for underground

                                          1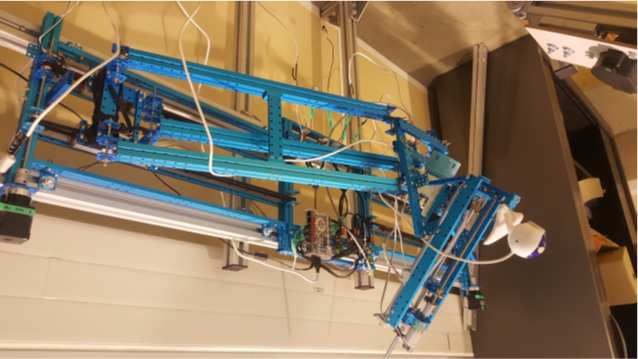
and multi-store garages for autonomous charging of the vehicle. Except
the snake robot, whose architecture is unique, the mechanical architecture
of the robot for charging the Gen.E is the KUKA serial architecture. The
end-effector is adapted for the insertion of the power outlet into the electric
vehicle. The DC quick charging process starts with communication between
the vehicle and the electric filling station. The vehicle transmits its data to
the charging station, which gives back the target position for the automated
parking (Walzel et al. (2016)). The charging socket of the vehicle has to be in
a target area of 200 by 200 mm. Afterwards, a camera on the robot detects
the exact position of the charging socket, with an accuracy of mm. After,
the gripper picks up the DC-Connector and connects with the charging
socket of the vehicle. After having linked the DC-Connector, the charging
process starts. Once the battery is fully charged, the robot automatically
unplugs the DC-Connector.
    Another automatic recharge system is the NRG-X, it can be adapted to
any EV or PHEV and is capable of fast charging. Furthermore, it has a
tolerance for inaccurate parking positions. The NRG-X system is based on a
combination of conductive and inductive charging beneath the vehicle, thus
an adapter for the vehicle is necessary (Miseikis et al. (2017)). It has to be
noted that although industrial robots can very well adapt to several tasks,
their design and production remain very expensive for the application.
    For public places, such as car parks, shared solutions have been pro-
posed (Walzel et al. (2016)). However, this solution is expensive in terms
of infrastructure and cannot be used for individual houses. The price of an
industrial robot is about 20-40% of the price of a car. Research projects in
this context aim to develop specific robots by reducing the number of actu-
ators (Yuan et al. (2020)) or overcoming the effects of gravity on actuators
(Gao et al. (2016)) and (Ketfi-C. et al. (2018)), these are the main objec-
tives on which this article is based. This is the main reason why the French
company Renault decided in 2018-2019 to develop a less expensive charging
robot for its upcoming electric cars (Kamga (2017)). The specifications for
the robot indicate that it has to be mounted on the garage wall and will
recharge the battery by facing the car. The robot must be small, precise,
and stiff. It must allow the plug to be inserted in safely and properly way.
The main requirements are: (a) Insertion and withdrawal forces: 70 N, ±10
N, (b) Depth of insertion: 40 mm, ±20 mm, (c) Distance between plug and
socket: 20 mm, +10 mm, (d) Workspace: 200 ×200 ×20 mm3 , (e) Degree of
freedom: 3, (f) Location accuracy: 0.5 mm, ±0.1 mm, (g) Length of electric
cables: 1500 mm, +500 mm, (h) Weigh of electric cables: 1.4 kg,+0.45 kg,
(i) Plug diameter: 65 mm, ±5 mm, (j) Total weigh of the robot: 10 kg, +5
kg, and (k) Occupied space 1500 ×200 mm2 .

                                      2
2 Design requirements of a robot for the automatic
charging of an electric car

Our work focuses on the Renault Zoe, for this car, the plug is placed on the
front and is slightly inclined. The mobility required for the robot could be at
least three translations if the car is on a horizontal floor, plus a translation
along the insertion axis for the electric plug. By using the flexibility of the
insertion tool, it is possible to avoid using a wrist or spatial mechanisms,
(Figliolini et al. (2012)), (Figliolini et al. (2016)).
    To reduce the cost of the robot, it is possible to mix the vertical move-
ment with the insertion direction. Figure 1 depicts the car and the dexterous
workspace of the robot. Several robot architectures were analyzed before
settling on a parallel P-Pi-R-P type robot for planar motion (Rea et al.
(2013)) put in series with a linear actuator for insertion movement where
P stands for prismatic actuated joints, Pi for a four-bar mechanism similar
to an RR mechanism but with opposite bars parallel two by two, and R for
revolute joint.
   The main advantages of this architecture are, simplified design (Wenger
et al. (2001); Ottaviano and Rea (2013)), and the forces applied to the
actuators decrease as the end-effector moves away from the base. This will
be the case when inserting the plug.

                                                     Plug

                                                    10 cm
                                           Dextrous
                                           workspace
                                                    10 cm

                                             20 cm
                                              60 cm
                                    Dextrous              Plug
                                    workspace Insertion
                                              axis        1 cm
                                                      35°

                                                20 cm       1 cm

                                                        60 cm

              Figure 1. Workspace of robot and the Zoe car

                                       3
3     Mechanism understudy
The kinematics of the robot can be written in three stages, (i) the alpha
mechanism which allows translations of the end-effector in one plane, (ii) the
beta mechanism which does the insertion of the plug, and (iii) the gamma
mechanism which is the assembly of the first two.

3.1       The α mechanism: P-Pi-R-P planar parallel robot
    The first mechanism aims to achieve a planar displacement. To choose
this architecture, the constraint of storage on a wall and the reduction of
on-board weight lead to the choice of prismatic joints.
    The design parameters of the α mechanism are the following:
    • L: the length of the two arms;
    • L2 : the length of the robot’s base;
    • L3 : the distance between B and C
    • ρ1 and ρ2 : the length of the left and right linear actuator;
    • [x, y]: the coordinate of point V located in the middle of (B, C);
    • [0, epy ]: the offset from V to F ;
    • [e1x + ρ1 , e1y ]: the coordinate of A;
    • [L2 − ρ2 − e2x , e2y ]: the coordinate of E;

                                           L3
                                   B       VC
                                                         epy
                                       F                       L
      y          e1x                       L3/2                                e2x
                              L
                  A                                                            E
           e1y                                                     D                    e2y
            r1
                          x
                                                                                   r2
                                                    L2

                 Figure 2. Kinematic scheme of the α mechanism

   According to the kinematic scheme in Figure 2, the constraint equations
that can be obtained are the following

                       (x − e1x − ρ1 − L3 /2)2 + (y − e1y )2           =   L2                 (1)
                                                2                  2           2
                 (L2 − x − L3 /2 − e2x − ρ2 ) + (y − e2y )             =   L                  (2)

                                           4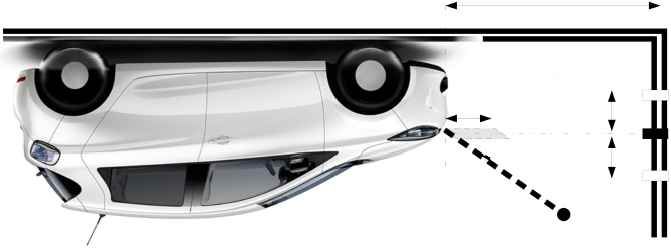
with Eqs. 1–2, the inverse kinematic equations can be obtained as
                                      q
           ρ1 = x − e1x − L3 /2 − 2L2 − (y − e1y )2                            (3)
                                           q
           ρ2 = L2 − x − L3 /2 − e2x − 2L2 − (y − e1y )2                       (4)

Solving Eqs. 1–2 for the Cartesian coordinates x and y allows the evaluation
of two assembly modes. However, only one will be accessible, thanks to the
joint limits (Wenger et al. (2001)).
    To avoid the singularity of the Pi joint in the folded position, the offset
epy is defined. The inclined placement of the parallelogram allows sufficient
stiffness to be maintained when the robot is close to its base in the folded
position. Indeed, the stiffness of a parallelogram is proportional to the area
formed by the four bars (Majou et al. (2002)). The placement of the bar
(DF ) does no influence on the kinematics, but it does influence the stiffness
of the robot.
    In Figure 3, two singular postures are depicted to define the boundaries of
the workspace and to separate into two aspects by the parallel singularity.
The IIM-type singularity of the four-bar mechanism defined in (Zlatanov
et al. (1993)) is avoided thanks to the offset epy .

                            B       V       C

                                F

                          A                 E
                                    D
            r1
                                                                      r2
    A                               B       V   C                 D        E
                                        F

 Figure 3. Parallel and serial singular configuration of the α mechanism

                                            5
3.2 The β mechanism: serial robot
For this mechanism, the constraint equations define P with respect to
the Cartesian frame z ′ -y ′ . According to Figure 4, it is possible to note that:
• ρ3 : is the length of the linear actuator that defines the coordinate of
H with respect to G;
• [e3y , e3z ]: is the coordinate of H with respect to P ;
• [e4y , e4z : is the coordinate of V in the reference frame z ′ -y ′ .
• [x′ , y ′ : is the coordinate of P in the reference frame z ′ -y ′ .
r3
G y’
q H
e4z
z’ z
e3z
e4y
V P P
y` e3y
Figure 4. Kinematic scheme of the β mechanism.
According to the kinematic scheme in Figure 4, the constraint equations
that can be obtained are the following
z′ = e3z + ρ3 cos(θ) (5)
y′ = e3y + ρ3 sin(θ) (6)
and, its inverse kinematic as
q
ρ3 = (z ′ − e3z )2 + (y ′ − e3y )2 (7)
The offset actuator reduces the volume of the robot when it is folded1 .
3.3 The γ mechanism
The merging of the mechanisms described in earlier subsections gives a
3 d.o.f. robot, the γ mechanism. For verifying the operation of the robot
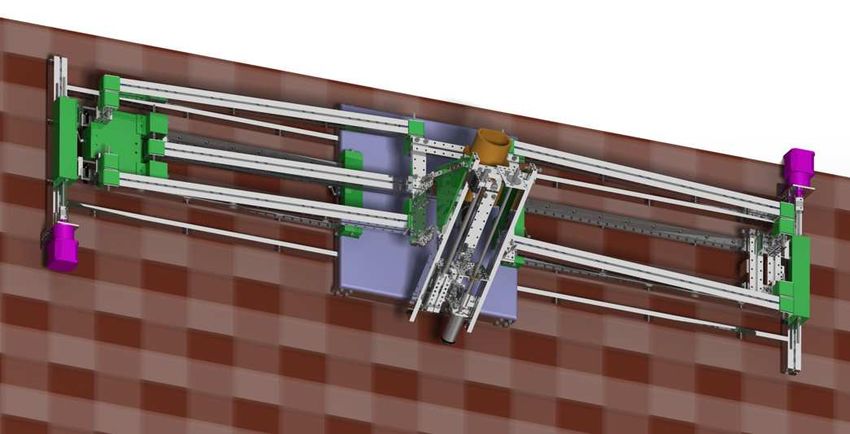
prototype, an Arduino micro-controller can be used. Figure 5 shows a CAD
model in CATIA V5 with components from Makeblock (2022).
1
See movie: https://youtu.be/lCRXJ5tpTMM
6Figure 5. CAD mode of robot Figure 6. Prototype of the robot
4 Workspace analysis
The workspace of a robot can be defined as the set of points that can
be reached by its end-effector (Khalil and Dombre (2000)). This is the
space where the robot can operate and carry out tasks. In this work, the
workspace is evaluated according to the reference point V of the α mecha-
nism. It is important to know the positions V can reach to avoid issues such
as singularity configurations, interference, collisions. Workspace is assessed
as an intersection of two sets of points2 . Following distances have to be
defined:
• e5x : is the distance between the y-axis and the a joint, when the left
actuator is at the end of its stroke;
• e6x : is the distance between the y-axis and the e joint, when the right
actuator is at the end of its stroke;
• e7x : is the distance between the y-axis and the e joint when the right
actuator is at the end of his stroke.
The complete workspace is displayed in Figure 7. The workspace bound-
aries can be described analytically using five equations that can be used to
verify whether the end-effector can reach a specified position or not.
r r
L3 L3
(x − − e1x )2 + (y − e1y )2 ≥ L, (x + − e7x )2 + (y − e2y )2 ≥ L
2 2
r r
L3 L3
(x − − e5x )2 + (y − e1y )2 ≤ L, (x + − e6x )2 + (y − e2y )2 ≤ L
2 2
To analyse the position of the end-effector, a regular workspace shape is
considered. In our case, we evaluate the largest square that gives an inner
tangent to the boundaries of the workspace (Chablat et al. (2004)). The
2
See the movie: https://youtu.be/Y0uyeXuP5Eg
7V C
B
L
L
y A E
e1x x
e5x
e6x
e7x
Figure 7. Workspace of the α mechanism.
side length of the square is given by lb and, for algebraic computation, a
Lame curve is used,
(x − xc )n + (y − yc )n = lbn (8)
with n a positive even integer and (xc , yc ) are the center of the workspace.
To limit the computation cost, n is set at 6 as a first approximation and
then to 12 to better approximate the square shape. To find the position of
the regular workspace, the methodology defined by Chablat et al. (2012) is
used. The optimisation problem is written as the intersection of the robot
workspace boundary with the boundary of the desired regular workspace
whose placement depends on (xc , yc ) . If the set of solutions obtained is
non-zero, then we have found a candidate solution for the robot realization.
This calculation was carried out using the Siropa library, whose functions
are presented in (Jha et al. (2018)). To simplify the design, only commercial
components from (Makeblock (2022)) have been used, without the need for
machining. Several bar sizes were tested. This demonstrates that this robot
can easily be built. The main sizes are L = 532mm, L2 = 1300mm, and
L3 = 160mm. For this set of design parameters, a set of possible placements
for the regular workspace was found by using Cylindrical Algebraic Decom-
position Moroz et al. (2010). Figure 8 presents several regions where there
is no intersection between the regular workspace and the workspace of the
robot. However, only one region is included in the workspace of the robot.
If the robot can reach the desired workspace, we must be checked that the
stiffness and workspace properties are under the specifications. The stiff-
ness of the mechanism is therefore analysed in nine different configurations,
8yc
Solution
selected
xc
Figure 8. Possible placements of the regular workspace
which correspond to the precision points from 1 to 9, as shown in Figure 9.
1 2 3
4 5 6
7 8 9
lb
Figure 9. On the left, the regular square inside the regular workspace, on
the right, the nine test points for the stiffness analysis with xc = 570 and
yc = 335.
5 Stiffness analysis
To evaluate the stiffness of the robot to meet the specifications, simulations
in CATIA were performed. The robot’s stiffness is analysed in its working
space. Two types of simulations have been taken into account: (i) when
ρ1 and ρ2 move, i.e. the α mechanism, and (ii) when ρ3 moves, i.e. the β
mechanism. The materials used are mainly aluminium, except for the shafts,
the bearings, and slide guides, which are made of steel. In all simulations,
the self-weight of the structure is taken into account. As ball bearings are
9Position Max displacement [mm]
1 0.995
2 0.993
3 0.991 ρ3 Max displacement
4 0.990 [mm] [mm]
5 0.996 50 1.080
6 0.989 75 0.996
7 1.030 100 0.936
8 1.010 125 0.907
9 1.030 150 0.958
Table 1. Maximum displacements Table 2. Maximum displace-
throughout the workspace ments for the β mechanism
used, there is little backlash in the robot. The bending of the end-effector
is due to the bending of the arms. The finite element analysis gives us the
following results for case (i), Table 1 and case (ii), Table 2. However, as
we are using an external sensor-based controller, an embedded camera, the
most important issue is to have a constant deformation.
Figure 10. Boundaries conditions and gravity load in the CAD modelling
6 Hardware and software
The control is realized using a Rasberry Pi 4 board, which allows the use of a
touch screen, a camera to detect the position of the socket, and a serial link
to an Arduino board (Microcontroller Me Auriga MakeBlock). Two stepper
motors are used (42BYG Geared Stepper Motor) with two belts and four
pulleys for the α mechanism, and a DC motor and a ball screw for the β
mechanism (Makeblock DC25 with sensor, 86 rpm). MakeBlock modules
10are used for the input-output connection with the Arduino board. A Python
program manages a user interface, the camera with OpenCV functions, and
the communication with the Arduino board. To locate the plug on the car,
we use a QR code stuck next to the plug. When the robot moves, the QR
code seen by the camera is used to adjust the trajectory before starting the
insertion of the plug3 .
7 Conclusions
In this article, we presented a robot that allows the insertion of a plug into
an electric car for charging. This robot is designed for the Zoe car but
could be adapted to other vehicles having a front charging system, like the
Nissan Leaf. To reduce manufacturing costs, off-the-shelf components were
used in combination with hybrid kinematics with a simple kinematic model.
A prototype was realized as a proof of concept associated with the patent
application. A GitHub repository will soon be created to make the CAD
and source code of the control available.
Acknowledgements
This work was supported by the project Chair between Renault and Cen-
trale Nantes about performances of electric vehicles propulsion.
Bibliography
Damien Chablat, Ph Wenger, Félix Majou, and J-P Merlet. An inter-
val analysis based study for the design and the comparison of three-
degrees-of-freedom parallel kinematic machines. International Journal
of Robotics Research, 23(6):615–624, 2004.
Damien Chablat, Guillaume Moroz, Vigen Arakelian, Sébastien Briot, and
Philippe Wenger. Solution regions in the parameter space of a 3-rrr
decoupled robot for a prescribed workspace. In Latest Advances in Robot
Kinematics, pages 357–364. Springer, 2012.
Giorgio Figliolini, Pierluigi Rea, and Jorge Angeles. The synthesis of the
axodes of spatial four-bar linkages. In International Design Engineering
Technical Conferences and Computers and Information in Engineering
Conference, volume 45035, pages 1597–1605. American Society of Me-
chanical Engineers, 2012.
Giorgio Figliolini, Pierluigi Rea, and J. Angeles. The synthesis of the axodes
of rccc linkages. Journal of Mechanisms and Robotics, 8(2):021011, 2016.
3
See the movie: https://youtu.be/P5wCgRqSyDQ
11Dalong Gao, Neil David Mckay, Matthew J Reiland, Simon Foucault, Marc-
Antoine Lacasse, Thierry Laliberte, Boris Mayer-St-Onge, Alexandre
Lecours, Clement Gosselin, David E Milburn, et al. Robotically operated
vehicle charging station, February 23 2016. US Patent 9,266,440.
Ranjan Jha, Damien Chablat, Luc Baron, Fabrice Rouillier, and Guillaume
Moroz. Workspace, joint space and singularities of a family of delta-like
robot. Mechanism and Machine Theory, 127:73–95, 2018.
Gabriel Simo Kamga. Robotisation de la recharge à domicile d’une Renault
Zoé. Master’s thesis, Ecole Centrale de Nantes, 2017.
Ahmed Ketfi-C., Damien Chablat, Ph. Wenger, and M. Ghanes. Dispositif
automatise de charge d’un véhicule électrique, 03 2018. FR3078660.
Wisama Khalil and Etienne Dombre. Modeling, identification and control
of robots, kp science, ed, 2000.
Félix Majou, Philippe Wenger, and Damien Chablat. Design of a 3 axis
parallel machine tool for high speed machining: The orthoglide. In ID-
MME, 4ème conférence internationale sur la conception et la fabrication
intégrées en mécanique, pages 1–10. AIP-Priméca, 2002.
Makeblock. Makeblock®US official store, robot kits, stem toys for kids &
makers. http://https://www.makeblock.com/, 2022. Acc.: 21-02-16.
Justinas Miseikis, Matthias Ruther, Bernhard Walzel, Mario Hirz, and Hel-
mut Brunner. 3d vision guided robotic charging station for electric and
plug-in hybrid vehicles. arXiv preprint arXiv:1703.05381, 2017.
Guillaume Moroz, Damien Chablat, Philippe Wenger, and Fabrice Rouiller.
Cusp points in the parameter space of rpr-2prr parallel manipulators. In
New Trends in Mechanism Science, pages 29–37. Springer, 2010.
Erika Ottaviano and Pierluigi Rea. Design and operation of a 2-dof leg-wheel
hybrid robot. Robotica, 31(8):1319–1325, 2013.
Pierluigi Rea, Erika Ottaviano, Marco Conte, Angelino D’Aguanno, and
Daniele De Carolis. The design of a novel tilt seat for inversion therapy.
International Journal of Imaging and Robotics, 11(3):1–10, 2013.
Bernhard Walzel, Christopher Sturm, Jürgen Fabian, and Mario Hirz. Au-
tomated robot-based charging system for electric vehicles. In 16. Inter-
nationales Stuttgarter Symposium, pages 937–949. Springer, 2016.
Philippe Wenger, Clément Gosselin, and Damien Chablat. A compara-
tive study of parallel kinematic architectures for machining applications.
Electronic Journal of Computational Kinematics, 1(1):23, 2001.
Han Yuan, Qiong Wu, and Lili Zhou. Concept design and load capacity
analysis of a novel serial-parallel robot for the automatic charging of
electric vehicles. Electronics, 9(6):956, 2020.
D Zlatanov, RG Fenton, and B Benhabib. Singularity analysis of mech-
anisms and robots via a velocity-equation model of the instantaneous
kinematics. In IEEE International Conference on Robotics and Automa-
tion, volume 1(2), pages 986–986. IEEE, 1993.
12You can also read