SEAGATE DISCWIZARD - USER GUIDE
←
→
Page content transcription
If your browser does not render page correctly, please read the page content below

acronis.com

Seagate DiscWizard

User Guide       REVISION: 1/11/2023

Table of contents
Introduction                                                                                    6
    What is Seagate DiscWizard?                                                                 6
    System requirements and supported media                                                     6
     Minimum system requirements                                                                6
     Supported operating systems                                                                6
     Supported file systems                                                                     7
     Supported storage media                                                                    8
    Installing and uninstalling Seagate DiscWizard                                              8
    Technical Support                                                                           9
Basic concepts                                                                                 10
    The difference between file backups and disk/partition images                              11
    Full backup                                                                                12
    Deciding where to store your backups                                                       13
     Preparing a new disk for backup                                                           13
     Authentication settings                                                                   14
    Wizards                                                                                    14
Backing up data                                                                                16
    Backing up disks and partitions                                                            16
    Backup options                                                                             17
     Scheduling                                                                                17
     Backup schemes                                                                            18
     Notifications for backup operation                                                        20
     Image creation mode                                                                       22
     Pre/Post commands for backup                                                              22
     Backup splitting                                                                          23
     Backup validation option                                                                  24
     Backup reserve copy                                                                       24
     Error handling                                                                            25
     File-level security settings for backup                                                   26
     Computer shutdown                                                                         26
     Performance of backup operation                                                           27
    Operations with backups                                                                    28
     Backup operations menu                                                                    28
     Validating backups                                                                        29
     Adding an existing backup to the list                                                     29

2                                                          © Acronis International GmbH, 2003-2023
Recovering data                                                                               30
    Recovering disks and partitions                                                           30
     Recovering your system after a crash                                                     30
     Recovering partitions and disks                                                          41
     About recovery of dynamic/GPT disks and volumes                                          42
     Arranging boot order in BIOS or UEFI BIOS                                                45
    Recovering files and folders                                                              46
    Searching backup content                                                                  47
    Recovery options                                                                          48
     Disk recovery mode                                                                       48
     Pre/Post commands for recovery                                                           48
     Validation option                                                                        49
     Computer restart                                                                         49
     File recovery options                                                                    49
     Overwrite file options                                                                   50
     Performance of recovery operation                                                        50
     Notifications for recovery operation                                                     51
Disk cloning and migration                                                                    53
    Disk cloning utility                                                                      53
     Clone Disk wizard                                                                        53
     Manual partitioning                                                                      55
     Excluding items from cloning                                                             56
    Migrating your system from an HDD to an SSD                                               58
     SSD size                                                                                 58
     Which migration method to choose                                                         58
     What to do if Seagate DiscWizard does not recognize your SSD                             58
     Migrating to SSD using the backup and recovery method                                    60
Tools                                                                                         61
    Seagate Media Builder                                                                     61
     Creating Seagate bootable media                                                          62
     Seagate bootable media startup parameters                                                63
     Adding drivers to an existing .wim image                                                 65
     Creating an .iso file from a .wim file                                                   66
    Making sure that your bootable media can be used when needed                              67
     Selecting video mode when booting from the bootable media                                71
    Adding a new hard disk                                                                    72
     Selecting a hard disk                                                                    73

3                                                         © Acronis International GmbH, 2003-2023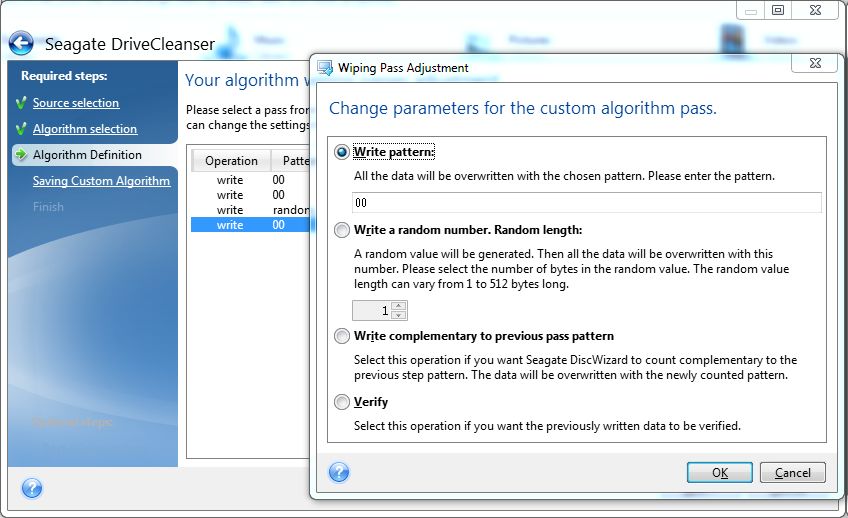
Selecting initialization method                                       73
     Creating new partitions                                               74
    Security and Privacy Tools                                             77
     Seagate DriveCleanser                                                 77
    Mounting a backup image                                                82
     How to mount an image                                                 83
    Unmounting an image                                                    84
Troubleshooting                                                            85
    Acronis System Report                                                  85
Glossary                                                                   87
Index                                                                      89

4                                      © Acronis International GmbH, 2003-2023
Copyright statement
© Acronis International GmbH, 2003-2023. All rights reserved.

All trademarks and copyrights referred to are the property of their respective owners.

Distribution of substantively modified versions of this document is prohibited without the explicit
permission of the copyright holder.

Distribution of this work or derivative work in any standard (paper) book form for commercial
purposes is prohibited unless prior permission is obtained from the copyright holder.

DOCUMENTATION IS PROVIDED “AS IS” AND ALL EXPRESS OR IMPLIED CONDITIONS,
REPRESENTATIONS AND WARRANTIES, INCLUDING ANY IMPLIED WARRANTY OF MERCHANTABILITY,
FITNESS FOR A PARTICULAR PURPOSE OR NON-INFRINGEMENT, ARE DISCLAIMED, EXCEPT TO THE
EXTENT THAT SUCH DISCLAIMERS ARE HELD TO BE LEGALLY INVALID.

Third party code may be provided with the Software and/or Service. The license terms for such
third-parties are detailed in the license.txt file located in the root installation directory. You can
always find the latest up-to-date list of the third party code and the associated license terms used
with the Software and/or Service at https://kb.acronis.com/content/7696

Acronis patented technologies
Technologies, used in this product, are covered and protected by one or more U.S. Patent Numbers:
7,047,380; 7,246,211; 7,275,139; 7,281,104; 7,318,135; 7,353,355; 7,366,859; 7,383,327; 7,475,282;
7,603,533; 7,636,824; 7,650,473; 7,721,138; 7,779,221; 7,831,789; 7,836,053; 7,886,120; 7,895,403;
7,934,064; 7,937,612; 7,941,510; 7,949,635; 7,953,948; 7,979,690; 8,005,797; 8,051,044; 8,069,320;
8,073,815; 8,074,035; 8,074,276; 8,145,607; 8,180,984; 8,225,133; 8,261,035; 8,296,264; 8,312,259;
8,347,137; 8,484,427; 8,645,748; 8,732,121; 8,850,060; 8,856,927; 8,996,830; 9,213,697; 9,400,886;
9,424,678; 9,436,558; 9,471,441; 9,501,234; and patent pending applications.

5                                                             © Acronis International GmbH, 2003-2023

Introduction

What is Seagate DiscWizard?
Seagate DiscWizard is a complete cyber protection solution that ensures the security of all your
information. It can back up your documents, photos, emails, and selected partitions, and even the
entire disk drive, including operating system, applications, settings, and all of your data. One of its
main advantages is the data protection and security features.

Backups allow you to recover your computer system should a disaster occur, such as losing data,
accidentally deleting critical files or folders, or suffering a complete hard disk crash.

Learn how to protect your computer: "Protecting your system".

System requirements and supported media

Minimum system requirements
Seagate DiscWizard requires the following hardware.

l   Seagate, Maxtor, Samsung or LaCie drive
l   Intel CORE 2 Duo (2GHz) processor or equivalent
    The CPU must support SSE instructions.
l   2 GB RAM
l   7 GB of free space on the system hard disk
l   CD-RW/DVD-RW drive or USB drive for bootable media creation
    o   Required free space for Linux is about 660 MB.
    o   Required free space for Windows is about 700 MB.
l   Screen resolution is 1024 x 768
l   Mouse or other pointing device (recommended)

Warning!
Successful backup and recovery are not guaranteed for the installations on virtual machines.

Other requirements
l   An internet connection is required for the product activation and for downloading protection
    updates.
l   You need to have administrator privileges to run Seagate DiscWizard.

Supported operating systems
Seagate DiscWizard has been tested on the following operating systems.

6                                                             © Acronis International GmbH, 2003-2023
l   Windows 11
l   Windows 10
l   Windows 8.1
l   Windows 8
l   Windows 7 SP1 (all editions)
l   Windows Home Server 2011

Note
l   Beta builds are not supported. See https://kb.acronis.com/content/60589.
l   Windows Embedded, IoT editions, Windows 10 LTSB, Windows 10 LTSC, and Windows 10 in S
    mode are not supported.
l   To use Seagate DiscWizard on Windows 7, Windows 8, and Windows 8.1, you will need the
    following security updates from Microsoft: KB4474419 and KB4490628. See
    https://kb.acronis.com/content/69302.

Seagate DiscWizard also lets you create a bootable CD-R/DVD-R or USB drive that can back up and
recover a disk/partition on a computer running any Intel- or AMD- based PC operating system,
including Linux®.

It is possible for the software to work on other Windows operating systems, but it is not guaranteed.

Warning!
Successful recovery is guaranteed only for the supported operating systems. Other operating
systems can be backed up using a sector-by-sector approach, but they may become unbootable
after recovery.

Supported file systems
l   NTFS
l   Ext2/Ext3/Ext4
l   ReiserFS(3)1
l   Linux SWAP2
l   HFS+/HFSX3
l   FAT16/32/exFAT4

If a file system is not supported or is corrupted, Seagate DiscWizard can copy data using a sector-by-
sector approach.

1File systems are supported only for disk or partition backup/recovery operations.
2File systems are supported only for disk or partition backup/recovery operations.
3Disk recovery, partition recovery, and cloning operations are supported without resizing.
4Disk recovery, partition recovery, and cloning operations are supported without resizing.

7                                                                    © Acronis International GmbH, 2003-2023
Supported storage media
l     Hard disk drives (HDD)
l     Solid-state drives (SSD)
l     Networked storage devices
l     FTP servers

      Note
      The FTP server must allow passive mode file transfers. Seagate DiscWizard splits a backup into
      files with a size of 2GB when backing up directly to an FTP server.

l     CD-R/RW, DVD-R/RW, DVD+R (including double-layer DVD+R), DVD+RW, DVD-RAM, BD-R, BD-RE
l     USB 1.1 / 2.0 / 3.0, USB-C, eSATA, FireWire (IEEE-1394), SCSI, and PC card storage devices

Limitations on operations with dynamic disks
l     Recovery of a dynamic volume as a dynamic volume with manual resizing is not supported.
l     Disk cloning operation is not supported for dynamic disks.

The firewall settings of the source computer should have Ports 20 and 21 opened for the TCP and
UDP protocols to function. The Routing and Remote Access Windows service should be disabled.

Installing and uninstalling Seagate DiscWizard
To install Seagate DiscWizard

1. Run the setup file.
2. Select the installation mode:
      l   Click Install for the default installation.
      Seagate DiscWizard will be installed on your system partition (usually C:).
3. When the installation is complete, click Start application.
4. Read and accept the terms of the license agreements for Seagate DiscWizard and Bonjour.
      Bonjour software will be installed on your computer for advanced support of NAS devices. You
      can uninstall the software at any time.

To recover from an Seagate DiscWizard error

If Seagate DiscWizard ceased running or produced errors, its files might be corrupted. To repair this
problem, you first have to recover the program. To do this, run Seagate DiscWizard installer again. It
will detect Seagate DiscWizard on your computer and will ask you if you want to modify or remove
it.

To uninstall Seagate DiscWizard completely

l     If you use Windows 11, click Start > Settings > Apps > Seagate DiscWizard > Uninstall.
l     If you use Windows 10, click Start > Settings > Apps > Seagate DiscWizard > Uninstall.

8                                                              © Acronis International GmbH, 2003-2023
l   If you use Windows 8, click the Settings icon, then select Control Panel > Uninstall a program >
    Seagate DiscWizard > Uninstall.
l   If you use Windows 7, click Start > Control Panel > Uninstall a program > Seagate DiscWizard
    > Uninstall.

Then follow the instructions on the screen. You may have to restart your computer afterwards to
complete the task.

Technical Support
If you need assistance with Seagate DiscWizard, refer to the official support resources of Seagate at
https://www.seagate.com/support/.

9                                                          © Acronis International GmbH, 2003-2023
Basic concepts
This section provides general information about basic concepts which could be useful for
understanding how the program works.

Note
Certain features and functionalities may be unavailable in the edition that you use.

Backup and recovery

Backup refers to the making copies of data so that these additional copies may be used to recover
the original after a data loss event.

Backups are useful primarily for two purposes:

l    To recover an operating system when it is corrupted or cannot start (called disaster recovery).
     Refer to Protecting your system for more details about protecting your computer from a disaster.
l    To recover specific files and folders after they have been accidentally deleted or corrupted.

Seagate DiscWizard does both by creating disk (or partition) images and file-level backups
respectively.

Backup versions

Backup versions are the file or files created during each backup operation. The number of versions
created is equal to the number of times the backup is executed. So, a version represents a point in
time to which the system or data can be restored.

Backup versions represent full, incremental and differential backups - see Full, incremental and
differential backups.

The backup versions are similar to file versions. The file versions concept is familiar to those who
use a Windows feature called "Previous versions of files". This feature allows you to restore a file as
it existed on a particular date and time. A backup version allows you to recover your data in a similar
way.

This could be useful when trying to find damaged or deleted files. Simply browse through the
backup versions until you find the backup version containing the required files. Additionally, you can
recover different saved versions of the found files.

Disk cloning

This operation copies the entire contents of one disk drive to another disk drive. This may be
necessary, for example, when you want to clone your operating system, applications, and data to a
new larger capacity disk. You can do it two ways:

l    Use the Clone disk utility.
l    Back up your old disk drive, and then recover it to the new one.

Backup validation

10                                                            © Acronis International GmbH, 2003-2023
The backup validation feature allows you to confirm that your data can be recovered. The program
adds checksum values to the data blocks being backed up. During backup validation, Seagate
DiscWizard opens the backup file, recalculates the checksum values and compares those values with
the stored ones. If all compared values match, the backup file is not corrupted.
Scheduling
For your backups to be really helpful, they must be as up to date as possible. Schedule your backups
to run automatically and on a regular basis.
Deleting backups
Seagate DiscWizard stores information on the backups in a metadata information database.
Therefore, deleting unneeded backup files in File Explorer will not delete information about these
backups from the database. This will result in errors when the program tries to perform operations
on the backups that no longer exist.
The difference between file backups and disk/partition
images
When you back up files and folders, only the files and folder tree are compressed and stored.
Disk/partition backups are different from file and folder backups. Seagate DiscWizard stores an
exact snapshot of the disk or partition. This procedure is called "creating a disk image" or "creating a
disk backup" and the resulting backup is often called "a disk/partition image" or "a disk/partition
backup".
What does a disk/partition backup contain?
A disk/partition backup contains all the data stored on the disk or partition:
1. Zero track of the hard disk with the master boot record (MBR) (applicable to MBR disk backups
only).
2. One or more partitions, including:
a. Boot code.
b. File system meta data, including service files, file allocation table (FAT), and partition boot
record.
c. File system data, including operating system (system files, registry, drivers), user data and
software applications.
3. System Reserved partition, if any.
4. EFI system partition, if any (applicable to GPT disk backups only).
What is excluded from disk backups?
To reduce image size and speed up image creation, by default Seagate DiscWizard only stores the
hard disk sectors that contain data.
Seagate DiscWizard excludes the following files from a disk backup:
11 © Acronis International GmbH, 2003-2023l pagefile.sys l hiberfil.sys (a file that keeps RAM contents when the computer goes into hibernation) You can change this default method by turning on the sector-by-sector mode. In this case, Seagate DiscWizard copies all hard disk sectors, and not only those that contain data. Full backup Note Incremental and differential backups are not available in this product edition. The result of a full method backup operation (also known as full backup version) contains all of the data at the moment of the backup creation. Example: Every day, you write one page of your document and back it up using the full method. Seagate DiscWizard saves the entire document every time you run backup. 1.tibx, 2.tibx, 3.tibx, 4.tibx—files of full backup versions. Additional information A full backup version forms a base for further incremental or differential backups. It can also be used as a standalone backup. A standalone full backup might be an optimal solution if you often roll back the system to its initial state or if you do not like to manage multiple backup versions. Recovery: In the example above, to recover the entire work from the 4.tibx file, you need to have only one backup version—4.tib. 12 © Acronis International GmbH, 2003-2023
Deciding where to store your backups
Seagate DiscWizard supports quite a few of storage devices. For more information, refer to
"Supported storage media" (p. 8).

Recommended storage media:

1. External drive
     If you plan to use an external USB hard drive with your desktop PC, we recommend that you
     connect the drive to a rear connector by using a short cable.
2. Home file server, NAS, or NDAS
     Check whether Seagate DiscWizard detects the selected backup storage, both in Windows and
     when booted from the bootable media.
     To gain access to an NDAS-enabled storage device, in many cases you will need to specify the
     NDAS device ID (20 characters) and the write key (five characters). The write key allows you to
     use an NDAS-enabled device in write mode (for example, for saving your backups). Usually the
     device ID and write key are printed on a sticker attached to the bottom of the NDAS device or on
     the inside of its enclosure. If there is no sticker, you need to contact your NDAS device vendor to
     obtain that information.
3. Optical discs (CD, DVD, BD)
     Blank optical discs such as DVD-R, DVD+R are very cheap, so they will be the lowest cost solution
     for backing up your data, though the slowest one.
     Due to the necessity of swapping discs, we strongly recommend to avoid backing up to DVDs if
     the number of discs is more than three. When there is no alternative to backing up to DVDs, we
     recommend to copy all DVDs to a folder on a hard disk, and then to recover from that folder.

Preparing a new disk for backup
A new internal or external hard drive may not be recognized by Seagate DiscWizard. If this is the
case, use the operating system tools to change the disk status to Online and then to initialize the
disk.

To change a disk status to Online

1. Open Disk Management. To do this, go to Control Panel -> System and Security ->
     Administrative Tool, start Computer Management, and then click Disk Management.
2. Find the disk marked as Offline. Right-click the disk and then click Online.
3. The disk status will be changed to Online. After that, you will be able to initialize the disk.

To initialize a disk

1. Open Disk Management. To do this, go to Control Panel -> System and Security ->
     Administrative Tool, start Computer Management, and then click Disk Management.
2. Find the disk marked as Not Initialized. Right-click the disk and then click Initialize Disk.
3. Select a partition table for the disk - MBR or GPT, and then click OK.

13                                                            © Acronis International GmbH, 2003-2023
4. [optional step] To create a volume on the disk, right-click the disk, click New Simple Volume,
and then follow the wizard's steps to configure the new volume. To create one more volume,
repeat this operation.
Authentication settings
If you are connecting to a networked computer, in most cases you will need to provide the
necessary credentials for accessing the network share. For example, this is possible when you select
a backup storage. The Authentication Settings window appears automatically when you select a
networked computer name.
If necessary, specify the user name and password, and then click Test connection. When the test is
successfully passed, click Connect.
Troubleshooting
When you create a network share that you plan to use as a backup storage, ensure that at least one
of the following conditions is met:
l Windows account has a password on the computer where the shared folder is located.
l Password-protected sharing is turned off in Windows.
For example, in Windows 7, you can find this setting at Control Panel —> Network and
Internet —> Network and Sharing Center —> Advanced sharing settings —> Turn off
password protected sharing.
Otherwise, you will not be able to connect to the shared folder.
Wizards
When you use the available Seagate DiscWizard tools and utilities, the program will in many cases
employ wizards to guide you through the operations.
For example, see the screenshot below.
14 © Acronis International GmbH, 2003-2023A wizard window usually consists of the following areas:
1. This is the list of steps to complete the operation. A green checkmark appears next to a complete
step. The green arrow indicates the current step. When complete all the steps, the program
displays the Summary screen in the Finish step. Check the summary and click Proceed to start
the operation.
2. This toolbar contains buttons to manage objects you select in area 3.
For example:
l Details - displays the window that provides detailed information about the selected
backup.
l Properties - displays the selected item properties window.
l Create new partition - displays the window where you can configure a new partition
settings.
l Columns - allows you to choose which table columns to display and in which order.
3. This is the main area where you select items and change settings.
4. This area displays additional information about the item you select in area 3.
15 © Acronis International GmbH, 2003-2023Backing up data
Backing up disks and partitions
Note
Certain features and functionalities may be unavailable in the edition that you use.
As opposed to file backups, disk and partition backups contain all the data stored on the disk or
partition. This backup type is usually used to create an exact copy of a system partition of the whole
system disk. Such backup allows you to recover your computer when Windows works incorrectly or
cannot start.
To back up partitions or disks
1. Start Seagate DiscWizard.
2. On the sidebar, click Backup.
3. Click Add backup.
4. [Optional] To rename the backup, click the arrow next to the backup name, click Rename, and
then enter a new name.
5. Click the Backup source area, and then select Disks and partitions.
6. In the opened window, select the check boxes next to the partitions and disks that you want to
back up, and then click OK.
To view hidden partitions, click Full partition list.
Note
To back up dynamic disks you can use only the partition mode.
7. Click the Backup destination area, and then select a destination for backup:
l Your external drive—When an external drive is plugged into your computer, you can select it
from the list.
l Browse—Select a destination from the folder tree.
Note
If possible, avoid storing your system partition backups on dynamic disks, because the system
partition is recovered in the Linux environment. Linux and Windows work with dynamic disks
differently. This may result in problems during recovery.
8. [optional step] Click Options to set the options for the backup. For more information see Backup
options.
9. [optional step] Click the Add a comment icon, and then type a comment to the backup version.
Backup comments will help you to find the necessary version later, when recovering your data.
10. Perform one of the following:
16 © Acronis International GmbH, 2003-2023l To run the backup immediately, click Back up now.
l To run the backup later or on a schedule, click the arrow to the right of the Back up now
button, and then click Later.
Backup options
When you create a backup, you can change additional options and fine-tune the backup process. To
open the options window, select a source and destination for a backup, and then click Options.
After you have installed the application, all options are set to the initial values. You can change them
for your current backup operation only or for all backups that will be created in future. Select the
Save as default check box to apply the modified settings to all further backup operations by
default.
If you want to reset all the modified options to the values that were set after the product installation
initially, click the Reset to initial settings button. Note that this will reset the settings for the
current backup only. To reset the settings for all further backups, click Reset to initial settings,
select the Save the settings as default check box, and then click OK.
Scheduling
Note
Certain features and functionalities may be unavailable in the edition that you use.
Location: Options > Schedule
The Schedule tab allows you to specify the backup and validation schedule settings.
You can specify a schedule for backups created or validated regularly:
l Daily—The operation will be executed once a day or more frequently.
l Weekly—The operation will be executed once a week or several times a week on the selected
days.
l Monthly—The operation will be executed once a month or several times a month on the
selected dates.
l Do not schedule—The scheduler will be turned off for the current operation. In this case the
backup or validation will run only when you click Back up now or Validate respectively in the
main window.
Advanced settings
Clicking Advanced settings allows you to specify the following additional settings for backup and
validation:
l Back up only when the computer is locked or screensaver is running—Select this check box
to postpone a scheduled operation until the next time the computer is not in use (a screen saver
is displayed or computer is locked). For the validation schedule, the check box changes to Run
17 © Acronis International GmbH, 2003-2023the validation only when the computer is idle.
l Wake up the sleeping/hibernating computer—Select this check box to wake up the
sleeping/hibernating computer to perform the scheduled operation.
l Prevent the computer from going to sleep/hibernate—Select this check box to eliminate a
situation when a time-consuming backup is interrupted if the computer goes into sleep or
hibernation mode.
l Run missed operations at the system startup with delay (in minutes)—Select this check box
to force the missed operation to run at the next system startup, if the computer was switched off
at the scheduled time, and the operation was not performed.
Additionally, you can set a time delay to start backup after the system startup. For example, to
start backup 20 minutes after system startup, enter 20 in the appropriate box.
l Run missed operations when an external device is connected [optional, if you schedule a
backup to a USB flash drive, or validation of a backup that is located on a USB flash drive]—Select
this check box to run a missed operation when the USB flash drive is attached if it was
disconnected at the scheduled time.
Weekly backup parameters
You can set up the following parameters for backups created or validated weekly:
l Days of the week—Select the days on which to run the operation .
l At—Select the operation start time.
Description of the Advanced settings see in Scheduling.
Backup schemes
Location: Options > Backup scheme
Backup schemes along with the scheduler help you set up your backup strategy. The schemes allow
you to optimize backup storage space usage, improve data storage reliability, and automatically
delete the obsolete backup versions.
The backup scheme defines the following parameters:
l Sequence of the backup versions created using different methods
l Version cleanup rules
Seagate DiscWizard allows you to choose from the following backup schemes:
l Single version scheme—Select this scheme if you want to use the smallest backup storage.
l Custom scheme—Select to set up a backup scheme manually.
You can easily change the backup scheme for a pre-existing backup. This will not affect the integrity
of the backup chains, so you will be able to recover your data from any previous backup version.
18 © Acronis International GmbH, 2003-2023Note
You cannot change the backup scheme when backing up to optical media such as a DVD/BD. In this
case, Seagate DiscWizard by default uses a custom scheme with only full backups. This is because
the program cannot consolidate backups stored on optical media.
Single version scheme
The program creates a full backup version and overwrites it every time when you run the backup
manually. In this process, the old version is deleted only after a new version is created.
Note
The very first file will remain for auxiliary purposes, without your data in it. Do not delete it!
Result: you have a single up-to-date full backup version.
Required storage space: minimal.
Custom schemes
With Seagate DiscWizard you also can create your own backup schemes. Schemes can be based on
the pre-defined backup schemes. You can make changes in a selected pre-defined scheme to suit
your needs and then save the changed scheme as a new one.
Note
You cannot overwrite existing pre-defined backup schemes.
Turn on automatic cleanup
l Old version cleanup rules—To delete obsolete backup versions automatically, you can set one
of the following cleanup rules:
o Delete versions older than [n] days [available for full method only]—Select this option to
limit the age of backup versions. All versions that are older than the specified period will be
automatically deleted.
o Delete version chains older than [n] days [available for incremental and differential
methods only]—Select this option to limit the age of backup version chains. The oldest version
chain will be deleted only when the most recent backup version of this chain is older than the
specified period.
o Store no more than [n] recent versions [available for full method only]—Select this option
to limit the maximum number of backup versions. When the number of versions exceeds the
specified value, the oldest backup version will be automatically deleted.
o Store no more than [n] recent version chains [available for incremental and differential
methods only]—Select this option to limit the maximum number of backup version chains.
When the number of version chains exceeds the specified value, the oldest backup version
chain will be automatically deleted.
19 © Acronis International GmbH, 2003-2023o Keep size of the backup no more than [defined size] [not available for local backups]—
Select this option to limit the maximum size of the backup. After creating a new backup
version, the program checks whether the total backup size exceeds the specified value. If it's
true, the oldest backup version will be deleted.
l Do not delete the first version of the backup—Select this check box to keep the initial data
state. The program will create two initial full backup versions. The first version will be excluded
from the automatic cleanup, and will be stored until you delete it manually. If you select
incremental or differential method, the first backup chain will start from the second full backup
version. And only the third version of the backup will be incremental or differential one. Note that
when the check box is selected for the full method, the Store no more than [n] recent versions
check box changes to Store no more than 1+[n] recent versions.
Managing custom backup schemes
If you change anything in an existing backup scheme, you can save the changed scheme as a new
one. In this case you need to specify a new name for that backup scheme.
l You can overwrite existing custom schemes.
l You cannot overwrite existing pre-defined backup schemes.
l In a scheme name, you can use any symbols allowed by OS for naming files. The maximum length
of a backup scheme name is 255 symbols.
l You can create not more than 16 custom backup schemes.
After creating a custom backup scheme, you can use it as any other existing backup scheme while
configuring a backup.
You can also use a custom backup scheme without saving it. In this case, it will be available only for
the backup where it was created and you will be unable to use it for other backups.
If you do not need a custom backup scheme anymore, you can delete it. To delete the scheme,
select it in the backup schemes list, click Delete, and then confirm in the Delete scheme window.
Note
The pre-defined backup schemes cannot be deleted.
Notifications for backup operation
Location: Options > Notifications
Sometimes a backup or recovery procedure can last an hour or longer. Seagate DiscWizard can
notify you when it is finished via email. The program can also duplicate messages issued during the
operation or send you the full operation log after operation completion.
By default, all notifications are disabled.
20 © Acronis International GmbH, 2003-2023Free disk space threshold
You may want to be notified when the free space on the backup storage becomes less than the
specified threshold value. If after starting a backup Seagate DiscWizard finds out that the free space
in the selected backup location is already less than the specified value, the program will not begin
the actual backup process and will immediately inform you by displaying an appropriate message.
The message offers you three choices - to ignore it and proceed with the backup, to browse for
another location for the backup or to cancel the backup.
If the free space becomes less than the specified value while the backup is being run, the program
will display the same message and you will have to make the same decisions.
Seagate DiscWizard can monitor free space on the following storage devices: local hard drives, USB
cards and drives, and Network shares (SMB). This option cannot be enabled for FTP servers and
CD/DVD drives.
To set the free disk space threshold
1. Select the Show notification message on insufficient free disk space check box.
2. Enter a threshold value in the Notify me when free disk space is less than box.
Note
The message will not be displayed if the Do not show messages and dialogs while processing
(silent mode) check box is selected in the Error handling settings.
Email notification
1. Select the Send email notifications about the operation state check box.
2. Configure email settings:
l Enter the email address in the To field. You can enter several addresses, separated by
semicolons.
l Enter the outgoing mail server (SMTP) in the Server settings field.
l Set the port of the outgoing mail server. By default, the port is set to 25.
l Select the required encryption for the emails.
l If required, select the SMTP authentication check box, and then enter the user name and
password in the corresponding fields.
3. To check whether your settings are correct, click the Send test message button.
If the test message sending fails
1. Click Show extended settings.
2. Configure additional email settings:
l Enter the sender's email address in the From field. If you are not sure what address to specify,
then type any address you like in a standard format, for example aaa@bbb.com.
l Change the message subject in the Subject field, if necessary.
21 © Acronis International GmbH, 2003-2023To simplify monitoring a backup status, you can add the most important information to the
subject of the email messages. You can type the following text labels:
o %BACKUP_NAME%—The backup name
o %COMPUTER_NAME%—The name of the computer where the backup was started
o %OPERATION_STATUS%—The result of the backup or other operation
For example, you can type: Status of backup %BACKUP_NAME%: %OPERATION_STATUS%
(%COMPUTER_NAME%)
l Select the Log on to incoming mail server check box, and enter the incoming mail server
(POP3) under it.
l Set the port of the incoming mail server. By default, the port is set to 110.
3. Click the Send test message button again.
Additional notification settings
l Send notification upon operation's successful completion—Select this check box to send a
notification concerning a process completion.
l Send notification upon operation failure—Select this check box to send a notification
concerning a process failure.
l Send notification when user interaction is required—Select this check box to send a
notification with operation messages.
l Add full log to the notification—Select this check box to send a notification with a full log of
operations.
Note
You will only get email notifications for a particular backup.
Image creation mode
Location: Options > Advanced > Image creation mode
You can use these parameters to create an exact copy of your whole partitions or hard disks, and
not only the sectors that contain data. For example, this can be useful when you want to back up a
partition or disk containing an operating system that is not supported by Seagate DiscWizard. Keep
in mind that this mode increases processing time and usually results in a larger image file.
l To create a sector-by-sector image, select the Back up sector-by-sector check box.
l To include all unallocated disk space into the backup, select the Back up unallocated space
check box.
This check box is available only when the Back up sector-by-sector check box is selected.
Pre/Post commands for backup
Location: Options > Advanced > Pre/Post commands
You can specify commands (or even batch files) that will be automatically executed before and after
the backup procedure.
22 © Acronis International GmbH, 2003-2023For example, you may want to start/stop certain Windows processes, or check your data before
starting backup.
To specify commands (batch files)
l Select the Use custom commands check box.
l Select a command to be executed before the backup process starts in the Pre-command field. To
create a new command or select a new batch file, click the Edit button.
l Select a command to be executed after the backup process ends in the Post-command field. To
create a new command or select a new batch file, click the Edit button.
Please do not try to execute interactive commands, i.e. commands that require user input (for
example, pause). These are not supported.
Edit user command for backup
You can specify user commands to be executed before or after the backup procedure:
l In the Command field, type-in a command or select it from the list. Click ... to select a batch file.
l In the Working directory field, type-in a path for command execution or select it from the list of
previously entered paths.
l In the Arguments field enter or select command execution arguments from the list.
Disabling the Do not perform operations until the command's execution is complete
parameter (enabled for Pre commands by default), will permit the backup process to run
concurrently with your command execution.
The Abort the operation if the user command fails (enabled by default) parameter will abort the
operation if any errors occur in command execution.
You can test a command you entered by clicking the Test command button.
Backup splitting
Location: Options > Advanced > Backup splitting
Note
Seagate DiscWizard cannot split already existing backups. Backups can be split only when being
created.
Large backups can be split into several files that together make up the original backup. A backup
can also be split for burning to removable media.
The default setting - Automatic. With this setting, Seagate DiscWizard will act as follows.
When backing up to a hard disk:
l If the selected disk has enough space and its file system allows the estimated file size, the
program will create a single backup file.
23 © Acronis International GmbH, 2003-2023l If the storage disk has enough space, but its file system does not allow the estimated file size, the
program will automatically split the image into several files.
l If you do not have enough space to store the image on your hard disk, the program will warn you
and wait for your decision as to how you plan to fix the problem. You can try to free some
additional space and continue or select another disk.
When backing up to a CD-R/RW, DVD-R/RW, DVD+R/RW, BD-R/RE:
l Seagate DiscWizard will ask you to insert a new disk when the previous one is full.
Alternatively, you may select the desired file size from the drop-down list. The backup will then be
split into multiple files of the specified size. This is useful when you store a backup to a hard disk in
order to burn the backup to CD-R/RW, DVD-R/RW, DVD+R/RW or BD-R/RE later on.
Note
Creating images directly on CD-R/RW, DVD-R/RW, DVD+R/RW, BD-R/RE might take considerably
more time than it would on a hard disk.
Backup validation option
Location: Options > Advanced > Validation
You can specify the following settings:
l Validate backup each time after it is completed—Select to check the integrity of the backup
version immediately after backup. We recommend that you enable this option when you back up
your critical data or system disk.
o Validate the latest diverse backup version only—A quick validation of the last backup slice.
o Validate entire backup
l Validate backup on schedule—Select to schedule validation of your backups to ensure that
they remain "healthy".
o The latest diverse backup version when it is completed
o Entire backup when it is completed
The default settings are as follows:
o Frequency—Once a month.
o Day—The date when the backup was started.
o Time—The moment of backup start plus 15 minutes.
You can also configure start of the validation manually from the backup context menu.
To do this, right-click the backup and choose:
l Validate all versions
l Validate the latest version
Backup reserve copy
Location: Options > Advanced > Backup reserve copy
24 © Acronis International GmbH, 2003-2023Backup reserve copy is an independent full backup version created immediately after a normal
backup. Even when you create an incremental or differential backup version containing only data
changes, the reserve copy will contain all the data selected for the normal backup. You can save
reserve copies of your backups on the file system, a network drive, or a USB flash drive.
Note
CD/DVDs are not supported as locations for reserve copies.
To make a reserve copy
1. Select the Create a reserve copy of my backups check box.
2. Specify a location for the backup copies.
3. Select the reserve copy format. You can create it as an Acronis backup (.tib files) or just copy the
source files to the selected location as is, without any modification.
4. [Optional step] Protect the reserve copy with a password.
All other backup options will be inherited from the source backup.
Error handling
When Seagate DiscWizard encounters an error while performing a backup, it stops the backup
process and displays a message, waiting for a response on how to handle the error. You can
configure an error handling policy, so Seagate DiscWizard will not stop the backup process, but will
handle the error according to the rules that you set, and will continue working.
Note
This topic applies to backups that use local or network backup destinations.
To set up the error handling policy
1. On the Backup dashboard > Options > Advanced > Error handling
2. Set the error handling policy:
l Do not show messages and dialogs while processing (silent mode) - Enable this setting to
ignore errors during backup operations. This is useful when you cannot control the backup
process.
l Ignore bad sectors - This option is available only for disk and partition backups. It lets you
successfully complete a backup even if there are bad sectors on the hard disk.
We recommend that you select this check box when your hard drive is failing, for example:
o Hard drive is making clicking or grinding noises during operation.
o The S.M.A.R.T. system has detected hard drive issues and recommends that you back up
the drive as soon as possible.
When you leave this check box cleared, the backup may fail because of possible bad sectors
on the drive.
l Repeat attempt if a backup fails - This option allows you to automatically repeat a backup
attempt if the backup fails for some reason. You can specify the number of attempts and the
25 © Acronis International GmbH, 2003-2023interval between attempts. Note that if the error interrupting the backup persists, the backup
will not be created.
3. Click OK.
File-level security settings for backup
Note
Certain features and functionalities may be unavailable in the edition that you use.
Location: Options > Advanced > File-level security settings
Note
This option is only available for file-level backups.
You can specify security settings for backed up files:
l Preserve file security settings in backups - selecting this option will preserve all the security
properties (permissions assigned to groups or users) of the backup files for further recovery.
By default, files and folders are saved in the backup with their original Windows security settings
(i.e. permissions for read, write, execute and so on for each user or user group, set in file
Properties -> Security). If you recover a secured file/folder on a computer without the user
specified in the permissions, you may not be able to read or modify this file.
To eliminate this kind of problem, you can disable preserving file security settings in backups.
Then the recovered files/folders will always inherit the permissions from the folder to which they
are recovered (parent folder or disk, if recovered to the root).
Or, you can disable file security settings during recovery, even if they are available in the backup.
The result will be the same.
l In backups, store encrypted files in a decrypted state (the preset is disabled) - check the
option if there are encrypted files in the backup and you want them to be accessed by any user
after recovery. Otherwise, only the user who encrypted the files/folders will be able to read them.
Decryption may also be useful if you are going to recover encrypted files on another computer.
If you do not use the encryption feature available in Windows XP and later operating systems,
simply ignore this option. (Files/folders encryption is set in Properties -> General -> Advanced
Attributes -> Encrypt contents to secure data).
Computer shutdown
Location: Options > Advanced > Computer shutdown
You can configure the following options:
l Stop all current operations when I shut down the computer—When you turn off your
computer while Seagate DiscWizard is performing a long operation, for example a disk backup,
this operation prevents the computer from shutdown. When this check box is selected, Seagate
DiscWizard automatically stops all its current operations before shutdown. This may take about
26 © Acronis International GmbH, 2003-2023two minutes. The next time you run Seagate DiscWizard, it will restart the stopped backups.
l Shut down the computer after the backup is complete—Select this option if the backup
process you are configuring may take a long time. In this case, you will not have to wait until the
operation completion. The program will perform the backup and turn off your computer
automatically.
This option is also useful when you schedule your backups. For example, you may want to
perform backups every weekday in the evening to save all your work. Schedule the backup and
select the check box. After that you may leave your computer when you finish your work knowing
that the critical data will be backed up and the computer will be turned off.
Performance of backup operation
Location for backups to local destinations: Options > Advanced > Performance
Compression level
You can choose the compression level for a backup:
l None—The data will be copied without any compression, which may significantly increase the
backup file size.
l Normal—The recommended data compression level (set by default).
l High—Higher backup file compression level, takes more time to create a backup.
l Max—Maximum backup compression, but takes a long time to create a backup.
Note
The optimal data compression level depends on the type of files stored in the backup. For example,
even maximum compression will not significantly reduce the backup size, if the backup contains
essentially compressed files, like .jpg, .pdf or .mp3.
Note
You cannot set or change the compression level for a pre-existing backup.
Operation priority
Changing the priority of a backup or recovery process can make it run faster or slower (depending
on whether you raise or lower the priority), but it can also adversely affect the performance of other
running programs. The priority of any process running in a system, determines the amount of CPU
usage and system resources allocated to that process. Decreasing the operation priority will free
more resources for other CPU tasks. Increasing backup or recovery priority may speed up the
process by taking resources from the other currently running processes. The effect will depend on
total CPU usage and other factors.
You can set up the operation priority:
l Low (enabled by default)—The backup or recovery process will run slower, but the performance
of other programs will be increased.
27 © Acronis International GmbH, 2003-2023l Normal—The backup or recovery process will have the equal priority with other processes.
l High—The backup or recovery process will run faster, but the performance of other programs
will be reduced. Be aware that selecting this option may result in 100% CPU usage by Seagate
DiscWizard.
Network connection transfer rate
When you back up data to network drives, or FTP, you can change the connection speed used by
Seagate DiscWizard. Set the connection speed that will allow you to use Internet and network
resources without annoying slowdowns.
To set up the connection speed, select one of the following options:
l Maximum
The data transfer rate is maximum within a system configuration.
l Limit upload speed to
You can specify a maximum value for data upload speed.
Operations with backups
Backup operations menu
The backup operations menu provides quick access to additional operations that can be performed
with the selected backup.
The backup operations menu can contain the following items:
l Rename—Set a new name for a backup in the list. The backup files will not be renamed.
l Reconfigure (for backups manually added to the backup list)—Configure the settings of a backup
created by a previous version. This item may also appear for backups created on another
computer and added to the backup list without importing their settings.
Without backup settings, you cannot refresh the backup by clicking Back up now. Also, you
cannot edit and clone the backup settings.
l Validate the latest version—Start quick validation of the last backup slice.
l Validate all versions—Start validation of all backup slices.
l Clean up versions—Delete backup versions you no longer need.
l Clone settings—Create a new empty backup box with the settings of the initial backup and
named (1) [the initial backup name]. Change the settings, save them, and then click Back up
now on the cloned backup box.
l Move—Move all of the backup files to another location. The subsequent backup versions will be
saved to the new location.
If you change the backup destination by editing the backup settings, only new backup versions
will be saved to the new location. The earlier backup versions will remain in the old location.
28 © Acronis International GmbH, 2003-2023l Delete—Depending on a backup type, you can completely delete the backup from its location or
choose whether you want to delete the backup box only. When you delete a backup box, the
backup files remain in the location and you will be able to add the backup to the list later. Note
that when you delete a backup completely, the deletion cannot be undone.
l Open location—Open the folder containing the backup files.
l Search files—Find a specific file or folder in a backup by entering its name into the search field.
Validating backups
The validation procedure checks whether you will be able to recover data from a backup.
For example, backup validation is important before you recover your system. If you start recovery
from a corrupted backup, the process will fail and your computer may become unbootable. We
recommend that you validate system partition backups under bootable media. Other backups may
be validated in Windows. See also Preparing for recovery and Basic concepts.
To validate an entire backup in Windows
1. Start Seagate DiscWizard, and then click Backup on the sidebar.
2. In the backup list, click the down arrow icon next to the backup to validate, and then click
Validate.
To validate a specific backup version or an entire backup in a standalone version of Seagate
DiscWizard (bootable media)
1. On the Recovery tab, find the backup that contains the version that you want to validate. If the
backup is not listed, click Browse for backup, and then specify the path to the backup. Seagate
DiscWizard adds this backup to the list.
2. Right-click the backup or a specific version, and then click Validate Archive. This opens the
Validate Wizard.
3. Click Proceed.
Adding an existing backup to the list
You may have Seagate DiscWizard backups created by a previous product version or copied from
another computer. Every time you start Seagate DiscWizard, it scans your computer for such
backups and adds them to the backup list automatically.
If you have backups that are not shown in the list, you can add them manually.
To add backups manually
1. In the Backup section, at the bottom of the backup list, click the arrow icon, and then click Add
existing backup. The program opens a window where you can browse for backups on your
computer.
2. Select a backup version (a .tib file), and then click Add.
The entire backup will be added to the list.
29 © Acronis International GmbH, 2003-2023Recovering data
Recovering disks and partitions
Recovering your system after a crash
When your computer fails to boot, it is advisable to at first try to find the cause using the
suggestions given in Trying to determine the crash cause. If the crash is caused by corruption of the
operating system, use a backup to recover your system. Make the preparations described in
Preparing for recovery and then proceed with recovering your system.
Trying to determine the crash cause
A system crash can be due to two basic factors:
l Hardware failure
In this scenario, it is better to let your service center handle the repairs. However, you may want
to perform some routine tests. Check the cables, connectors, power of external devices, etc.
Then, restart the computer. If there is a hardware problem, the Power-On Self Test (POST) will
inform you about the failure.
If the POST does not reveal a hardware failure, enter BIOS and check whether it recognizes your
system hard disk drive. To enter BIOS, press the required key combination (Del, F1, Ctrl+Alt+Esc,
Ctrl+Esc, or some other, depending on your BIOS) during the POST sequence. Usually the
message with the required key combination is displayed during the startup test. Pressing this
combination takes you to the setup menu. Go to the hard disk autodetection utility which usually
comes under "Standard CMOS Setup" or "Advanced CMOS setup". If the utility does not detect
the system drive, it has failed and you need to replace the drive.
l Operating system corruption (Windows cannot start up)
If the POST correctly detects your system hard disk drive, then the cause of the crash is probably
a virus, malware or corruption of a system file required for booting. In this case, recover the
system using a backup of your system disk or system partition. Refer to Recovering your system
for details.
Preparing for recovery
We recommend that you perform the following actions before recovery:
l Scan the computer for viruses if you suspect that the crash occurred due to a virus or malware
attack.
l Under bootable media, try a test recovery to a spare hard drive, if you have one.
l Validate the image under bootable media. A backup that can be read during validation in
Windows, may not always be readable in a Linux environment.
Under bootable media, there are two ways to validate a backup:
30 © Acronis International GmbH, 2003-2023o To validate a backup manually, on the Recovery tab, right-click a backup and select Validate
Archive.
o To validate a backup automatically before recovery, on the Options step of the Recovery
Wizard, select the Validate backup archive before recovery check box.
l Assign unique names (labels) to all partitions on your hard drives. This will make finding the disk
containing your backups easier.
When you use the bootable media, it creates disk drive letters that might differ from the way
Windows identifies drives. For example, the D: disk identified in the bootable media might
correspond to the E: disk in Windows.
Recovering your system to the same disk
Before you start, we recommend that you complete the procedures described in Preparing for
recovery.
To recover your system
1. Attach the external drive if it contains the backup to be used for recovery and make sure that the
drive is powered on.
2. Arrange the boot order in BIOS so as to make your Seagate bootable media (CD, DVD or USB
drive) the first boot device. See Arranging boot order in BIOS or UEFI BIOS.
If you use a UEFI computer, pay attention to the boot mode of the bootable media in UEFI BIOS.
It is recommended that the boot mode matches the type of the system in the backup. If the
backup contains a BIOS system, then boot the bootable media in BIOS mode; if the system is
UEFI, then ensure that UEFI mode is set.
31 © Acronis International GmbH, 2003-20233. Boot from Seagate bootable media and select Seagate DiscWizard.
4. On the Home screen, select My disks below Recover.
5. Select the system disk or partition backup to be used for recovery.
When the backup is not displayed, click Browse and specify path to the backup manually.
Note
If the backup is located on a USB drive, and the drive is not recognized correctly, check the USB
port version. If it is a USB 3.0 or USB 3.1, try connecting the drive to a USB 2.0 port.
6. Select Recover whole disks and partitions at the Recovery method step.
7. [Optional] At the Recovery point step, select the date and time to recover your system to.
8. Select the system partition (usually C) on the What to recover screen. If the system partition has
a different letter, select the partition using the Flags column. It must have the Pri, Act flags. If
you have the System Reserved partition, select it, too.
32 © Acronis International GmbH, 2003-2023You can also read